検索

InterSystems Official
· Jun 5, 2024

What's new with InterSystems Language Server 2.5.0 - repost

Note: this was originally posted on June 5, 2024 but presented as being posted on May 9, 2024 so this re-post fixes the date. 

Recent updates to the Intersystems Language Server introduce many significant enhancements aimed at improving developer experience and productivity. I'll talk about some of the key ones here, while the complete list, including numerous bug fixes, can be found in the Language Server's CHANGELOG.

Detailed descriptions for syntax errors

In the past, all syntax errors were reported simply as "Syntax error." Now, the syntax error reported in VS Code's PROBLEMS pane has the same detail you find when compiling in the terminal, helping you more quickly identify and resolve issues in your code. In the below screenshot I have several errors in my ObjectScript code. On the left, under Before, the language server would only report, "Syntax error". Now, under After, you will find that the language server is able to provide much more useful error descriptions in the PROBLEMS pane. And remember, this all happens as you type -- prior to compilation. So it's a good idea to keep this pane visible if you often benefit from this kind of help.

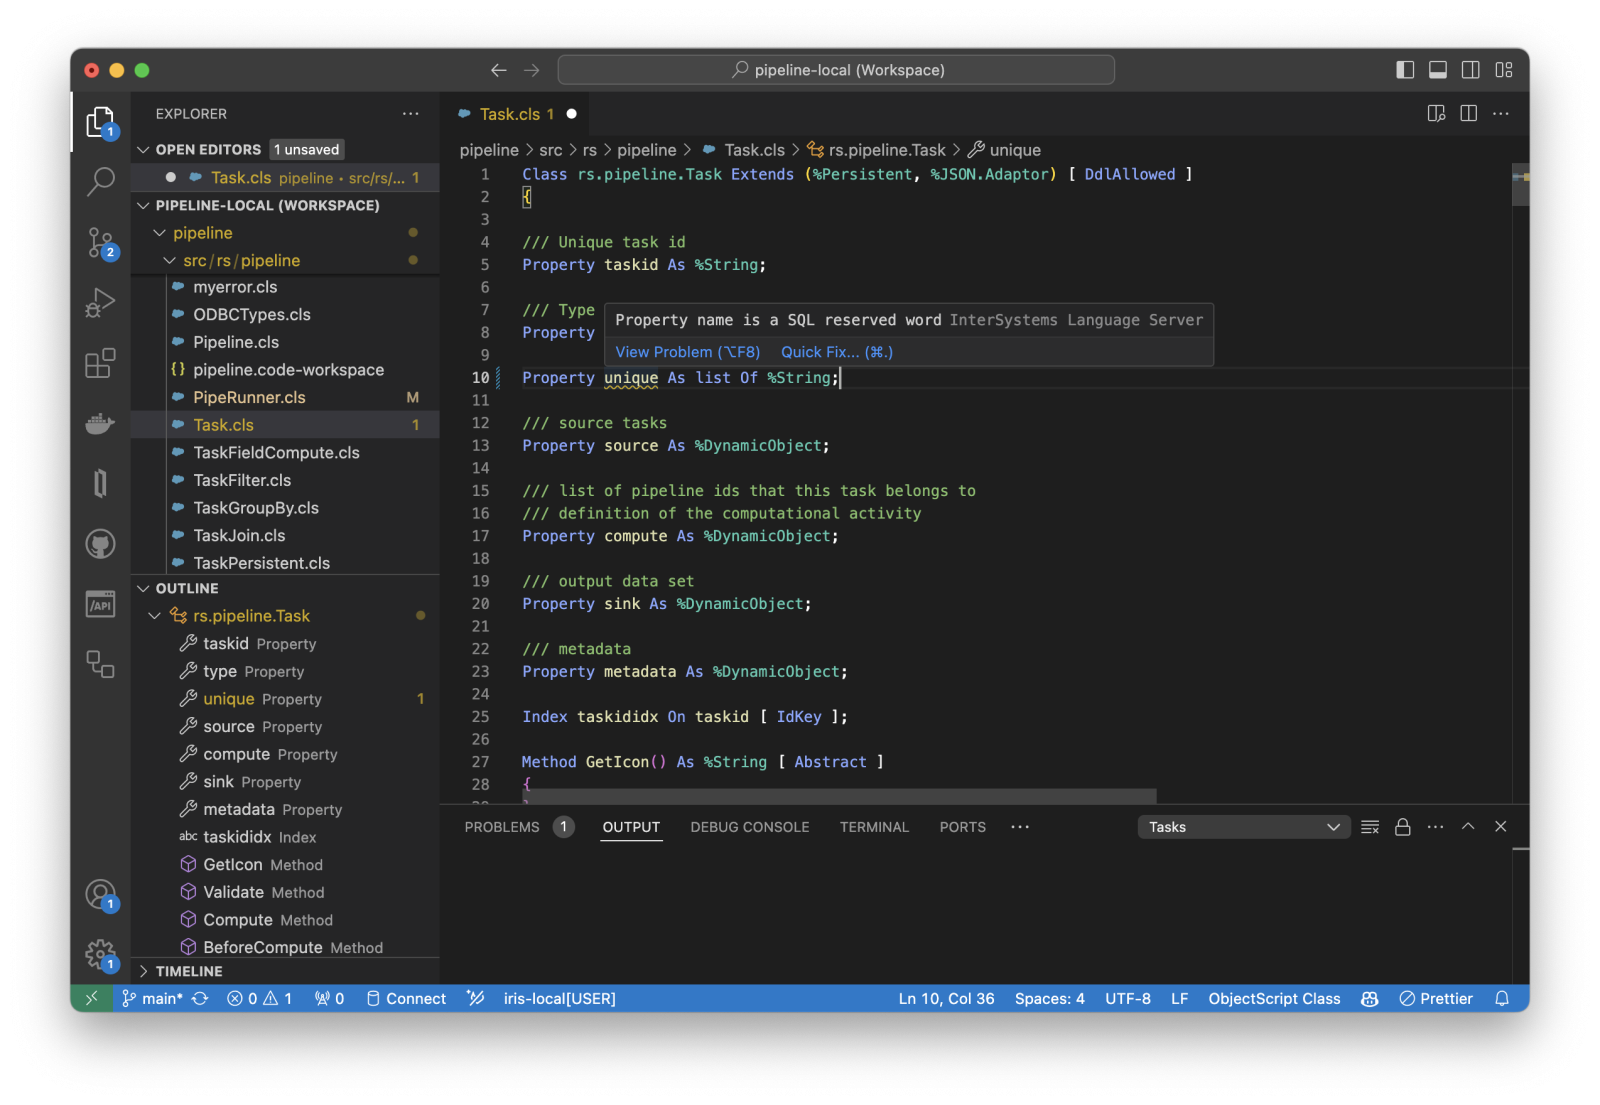
 Warnings for SQL reserved words in persistent classes

You should already know that you should not try to use SQL reserved words in class names or properties. But in case you forget, or happen to use a more obscure one -- like LEVEL -- by mistake, the parser will now warn you even prior to attempting compilation. In the below screenshot I've named a property "unique". That's a reserved word in SQL, so it gets a warning underline and, when you hover over the underlined text, an appropriate message. 

Hover for class description when over a typed variable

When hovering over a variable, you now instantly see the class it represents along with the class' description. In the screenshot below, I'm hovering over the variable `task` on line 142 (of Tester.cls in the left pane). I get the full class name followed by the description provided by the class author. In the right pane I'm showing the source of rs.pipeline.Task so you can see where that information came from. 

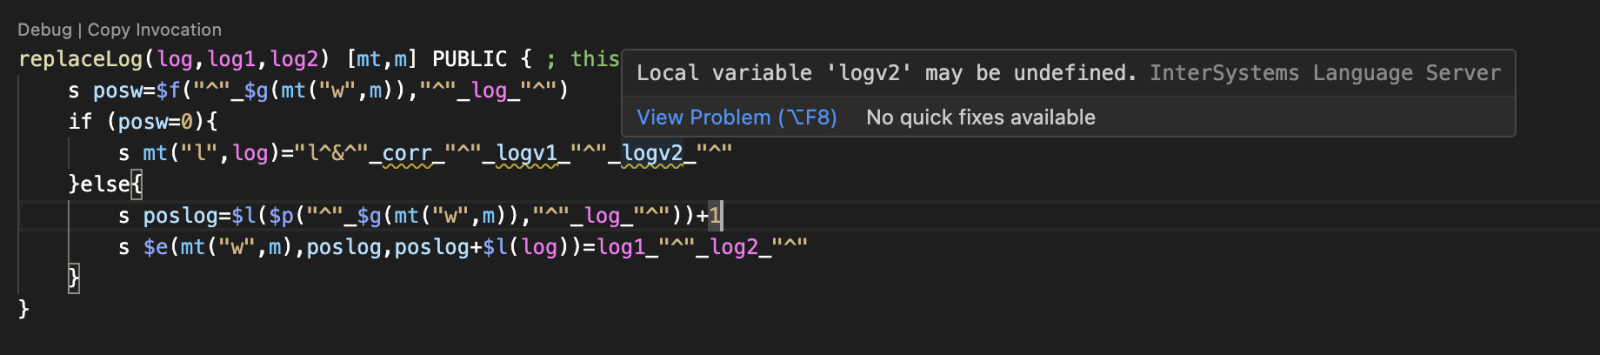
Variable tracking in routine procedure blocks

If you write routines, you will now get warnings about potentially undefined variables in routine procedure blocks, just like you have long had for class methods. This is very helpful for preventing potential runtime errors that are often hard to identify!


Other updates document the latest features of IRIS, including vector functions, and add more comprehensive documentation and in-editor help features. Developers can now access detailed information and examples directly within their coding environment, reducing the need to switch contexts and look up external resources.

These new features collectively aim to streamline the coding process, reduce errors, and enhance overall productivity for developers using the Intersystems Language Server. Once again, for a detailed list of all changes and enhancements, you can check the full changelog on GitHub.

1 Comment
Discussion (1)2
Log in or sign up to continue
Article
· Jun 5, 2024 4m read

Como crear tu propia searchtable para mensajería HL7.

Mi intención es mostrar lo sencillo que es generar una tabla de búsqueda teniendo en cuenta la información que llega en nuestra mensajería HL7, ciertamente la tabla de búsqueda de mensajes HL7 que proporciona IRIS es suficiente para la mayoría de las búsquedas que queremos hacer, pero siempre tenemos aquel campo especial de nuestro HIS, LIS, RIS, etc.  por el que nos gustaría buscar pero que está en un segmento fuera de esa tabla de búsqueda, ese campo que nos obliga a generar una búsqueda concreta utilizando los criterios de búsqueda ampliados, seguramente tendremos muchísimos mensajes y tendremos que filtrar también por fecha y hora para que no nos dé un timeout.


¿Cómo resolvemos esto?.  

Generando nuestra propia searchtable. 

¿Y cómo generamos nuestra searchtable?

Como hemos hecho siempre los que no somos genios ¡COPIANDO!, en nuestra vida nos encontraremos 3-4 genios, serán los que inventen, generen, visualicen el más allá, etc.,  si eres uno de ellos ya sabes cómo hacer esto , estarás en el top 100 del global master, tendrás más de 500.000 puntos y un auténtico ajuar en tu casa de productos Intersystems, el resto haremos como hemos hecho todos estos años antes del CHAT GPT, copiar y sin ningún tipo de rubor, con la cabeza bien alta, así que empecemos.


Primer paso


Generaremos nuestra clase en el Visual Studio Code, abriremos la clase EnsLib.HL7.SearchTableque que el propio IRIS nos da y sin ningún tipo de vergüenza copiaremos todo el contenido de la clase CTRL+C, nos iremos a nuestra clase y CTRL+V.


Súper importante: copiaremos también los Extends, los ClassType, Inheritance, no nos dejamos nada, solo lo del Copyright, eso no nos interesa J, no tenemos tanto ego como para dejar marca de nuestra gran labor.


Si eres de la vieja escuela esta pantalla te sonará mucho 😉


Segundo paso


Ahora es cuando hacemos la magia, añadimos nuestros campos, quitamos los que no nos interesen, incluso lo podemos pasar a castellano para que parezca que somos mejores.


En este caso he añadido el origen del mensaje, el destino, el evento, el servicio y el episodio del paciente, y aquí es cuando entra vuestra necesidad, añadid el campo que queráis/necesitéis, como veis podéis añadir el segmento, el campo y el componente de forma numérica, para mi es más sencillo que poner el nombre inglés, pero tened en cuenta que solo podemos asegurar que el segmento 1 será el MSH, el resto dependerá de cada mensaje, así que en el caso de los segmentos mejor el código (PID, PV1).

Después de toda esta ardua tarea compilamos y ya tenemos nuestra tabla de búsqueda, solo nos falta asignarla a los componentes de nuestra producción, obviamente a los componentes HL7, vamos a ello.


Tercer paso


Abrimos nuestra producción y buscamos los componentes HL7, vamos a los parámetros adicionales y allí encontraremos nuestra tabla de búsqueda, la seleccionamos y procedemos a aplicar los cambios, a partir de ese momento todos los mensajes que entren por ese componente se almacenaran en nuestra tabla de búsqueda, si más adelante añadimos más campos en la tabla de búsqueda, será a partir de la compilación de esta cuando empezaran a guardarse, para los mensajes anteriores ese campo estará en blanco.


Que entren o salgan, en las operaciones del tipo HL7 también tenemos la tabla de búsqueda, en los componentes de salida normalmente no viene activada ninguna por defecto, pero si nos interesa controlar la salida también la tenemos disponible.


Con estos sencillos pasos ya tenemos preparada nuestra producción para que guarde los datos que nos interesan, solo nos falta generar la consultas, nos vamos al visor de mensajes


Demostración


En la mensajería dentro de los criterios ampliados, cuando seleccionemos las tablas de búsqueda encontraremos nuestra obra de arte, la seleccionamos y ya podemos empezar a jugar con nuestros campos


A continuación, pondré varios ejemplos, pero vuestra imaginación es el límite, me he emocionado, los campos de la tabla de búsqueda os marcaran los límites.


1. Búsqueda si ninguna condición, solo queremos ver el evento del mensaje de entrada y el identificador del mensaje.


2 Búsqueda por evento mostrando los códigos del paciente y el episodio


3 Búsqueda por episodio mostrando el servicio, el nombre del paciente y el tipo de mensaje HL7


A partir de aquí ya es cosa vuestra, a disfrutar 😋

2 Comments
Discussion (2)3
Log in or sign up to continue
InterSystems Official
· Jun 5, 2024

Windows upgrade removes Studio in 2024.2

As most of you have heard already, InterSystems announced the deprecation of Studio with the release of IRIS 2023.2. A detailed deprecation plan was revealed in November, and we are now hitting the first milestone in that plan. Starting with 2024.2 preview kits, Windows kits will no longer contain Studio. This means that new installations using this kit will not install Studio, and upgrading an existing instance to version 2024.2 (or later) will remove Studio from the instance’s bin directory.

Developers who wish to keep using Studio simply need to download the 2024.1 Studio independent component from the WRC distribution page. Note that re-installing Studio in this manner will not destroy or modify your existing registry settings, so you won't lose your Studio configuration data. Studio version 2024.1 is forward compatible, so it can connect to IRIS versions 2024.1+. It will be available on the WRC distribution page for a minimum of 24 months following the release of IRIS 2024.2.

I encourage developers that have not tried VS Code in a long time (or ever) to give it another try. Official InterSystems documentation can be found here. And long-time Studio users should take special note of the Studio migration guide we have put together. 

5 Comments
Discussion (5)6
Log in or sign up to continue
Announcement
· Jun 5, 2024

Última llamada para el webinar de mañana "Base de datos de Vectores y RAG: Aplicaciones de IA generativa sobre tus datos"

¡Hola desarrolladores!

Os recordamos que mañana tendremos nuestro webinar en español: "Base de datos de Vectores y RAG: Aplicaciones IA generativa sobre tus datos", el jueves 6 de junio, a las 4:00 PM (CEST). Viene de la mano de @Alberto Fuentes, Sales Engineer en InterSystems.

¡No os lo perdáis! ➡️ Registro >>


Durante el webinar, aprenderemos qué son y para qué sirven las bases de datos vectoriales y cómo podemos utilizarlas para construir aplicaciones de IA generativa sobre nuestros propios datos utilizando planteamientos RAG (Retrieval Augmented Generation).

¡Tic tac!

Discussion (0)1
Log in or sign up to continue
Question
· Jun 5, 2024

JavaScript in Zen pages

Hi Guys,

This is more of a Javascript question but just in case would have an idea.

basically I'm calling the below JavaScript function from a classMethod to add Options to an html  <Select> tag (Dropdown) and after adding all options I would like to set a specific value or index to be selected, its working and actually the required option is selected but not showing as selected in the dropdown box.

For testing purposes I've set option 4 to be selected by default as example and it's not showing as selected in required dropdown (green)   


but if I click on the dropdown box option 4 is selected, so its like I need to refresh the dropdown or something  I've tried something like ctl.refresh() and ctl.reload() and didn't work


function addOptions(id)
{ var res=#server(..SetComponents(id))#
var ctl document.getElementById('Component');
var dt=res.split('|')
var vals=dt[0].split('^')
var display=dt[1].split('^')
 for (var i=1; i<vals.length; i++)
 {
  var opt document.createElement('option');
      opt.value vals[i];
      opt.innerHTML =display[i]
      ctl.appendChild(opt);
      if (i==3)
      {opt.selected=true;}
     
 }      ctl.options.selectedIndex=3; }
</script>>


Thanks

2 Comments
Discussion (2)2
Log in or sign up to continue