Background:
This guideline provides an overview of how to design and implement a REST API interface for querying patient demographic data from an Electronic Patient Record (EPR) system using HealthConnect. The process involves sending a query request with the patient's identification number, retrieving the response from the EPR system, extracting the required patient demographic data from the HL7 message, and sending it as a JSON response to the supplier. The high-level process diagram is shown below (Screenshot 1).
Note: You can modify or add code and other features according to your requirements. This is just a basic guideline I’ve created for quick solutions.
Screenshot 1: A High-Level Message Process Diagram.

The step-by-step guideline is provided below:
- Setup HealthConnect Management Portal (MP) – Production Configuration (PC).
- Custom Code
- Using Postman
Step 1: Set Up Web Application
Set up the REST service in the HealthConnect Management Portal.
- Go to System Administration → Security → Application → Web Application.
- Click "Create New Web Application".
- Enter the name of the application.
- Provide a description (optional).
- For Namespace, select the appropriate namespace.
- Click on REST (for enable).
- Enter the Dispatch Class.
- Select "Unauthenticated" (I will later explain how to set up a password)
- And click "Save". See the screenshot 2 below (example):
Screenshot 2: Web Application and Setting Up REST

Step 2: Create Required Classes
A. Create Class - GetRequestDatasets
- Open Cache Studio and select the appropriate namespace (where you set it up).
- Create a new class by clicking File → New → General → Class Definition → OK.
- Enter the package name and class name "GetRequestDatasets". See Screenshot 3 below:
Screenshot 3: Code for GetRequestDatasets

B. Create Response Datasets Class
Note: You can add or remove properties according to your requirements.
- Class name "SetResponseDatasets", then write the following code and compile it. (See Screenshot 4 below.)
Screenshot 4: Code for SetResponseDatasets

C. Create Business Process
- Name the Business Process "QueryRequestResponse", then write the following code and compile it. (See Screenshot 5 below.)
Screenshot 5: Code for Business Process - QueryRequestResponse

Continue..
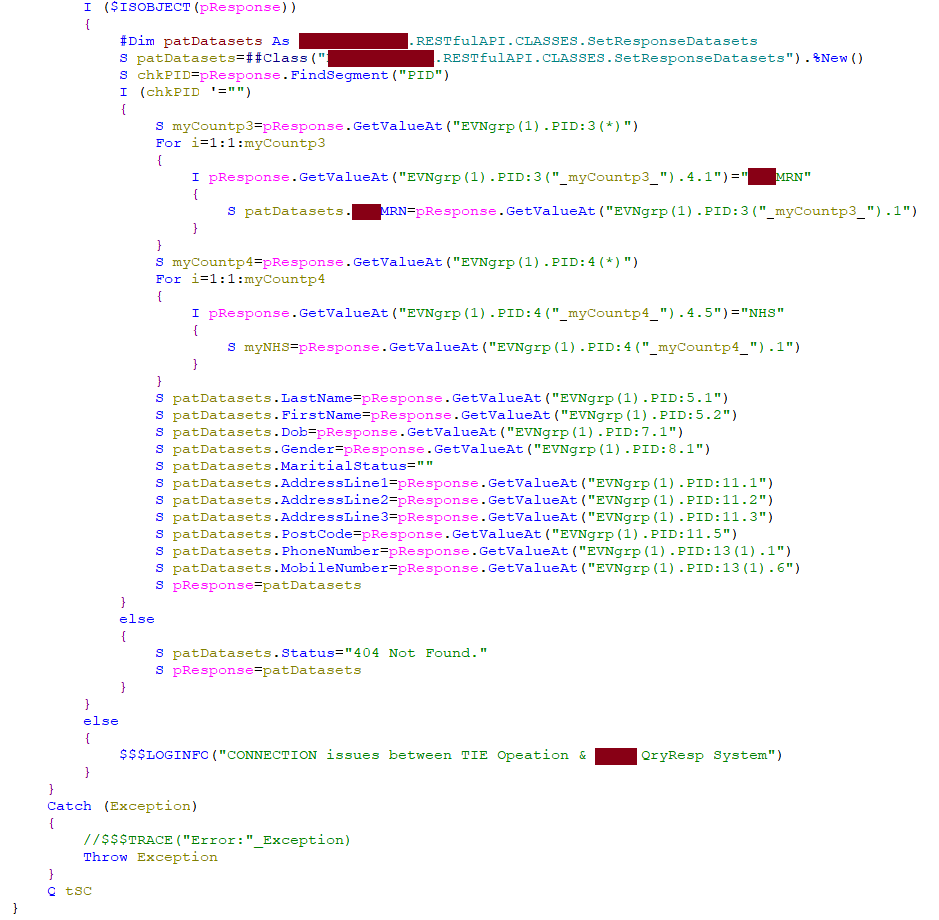
Note: "404 Not Found" is just a display message, but you can set this up differently.
D. Create Business Servies
- Name the Business Service "GetRequest", then write the following code and compile it. (See Screenshot 6 below.)
Screenshot 6: Code for Business Process - QueryRequestResponse

E. Create Rest Handler
- Name the Rest Handler "RestHandler", then write the following code and compile it. (See Screenshot 7 below.)
Screenshot 7: Code for RestHandler


In the Studio, your final layout should look like the screenshot (8) below:
Screenshot 8: Studio Layout of Restful API

Step 3: Set Up Management Portal : Production Configuration.
Give the names (services, processes, operations) according to your requirements.
- Services: Select the appropriate class → ...RESTfulAPI.SERVICES.GetRequest
- Processes: Select the appropriate class → ...RESTfulAPI.PROCESS.QueryRequestResponse
- Operations: Select EnsLib.HL7.Operation.TCPOperation (for EPR System)
Note: Go to Service’s settings and select the process name from the dropdown list that you have defined. See Screenshot 9 below
Screenshot 9: The management portal: production configuration view.

Finally, we have set up everything. Now, let's test or evaluate the interface.
Step 4: Testing and Evaluation
I am using POSTMAN, so download and install POSTMAN if you don’t have it already.
Test Case 1: Request with a valid Patient MRN Number using POSTMAN (GET à https://......restapi/Patient?MRN=510800
Screenshot 10: Output of Test Case 1.

Test Case 2: Request with a valid Patient MRN Number using POSTMAN (using different way) https://......restapi/510800
Screenshot 11: Output of Test Case 2.

Test Case 3: Request with an invalid Patient MRN Number using POSTMAN
Screenshot 12: Output of Test Case 3.

Test Case 4: If the Management Portal's services are disabled, the following message will appear.
Screenshot 13 (a): Disabled Services - Output of Test Case 4.

Screenshot 13 (b): Disabled Services - Output of Test Case 4.

Let’s look at the message visual trace
Screenshot 14 : Visual Trace

Screenshot 15 : Source Message:

Screenshot 16: Process Message - Generate Message – QRY Q01 message sent to the operation

Screenshot 17: Response from the EPR System – ADR^A19 (Operation)

Screenshot 18: Process Message - Extract the required data from the A19 message.

Password Setup for REST API
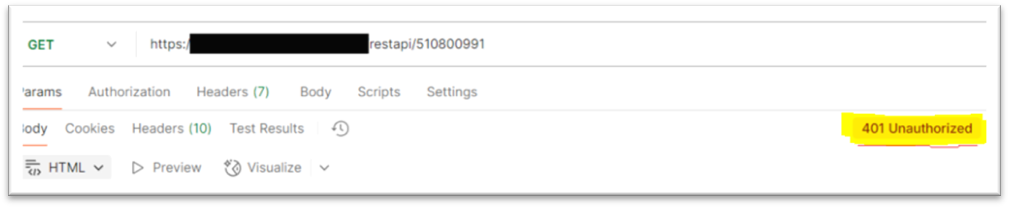
The approach below provides a basic solution for setting up a username and password to access the REST API configured in HealthConnect. For testing and explanation purposes, I have used Postman.
Screenshot 1: Unauthorized
PROCESS:
Step 1: Create a limited-access user account in the HealthConnect Management Portal
- System Administrator → Security → Users.
- Click "Create New User".
- Enter a username (e.g., Test).
- Fill in other details (e.g., Name, Comment, etc.).
- Set a password (e.g., restTest764).
- Click Save (see screenshot 2 below).
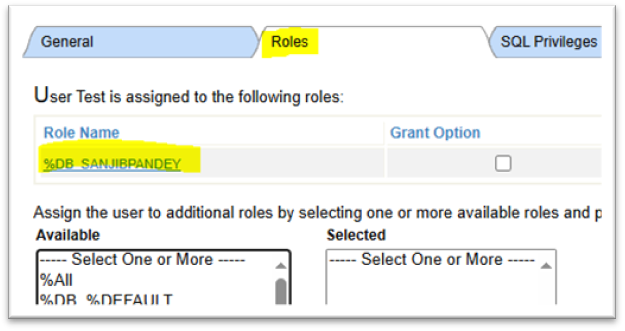
- Navigate to the "Roles" section.
- Select the appropriate "%DB_...." role.
- Click “Assign” (see screenshot 3 below)
Screenshot 2:

Screenshot 3:
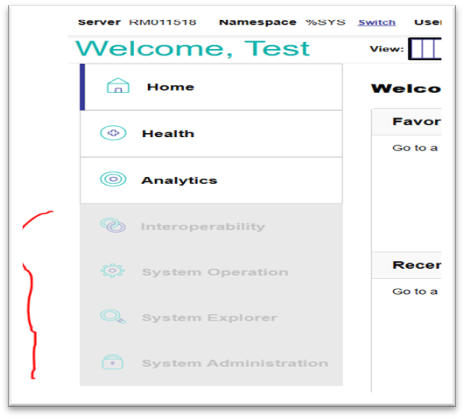
Step 2: Checking the User Account
Log out from the Management Portal, then log in using the newly created user credentials.

The user will have limited access (see screenshot 4 below)
Screenshot 4:
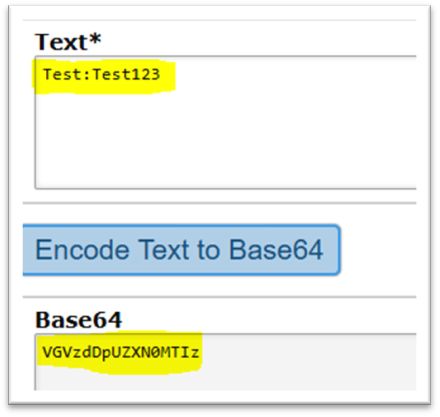
Step 3: Conver the username and password to BASE64 encode
Note: The username and password must match the credentials created in the Management Portal.
Go to: Base64 Encoder - https://base64.guru/converter/encode/text
Format is - Username:password (see screenshot 5 below)
For example: Username=Test, Password = Test123,
Screenshot 5:
Step 4: Set up the Password in Postman
- Open Postman.
- Go to the "Headers" tab.
- Enter the following key-value pair:
- Key: Authorization
- Value: Basic <your_base64_encoded_value>
- Refer to the screenshot 6 below for guidance.
Screenshot 6

Now, you can test the request in Postman. If everything is set up correctly, you will receive a response.
Below is an example response (from my own setup):
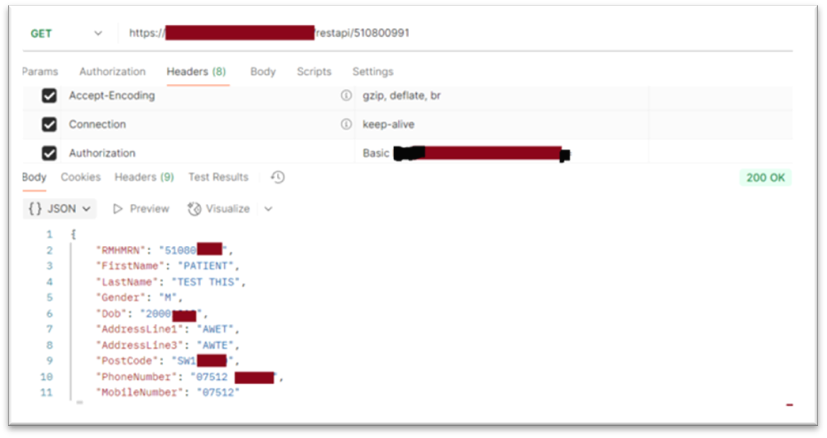
So, provide this Base64-encoded username and password to your end user to access your REST API. This is not the most secure solution, but it works. For a more secure approach using JWT authentication, please read my other article.
I hope this will be helpful to you.
Thank you.