Clear filter
Announcement
Evgeny Shvarov · Jul 14, 2022
Hi developers!
Here is the score of technical bonuses for participants' applications in the InterSystems Climate Change Full Stack Contest 2022!
Project
Climate Change
isc.rest
isc.ipm.js
Embedded Python
AtScale
Docker
ZPM
Online Demo
Unit Testing
First Article on DC
Second Article on DC
Code Quality
Video on YouTube
Total Bonus
Nominal
5
2
2
3
3
2
2
2
2
2
1
1
3
30
interoperability-manager
2
2
2
2
1
9
iris-for-money
2
-
-
-
1
3
iris-climate-change
5
3
2
2
12
Carbon Footprint Counter
5
2
2
2
2
2
3
18
Arctic sea ice viewer
5
2
7
Kozo
5
2
2
3
12
Bonuses are subject to change upon the update.
Please claim here in the comments below or in the Discord chat.
I claim bonus for: online demo, youtube, zpm Thank you, Yuri)))We'll add everything) Thanks!
Article
Maxim Yerokhin · Sep 21, 2016
Imagine that your .NET project uses the Caché DBMS and you need a fully-functional and reliable authorization system. Writing such a system from scratch would not make much sense, and you will clearly want to use something that already exists in .NET, e.g. ASP.NET Identity. By default, however, this framework supports only its native DBMS – MS SQL. Our task was to create an adaptor that would let us quickly and easily port Identity to the InterSystems Caché DBMS. This work resulted in creation of the ASP.NET Identity Caché Provider.
MSSQL is the default data provider for ASP.NET Identity, but since Identity’s authorization system can interact with any other relational DBMS, we implemented this functionality for InterSystems Caché.
The goal of the ASP.NET Identity Caché Provider project was to implement a Caché data provider that would work with ASP.NET Identity. The main task was to store and provide access to such tables as AspNetRoles, AspNetUserClaims, AspNetUserLogins, AspNetUserRoles and AspNetUsers without breaking the standard workflows involving these tables.
Let’s take a look at the implementation of the Caché data provider for ASP.NET Identity. It had two phases:
Implementation of data storage classes (that will be responsible for storing state data) and the IdentityDbContext class that encapsulates all low-level logic for interaction with the data storage. We also implemented the IdentityDbInitializer class that adapts the Caché database for working with Identity.Implementation of the UserStore and RoleStore classes (along with integration tests). A demo project.
During the first stage, the following classes were implemented:
IdentityUser — implementation of the IUser interface.IdentityUserRole — an associative entity for the User–Role pair.IdentityUserLogin — user login data.
Extendable version of the UserLoginInfo class.
IdentityUserClaim —information about the user’s claims.IdentityDbContext<TUser, TRole, TKey, TUserLogin, TUserRole, TUserClaim> — context of the Entity Framework database.
Let’s take a look at the IdentityUser entity more detailed. It is a storage for users, roles, logins, claims and user-role relations. Below there is an example of a regular and generalized variant of IdentityUser.
namespace InterSystems.AspNet.Identity.Cache
{
/// <summary>
/// IUser implementation
/// </summary>
public class IdentityUser : IdentityUser<string, IdentityUserLogin, IdentityUserRole, IdentityUserClaim>, IUser
{
/// <summary>
/// Constructor which creates a new Guid for the Id
/// </summary>
public IdentityUser()
{
Id = Guid.NewGuid().ToString();
}
/// <summary>
/// Constructor that takes a userName
/// </summary>
/// <param name="userName"></param>
public IdentityUser(string userName)
: this()
{
UserName = userName;
}
}
/// <summary>
/// IUser implementation
/// </summary>
/// <typeparam name="TKey"></typeparam>
/// <typeparam name="TLogin"></typeparam>
/// <typeparam name="TRole"></typeparam>
/// <typeparam name="TClaim"></typeparam>
public class IdentityUser<TKey, TLogin, TRole, TClaim> : IUser<TKey>
where TLogin : IdentityUserLogin<TKey>
where TRole : IdentityUserRole<TKey>
where TClaim : IdentityUserClaim<TKey>
{
/// <summary>
/// Constructor
/// </summary>
public IdentityUser()
{
Claims = new List<TClaim>();
Roles = new List<TRole>();
Logins = new List<TLogin>();
}
/// <summary>
/// Email
/// </summary>
public virtual string Email { get; set; }
Special objects called Roles are intended for access rights restrictions in Identity. A role in the configuration can correspond to job positions or types of activities of various user groups.
namespace InterSystems.AspNet.Identity.Cache
{
/// <summary>
/// EntityType that represents a user belonging to a role
/// </summary>
public class IdentityUserRole : IdentityUserRole<string>
{
}
/// <summary>
/// EntityType that represents a user belonging to a role
/// </summary>
/// <typeparam name="TKey"></typeparam>
public class IdentityUserRole<TKey>
{
/// <summary>
/// UserId for the user that is in the role
/// </summary>
public virtual TKey UserId { get; set; }
/// <summary>
/// RoleId for the role
/// </summary>
public virtual TKey RoleId { get; set; }
}
}
IdentityDbContext is an instance that encapsulates the creation of a connection, loading of entities from a database, validation of user’s objects conformity to the structure of associated tables and field values. Let’s use the OnModelCreating as an example – this method validates tables according to Identity requirements.
protected override void OnModelCreating(DbModelBuilder modelBuilder)
{
// Mapping and configuring identity entities according to the Cache tables
var user = modelBuilder.Entity<TUser>()
.ToTable("AspNetUsers");
user.HasMany(u => u.Roles).WithRequired().HasForeignKey(ur => ur.UserId);
user.HasMany(u => u.Claims).WithRequired().HasForeignKey(uc => uc.UserId);
user.HasMany(u => u.Logins).WithRequired().HasForeignKey(ul => ul.UserId);
user.Property(u => u.UserName)
.IsRequired()
.HasMaxLength(256)
.HasColumnAnnotation("Index", new IndexAnnotation(new IndexAttribute("UserNameIndex") { IsUnique = true }));
user.Property(u => u.Email).HasMaxLength(256);
modelBuilder.Entity<TUserRole>()
.HasKey(r => new { r.UserId, r.RoleId })
.ToTable("AspNetUserRoles");
modelBuilder.Entity<TUserLogin>()
.HasKey(l => new { l.LoginProvider, l.ProviderKey, l.UserId })
.ToTable("AspNetUserLogins");
modelBuilder.Entity<TUserClaim>()
.ToTable("AspNetUserClaims");
var role = modelBuilder.Entity<TRole>()
.ToTable("AspNetRoles");
role.Property(r => r.Name)
.IsRequired()
.HasMaxLength(256)
.HasColumnAnnotation("Index", new IndexAnnotation(new IndexAttribute("RoleNameIndex") { IsUnique = true }));
role.HasMany(r => r.Users).WithRequired().HasForeignKey(ur => ur.RoleId);
}
DbModelBuilder is used for comparing CLR classes with the database schema. This code-oriented approach to build an EDM model is called Code First. DbModelBuilder is typically used for configuring the model by means of redefining OnModelCreating(DbModelBuilder). However, DbModelBuilder can also be used independently from DbContext for model creation and subsequent design of DbContext or ObjectContext.
The IdentityDbInitializer class prepares the Caché database for using Identity.
public void InitializeDatabase(DbContext context)
{
using (var connection = BuildConnection(context))
{
var tables = GetExistingTables(connection);
CreateTableIfNotExists(tables, AspNetUsers, connection);
CreateTableIfNotExists(tables, AspNetRoles, connection);
CreateTableIfNotExists(tables, AspNetUserRoles, connection);
CreateTableIfNotExists(tables, AspNetUserClaims, connection);
CreateTableIfNotExists(tables, AspNetUserLogins, connection);
CreateIndexesIfNotExist(connection);
}
}
CreateTableIfNotExists method creates the necessary tables if they don't exist. Table existence checks are performed by running a query against the Cache – Dictionary.CompiledClass table that stores information about existing tables. If the table doesn't exist, it will be created.
On the second stage, IdentityUserStore and IdentityRoleStore instances were created. They encapsulate the logic of adding, editing and removing users and roles. These entities required 100% unit-test coverage.
Let's draw the bottom line: we created a data provider that allows the Caché DBMS to work with Entity Framework within the context of the ASP.NET Identity technology. The app is packed into a separate Nuget package, so if you need to work with the Caché DBMS and use standard Microsoft authorization, all you need to do is to add the Identity Caché Provider build into your project via Nuget Package Manager.
The source code of the project, along with samples and documentation, is available on GitHub. regarding Identity.Test on github: XUnit requires some extra installation steps and external engine to run, what are its benefits compared to VS's default test framework?
Article
Jonathan Levinson · Nov 1, 2016
Don’t use Python built into Mac. Because of System Integrity Protection (SIP) you will not be able to access the libraries that the InterSystems Python binding requires. The Python build into the MAC has baked in what libraries it can use.Install another Python. Don’t put this other ahead of Mac Python on path since this could break things. Apple regards its Python as part of the its OS, and may use that Python in its system operations.This Python will not be installed into the protected area. Mac does not want you messing with its Python.Use explicit path to invoke this other Python. You can use shell scripts and aliases to simplify your python with full path invocation.
Article
Murray Oldfield · Jan 12, 2017
----
Hi, this post was initially written for Caché. In June 2023, I finally updated it for IRIS. If you are revisiting the post since then, the only real change is substituting Caché for IRIS! I also updated the links for IRIS documentation and fixed a few typos and grammatical errors. Enjoy :)
----
In this post, I show strategies for backing up InterSystems IRIS using _External Backup_ with examples of integrating with snapshot-based solutions. Most solutions I see today are deployed on Linux on VMware, so a lot of the post shows how solutions integrate VMware snapshot technology as examples.
## IRIS backup - batteries included?
IRIS online backup is included with an IRIS install for uninterrupted backup of IRIS databases. But there are more efficient backup solutions you should consider as systems scale up. _External Backup_ integrated with snapshot technologies is the recommended solution for backing up systems, including IRIS databases.
## Are there any special considerations for external backup?
Online documentation for [External Backup](http://docs.intersystems.com/irislatest/csp/docbook/DocBook.UI.Page.cls?KEY=GCDI_backup#GCDI_backup_methods_ext) has all the details. A key consideration is:
> "To ensure the integrity of the snapshot, IRIS provides methods to freeze writes to databases while the snapshot is created. Only physical writes to the database files are frozen during the snapshot creation, allowing user processes to continue performing updates in memory uninterrupted."
It is also important to note that part of the snapshot process on virtualised systems causes a short pause on a VM being backed up, often called stun time. Usually less than a second, so not noticed by users or impacting system operation; however, in some circumstances, the stun can last longer. If the stun is longer than the quality of service (QoS) timeout for IRIS database mirroring, then the backup node will think there has been a failure on the primary and will failover. Later in this post, I explain how you can review stun times in case you need to change the mirroring QoS timeout.
[A list of other InterSystems Data Platforms and performance series posts is here.](https://community.intersystems.com/post/capacity-planning-and-performance-series-index)
You should also review [IRIS online documentation Backup and Restore Guide for this post.](http://docs.intersystems.com/irislatest/csp/docbook/DocBook.UI.Page.cls?KEY=GCDI_backup)
# Backup choices
## Minimal Backup Solution - IRIS Online Backup
If you have nothing else, this comes in the box with the InterSystems data platform for zero downtime backups. Remember, _IRIS online backup_ only backs up IRIS database files, capturing all blocks in the databases that are allocated for data with the output written to a sequential file. IRIS Online Backup supports cumulative and incremental backups.
In the context of VMware, an IRIS Online Backup is an in-guest backup solution. Like other in-guest solutions, IRIS Online Backup operations are essentially the same whether the application is virtualised or runs directly on a host. IRIS Online Backup must be coordinated with a system backup to copy the IRIS online backup output file to backup media and all other file systems used by your application. At a minimum, system backup must include the installation directory, journal and alternate journal directories, application files, and any directory containing external files the application uses.
IRIS Online Backup should be considered as an entry-level approach for smaller sites wishing to implement a low-cost solution to back up only IRIS databases or ad-hoc backups; for example, it is helpful in the set-up of mirroring. However, as databases increase in size and as IRIS is typically only part of a customer's data landscape, _External Backups_ combined with snapshot technology and third-party utilities are recommended as best practice with advantages such as including the backup of non-database files, faster restore times, enterprise-wide view of data and better catalogue and management tools.
## Recommended Backup Solution - External backup
Using VMware as an example, Virtualising on VMware adds functionality and choices for protecting entire VMs. Once you have virtualised a solution, you have effectively encapsulated your system — including the operating system, the application and the data — all within .vmdk (and some other) files. When required, these files can be straightforward to manage and used to recover a whole system, which is very different from the same situation on a physical system where you must recover and configure the components separately -- operating system, drivers, third-party applications, database and database files, etc.
# VMware snapshot
VMware’s vSphere Data Protection (VDP) and other third-party backup solutions for VM backup, such as Veeam or Commvault, take advantage of the functionality of VMware virtual machine snapshots to create backups. A high-level explanation of VMware snapshots follows; see the VMware documentation for more details.
It is important to remember that snapshots are applied to the whole VM and that the operating system and any applications or the database engine are unaware that the snapshot is happening. Also, remember:
> By themselves, VMware snapshots are not backups!
Snapshots _enable_ backup software to make backups, but they are not backups by themselves.
VDP and third-party backup solutions use the VMware snapshot process in conjunction with the backup application to manage the creation and, very importantly, deletion of snapshots. At a high level, the process and sequence of events for an external backup using VMware snapshots are as follows:
- Third-party backup software requests the ESXi host to trigger a VMware snapshot.
- A VM's .vmdk files are put into a read-only state, and a child vmdk delta file is created for each of the VM's .vmdk files.
- Copy on write is used with all changes to the VM written to the delta files. Any reads are from the delta file first.
- The backup software manages copying the read-only parent .vmdk files to the backup target.
- When the backup is complete, the snapshot is committed (VM disks resume writes and updated blocks in delta files written to parent).
- The VMware snapshot is now removed.
Backup solutions also use other features such as Change Block Tracking (CBT) to allow incremental or cumulative backups for speed and efficiency (especially important for space saving), and typically also add other important functions such as data deduplication and compression, scheduling, mounting VMs with changed IP addresses for integrity checks etc., full VM and file level restores, and catalogue management.
> VMware snapshots that are not appropriately managed or left to run for a long time can use excessive storage (as more and more data is changed, delta files continue to grow) and also slow down your VMs.
You should think carefully before running a manual snapshot on a production instance. Why are you doing this? What will happen if you revert *back in time* to when the snapshot was created? What happens to all the application transactions between creation and rollback?
It is OK if your backup software creates and deletes a snapshot. The snapshot should only be around for a short time. And a crucial part of your backup strategy will be to choose a time when the system has low usage to minimise any further impact on users and performance.
## IRIS database considerations for snapshots
Before the snapshot is taken, the database must be quiesced so that all pending writes are committed, and the database is in a consistent state. IRIS provides methods and an API to commit and then freeze (stop) writes to databases for a short period while the snapshot is created. This way, only physical writes to the database files are frozen during the creation of the snapshot, allowing user processes to continue performing updates in memory uninterrupted. Once the snapshot has been triggered, database writes are thawed, and the backup continues copying data to backup media. The time between freeze and thaw should be quick (a few seconds).
In addition to pausing writes, the IRIS freeze also handles switching journal files and writing a backup marker to the journal. The journal file continues to be written normally while physical database writes are frozen. If the system were to crash while the physical database writes are frozen, data would be recovered from the journal as usual during start-up.
The following diagram shows freeze and thaw with VMware snapshot steps to create a backup with a consistent database image.
## VMware snapshot + IRIS freeze/thaw timeline (not to scale)
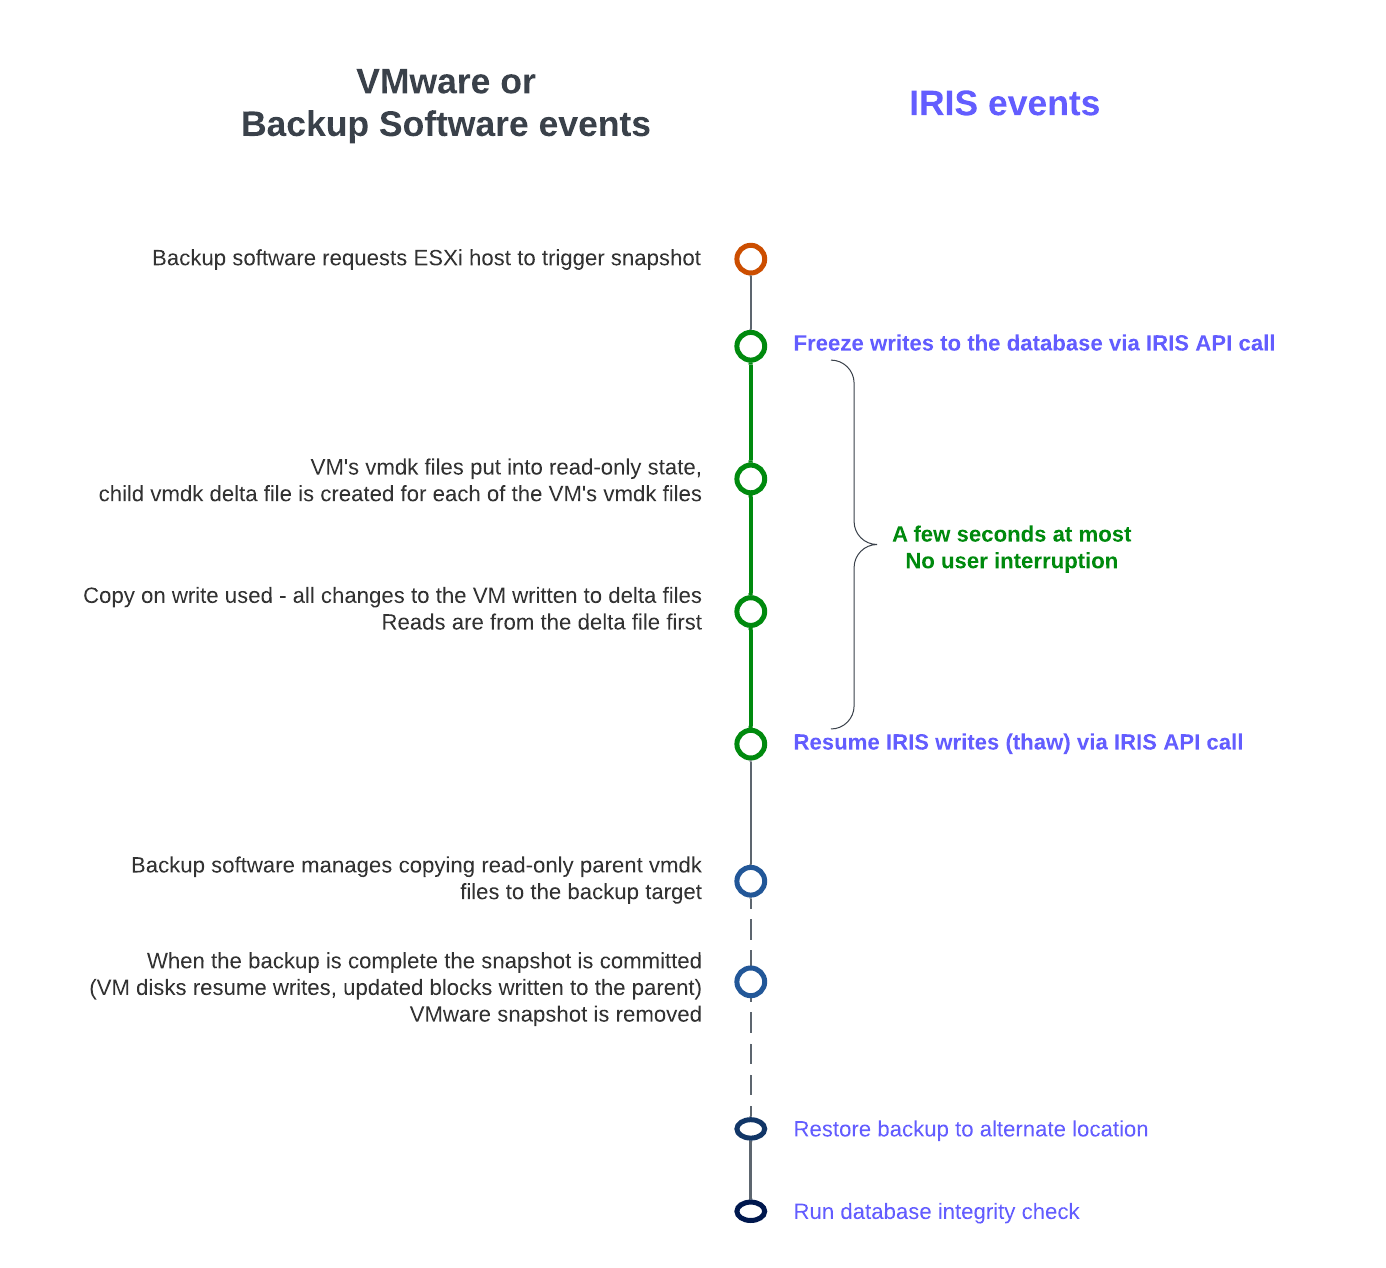
> _Note the short time between Freeze and Thaw -- only the time to create the snapshot, not the time to copy the read-only parent to the backup target._
# Integrating IRIS Freeze and Thaw
vSphere allows a script to be automatically called on either side of snapshot creation; this is when IRIS Freeze and Thaw are called. Note: For this functionality to work correctly, the ESXi host requests the guest operating system to quiesce the disks via _VMware Tools._
> VMware tools must be installed in the guest operating system.
The scripts must adhere to strict name and location rules. File permissions must also be set. For VMware on Linux, the script names are:
# /usr/sbin/pre-freeze-script
# /usr/sbin/post-thaw-script
Below are examples of freeze and thaw scripts our team use with Veeam backup for our internal test lab instances, but these scripts should also work with other solutions. These examples have been tested and used on vSphere 6 and Red Hat 7.
> While these scripts can be used as examples and illustrate the method, you must validate them for your environments!
### Example pre-freeze-script:
#!/bin/sh
#
# Script called by VMWare immediately prior to snapshot for backup.
# Tested on Red Hat 7.2
#
LOGDIR=/var/log
SNAPLOG=$LOGDIR/snapshot.log
echo >> $SNAPLOG
echo "`date`: Pre freeze script started" >> $SNAPLOG
exit_code=0
# Only for running instances
for INST in `iris qall 2>/dev/null | tail -n +3 | grep '^up' | cut -c5- | awk '{print $1}'`; do
echo "`date`: Attempting to freeze $INST" >> $SNAPLOG
# Detailed instances specific log
LOGFILE=$LOGDIR/$INST-pre_post.log
# Freeze
irissession $INST -U '%SYS' "##Class(Backup.General).ExternalFreeze(\"$LOGFILE\",,,,,,1800)" >> $SNAPLOG $
status=$?
case $status in
5) echo "`date`: $INST IS FROZEN" >> $SNAPLOG
;;
3) echo "`date`: $INST FREEZE FAILED" >> $SNAPLOG
logger -p user.err "freeze of $INST failed"
exit_code=1
;;
*) echo "`date`: ERROR: Unknown status code: $status" >> $SNAPLOG
logger -p user.err "ERROR when freezing $INST"
exit_code=1
;;
esac
echo "`date`: Completed freeze of $INST" >> $SNAPLOG
done
echo "`date`: Pre freeze script finished" >> $SNAPLOG
exit $exit_code
### Example thaw script:
#!/bin/sh
#
# Script called by VMWare immediately after backup snapshot has been created
# Tested on Red Hat 7.2
#
LOGDIR=/var/log
SNAPLOG=$LOGDIR/snapshot.log
echo >> $SNAPLOG
echo "`date`: Post thaw script started" >> $SNAPLOG
exit_code=0
if [ -d "$LOGDIR" ]; then
# Only for running instances
for INST in `iris qall 2>/dev/null | tail -n +3 | grep '^up' | cut -c5- | awk '{print $1}'`; do
echo "`date`: Attempting to thaw $INST" >> $SNAPLOG
# Detailed instances specific log
LOGFILE=$LOGDIR/$INST-pre_post.log
# Thaw
irissession $INST -U%SYS "##Class(Backup.General).ExternalThaw(\"$LOGFILE\")" >> $SNAPLOG 2>&1
status=$?
case $status in
5) echo "`date`: $INST IS THAWED" >> $SNAPLOG
irissession $INST -U%SYS "##Class(Backup.General).ExternalSetHistory(\"$LOGFILE\")" >> $SNAPLOG$
;;
3) echo "`date`: $INST THAW FAILED" >> $SNAPLOG
logger -p user.err "thaw of $INST failed"
exit_code=1
;;
*) echo "`date`: ERROR: Unknown status code: $status" >> $SNAPLOG
logger -p user.err "ERROR when thawing $INST"
exit_code=1
;;
esac
echo "`date`: Completed thaw of $INST" >> $SNAPLOG
done
fi
echo "`date`: Post thaw script finished" >> $SNAPLOG
exit $exit_code
### Remember to set permissions:
# sudo chown root.root /usr/sbin/pre-freeze-script /usr/sbin/post-thaw-script
# sudo chmod 0700 /usr/sbin/pre-freeze-script /usr/sbin/post-thaw-script
## Testing Freeze and Thaw
To test the scripts are running correctly, you can manually run a snapshot on a VM and check the script output. The following screenshot shows the "Take VM Snapshot" dialogue and options.

**Deselect**- "Snapshot the virtual machine's memory".
**Select** - the "Quiesce guest file system (Needs VMware Tools installed)" check box to pause running processes on the guest operating system so that file system contents are in a known consistent state when you take the snapshot.
> Important! After your test, remember to delete the snapshot!!!!
If the quiesce flag is true, and the virtual machine is powered on when the snapshot is taken, VMware Tools is used to quiesce the file system in the virtual machine. Quiescing a file system is a process of bringing the on-disk data into a state suitable for backups. This process might include such operations as flushing dirty buffers from the operating system's in-memory cache to disk.
The following output shows the contents of the `$SNAPSHOT` log file set in the example freeze/thaw scripts above after running a backup that includes a snapshot as part of its operation.
Wed Jan 4 16:30:35 EST 2017: Pre freeze script started
Wed Jan 4 16:30:35 EST 2017: Attempting to freeze H20152
Wed Jan 4 16:30:36 EST 2017: H20152 IS FROZEN
Wed Jan 4 16:30:36 EST 2017: Completed freeze of H20152
Wed Jan 4 16:30:36 EST 2017: Pre freeze script finished
Wed Jan 4 16:30:41 EST 2017: Post thaw script started
Wed Jan 4 16:30:41 EST 2017: Attempting to thaw H20152
Wed Jan 4 16:30:42 EST 2017: H20152 IS THAWED
Wed Jan 4 16:30:42 EST 2017: Completed thaw of H20152
Wed Jan 4 16:30:42 EST 2017: Post thaw script finished
This example shows 6 seconds of elapsed time between freeze and thaw (16:30:36-16:30:42). User operations are NOT interrupted during this period. _You will have to gather metrics from your own systems_, but for some context, this example is from a system running an application benchmark on a VM with no IO bottlenecks and an average of more than 2 million Glorefs/sec, 170,000 Gloupds/sec, and an average 1,100 physical reads/sec and 3,000 writes per write daemon cycle.
> Remember that memory is not part of the snapshot, so on restarting, the VM will reboot and recover. Database files will be consistent. You don’t want to "resume" a backup; you want the files at a known point in time. You can then roll forward journals and whatever other recovery steps are needed for the application and transactional consistency once the files are recovered.
For additional data protection, a [journal switch](http://docs.intersystems.com/irislatest/csp/docbook/DocBook.UI.Page.cls?KEY=GCDI_journal#GCDI_journal_util_JRNSWTCH "Journal switch") can be done by itself, and journals can be backed up or replicated to another location, for example, hourly.
Below is the output of the `$LOGFILE` in the example freeze/thaw scripts above, showing journal details for the snapshot.
01/04/2017 16:30:35: Backup.General.ExternalFreeze: Suspending system
Journal file switched to:
/trak/jnl/jrnpri/h20152/H20152_20170104.011
01/04/2017 16:30:35: Backup.General.ExternalFreeze: Start a journal restore for this backup with journal file: /trak/jnl/jrnpri/h20152/H20152_20170104.011
Journal marker set at
offset 197192 of /trak/jnl/jrnpri/h20152/H20152_20170104.011
01/04/2017 16:30:36: Backup.General.ExternalFreeze: System suspended
01/04/2017 16:30:41: Backup.General.ExternalThaw: Resuming system
01/04/2017 16:30:42: Backup.General.ExternalThaw: System resumed
# VM Stun Times
At the creation point of a VM snapshot and after the backup is complete and the snapshot is committed, the VM needs to be frozen for a short period. This short freeze is often referred to as stunning the VM. A good blog post on stun times is [here](http://cormachogan.com/2015/04/28/when-and-why-do-we-stun-a-virtual-machine/ "Blog Post on stun times"). I summarise the details below and put them in the context of IRIS database considerations.
From the post on stun times: “To create a VM snapshot, the VM is “stunned” in order to (i) serialize device state to disk, and (ii) close the current running disk and create a snapshot point.…When consolidating, the VM is “stunned” in order to close the disks and put them in a state that is appropriate for consolidation.”
Stun time is typically a few 100 milliseconds; however, if there is a very high disk write activity during the commit phase, stun time could be several seconds.
> If the VM is a Primary or Backup member participating in IRIS Database Mirroring and the stun time is longer than the mirror Quality of Service (QoS) timeout, the mirror will report the Primary VM as failed and initiate a mirror takeover.
**Update March 2018:**
My colleague, Peter Greskoff, pointed out that a backup mirror member could initiate failover in as short a time as just over half QoS timeout during a VM stun or any other time the primary mirror member is unavailable.
For a detailed description of QoS considerations and failover scenarios, see this great post: [Quality of Service Timeout Guide for Mirroring](https://community.intersystems.com/post/quality-service-timeout-guide-mirroring), however the short story regarding VM stun times and QoS is:
> If the backup mirror does not receive any messages from the primary mirror within half of the QoS timeout, it will send a message to ensure the primary is still alive. The backup then waits an additional half QoS time for a response from the primary machine. If there is no response from the primary, it is assumed to be down, and the backup will take over.
On a busy system, journals are continuously sent from the primary to the backup mirror, and the backup would not need to check if the primary is still alive. However, during a quiet time — when backups are more likely to happen — if the application is idle, there may be no messages between the primary and backup mirror for more than half the QoS time.
Here is Peter’s example; Think about this time frame for an idle system with a QoS timeout of:08 seconds and a VM stun time of:07 seconds:
- :00 Primary pings the arbiter with a keepalive, arbiter responds immediately
- :01 backup member sends keepalive to the primary, primary responds immediately
- :02
- :03 VM stun begins
- :04 primary tries to send keepalive to the arbiter, but it doesn’t get through until stun is complete
- :05 backup member sends a ping to primary, as half of QoS has expired
- :06
- :07
- :08 arbiter hasn’t heard from the primary in a full QoS timeout, so it closes the connection
- :09 The backup hasn’t gotten a response from the primary and confirms with the arbiter that it also lost connection, so it takes over
- :10 VM stun ends, too late!!
Please also read the section, _Pitfalls and Concerns when Configuring your Quality of Service Timeout_, in the linked post above to understand the balance to have QoS only as long as necessary. Having QoS too long, especially more than 30 seconds, can also cause problems.
**End update March 2018:**
For more information on Mirroring QoS, also see the [documentation](https://docs.intersystems.com/irislatest/csp/docbook/DocBook.UI.Page.cls?KEY=GHA_mirror#GHA_mirror_set_tunable_params_qos).
> Strategies to keep stun time to a minimum include running backups when database activity is low and having well-set-up storage.
As noted above, when creating a snapshot, there are several options you can specify; one of the options is to include the memory state in the snapshot - Remember, _memory state is NOT needed for IRIS database backups_. If the memory flag is set, a dump of the internal state of the virtual machine is included in the snapshot. Memory snapshots take much longer to create. Memory snapshots are used to allow reversion to a running virtual machine state as it was when the snapshot was taken. This is NOT required for a database file backup.
> When taking a memory snapshot, the entire state of the virtual machine will be stunned, **stun time is variable**.
As noted previously, for backups, the quiesce flag must be set to true for manual snapshots or by the backup software to guarantee a consistent and usable backup.
## Reviewing VMware logs for stun times
Starting from ESXi 5.0, snapshot stun times are logged in each virtual machine's log file (vmware.log) with messages similar to:
`2017-01-04T22:15:58.846Z| vcpu-0| I125: Checkpoint_Unstun: vm stopped for 38123 us`
Stun times are in microseconds, so in the above example, `38123 us` is 38123/1,000,000 seconds or 0.038 seconds.
To be sure that stun times are within acceptable limits or to troubleshoot if you suspect long stun times are causing problems, you can download and review the vmware.log files from the folder of the VM that you are interested in. Once downloaded, you can extract and sort the log using the example Linux commands below.
### Example downloading vmware.log files
There are several ways to download support logs, including creating a VMware support bundle through the vSphere management console or from the ESXi host command line. Consult the VMware documentation for all the details, but below is a simple method to create and gather a much smaller support bundle that includes the `vmware.log` file so you can review stun times.
You will need the long name of the directory where the VM files are located. Log on to the ESXi host where the database VM is running using ssh and use the command: `vim-cmd vmsvc/getallvms ` to list vmx files and the long names unique associated with them.
For example, the long name for the example database VM used in this post is output as:
`26 vsan-tc2016-db1 [vsanDatastore] e2fe4e58-dbd1-5e79-e3e2-246e9613a6f0/vsan-tc2016-db1.vmx rhel7_64Guest vmx-11`
Next, run the command to gather and bundle only log files:
`vm-support -a VirtualMachines:logs`.
The command will echo the location of the support bundle, for example:
`To see the files collected, check '/vmfs/volumes/datastore1 (3)/esx-esxvsan4.iscinternal.com-2016-12-30--07.19-9235879.tgz'`.
You can now use sftp to transfer the file off the host for further processing and review.
In this example, after uncompressing the support bundle navigate to the path corresponding to the database VMs long name. For example, in this case:
`/vmfs/volumes//e2fe4e58-dbd1-5e79-e3e2-246e9613a6f0`.
You will see several numbered log files; the most recent log file has no number, i.e. `vmware.log`. The log may be only a few 100 KB, but there is a lot of information; however, we care about the stun/unstun times, which are easy enough to find with `grep`. For example:
$ grep Unstun vmware.log
2017-01-04T21:30:19.662Z| vcpu-0| I125: Checkpoint_Unstun: vm stopped for 1091706 us
---
2017-01-04T22:15:58.846Z| vcpu-0| I125: Checkpoint_Unstun: vm stopped for 38123 us
2017-01-04T22:15:59.573Z| vcpu-0| I125: Checkpoint_Unstun: vm stopped for 298346 us
2017-01-04T22:16:03.672Z| vcpu-0| I125: Checkpoint_Unstun: vm stopped for 301099 us
2017-01-04T22:16:06.471Z| vcpu-0| I125: Checkpoint_Unstun: vm stopped for 341616 us
2017-01-04T22:16:24.813Z| vcpu-0| I125: Checkpoint_Unstun: vm stopped for 264392 us
2017-01-04T22:16:30.921Z| vcpu-0| I125: Checkpoint_Unstun: vm stopped for 221633 us
We can see two groups of stun times in the example, one from snapshot creation and a second set 45 minutes later for each disk when the snapshot is deleted/consolidated (e.g. after the backup software has completed copying the read-only vmx file). The above example shows that most stun times are sub-second, although the initial stun time is just over one second.
Short stun times are not noticeable to an end user. However, system processes such as IRIS Database Mirroring continuously monitor whether an instance is ‘alive’. If the stun time exceeds the mirroring QoS timeout, the node may be considered uncontactable and ‘dead’, and a failover will be triggered.
_Tip:_ To review all the logs or for trouble-shooting, a handy command is to grep all the `vmware*.log` files and look for any outliers or instances where stun time is approaching QoS timeout. The following command pipes the output to awk for formatting:
`grep Unstun vmware* | awk '{ printf ("%'"'"'d", $8)} {print " ---" $0}' | sort -nr`
# Summary
You should monitor your system regularly during normal operations to understand stun times and how they may impact QoS timeout for HA, such as mirroring. As noted, strategies to keep stun/unstun time to a minimum include running backups when database and storage activity is low and having well-set-up storage. For constant monitoring, logs may be processed by using VMware Log Insight or other tools.
In future posts, I will revisit backup and restore operations for InterSystems Data Platforms. But for now, if you have any comments or suggestions based on the workflows of your systems, please share them via the comments sections below. Hi Murray,thank you for continuing your series.Don't you think that VM image backup (despite of its importance) has a drawback as it may contain pretty huge amount of data that is unnecessary for simple database restoration? E.g., VM image may contain hundreds of gigabytes of journals useless for the database state in backup file. IMHO, in this case a kind of selective backup can be attractive. Not aware of Veeam, but sure that Acronis can do it on file system level. I wonder if selective external backup (e.g., in the case of Veeam) can be integrated with Cache DB freeze/thaw features with the same ease as a full one? **Addendum:** I was reminded that there is an extra step when configuring external backups.
_When the security configuration requires that the backup script supply Caché credentials, you can do this by redirecting input from a file containing the needed credentials. Alternatively, you can enable OS-level authentication and create a Caché account for the OS user running the script._
[Please see the online documentation for full details](http://docs.intersystems.com/cache20162/csp/docbook/DocBook.UI.Page.cls?KEY=GCDI_backup#GCDI_backup_methods_ext) Hi Alexey, good question. There is no one size fits all. My aim is to highlight how external backups work so teams responsible can evaluate their best solution when talking to vendors. Third-party solutions will be a suite of management tools, not simply backup/restore, so there are many features to evaluate. For example, products that backup VMs will have features for change block tracking (CBT) so only changed blocks in the VM (not just changes to CACHE.DAT) are backed up. So incremental. But they also include many other features including replication, compression, deduplication, and data exclusion to manage what is backed up, when and what space is required. Snapshot solutions at the storage array level also have many similar functions. You can also create your own solutions integrating freeze/thaw, for example using LVM snapshots. Often a Caché application is only one of many applications and databases at a company. So usually the question is turned around to "can you backup <Caché Application x> with <vendor product y>". So now with knowledge of how to implement freeze/thaw you can advise the vendor of your Caché application requirements. To backup only selected files/filesystems on logical volumes (for example a filesystem on LVM2) the snapshot process and freeze/thaw scripts can still be used and would be just about the same.
As an example the sequence of events is:
- Start process e.g. via script scheduled via cron
- _Freeze Caché_ via script as above.
- Create snapshot volume(s) with`lvcreate`.
- _Thaw Caché_ via script as above.
- `mount` snapshot filesystem(s) (for safety mount read only).
- backup snapshot files/filesystems to somewhere else…
- `unmount`snapshot filesystem(s)
- Remove snapshot volume(s) with`lvremove`
Assuming the above is scripted with appropriate error traps. This will work for virtual or physical systems.
There are many resources on the web for explaining LVM snapshots. A few key points are:
LVM snapshots use a different copy-on-write to VMware. VMware writes to the delta disk and merges the changes when the snapshot is deleted which has an impact that is managed but must be considered -- as explained above. For LVM snapshots at snapshot creation LVM creates a pool of blocks (the snapshot volume) which also contains a full copy of the LVM metadata of the volume. When writes happen to the main volume _the block being overwritten is copied to this new pool on the snapshot volume_ and _the new block is written to the main volume_. So the more data that changes between when a snapshot was taken and the current state of the main volume, the more space will get consumed by that snapshot pool. So you must consider the data change rate in your planning. When an access comes for a specific block, LVM knows which block to access.
Like VMware, best practice for production systems is not to have multiple snapshots of the same volume, every time you write to a block in the main volume you potentially trigger writes in every single snapshot in the tree. For the same reason accessing a block can be slower.
Deleting a single snapshot is very fast. LVM just drops the snapshot pool.
Murray, did you mean that LVM snapshot volume is a sequential file in contrast to VMWare snapshot delta disk which is random access one? So, with the similar DB write load the snapshot size would be greater in case of LVM, won't it?I tried LVM snapshot and backup with Caché freezing once upon a time. AFAIR, the space should be preliminary reserved inside LV for snapshot volume, and if it was too low the snapshot could fail. Hi, LVM and VMware approach to snapshots are very different. But the way we interact with them with freeze/thaw is similar.
- freeze Caché/snapshot (VM, LVM, array,etc)/thaw Caché/backup something.../etc
LVM presents a _view_ of the volume (your data) at the instant of the snapshot, then you can copy (backup) all or selected files in that view somewhere else. If you look at the _snapshot volume_, filesystem for example with `ls -l` you will see all your files as they were back at the snapshot instant. In LVM2 the snapshot can be read/write which is why I say you should mount read only for backups. If you look at the parent you see your files as they are now. You must have unused space in the logical volume to allocate to the snapshot volume (created with the `lvcreate` command). Yes, if the snapshot volume fills up with changed data it will now be useless and is discarded. So you need to understand the data change rate at your chosen backup time. But a bit of testing should tell you that. There are videos and more help via $google.
Think of VMware server instance as just a bunch of files on the datastore disks which encapsulates the whole server including OS, drivers, Caché, data, etc, etc. The VMware delta disk is where all block changes are written since the snapshot started. The _parent_ files are the VM at the instant of snapshot. You do not have a simple 'view back in time' capability that LVM has. The delta file(s) are written to the VM datastore, so there must be space for that too. But thats not so fiddly as LVM because you probably have a lot of spare space on the datastore -- but you still need to be sure to plan for that as well!
Which backup uses more space is really dependant on how long the snapshot hangs around. Snapshot files are the size of changed blocks. You want to delete snapshots as soon as the backup finishes to minimise space used either way. Smart VMware utilities that can do incremental backups through CBT will probably be quickest.
To clarify and answer a question asked offline with an example;
"Alternatively, you can enable OS-level authentication and create a Caché account for the OS user running the script."
Create a user for backup functions in the operating system named _backup_ or similar, and add a user with same name in Caché.
Assign an appropriate role to the new Caché user based on your security requirements (for example you can test with `%All` role).
Then enable the system parameter to allow OS authentication. Follow the steps in [Configuring for Operating-System–based Authentication](http://docs.intersystems.com/latest/csp/docbook/DocBook.UI.Page.cls?KEY=GCAS_authe#GCAS_authe_os). (`%Service_Terminal` on Unix or `%Service_Console` for Windows).
The advantage of using a standard user name is you have a consistent approach for all instances. Hmm, in the Freeze script is that a typo on the line:$INST -U '%SYS' "##Class(Backup.General).ExternalFreeze(\"$LOGFILE\",,,,,,1800)" >> $SNAPLOG $ .. shouldn't this be ..$INST -U '%SYS' "##Class(Backup.General).ExternalFreeze(\"$LOGFILE\",,,,,,1800)" >> $SNAPLOG 2>&1?Also, as others have commented there are times when root can't do this, so you need to prefix the whole thing with: su - {cacheusr/cachesys} -c "freeze/thaw csession command" >> $SNAPLOG 2>&1There's various methods for determining which user to use, unfortunately no API call or reliable "the username is in this file here" method, but you can check the process owner of the running cache instance, or you can check the ownership of the cache.cpf file for just two. On Linux, if your log file is defined inside the script the easiest way to deal with it is to use the exec command:SNAPLOG=$LOGDIR/snapshot.logexec >> $SNAPLOGexec 2>&1# From here everything will be written in the log file without needing to use the redirection command ( > / >> ) Indeed, that's what I did in my version. Not sure I see the need for the separate per-DB logfiles either but there can be complications wrt permissions in /var/log.By the way you can use the following code to determine what userid csession has to run as for each instance "$INST": CACHEHOME="`/bin/ccontrol qlist | awk -F^ '$1=="'"${INST}"'" {print $2}'`" MANAGERUSER="`awk '/^security_settings.manager_user:/ {print $2}' ${CACHEHOME}/parameters.isc`" And I can confirm the above is working well.-- Matt.Reynolds@intersystems.com @Murray.Oldfield - once again, bravo! Thank you for making this information more available to the community! Thanks for the excellent article. Is there a similar article that describes the process and scripts to be used on Windows with Cache?
Ashley Worth adding here obviously that although all of the above commentary is absolutely still true of IRIS, the above scripts don't work with IRIS because the command names have changed. We are working on local changes to our own scripts to support freeze/thaw of both platforms with the same script but that's not completed yet.
Cheers!
Hi Ashley, I don't do much with Windows, but a colleague offered the following as 'quick and dirty' examples. Perhaps, as this gets bumped to the front page of community because of the answer someone else can contribute a more functional example.
For your production use you will need to substitute your paths etc and add logging and perhaps enhance the error checking. So with all the usual caveats of test before use in production and so on;
**Freeze Script**
```
D:
CD D:\InterSystems\T2017\mgr
..\bin\cache -s. -B -V -U%%SYS ##Class(Backup.General).ExternalFreeze()
if errorlevel 3 goto NEXT
if errorlevel 5 goto FAIL
goto END
:NEXT
CD D:\InterSystems\HS20152\mgr
..\bin\cache -s. -B -V -U%%SYS ##Class(Backup.General).ExternalFreeze()
if errorlevel 3 goto OK
if errorlevel 5 goto FAIL
goto END
:OK
Echo SYSTEM IS FROZEN
exit 0
:FAIL
echo ERROR
exit 1
:END
exit 1
```
**Thaw Script**
```
D:
CD D:\InterSystems\HS20152\mgr
..\bin\cache -s. -B -V -U%%SYS ##Class(Backup.General).ExternalThaw()
CD D:\InterSystems\T2017\mgr
..\bin\cache -s. -B -V -U%%SYS ##Class(Backup.General).ExternalThaw()
exit 0
```
Hi Murray,could you tell me if it is possible to implement something similar in MSM-UNIX, Version 4.4.0?I don't know if the MSM has this "freeze writing" feature during the snapshoot process.Grateful for the attentionRafael Hi Rafael!
>I don't know if the MSM has this "freeze writing" feature during the snapshot process.I don't know if anyone on Earth knows if MSM 4.4 has the feature ) When was the release? 25 years ago? We're not all dead yet! I still have a full set of MSM 4.4 printed documentation on my bookshelf. And several developers who worked for Micronetics are still on the staff at InterSystems (pinging @Charles.SorensonII)
I haven't tested this, but you may be able to use the ZFLUSH command to flush buffers to disk, after first setting switch 13 using D ^SWREG in the MGR UCI to disable database writes. SWREG has entrypoints to let you set and clear switches programmatically.
In case there are still some MSM experts out there who aren't on Developer Community, you might also try posting on https://groups.google.com/forum/#!forum/comp.lang.mumps Hello Rafael,
I have not tested this extensively, nor do I recall it being done. However it does sound very reasonable and a quick test leads me to believe it would work. You should test the first few backups by restoring them and running ^VALIDATE on them. If you need further assistance please enter a support request at http://support.intersystems.com.
Sincerely, Clark----------------Clark C. Matthews clarkm@intersystems.comTechnical Support SpecialistInterSystems Worldwide Response Center Voice: +1-617-621-07001http://www.intersystems.com/ * ftp://ftp.intersystems.com/ * support@intersystems.com Hi Murray,
Apologies for resurrecting an old post here, but I know that with the newer versions of Healthshare, Cache has become VSS aware. What considerations are there to this change with regards to a backup solution such as Veeam? Is there any chance you could revise this post to include these changes, or create a new post documenting the new process with those changes in mind; more specifically within a Windows environment?
Thanks! Hello Marcus,
The VSS implementation is quite straightforward for users. When you try to create a VSS shadow copy this will invoke the Caché VSS writer, which automatically calls external freeze/thaw. I'm not familiar with Veeam and its integration with VSS, but you could probably verify this behavior with a quick test.
You can see that Caché is ready by the following cconsole.log message (documented):
"Caché VSS Writer started"
From another level, you can verify the Caché VSS writer using "vssadmin list writers" at the OS command prompt.
I hope that helps. Perhaps others are more familiar with Veeam. We modified the script and added the correct commands for iris and it works great now! :)
Thanks for such a great tool, this has been very helpful Hi Murray,
Great article. Can you point me to any roadmap for Change Block Tracking (CBT) within IRIS? We are expecting to reach over 400TB in size for the IRIS database within the next few years so we need to plan how to manage this growing backup window. Current technology is Dell PowerMax (source), CommVault Intellisnap which then mounts to a Linux Media Agent then its backed up to an offsite disk based target. Since we can only use one Media Agent that will require a huge throughput per hour (40TB/hr) to get done within a reasonable timeframe, so it doesn't impact production on the PowerMax during the day. CBT seems to be the next best way to reduce the window. Thoughts?
Article
Dmitry Pavlov · Jan 20, 2017
About the Ontodia libraryFirst of all, I think we should provide some background information about Ontodia and Caché DBMS. Let’s start with a less known product, Ontodia. Ontodia is the result of a joint project of the ISST lab of the ITMO University and VISmart, a software development company specializing in the semantic web domain. The Ontodia service was created as a web application for visualizing linked data and ontologies. We created this service because we couldn’t find simple, accessible and efficient tools for convenient visualization of linked data. A typical use case for Ontodiа could be described as a sequence of 3 steps:The user provides a set of data for visualization: RDF or OWL file, or enters access parameters for the data endpoint. The user navigates the data and builds the desired diagram.The user saves the diagram, shares it with colleagues, publishes it with a permanent link or embeds the diagram into a webpage. Ontodia is up and running 24/7 at www.ontodia.org. An overview of its basic capabilities in the screencast format can be found here. As time went by and we collected some feedback, we came to realize that there was huge demand for graph-based visualization of data stored in relational and object databases. The Russian office of Intersystems company was very prominent in expressing interest in Ontodia.The service started to grow and gain new features, eventually going beyond semantic data. First and foremost, we added the support of object DBMS’s (Caché DBMS is essentially an object database) via a proprietary REST API used for receiving data.The next big step was the porting of the Ontodia service into a standalone JavaScript library. The code of the library is currently published on <github>. All server-side functions, such as access control, user management, data storage and such, are now performed by platforms that use Ontodia as a library. In this particular case, InterSystems Caché became such a platform. Creation of a standalone library made it possible to implement simplified integration with platforms. The scenario of interaction between a platform, such as Caché DBMS, and the library is now as follows:When a user sends a request to a particular URL, the Caché DBMS server invokes the library codeThe library requests the necessary set of data (to be shown on a graph) from Caché DBMS. The server replies with requested data.Ontodia restores the data scheme in graph terms (connections, vertices, connection and vertex properties)The user initiates graph saving and Ontodia sends a JSON to the server for saving and storing the graphAbout InterSystems CachéWe should now say a few words about the system that made Ontodia its standard part. If you look broadly at it, then InterSystems Caché is a database management system, but if you step back and look at it from an even broader angle, you’ll find out that it’s a platform for developing data processing applications. It is also assumed that Caché is a multi-model DBMS, which means that it offers a number of different ways to store, display and provide access to data based on corresponding representations. In essence, Ontodia is yet another method of representing data in Caché, which allows the user to better understand the structure of data organization in terms of stored classes and connections between them (including ranks and connection semantics), as well as to visualize the properties of stored class instances, their connections with other instances in the database, and, finally, to navigate instances in the database. Ontodia’s capabilities relevant to CachéOntodia can display the following data elements on an interactive graph:Classes and their properties;Instances and their properties;Connections between classes;Connections between classes and instances;Connections between instances.Graph rendering featuresEach vertex of the graph is displayed as a rectangle with rounded corners. Inside each rectangle is a label with the name of the object, and a small text on a colored bar specifying the class of the object. The bar above helps distinguish classes by color.A single click on a graph vertex places the focus on this vertex and displays all related objects on the Instances panel. A double-click on a vertex helps unfold a list of object properties.Connections are rendered as lines with arrows corresponding to their direction and their names shown above.After this brief familiarization with Ontodia’s visual language, it’s time to show how data from Caché is displayed and how Ontodia helps interact with graphs.User interaction with graphAt the start, Ontodia displays a tree of classes of the received data set on the Class tree panel (see illustration) and allows you to drag classes into the graph’s workspace (in the middle). It allows you to search the class tree and filter results on the go as characters are typed in.The user can view all instances of any class. Instances are filtered on the Instances tab by clicking on any class in the tree. If the number of results is too high, you can use simple string search to find what you need.The user can also drag one or several instances from the Instances panel to the graph’s workspace. Users can manage the display of connections by going to the Connections panel and selecting the types of connections to be shown on the graph. You can also enable or disable connection labels. This feature lets you control the “saturation” of the graph with elements and connections. Users can remove any vertices and connections, thus forming the resulting set of data to be displayed. The user can move vertices and connections across the work area to achieve the most visually efficient placement of elements. The user can zoom in and out from the graph, move the graph within the boundaries of the workspace and fit the graph size to that of the screen.Double-clicking any vertex will open a list of object properties.Below is an example of a graph that took around 30 seconds to create. Navigation capabilitiesNot only does Ontodia allow you to create any number of data views (diagrams), but also allows you to analyze data by looking at its visual representation:Click any graph vertex and get a list of all directly connected objects on the Instances panel. After that, users can drag the objects, thus plotting the trajectory of their navigation through the data.Get all connections forming the selected vertex on the graph. Connections will be listed in the top part of the Connections panel. The number of objects on the other side of the connection will be shown to the right of each identified connection on the Connections panel. By clicking the filter icon next to the necessary connection, the user will populate the corresponding area of the Instances panel with objects that are connected to the object selected on the graph.How to see a demo and get more information:Link to a demo.Link to an Ontodia screencast.The projects repository is publicly accessible here.How to installTo install the latest version of the library capable of working with Caché via a Rest API, you need to import the OntodiaCache package. To do this, download the archive here, then import the OntodiaCache.xml file (it will be in ontodia-cache-release.zip archive) to Caché Studio (tutorial). As a result, you will get all the necessary resources, and compilation will produce a new web application.How to startAfter installation, go to the Caché server at [server URL]/csp/ontodia-cache/index.html.In order to specify which particular namespace to use for data visualization, add a “namespace” parameter for the necessary value to the address line.Example: localhost:57772/csp/ontodia-cache/index.html?namespace=Samples Building a new version of OntodiaCache.xmlTo build a project, you will need NodeJS to be installed. If you have it, clone the source code of the repository and run the npm install command in the root folder of the project. This will install all the necessary modules via NPM.Once done, you will need to install the old version of the OntodiaCache.xml file — see the “How to install” section above.Starting from this moment, you will need to execute the npm run webpack command in the root folder to build the project. Running this command will create the necessary source code that must be moved to the InterSystems Caché Studio server folder ({Server folder}\Cache\CSP\{namespace}Example: C:\InterSystems\Cache\CSP\ontodia-cache) – can be used for developing a new version of the library.To complete the process, go to InterSystems Caché Studio, click the root element of the Workspace panel and select the “export to xml” command from the context menu, then specify the destination folder for the new version of the .xml file.What’s nextWe plan to extend the functionality of the library, and specifically do the following:Create configurable templates for displaying instances of particular classes (we’d like to, for example, allow users to show an instance of the “person” class as a photo with a name, last name and contact details)Implement a possibility to edit data right on the graphImplement the support of popular notations: UML, IDEF, Archimate, etc.It is clear that creating a new version with the listed features will take a lot of time. We don’t want to wait for too long and will appreciate any help or contributions that will help make Ontodia better and more functional.FeedbackThe latest news about the project is available in our blog.Contact us by email. I haven't read the article yet but, just to let you know, the first two images are missing. Images are fine for me.Looks like they are hosted on a google drive, perhaps your behind an http proxy that blocks that domain? I've relocated this two images from google drive storage to another one (to the same as for others pictures in this article), hope it helps.
Article
Tomohiro Iwamoto · Mar 15, 2021
## Purpose
Most CloudFormation articles are Linux-based (no wonder), but there seems to be a demand for automation for Windows as well. Based on this [original article by Anton](https://community.intersystems.com/node/473846
), I implemented an example of deploying a mirror cluster to Windows servers using CloudFormation.I also added a simple walk through.
The complete source code can be found [here](https://github.com/IRISMeister/AWSIRISDeployment).
Update: 2021 March 1 I added a way to connect to Windows shell by public key authentication via a bastion host as a one-liner.
## Prerequisites and requirements
[The same](https://community.intersystems.com/node/473846/%C2%A0using-cloudformation-template#_Toc47601905) applies to this article. Both binary and license key in your S3 bucket must be for Windows, though.
```bash
$ aws s3 cp IRIS-2020.1.0.215.0-win_x64.exe s3://$BUCKET
```
## Differences from the original
When I changed the deployment destination to Windows, I made some modifications while keeping in mind to maintain compatibility with the Linux version.
- Removed default values in YAML files
- You have to provide default values that suit your environment.
- Added two new YAML files for Windows
- based on MirrorNode.yaml → MirrorNode_Windows.yaml
- based on MirrorCluster.yaml → MirrorCluster_Windows.yaml
- Created a new parameter LatestAmiIdForIRISParameter. This is used to choose which Windows edition (Japanese, English etc. Should work with any language edition) to use.
- Separated Arbiter security group
- Added SecurityGroupIngress (port: 3389) for RDP access
- Added listener port: 52773 to external load balancer. Added port:52773 as its target group.
- Normally, you should setup a separate web server for http access, but I'm using built-in Apache server.
- Added an internal load balancer. Registered listener port:52773. Added port:52773 as its target group.
- This is for communications within the same VPC. To enable access to a primary member when communication module is not mirror aware (unlike Web Gateway and ECP app server). Simple Http client for example.
https://docs.aws.amazon.com/elasticloadbalancing/latest/classic/elb-create-internal-load-balancer.html
- Added the following to the CloudFormation output items
- Added HTTPEndpoint.
This is the URL when you access the management portal via the external load balancer.
- Added IntHTTPEndpoint.
This is the URL when you access the management portal via the internal load balancer.
- Added Node01ViaBastionAlt and Node02ViaBastionAlt.
To workaround annoying "posix_spawn: No such file or directory" error which happens only in Windows version of the OpenSSH client when executing SSH -J. Providing a command with the same effect for convenience.
- Fixed the SE.ShardInstaller class
- Added the second argument (database file location) to CreateMirroredDB(), and modified its logic accordingly.
- Restored the commented out parts of CreateMirrorSet() and JoinAsFailover()
When running ##class(SYS.Mirror)CreateMirrorSet() and JoinAsFailover() on Windows, the default ECP Address ($system.INetInfo.LocalHostName()) became Windows host name such as "EC2AMAZ-F1UF3QM".
JoinMirrorAsFailoverMember() failed because this host name cannot be resolved by DNS from other hosts. So I restored the following part:
```
set hostName=$system.INetInfo.HostNameToAddr($system.INetInfo.LocalHostName())
set mirror("ECPAddress") = hostName
```
## Customization options
PowerShell script files, etc., are created using MirrorNode_Windows.yaml. Please change the following parts to suit your environment and purpose.
- Localization of Windows environment (timezone, firewall settings)
- c:\cfn\scripts\Setup-config.ps1
timezone is set to "Tokyo Standard Time".
***Note: Windows firewall is disabled !***
- IRIS kit name
- c:\cfn\scripts\Install-IRIS.ps1
$DISTR="IRIS-2020.1.0.215.0-win_x64"
- Drive creation, assignment
- Resources section
```
Resources:
NodeInstance:
Properties:
BlockDeviceMappings:
```
- c:\cfn\scripts\drives.diskpart.txt
- IRIS installation destination, etc.
- c:\cfn\scripts\Install-IRIS.ps1
```
$irisdir="h:\InterSystems\IRIS"
$irissvcname="IRIS_h-_intersystems_iris"
$irisdbdir="I:\iris\db\"
$irisjrndir="J:\iris\jrnl\pri"
$irisjrnaltdir="K:\iris\jrnl\alt"
```
This PowerShell script file, when combined with /temp/envs.ps1 created at runtime, functions as an unattended installation script for IRIS.
- Software to pre-install
- c:\cfn\scripts\Install-choco-packages.ps1
AWS CLI is required to use S3. I installed Notepad++ and Google Chrome additionally for convenience.
## Misc
### 1. Load balancer health check value
Default values are used for load balancer health checks.Uncomment the following in MirrorCluster_Windows.yaml and adjust to the appropriate values.
```
#HealthCheckTimeoutSeconds: 10
#HealthCheckIntervalSeconds: 10
#UnhealthyThresholdCount: 3
```
### 2. Deploying standalone IRIS
If you specify MirrorNode_Windows.yaml when creating the stack, you can start IRIS in a standalone configuration.In this case, select the public subnet as the subnet to deploy.
### 3. SSH to Windows
If you install OpenSSH on the IRIS operating host, you can SSH to the IRIS host via the bastion host.However, the effectiveness is limited compared to the Linux version, as the commands which can be executed with the CLI on the Windows version of IRIS are somehow restricted.
Execute this on the IRIS host:
```powershell
PS C:\Users\Administrator> Add-WindowsCapability -Online -Name OpenSSH.Server~~~~0.0.1.0
PS C:\Users\Administrator> Start-Service sshd
```
When accessing from the Windows 10, I used Git Bash to avoid "posix_spawn: No such file or directory" which is unique to the Windows version of the OpenSSH client.
```bash
user@DESKTOP-XXXX MINGW64 ~ ssh -oProxyCommand="ssh -i .ssh/aws.pem -W %h:%p ec2-user@54.95.171.248" Administrator@10.0.0.62
Administrator@10.0.0.62's password: the password obtained via RDP connection
```
It may says, load pubkey ".ssh/aws.pem": invalid format, but you can ignore it.
If you copy the .ssh/authorized_keys (public key) from the bastion host to Windows servers, you can use public key authentication with a one-liner:
```bash
user@DESKTOP-XXXX MINGW64 ~ ssh -i .ssh/aws.pem -oProxyCommand="ssh -i .ssh/aws.pem -W %h:%p ec2-user@54.95.171.248" Administrator@10.0.0.62
```
> Windows Admin group user requires special settings.I learned how to do that from [here](https://www.concurrency.com/blog/may-2019/key-based-authentication-for-openssh-on-windows).
### 4. If a Python error appears in cfg-init.log
It seems that the following error may appear in cfn-init.log:
```
2021-02-12 02:50:32,957 [ERROR] -----------------------BUILD FAILED!------------------------
2021-02-12 02:50:32,957 [ERROR] Unhandled exception during build: 'utf8' codec can't decode byte 0x83 in position 8: invalid start byte
```
The following instructions have been added to Install-IRIS.ps1 with the hope that it can be eluded:
```
[Console]::OutputEncoding = [System.Text.Encoding]::UTF8
```
## Example walk through
This is an execution example. I have prepared the following subnets for IRIS hosts and arbiter host.
- Public subnet
- Private subnet
- Route table / route
- Route table / subnet association
### Editing the YAML file
Clone the contents of the [Git Repository](https://github.com/IRISMeister/AWSIRISDeployment) locally and make the necessary changes.
- Mandatory changes
Change TemplateURL values (there are four of them) in MirrorCluster_Windows.yaml to match your S3 bucket name.
```
TemplateURL: https://my-cf-templates.s3-ap-northeast-1.amazonaws.com/MirrorNode_Windows.yaml
```
If you perform deployment repeatedly, it is convenient to set your own default value as follows:
```
BastionSubnetIdParameter:
Default: 'subnet-0f7c4xxxxxxxxxxxx,subnet-05b42xxxxxxxxxxxx'
InstanceSubnetIdParameter:
Default: 'subnet-0180bxxxxxxxxxxxx,subnet-03272xxxxxxxxxxxx,subnet-08e8fxxxxxxxxxxxx'
S3BucketNameParameter:
Default: my-cf-templates
```
*Note:*
- Since the load balancer is set, be sure to specify two subnets belonging to different AZs in BastionSubnetIdParameter.
- Since the load balancer is set, be sure to specify three subnets belonging to different AZs in InstanceSubnetIdParameter.The first two are for IRIS hosts, and the last one is for an Arbiter host.
- The host on which IRIS is installed requires access to the internet during the installation process. To be more specific, the AWS CLI will be installed for S3 access and chocolatey is used for that. If you have not setup a NAT gateway for a private subnet, as a temporary workaround, you may use a public subnet for InstanceSubnetIdParameter.(the bastion host will become meaningless...though)
When you finished your edits, copy them to your S3 bucket.
### S3 bucket preparation
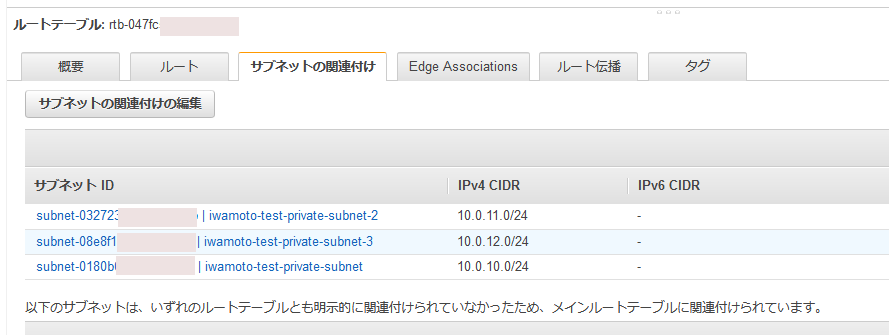
The contents of your bucket should look like this:
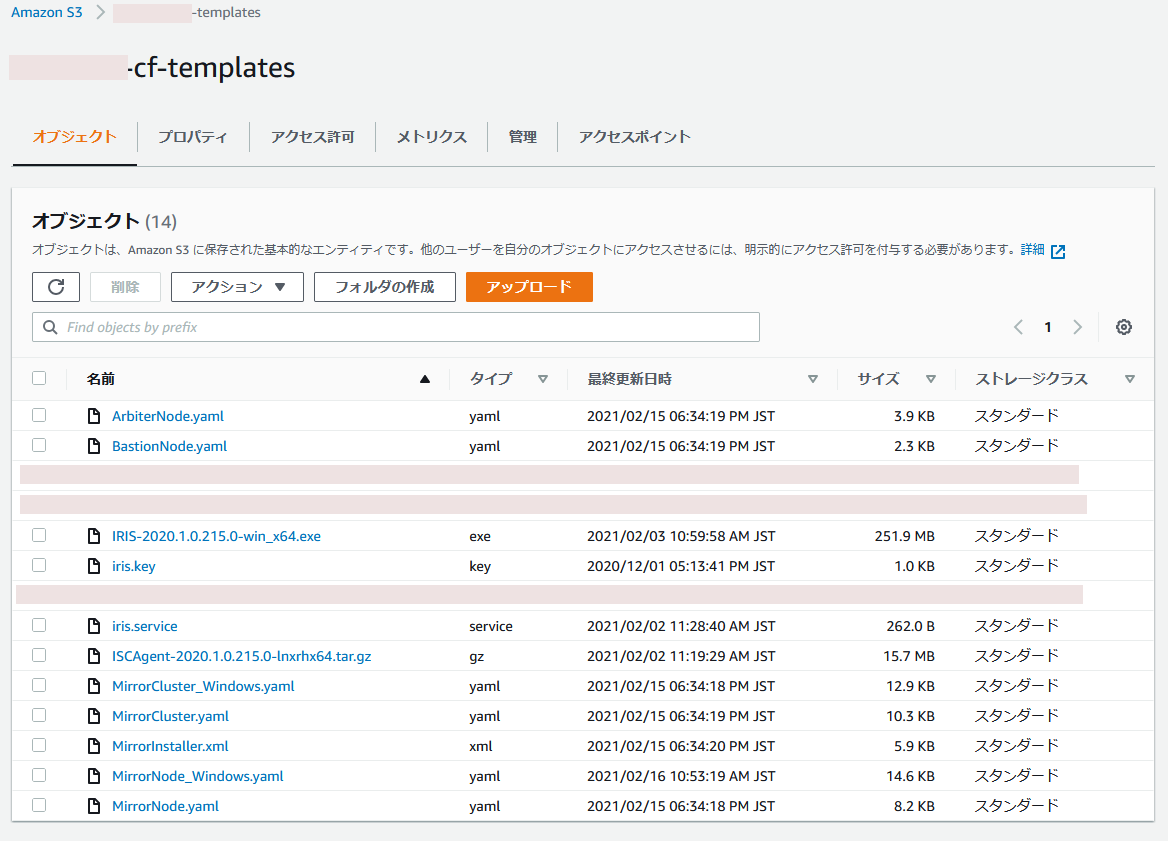
Remember URL of MirrorCluster_Windows.yaml such as https://my-cf-templates.s3-ap-northeast-1.amazonaws.com/MirrorCluster_Windows.yaml . You will need it later.
### Running CloudFormation from aws console
1. Create stack "with new resources"
The operation flow is the same as [Deploying ICM on AWS using CloudFormation](https://jp.community.intersystems.com/node/480741). (Sorry. Japanese article only)
Select "Amazon S3 URL" as the template source and specify the URL you recorded earlier. Set the parameters on the Specify Stack Details screen and push Next button.
| Parameter | Setting value example |
| -------------------------------------------------------- | -------------------------------------------------------------------------- |
| Password for SuperUser/_SYSTEM user | SYS1 |
| S3 bucket with IRIS binaries | my-cf-templates |
| Which VPC should this be deployed to? | vpc-0e538xxxxxxxxxxxx |
| Subnets to deploy Bastion host (public) | subnet-0f7c4xxxxxxxxxxxx,subnet-05b42xxxxxxxxxxxx |
| Subnets to deploy IRIS (private subnet recommended) | subnet-0180bxxxxxxxxxxxx,subnet-03272xxxxxxxxxxxx,subnet-08e8fxxxxxxxxxxxx |
| Allowed CIDR block for external access to the instances | 0.0.0.0/0 |
| EC2 instance type for IRIS nodes | m5.large |
| SSH Key Pair name to connect to EC2 instances | aws |
| IAM Role for EC2 instances | S3FullAccessForEC2 |
| Which language version of Windows should be deployed to? | /aws/service/ami-windows-latest/Windows_Server-2019-English-Full-Base |
There are no particular settings on the "Configure Stack Options" screen. Push next button.
> If deployment failed, disabling the Stack creation options "Rollback on failure" will leave the created environments, making it easier to analyze the problem later. (Don't forget to delete it manually when you no longer need them).
There are no particular settings on the "Review" screen. You just review them.
Push the "Create Stack" button, and then, the creation of multiple nested stacks will start.
2. Check the output contents. Wait for the stack status to become CREATE_COMPLETE (it took about 15 minutes in my case).
Display the output.You can disable line wrapping with the gear icon.
| Key | Value | Explanation |
| ------------------- | -------------------------------------------------------------------------------------------------------------- | ------------------------------------------------ |
| BastionPublicIP | 13.115.71.170 | Basion Host public IP |
| HTTPEndpoint | http://iwa-NLB-4b1e6859b5a84ec3.elb.ap-northeast-1.amazonaws.com:52773/csp/sys/%25CSP.Portal.Home.zen | SMP Endpoint as an example for HTTP access |
| IntHTTPEndpoint | http://iwa-Internal-NLB-ae03aa0055ea57e5.elb.ap-northeast-1.amazonaws.com:52773/csp/sys/%25CSP.Portal.Home.zen | Endpoint for internal HTTP access |
| JDBCEndpoint | jdbc:IRIS://iwa-NLB-4b1e6859b5a84ec3.elb.ap-northeast-1.amazonaws.com:51773/DATA | JDBC Connection String |
| Node01PrivateIP | 10.0.10.43 | Node 01 Private IP |
| Node01ViaBastion | ssh -J ec2-user@13.115.71.170 ec2-user@10.0.10.43 -L 52773:10.0.10.43:52773 | Node 01 Connection via Bastion |
| Node01ViaBastionAlt | ssh -i .ssh\aws.pem -L 52773:10.0.10.43:52773 ec2-user@13.115.71.170 | Node 01 Connection via Bastion, Alternative way. |
| Node02PrivateIP | 10.0.11.219 | Node 02 Private IP |
| Node02ViaBastion | ssh -J ec2-user@13.115.71.170 ec2-user@10.0.11.219 -L 52773:10.0.11.219:52773 | Node 02 Connection via Bastion |
| Node02ViaBastionAlt | ssh -i .ssh\aws.pem -L 52773:10.0.11.219:52773 ec2-user@13.115.71.170 | Node 02 Connection via Bastion, Alternative way. |
Click HTTPEndpoint and verify that the Management Portal is displayed.
> It will take some time for the load balancer to finish its health checks. You may have to wait a moment.
Log in with the user name "SuperUser" and the password you provided in the parameters.
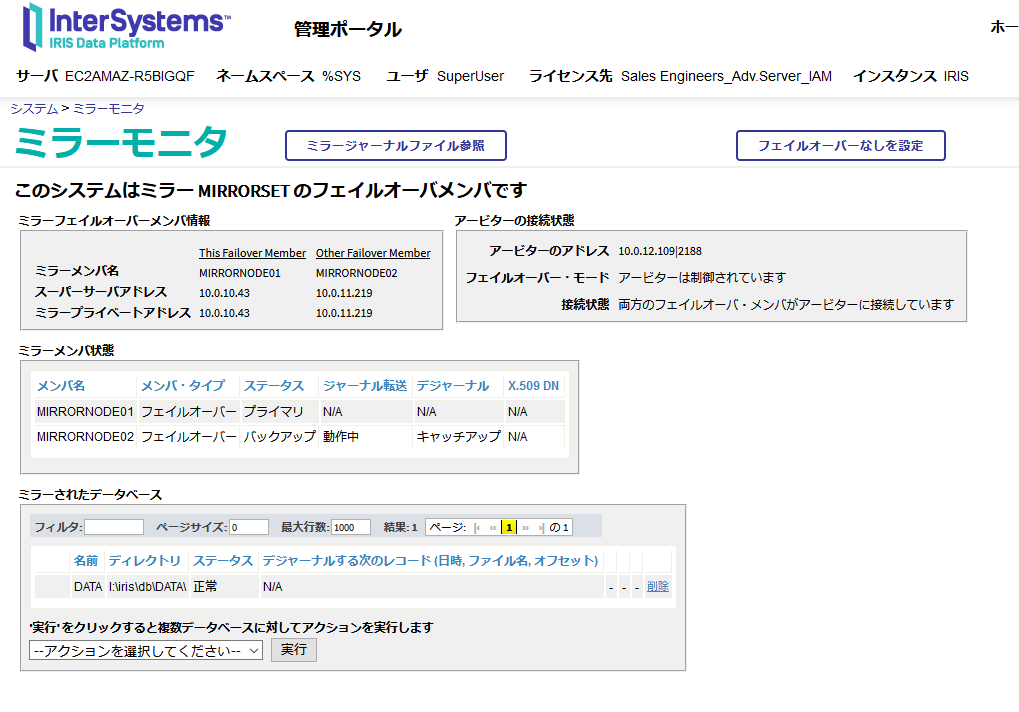
3. Checking the mirror status
Click the "Show Mirror Monitor" link on the right edge of the home screen of the management portal.If it is successful, it is displayed as shown in the screenshot below.
4. Check if operating correctly
- Check the external load balancer
Execute the following command from your client (in this case, Windows 10) and check that HTTP/ 1.1 200 OK is returned.The host name in the URL is the host name of the HTTPEndpoint value used earlier.
```
C:\Users\iwamoto>curl http://iwa-NLB-4b1e6859b5a84ec3.elb.ap-northeast-1.amazonaws.com:52773/csp/mirror_status.cxw -v
* Trying 3.114.52.16...
* TCP_NODELAY set
* Connected to iwa-NLB-4b1e6859b5a84ec3.elb.ap-northeast-1.amazonaws.com (3.114.52.16) port 52773 (#0)
> GET /csp/mirror_status.cxw HTTP/1.1
> Host: iwa-NLB-4b1e6859b5a84ec3.elb.ap-northeast-1.amazonaws.com:52773
> User-Agent: curl/7.55.1
> Accept: */*
>
< HTTP/1.1 200 OK
< Content-Type: text/plain
< Connection: close
< Content-Length: 7
<
SUCCESS* Closing connection 0
```
- Check the internal load balancer
SSH to the bastion host, execute the following command, and check that HTTP/1.1 200 OK is returned.The host name in the URL is the host name of the IntHTTPEndpoint value used earlier.
```
[ec2-user@ip-172-31-37-178 ~]$ curl http://iwa-Internal-NLB-ae03aa0055ea57e5.elb.ap-northeast-1.amazonaws.com:52773/csp/mirror_status.cxw -v
・
・
< HTTP/1.1 200 OK
・
・
```
- Stop the Mirror primary member
Make an RDP connection to the primary member IRIS host (it should be Node01) and stop IRIS. If Node01 is created in a private subnet (as recommended), an RDP connection cannot be made directly, so you need to execute the following command on client to transfer from localhost.The actual command can be obtained by changing the port of Node01ViaBastionAlt in the output from 52773 to 3389.
```
C:\Users\iwamoto>ssh -i .ssh\aws.pem -L 3389:10.0.10.43:3389 ec2-user@13.115.71.170
```
Also, the Windows password must be obtained using the RDP connection method from the AWS console. Then connect to localhost:3389 with RDP and log in as Administrator by using the password you obtained.
You will see the following error until the external load balancer recognizes that the old backup member has been promoted to primary:
```
curl: (7) Failed to connect to http://iwa-NLB-4b1e6859b5a84ec3.elb.ap-northeast-1.amazonaws.com port 52773: Connection refused
```
It will take some time (depending on the load balancer health check values, I mentioned earlier).
After that, check that both the external and internal load balancer responses are SUCCESS (HTTP / 1.1 200 OK).
## Referenced sites
I used the following sites as a reference:
- https://aws.amazon.com/premiumsupport/knowledge-center/cloudformation-drive-letters-windows/
- https://www.concurrency.com/blog/may-2019/key-based-authentication-for-openssh-on-windows
- https://dev.classmethod.jp/articles/about-windows-cfn-init-non-ascii-encoding-error/
- https://dev.classmethod.jp/articles/aws-cloudformation-setup-windows-server-2016/
Article
Michael Braam · Jun 2, 2021
InterSystems SAM is a great tool to monitor your InterSystems IRIS and InterSystems IRIS For Health clusters on prem or in a cloud environment. This article describes how you can implement a customized alert handler. This is currently an undocumented and most likely an unknown feature of InterSystems SAM. With future releases it will be probably made easier to leverage this useful concept.
In the interest of shortness, I will only mention InterSystems IRIS in this article, but the following applies to InterSystems IRIS and InterSystems IRIS For Health.
InterSystems SAM is a cluster of five containers and each of these containers plays a specific role. These are:
Grafana to build dashboards to visualize your selected system metrics, i.e. metrics which InterSystems IRIS provides out of the box, and your own (application-)metrics.
Prometheus, a cloud native monitoring tool which collects time series data from the target instances
Nginx as the web server
the Alertmanager which collects InterSystems IRIS alerts and Prometheus alerts
and the SAM Manager which is the heart of SAM. This is an InterSystems IRIS instance in which all the metric data is stored
InterSystems SAM triggers two different classes of alerts.
InterSystems IRIS alerts which are defined by InterSystems IRIS
User-defined alerts. These are alerts which you can specify in so-called alert rules in the SAM portal. For details how to specify alert-rules see the documentation (https://docs.intersystems.com/sam/csp/docbook/Doc.View.cls?KEY=ASAM#ASAM_edit_alert)
Alerts that are triggered are displayed in the SAM portal but what if you wish to notify someone who is responsible for the monitored InterSystems IRIS cluster via different communication channels like e-Mail or SMS etc. so that he can take care of the cluster and fix the problem. That's where a customized alert handler comes into play.
This article describes the neccessary steps to implement your own alert handler for your SAM Manager instance. In this example the alert handler will send an e-Mail to a preconfigured e-mail address along with the alert information.
The key here is that there is a "hidden" abstract class %SAM.AbstractAlertsHandler in the SAM Manager instance. See the class refernce below:
You have to derive your own alert handler from this abstract class first and then implement the classmethod HandleAlerts. The method receives a JSON array with the alert details.
So in my simple example the alert handler is a class SAM.AlertHandler which subclasses %SAM.AbstractAlertsHandler. The implementation of the HandleAlerts() method is simple. See the full code below:
It delegates the work to the method SendAlert. It assumes that you have an e-mail user account which you can use for the alerts. The e-mail password is stored in the database, but the password is encrypted using the data-element encryption capability of InterSystems IRIS. Therefore you have to create an encrytion key in the SAM Manager and this key must be loaded. Otherwise the alert handler will not be able to send the e-Mail. My e-mail provider requires SSL/TLS to send the e-mail. I have defined an SSL-configuration ForMail in the SAM Manager instance. The rest of the code is straight forward. See the code below:
It simply copies the received JSON array with the alert details to the e-mail body and sends it to the recipients.
There is one remaining issue. You cannot directly create and edit the alert handler class in your SAM Manager instance. The default configuration does not allow connections from your IDE (IRIS studio or VSCode) to the SAM manager instance.
To resolve this I have created and edited the alert handler class in my InterSystems IRIS instance and have imported it into the SAM namespace of my SAM Manager instance. Another option would be to modify the docker-compose file to start InterSystems SAM, but I didn't want to touch this.
Once you have successfully loaded you alert handler class into your InterSystems SAM Manager instance the HandleAlerts method will be executed for every alert that is triggered in your monitored InterSystems IRIS cluster.
Enjoy!
💡 This article is considered as InterSystems Data Platform Best Practice.
Excellent work @Michael.Braam, love all the details!
Thanks!
Announcement
Ben Spead · Jul 7, 2021
Hello Developers!
Have you ever had to convert HL7v2 messages to FHIR (Fast Healthcare Interoperability Resources) and found the process complicated and confusing? InterSystems is rolling out a new cloud based SaaS offering called InterSystems FHIR Transformation Service, which makes the process easy. We are excited to announce an Early Access Preview Program for our new offering, and we would love to have you kick the tires and let us know what you think! All you need is a free AWS account, with an S3 bucket to drop in your HL7v2 messages, and another S3 bucket to get your FHIR output.
<tl;dr;>
Check out this simple demo of the functionality here:
A simple step-by-step guide on how you can sign up for a free AWS account and a free InterSystems Cloud Portal account and exercise the powerful functionality of the transformation services can be found on the InterSystems Learning Site. Full documentation is available within InterSystems Documentation.
We are going to be formally launching this offering later in July, and when the preview is over you can still take advantage of getting your first one million transformations for free!
</tl;dr;>
More details on this new offer from InterSystems:
Introducing InterSystems FHIR Transformation Service. The health information industry has embraced FHIR®, or Fast Healthcare Interoperability Resources, as its newest data standard for exchanging healthcare data. The on-demand InterSystems FHIR Transformation Service enables healthcare providers, payers, and pharmaceutical companies to convert their existing data formats to FHIR standards and extract the most value from their data. InterSystems is a leader in healthcare interoperability, implementing not only the latest FHIR standard, but all major healthcare standards including HL7v2, X12, CDA, C-CDA, and DICOM.
InterSystems FHIR Transformation Service was designed to make converting messages from these earlier standards into FHIR R4 simple, with the initial release supporting the transformation of HL7 v2 messages to FHIR R4. The FHIR messages can then be sent to an AWS S3 bucket or Amazon HealthLake (Preview), with other FHIR repository options being added in the future.
HealthShare Message Transformation Services makes transforming HL7v2 messages into FHIR simple. You don't need to worry about transformation logic, so you can shift your focus to building great healthcare applications, leaving the complexities of message transformations to InterSystems. The service provides:
Easy provisioning and launching on AWS
Checking your inbound S3 bucket for HL7v2 messages
Validating of HL7 contents
Message conversion to FHIR R4
Routing converted messages to your outbound S3 bucket, the InterSystems FHIR Server (Preview) service, or an Amazon HealthLake (Preview) repository
Monitoring the status and statistics of your transformation pipelines
Additionally, the service is built on the AWS infrastructure, so it is ISO 27001:2013 and HITRUST certified to support HIPAA. InterSystems manages the operations, monitoring, and backups of the service.
Best of all, once this offering is launched commercially, you will get the first one million transformations for free and after that you will pay for only what you use with a very low cost per transformed message. There will be no long-term contracts for using this service - cancel any time.
We are very interested in your feedback. Please leave comments on this article with feedback, or reach out to the team directly at HMTS@InterSystems.com.
UPDATE: July 15, 2021
InterSystems is very pleased to announce that as of July 15th, HeathShare Message Transformation Services is now available as a commercial offering in the AWS Marketplace:
https://aws.amazon.com/marketplace/pp/prodview-q7ryewpz75cq2
You can subscribe from your AWS account and new subscriptions will receive the 1 million free transformations (try before you buy). Preview accounts created under the Early Access Preview Program will continue to work for a month after they have been created.
We are still VERY interested in seeing people try this service and provide us with specific feedback on how it might bring value to them and their organization. Please feel free to start up discussions on this thread or reach out to HMTS@InterSystems.com.
HL7 ® and FHIR ® are the registered trademarks of Health Level Seven International and the use of these trademarks does not constitute an endorsement by HL7. Use of the FHIR trademark does not constitute endorsement of InterSystems FHIR Transformation Service or InterSystems FHIR Transformation Service by HL7. Thanks @Ben Spead
Converting HL7v2 to HL7FHIR is always a challenging task. By using HealthShare Message Transformation Services in cloud based SaaS I found it I can achieve it easily.Once again thanks for the step by step guide.
Regards
Highly interesting, definitely warrants a more in depth look for future applications. Thanks @Raymond.Rebbeck - we would love for you to give it a try and let us know what you think! We're excited to announce that the offering went live on AWS Marketplace on July 15th:
https://aws.amazon.com/marketplace/pp/prodview-q7ryewpz75cq2
I have updated the article to reflect this. We are still looking for more feedback so please create your account and give it a try for free when you have time!
Hi Ben
I would be very happy to participate. I have a number of Patient HL7 Interfaces and a lot of LabTrak Interfaces as well so I will feed a little bit of hands on help to get my IRIS for Health 2021Python Foundation completed and configured and then I add an operation into any of the interfaces to send a steady stream of HL7 messages into the FHIR Server.
Question
reach.gr G · Jul 11, 2021
Hi InterSystems Architects,
Please may I know the relationship between
1. Menus, Workflows, Workflow Items, Components, Code Tables, etc
Detailed relationship diagrams, how each element in each of the above are related to another.
2. When I extracted the data. I see ID number, but they aren't unique or related. I wanted to build a relationship between them myself in the absence of documents but I am missing the critical unique primary key of each and how they are referred in another table.
Your help is appreciated and let me know if you need any specific (Non Confidential) information to get help. This is my Understanding:
From objects - Classes (components) are designed - For example: web.PAPerson is the class and I wanted to search for it in the Element Reference Map, but I could not find. So I need more details here and understanding.
2. Based on design, Elements are grouped to form Components
3. Based on design Components are grouped in the Workflow Items ( Again I need explanation here) and they may also be derived from code tables.
4. Based on Design Work is set up deriving from Components ?
5. Based on user flow, series of Work flow Items are grouped to form Workflow Managers
6. Based on Design workflow managers are linked to Menus Mangers. Menu Headers etc
Please can you help me fill in the above gaps, corrections and relevant documents, where I can trace from fundamental non divisible element to user form that can be configurable.
Many Thanks Hi Intersystems,
I am still waiting for the answer and knowledge so that I can understand your application better. This shouldn't take this long, I was expecting an answer within 24 hours so that I can continue my learning. You should understand that while InterSystems employees are on the community this is really a public forum and not an "official" support path. Questions are answered by the community at large when they can. For people in the forum to help more information is needed. You indicated you are working with HealthShare however this is really a family of solutions. Which specific product are you referring to? What part of that product are you trying understand better? The more specific you can be the easier it is for the community to help.
If you have an immediate need I would suggest that you contact the Worldwide Response Center (referred to as the WRC) for immediate support. Here is the contact information:
Phone:+1-617-621-0700+44 (0) 844 854 29170800615658 (NZ Toll Free)1800 628 181 (Aus Toll Free)
Email:support@intersystems.com
Finally, learning services (learning.instersystems.com) and documentation (docs.intersystems.coms) can be of great help. For HealthShare specific areas you do need to be a registered HealthShare user. If you are not work with your organization and the WRC to get that updated.
Announcement
Benjamin De Boe · Apr 8, 2021
GA releases are now available for the 2020.4 version of InterSystems IRIS, InterSystems IRIS for Health and InterSystems IRIS Studio.
InterSystems IRIS Data Platform 2020.4 makes it even easier to develop, deploy and manage augmented applications and business processes that bridge data and application silos. It has many new capabilities including:
Enhancements for application and interface developers, including:
Support for Java SE 11 LTS, both when using Oracle OpenJDK and AdoptOpenJDK
Support for Connection Pooling for JDBC
A new "foreach" action in routing rules for segmented virtual documents
Enhancements for database and system administrators, including:
ICM now supports deploying System Alerting and Monitoring (SAM) and InterSystems API Manager (IAM)
Extensions to our SQL syntax for common administrative tasks
Simplified deployment for InterSystems Reports
InterSystems IRIS for Health 2020.4 includes all of the enhancements in InterSystems IRIS 2020.4. In addition, this release includes
Enhanced FHIR support, including support for FHIR profiles
Support for the RMD IHE profile
DataGate support in the HL7 Migration Tooling
More details on these features can be found in the product documentation:
InterSystems IRIS 2020.4 documentation and release notes
InterSystems IRIS for Health 2020.4 documentation and release notes
As this is a Continuous Delivery (CD) release, it is only available in OCI (Open Container Initiative) a.k.a. Docker container format. Container images are available for OCI compliant run-time engines for Linux x86-64 and Linux ARM64, as detailed in the Supported Platforms document.
Container images for the Enterprise Edition and all corresponding components are available from the InterSystems Container Registry using the following commands:
docker pull containers.intersystems.com/intersystems/iris:2020.4.0.547.0
docker pull containers.intersystems.com/intersystems/irishealth:2020.4.0.547.0
For a full list of the available images, please refer to the ICR documentation.
Container images for the Community Edition can also be pulled from the Docker store using the following commands:
docker pull store/intersystems/iris-community:2020.4.0.547.0
docker pull store/intersystems/iris-community-arm64:2020.4.0.547.0
docker pull store/intersystems/irishealth-community:2020.4.0.547.0
docker pull store/intersystems/irishealth-community-arm64:2020.4.0.547.0
Alternatively, tarball versions of all container images are available via the WRC's CD download page.
Our corresponding listings on the main cloud marketplaces will be updated in the next few days.
InterSystems IRIS Studio 2020.4 is a standalone IDE for use with Microsoft Windows and can be downloaded via the WRC's components download page. It works with InterSystems IRIS and InterSystems IRIS for Health version 2020.4 and below. InterSystems also supports the VSCode-ObjectScript plugin for developing applications for InterSystems IRIS with Visual Studio Code, which is available for Microsoft Windows, Linux and MacOS.
Other standalone InterSystems IRIS 2020.4 components, such as the ODBC driver and web gateway, are also available from the WRC's components download page. And we updated the images with ZPM 0.2.14 too:
intersystemsdc/iris-community:2020.3.0.221.0-zpm
intersystemsdc/iris-community:2020.4.0.547.0-zpm
intersystemsdc/iris-ml-community:2020.3.0.302.0-zpm
intersystemsdc/irishealth-community:2020.3.0.221.0-zpm
intersystemsdc/irishealth-community:2020.4.0.547.0-zpm
And to launch IRIS do:
docker run --rm --name my-iris -d --publish 9091:1972 --publish 9092:52773 intersystemsdc/iris-community:2020.3.0.221.0-zpm
docker run --rm --name my-iris -d --publish 9091:1972 --publish 9092:52773 intersystemsdc/iris-community:2020.4.0.547.0-zpm
docker run --rm --name my-iris -d --publish 9091:1972 --publish 9092:52773 intersystemsdc/iris-ml-community:2020.3.0.302.0-zpm
docker run --rm --name my-iris -d --publish 9091:1972 --publish 9092:52773 intersystemsdc/irishealth-community:2020.3.0.221.0-zpm
docker run --rm --name my-iris -d --publish 9091:1972 --publish 9092:52773 intersystemsdc/irishealth-community:2020.4.0.547.0-zpm
And for terminal do:
docker exec -it my-iris iris session IRIS
and to start the control panel:
http://localhost:9092/csp/sys/UtilHome.csp
To stop and destroy container do:
docker stop my-iris
Announcement
Anastasia Dyubaylo · Mar 29, 2023
Hey Community,
We are glad to invite you to the upcoming kick-off webinar for the InterSystems IRIS Cloud SQL and IntegratedML Contest.
In this webinar, we'll present you the arena for the next contest: our new cloud offerings InterSystems IRIS Cloud SQL and InterSystems IRIS Cloud IntegratedML. We'll describe what these SaaS offers are all about and walk you through setting up your account and log on to the web portal, which includes an intuitive user interface to load data, create and train machine learning models, and then evaluate those models on test data. For the contest environment, we have included sample datasets so you can go from account signup to your first SQL query and IntegratedML model in a matter of seconds.
Date & Time: Monday, April 3 – 11 am EDT | 5 pm CEST
Speakers: 🗣 @Steven.LeBlanc, InterSystems Product Specialist, Cloud Operations🗣 @Thomas.Dyar, InterSystems Product Specialist, Machine Learning🗣 @Benjamin.DeBoe, InterSystems Product Manager🗣 @Dean.Andrews2971, InterSystems Head of Developer Relations 🗣 @Evgeny.Shvarov, InterSystems Developer Ecosystem Manager
>> Register here << Hi Devs!Please join the "[Kick-off Webinar] InterSystems IRIS Cloud SQL and IntegratedML Contest" in 20 minutes!➡️ Follow this link - https://us02web.zoom.us/j/9822194974?pwd=bnZBdFhCckZ6c0xOcW5GT1lLdnAvUT09Or join our➡️ YouTube stream: https://youtube.com/live/ZzlK9vc_jO0?feature=share
Announcement
Anastasia Dyubaylo · Nov 18, 2022
Hey Developers,
Watch this video to learn how InterSystems has been building out capabilities to support current and future regulations in the US market that can have a significant impact on payers and providers:
⏯ How InterSystems Supports the CMS & ONC Regulations as well as Prior Authorization @ Global Summit 2022
🗣 Presenter: Lynda Rowe, Senior Advisor, Value-Based Markets, InterSystems
Visit our InterSystems Developers YouTube channel and subscribe to receive updates!
Announcement
Anastasia Dyubaylo · Apr 25, 2023
Hi Community,
Let's meet together at the online meetup with the winners of the InterSystems IRIS Cloud SQL and IntegratedML Contest – a great opportunity to have a discussion with the InterSystems Experts team as well as our contestants.
Winners' demo included!
Date & Time: Thursday, April 27, 12 pm EDT | 6 pm CEST
Join us to learn more about winners' applications and to have a talk with our experts.
➡️ REGISTER TODAY
See you all at our virtual meetup!
Announcement
Anastasia Dyubaylo · Sep 13, 2022
Hi Developers,
We have another great opportunity for you to join us in Germany for a Conference for Data Scientists, Data Engineers and Data Teams that will be held in Karlsruhe!
⏱ Date: 20 – 21 September 2022
📍Venue: IHK Karlsruhe, Lammstr. 13-17, 76133 Karlsruhe, Germany
Our speaker Markus Mechnich will be talking about (Smart) Data Fabrics during the session titled “Putting an end to data silos: making better decisions, pain-free”. He will discuss the challenge of accessing and merging different systems that store data that is rarely homogeneous and/or synchronous enough for a comprehensive evaluation and using it to make sound business decisions.
✅ REGISTER HERE
We look forward to welcoming you to Karlsruhe!
Announcement
Larry Finlayson · Nov 16, 2022
Managing InterSystems Servers December 5-9, 2022 9:00am-5:00pm US-Eastern Time (EST)
This five-day course teaches system and database administrators how to install, configure and secure InterSystems server software, configure for high availability and disaster recovery, and monitor the system. Students also learn troubleshooting techniques.
This course is applicable to both InterSystems IRIS and Caché. Although the course is mostly platform independent, students can complete the exercises using either Windows or Ubuntu.
Self Register Here