The Security Package - Managing Roles Programmatically
We are back to %SYS once again! Since we covered managing users and resources in the last two articles, we can finally move on to roles. As you may have guessed, there are a lot of methods of managing them that you have already seen in our previous writings. However, we can still encounter key differences in this particular class.
Before we begin, bear in mind that this is another class that should not be manipulated through direct SQL access. In newer versions of IRIS, you will find a NoSQL trigger that will prevent you from doing that anyway. However, if you have an older version of Cache, remember to be careful!
Roles have name and description fields that must follow the same rules as corresponding properties in the resources class. The name has a maximum of sixty-four characters. It is not case sensitive, cannot contain a colon or a comma, and cannot start with a percent sign unless it is a system-defined role. The description can contain up to two hundred fifty-six characters and include commas and colons. It is there for you to provide a description of what the role is.
In addition to the abovementioned properties, roles also have a GrantedRoles property. It is a list of role names that are granted by this role. Suppose we had a role called NS1_Read that granted select permissions to all tables in the namespace NS1 and another role called NS2_Read that granted select permissions to all the tables in the namespace NS2. We could also create an All_Read role that would grant select permissions to all tables in both namespaces by giving it the granted roles NS1_Read and NS2_Read. While the latter can help us accomplish the same thing, it also requires a lot of extra work. Additionally, using the GrantedRoles property simplifies keeping changes to the roles in sync. It means that any alterations made to the granted roles will immediately be reflected in the All_Read role without the necessity of any supplementary modifications.
Roles are also related to resources. It creates a list of Security.Resource objects that we can iterate over (do not confuse it with the Security.Resources class we learned about in the last article). Let’s examine one long, powerful line of code to learn more:
for x=1:1:myrole.Resources.Count() {write myrole.Resources.GetAt(x).Name," ",myrole.Resources.GetAt(x).PermissionLogicalToDisplay(myrole.Resources.GetAt(x).Permission),!}
Assume that the variable myrole is any valid Security.Roles object. In this case, this loop will write out the name of each resource that the role grants along with the permission it gives to that role. It uses the Permission property’s LogicalToDisplay method because the Permission property is an integer, but it is easier to read if we convert it to its display value. If we had a role that granted use permission on the %Admin_Task resource, it would write out “%Admin_Task U”.
We will start exploring the methods by looking at the Get method. It will allow us immediately to find out some inconsistencies between Security.Roles and the classes we examined in our previous articles. In the other classes, the Get method took two arguments: a string containing the name of the object and a value passed by reference that returned the properties array. Yet, in this class, we can see the third argument that is passed by reference and returns the role object. Therefore, we can do the following:
set sc = ##class(Security.Roles).Get("NS1_Read",.props,.myrole)
It will set props to the properties array and myrole to the role object. You will notice that the properties array only contains three properties for a role. They are Description, GrantedRoles, and Resources. Within this array, props(“Resources”) is returned as a string containing a comma-separated list of resource:permission pairs with the permission shown as its display value. GrantedRoles is also a comma-separated list of roles.
There is also a GetProps role that takes two arguments and looks ver similar to our typical Get method. Unfortunately, the arguments are not the same. Unlike many other methods in these classes, the first argument is the object handle for the role rather than a string containing its name. The second one is a value passed by reference that will contain the properties array.
The values of the properties array come in the format accepted by the Create method. However, it cannot accept the entire array. Instead, it accepts four strings: a name, description, resources, and granted roles, respectively.
Suppose I had the following properties from my NS1_Read role:
props("Description")="Read Role for NS1"
props("GrantedRoles")=""
props("Resources")="%DB_NS1:R"
If I wanted to use it to create the NS2_Read role that would give write permission to the database, I could do the following:
set newprops("Description")= $REPLACE(props("Description"),"NS1","NS2")
set newprops("GrantedRoles") = props("GrantedRoles")
set newprops("Resources")=$REPLACE(props("Resources"),"NS1","NS2")
set sc = ##class(Security.Roles).Create("NS2_Read", newprops("Description"), newprops("Resources"), newprops("GrantedRoles"))
It would create a new role called “NS2_Read” with the description “Read Role for NS2” and read permission on the %DB_NS2 resource. To create the All_Read role, I could use:
set sc = ##class(Security.Roles).Create(“All_Read",“Combined Read role for NS1 and NS2","","NS1_Read,NS2_Read")
This role does not have any resource permissions. Nonetheless, since it grants the user NS1_Read and NS2_Read, it still confers all the resource permissions from both roles
From now on, all the following methods should look awfully familiar:
- set sc = ##class(Security.Roles).Modify("NS2_Read",.props) would modify the NS2_Read role according to the properties array passed to it.
- set sc = ##class(Security.Roles).Delete("NS2_Read") would delete the NS2_Read role and return a status.
- set exists = ##class(Security.Roles).Exists("NS2_Read",.myrole,.sc) would check if the NS2_Read role exists, return the role object as myrole if it does, set a status code in sc, and return a boolean that can tell you whether or not the role exists. Remember, if the function returns a 0, you need to check sc to clarify if it actually does not exist or if there was an error determining its existence!
There is also a Rename method that other classes did not have. It allows you to rename a role object and update that role name in all relevant tables by passing the new name first and then the old one. It means that if I accidentally named my role NS2_Reed, I could fix that by using the next line:
set sc = ##class(Security.Roles).Rename(“NS2_Read",“NS2_Reed")
The usual import and export methods are present here as well. In the Export method in this class, you need to pass the file name as a string and the numexported by reference, as usual. After that, you can enter a comma-separated list of roles to export only specified ones or an asterisk for all of them. Then, you should type in a comma-separated list of resource names to export only the roles that contain those resources or an asterisk for all of them. Next, you must pass a boolean specifying whether or not to export the SQL privileges. Finally, you can enter another number by reference to return the number of SQL privileges exported. Remember that the Database roles starting with %DB_ will never be exported. However, if you wish to export all roles granting the %DB_NS1 resource along with all associated SQL privileges, use the following:
set sc = ##class(Security.Roles).Export(“MyRoles.xml", .numexported, “*", “%DB_NS1", 1, .privsexported)
Once you have that file, if you want to import those roles into another system, call the next command:
set sc = ##class(Security.Roles).Import(“MyRoles.xml", .numimported, 1, .privsimported)
It will import all those roles and their associated SQL privileges. It will also set numimported to the number of imported roles and privsimported to the number of imported SQL privilege records.
Speaking of SQL privileges, we have not yet reviewed adding SQL table permissions to a role. Still, it is a crucial step! I bet, in most cases, you have done it using the System Management Portal.
I have to warn you that this piece is very different from other classes. We have to use the SQL grant command here. To do it in your code, you can employ embedded or dynamic SQL to run the query. Depending on how you utilize this command, you can make it quite specific or really broad. Consider the following SQL statement, but do not try to use it:
GRANT * ON * TO *
It grants all seven basic privileges (%ALTER, DELETE, INSERT, SELECT, UPDATE, INSERT, and EXECUTE) to all tables to all existing users. In fact, if we replace the last asterisk with _PUBLIC, these permissions will also be granted to all future users. We will need to define access in a much more narrow way. For instance:
GRANT SELECT ON SCHEMA SQLUser TO NS1_Read
It will grant the NS1_Read role permission to select from every table in the SQLUser schema in whatever namespace the command was run in. If we had an SQLUser.People table and only wanted to grant access to it, we would use the following line:
GRANT SELECT ON SQLUser.People TO NS1_Read
If you want to specify column-level permissions, you have to include a comma-separated list of column names after each permission. IIf that table has fields called FirstName and LastName, and we want the role to be able to update them while still allowing it to select the entire table, use the line below:
GRANT SELECT,UPDATE(FirstName,LastName) ON SQLUser.People TO NS1_Read
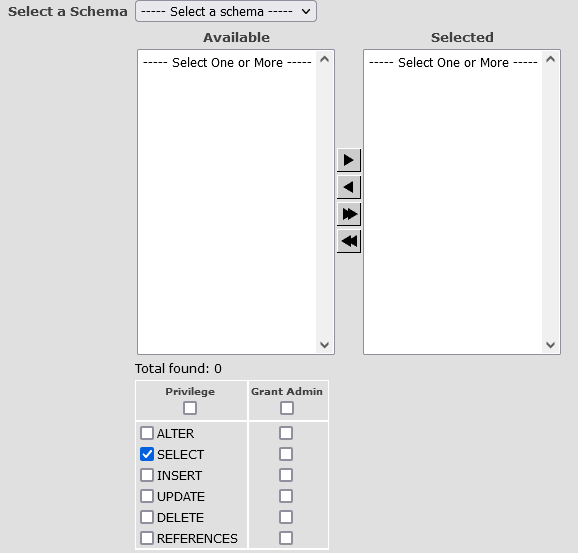
For any of these commands, if we add WITH GRANT OPTION at the end, we will enable the user to grant the same permissions to others. It is identical to checking the “Grant Admin” box in the System Management Portal. If you have several tables or roles in mind, you can create a comma-separated list to grant those privileges all at once.
The grant command can also grant administrative privileges to roles. You might be familiar with this list from the SQL Privileges tab of the Edit Roles page in the System Management Portal.

These are granted in pretty much the same way but without the ON part of the command. For example:
GRANT %CREATE_TABLE TO NS1_Read
You can add WITH ADMIN OPTION to that grant command to allow the user to give the others that permission. It is the equivalent of using the “Assign with Grant Option” in the System Management Portal.
Now that we have set up users, resources, and roles, watch out for our next article: applications!
Comments
This is very helpful, thanks David!
Great article!
Some notes:
- SQL grants should be granted in a namespace with an SQL object.
- SQL grants can be granted only to users and roles that exist.
Thank you David for writing this up.
Will the Schema-level GRANT command (e.g., GRANT SELECT ON SCHEMA SQLUser TO NS1_Read) also provide "SELECT" privileges to the Views and any Stored Procedures in the schema or only to the tables?
Thanks again