The Security Package - Managing Resources Programmatically
Welcome back to %SYS! If you read the first article in this series, you must have already seen how to manage your users through the Security.Users class programmatically. Today, we will move on to Resources! Many of the classes in this package use a very similar set of methods. That means that the more we cover, the more familiar you will feel about the subject.
Users are a bit complicated and have a lot of options. Resources, on the other hand, are much simpler. They have names that can be chosen from almost anything you can come up with. However, there are a handful of rules to keep in mind. The name must contain no more than sixty-four characters. It cannot contain colons or commas. This happens because colons and commas would throw off the GetResourceSet method from Security.Users, which returns a comma-separated list of resource:permission pairs. Commas and colons in a resource name would make that returned string impossible to parse reliably. If it contains an underscore, the next character after if cannot be a percent sign (%). The names are not case sensitive. For that reason, you cannot have one named %MyResource and another named %myresource. Aside from those few things, you can give them any name you want, and unless you are Elon Musk, you can probably come up with a name that does not include a few specific characters!
There is also a description field that can fit up to two hundred fifty-six characters. This one does not have any restrictions besides the length, so it is there for you to specify what this resource is for. You should also take into account that there are some system-defined resources out there, and for those ones, you will not be able to change the description.
Additionally, there is a PublicPermission property. You can use it to define what permissions unauthenticated users have for this resource. This property is a Security.Datatype.Permission field, which is, in fact, an integer. Yet, its usage is based on three binary digits. This is why it can cause some confusion for those not used to working with binary.
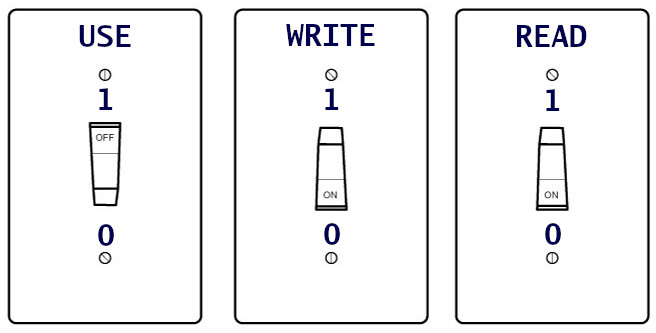
To visualize this, imagine that you have three light switches on a wall. The one on the right turns the Read permission on and off. The middle one is for the Write permission. The switch on the left toggles the Use permission. Each switch is positioned either on (a binary 1) or off (a binary 0).
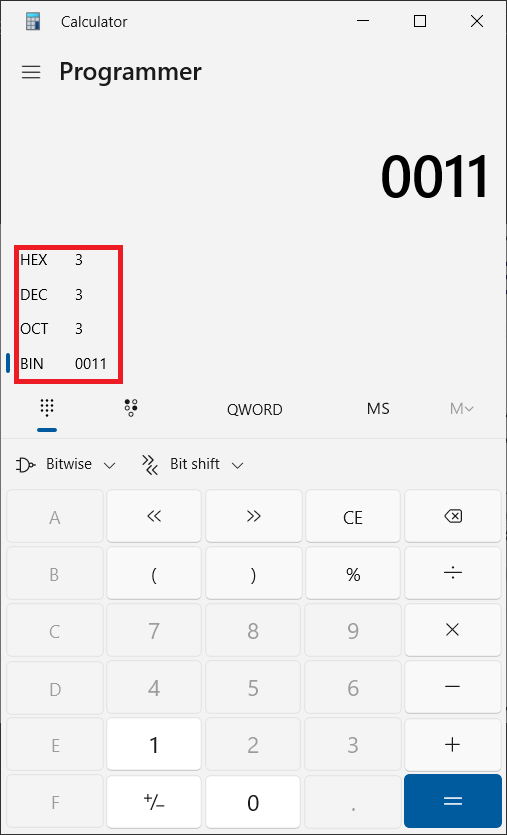
If I want the public to have both read and write permissions, I have to turn on the two switches on the right. This would be 011 in binary. As an integer, that would be a 3. If you need some help converting between those two values, even the standard Windows calculator can do the job. Just bring it up, click on the menu, and choose Programmer mode. Along the left side, click on BIN to switch to binary and enter your binary number. You will see right away how that binary number is represented in hexadecimal, decimal, and octal forms as well. The one you need to set will be the decimal value.
 Of course, if you do not feel like playing with figuring out the binary representation of the permissions you need, you can also set this property to “RW” or "READ,WRITE”. Yet, I should warn you that in that case, you will miss out on that fun detour into binary! For all three permissions, it would look like “RWU” or “READ,WRITE,USE”.
Besides the abovementioned properties, there is also a Type one. Although you do not have to set it for yourself, it can tell you what kind of resource this is. If you query User.Resources in the %SYS namespace in the System Management Portal, you will see that this column says things like Application, System, Service, or Database. It is not supposed to be set for user-defined resources. It means that if you switch the query to Logical mode rather than Display one, you will see a number since it is, again, a binary representation behind the scenes.
Resources have the same Create, Exists, Modify, Get, Delete, Export, and Import functions that the Users class has. The bad news is that the Create method does not allow you to pass an array as an argument, so you will have to remember in what order the properties go. The good news is that there are only a few arguments to pass. They are the name, description, and public permissions respectively. The type can also be passed here. However, it is only supposed to be used for the system initialization and not for user-defined resources. So if I did this:
set sc = ##class(Security.Resources).Create("Test","Test Resource","RWU")
I would get back a %Status indicating that a resource called “Test” with a description of “Test Resource” and public permissions of read, write, and use were created. Wait! What? I only wanted the public to have the read permission. Let's fix it by modifying it with the following:
if ##class(Security.Resources).Exists("Test"){
set sc = ##class(Security.Resources).Get("Test",.props)
set props("PublicPermission") = "R"
set sc = ##class(Security.Resources).Modify("Test",.props)
}
First, we need to make sure that the resource exists. Then, we should use the Get method to move the properties of the resource into an array. After that, the PublicPermission property in the array will be changed to just “R”. The next step will be to call the Modify method to update the resource. Of course, depending on your programming needs, you may want to check those %Status objects that get returned to verify if they are successful. All of this should look quite familiar to you if you read our previous article on Users.
The Delete method in this class works similarly to the one in the Users class as well. All you need to do is just pass it the name of a resource. In turn, it will delete that resource (reminder: names are not case sensitive) and also remove it from all of the roles, applications, and databases that use it for access permissions. That could result in unintended consequences if the Resource was in use somewhere, so make sure you know exactly how it was employed before deleting it. That is precisely what the InUse method was designed for! You can start by calling the following using:
set sc = ##class(Security.Resources).InUse("Test",.inuse,.roles,.dbs,.apps)
The four arguments that are passed by reference will hold some valuable information. The inuse variable will be a one or a zero telling you whether the resource is in use or not. If it’s a 0, it’s not used anywhere, but if it’s a 1, something is using it. In that case, one or more of the roles, dbs, or apps variables will not be null. Instead, they will have a list of the roles, databases, and applications that use that resource. If we want to make sure we are not going to delete a resource that is currently in use, we might try the following:
set sc = ##class(Security.Resources).InUse("Test",.inuse,.roles,.dbs,.apps)
if inuse = 0{
set sc = ##class(Security.Resources).Delete("Test")
}
So far, only the Export and Import functions are left for us to show you. They are, again, very similar to those in the Users class. The simplest way to export them is to call it without any arguments:
set sc = ##class(Security.Resources).Export()
It will create a file called ResourcesExport.xml in the mgr subfolder in your install location with every resource in your system. There are some other options, though.
set sc = ##class(Security.Resources).Export("myexport.xml",.numexported,"*",1)
It will export all resources to a file named myexport.xml. After that, numexported will tell us the number of resources that were relocated. Since we provided a * for the third argument, it will export all resources regardless of their name. If we wish to export a specific list of resources, we can provide a comma-separated list of names here instead.
The number 1 at the end indicates that we want to export all resources with a read public permission. In this case, we do have to use the number. The letters and words we used in the Create and Modify methods will not work here. There are two critical things to keep in mind regarding this argument. First, it will include all resources with the specified permissions, even if they have more than just that permission. Telling it to export the ones with the read permission will result in exporting those with read; read and write; read and use; or read, write, and use. Second, if you only want Resources without public permissions, you should use the number 512.
When you want to import this file later, you can use the next line:
set sc = ##class(Security.Resources).Import("myexport.xml",.numimported,1)
It will import all of the resources from the XML file, and numimported will tell you the number of resources that were imported. If you set the last argument to 0, it will actually not import any resources. However, numimported will inform you how many of them would have been imported if the last flag had been a 1.
There is a query in this class, too. It is called List. You can use it as follows:
set stmt = ##class(%SQL.Statement).%New()
set sc = stmt.%PrepareClassQuery("Security.Resources","List")
set rs = stmt.%Execute("DB",-1,-1,1)
When executing this query, the first argument is a name or a part of the name you are looking for. The second number is the public permissions number again. The third one should always be a -1. The last is set to 0 by default, and if left so, it will search for resources with a name starting with the given name string. If you change it to a 1, it will look for resources that contain the name string you provided. This query returns the Name, Description, PublicPermission, Type, and ResourceType. The Type and ResourceType are both the Type property, but Type is the logical value, whereas ResourceType is the display string for it.
That is all I wanted to share with you about the resource class. Watch out for future articles including those regarding the roles package!