Node.js: create a basic web app with React - part 2
Developing a Full-Stack JavaScript web app with Caché requires you to bring together the right building blocks. In the previous part, we created a basic front-end React application. In the second part of this article series I will show how to choose the right back-end technology for your application. You will see Caché allows you to use many different approaches to link your front-end to your Caché server, depending on your application's needs. In this part we will set up a back-end with Node.js/QEWD and CSP/REST. In the next part we will enhance our basic web app and connect it to Caché using these technologies.
Caché is a very powerful and flexible multi-model database and application server with a rather unique approach. It allows to connect your application front-end using many different technologies. This is a great advantage, but can make the decision which back-end technology more difficult.
As a developer, you want to choose a technology that will exist in the long term, makes you productive during development, keeps your codebase stable and allows your application to run on as many devices and platforms as possible using the same source code.
These requirements bring you these days inevitably to applications written using JavaScript because it's the language used in browsers (causing it to be available on all kinds of platforms and making it so popular). With the inception of Node.js, it became possible to use JavaScript server-side too, allowing a developer to use the same language at the front- and the back-end.
Basically, you can write a website or web app in two different ways: using server-side or client-side (rendering) technology. Server-side rendering is an excellent choice for a typical website, while client-side rendering is the best choice when you write a web app (e.g. because it needs to work offline too). Caché's CSP pages is a good example of a server-side technology, while React is a client-side technology (while it can be used these days for server-side rendering as well). This is a choice you'll have to make and depends entirely on your application.
For now, we will concentrate on writing web apps, I will not discuss CSP pages here.
At the back-end, you'll also need to choose which technology to use for your web app: will you just use Caché's application server and use CSP/REST calls or will you use Node.js as your application server working in front of Caché? Using Node.js as your application server gives you the best of both worlds: it allows you to write your back-end code in JavaScript with Caché as a database and application server behind it.
What makes this combination so powerful?
- use the same language (JavaScript) at the front- and the back-end
- use all existing standard Node.js modules in your applications (extending your application functionality to all possible kinds of external devices and services you can imagine)
- allows you to re-use your existing COS code using very small function wrappers
- integrate your app with other standard services and protocols
- ...
Writing your apps with these technologies doesn't limit you to one technology: in fact, you can combine them all in the same application!
Next question is how you can link your front-end to your back-end. These days, you have different possibilities, each with their own (dis)advantages:
- WebSockets: creates a bi-directional (stateful) channel to your back-end and your server can "push" a message to your front-end, your app doesn't need to initiate a request first. This is an excellent choice for internal applications with a stable network connection. The Node.js's socket.io library also provides "graceful degradation" by providing a fall-back to Ajax calls.
- REST: your front-end is loosely coupled to your back-end (stateless); no bi-directional communication possible, the app has to initiate each request. This is a good choice for applications not requiring sessions, unstable networks, ...
- Ajax: is still widely used, also used as a fall-back for WebSocket connections
As a first example, I will introduce a Node.js back-end using the QEWD module:
- creates a secure communications channel between you web app and the back-end through WebSockets by default using the underlying socket.io library and allows you to switch to Ajax mode transparently (without requiring you to change your application code!)
- connects your application code at the back-end to your Caché database
- also contains a powerful standard Express REST server, providing you with REST services in the same back-end server, also allowing you to create federated calls to underlying remote servers and aggregating everything in one single response (even allowing you to intercept and modify the response to your own custom needs!)
- is completely modular and integrated with existing Node.js modules - allows you to use all other Node.js modules in your applications - it even allows you to replace the Express server by another one, e.g. Ember.js
- greatly simplifies code development in the back-end by solving the problem of asynchronous coding in JavaScript: allows you to write your code completely synchronous
- creates a multi-processing back-end for you with as many Node.js processes as needed - functionality Node.js itself doesn't provide you by default
- allows you to use any client-side (front-end) framework like React, Angular, ExtJS, Vue.js, ...
Before we start, one more important note: in part 1 we built a small React demo app using create-react-app. You noticed that this module contains a Node.js development server running at localhost:3000. It's important to note that this server is only meant for the front-end - the QEWD back-end server we will set up here is a completely different back-end (application) server running separately on a different port (typically on localhost:8080 for development). During development, both the React development server at port 3000 and the QEWD application server at port 8080 will be running on the same machine, don't be confused by both servers! In production, the situation will be different: your React app will be running in the client's browser and your QEWD server will be listening on your Caché server for client connections coming in.
I'll show you now here all steps to get you started for our React example app.
First, open a Windows command prompt to install QEWD on your system:

When installation finishes, you'll see a couple of warnings you can safely ignore. Note how the qewd module is using existing Node.js modules as building blocks (take a look inside the C:\qewd\node_modules folder). The qewd-monitor module will be used later to monitor your QEWD server and the cors module will be needed for REST requests.
QEWD needs to connect to Caché, so we need to copy the cache.node connector we used in the first Node.js Caché test script to C:\qewd\node_modules. This will allow QEWD to start our Node.js child processes that will connect to Caché.
We only need to create a small JavaScript startup script to launch the QEWD application server. First, add the C:\qewd project folder to your Atom editor. Next, isnide the C:\qewd folder, create a new qewd-start.js file and open it to edit.
Copy/paste the following code in this file and save it:
// define the QEWD configuration (adjust directories if needed)
let config = {
  managementPassword: 'keepThisSecret!',
  serverName: 'My first QEWD Server',
  port: 8080,
  poolSize: 1,
  database: {
    type: 'cache',
    params: {
      path:"C:\\InterSystems\\Cache\\Mgr",
      username: "_SYSTEM",
      password: "SYS",
      namespace: "USER"
    }
  }
};
// include the cors module to automatically add CORS headers to REST responses
let cors = require('cors');
// define the QEWD Node.js master process variable
let qewd = require('qewd').master;
// start the QEWD server now ...
qewd.start(config);
// define the internal QEWD Express module instance
let xp = qewd.intercept();
// define a basic test path to test if our QEWD server is up- and running
xp.app.get('/testme', function(req, res) {
  console.log('*** /testme query: ', req.query);
  res.send({
    hello: 'world',
    query: req.query
  });
});
* For a complete introduction in the QEWD application server for Node.js/Caché, I recommend to check out an read the complete step-by-step documentation under the "Training" tab at the top.
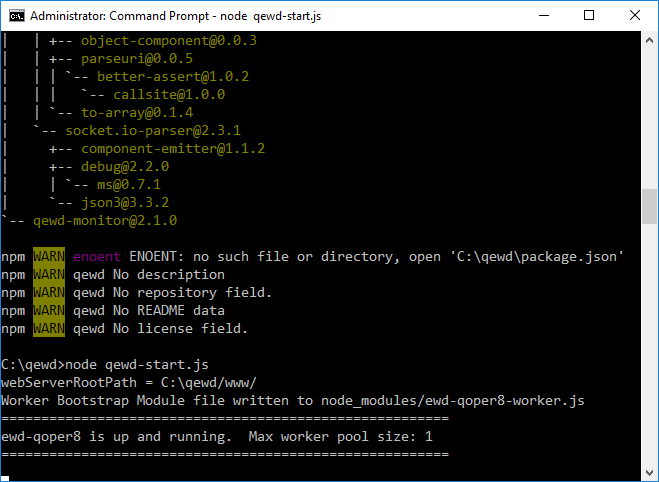
Now we can start our QEWD application server on the command line:
If you get warnings from Windows firewall, give the Node.js process access to the network.
Now open Chrome, and install the Advanced REST client (ARC) extension (app) to debug REST requests we will launch to our application server.
Open a new tab page and click on "Apps" in the toolbar. You'll see the new extension is available there. Click on the tile to launch this ARC app.
Now enter the url http://localhost:8080/testme?nodejs=hot&cache=cool in the request text line at the top and watch the response from de QEWD/Express module:

Congratulations! If you see this response, your QEWD server was started successfully and the Express module inside is working too!
Until now, we still didn't connect to Caché yet: we only tested the QEWD master process where all requests will come in. It's listening for WebSocket connections and the Express module is ready to serve REST requests.
The first option to access our back-end we will implement now is through the QEWD REST server (see documentation): create an testrest.js module file inside C:\qewd\node_modules
module.exports = {
  restModule: true,
  handlers: {
    isctest: function(messageObj, finished) {
      // this isctest handler retrieves text from the ^nodeTest global and returns it
      let incomingText = messageObj.query.text;
      let nodeTest = new this.documentStore.DocumentNode('nodeTest');
      let d = new Date();
      let ts = d.getTime();
      nodeTest.$(ts).value = incomingText;
      finished({text: 'You sent: ' + incomingText + ' at ' + d.toUTCString()});
    }
  }
};
Save this file and edit the qewd-start.js file in C:\qewd. We need to add an endpoint here for our new REST module:
// define the QEWD configuration (adjust directories if needed)
let config = {
  managementPassword: 'keepThisSecret!',
  serverName: 'My first QEWD Server',
  port: 8080,
  poolSize: 1,
  database: {
    type: 'cache',
    params: {
      path:"C:\\InterSystems\\Cache\\Mgr",
      username: "_SYSTEM",
      password: "SYS",
      namespace: "USER"
    }
  }
};
// include the cors module to automatically add CORS headers to REST responses
let cors = require('cors');
// define the QEWD Node.js master process variable
let qewd = require('qewd').master;
// start the QEWD server now ...
qewd.start(config);
// define the internal QEWD Express module instance
let xp = qewd.intercept();
// define a basic test path to test if our QEWD server is up- and running
xp.app.get('/testme', function(req, res) {
  console.log('*** /testme query: ', req.query);
  res.send({
    hello: 'world',
    query: req.query
  });
});
// define REST endpoint for /testrest requests
xp.app.use('/testrest', cors(), xp.qx.router())
The line we added will route all requests beginning with the /testrest path to our testrest.js module. To activate the new route, we need to restart the QEWD server by pressing Ctrl-C in the command prompt window and restart it:

* Note that you can even restart a QEWD server with clients connected in case (not recommended on a busy system): it will automatically resume/reconnect all client connections. Btw, there's also a easier way to add/(re)define routes dynamically on a running QEWD server; this requires a small routing module which gives you more flexibility without the need to stop the QEWD server.
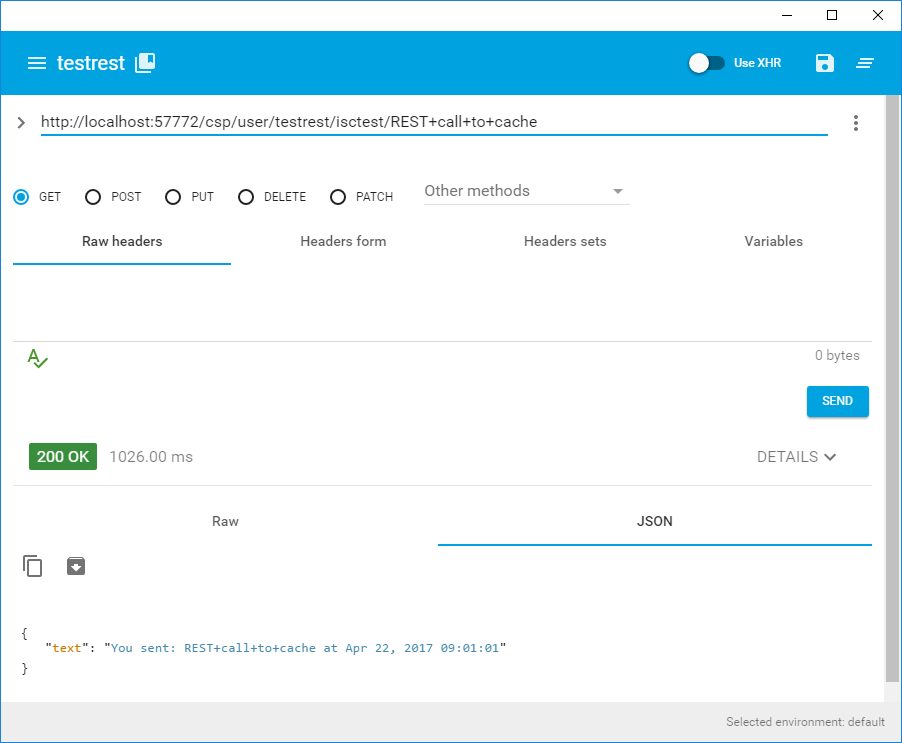
Now return to the ARC REST client and launch a new request to http://localhost:8080/testrest/isctest?text=REST+call+to+cache

In the command prompt where the QEWD server is running, you'll see messages appear from the incoming call:

You see that QEWD has now started a worker process for this request. Why? The master process (the Express server) receives your request and hands it over to the QEWD Express cors() middleware first to add CORS headers and next to the QEWD/REST routing function xp.qx.router() this time which adds the request to the request queue and starts a child process (the worker). These workers actually handle your requests and process your application code (in testrest.js). This allows multi-processing of requests, as QEWD can start as many workers as needed.
In the console output, you probably noticed the master process received the REST request and handed the request over to the worker. The worker loads your application module, calls the right request handler and returns the response.
Now that we defined already a QEWD REST endpoint, we will now add a second option to call our back-end using WebSockets: create a test.js module file in C:\qewd\node_modules to process requests (messages) coming in through WebSocket connections:
module.exports = {
  handlers: {
    isctest: function(messageObj, session, send, finished) {
      // get the text coming in from the message request
      var incomingText = messageObj.params.text;
      // instantiate the global node ^nodeTest as documentStore abstraction
      let nodeTest = new this.documentStore.DocumentNode('nodeTest');
      // get the current date & time
      let d = new Date();
      let ts = d.getTime();
      // save the text from the request in the ^nodeTest global (subscripted by the current timestamp)
      nodeTest.$(ts).value = incomingText;
      // return the response to the client using WebSockets (or Ajax mode)
      finished({text: 'You sent: ' + incomingText + ' at ' + d.toUTCString()});
    }
  }
};
This request handler is nearly the same as the REST request handler, however you'll notice some subtle differences: in the handler's function parameters, a session object and a send() method is available now. The send() method allows the back-end to send "push" messages to the front-end and we also have a session object now because WebSocket connections are stateful.
This WebSocket request handler can't be tested using the ARC tool, because we need to set up a WebSocket connection to test this. You'll see how this works in the next part where we will enhance our React front-end app to start a WebSocket connection to our QEWD back-end.
For more detailed documentation and training about how the QEWD/Express server works, I strongly recommend to check out and read the complete step-by-step documentation under the "Training" tab.
The third option to connect to our back-end is using CSP/REST calls: go to the System portal and in System management, go to Security - Applications - Webapplications and define a new Web application (see also the CSP/REST documentation):

Open Caché Studio and create an App.TestRestHandler class in the USER namespace and add this code:
Class App.TestRestHandler Extends %CSP.REST
{
  Parameter HandleCorsRequest = 1;
  XData UrlMap
  {
    <Routes>
      <Route Url="/isctest/:text" Method="GET" Call="GetIscTest"/>
    </Routes>
  }
  ClassMethod GetIscTest(text As %String = "") As %Status
  {
    #Dim e as %Exception.AbstractException
    #Dim status as %Status
    Try {
      Set d = $now()
      Set ts = $zdt(d,-2)
      Set ^nodeTest(ts) = text
      If $Data(%response) Set %response.ContentType="application/json"
      Write "{"
      Write " ""text"" : ""You sent: ",text," at ",$zdt(d,5,1),""""
      Write "}"
    } Catch (e) {
      Set status=e.AsStatus()
      Do ..ErrorHandler(status)
    }
    Quit $$$OK
  }
  ClassMethod ErrorHandler(status)
  {
    #Dim errorcode, errormessage as %String;
    set errorcode=$piece(##class(%SYSTEM.Status).GetErrorCodes(status),",")
    set errormessage=##class(%SYSTEM.Status).GetOneStatusText(status)
    Quit ..ErrorHandlerCode(errorcode,errormessage)
  }
  ClassMethod ErrorHandlerCode(errorcode, errormessage) As %Status
  {
    Write "{"
    Write " ""ErrorNum"" : """,errorcode,""","
    Write " ""ErrorMessage"" : """,errormessage,""""
    write "}"
    If $Data(%response) {
      Set %response.ContentType="application/json"
    }
    quit $$$OK
  }
}
* Thanks to Danny Wijnschenk for his CSP/REST example
Let's test this REST back-end too using ARC:
Congratulations! We have created three possible ways of connecting to our Caché back-end:
- using the Node.js/QEWD/Express application server through REST calls
- using the Node.js/QEWD/Express application server through WebSockets (with optional fall-back to Ajax calls)
- using the CSP/REST gateway using Caché as application server via CSP/REST handler classes
As you see, with Caché there are many ways to reach our goal. You can decide which option works best for you.
If you (or most of your development team) are familiar with JavaScript and you want to develop your application using the same language with powerful JavaScript frameworks at the front-end and/or your application needs features or external services already available in Node.js modules, then a Node.js application server in front of Caché is your best option because you'll have the best of both worlds and you can keep and re-use your existing code, classes and SQL in Caché. The QEWD application server is specifically designed for for writing enterprise applications with Caché and is your best option here to integrate front- and back-end.
If your front-end is written using plain HTML, you're not using powerful JavaScript frameworks and your application only needs REST calls to Caché, you can connect directly to Caché using CSP/REST. Just remember that you can't use all readily available Node.js modules in this case.
Now we're ready for part 3: we will connect our React app at the front-end to our three posible back-ends!
Comments
Very nice article, Ward!
For anyone wanting to create a Cache-based REST / Web Service back-end, QEWD + Node.js is definitely worth considering as a modern, lightweight but very high-performance, robust and scalable alternative to CSP. I'd recommend that anyone interested should also go through this slide deck:
https://www.slideshare.net/robtweed/ewd-3-training-course-part-31-ewdxp…
Regarding the installation of QEWD, it's worth pointing out that the Github/NPM repository includes an installers folder which contains a number of installer scripts for Linux-based systems. There's even one for QEWD + Linux + Cache, although it shouldn't be run as a script since you will probably already have Cache installed - use it instead as a guide for the commands you need to run in order to install the various bits and pieces.
See https://github.com/robtweed/qewd/tree/master/installers
There's even an installer for the Raspberry Pi, although that can't use Cache (sadly!)
Another alternative is to use the Docker appliance, but it would need to be adapted to work with Cache. See https://github.com/robtweed/qewd/tree/master/docker
I'm deeply impressed.
should have seen this earlier.
... "keep and re-use your existing code, classes and SQL in Caché."
just for ignorace: How am i supposed to use SQL via Node.js?
To use SQL from Node.js - keeping the advantages of both worlds (JS & COS) - I created a small helper module you can use in your own Node.js handler modules.
The way it works is:
-
you call a function/method in COS from your Node.js handler, passing all necessary parameters in
-
the helper module puts them in a temp global (this means you don't have any limits on the amount of data you pass to Caché)
-
your COS code uses the input data (parameters) in the $$$jsData("params", ...) global (I defined a macro for readability)
-
your code fills the $$$jsData("json", ...) global with the result data (remember that JSON maps 1-to-1 on a Caché global)
- you get the response back in you Node.js handler and you have your result data available as a JSON object ...
I released a new module for this: qewd-cos - it's explained in detail in the module how it works with a working example. This module defines a standardized way of calling your own functions in Caché - take a look at the source code to see how you can call Caché functions and return standard responses in QEWD.
Btw, you can also use QEWD in the other direction: you can call from your COS code your own QEWD REST (or microService) endpoints using HTTP calls using ##class(%Net.HttpRequest). This is e.g. very useful to send e-mails using standard NPM modules allowing you to use templating engines (like handlebars, ...). It allows you to create more advanced e-mails much easier. Or more in general, to make external Node.js modules/functionality available in Caché which is not built-in.
thanks for the inspiration - that sounds very interesting, must have a closer look at that
Hi, Ward! This looks very interesting.
Do you have an example of sending e-mails using NPM from COS?
Hi Evgeny, I'm using this technique for sending e-mails (using a template engine like handlebars) in my own applications, but I don't have an easy example stripped-down to the bare essentials right at hand. But I'll write an example post how to do this as soon as I have some spare time and I'll add a link to it in this post too.
start QEWD .png)
That's a code sequencing issue. Change the end of Ward's qewd-start.js file to this:
let qewd = require('qewd').master;
// define the internal QEWD Express module instance
// start the QEWD server now ...
qewd.start(config);
let xp = qewd.intercept();
// define a basic test path to test if our QEWD server is up- and running
xp.app.get('/testme', function(req, res) {
console.log('*** /testme query: ', req.query);
res.send({
hello: 'world',
query: req.query
});
});
and it should work for you
@Rob Tweed thanks for the correction: of course, the qewd.start must be done before the qewd.intercept - my mistake. I changed the article text to reflect this change!
Thanks for sharing! Really helpful.