InterSystems Data Platforms and performance - Part 5 Monitoring with SNMP
InterSystems Data Platforms and performance - Part 5 Monitoring with SNMP
In previous posts I have shown how it is possible to collect historical performance metrics using pButtons. I go to pButtons first because I know it is installed with every Data Platforms instance (Ensemble, Caché, …). However there are other ways to collect, process and display Caché performance metrics in real time either for simple monitoring or more importantly for much more sophisticated operational analytics and capacity planning. One of the most common methods of data collection is to use SNMP (Simple Network Management Protocol).
SNMP a standard way for Caché to provide management and monitoring information to a wide variety of management tools. The Caché online documentation includes details of the interface between Caché and SNMP. While SNMP should 'just work' with Caché there are some configuration tricks and traps. It took me quite a few false starts and help from other folks here at InterSystems to get Caché to talk to the Operating System SNMP master agent, so I have written this post so you can avoid the same pain.
In this post I will walk through the set up and configuration of SNMP for Caché on Red Hat Linux, you should be able to use the same steps for other *nix flavours. I am writing the post using Red Hat because Linux can be a little more tricky to set up - on Windows Caché automatically installs a DLL to connect with the standard Windows SNMP service so should be easier to configure.
Once SNMP is set up on the server side you can start monitoring using any number of tools. I will show monitoring using the popular PRTG tool but there are many others - Here is a partial list.
Note the Caché and Ensemble MIB files are included in the Caché_installation_directory/SNMP folder, the file are: ISC-CACHE.mib and ISC-ENSEMBLE.mib.
Previous posts in this series:
- Part 1 - Getting started on the Journey, collecting metrics.
- Part 2 - Looking at the metrics we collected.
- Part 3 - Focus on CPU.
- Part 4 - Looking at memory.
Start here...
Start by reviewing Monitoring Caché Using SNMP in the Caché online documentation.
1. Caché configuration
Follow the steps in Managing SNMP in Caché section in the Caché online documentation to enable the Caché monitoring service and configure the Caché SNMP subagent to start automatically at Caché startup.
Check that the Caché process is running, for example look on the process list or at the OS:
ps -ef | grep SNMP
root      1171  1097  0 02:26 pts/1    00:00:00 grep SNMP
root     27833     1  0 00:34 pts/0    00:00:05 cache -s/db/trak/hs2015/mgr -cj -p33 JOB^SNMP
Thats all, Caché configuration is done!
2. Operating system configuration
There is a little more to do here. First check that the snmpd daemon is installed and running. If not then install and start snmpd.
Check snmpd status with:
service snmpd status
Start or Stop snmpd with:
service snmpd start|stop
If snmp is not installed then you will have to install as per OS instructions, for example:
yum -y install net-snmp net-snmp-utils
3. Configure snmpd
As detailed in the Caché documentation, on Linux systems the most important task is to verify that the SNMP master agent on the system is compatible with the Agent Extensibility (AgentX) protocol (Caché runs as a subagent) and the master is active and listening for connections on the standard AgentX TCP port 705.
This is where I ran into problems. I made some basic errors in the snmp.conf file that meant the Caché SNMP subagent was not communicating with the OS master agent. The following sample /etc/snmp/snmp.conf file has been configured to start agentX and provide access to the Caché and ensemble SNMP MIBs.
Note you will have to confirm whether the following configuration complies with your organisations security policies.
At a minimum the following lines must be edited to reflect your system set up.
For example change:
syslocation "System_Location"
to
syslocation "Primary Server Room"
Also edit the at least the following two lines:
syscontact  "Your Name"
trapsink  Caché_database_server_name_or_ip_address public
Edit or replace the existing /etc/snmp/snmp.conf file to match the following:
###############################################################################
#
# snmpd.conf:
#   An example configuration file for configuring the NET-SNMP agent with Cache.
#
#   This has been used successfully on Red Hat Enterprise Linux and running
#   the snmpd daemon in the foreground with the following command:
#
#	/usr/sbin/snmpd -f -L -x TCP:localhost:705 -c./snmpd.conf
#
#   You may want/need to change some of the information, especially the
#   IP address of the trap receiver of you expect to get traps. I've also seen
#   one case (on AIX) where we had to use  the "-C" option on the snmpd command
#   line, to make sure we were getting the correct snmpd.conf file.
#
###############################################################################

###########################################################################
# SECTION: System Information Setup
#
#   This section defines some of the information reported in
#   the "system" mib group in the mibII tree.

# syslocation: The [typically physical] location of the system.
#   Note that setting this value here means that when trying to
#   perform an snmp SET operation to the sysLocation.0 variable will make
#   the agent return the "notWritable" error code.  IE, including
#   this token in the snmpd.conf file will disable write access to
#   the variable.
#   arguments:  location_string

syslocation  "System Location"

# syscontact: The contact information for the administrator
#   Note that setting this value here means that when trying to
#   perform an snmp SET operation to the sysContact.0 variable will make
#   the agent return the "notWritable" error code.  IE, including
#   this token in the snmpd.conf file will disable write access to
#   the variable.
#   arguments:  contact_string

syscontact  "Your Name"

# sysservices: The proper value for the sysServices object.
#   arguments:  sysservices_number

sysservices 76

###########################################################################
# SECTION: Agent Operating Mode
#
#   This section defines how the agent will operate when it
#   is running.

# master: Should the agent operate as a master agent or not.
#   Currently, the only supported master agent type for this token
#   is "agentx".
#
#   arguments: (on|yes|agentx|all|off|no)

master agentx
agentXSocket tcp:localhost:705

###########################################################################
# SECTION: Trap Destinations
#
#   Here we define who the agent will send traps to.

# trapsink: A SNMPv1 trap receiver
#   arguments: host [community] [portnum]

trapsink  Caché_database_server_name_or_ip_address public

###############################################################################
# Access Control
###############################################################################

# As shipped, the snmpd demon will only respond to queries on the
# system mib group until this file is replaced or modified for
# security purposes.  Examples are shown below about how to increase the
# level of access.
#
# By far, the most common question I get about the agent is "why won't
# it work?", when really it should be "how do I configure the agent to
# allow me to access it?"
#
# By default, the agent responds to the "public" community for read
# only access, if run out of the box without any configuration file in
# place.  The following examples show you other ways of configuring
# the agent so that you can change the community names, and give
# yourself write access to the mib tree as well.
#
# For more information, read the FAQ as well as the snmpd.conf(5)
# manual page.
#
####
# First, map the community name "public" into a "security name"

#       sec.name  source          community
com2sec notConfigUser  default       public

####
# Second, map the security name into a group name:

#       groupName      securityModel securityName
group   notConfigGroup v1           notConfigUser
group   notConfigGroup v2c           notConfigUser

####
# Third, create a view for us to let the group have rights to:

# Make at least  snmpwalk -v 1 localhost -c public system fast again.
#       name           incl/excl     subtree         mask(optional)
# access to 'internet' subtree
view    systemview    included   .1.3.6.1

# access to Cache MIBs Caché and Ensemble
view    systemview    included   .1.3.6.1.4.1.16563.1
view    systemview    included   .1.3.6.1.4.1.16563.2
####
# Finally, grant the group read-only access to the systemview view.

#       group          context sec.model sec.level prefix read   write  notif
access  notConfigGroup ""      any       noauth    exact  systemview none none
After editing the /etc/snmp/snmp.conf file restart the snmpd deamon.
service snmpd restart
Check the snmpd status, note that AgentX has been started see the status line: Turning on AgentX master support.
h-4.2# service snmpd restart
Redirecting to /bin/systemctl restart  snmpd.service
sh-4.2# service snmpd status
Redirecting to /bin/systemctl status  snmpd.service
● snmpd.service - Simple Network Management Protocol (SNMP) Daemon.
   Loaded: loaded (/usr/lib/systemd/system/snmpd.service; disabled; vendor preset: disabled)
   Active: active (running) since Wed 2016-04-27 00:31:36 EDT; 7s ago
 Main PID: 27820 (snmpd)
   CGroup: /system.slice/snmpd.service
		   └─27820 /usr/sbin/snmpd -LS0-6d -f

Apr 27 00:31:36 vsan-tc-db2.iscinternal.com systemd[1]: Starting Simple Network Management Protocol (SNMP) Daemon....
Apr 27 00:31:36 vsan-tc-db2.iscinternal.com snmpd[27820]: Turning on AgentX master support.
Apr 27 00:31:36 vsan-tc-db2.iscinternal.com snmpd[27820]: NET-SNMP version 5.7.2
Apr 27 00:31:36 vsan-tc-db2.iscinternal.com systemd[1]: Started Simple Network Management Protocol (SNMP) Daemon..
sh-4.2#
After restarting snmpd you must restart the Caché SNMP subagent using the ^SNMP routine:
%SYS>do stop^SNMP()

%SYS>do start^SNMP(705,20)
The operating system snmpd daemon and Caché subagent should now be running and accessible.
4. Testing MIB access
MIB access can be checked from the command line with the following commands. snmpget returns a single value:
snmpget -mAll -v 2c -c public vsan-tc-db2 .1.3.6.1.4.1.16563.1.1.1.1.5.5.72.50.48.49.53

SNMPv2-SMI::enterprises.16563.1.1.1.1.5.5.72.50.48.49.53 = STRING: "Cache for UNIX (Red Hat Enterprise Linux for x86-64) 2015.2.1 (Build 705U) Mon Aug 31 2015 16:53:38 EDT"
And snmpwalk will 'walk' the MIB tree or branch:
snmpwalk -m ALL -v 2c -c public vsan-tc-db2 .1.3.6.1.4.1.16563.1.1.1.1

SNMPv2-SMI::enterprises.16563.1.1.1.1.2.5.72.50.48.49.53 = STRING: "H2015"
SNMPv2-SMI::enterprises.16563.1.1.1.1.3.5.72.50.48.49.53 = STRING: "/db/trak/hs2015/cache.cpf"
SNMPv2-SMI::enterprises.16563.1.1.1.1.4.5.72.50.48.49.53 = STRING: "/db/trak/hs2015/mgr/"
etc
etc
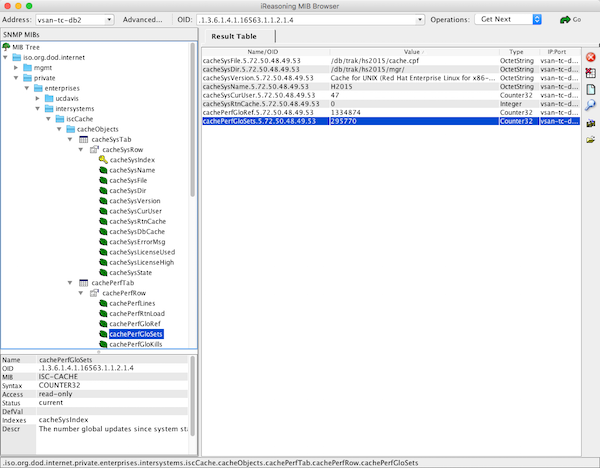
There are also several windows and *nix clients available for viewing system data. I use the free iReasoning MIB Browser. You will have to load the ISC-CACHE.MIB file into the client so it knows the structure of the MIB.
The following image shows the iReasoning MIB Browser on OSX.
Including in Monitoring tools
This is where there can be wide differences in implementation. The choice of monitoring or analytics tool I will leave up to you.
Please leave comments to the post detailing the tools and value you get from them for monitoring and managing your systems. This will be a big help for other community members.
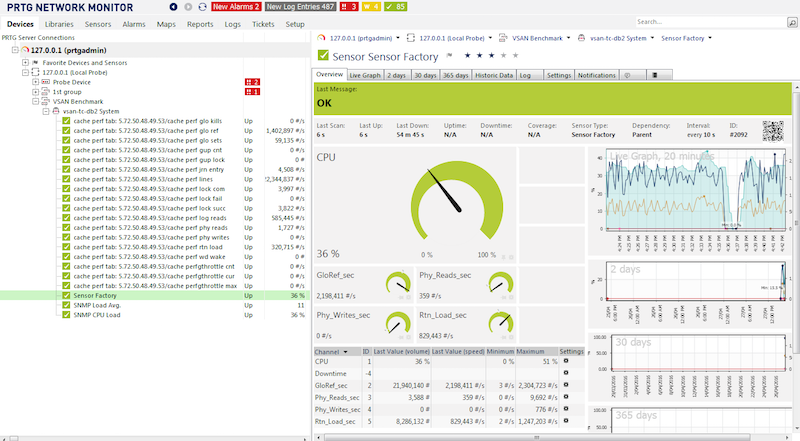
Below is a screen shot from the popular PRTG Network Monitor showing Caché metrics. The steps to include Caché metrics in PRTG are similar to other tools.
Example workflow - adding Caché MIB to monitoring tool.
Step 1.
Make sure you can connect to the operating system MIBs. A tip is to do your trouble-shooting against the operating system not Caché. It is most likely that monitoring tools already know about and are preconfigured for common operating system MIBs so help form vendors or other users may be easier.
Depending on the monitoring tool you choose you may have to add an SNMP 'module' or 'application', these are generally free or open source. I found the vendor instructions pretty straight forward for this step.
Once you are monitoring the operating system metrics its time to add Caché.
Step 2.
Import the ISC-CACHE.mib and ISC-ENSEMBLE.mib into the tool so that it knows the MIB structure.
The steps here will vary; for example PRTG has a 'MIB Importer' utility. The basic steps are to open the text file ISC-CACHE.mib in the tool and import it to the tools internal format. For example Splunk uses a Python format, etc.
Note: I found the PRTG tool timed out if I tried to add a sensor with all the Caché MIB branches. I assume it was walking the whole tree and timed out for some metrics like process lists, I did not spend time troubleshooting this, instead I worked around this problem by only importing the performance branch (cachePerfTab) from the ISC-CACHE.mib.
Once imported/converted the MIB can be reused to collect data from other servers in your network. The above graphic shows PRTG using Sensor Factory sensor to combine multiple sensors into one chart.
Summary
There are many monitoring, alerting and some very smart analytics tools available, some free, others with licences for support and many and varied functionality.
You must monitor your system and understand what activity is normal, and what activity falls outside normal and must be investigated. SNMP is a simple way to expose Caché and Ensemble metrics.
Comments
I was asked a couple of questions offline, so the following is to answer them:
Q1. In your article, why do you say it is necessary to change information strings in snmpd.conf? (ie. syslocation/syscontact)?
A1. What I mean is that you should change syslocation and syscontact to reflect your site, but leaving them as the defaults in the sample will not stop SNMP working using this sample snmpd.conffile.
Q2. you also mention basic errors you made in configuring it, which were these? It might be helpful to mention the debugging facilities for snmp (^SYS("MONITOR","SNMP","DEBUG") ) as well?
A2. One problem was misconfiguring the security settings in snmpd.conf. Following the example above will get you there.
I also spun my wheels with what turned out to be a spelling (or case) error on the line agentXSocket tcp:localhost:705. In the end I figured out the problem was to do with agentX not starting by looking at the logs written to the install-dir/mgr/SNMP.log file. Caché logs any problems encountered while establishing a connection or answering requests in the SNMP.log. You should also check cconsole.log and the logs for snmpd in the OS.
On Windows, iscsnmp.dll logs any errors it encounters in %System%\System32\snmpdbg.log (on a 64–bit Windows system, this file is in the SysWOW64 subdirectory).
As pointed out in Fabian's question more information can be logged to the SNMP.log if you set ^SYS("MONITOR","SNMP","DEBUG")=1 in the %SYS namespace and restart the ^SNMP Caché subagent process. This logs details about each message received and sent.
Thanks for the questions MO
BTW Although I have not tried implementing - due to high number of Healthcare applications using Caché I thought it may be of interest that Paessler PRTG has developed new sensors for monitoring medical equipment that communicate via HL7 and DICOM.
https://www.paessler.com/blog/2016/04/13/all-about-prtg/ehealth-sensors…
I've installed PRTG on a windows 10 system... enabled SNMP services... I've configured SNMP Service to Community "public" destination "127.0.0.1"... PRTG is able to see and graph the system statistics... OK.
Then I imported ISC-Cache.mib with Paesler MIB Imported, OK, and "Save for PRTG Network Monitor"... everything seems fine, but, then, where is supposed to be? When I go to PRTG NM I cannot see anyhing related to Caché ... no clue about the library that I supposedly just imported... S of SNMP means Simple... so I'm pretty sure I'm missing something really basic here, but I don't know how to go on.
Found... I just got to go to add sensors to a group, windows type and snmp library... there it is the oidlib I had just imported!!
When using containers (IRIS) how do use the host to proxy the snmp calls? is there a way to have the container use the hosts ip (and port 705) to do its reporting?
Hi Jay,
for the docker run command look at the --net=host flag.
Also SAM might be of interest to you. See
I hope it's helpful
do we hv a similar topic for Cache on windows?Thx!