In the modern world, the most valuable asset for companies is their data. Everything from business processes and applications to transactions is based on data which defines the success of the organization's operations, analysis, and decisions. In this scenario, the data structures need to be ready for frequent changes, yet in a managed and governed way. Otherwise, we will inevitably lose money, time, and quality of corporate solutions.
For a long time, data management and governance were solely based on the data itself, with excellent backup, restoration, ACID (Atomicity, Consistency, Isolation, and Durability) resources, authentication/authorization controls, logging, and tracing. However, since the business has become more dynamic and agile, changes in data structures have generated many outages and system breakdowns. To resolve this, DDL (Data Definition Language) source code management solutions were created. Two of those great solutions have become market references: Liquibase and Flyway. None of them, however, supported InterSystems IRIS until 2023, when Dmitry Maslennikov released a Liquibase extension for IRIS, making it possible to add IRIS DDLs to DevOps pipelines. The IRIS Liquibase extension is an open-source product, and it is currently published on https://openexchange.intersystems.com/package/liquibase-iris.
This article will detail what Liquibase is and how to use it to manage data structures together with the extension created by Dmitry, liquibase-iris.
What is Liquibase?
Liquibase is a database schema change management solution that enables you to revise and release database changes faster and safer from development to production. To start using Liquibase quickly and easily, you can write your migration scripts in SQL. To take advantage of database abstraction abilities that allow you to write changes and deploy them to different database platforms, you can specify database-agnostic changes in XML, JSON, or YAML(https://docs.liquibase.com/concepts/introduction-to-liquibase.html).
Liquibase Workflow
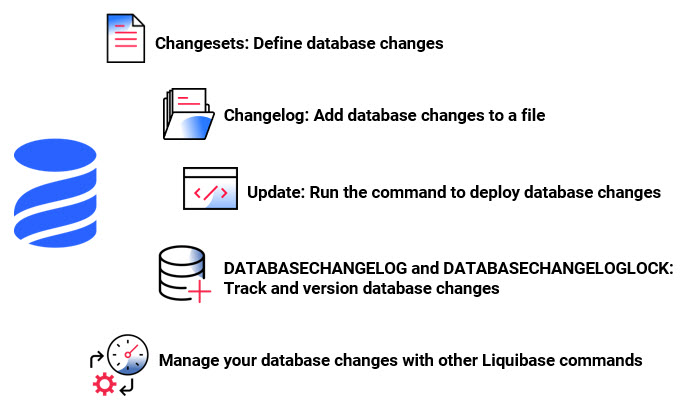
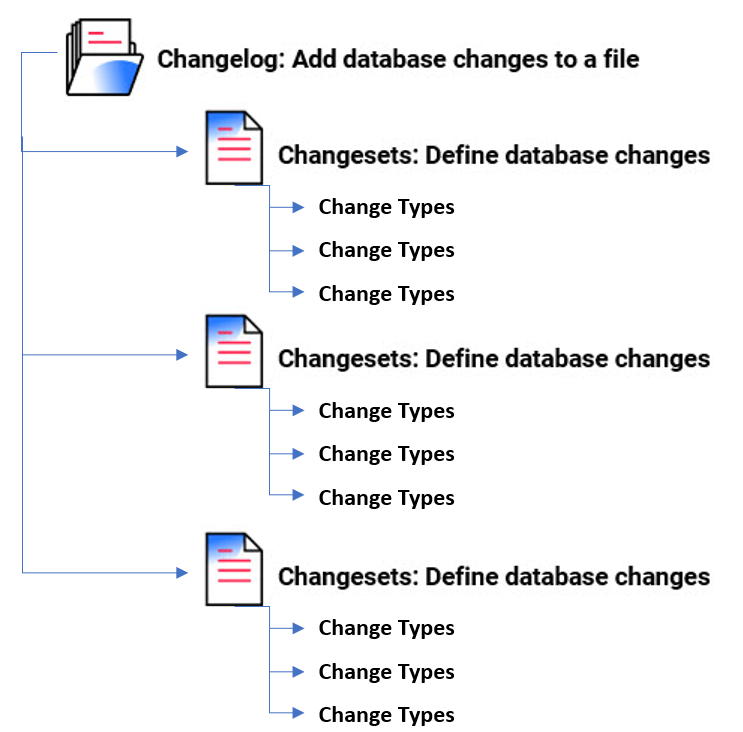
Changelogs
Liquibase uses SQL, XML, JSON, and YAML changelog files to list database changes in sequential order. Those database alterations have the format of changesets that contain Change Types, which are types of operations to apply to the database, e.g., adding a column or primary key. Context, label, and precondition changelog tags help us control precisely when a database modification was made and to which database environment it was deployed. (https://docs.liquibase.com/concepts/introduction-to-liquibase.html).
Liquibase properties file
Liquibase commands
Database Changelog and Database Changelog Lock
Database management options
- Run the command-line client (CLI).
Step-by-step instructions on Liquibase with IRIS
Install Liquibase
To employ Liquibase CLI, install Liquibase on your OS:
1. Install Java (if you do not have it yet).
2. Download Liquibase CLI (https://www.liquibase.com/download):
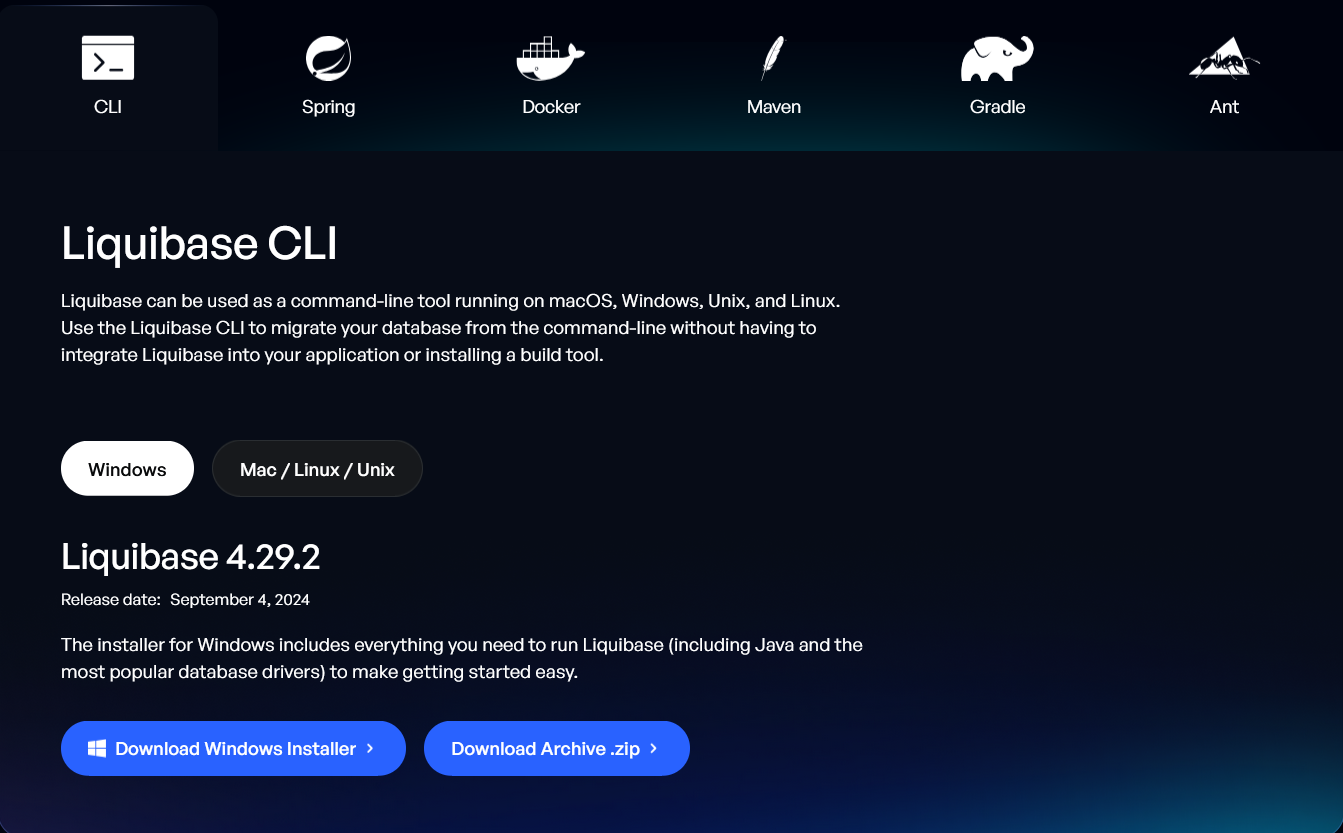
3. If necessary, you can download the Windows or Mac installer or simply get the zip file and extract it to any folder.
4. Add the Liquibase installation directory to your system PATH (when you use the Installer, the path is included automatically).
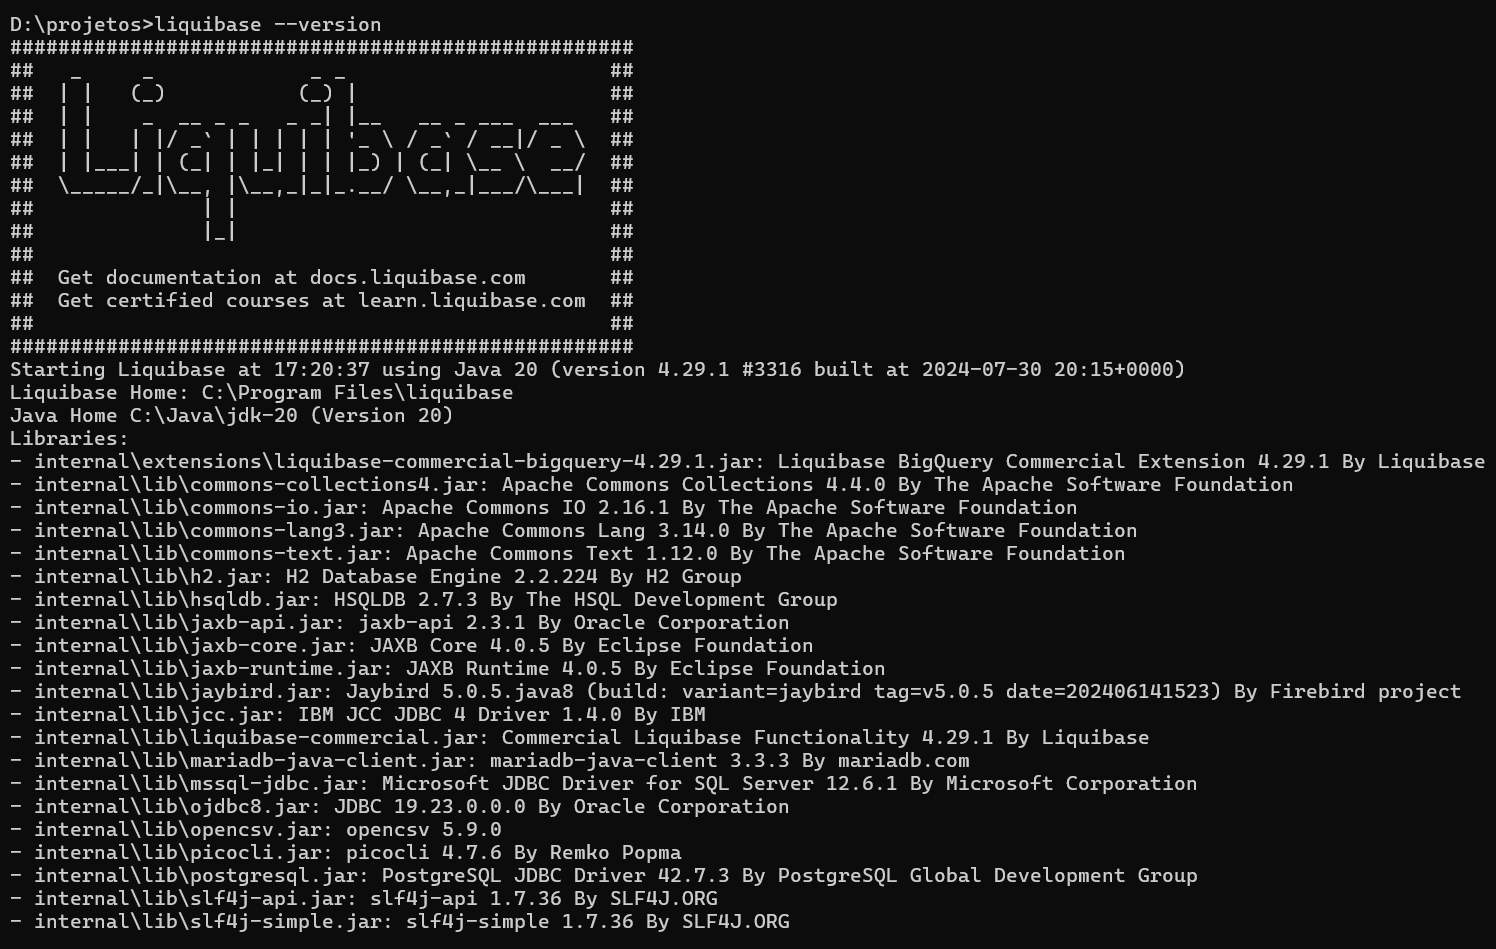
5. From a command line or terminal, type liquibase --version to verify that Liquibase has been installed successfully:

Set Liquibase for your IRIS project
We will use a sample to see Liquibase in action, so follow the next steps:
1. Do a git clone for the project intersystems-iris-dev-template (https://openexchange.intersystems.com/package/intersystems-iris-dev-temp...):
git clone https://github.com/intersystems-community/intersystems-iris-dev-template.git2. Go to the folder intersystems-iris-dev-template and open the project on VSCode:

3. Open a new Terminal:


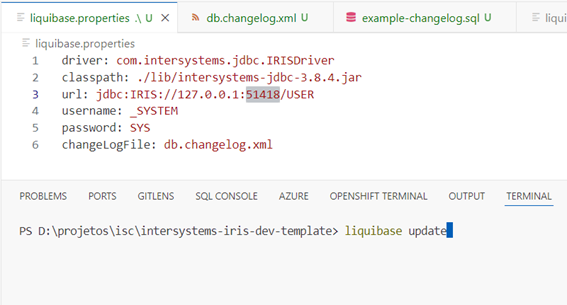
5. After the project has started, go to the Docker Desktop > Containers and expand intersystems-iris-dev-template; then get the host port for the superport 1972 (in my case it is 51418):

driver: com.intersystems.jdbc.IRISDriver
classpath: ./lib/intersystems-jdbc-3.8.4.jar
url: jdbc:IRIS://127.0.0.1:51418/USER
username: _SYSTEM
password: SYS
changeLogFile: db.changelog.xml
7. Create the file db.changelog.xml in the root project folder with the following content:
<?xml version="1.0" encoding="UTF-8"?>
<databaseChangeLog
xmlns="http://www.liquibase.org/xml/ns/dbchangelog"
xmlns:xsi="http://www.w3.org/2001/XMLSchema-instance"
xmlns:ext="http://www.liquibase.org/xml/ns/dbchangelog-ext"
xmlns:pro="http://www.liquibase.org/xml/ns/pro"
xsi:schemaLocation="http://www.liquibase.org/xml/ns/dbchangelog
http://www.liquibase.org/xml/ns/dbchangelog/dbchangelog-latest.xsd
http://www.liquibase.org/xml/ns/dbchangelog-ext http://www.liquibase.org/xml/ns/dbchangelog/dbchangelog-ext.xsd
http://www.liquibase.org/xml/ns/pro http://www.liquibase.org/xml/ns/pro/liquibase-pro-latest.xsd">
<changeSet id="1" author="yuri">
<createTable schemaName="dc_sample" tableName="persons">
<column name="id" type="int" autoIncrement="true">
<constraints primaryKey="true" nullable="false"/>
</column>
<column name="firstname" type="varchar(50)"/>
<column name="lastname" type="varchar(50)">
<constraints nullable="false"/>
</column>
<column name="state" type="char(2)"/>
</createTable>
</changeSet>
<changeSet id="2" author="yuri">
<addColumn schemaName="dc_sample" tableName="persons">
<column name="username" type="varchar(8)"/>
</addColumn>
</changeSet>
<changeSet id="3" author="yuri">
<addLookupTable existingTableSchemaName="dc_sample"
existingTableName="persons" newTableSchemaName="dc_sample" existingColumnName="state"
newTableName="state" newColumnName="id" newColumnDataType="char(2)"/>
</changeSet>
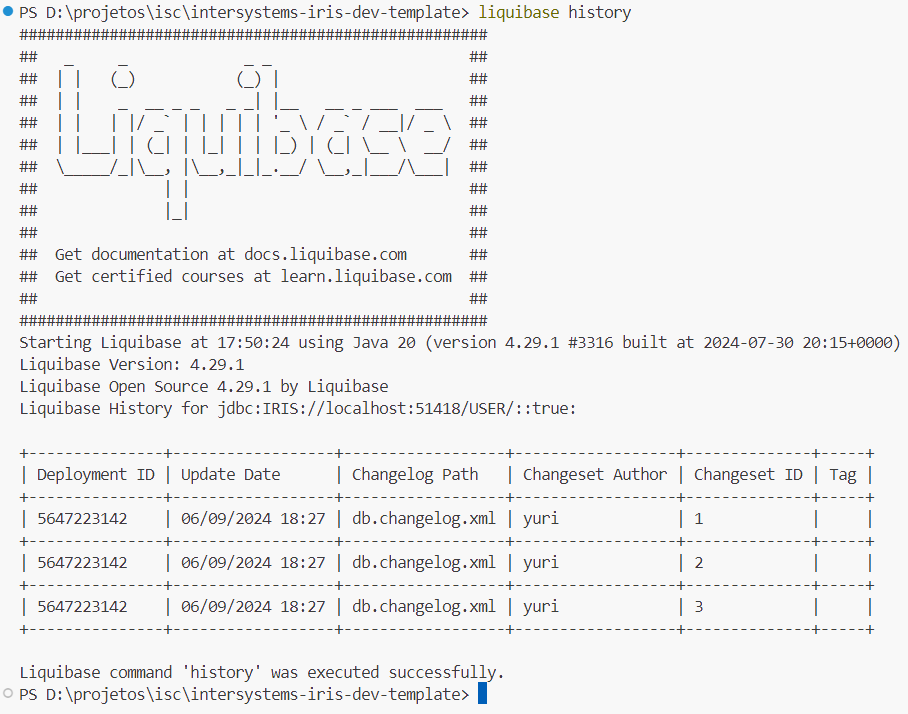
</databaseChangeLog>8. Using the terminal, execute the command liquibase update on the root folder:
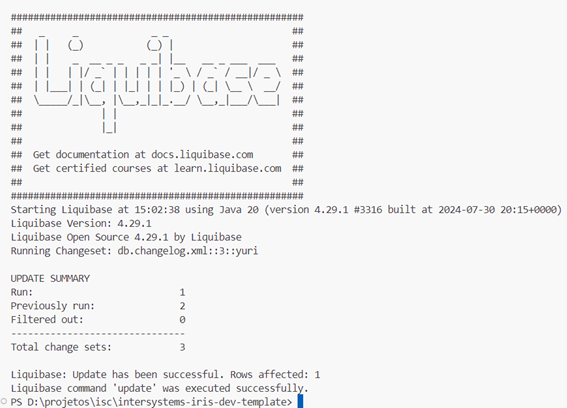
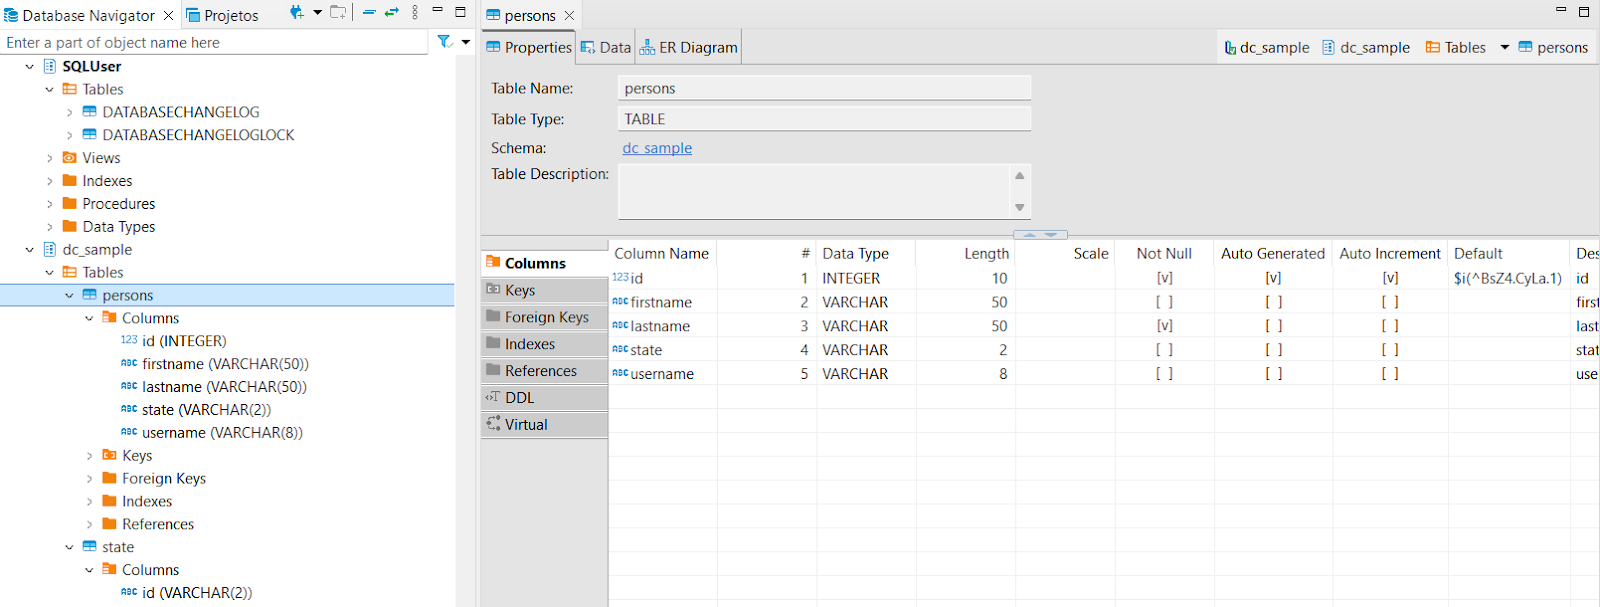
10. Check out the results on Management Portal or on DBeaver:
Liquibase commands
Database update commands
Database inspection commands
Change tracking commands
All other commands are documented on the following webpage: https://docs.liquibase.com/commands/command-list.html.
Liquibase Change Types
A Change Type is a database-independent XML, YAML, or JSON formatted modification that you can specify to update your database with Liquibase. Change Types correspond to SQL statements applied to your database, e.g., CREATE TABLE.You determine the Change Type you wish to employ within a Changeset in your Changelog (source: https://docs.liquibase.com/change-types/home.html). This tutorial utilized XML change type. However, it is possible to work with YAML or JSON as well. Look at the samples below:
YAML change type
To use YAML-based changelogs, you must include snakeyaml-<version>.jar in your classpath. In the example below, the changelog contains changesets that do the following (source: https://docs.liquibase.com/concepts/changelogs/yaml-format.html):
- It creates a new person table with columns id, firstname, lastname, and state;
- It adds a new username column to the person table;
- It creates a lookup table state using data from a person.
databaseChangeLog:
- changeSet:
      id:  1
      author:  your.name
      labels: example-label
      context: example-context
      comment: example-comment
      changes:
       - createTable:
            tableName:  person
            columns:
              - column:
                  name:  id
                  type:  int
                  autoIncrement:  true
                  constraints:
                    primaryKey:  true
                    nullable:  false
              - column:
                  name:  name
                  type:  varchar(50)
                  constraints:
                    nullable:  false
              - column:
                  name:  address1
                  type:  varchar(50)
              - column:
                  name:  address2
                  type:  varchar(50)
              - column:
                  name:  city
                  type:  varchar(30)
- changeSet:
      id:  2
      author:  your.name
      labels: example-label
      context: example-context
      comment: example-comment
      changes:
       - createTable:
            tableName:  company
            columns:
              - column:
                  name:  id
                  type:  int
                  autoIncrement:  true
                  constraints:
                    primaryKey:  true
                    nullable:  false
              - column:
                  name:  name
                  type:  varchar(50)
                  constraints:
                    nullable:  false
              - column:
                  name:  address1
                  type:  varchar(50)
              - column:
                  name:  address2
                  type:  varchar(50)
              - column:
                  name:  city
                  type:  varchar(30)
- changeSet:
      id:  3
      author:  other.dev
      labels: example-label
      context: example-context
      comment: example-comment
      changes:
       - addColumn:
            tableName:  person
            columns:
              - column:
                  name:  country
                  type:  varchar(2)
JSON Change Type
When operating a JSON-based changelog file, you need to select one of the following ways to audit your database and execute alterations (source: https://docs.liquibase.com/concepts/changelogs/json-format.html):
- Pass it as an argument in the command line during runtime:
liquibase update --changelog-file=example-changelog.json- Specify it in the Liquibase properties file:
changelog-file: ../example-changelog.jsonYou can also include other related properties in the properties file, e.g., searchPath, which defines the directories and .jar files to search for changelog files. If you have multiple files, they can be separated with commas. Check out the following sample:
{
    "databaseChangeLog": [
      {
        "changeSet": {
          "id": "1",
          "author": "yuri",
          "changes": [
            {
              "createTable": {
                "tableName": "person",
                "columns": [
                  {
                    "column": {
                      "name": "id",
                      "type": "int",
                      "autoIncrement": true,
                      "constraints": {
                        "primaryKey": true,
                        "nullable": false
                      },

                    }
                  },
                  {
                    "column": {
                      "name": "firstname",
                      "type": "varchar(50)"
                    }
                  },
                  {
                    "column": {
                      "name": "lastname",
                      "type": "varchar(50)",
                      "constraints": {
                        "nullable": false
                      },

                    }
                  },
                  {
                    "column": {
                      "name": "state",
                      "type": "char(2)"
                    }
                  }
                ]
              }
            }
          ]
        }
      },
      {
        "changeSet": {
          "id": "2",
          "author": "robert",
          "changes": [
            {
              "addColumn": {
                "tableName": "person",
                "columns": [
                  {
                    "column": {
                      "name": "username",
                      "type": "varchar(8)"
                    }
                  }
                ]
              }
            }
          ]
        }
      },
      {
        "changeSet": {
          "id": "3",
          "author": "carlos",
          "changes": [
            {
              "addLookupTable": {
                "existingTableName": "person",
                "existingColumnName": "state",
                "newTableName": "state",
                "newColumnName": "id",
                "newColumnDataType": "char(2)",

              }
            }
          ]
        }
      }
    ]
}
SQL Change Type
It is possible to operate SQL as a change type as well. However, database independence will not be guaranteed once product-specific SQL has been written (click the following link for more information: https://docs.liquibase.com/concepts/changelogs/sql-format.html). Take a look at the sample below:
--liquibase formatted sql
--changeset your.name:1 labels:example-label context:example-context
--comment: example comment
create table person (
    id int primary key auto_increment not null,
    name varchar(50) not null,
    address1 varchar(50),
    address2 varchar(50),
    city varchar(30)
)
--rollback DROP TABLE person;
--changeset your.name:2 labels:example-label context:example-context
--comment: example comment
create table company (
    id int primary key auto_increment not null,
    name varchar(50) not null,
    address1 varchar(50),
    address2 varchar(50),
    city varchar(30)
)
--rollback DROP TABLE company;
--changeset other.dev:3 labels:example-label context:example-context
--comment: example comment
alter table person add column country varchar(2)
--rollback ALTER TABLE person DROP COLUMN country;
Using Liquibase on DevOps projects
You can also use Liquibase on DevOps projects. It means that whenever your database creation/modification source code is uploaded to GitHub or GitLab, you can run Liquibase to synchronize the new version with the target database. To do it (when you work with GitHub), you can use a Github action. To see a sample, examine the following link https://github.com/liquibase/liquibase-github-action-example. However, in a nutshell, you must create the folder /.github/workflows/yourfile.yml and write something similar to the code below:
on: [push]
jobs:
  test-liquibase-action:
    runs-on: ubuntu-latest
    name: Test Liquibase Action
    steps:
      - uses: actions/checkout@v2
      - uses: liquibase/liquibase-github-action@v2
        with:
          operation: 'update'
          changeLogFile: 'db.changelog.yml'
          username: ${{ secrets.USERNAME }}
          password: ${{ secrets.PASSWORD }}
url: ${{ secrets.URL }}%20(2)(2).jpg)
.png)