Clear filter
Announcement
Anastasia Dyubaylo · Mar 13, 2020
Hi Community!
New "Coding Talk" video is already on InterSystems Developers YouTube:
⏯ How to Enable Docker and VSCode to Your InterSystems IRIS Solution
In this video, presented by @Evgeny Shvarov, you will learn how to add InterSystems IRIS Docker and VSCode environment to your current repository with InterSystems ObjectScript using iris-docker-dev-kit project on Open Excahnge.
➡️ iris-docker-dev-kit – a set of files to facilitate development with InterSystems IRIS using Docker and VSCode. It gives you the option to develop your InterSystems ObjectScript solution in IRIS Community Edition or IRIS Community Edition for Health on your laptop using VSCode ObjectScript extension.
And...
You're very welcome to watch all Coding Talks in a dedicated "Coding Talks" playlist on our InterSystems Developers YouTube Channel.
Stay tuned! 👍🏼
Announcement
Anastasia Dyubaylo · Apr 20, 2020
Hi Community,
New "Coding Talk" video was specially recorded by @Evgeny.Shvarov for the second IRIS Programming Contest:
⏯ Creating CRUD REST API for InterSystems IRIS in 5 minutes
In this video, presented by @Evgeny Shvarov, you'll learn how to create your own basic CRUD API for InterSystems IRIS using the GitHub template and expose it with Open API spec.
➡️ Check out the app used in this demo: objectscript-rest-docker-template
And...
You're very welcome to join the second IRIS Programming Contest! Show your best coding skills and win cool prizes!
Stay tuned! 👍🏼
Announcement
Thomas Carroll · Feb 14, 2019
Breaking news!
InterSystems just announced the availability of the InterSystems IRIS for Health™ Data Platform across the Amazon Web Services, Google Cloud, and Microsoft Azure marketplaces.
With access to InterSystems unified data platform on all three major cloud providers, developers and customers have flexibility to rapidly build and scale the digital applications driving the future of care on the platform of their choice.
To learn more please follow this link.
Announcement
Anastasia Dyubaylo · May 13, 2019
Hey Community!
The latest webinar, recorded by InterSystems Sales Engineers @Sergey Lukyanchikov and @Eduard Lebedyuk, is already on InterSystems Developers YouTube! Please welcome:
"Machine Learning Toolkit (Python, ObjectScript, Interoperability, Analytics) for InterSystems IRIS"
Big applause to these speakers, thank you guys!
Want more?
Please find all the details in this post.
Enjoy watching the webinar! Please don't forget to check out additional materials for this webinar:Python Gateway Part I: IntroductionPython Gateway Part II: InstallationIn addition, try out the apps on Open Exchange Marketplace:PythonGateway AppRGateway AppStay tuned! Great webinar, machines learning are high in the market, knowledge is always good.
Announcement
Evgeny Shvarov · Sep 27, 2019
Hi Developers!
Just want to share the information with you that we support TechCrunch Disrupt Hackathon 2019 this year!
It will take place from 2-4 of October in San Francisco, CA.
We introduced InterSystems special prizes for participants which solutions will use InterSystems IRIS $4,000 and InterSystems IRIS for Health 4,000.
Learn more here.
If you happen to participate we wish you luck and hope you'll leverage InterSystems IRIS data platform functionality to win Disrupt Hackathon 2019!
Announcement
Anastasia Dyubaylo · Feb 5, 2021
Hi Developers,
Please welcome the new video on InterSystems Developers YouTube:
⏯ Building REST API with InterSystems IRIS Docker Container in 5 Minutes
See the process of creating a new REST API back end for an application using development tools like GitHub, Docker, VS Code, and the ZPM package manager in InterSystems IRIS data platform. Learn about using OpenAPI specifications for ground-up and API-first development approaches.
🗣 Presenter: @Sergei.Shutov, Principal Applications Developer, InterSystems
Useful links:
ObjectScript REST Docker template
OpenAPI Examples
AppS.REST framework
Enjoy watching this video! 👍🏼
Article
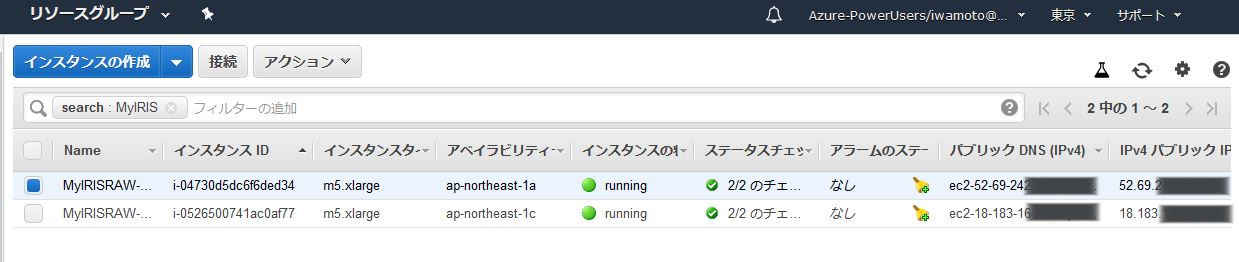
Tomohiro Iwamoto · Dec 24, 2020
## About this article:
In InterSystems IRIS, the default form of access to the management portal is HTTP, which means that if the client is in the office and the server is in the cloud, many clients probably desire to encrypt their traffic in some way.
Thus, we would like to show you some ways to encrypt your traffic to and from the IRIS management portal (or various REST services) running on AWS.
> This article uses the IRIS built-in apache server for access. It should not be used for benchmarking purposes or as a method of access from production environments applications.
> It is designed to encrypt access for development, operation verification, and quick management and with a small number of people.
The best solution would be to prepare a domain name and an SSL server certificate issued by a central certification authority. However, in the case of the aforementioned applications, it would not be easy in terms of cost.
Therefore, the following certificates are assumed to be used:
- Self-signed (a Japanese so-called “ore ore” certificate)
- A certificate issued by a self-built certification authority (a Japanese so-called “ore ore” Certification Authority)
We additionally assume the following running environment:
| The PC environment ||
| ------------- | -------------:|
| O/S | Windows 10 |
| Browser | Chrome/FireFox/Edge |
| IDE | vscode+ObjectScript Extension |
| Unused port number in the local PC | 8888 |
| The secret key of the key pair used during the creation of the EC2 Instance | aws-secret.pem |
| AWS Environment ||
| ------------- | -------------:|
| IRIS host's public hostname | ec2-54-250-169-xxx.ap-northeast-1.compute.amazonaws.com |
| IRIS webserver port number | 52773 |
| O/S | Ubuntu 18.04LTS |
| O/S User name | ubuntu |
* * *
## Direct Access
### 1) Using Port Forwarding
This is the easiest way.
In the security group, the port for SSH (22) must be allowed inbound from the Internet.
C:\Users\xxxx>ssh -i aws-secret.pem -L 8888:localhost:52773 ubuntu@ec2-54-250-169-xxx.ap-northeast-1.compute.amazonaws.com
While running this command from the PC, you can access the IRIS host through the link below.
http://localhost:8888/csp/sys/%25CSP.Portal.Home.zen
Since you are logged in with ssh, you can use it for terminal operations such as those performed during the development process (starting and stopping IRIS, starting an IRIS session, etc.).
This method is also useful for the super-server port (51773), so it can encrypt the communication with Studio.
Note: For Windows, if you do not place the private key for ssh (aws-secret.pem) in %USERPROFILE%\, you will get an error.
C:\Users\xxxx>dir %USERPROFILE%\aws-secret.pem
2020/07/14 17:10 1,692 aws-secret.pem
1 File(s) 1,692 bytes
0 Dir(s) 100,576,694,272 bytes free
The vscode settings (settings.json) should look like the one below.
{
"objectscript.conn": {
"host": "localhost",
"https": false,
"port": 8888,
"ns": "USER",
"username": "xxx",
"password": "xxx",
"active": true
}
}
### 2) Using a Reverse Proxy with SSL configuration
In this case, you deploy a self-certified apache or Nginx with a reverse proxy configuration and access the IRIS host through it.
In the security group, a port for HTTPS (443) must be allowed inbound from the Internet.
A script to configure apache and Nginx is available in the [link](https://github.com/IRISMeister/apache-ssl.git). This will allow you to access the IRIS host from your browser through the link below.
https://ec2-54-250-169-xxx.ap-northeast-1.compute.amazonaws.com/csp/sys/%25CSP.Portal.Home.zen
The vscode settings (settings.json) should look like the following:
{
"objectscript.conn": {
"host": "ec2-54-250-169-xxx.ap-northeast-1.compute.amazonaws.com",
"https": true,
"port": 443,
"ns": "USER",
"username": "xxx",
"password": "xxx",
"active": true
}
}
* * *
## Via Bastion host
Suppose you are uncomfortable about letting user data, EC2 instance of SSH (including code) or HTTPS ports be published on the Internet, despite being for verification purposes. In that case, you can use a Bastion Host.
The security group must allow inbound TCP traffic between the Bastion Host and the IRIS host.
It is assumed that the execution environment is as follow:
| AWS Environment ||
| ------------- | -------------:|
| IRIS host's public hostname | none |
| Internal IP address of the IRIS host | 10.0.1.81 |
| Public hostname of the Bastion host | ec2-54-250-169-yyy.ap-northeast-1.compute.amazonaws.com |
### 1) Using Port Forwarding
In the security group, the port for SSH (22) must be allowed inbound to the Internet.
The following commands are executed against the Bastion host:
C:\Users\xxxx>ssh -i aws-secret.pem -L 8888:10.0.1.81:52773 ubuntu@ec2-54-250-169-yyy.ap-northeast-1.compute.amazonaws.com
Ditto.
### 2) Using a Reverse Proxy with SSL configuration
In the security group, the HTTPS port (443) must be allowed inbound to the Internet.
Do the same task (deploy apache/Nginx) on the Bastion host.
Change the [destination URL](https://github.com/IRISMeister/apache-ssl/blob/master/apache-conf/other/iris.conf) to the internal IP address of the IRIS host: 10.0.1.81.
ProxyRequests Off
ProxyPass / http://10.0.1.81:52773/
ProxyPassReverse / http://10.0.1.81:52773/
Ditto. (Except that now using the bastion hostname as URL)
* * *
## Via AWS/ALB
It is not something people typically do, but you can apply a self-certification to AWS/ALB. In this case, the ALB will be SSL-terminated, saving you the trouble of preparing a separate SSL-enabled apache.
Since creating an ALB requires at least two AZs, I have used mirrored DMs created by ICM (InterSystems Cloud Manager).
(For more information about ICM, see [How to Configure an IRIS Cluster with ICM](https://jp.community.intersystems.com/post/icm%E3%82%92%E5%88%A9%E7%94%A8%E3%81%97%E3%81%A6iris%E3%82%AF%E3%83%A9%E3%82%B9%E3%82%BF%E3%83%BC%E3%82%92%E6%A7%8B%E6%88%90%E3%81%99%E3%82%8B%E6%96%B9%E6%B3%95))
default.json (excerpt)
{
"Zone": "ap-northeast-1a,ap-northeast-1c",
"Mirror": "true",
}
definitions.json
[
{
"Role": "DM",
"Count": "2",
"MirrorMap": "primary,backup",
"ZoneMap": "0,1"
}
]
Use the certificate files you created in [setup.sh](https://github.com/IRISMeister/apache-ssl/blob/master/setup.sh).
Import these files to ACM (AWS Certificate Manager).
Certificate: contents of the server.crt
Certificate of the Private key: contents of the server.key
Certificate Chain: contents of the inca.pem
Tip) If you have access to awscli, uncomment the last line of [setup.sh](https://github.com/IRISMeister/apache-ssl/blob/master/setup.sh), then it will be registered automatically.
Create a new ALB with the following settings:
Step 1: Configure Load Balancer
Name: anything
Scheme: For Internet
IP address type: ipv4
Listeners: https (port: 443)
Availability Zones: ap-northeast-1a,ap-northeast-1c
Step 2: Configuration of Security Settings
Selecting a default certificate: Selecting a certificate from ACM
Certificate Name: (Select the certificate you have just imported into ACM)
Step 3: Configure Security Groups
Security group settings: Create a new security group →that Allows only HTTPS (port:443).
Step 4: Configure Routing
Target group: New target group
Name: anything
Target Type: Instance
Protocol: HTTP
Port: 52773
Health Checks
Protocol: http
Path: /csp/bin/Mirror_status.cxw
Health Check Advanced Settings
Port: Overwrite →52773
Step 5: Register Targets
"Add to registered" the EC2 Instance you've just provisioned.
After the ALB status become active, you can use HTTPS with DNS name of the ALB.
> https://[ALB DNS Name]/csp/sys/exp/%25CSP.UI.Portal.SQL.Home.zen
Question
Eduard Lebedyuk · Jan 24, 2022
I'm using this Dockerfile to build .Net Gateway with my PEX BS. It works fine. If I change the image reference here to store/intersystems/iris-community:2021.2.0.617.0 in line 8 (so update from 2020.2 to 2021.2) it fails to build with:
KafkaConsumer.cs(4,20): error CS0234: The type or namespace name 'EnsLib' does not exist in the namespace 'InterSystems' (are you missing an assembly reference?) [/source/KafkaConsumer.csproj]
KafkaConsumer.cs(9,34): error CS0246: The type or namespace name 'BusinessService' could not be found (are you missing a using directive or an assembly reference?) [/source/KafkaConsumer.csproj]
On this line:
RUN dotnet publish -c release -o /app
Any idea why this might happen? Add to csproj
<PackageReference Include="IRISUtilsCore21" Version="1.0.0" />
Announcement
Jiahao Song · Oct 7, 2021
Hello All,
InterSystems Certification has redesigned their IRIS Integration certification exam, and we again need input from our community to help validate the topics. Here's your chance to have your say in the knowledge, skills, and abilities that a certified InterSystems IRIS Integration Specialist should possess. And, yes, we'd like to hear from you Ensemble users as well!
Here's the exam title and the definition:
InterSystems IRIS Integration Specialist
An IT professional who:
designs and builds integrations for various industries, and
manages and configures productions using InterSystems IRIS interoperability tools.
So, how can you help? If you have 30-45 minutes to fill out a task survey, you can help us rate each exam topic based on your experience.
Interested? Please contact the Certification Team at certification@intersystems.com.
Thank you!Jiahao Song, Certification Exam Developer, InterSystems
Announcement
Jacquie Clermont · Jun 16, 2022
Hi Community:
I'm flying out to Seattle tomorrow to set up. Can't wait to see the city again; it's really beautiful.
We just finalized the conference guide, which is being printed now. I am attaching a PDF.
Announcement
Anastasia Dyubaylo · Aug 15, 2022
Hello, Members of the Community!
We're so proud to announce that our InterSystems Developer Community has reached a couple of HUGE milestones:
📝 10,000 published posts
👥 11,000 registered members
👁 5,000,000 reads (it's five million!)
We'd like to congratulate you, our dear members, and us (admins, content managers, and moderators) on reaching 11K members, 10K posts, and 5M 🍋🍋🍋🍋🍋 views! We are so proud to be part of this success, that has been created solely by and thanks to you!
We'd like to thank each and every one of you for being part of our group of like-minded people! Thank you for asking questions and starting conversations! For sharing your knowledge and your successes! For giving us suggestions and making us think and thus become better and more useful to you! You're keeping this Community alive and thriving! We are very glad to have you with us! ❤️
And to make this occasion even more festive...
The Developer Community Discord channel reached 500 members! 🎉 Still have a lot of work in front of us in this direction, but we're up to the challenge. And we're hoping you will join us there as well to get even more useful info and ideas. Join here >>
Thanks again! And let's grow together! Wow! It's awesome! Great to see that the Community is growing! Congratulations on such an amazing set of milestones!! Great work everyone :)
I do have a question about the Discord channel ... wouldn't Q&A on the Discord channel dilute content on the D.C.? Or is the Discord channel for a different purpose than asking questions and sharing knowledge about InterSystems products? I see discord as an additional way to get in touch with the community. And there is possible to be online and get answers a bit faster. @Dmitry.Maslennikov - does the knowledge that is captured in Discord make its way back into the D.C.? If not then I think the rest of our users are missing out (and joining Discord shouldn't be a requirement for all D.C. members) Congrats! 👏🏽🥳 🎉 Congrats! I am proud to be part of this history. I love the Dev Community and how we all help each other learn more and more! It's great to see large numbers of Developers joining the Community. Here's to you and your success in building amazing solutions that have great impact in the world! Hi @Benjamin.Spead! Discord gives the pleasure of instant conversation and audio/video calls. It can save hours of time for developers, helps to learn faster and gives extra experience and knowledge.
So, yes, Discord is not a requirement and it doesn’t ideally suite as a knowledge base but it shows itself as a helpful tool for the developer community as a perfect tool for communication. Congratulations, Great milestones!! Nice work everyone :) Congratulation... next challenge... 15,000 members and 10,000,000 views 🥳🥳🥳🥳🥳 accepted 😏😏😏 Thanks for the clarification! So Discord is more for synchronous communication while the D.C. is Async and long-term knowledge repository? If so, please be encouraging people to share their answers on the D.C. if they find them on Discord via real time conversations :) Congratulations! The Developer Community is a invaluable tool for InterSystems customers.
Announcement
Anastasia Dyubaylo · Jul 20, 2022
Hi Community!
We are proud to announce that InterSystems will be hosting the Women's Health - FemTech: Much More than A Niche Market!
⏱ Time: July 28, 6:00 PM – 7:00 PM EDT📍 Location: Online event
This event is organized by HealthTech Build whose mission is to create opportunities for medical providers, biotech digital innovators, health data scientists, digital therapeutics developers, and software engineers to work towards common goals in disruptively productive ways. For this event, the goal will be to exchange ideas and address unmet women's health needs in new ways.
The highlight of the event will be a HealthTech Build panel with:
Janine Kopp, Investor & Head of Venture Studio, Takeda Digital Ventures
Uros Kuzmanovic, CEO, Biosens8
Mary Beth Cicero, CEO, 3Daughters
Thom Busby, Senior Vice President, Outcome Capital
Don't miss out on this excellent opportunity to discover challenges and discuss new solutions in a great company of like-minded peers!
>> REGISTER HERE <<
Article
Daniel Kutac · Aug 3, 2016
This article, and following two articles of the series, is intended as a user guide for developers or system administrators, who need to work with OAuth 2.0 framework (further referred to as OAUTH for simplicity) in their InterSystems product based applications.
Created by Daniel Kutac, Senior Sales Engineer, InterSystems
History of post-publishing corrections and changes
August 3, 2016 - fixed Google Client configuration screenshot, updated Google APIs screenshot to reflect new version of pages
August 28, 2016 - changes to JSON related code, reflecting changes to Cache 2016.2 JSON support.
May 3 2017 - updates to text and screens to reflect new UI and features released with Cache 2017.1
February 19 2018 - changed Caché to InterSystems IRIS to reflect latest development. Please bear in mind, however, that despite the change in product name, the article covers all InterSystems products - InterSystems IRIS Data Platform, Ensemble and Caché.
August 17 2020 - everythiong changes, and software even more. Please consult reply from Micholai Mitchko for updated Google's Oauth2 url.
Part 1. Client
Introduction
This is the first part of 3 part series of articles about the InterSystems implementation of the Open Authorization Framework.
In this first part, we give a short introduction to the topic and show a simple scenario where InterSystems IRIS application acts as a client to an Authorization server, requesting some protected resources.
The second part will describe a more complex scenario, where InterSystems IRIS itself acts as an authorization server and also as an authentication server via OpenID Connect.
The last part of this series will describe individual parts of OAUTH framework classes as they are implemented by InterSystems IRIS.
What is Open Authorization Framework[1] about
Many of you have already had a chance to hear about Open Authorization Framework and what is can be used for. So just a brief summary for those who have not heard about it yet.
Open Authorization Framework, OAUTH, currently at version 2.0, is a protocol allowing primarily web based application to Exchange information in a secured way by establishing indirect trust between a client (application requesting data) and a resource owner (application holding requested data). The trust itself is provided by a body that both client and resource server recognize and trust. This body is called the authorization server.
A simple illustration use case follows:
Suppose Jenny (in OAUTH terminology the Resource owner) works on a project in company JennyCorp. She creates a project plan for a larger potential business and invites her business partner John (client user) from JohnInc to review the document. She is not happy, though, to give John access to her company’s VPN so she puts the document onto a Google Drive (the Resource server) or other similar cloud storage. By doing that, she had established a trust between her and Google (the Authorization server). She marks the document for sharing with John (John already uses Google Drive service and Jenny knows his email).
When John wants to read the document, he authenticates himself to his Google account and from his mobile device (tablet, notebook, etc.) he launches a document editor (the Client server) and loads Jenny’s project file.
Whilst it sounds quite simple, there is a lot of communication between the two persons and Google. All communication follows the OAuth 2.0 specification, so John’s client – the reader application – has to authenticate first with Google (this step is not covered by OAUTH) and once authorized by John applying a consent on Google provided form, Google authorizes the reader application to access the document by issuing an access token. The reader application uses the access token to issue a request to Google Drive service in order to retrieve Jenny’s file.
The diagram below illustrates communication between individual parties
Please note: whilst all OAUTH 2.0 communication is using HTTP requests, servers do not have to be web applications at all.
Let’s illustrate this simple scenario with InterSystems IRIS.
Simple Google Drive demo
In this demonstration we would create a small CSP based application that would request resources (list of files) stored at Google Drive service with our own account (and also a list of our calendars as a bonus).
Prerequisites
Before we can start with application coding, we need to prepare environment. This includes a web server with SSL enabled and a Google profile.
Web Server configuration
As stated above, we need to communicate to the Authorization server with SSL, as this is required by OAuth 2.0 by default. We want to keep our data secure, right?
It is out of scope of this article to explain how to configure a webserver to support SSL, so please refer to user manuals of a respective web server of your preference. For your curiosity (as we may later show some screenshots) we will, in this particular example, use Microsoft IIS server.
Google configuration
In order to register ourselves to Google, we need to use Google API Manager - https://console.developers.google.com/apis/library?project=globalsummit2016demo
For the purpose of the demonstration, we created an account GlobalSummit2016Demo. Make sure we have enabled the Drive API
Now, it is time to define credentials
Please note the following.
Authorized JavaScript – we allow only scripts originating locally – relatively to calling page
Authorized redirect URIs – in theory we can redirect our client application to any site, but when using InterSystems IRIS OAUTH implementation, we must redirect to https://localhost/csp/sys/oauth2/OAuth2.Response.cls. You can define multiple authorized redirect URIs, as illustrated in the screenshot, but for this demo we only need the second entry of the two.
Finally, we need to configure InterSystems IRIS as a client of the Google Authorization server
Caché configuration
InterSystems IRIS OAUTH2 client configuration is a two-step process. First, we need to create a Server Configuration.
In SMP, navigate to System Administration > Security > OAuth 2.0 > Client Configurations.
Click Create Server Configuration button, fill the form and save it.
All information entered into the form can be found at Google developers console site. Please note that InterSystems IRIS supports automatic Open ID discovery. However, as we are not using it, we entered all information manully
Now, click Client Configurations link next to the newly created Issuer Endpointand click Create Client Configuration button.
Leave Client Information and JWT Settings tabs empty (with default values) and fill client credentials.
Please note: We are creating Confidential Client (this is more secure than public and it means that client secret never leaves the client server application (it is never transmitted to the browser)
Further, make sure Use SSL/TLS is checked, and provide host name (localhost as we are redirecting locally to the client application) and eventually port and prefix (this is helpful when there are multiple InterSystems IRIS instances at the same machine). Based on the information entered, client redirect URL is computed and displayed in the above line.
In the screenshot above, we supplied a SSL configuration named GOOGLE. The name itself is actually only used to help you to determine which of possibly many SSL configurations, is used by this particular communication channel. Caché is using SSL/TLS configurations to store all necessary information to establish secure traffic with the server (in this case, the Google OAuth 2.0 URIs).
Please refer to documentation for more details.
Supply Client ID and Client Secret values as obtained from the Google Credentials definition form (when using manual configuration).
Now we have all configuration steps finished and can move forward to coding a CSP application.
Client application
Client application is a simple web based CSP application. As such, it consists of server side source code that is defined and executed by the web server and a user interface, exposed to user by a web browser. The sample code provided expects the client application to run in tyhe GOOGLE namespace. Please modify the path /csp/google/ to whatever your namespace is.
Client server
The client server is a simple two pages application. Within the application, we will
· Assemble redirection URL to Google Authorization server
· Perform requests to Google Drive API and Google Calendar API and display result
Page 1
This is a page of the application, where we decided to call Google for its resources.
Following is a minimalistic, but fully functional code, representing the page.
Class Web.OAUTH2.Google1N Extends %CSP.Page
{
Parameter OAUTH2CLIENTREDIRECTURI = "https://localhost/csp/google/Web.OAUTH2.Google2N.cls";
Parameter OAUTH2APPNAME = "Google";
ClassMethod OnPage() As %Status
{
&html<<html>
<head>
</head>
<body style="text-align: center;">
<!-- insert the page content here -->
<h1>Google OAuth2 API</h1>
<p>This page demo shows how to call Google API functions using OAuth2 authorization.
<p>We are going to retrieve information about user and his/her Google Drive files as well as calendar entries.
>
// we need to supply openid scope to authenticate to Google
set scope="openid https://www.googleapis.com/auth/userinfo.email "_
"https://www.googleapis.com/auth/userinfo.profile "_
"https://www.googleapis.com/auth/drive.metadata.readonly "_
"https://www.googleapis.com/auth/calendar.readonly"
set properties("approval_prompt")="force"
set properties("include_granted_scopes")="true"
set url=##class(%SYS.OAuth2.Authorization).GetAuthorizationCodeEndpoint(..#OAUTH2APPNAME,scope,
..#OAUTH2CLIENTREDIRECTURI,.properties,.isAuthorized,.sc)
w !,"<p><a href='"_url_"'><img border='0' alt='Google Sign In' src='images/google-signin-button.png' ></a>"
&html<</body>
</html>>
Quit $$$OK
}
ClassMethod OnPreHTTP() As %Boolean [ ServerOnly = 1 ]
{
#dim %response as %CSP.Response
set scope="openid https://www.googleapis.com/auth/userinfo.email "_
"https://www.googleapis.com/auth/userinfo.profile "_
"https://www.googleapis.com/auth/drive.metadata.readonly "_
"https://www.googleapis.com/auth/calendar.readonly"
if ##class(%SYS.OAuth2.AccessToken).IsAuthorized(..#OAUTH2APPNAME,,scope,.accessToken,.idtoken,.responseProperties,.error) {
set %response.ServerSideRedirect="Web.OAUTH2.Google2N.cls"
}
quit 1
}
}
A brief explanation of the code follows
1. OnPreHTTP method - first, we check if, by a chance, we already have obtained a valid access token as a result of Google authorization - this can happen e.g. when we simply refresh the page. If not, we need to authorize. If we do have token, we simply redirect page to the page showing results
2. OnPage method - we only get here if we have no valid access token available, so we need to start communication - authenticate and authorize ourselves to Google so that it grants us the access token.
3. We define a scope string and properties array that modify behavior of Google authentication dialog (we need to authenticate to Google before it can authorize us based on our identity).
4. Finally, we receive URL of a Google login page and we present it to the user followed by the consent page.
One more note:
We specify the true redirection page in https://www.localhost/csp/google/Web.OAUTH2.Google2N.cls in OAUTH2CLIENTREDIRECTURI parameter. However, we have used system page of InterSystems IRIS OAUTH Framework in the Google Credentials definition! The redirection is handled internally by our OAUTH handler class.
Page 2
This page shows results of Google authorization, and if successful, we invoke Google API calls to retrieve data. Again, this code is minimalistic, but fully functional. We leave up to reader’s imagination more structured way of displaying incoming data.
Include %occInclude
Class Web.OAUTH2.Google2N Extends %CSP.Page
{
Parameter OAUTH2APPNAME = "Google";
Parameter OAUTH2ROOT = "https://www.googleapis.com";
ClassMethod OnPage() As %Status
{
&html<<html>
<head>
</head>
<body>>
// Check if we have an access token
set scope="openid https://www.googleapis.com/auth/userinfo.email "_
"https://www.googleapis.com/auth/userinfo.profile "_
"https://www.googleapis.com/auth/drive.metadata.readonly "_
"https://www.googleapis.com/auth/calendar.readonly"
set isAuthorized=##class(%SYS.OAuth2.AccessToken).IsAuthorized(..#OAUTH2APPNAME,,scope,.accessToken,.idtoken,.responseProperties,.error)
if isAuthorized {
// Google has no introspection endpoint - nothing to call - the introspection endpoint and display result -- see RFC 7662.
w "<h3>Data from <span style='color:red;'>GetUserInfo API</span></h3>"
// userinfo has special API, but could be also retrieved by just calling Get() method with appropriate url
try {
set tHttpRequest=##class(%Net.HttpRequest).%New()
$$$THROWONERROR(sc,##class(%SYS.OAuth2.AccessToken).AddAccessToken(tHttpRequest,"query","GOOGLE",..#OAUTH2APPNAME))
$$$THROWONERROR(sc,##class(%SYS.OAuth2.AccessToken).GetUserinfo(..#OAUTH2APPNAME,accessToken,,.jsonObject))
w jsonObject.%ToJSON()
} catch (e) {
w "<h3><span style='color: red;'>ERROR: ",$zcvt(e.DisplayString(),"O","HTML")_"</span></h3>"
}
/******************************************
* *
* Retrieve info from other APIs *
* *
******************************************/
w "<hr>"
do ..RetrieveAPIInfo("/drive/v3/files")
do ..RetrieveAPIInfo("/calendar/v3/users/me/calendarList")
} else {
w "<h1>Not authorized!</h1>"
}
&html<</body>
</html>>
Quit $$$OK
}
ClassMethod RetrieveAPIInfo(api As %String)
{
w "<h3>Data from <span style='color:red;'>"_api_"</span></h3><p>"
try {
set tHttpRequest=##class(%Net.HttpRequest).%New()
$$$THROWONERROR(sc,##class(%SYS.OAuth2.AccessToken).AddAccessToken(tHttpRequest,"query","GOOGLE",..#OAUTH2APPNAME))
$$$THROWONERROR(sc,tHttpRequest.Get(..#OAUTH2ROOT_api))
set tHttpResponse=tHttpRequest.HttpResponse
s tJSONString=tHttpResponse.Data.Read()
if $e(tJSONString)'="{" {
// not a JSON
d tHttpResponse.OutputToDevice()
} else {
w tJSONString
w "<hr/>"
/*
// new JSON API
&html<<table border=1 style='border-collapse: collapse'>>
s tJSONObject={}.%FromJSON(tJSONString)
set iterator=tJSONObject.%GetIterator()
while iterator.%GetNext(.key,.value) {
if $isobject(value) {
set iterator1=value.%GetIterator()
w "<tr><td>",key,"</td><td><table border=1 style='border-collapse: collapse'>"
while iterator1.%GetNext(.key1,.value1) {
if $isobject(value1) {
set iterator2=value1.%GetIterator()
w "<tr><td>",key1,"</td><td><table border=0 style='border-collapse: collapse'>"
while iterator2.%GetNext(.key2,.value2) {
write !, "<tr><td>",key2, "</td><td>",value2,"</td></tr>"
}
// this way we can go on and on into the embedded objects/arrays
w "</table></td></tr>"
} else {
write !, "<tr><td>",key1, "</td><td>",value1,"</td></tr>"
}
}
w "</table></td></tr>"
} else {
write !, "<tr><td>",key, "</td><td>",value,"</td></tr>"
}
}
&html<</table><hr/>
>
*/
}
} catch (e) {
w "<h3><span style='color: red;'>ERROR: ",$zcvt(e.DisplayString(),"O","HTML")_"</span></h3>"
}
}
}
Let’s have a quick look at the code:
1. We, first of all, need to check whether we have valid access token (so we were authorized)
2. If so, we can issue requests to APIs offered by the Google, and covered by the issued access token
3. For that, we use standard %Net.HttpRequest class but we add access token to the GET or POST method according to the called API specification
4. As you can see, the OAUTH framework has implemented the GetUserInfo() method for your convenience, but you can retrieve user information directly using the Google API specification, in the same way as we do it in RetrieveAPIInfo() helper method
5. As it is common in the OAUTH world to exchange data in JSON format, we just read incoming data and simply dump it to the browser. It is up to the application developer to parse and format received data so user can see it in a meaningful way. But this is beyond the scope of this demonstration. (Though there is some code commented out that shows how parsing can be done.)
Here is a screenshot of the output, showing raw JSON data.
Continue to part 2, describing InterSystems IRIS acting as authorization server and OpenID Connect provider.
[1] https://tools.ietf.org/html/rfc6749, https://tools.ietf.org/html/rfc6750
Excelent post Dan, thank you very much! Here is the related video from Global Summit 2016 Daniel,you wrote that:we need to communicate to the Authorization server with SSLIs it really necessary for the first steps with Open ID / OAUTH in testing environment? Hello! I'm trying to configure and run example from this article. But I can't configure SSL configurations. I tried some ways:1. By openssl in Windows -2. By "Public Key Infrastructure" in intersystems portal management.If I test ssl config - i get " ERROR #6085: Unable to write to socket with SSL/TLS configuration 'TEST', error reported 'SSL/TLS error in SSL_connect(), SSL_ERROR_SSL: protocol error, error:14090086:SSL routines:ssl3_get_server_certificate:certificate verify failed' "Can you write example by configure ssl with step of create certificates? Hi @Daniel.Kutac - For modern versions, you'll need to change this line in Web.OAUTH2.Google2N:
w jsonObject.$toJSON()
to
w jsonObject.%ToJSON()
because we're now returning a %DynamicAbstractObject Thank you Michael for spotting this! it's fixed now. Nice post helped me a lot to understand how OAuth can be used with InterSystems IRIS The article is considered as InterSystems Data Platform Best Practice. Hi Dan, Can you please update the following to make this tutorial up-to-date?
The endpoints in the Google1N and Google2n depend on your server and ssl port. Maybe make a note there that .../csp/google/Web.OAUTH2.... would be /csp/user/Web or /csp/namespaceABC/Web.Oauth2 depending on where you implement the code.
The issuing endpoints for the tutorial have changed to the following: https://accounts.google.com/.well-known/openid-configuration
Thank you @Nicholai.Mitchko for updated information and suggestion. I have modified the article to refer to your reply.
Article
Daniel Kutac · Aug 10, 2016
Created by Daniel Kutac, Sales Engineer, InterSystemsWarning: if you get confused by URLs used: the original series used screens from machine called dk-gs2016. The new screenshots are taken from a different machine. You can safely treat url WIN-U9J96QBJSAG as if it was dk-gs2016.Part 2. Authorization server, OpenID Connect serverIn the previous part of this short series, we have learned about simple use case – acting as an OAUTH[1] client. Now, it’s time to bring our experience to a whole new level. We are going to build much more complex environment, where InterSystems IRIS is going to play all OAUTH roles.We know already how to make a client, so let’s concentrate on authorization server and even more, the OpenID Connect[2] provider.As in the previous part, we need to prepare environment. This time it is going to be trickier, as there are more moving parts.Before we go into the details of our example, we need to spend a few words about OpenID Connect.As you may recall from previous part, we were asked – in order to be authorized by Google – to authenticate ourselves with Google first. The authentication is not part of OAUTH framework. In fact, there are many authentication frameworks around, independent of OAUTH. One of them is called OpenID. Started originally as an independent initiative, it recently leverages infrastructure provided by OAUTH framework, namely communication and data structures. Thus, OpenID Connect was born. In fact, many people call it OAUTH on steroids. Indeed, with OpenID Connect, you can not only authorize, but also authenticate using well known interfaces of OAUTH framework.Complex OpenID Connect demoWe will leverage much of the client code from the part 1. This saves us a lot of work, so we can concentrate on setting up environment.PrerequisitesThis time we need to add, to already existing web server with SSL enabled, a PKI infrastructure. We need some cryptography required by OpenID Connect. If you want authenticate someone, you want to be absolutely sure that no-one else can impersonate the agent (client, auth server,...) who sends his/her confidential data over the network. This is where X.509 based cryptography comes in.Please note: beginning with Cache 2017.1, it is no more needed to use X.509 Certificates to generate JWT / JWKS (JSON Web Key Set). We, for the backward compatibility and simplicity, use this option.PKIStrictly said, we do not need to use Caché PKI infrastructure at all, but it is more convenient way than using tools like openssl directly to generate all certificates.We are not going into details of generating certificates here, as you can find details either within InterSystems IRIS documentation or elsewhere. As a result of generating certificates, we will create 3 public/private key pairs and associated certificates.Let’s call them· root_ca (root_ca.cer) for our issuing certification authority· auth (auth.cer and auth.key) for authorization & OpenID server· client (client.cer and client.key) for client application server X.509 CredentialsWe need to define X.509 credentials at individual servers so they can sign and validate JSON Web Tokens (JWT) exchanged during our demoAuthorization & Authentication server configurationWithout going into details about how to define X.509 Credentials, we just show a screenshot of AUTHSERVER instance credentials.As image indicates, the AUTHSERVER owns its private key and certificate , whilst it only has certificate with public key of the CLIENTClient server configurationAnd similarly, credentials defined at CLIENT instanceHere the CLIENT owns private key and certificate, but only certificate with public key of AUTHSERVER.Resource server configurationWe do not need to define X509 credentials at RESSERVER instance in our example setup.OAUTH ConfigurationSimilarly to configuration described in part 1 of this series, we need to configure our servers for OAUTH. Let’s start with AUTHSERVER instance, as this is the central component in overall OAUTH configuration.AUTHSERVERIn System Management Portal, navigate to System Administration > Security > OAuth 2.0 > Server Configuration.Click the menu link and fill form items:· host name· port (optional)· prefix (optional) – these three fields compose Issuer endpoint· specify conditions for return refresh token· check supported grant types, for our demo just check all four types. However only Authorization code is used.· optionally check Audience required – this adds aud property into authorization code and implicit requests· optionally check Support user session - this means that an httpOnly cookie is used by the authorization server to keep the current user of this browser logged in. The second and subsequent requests for the access token will not prompt for user name and password.· specify endpoint intervals· define scopes supported by this server· accept default or enter custom values of customization options – please note – change Generate token class valued from %OAuth2.Server.Generate to %OAuth2.Server.JWT so that a JWT is used as the access token rather than just an opaque token.· provide name of registered SSL configuration to establish SSL over HTTP as required by OAuth 2.0· Fill in settings for JSON Web Token (JWT) Here is a screenshot of sample configurationHaving defined server configuration, we need to supply server client configuration. Within the page with server configuration form, click Client Configurations button and then press Create New Configuration for your CLIENT and RESSERVER instances.This image shows CLIENT configuration.Leave JWT Token tab empty - with default values. As you can see, we populated fields with meaningless data, unlike in real application case.And similarly, RESSERVER configurationAs you can see, there is only very basic information needed for resource server, namely you need to set client type to Resource server. With CLIENT, you need to provide more information, the Client type (confidential as our client runs as web application capable of keeping client secret at server, not sending it to client agent).CLIENTIn SMP, navigate to System Administration > Security > OAuth 2.0 > Client Configurations.Click Create Server Configuration button, fill the form and save it.Make sure that Issuer Endpoint corresponds to the value we defined earlier at the AUTHSERVER instance! You also need to modify authorization server endpoints according to your web server configuration. In our case we just embedded ‘authserver’ into each input field.Now, click Client Configurations link next to the newly created Issuer Endpoint and click Create Client Configuration button.Good! At this moment we have both CLIENT and AUTHSERVER configured. That could be enough for many use cases, as resource server may be just a namespace of AUTHSERVER, thus protected already. But let’s consider that we want to cover a use case where an external doctor is trying to retrieve data from our internal clinical system. So in order to allow such doctor to retrieve data, we definitely want to store his account information INSIDE our resource server for auditing and forensic reasons. In that case, we need to continue and define configurations at RESSERVER.RESSERVERIn SMP, navigate to System Administration > Security > OAuth 2.0 > Client Configurations.Click Create Server Configuration button, fill the form and save it.We used discovery function here, this is a new feature implemented in Cache 2017.1As you can see, this configuration is using the same data as corresponding configuration at CLIENT instance.Now, click Client Configurations link next to the newly created Issuer Endpoint and click Create Client Configuration button.Creating WT from X.509 Credentials is not recommended, but we used it for compatibility.Oh yes! Indeed, this was tedious, but necessary process. But now we can move forward, and start coding!Client ApplicationTo keep things as simple as possible, we will recycle much of code from our Google example we described in part 1.The client application is just two CSP pages, running in /csp/myclient application, with no security enforced – it just runs as unauthenticated user.Page 1
Class Web.OAUTH2.Cache1N Extends %CSP.Page
{
Parameter OAUTH2CLIENTREDIRECTURI = "https://dk-gs2016/client/csp/myclient/Web.OAUTH2.Cache2N.cls";
Parameter OAUTH2APPNAME = "demo client";
ClassMethod OnPage() As %Status
{
&html<<html>
<head>
<style>
.portalLogo {
color: rgb(53,107,141);
position: relative;
font-weight: bold;
font-size: 12pt;
top: 0px;
right: 0px;
border: 2px solid rgb(53,107,141);
padding: 2px;
padding-left: 5px;
padding-right: 5px;
border-radius: 4px;
background: #E0E0F0;
}
.portalLogoBox {
position: static;
padding: 10px;
padding-bottom: 4px;
padding-right: 30px;
text-align: center;
}
.portalLogoSub {
position: relative;
color: #808080;
font-size: 8pt;
top: 3px;
right: 0px;
}
</style>
</head>
<body>
<h1>Authenticating and Authorizing against Cache´ OAuth2 provider</h1>
<p>This page demo shows how to call Cache´ API functions using OAuth2 authorization.
<p>We are going to call Cache´ authentication and authorization server to grant our application access to data stored at another
Cache´ server.
>
// Get the url for authorization endpoint with appropriate redirect and scopes.
// The returned url is used in the button below.
// DK: use 'dankut' account to authenticate!
set scope="openid profile scope1 scope2"
set url=##class(%SYS.OAuth2.Authorization).GetAuthorizationCodeEndpoint(
..#OAUTH2APPNAME,
scope,
..#OAUTH2CLIENTREDIRECTURI,
.properties,
.isAuthorized,
.sc)
if $$$ISERR(sc) {
write "GetAuthorizationCodeEndpoint Error="
write ..EscapeHTML($system.Status.GetErrorText(sc))_"<br>",!
}
&html<
<div class="portalLogoBox"><a class="portalLogo" href="#(url)#">Authorize for <b>ISC</b></a></div>
</body></html>>
Quit $$$OK
}
ClassMethod OnPreHTTP() As %Boolean [ ServerOnly = 1 ]
{
#dim %response as %CSP.Response
set scope="openid profile scope1 scope2"
if ##class(%SYS.OAuth2.AccessToken).IsAuthorized(..#OAUTH2APPNAME,,scope,.accessToken,.idtoken,.responseProperties,.error) {
set %response.ServerSideRedirect="Web.OAUTH2.Cache2N.cls"
}
quit 1
}
}
Page 2
Class Web.OAUTH2.Cache2N Extends %CSP.Page
{
Parameter OAUTH2APPNAME = "demo client";
Parameter OAUTH2ROOT = "https://dk-gs2016/resserver";
Parameter SSLCONFIG = "SSL4CLIENT";
ClassMethod OnPage() As %Status
{
&html<<html>
<head>
</head>
<style>
body { font-family: verdana; }
h4 { color:#2080E0 ;}
</style>
<body>>
// Check if we have an access token from oauth2 server
set isAuthorized=##class(%SYS.OAuth2.AccessToken).IsAuthorized(..#OAUTH2APPNAME,,"scope1 scope2",.accessToken,.idtoken,.responseProperties,.error)
// Continue with further checks if an access token exists.
// Below are all possible tests and may not be needed in all cases.
// The JSON object which is returned for each test is just displayed.
if isAuthorized {
write "<h3>Authorized!</h3>",!
// Validate and get the details from the access token, if it is a JWT.
set valid=##class(%SYS.OAuth2.Validation).ValidateJWT(..#OAUTH2APPNAME,accessToken,"scope1 scope2",,.jsonObject,.securityParameters,.sc)
if $$$ISOK(sc) {
if valid {
write "Valid JWT"_"<br>",!
} else {
write "Invalid JWT"_"<br>",!
}
write "Access token="
do jsonObject.%ToJSON()
write "<br>",!
} else {
write "JWT Error="_..EscapeHTML($system.Status.GetErrorText(sc))_"<br>",!
}
write "<br>",!
// Call the introspection endpoint and display result -- see RFC 7662.
set sc=##class(%SYS.OAuth2.AccessToken).GetIntrospection(..#OAUTH2APPNAME,accessToken,.jsonObject)
if $$$ISOK(sc) {
write "Introspection="
do jsonObject.%ToJSON()
write "<br>",!
} else {
write "Introspection Error="_..EscapeHTML($system.Status.GetErrorText(sc))_"<br>",!
}
write "<br>",!
if idtoken'="" {
// Validate and display the IDToken -- see OpenID Connect Core specification.
set valid=##class(%SYS.OAuth2.Validation).ValidateIDToken(
..#OAUTH2APPNAME,
idtoken,
accessToken,,,
.jsonObject,
.securityParameters,
.sc)
if $$$ISOK(sc) {
if valid {
write "Valid IDToken"_"<br>",!
} else {
write "Invalid IDToken"_"<br>",!
}
write "IDToken="
do jsonObject.%ToJSON()
write "<br>",!
} else {
write "IDToken Error="_..EscapeHTML($system.Status.GetErrorText(sc))_"<br>",!
}
} else {
write "No IDToken returned"_"<br>",!
}
write "<br>",!
// not needed for the application logic, but provides information about user that we can pass to Delegated authentication
// Call the userinfo endpoint and display the result -- see OpenID Connect Core specification.
set sc=##class(%SYS.OAuth2.AccessToken).GetUserinfo(
..#OAUTH2APPNAME,
accessToken,,
.jsonObject)
if $$$ISOK(sc) {
write "Userinfo="
do jsonObject.%ToJSON()
write "<br>",!
} else {
write "Userinfo Error="_..EscapeHTML($system.Status.GetErrorText(sc))_"<br>",!
}
write "<p>",!
/***************************************************
* *
* Call the resource server and display result. *
* *
***************************************************/
// option 1 - resource server - by definition - trusts data coming from authorization server,
// so it serves data to whoever is asking
// as long as access token passed to resource server is valid
// option 2 - alternatively, you can use delegated authentication (OpenID Connect)
// and call into another CSP application (with delegated authentication protection)
// - that's what we do here in this demo
write "<h4>Call resource server (delegated auth)","</h4>",!
set httpRequest=##class(%Net.HttpRequest).%New()
// AddAccessToken adds the current access token to the request.
set sc=##class(%SYS.OAuth2.AccessToken).AddAccessToken(
httpRequest,,
..#SSLCONFIG,
..#OAUTH2APPNAME)
if $$$ISOK(sc) {
set sc=httpRequest.Get(..#OAUTH2ROOT_"/csp/portfolio/oauth2test.demoResource.cls")
}
if $$$ISOK(sc) {
set body=httpRequest.HttpResponse.Data
if $isobject(body) {
do body.Rewind()
set body=body.Read()
}
write body,"<br>",!
}
if $$$ISERR(sc) {
write "Resource Server Error="_..EscapeHTML($system.Status.GetErrorText(sc))_"<br>",!
}
write "<br>",!
write "<h4>Call resource server - no auth, just token validity check","</h4>",!
set httpRequest=##class(%Net.HttpRequest).%New()
// AddAccessToken adds the current access token to the request.
set sc=##class(%SYS.OAuth2.AccessToken).AddAccessToken(
httpRequest,,
..#SSLCONFIG,
..#OAUTH2APPNAME)
if $$$ISOK(sc) {
set sc=httpRequest.Get(..#OAUTH2ROOT_"/csp/portfolio2/oauth2test.demoResource.cls")
}
if $$$ISOK(sc) {
set body=httpRequest.HttpResponse.Data
if $isobject(body) {
do body.Rewind()
set body=body.Read()
}
write body,"<br>",!
}
if $$$ISERR(sc) {
write "Resource Server Error="_..EscapeHTML($system.Status.GetErrorText(sc))_"<br>",!
}
write "<br>",!
} else {
write "Not Authorized!<p>",!
write "<a href='Web.OAUTH2.Cache1N.cls'>Authorize me</a>"
}
&html<</body></html>>
Quit $$$OK
}
}
Following screenshots illustrate processing:
Authorization / OpenID Connect Authentication server login page at AUTHSERVER instance
User consent page at AUTHSERVER
And, finally, resulting page
As you could see, reading through the code, indeed, there is almost no difference to client code we showed in part 1. There is something new that comes with page 2. This is some debugging information, and checking validity of JWT. Once we validated returned JWT, we could introspect data coming from AUTHSERVER about the user identity. We simply presented this information to the page output, but we can do more with it. As in the above mentioned use case of an external doctor, we can use the identity information and pass it to the resource server for the authentication purposes if required. Or just passing this information as parameter to API call to resource server.
Next paragraphs will describe how we used the user identity information, in more details.
Resource Application
The resource server can be the same server as authorization / authentication server and in many cases that would be the case. But in our demo, we made the two servers separate InterSystems IRIS instances.
So, we have two possible cases, how to work with security context on the resource server.
Alternative 1 – no authentication
This is the simple case. Authorization/ authentication server are just the same Caché instance. In this case we can simply pass access token to a csp application, which is specifically created for a single purpose – serve data to client applications that use OAUTH to authorize them to ask for data.
The configuration of the resource csp application (we called it /csp/portfolio2) can look like the screenshot below.
We put just minimum security into the application definition – allowing only specific CSP page to be executed.
Alternatively, the resource server can provide a REST API instead of classic web pages. In real life scenarios, this is all up to the user to fine-tune security context.
An example of source code:
Class oauth2test.demoResource Extends %CSP.Page
{
ClassMethod OnPage() As %Status
{
set accessToken=##class(%SYS.OAuth2.AccessToken).GetAccessTokenFromRequest(.sc)
if $$$ISOK(sc) {
set sc=##class(%SYS.OAuth2.AccessToken).GetIntrospection("RESSERVER resource",accessToken,.jsonObject)
if $$$ISOK(sc) {
// optionally validate against fields in jsonObject
w "<p><h3>Hello from Caché server: <i>/csp/portfolio2</i> application!</h3>"
w "<p>running code as <b>$username = "_$username_"</b> with following <b>$roles = "_$roles_"</b> at node <b>"_$p($zu(86),"*",2)_"</b>."
}
} else {
w "<h3>NOT AUTHORIZED!</h3>"
w "<pre>"
w
i $d(%objlasterror) d $system.OBJ.DisplayError()
w "</pre>"
}
Quit $$$OK
}
}
Alternative 2 – delegated authentication
This is another extreme case, we want to utilize user’s identity at resource server to the maximum possible extent – as if the user was working with equal security context as internal users of resource server.
One of possible potions we have, is using delegated authentication.
To get this setup running, we need to perform a few more steps to configure the resource server.
· Enable Delegated Authentication
· Provide ZAUTHENTICATE routine
· Configure Web application (in our case we called in /csp/portfolio)
The ZAUTHENTICATE routine implementation is very simple and straightforward, as we trust the AUTHSERVER who provided user identity as well as his/her scope (security profile), so we simply accept whatever username is coming and pass it along with scope to resource server user database (with necessary translation between OAUTH scope and InterSystems IRIS roles). That’s it. The rest is done seamlessly by InterSystems IRIS.
Here is an example of ZAUTHENTICATE routine
#include %occErrors
#include %occInclude
ZAUTHENTICATE(ServiceName, Namespace, Username, Password, Credentials, Properties) PUBLIC
{
set tRes=$SYSTEM.Status.OK()
try {
set Properties("FullName")="OAuth account "_Username
//set Properties("Roles")=Credentials("scope")
set Properties("Username")=Username
//set Properties("Password")=Password
// temporary hack as currently we can't pass Credentials array from GetCredentials() method
set Properties("Password")="xxx" // we don't really care about oauth2 account password
set Properties("Roles")=Password
} catch (ex) {
set tRes=$SYSTEM.Status.Error($$$AccessDenied)
}
quit tRes
}
GetCredentials(ServiceName,Namespace,Username,Password,Credentials) Public
{
s ts=$zts
set tRes=$SYSTEM.Status.Error($$$AccessDenied)
try {
If ServiceName="%Service_CSP" {
set accessToken=##class(%SYS.OAuth2.AccessToken).GetAccessTokenFromRequest(.sc)
if $$$ISOK(sc) {
set sc=##class(%SYS.OAuth2.AccessToken).GetIntrospection("RESSERVER resource",accessToken,.jsonObject)
if $$$ISOK(sc) {
// todo: watch out for potential collision between standard account and delegated (openid) one!
set Username=jsonObject.username
set Credentials("scope")=$p(jsonObject.scope,"openid profile ",2)
set Credentials("namespace")=Namespace
// temporary hack
//set Password="xxx"
set Password=$tr(Credentials("scope")," ",",")
set tRes=$SYSTEM.Status.OK()
} else {
set tRes=$SYSTEM.Status.Error($$$GetCredentialsFailed)
}
}
} else {
set tRes=$SYSTEM.Status.Error($$$AccessDenied)
}
} catch (ex) {
set tRes=$SYSTEM.Status.Error($$$GetCredentialsFailed)
}
Quit tRes
}
The CSP page itself can then be very simple:
Class oauth2test.demoResource Extends %CSP.Page
{
ClassMethod OnPage() As %Status
{
// access token authentication is performed by means of Delegated authentication!
// no need to do it, again, here
// This is a dummy resource server which just gets the access token from the request and
// uses the introspection endpoint to ensure that the access token is valid.
// Normally the response would not be security related, but would contain some interesting
// data based on the request parameters.
w "<p><h3>Hello from Caché server: <i>/csp/portfolio</i> application!</h3>"
w "<p>running code as <b>$username = "_$username_"</b> with following <b>$roles = "_$roles_"</b> at node <b>"_$p($zu(86),"*",2)_"</b>."
Quit $$$OK
}
}
And, lastly, the Web application configuration for /csp/portfolio
If you were really paranoid, you could set Permitted classes as we did in first variant. Or, again, use REST API. But all this is way beyond the scope of our topic.
Next time, we are going to explain individual classes, introduced by the InterSystems IRIS OAUTH framework. We will describe their APIs, and when / where to call them.
[1] Whenever we mention OAUTH we mean OAuth 2.0 as specified in RFC 6749 - https://tools.ietf.org/html/rfc6749. We use shortcut OAUTH just for simplicity.
[2] OpenID Connect is maintained by OpenID Foundation – http://openid.net/connect Very interesting article series. I've just started to look into the OAuth 2.0 options supported by Caché. We are considering it as a method to secure an Angular (2+) application for communition with a Caché REST backend. Do you know if anyone else testing/using a similar approach? I noticed that there are a few missing images in the AUTHSERVER section. Would it be possible for you to add these to the article again? Lasse, can you be more specific please? I'll be happy to add more information, but I need to know what are you missing.Thank you! Hi DanielI was referring to images in the AUTHSERVER section that should show a sample configuration for the authentication server. The following images fail to load for me: 4_4.png, 5_3.png, 6_2.png, 7_0.png. Oh, now I see. I'm using Microsoft Edge as default browser and it displays them OK. Chrome is the troublemaker.I'll see what can I do to fix it. Fixed, can you check? Fixed All images are displaying correctly for me now (in Chrome as you correctly guessed). Thanks! Hello Daniel, I'm trying to figure how to make a REST resource available through JWT access token.I noticed that you used:set accessToken=##class(%SYS.OAuth2.AccessToken).GetAccessTokenFromRequest(.sc)For your resource oauth2test.demoResource, but it doesn't seem like this method validates the access token itself.As it only checks for http header validity.Does this means I'm obligated to call the introspection method or should I simply use:##class(%SYS.OAuth2.Validation).ValidateJWT(..#OAUTH2APPNAME,accessToken,"scope1 scope2",,.jsonObject,.securityParameters,.sc)Any help regarding this doubt is appreciated. Hi Daniel,I am trying to implement OAuth auth server, a client and a resource REST service. I am using password grant type. I want to set up delegated authentication for the OAuth client. I have been able to get most of the setup working and am having trouble with the last part. As per instructions, I am using %session.Login in my oauth client, but when I try to go to the resource url, the session is changing and so I cannot access the resource page.I have tried setting groupid for the client and resource web applications, used CSPSHARE and CSPCHD. Wondering if the trouble might be that the client application is unauthenticated, but resource application is delegated auth.Is there any way to use delegated auth for password grant type. Any help you can provide is greatly appreciated.Thank you! Just wanted to post an update on this. I was able to resolve this issue. After a call to GetIntrospection, we need to check for the value of jsonObject.active. If the token is invalid, GetIntrospection might return ok status, but active will be false in jsonObject.Thank you Hello Padma,sorry for delay in answering, I'm on vacation with limited access to computer. Glad you have resolved the issue!I was wondering what exactly are you trying to achieve, as grant type is determining messages flow between client and OAuth2 server. The way you authenticate yourself against Cache CSP (client) application is not related to the grant type at all. You can set your client CSP/ZEN app to use any Cache authentication. In one of project, where a Cache is issuing a HTTP request to a OAuth2 protected resource I'm using this code for password type grant:… main code
try {
set pResponse=##class(User.Response).%New()
set tHttpRequest=##class(%Net.HttpRequest).%New()
$$$THROWONERROR(tSC,..GetAccessToken())
$$$THROWONERROR(tSC,##class(%SYS.OAuth2.AccessToken).AddAccessToken(tHttpRequest,,tSSLConfig,..#oAUTH2aPPnAME,"NOTCSP")) // hardcoded sessionid to NOTCSP
set tHttpRequest.Server=<server>
set tHttpRequest.SSLCheckServerIdentity=0
set tURL=<whatever URL points to the resource>
$$$THROWONERROR(tSC,tHttpRequest.Get(tURL))
#dim tHttpResponse as %Net.HttpResponse = tHttpRequest.HttpResponse
$$$THROWONERROR(tSC,pResponse.Content.CopyFrom(tHttpResponse.Data))
} catch (e) {
Set tSC=e.AsStatus()
}
and GetAccessToken method
Method GetAccessToken() As %Status
{
#dim tSC as %Status = $$$OK
try {
//obtain Oauth2 token
set tScope="user/*"
set tApplication=..#oAUTH2aPPnAME
set tSessionId="NOTCSP"
set tUsername=<username>
set tPassword=<password>
#dim tError as %OAuth2.Error
// verify we have already access token
if '##class(%SYS.OAuth2.AccessToken).IsAuthorized(tApplication,tSessionId,tScope,.tAccessToken,.tIdToken,.tResponseProperties,.tError) {
// we shall check whether we have access privileges, not done here
//eventuallyt call ##class(%SYS.OAuth2.Validation).ValidateJWT()
// retrieve token from auth server and store to internal peristent store
$$$THROWONERROR(tSC,##class(%SYS.OAuth2.Authorization).GetAccessTokenPassword(tApplication,tUsername,tPassword,tScope,.tResponseProperties,.tError))
// load token to memory
set tIsAuthorized=##class(%SYS.OAuth2.AccessToken).IsAuthorized(tApplication,tSessionId,tScope,.tAccessToken,.tIdToken,.tResponseProperties,.tError)
}
if $isobject(tError) throw
} catch (e) {
throw e
}
Quit tSC
}
Hi Daniel, thanks for this article. I am wondering what's the well-known address, I've tried in different ways but no success. e.g from authorization server URI: https://localhost:<PORT>/<PREFIX>/oauth2/.well-known/openid-configuration
Can you please help me to find out the right well known URL?
Announcement
Janine Perkins · Jun 17, 2016
Learn about the creation and configuration of the HealthShare Business Services and Business Operations used to support the receipt and re-transmission of HL7 messages.Take HL7 I/O using HealthShare online course to learn to:Add HL7 Business Services and Business Operations to a production, both through the portal’s wizards and by copying a component already in the production.Configure HL7 Business Services, Operations, and Adapters.Learn More.