InterSystems IRIS Open Authorization Framework (OAuth 2.0) implementation - part 1
This article, and following two articles of the series, is intended as a user guide for developers or system administrators, who need to work with OAuth 2.0 framework (further referred to as OAUTH for simplicity) in their InterSystems product based applications.
Created by Daniel Kutac, Senior Sales Engineer, InterSystems
History of post-publishing corrections and changes
- August 3, 2016 - fixed Google Client configuration screenshot, updated Google APIs screenshot to reflect new version of pages
- August 28, 2016 - changes to JSON related code, reflecting changes to Cache 2016.2 JSON support.
- May 3 2017 - updates to text and screens to reflect new UI and features released with Cache 2017.1
- February 19 2018 - changed Caché to InterSystems IRIS to reflect latest development. Please bear in mind, however, that despite the change in product name, the article covers all InterSystems products - InterSystems IRIS Data Platform, Ensemble and Caché.
- August 17 2020 - everythiong changes, and software even more. Please consult reply from Micholai Mitchko for updated Google's Oauth2 url.
Part 1. Client
Introduction
This is the first part of 3 part series of articles about the InterSystems implementation of the Open Authorization Framework.
In this first part, we give a short introduction to the topic and show a simple scenario where InterSystems IRIS application acts as a client to an Authorization server, requesting some protected resources.
The second part will describe a more complex scenario, where InterSystems IRIS itself acts as an authorization server and also as an authentication server via OpenID Connect.
The last part of this series will describe individual parts of OAUTH framework classes as they are implemented by InterSystems IRIS.
What is Open Authorization Framework[1] about
Many of you have already had a chance to hear about Open Authorization Framework and what is can be used for. So just a brief summary for those who have not heard about it yet.
Open Authorization Framework, OAUTH, currently at version 2.0, is a protocol allowing primarily web based application to Exchange information in a secured way by establishing indirect trust between a client (application requesting data) and a resource owner (application holding requested data). The trust itself is provided by a body that both client and resource server recognize and trust. This body is called the authorization server.
A simple illustration use case follows:
Suppose Jenny (in OAUTH terminology the Resource owner) works on a project in company JennyCorp. She creates a project plan for a larger potential business and invites her business partner John (client user) from JohnInc to review the document. She is not happy, though, to give John access to her company’s VPN so she puts the document onto a Google Drive (the Resource server) or other similar cloud storage. By doing that, she had established a trust between her and Google (the Authorization server). She marks the document for sharing with John (John already uses Google Drive service and Jenny knows his email).
When John wants to read the document, he authenticates himself to his Google account and from his mobile device (tablet, notebook, etc.) he launches a document editor (the Client server) and loads Jenny’s project file.
Whilst it sounds quite simple, there is a lot of communication between the two persons and Google. All communication follows the OAuth 2.0 specification, so John’s client – the reader application – has to authenticate first with Google (this step is not covered by OAUTH) and once authorized by John applying a consent on Google provided form, Google authorizes the reader application to access the document by issuing an access token. The reader application uses the access token to issue a request to Google Drive service in order to retrieve Jenny’s file.
The diagram below illustrates communication between individual parties
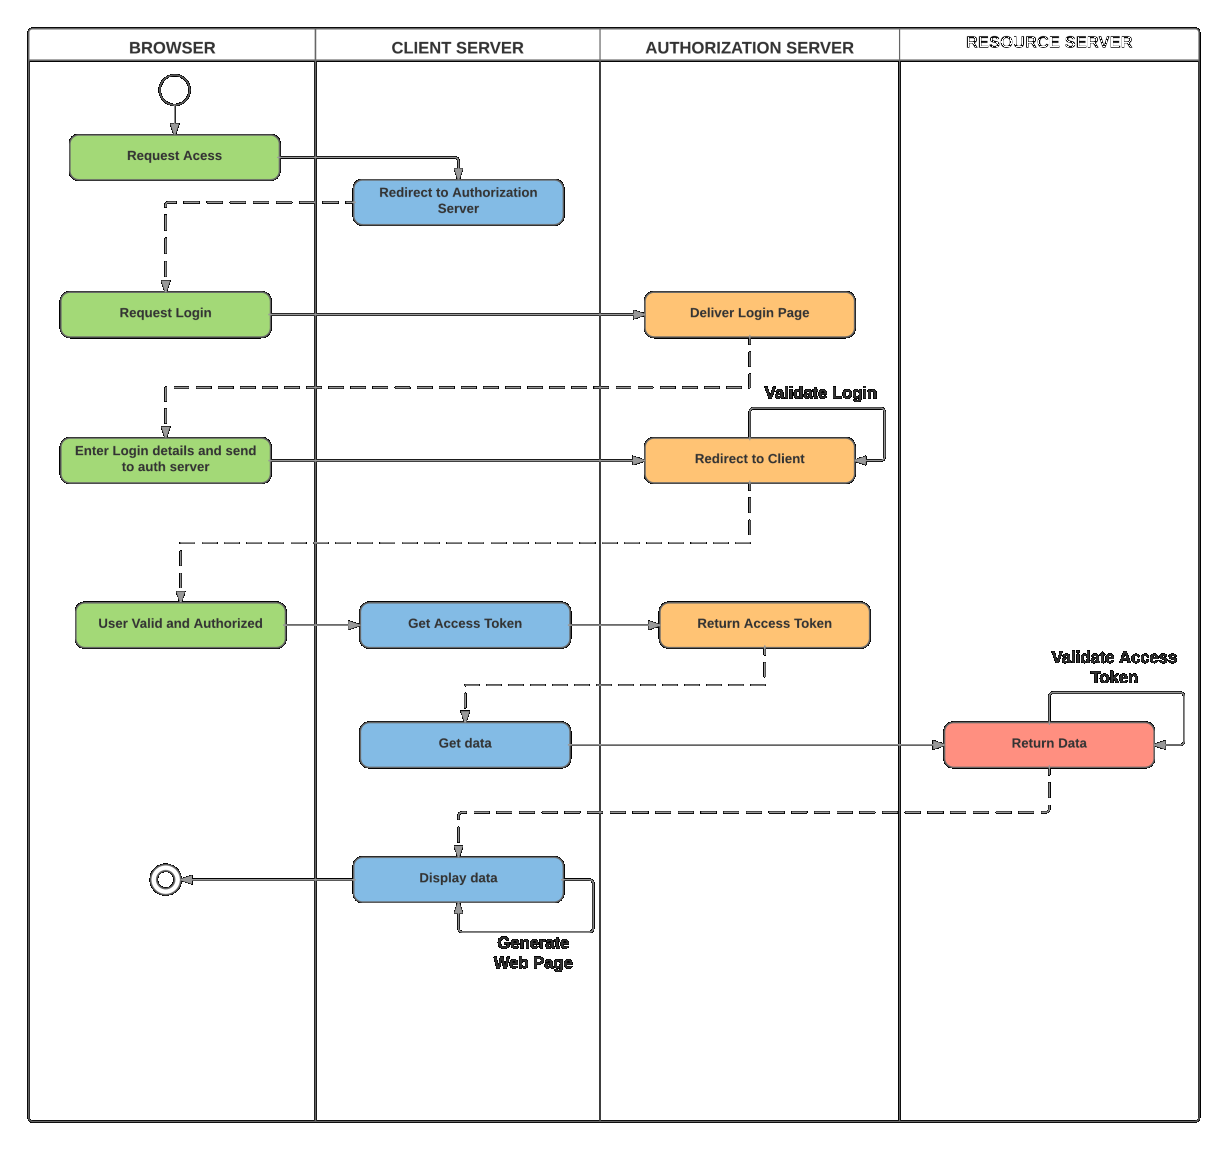
Please note: whilst all OAUTH 2.0 communication is using HTTP requests, servers do not have to be web applications at all.
Let’s illustrate this simple scenario with InterSystems IRIS.
Simple Google Drive demo
In this demonstration we would create a small CSP based application that would request resources (list of files) stored at Google Drive service with our own account (and also a list of our calendars as a bonus).
Prerequisites
Before we can start with application coding, we need to prepare environment. This includes a web server with SSL enabled and a Google profile.
Web Server configuration
As stated above, we need to communicate to the Authorization server with SSL, as this is required by OAuth 2.0 by default. We want to keep our data secure, right?
It is out of scope of this article to explain how to configure a webserver to support SSL, so please refer to user manuals of a respective web server of your preference. For your curiosity (as we may later show some screenshots) we will, in this particular example, use Microsoft IIS server.
Google configuration
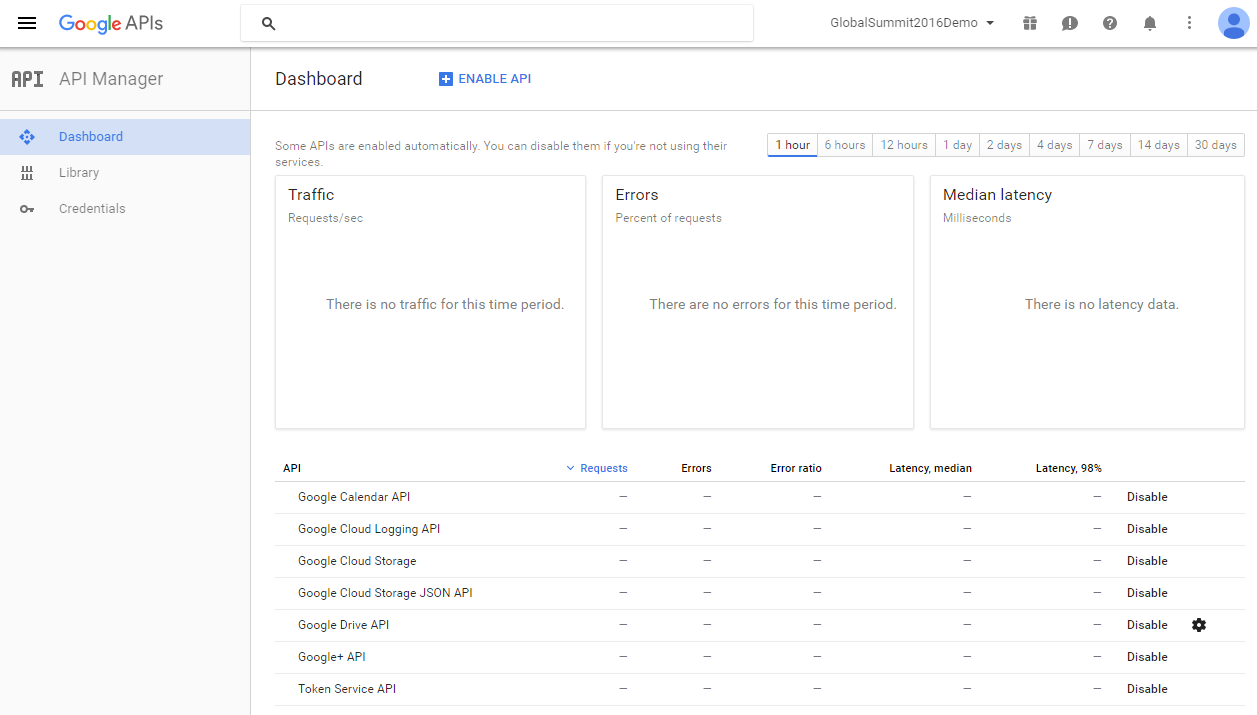
In order to register ourselves to Google, we need to use Google API Manager - https://console.developers.google.com/apis/library?project=globalsummit2016demo
For the purpose of the demonstration, we created an account GlobalSummit2016Demo. Make sure we have enabled the Drive API
Now, it is time to define credentials

Please note the following.
Authorized JavaScript – we allow only scripts originating locally – relatively to calling page
Authorized redirect URIs – in theory we can redirect our client application to any site, but when using InterSystems IRIS OAUTH implementation, we must redirect to https://localhost/csp/sys/oauth2/OAuth2.Response.cls. You can define multiple authorized redirect URIs, as illustrated in the screenshot, but for this demo we only need the second entry of the two.
Finally, we need to configure InterSystems IRIS as a client of the Google Authorization server
Caché configuration
InterSystems IRIS OAUTH2 client configuration is a two-step process. First, we need to create a Server Configuration.
In SMP, navigate to System Administration > Security > OAuth 2.0 > Client Configurations.
Click Create Server Configuration button, fill the form and save it.
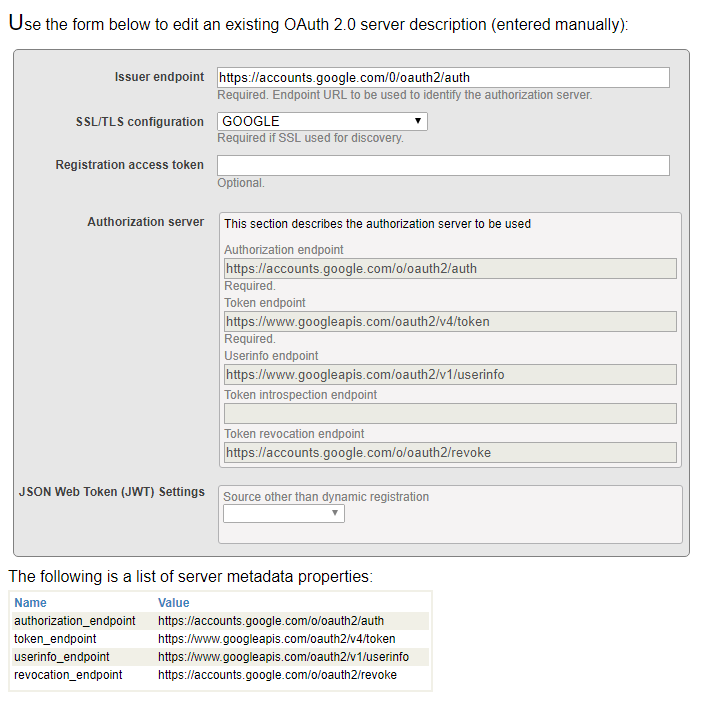
All information entered into the form can be found at Google developers console site. Please note that InterSystems IRIS supports automatic Open ID discovery. However, as we are not using it, we entered all information manully
Now, click Client Configurations link next to the newly created Issuer Endpoint
and click Create Client Configuration button.
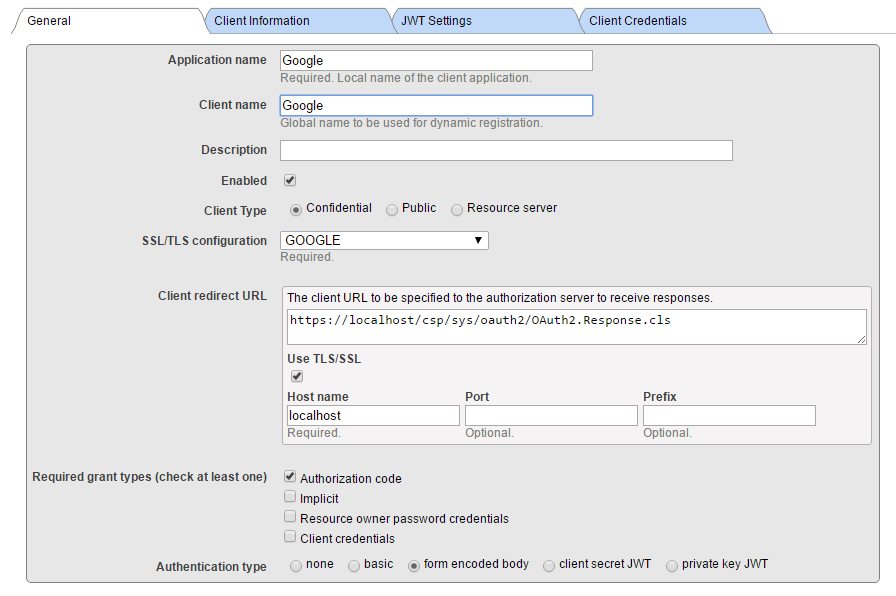
Leave Client Information and JWT Settings tabs empty (with default values) and fill client credentials.
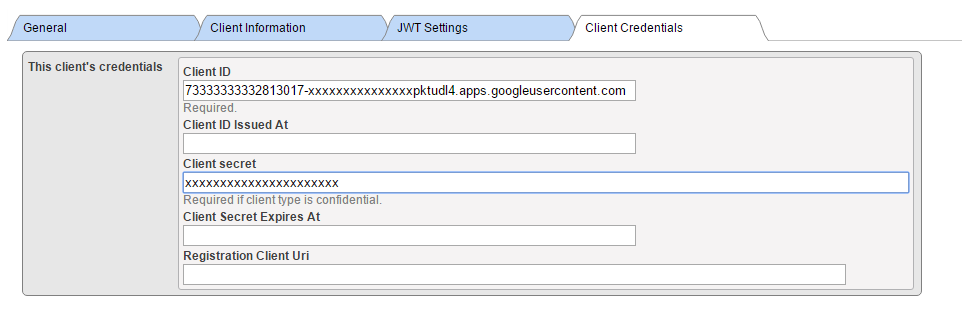
Please note: We are creating Confidential Client (this is more secure than public and it means that client secret never leaves the client server application (it is never transmitted to the browser)
Further, make sure Use SSL/TLS is checked, and provide host name (localhost as we are redirecting locally to the client application) and eventually port and prefix (this is helpful when there are multiple InterSystems IRIS instances at the same machine). Based on the information entered, client redirect URL is computed and displayed in the above line.
In the screenshot above, we supplied a SSL configuration named GOOGLE. The name itself is actually only used to help you to determine which of possibly many SSL configurations, is used by this particular communication channel. Caché is using SSL/TLS configurations to store all necessary information to establish secure traffic with the server (in this case, the Google OAuth 2.0 URIs).
Please refer to documentation for more details.
Supply Client ID and Client Secret values as obtained from the Google Credentials definition form (when using manual configuration).
Now we have all configuration steps finished and can move forward to coding a CSP application.
Client application
Client application is a simple web based CSP application. As such, it consists of server side source code that is defined and executed by the web server and a user interface, exposed to user by a web browser. The sample code provided expects the client application to run in tyhe GOOGLE namespace. Please modify the path /csp/google/ to whatever your namespace is.
Client server
The client server is a simple two pages application. Within the application, we will
· Assemble redirection URL to Google Authorization server
· Perform requests to Google Drive API and Google Calendar API and display result
Page 1
This is a page of the application, where we decided to call Google for its resources.
Following is a minimalistic, but fully functional code, representing the page.
Class Web.OAUTH2.Google1N Extends %CSP.Page
{
Parameter OAUTH2CLIENTREDIRECTURI = "https://localhost/csp/google/Web.OAUTH2.Google2N.cls";
Parameter OAUTH2APPNAME = "Google";
ClassMethod OnPage() As %Status
{
  &html<<html>
<head>
</head>
<body style="text-align: center;">
        <!-- insert the page content here -->
        <h1>Google OAuth2 API</h1>
        <p>This page demo shows how to call Google API functions using OAuth2 authorization.
        <p>We are going to retrieve information about user and his/her Google Drive files as well as calendar entries.
        >

  // we need to supply openid scope to authenticate to Google
  set scope="openid https://www.googleapis.com/auth/userinfo.email "_
  "https://www.googleapis.com/auth/userinfo.profile "_
  "https://www.googleapis.com/auth/drive.metadata.readonly "_
  "https://www.googleapis.com/auth/calendar.readonly"
  set properties("approval_prompt")="force"
  set properties("include_granted_scopes")="true"
  set url=##class(%SYS.OAuth2.Authorization).GetAuthorizationCodeEndpoint(..#OAUTH2APPNAME,scope,
    ..#OAUTH2CLIENTREDIRECTURI,.properties,.isAuthorized,.sc)
  w !,"<p><a href='"_url_"'><img border='0' alt='Google Sign In' src='images/google-signin-button.png' ></a>"
      &html<</body>
</html>>
  Quit $$$OK
}
ClassMethod OnPreHTTP() As %Boolean [ ServerOnly = 1 ]
{
  #dim %response as %CSP.Response
  set scope="openid https://www.googleapis.com/auth/userinfo.email "_
    "https://www.googleapis.com/auth/userinfo.profile "_
    "https://www.googleapis.com/auth/drive.metadata.readonly "_
    "https://www.googleapis.com/auth/calendar.readonly"
  if ##class(%SYS.OAuth2.AccessToken).IsAuthorized(..#OAUTH2APPNAME,,scope,.accessToken,.idtoken,.responseProperties,.error) {
    set %response.ServerSideRedirect="Web.OAUTH2.Google2N.cls"
  }
  quit 1
  }
}
A brief explanation of the code follows
1. OnPreHTTP method - first, we check if, by a chance, we already have obtained a valid access token as a result of Google authorization - this can happen e.g. when we simply refresh the page. If not, we need to authorize. If we do have token, we simply redirect page to the page showing results
2. OnPage method - we only get here if we have no valid access token available, so we need to start communication - authenticate and authorize ourselves to Google so that it grants us the access token.
3. We define a scope string and properties array that modify behavior of Google authentication dialog (we need to authenticate to Google before it can authorize us based on our identity).
4. Finally, we receive URL of a Google login page and we present it to the user followed by the consent page.
One more note:
We specify the true redirection page in https://www.localhost/csp/google/Web.OAUTH2.Google2N.cls in OAUTH2CLIENTREDIRECTURI parameter. However, we have used system page of InterSystems IRIS OAUTH Framework in the Google Credentials definition! The redirection is handled internally by our OAUTH handler class.
Page 2
This page shows results of Google authorization, and if successful, we invoke Google API calls to retrieve data. Again, this code is minimalistic, but fully functional. We leave up to reader’s imagination more structured way of displaying incoming data.
Include %occInclude
Class Web.OAUTH2.Google2N Extends %CSP.Page
{
Parameter OAUTH2APPNAME = "Google";
Parameter OAUTH2ROOT = "https://www.googleapis.com";
ClassMethod OnPage() As %Status
{
  &html<<html>
   <head>
   </head>
   <body>>
  // Check if we have an access token
  set scope="openid https://www.googleapis.com/auth/userinfo.email "_
    "https://www.googleapis.com/auth/userinfo.profile "_
    "https://www.googleapis.com/auth/drive.metadata.readonly "_
    "https://www.googleapis.com/auth/calendar.readonly"
  set isAuthorized=##class(%SYS.OAuth2.AccessToken).IsAuthorized(..#OAUTH2APPNAME,,scope,.accessToken,.idtoken,.responseProperties,.error)
  if isAuthorized {
    // Google has no introspection endpoint - nothing to call - the introspection endpoint and display result -- see RFC 7662.
    w "<h3>Data from <span style='color:red;'>GetUserInfo API</span></h3>"
    // userinfo has special API, but could be also retrieved by just calling Get() method with appropriate url
    try {
    set tHttpRequest=##class(%Net.HttpRequest).%New()
      $$$THROWONERROR(sc,##class(%SYS.OAuth2.AccessToken).AddAccessToken(tHttpRequest,"query","GOOGLE",..#OAUTH2APPNAME))
      $$$THROWONERROR(sc,##class(%SYS.OAuth2.AccessToken).GetUserinfo(..#OAUTH2APPNAME,accessToken,,.jsonObject))
      w jsonObject.%ToJSON()
    } catch (e) {
      w "<h3><span style='color: red;'>ERROR: ",$zcvt(e.DisplayString(),"O","HTML")_"</span></h3>"
    }
    /******************************************
    *                                         *
    *      Retrieve info from other APIs      *
    *                                         *
    ******************************************/
    w "<hr>"
    do ..RetrieveAPIInfo("/drive/v3/files")

    do ..RetrieveAPIInfo("/calendar/v3/users/me/calendarList")
  } else {
    w "<h1>Not authorized!</h1>"
  }
  &html<</body>
  </html>>
  Quit $$$OK
}


ClassMethod RetrieveAPIInfo(api As %String)
{
  w "<h3>Data from <span style='color:red;'>"_api_"</span></h3><p>"
  try {
    set tHttpRequest=##class(%Net.HttpRequest).%New()
    $$$THROWONERROR(sc,##class(%SYS.OAuth2.AccessToken).AddAccessToken(tHttpRequest,"query","GOOGLE",..#OAUTH2APPNAME))
    $$$THROWONERROR(sc,tHttpRequest.Get(..#OAUTH2ROOT_api))
    set tHttpResponse=tHttpRequest.HttpResponse
    s tJSONString=tHttpResponse.Data.Read()
    if $e(tJSONString)'="{" {
      // not a JSON
      d tHttpResponse.OutputToDevice()
    } else {
      w tJSONString
      w "<hr/>"
      /*
      // new JSON API
      &html<<table border=1 style='border-collapse: collapse'>>
      s tJSONObject={}.%FromJSON(tJSONString)
      set iterator=tJSONObject.%GetIterator()
        while iterator.%GetNext(.key,.value) {
          if $isobject(value) {
            set iterator1=value.%GetIterator()
            w "<tr><td>",key,"</td><td><table border=1 style='border-collapse: collapse'>"
            while iterator1.%GetNext(.key1,.value1) {
            if $isobject(value1) {
                set iterator2=value1.%GetIterator()
                w "<tr><td>",key1,"</td><td><table border=0 style='border-collapse: collapse'>"
                while iterator2.%GetNext(.key2,.value2) {
                    write !, "<tr><td>",key2, "</td><td>",value2,"</td></tr>"
                }
                // this way we can go on and on into the embedded objects/arrays
              w "</table></td></tr>"
            } else {
                  write !, "<tr><td>",key1, "</td><td>",value1,"</td></tr>"
            }
            }
          w "</table></td></tr>"
          } else {
              write !, "<tr><td>",key, "</td><td>",value,"</td></tr>"
          }
        }
    &html<</table><hr/>
    >
    */
    }
  } catch (e) {
    w "<h3><span style='color: red;'>ERROR: ",$zcvt(e.DisplayString(),"O","HTML")_"</span></h3>"
  }
}
}
Let’s have a quick look at the code:
1. We, first of all, need to check whether we have valid access token (so we were authorized)
2. If so, we can issue requests to APIs offered by the Google, and covered by the issued access token
3. For that, we use standard %Net.HttpRequest class but we add access token to the GET or POST method according to the called API specification
4. As you can see, the OAUTH framework has implemented the GetUserInfo() method for your convenience, but you can retrieve user information directly using the Google API specification, in the same way as we do it in RetrieveAPIInfo() helper method
5. As it is common in the OAUTH world to exchange data in JSON format, we just read incoming data and simply dump it to the browser. It is up to the application developer to parse and format received data so user can see it in a meaningful way. But this is beyond the scope of this demonstration. (Though there is some code commented out that shows how parsing can be done.)
Here is a screenshot of the output, showing raw JSON data.

Continue to part 2, describing InterSystems IRIS acting as authorization server and OpenID Connect provider.
Comments
Excelent post Dan, thank you very much!
Here is the related video from Global Summit 2016
Daniel,
you wrote that:
we need to communicate to the Authorization server with SSL
Is it really necessary for the first steps with Open ID / OAUTH in testing environment?
Hello! I'm trying to configure and run example from this article. But I can't configure SSL configurations. I tried some ways:
1. By openssl in Windows -
2. By "Public Key Infrastructure" in intersystems portal management.
If I test ssl config - i get " ERROR #6085: Unable to write to socket with SSL/TLS configuration 'TEST', error reported 'SSL/TLS error in SSL_connect(), SSL_ERROR_SSL: protocol error, error:14090086:SSL routines:ssl3_get_server_certificate:certificate verify failed' "
Can you write example by configure ssl with step of create certificates?
Hi @Daniel Kutac -
For modern versions, you'll need to change this line in Web.OAUTH2.Google2N:
w jsonObject.$toJSON()to
w jsonObject.%ToJSON()because we're now returning a %DynamicAbstractObject
Thank you Michael for spotting this! it's fixed now.
Nice post helped me a lot to understand how OAuth can be used with InterSystems IRIS
 The article is considered as InterSystems Data Platform Best Practice.
Hi Dan, Can you please update the following to make this tutorial up-to-date?
- The endpoints in the Google1N and Google2n depend on your server and ssl port. Maybe make a note there that .../csp/google/Web.OAUTH2.... would be /csp/user/Web or /csp/namespaceABC/Web.Oauth2 depending on where you implement the code.
- The issuing endpoints for the tutorial have changed to the following: https://accounts.google.com/.well-known/openid-configuration
.png)
Thank you @Nicholai Mitchko for updated information and suggestion. I have modified the article to refer to your reply.