Machine Learning in IRIS using the HuggingFace API and/or ml models in local ( using Python )
On this GitHub you can find all the information on how to use a HuggingFace machine learning / AI model on the IRIS Framework using python.

1. iris-huggingface
Usage of Machine Learning models in IRIS using Python; For text-to-text, text-to-image or image-to-image models.
Here, models as example :
2. Installation
2.1. Starting the Production
While in the iris-local-ml folder, open a terminal and enter :
docker-compose up
The very first time, it may take a few minutes to build the image correctly and install all the needed modules for Python.
2.2. Access the Production
Following this link, access the production : Access the Production
2.3. Closing the Production
docker-compose down
How it works
For now, some models may not work with this implementation since everything is automatically done, which means, no matter what model you input, we will try to make it work through transformers pipeline library.
Pipeline is a powerful tool by the HuggingFace team that will scan the folder in which we downloaded the model, then understand what library it should use between PyTorch, Keras, Tensorflow or JAX to then load that model using AutoModel.
From here, by inputting the task, the pipeline knows what to do with the model, tokenizer or even feature-extractor in this folder, and manage your input automatically, tokenize it, process it, pass it into the model, then give back the output in a decoded form usable directly by us.
3. HuggingFace API
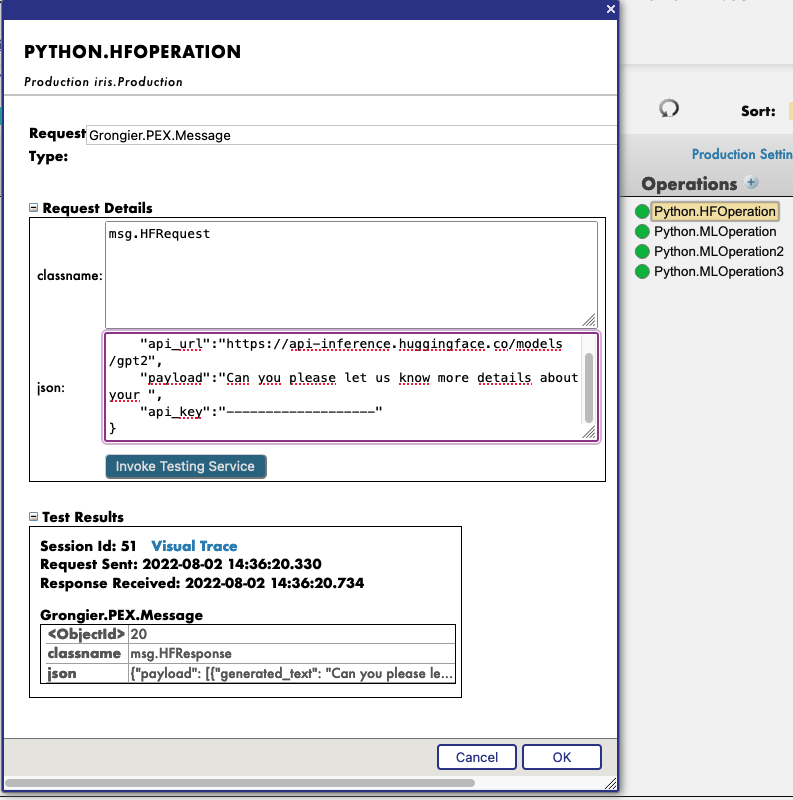
You must first start the demo, using the green Start button or Stop and Start it again to apply your config changes.
Then, by clicking on the operation Python.HFOperation of your choice, and selecting in the right tab action, you can test the demo.
In this test window, select :
Type of request : Grongier.PEX.Message
For the classname you must enter :
msg.HFRequest
And for the json, here is an example of a call to GPT2 :
{
    "api_url":"https://api-inference.huggingface.co/models/gpt2",
    "payload":"Can you please let us know more details about your ",
    "api_key":"----------------------"
}
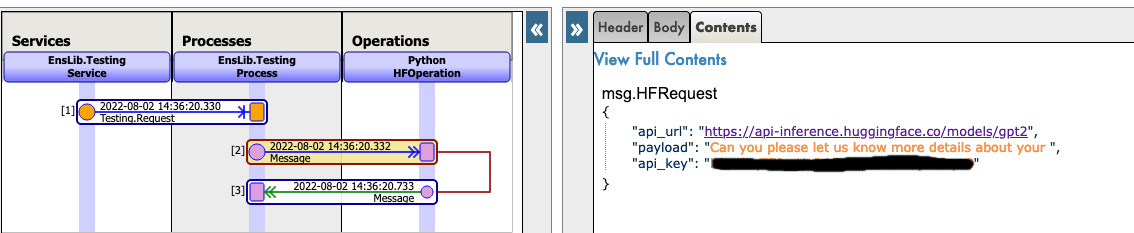
Now you can click on Visual Trace to see in details what happened and see the logs.
NOTE that you must have an API key from HuggingFace before using this Operation ( the api-keys are free, you just need to register to HF )
NOTE that you can change the url to try any other models from HuggingFace, you may need to change the payload.
See as example:

4. Use any model from the web
In the section we will teach you how to use almost any model from the internet, HuggingFace or not.
4.1. FIRST CASE : YOU HAVE YOUR OWN MODEL
In this case, you must copy paste your model, with the config, the tokenizer.json etc inside a folder inside the model folder.
Path : src/model/yourmodelname/
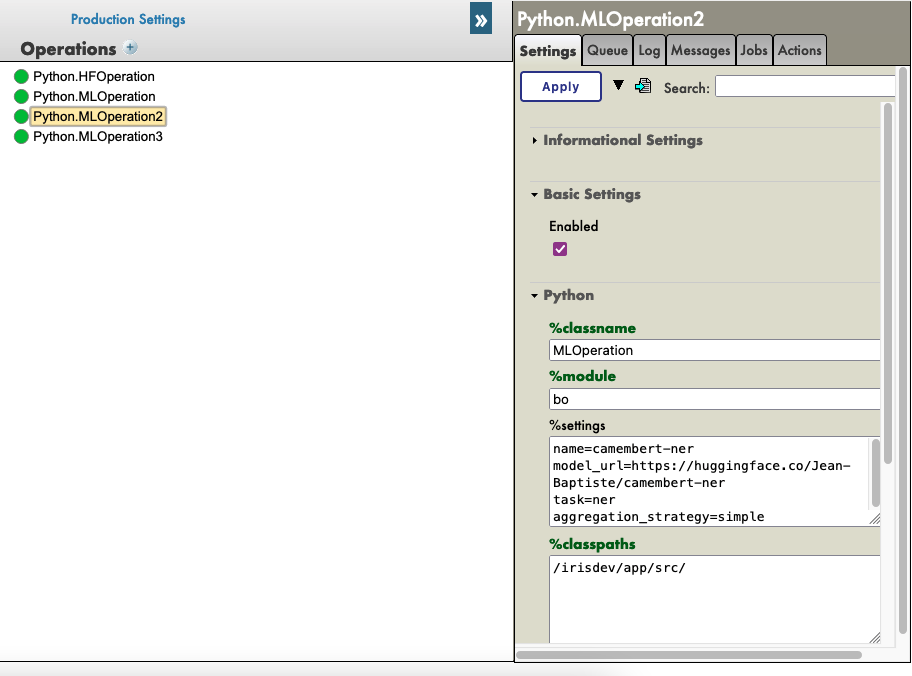
From here you must go to the parameters of the Python.MLOperation.
Click on the Python.MLOperation then go to settings in the right tab, then in the Python part, then in the %settings part.
Here, you can enter or modify any parameters ( don't forget to press apply once your are done ).
Here's the default configuration for this case :
%settings
name=yourmodelname
task=text-generation
NOTE that any settings that are not name or model_url will go into the PIPELINE settings.
Now you can double-click on the operation Python.MLOperation and start it.
You must see in the Log part the starting of your model.
From here, we create a PIPELINE using transformers that uses your config file find in the folder as seen before.
To call that pipeline, click on the operation Python.MLOperation , and select in the right tab action, you can test the demo.
In this test window, select :
Type of request : Grongier.PEX.Message
For the classname you must enter :
msg.MLRequest
And for the json, you must enter every arguments needed by your model.
Here is an example of a call to GPT2 :
{
    "text_inputs":"Unfortunately, the outcome",
    "max_length":100,
    "num_return_sequences":3
}
Click Invoke Testing Service and wait for the model to operate.
See for example:

Now you can click on Visual Trace to see in details what happened and see the logs.
See for example :

4.2. SECOND CASE : YOU WANT TO DOWNLOAD A MODEL FROM HUGGINGFACE
In this case, you must find the URL of the model on HuggingFace;
4.2.1. Settings
From here you must go to the parameters of the Python.MLOperation.
Click on the Python.MLOperation then go to settings in the right tab, then in the Python part, then in the %settings part.
Here, you can enter or modify any parameters ( don't forget to press apply once your are done ).
Here's some example configuration for some models we found on HuggingFace :
%settings for gpt2
model_url=https://huggingface.co/gpt2
name=gpt2
task=text-generation
%settings for camembert-ner
name=camembert-ner
model_url=https://huggingface.co/Jean-Baptiste/camembert-ner
task=ner
aggregation_strategy=simple
%settings for bert-base-uncased
name=bert-base-uncased
model_url=https://huggingface.co/bert-base-uncased
task=fill-mask
%settings for detr-resnet-50
name=detr-resnet-50
model_url=https://huggingface.co/facebook/detr-resnet-50
task=object-detection
%settings for detr-resnet-50-protnic
name=detr-resnet-50-panoptic
model_url=https://huggingface.co/facebook/detr-resnet-50-panoptic
task=image-segmentation
NOTE that any settings that are not name or model_url will go into the PIPELINE settings, so in our second example, the camembert-ner pipeline requirers an aggregation_strategy and a task that are specified here while the gpt2 requirers only a task.
See as example:
Now you can double-click on the operation Python.MLOperation and start it.
You must see in the Log part the starting of your model and the downloading.
NOTE You can refresh those logs every x seconds to see the advancement with the downloads.

From here, we create a PIPELINE using transformers that uses your config file find in the folder as seen before.
4.2.2. Testing
To call that pipeline, click on the operation Python.MLOperation , and select in the right tab action, you can test the demo.
In this test window, select :
Type of request : Grongier.PEX.Message
For the classname you must enter :
msg.MLRequest
And for the json, you must enter every arguments needed by your model.
Here is an example of a call to GPT2 ( Python.MLOperation ):
{
    "text_inputs":"George Washington lived",
    "max_length":30,
    "num_return_sequences":3
}
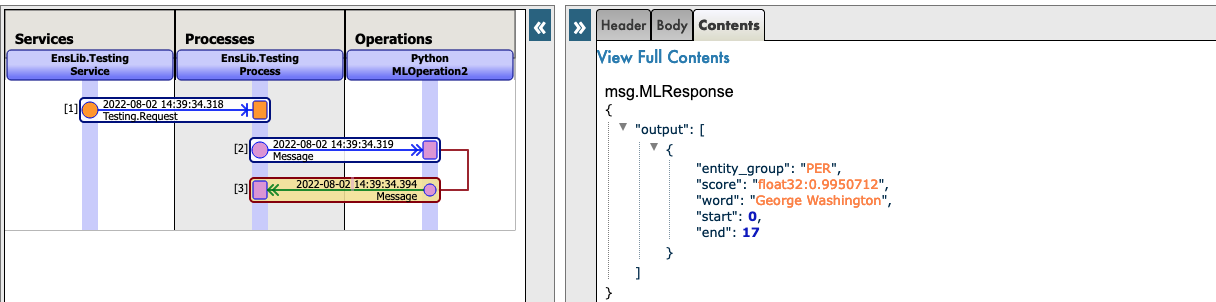
Here is an example of a call to Camembert-ner ( Python.MLOperation2 ) :
{
    "inputs":"George Washington lived in washington"
}
Here is an example of a call to bert-base-uncased ( Python.MLOperation3 ) :
{
    "inputs":"George Washington lived in [MASK]."
}
Here is an example of a call to detr-resnet-50 using an online url ( Python.MLOperationDETRRESNET ) :
{
    "url":"http://images.cocodataset.org/val2017/000000039769.jpg"
}
Here is an example of a call to detr-resnet-50-panoptic using the url as a path( Python.MLOperationDetrPanoptic ) :
{
    "url":"/irisdev/app/misc/000000039769.jpg"
}
Click Invoke Testing Service and wait for the model to operate.
Now you can click on Visual Trace to see in details what happened and see the logs.
NOTE that once the model was downloaded once, the production won't download it again but get the cached files found at src/model/TheModelName/.
If some files are missing, the Production will download them again.
See as example:
See as example:


5. TroubleShooting
If you have issues, reading is the first advice we can give you, most errors are easily understood just by reading the logs as almost all errors will be captured by a try / catch and logged.
If you need to install a new module, or Python dependence, open a terminal inside the container and enter for example : "pip install new-module"
To open a terminal there are many ways,
- If you use the InterSystems plugins, you can click in the below bar in VSCode, the one looking like
docker:iris:52795[IRISAPP]and selectOpen Shell in Docker. - In any local terminal enter :
docker-compose exec -it iris bash - From Docker-Desktop find the IRIS container and click on
Open in terminal
Some models may require some changes for the pipeline or the settings for example, it is your task to add in the settings and in the request the right information.
6. Conclusion
From here you should be able to use any model that you need or own on IRIS.
NOTE that you can create a Python.MLOperation for each of your model and have them on at the same time.
Comments
What a neat demo, looking forward to have something with picture like Dall-E (https://huggingface.co/spaces/dalle-mini/dalle-mini).
Do you have Dall-E access? I'm still on a waitlist.
I don't have access to Dall-E 2, I use mini-Dall-E : https://huggingface.co/dalle-mini.
If you are interested in ml and images I just updated the GitHub to work with `object-detection`, `image-segmentation` and `image-classification`.
I added some examples with the facebook detr resnet 50 to analyze images.
On the mean time I'm working on a GitHub to fine tune the ner state-of-the-art SpaCy to work with health data if you are interested.
💡 This article is considered as InterSystems Data Platform Best Practice