Ensemble / Interoperability Training Course
This training course is addressed to beginners who would like to discover the IRIS Interoperability framework. We will be using Docker and VSCode.
GitHub: https://github.com/grongierisc/formation-template
1. Ensemble / Interoperability Formation
The goal of this formation is to learn InterSystems' interoperability framework, and particularly the use of:
- Productions
- Messages
- Business Operations
- Adapters
- Business Processes
- Business Services
- REST Services and Operations
TABLE OF CONTENTS:
- 1. Ensemble / Interoperability Formation
- 2. Framework
- 3. Adapting the framework
- 4. Prerequisites
- 5. Setting up
- 6. Productions
- 7. Operations
- 8. Business Processes
- 9. Getting access to an extern database using JDBC
- 10. REST service
- Conclusion
2. Framework
This is the IRIS Framework.
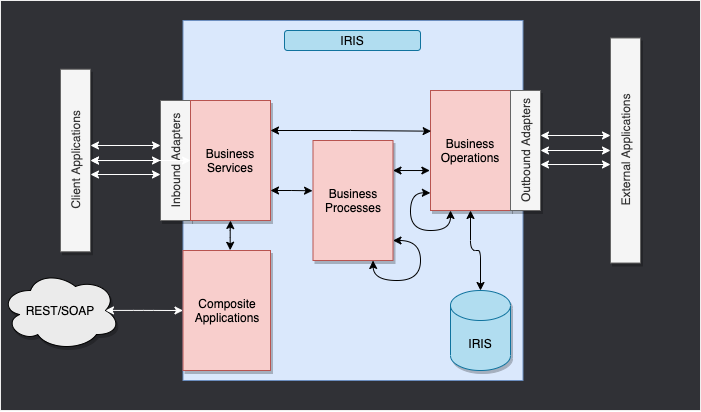
The components inside of IRIS represent a production. Inbound adapters and outbound adapters enable us to use different kind of format as input and output for our databse. The composite applications will give us access to the production through external applications like REST services.
The arrows between them all of this components are messages. They can be requests or responses.
3. Adapting the framework
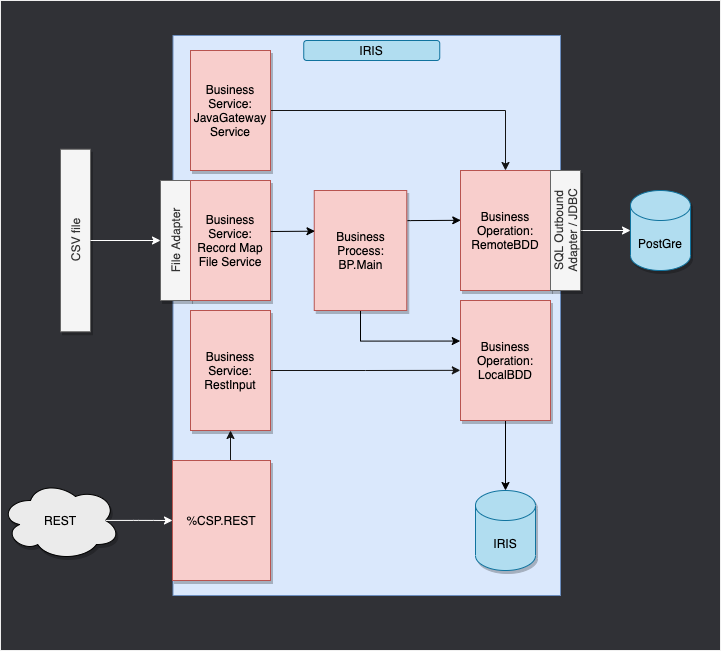
In our case, we will read lines in a csv file and save it into the IRIS database.
We will then add an operation that will enable us to save objects in an extern database too, using JDBC. This database will be located in a docker container, using postgre.
Finally, we will see how to use composite applications to insert new objects in our database or to consult this database (in our case, through a REST service).
The framework adapted to our purpose gives us:
4. Prerequisites
For this formation, you'll need:
- VSCode: https://code.visualstudio.com/
- The InterSystems addons suite for vscode: https://intersystems-community.github.io/vscode-objectscript/installation/
- Docker: https://docs.docker.com/get-docker/
- The docker addon for VSCode.
5. Setting up
5.1. Docker containers
In order to have access to the InterSystems images, we need to go to the following url: http://container.intersystems.com. After connecting with our InterSystems credentials, we will get our password to connect to the registry. In the docker VScode addon, in the image tab, by pressing connect registry and entering the same url as before (http://container.intersystems.com) as a generic registry, we will be asked to give our credentials. The login is the usual one but the password is the one we got from the website.
From there, we should be able to build and compose our containers (with the docker-compose.yml and Dockerfile files given).
5.2. Management Portal
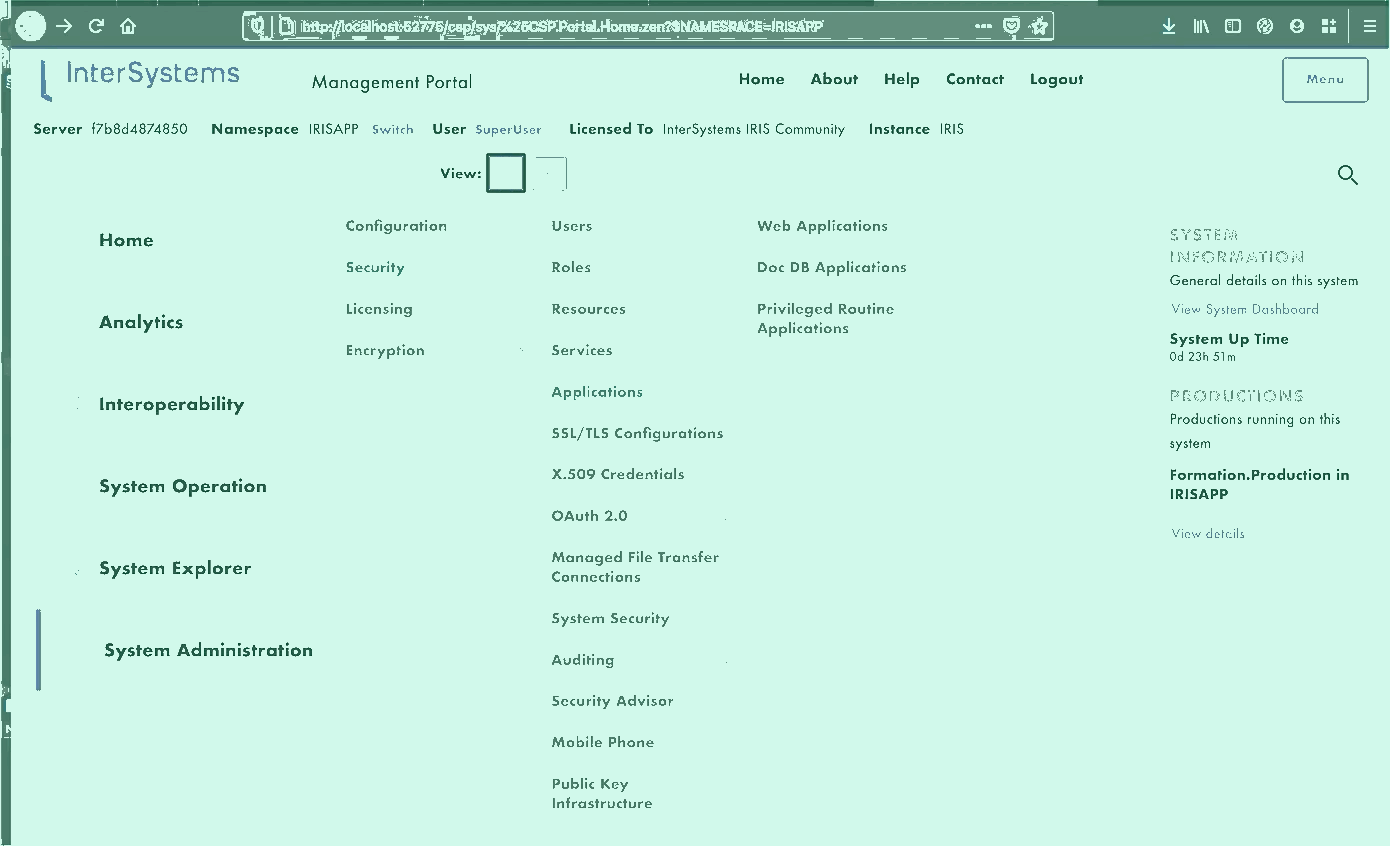
We will open a Management Portal. It will give us access to an webpage where we will be able to create our production. The portal should be located at the url: http://localhost:52775/csp/sys/UtilHome.csp?$NAMESPACE=IRISAPP. You will need the following credentials:
LOGIN: SuperUser
PASSWORD: SYS
5.3. Saving progress
A part of the things we will be doing will be saved locally, but all the processes and productions are saved in the docker container. In order to persist all of our progress, we need to export every class that is created through the Management Portal with the InterSystems addon ObjectScript:

We will have to save our Production, Record Map, Business Processes and Data Transfromation this way. After that, when we close our docker container and compose it up again, we will still have all of our progress saved locally (it is, of course, to be done after every change through the portal). To make it accessible to IRIS again we need to compile the exported files (by saving them, InterSystems addons take care of the rest).
6. Productions
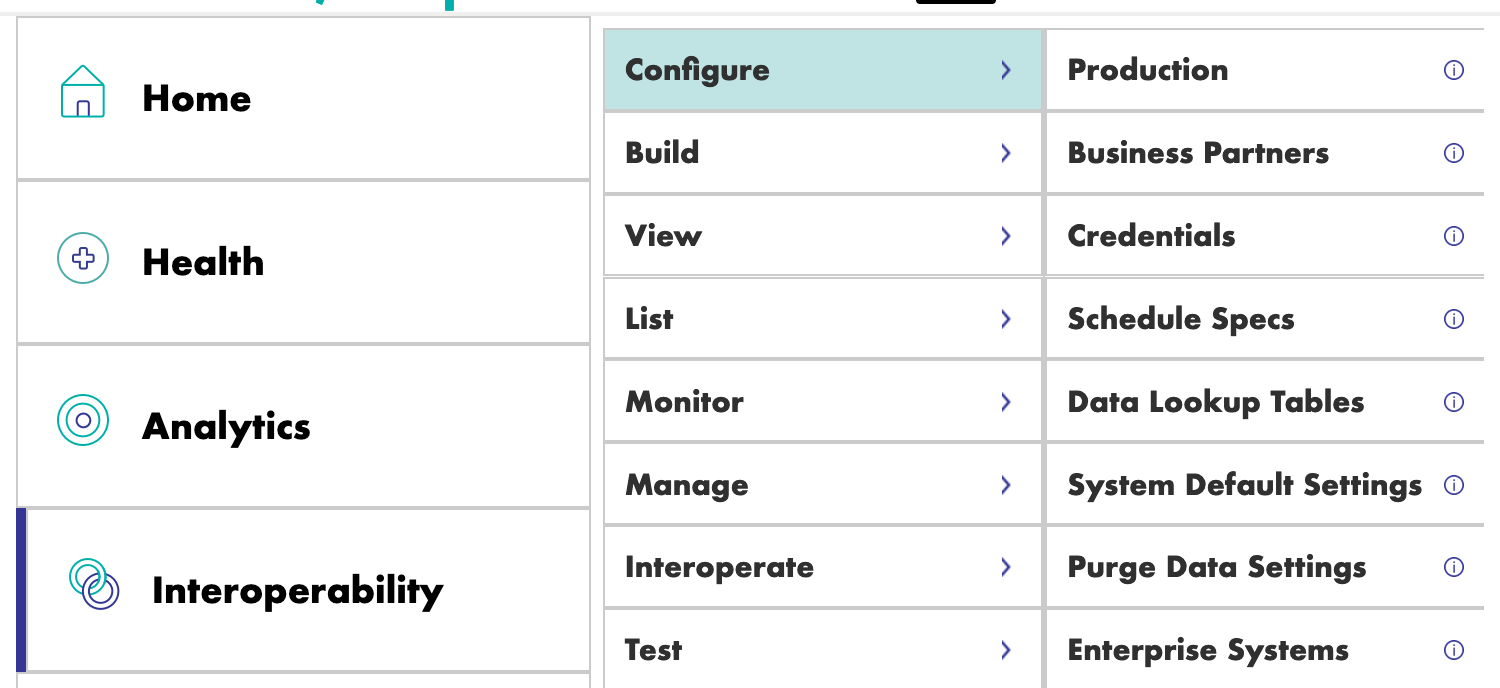
We can now create our first production. For this, we will go through the [Interoperability] and [Configure] menus:
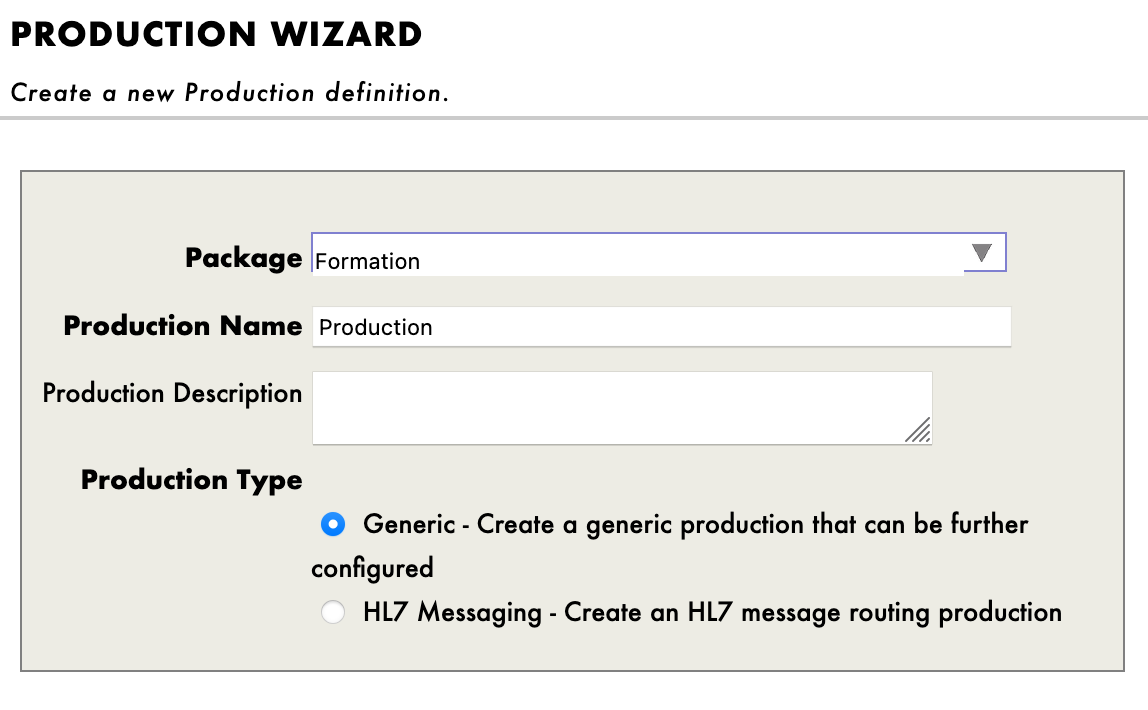
We then have to press [New], select the [Formation] package and chose a name for our production:
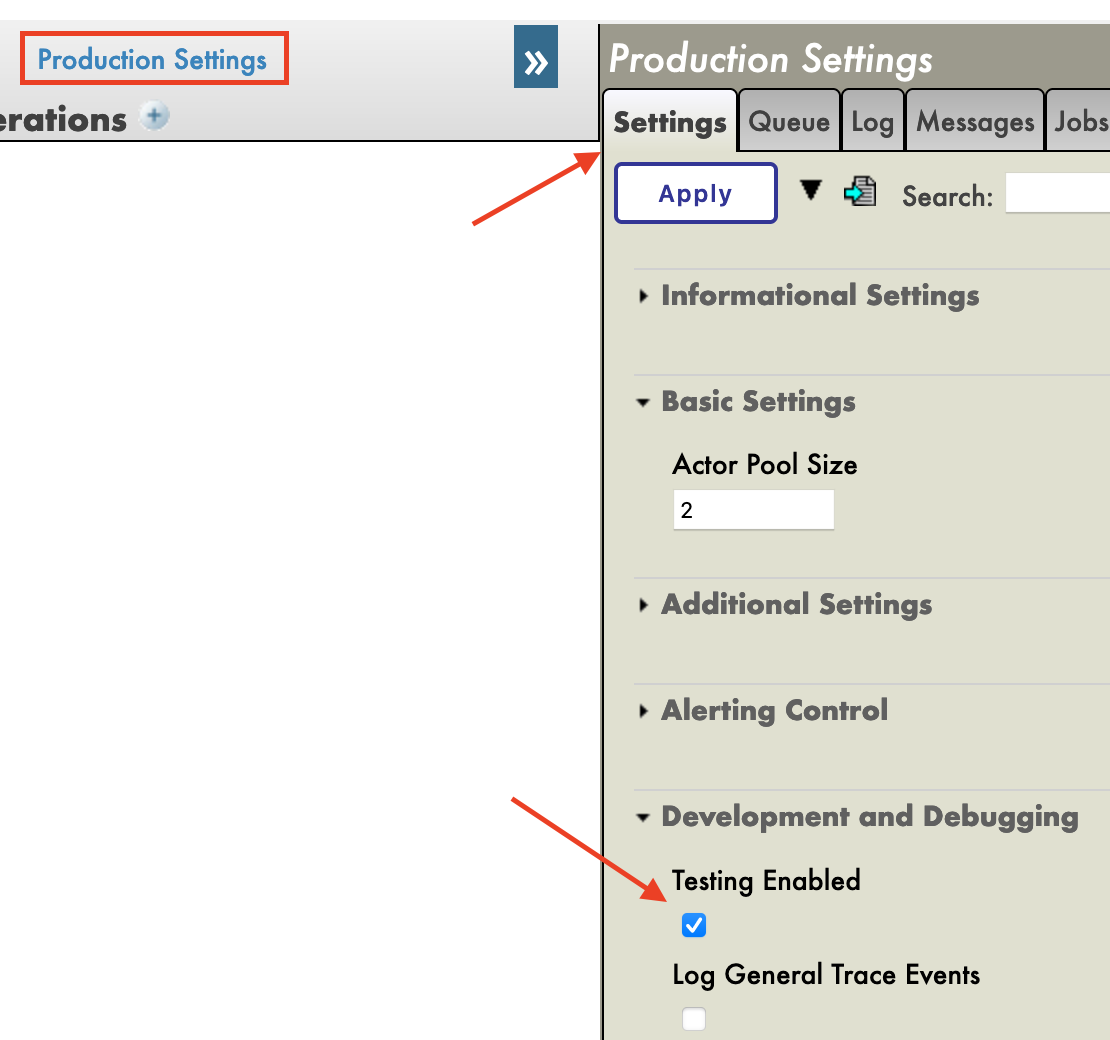
Immediatly after creating our production, we will need to click on [Production Settings] just above the [Operations] section. In the right sidebar menu, we will have to activate [Testing Enabled] in the [Development and Debugging] part of the [Settings] tab (don't forget to press [Apply]).
In this first production we will now add Business Operations.
7. Operations
A Business Operation (BO) is a specific operation that will enable us to send requests from IRIS to an external application / system. It can also be used to directly save in IRIS what we want.
We will create those operations in local, that is, in the Formation/BO/ file. Saving the files will compile them in IRIS.
For our first operation we will save the content of a message in the local database.
We need to have a way of storing this message first.
7.1. Creating our storage class
Storage classes in IRIS extends the type %Persistent. They will be saved in the intern database.
In our Formation/Table/Formation.cls file we have:
Class Formation.Table.Formation Extends %Persistent
{

Property Name As %String;

Property Salle As %String;

}
Note that when saving, additional lines are automatically added to the file. They are mandatory and are added by the InterSystems addons.
7.2. Creating our message class
This message will contain a Formation object, located in the Formation/Obj/Formation.cls file:
Class Formation.Obj.Formation Extends (%SerialObject, %XML.Adaptor)
{

Property Nom As %String;

Property Salle As %String;

}
The Message class will use that Formation object, src/Formation/Msg/FormationInsertRequest.cls:
Class Formation.Msg.FormationInsertRequest Extends Ens.Request
{

Property Formation As Formation.Obj.Formation;

}
7.3. Creating our operation
Now that we have all the elements we need, we can create our operation, in the Formation/BO/LocalBDD.cls file:
Class Formation.BO.LocalBDD Extends Ens.BusinessOperation
{

Parameter INVOCATION = "Queue";

Method InsertLocalBDD(pRequest As Formation.Msg.FormationInsertRequest, Output pResponse As Ens.StringResponse) As %Status
{
    set tStatus = $$$OK

    try{
        set pResponse = ##class(Ens.Response).%New()
        set tFormation = ##class(Formation.Table.Formation).%New()
        set tFormation.Name = pRequest.Formation.Nom
        set tFormation.Salle = pRequest.Formation.Salle
        $$$ThrowOnError(tFormation.%Save())
    }
    catch exp
    {
        Set tStatus = exp.AsStatus()
    }

    Quit tStatus
}

XData MessageMap
{
<MapItems>
    <MapItem MessageType="Formation.Msg.FormationInsertRequest">
        <Method>InsertLocalBDD</Method>
    </MapItem>
</MapItems>
}

}
The MessageMap gives us the method to launch depending on the type of the request (the message sent to the operation).
As we can see, if the operation received a message of the type Formation.Msg.FormationInsertRequest, the InsertLocalBDD method will be called. This method will save the message in the IRIS local database.
7.4. Adding the operation to the production
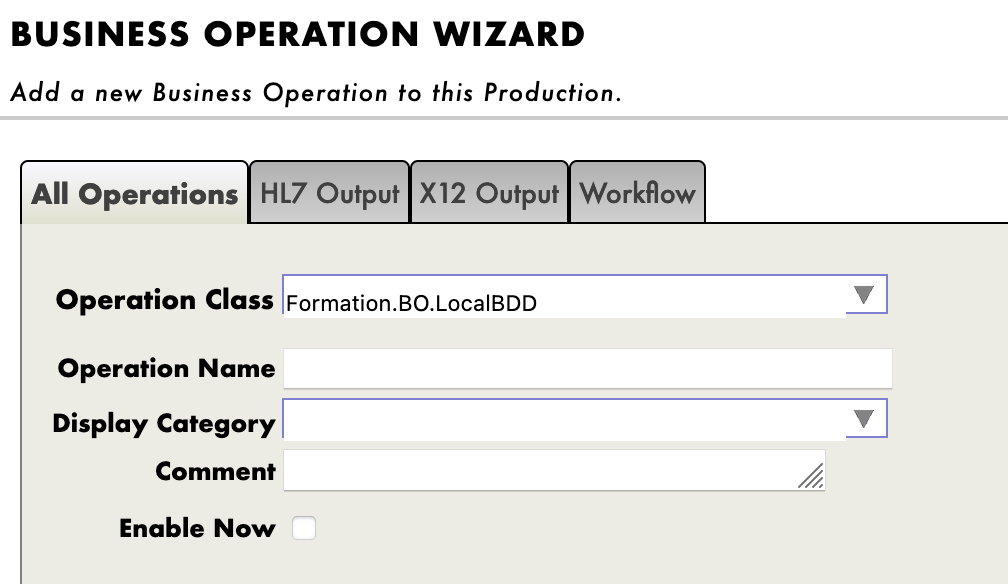
We now need to add this operation to the production. For this, we use the Management Portal. By pressing the [+] sign next to [Operations], we have access to the [Business Operation Wizard]. There, we chose the operation class we just created in the scrolling menu.
7.5. Testing
Double clicking on the operation will enable us to activate it. After that, by selecting the operation and going in the [Actions] tabs in the right sidebar menu, we should be able to test the operation (if not see the production creation part to activate testings / you may need to start the production if stopped).
By doing so, we will send the operation a message of the type we declared earlier. If all goes well, the results should be as shown below:

Showing the visual trace will enable us to see what happened between the processes, services and operations. here, we can see the message being sent to the operation by the process, and the operation sending back a response (that is just an empty string).
8. Business Processes
Business Processes (BP) are the business logic of our production. They are used to process requests or relay those requests to other components of the production.
Business Processes are created within the Management Portal:
8.1. Simple BP
8.1.1. Creating the process
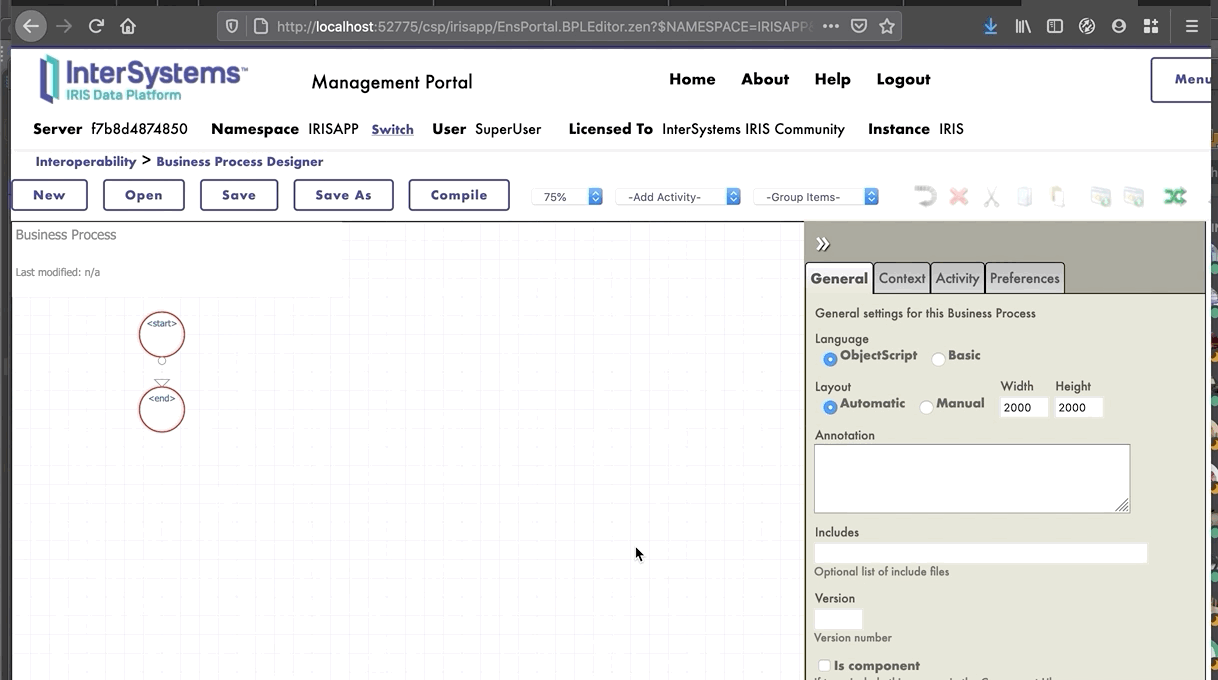
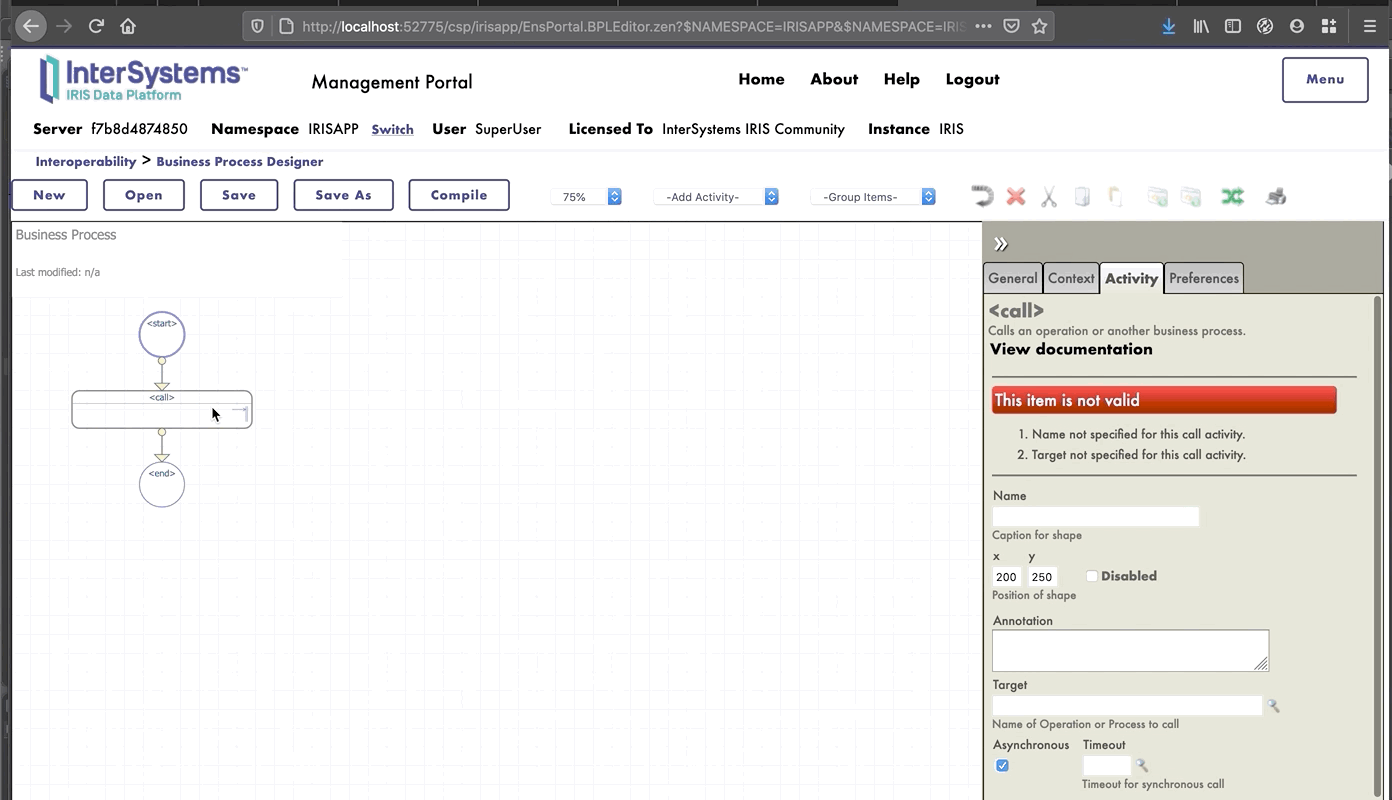
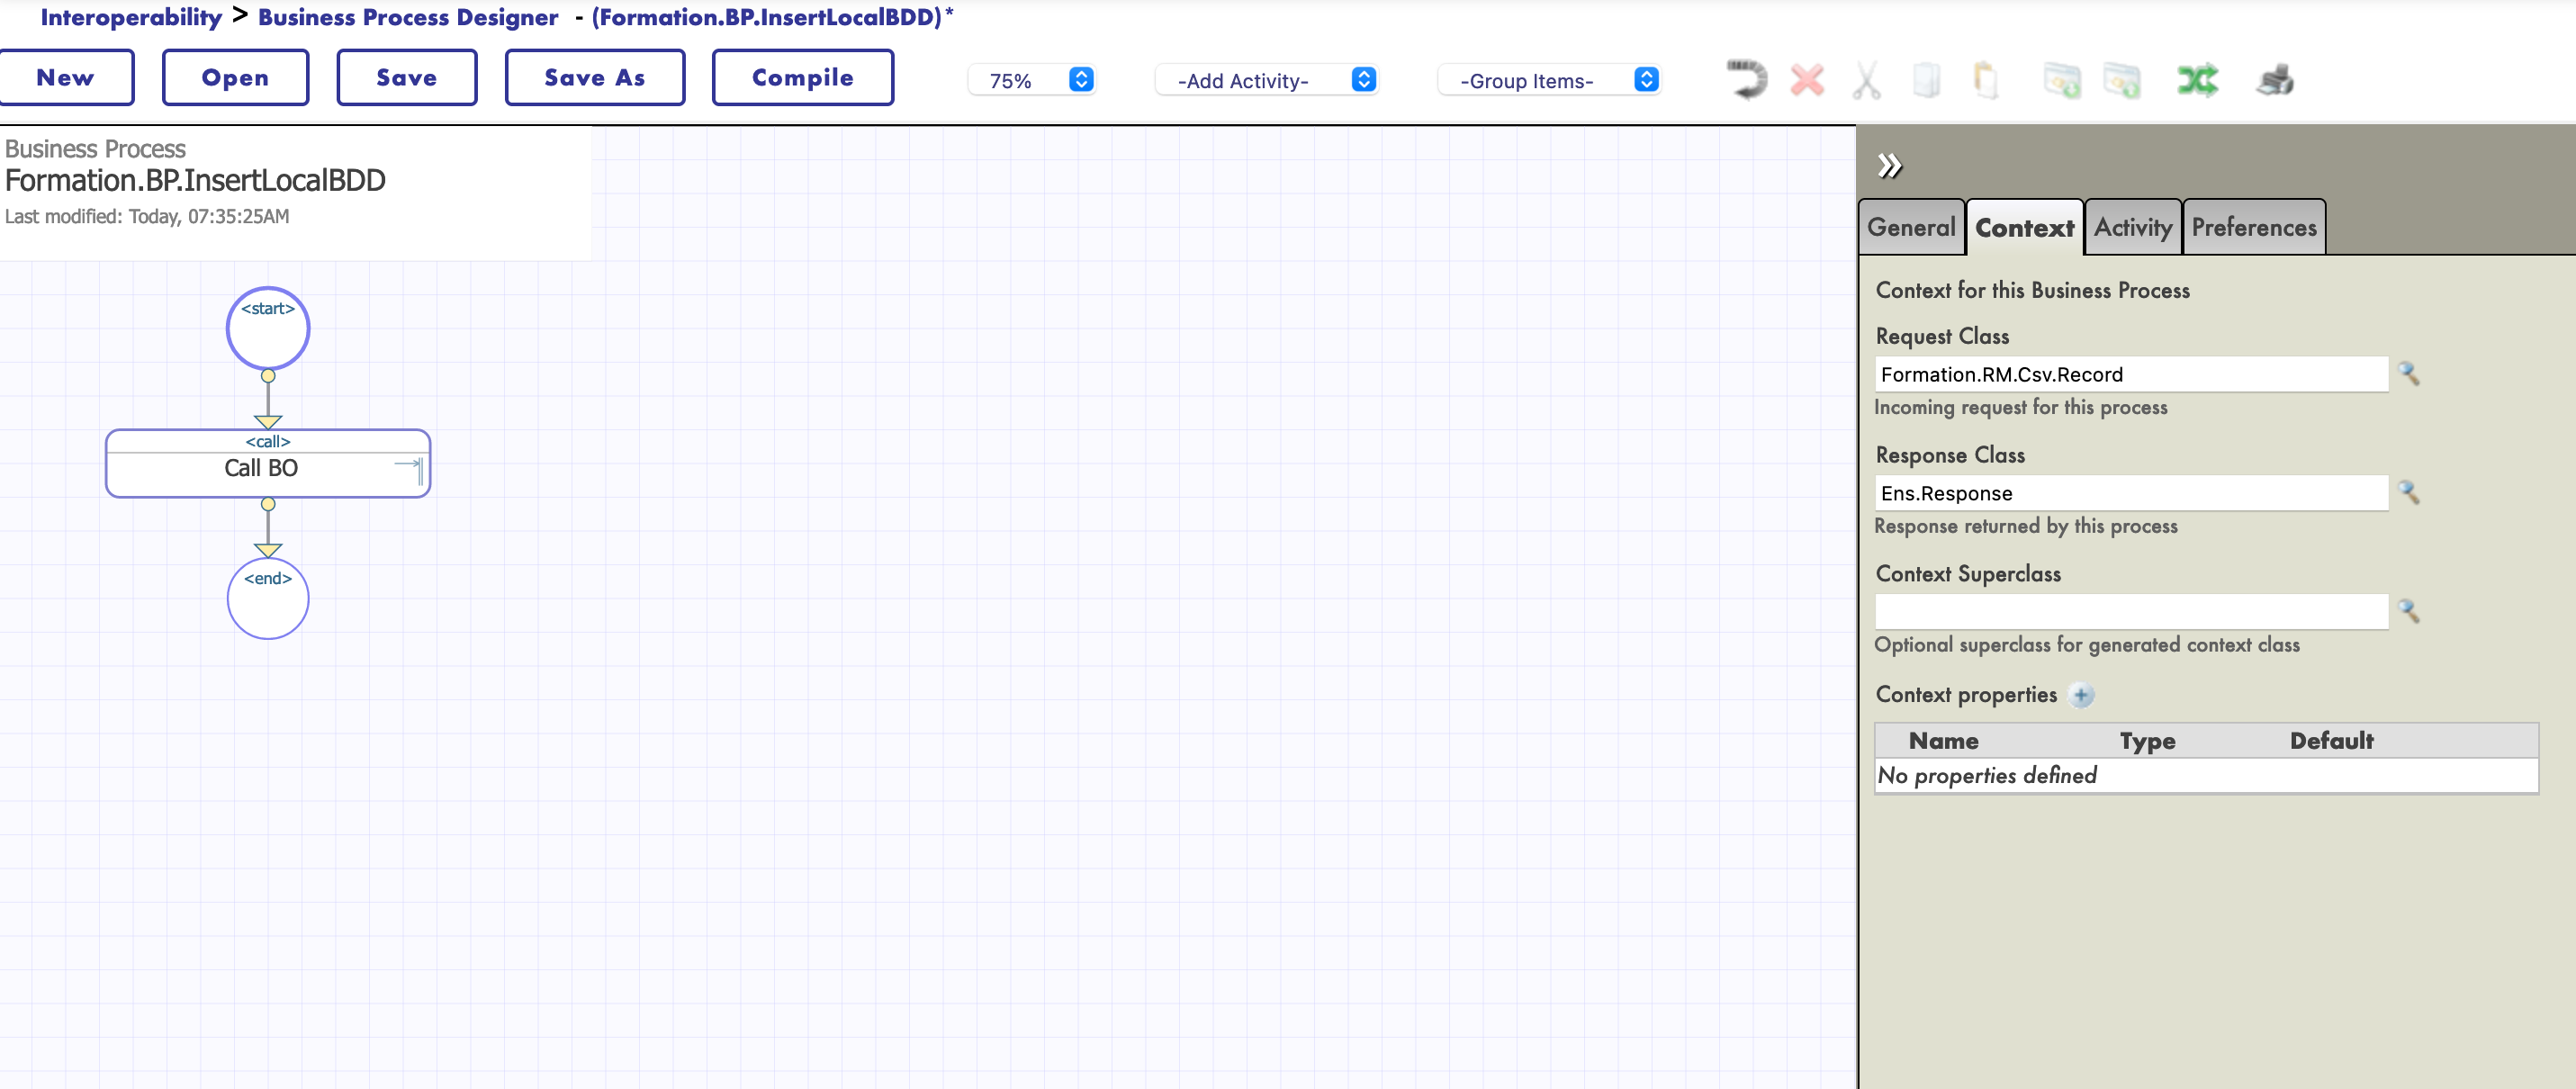
We are now in the Business Process Designer. We are going to create a simple BP that will call our operation:
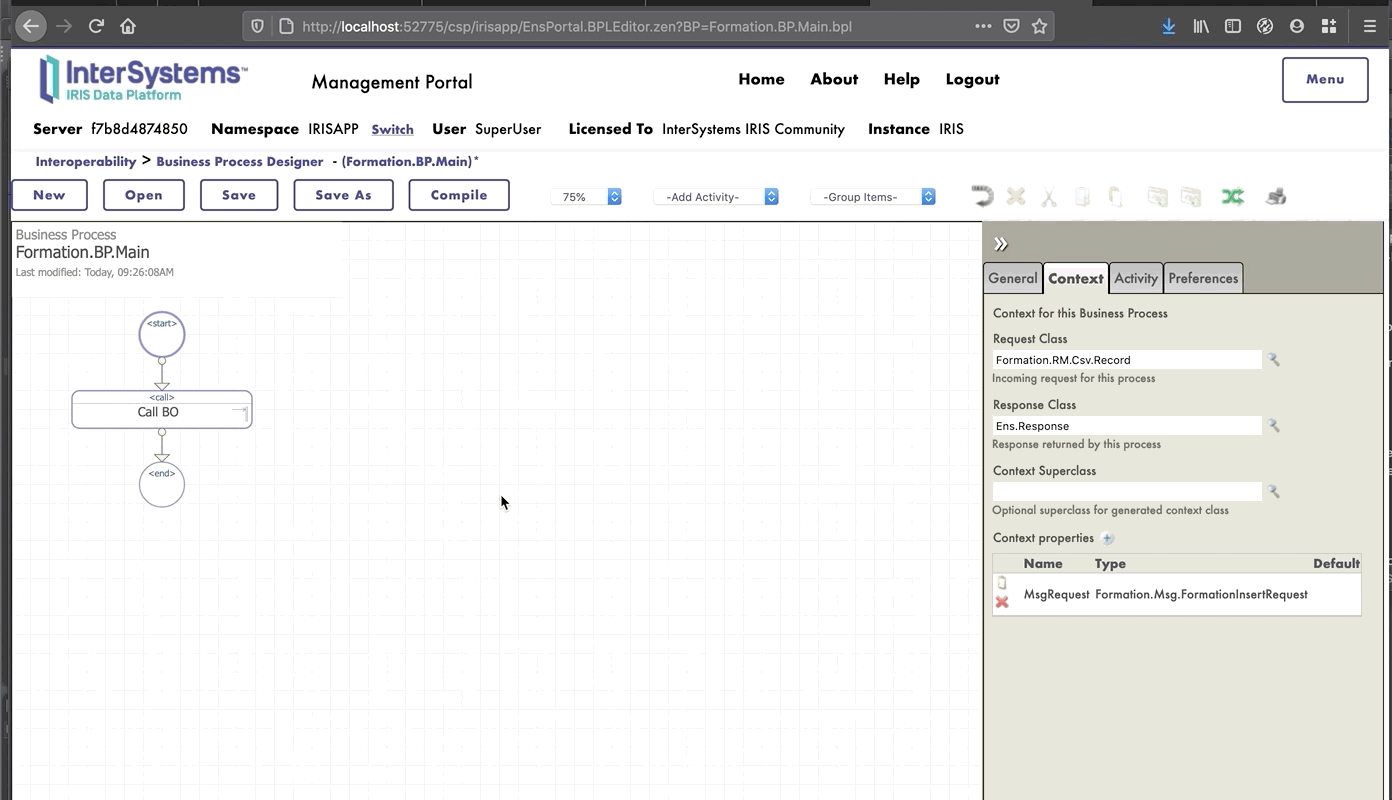
8.1.2. Modifying the context of a BP
A BP has a Context. It is composed of a request class, the class of the input, and of a response class, the class of the output. Business Processes only have one input and one output. It is also possible to add properties.
Since our BP will only be used to call our BO, we can put as request class the message class we created (we don't need an output as we just want to insert into the database).
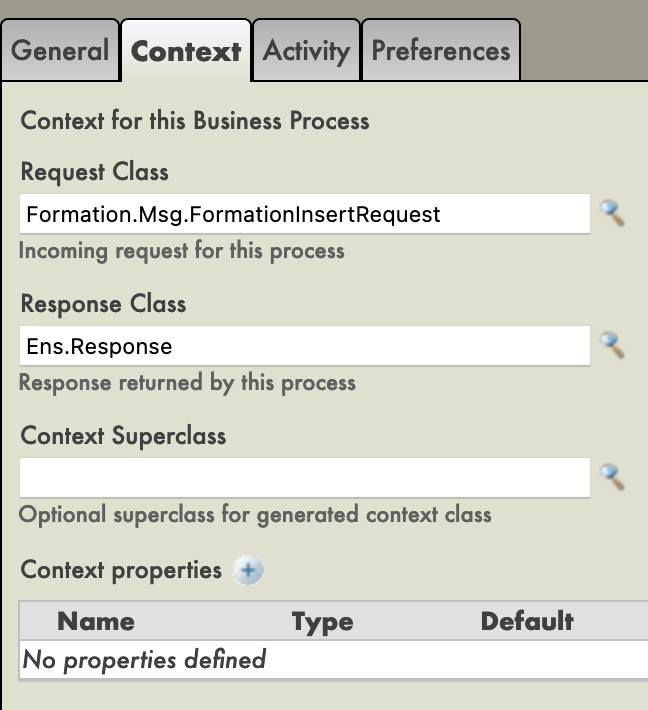
We then chose the target of the call function : our BO. That operation, being called has a callrequest property. We need to bind that callrequest to the request of the BP (they both are of the class Formation.Msg.FormationInsertRequest), we do that by clicking on the call function and using the request builder:
We can now save this BP (in the package ‘Formation.BP‘ and under the name ‘InsertLocalBDD‘ or 'Main', for example). Just like the operations, the processes can be instantiated and tested through the production configuration, for that they need to be compiled beforehand (on the Business Process Designer screen).
Our Process for now only passes the message to our Operation. We are going to complexify it so that the BP will take as input one line of a CSV file.
8.2. BP reading CSV lines
8.2.1. Creating a record map
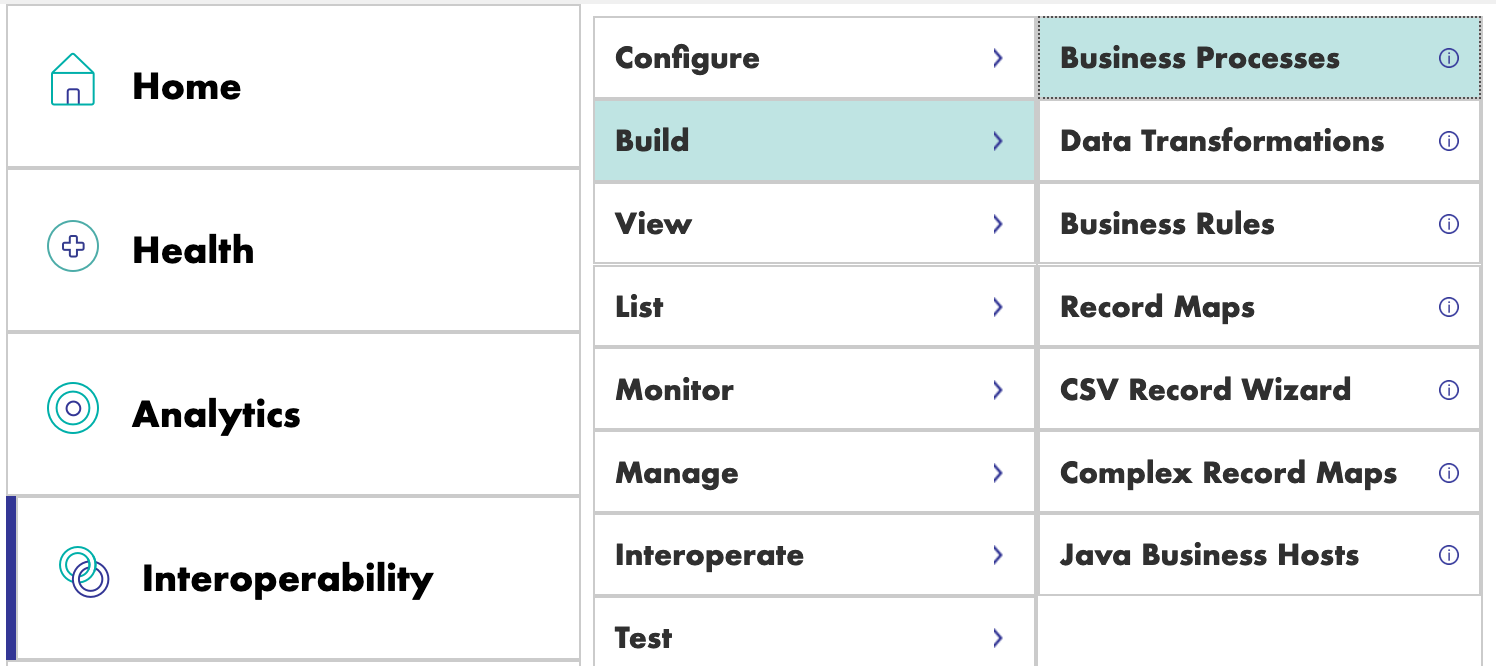
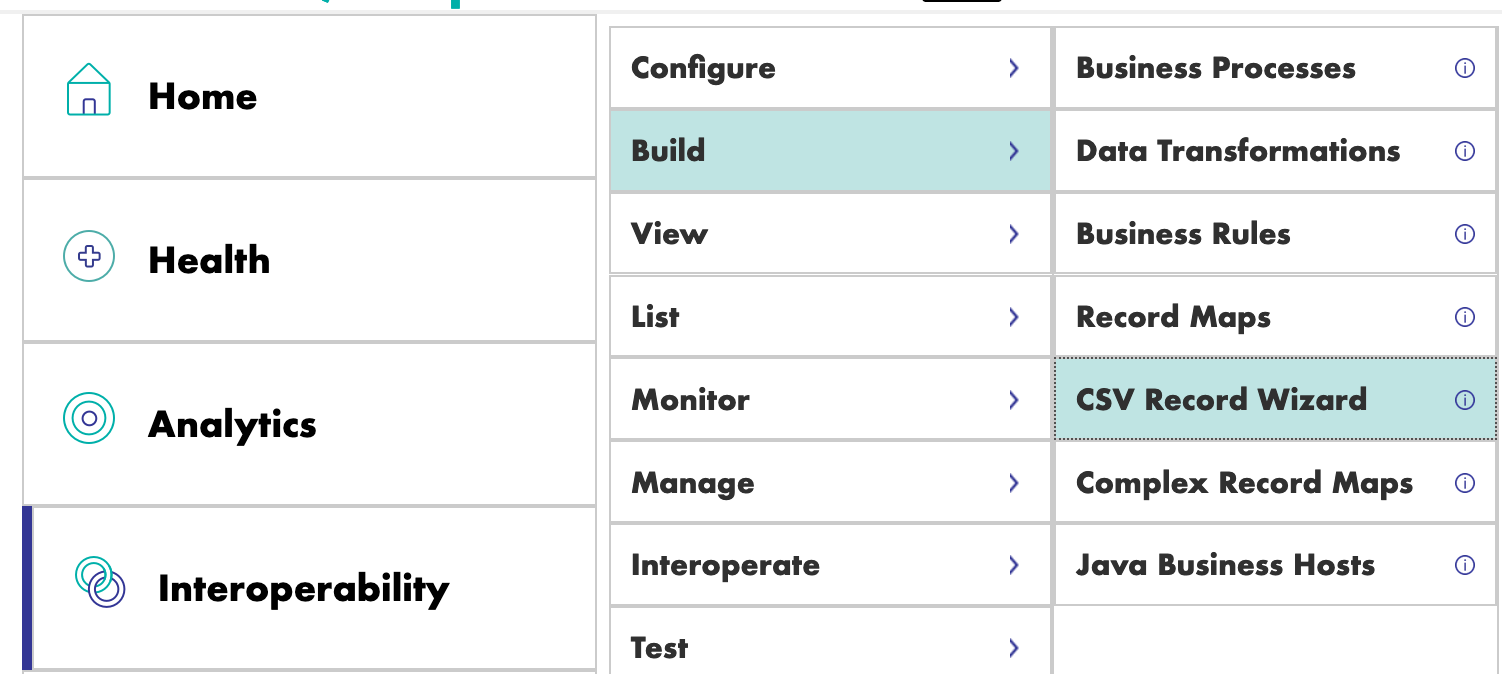
In order to read a file and put its content into a file, we need a Record Map (RM). There is a Record Mapper specialized for CSV files in the [Interoperability > Build] menu of the management portal:
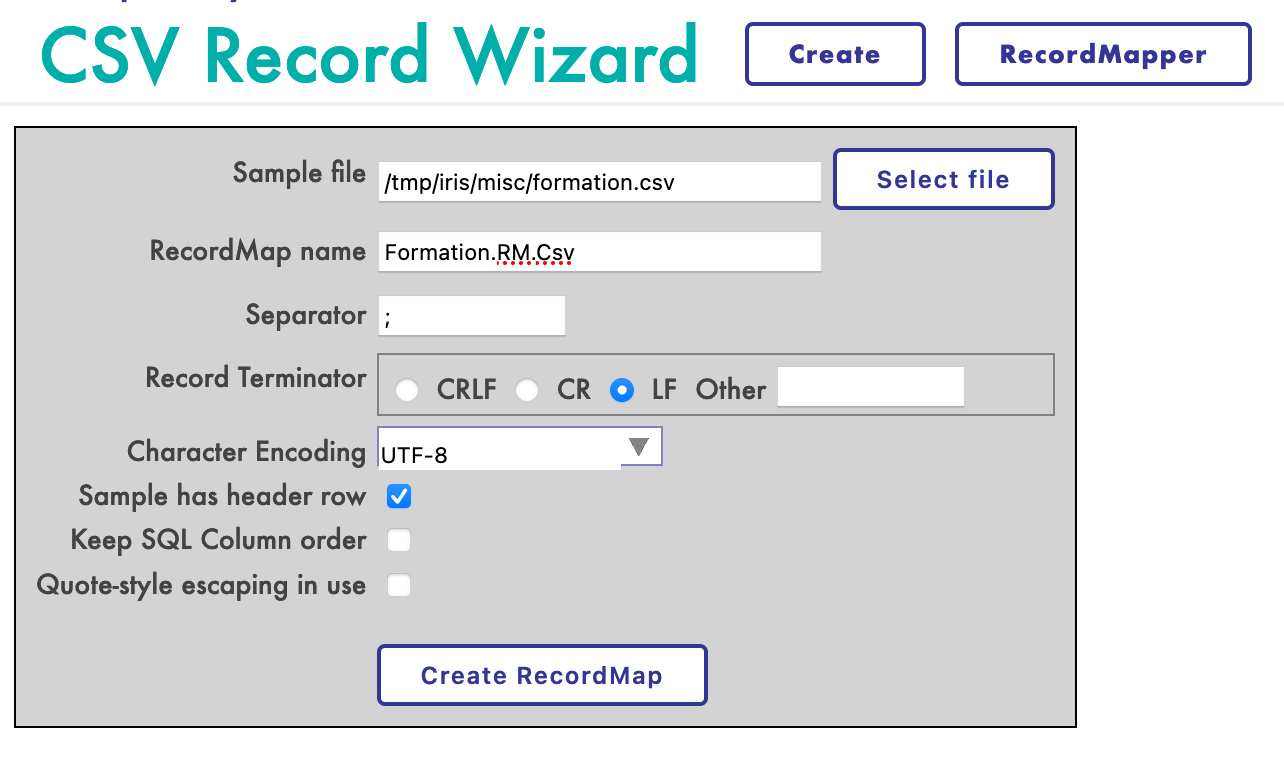
We will create the mapper like this:
You should now have this Record Map:
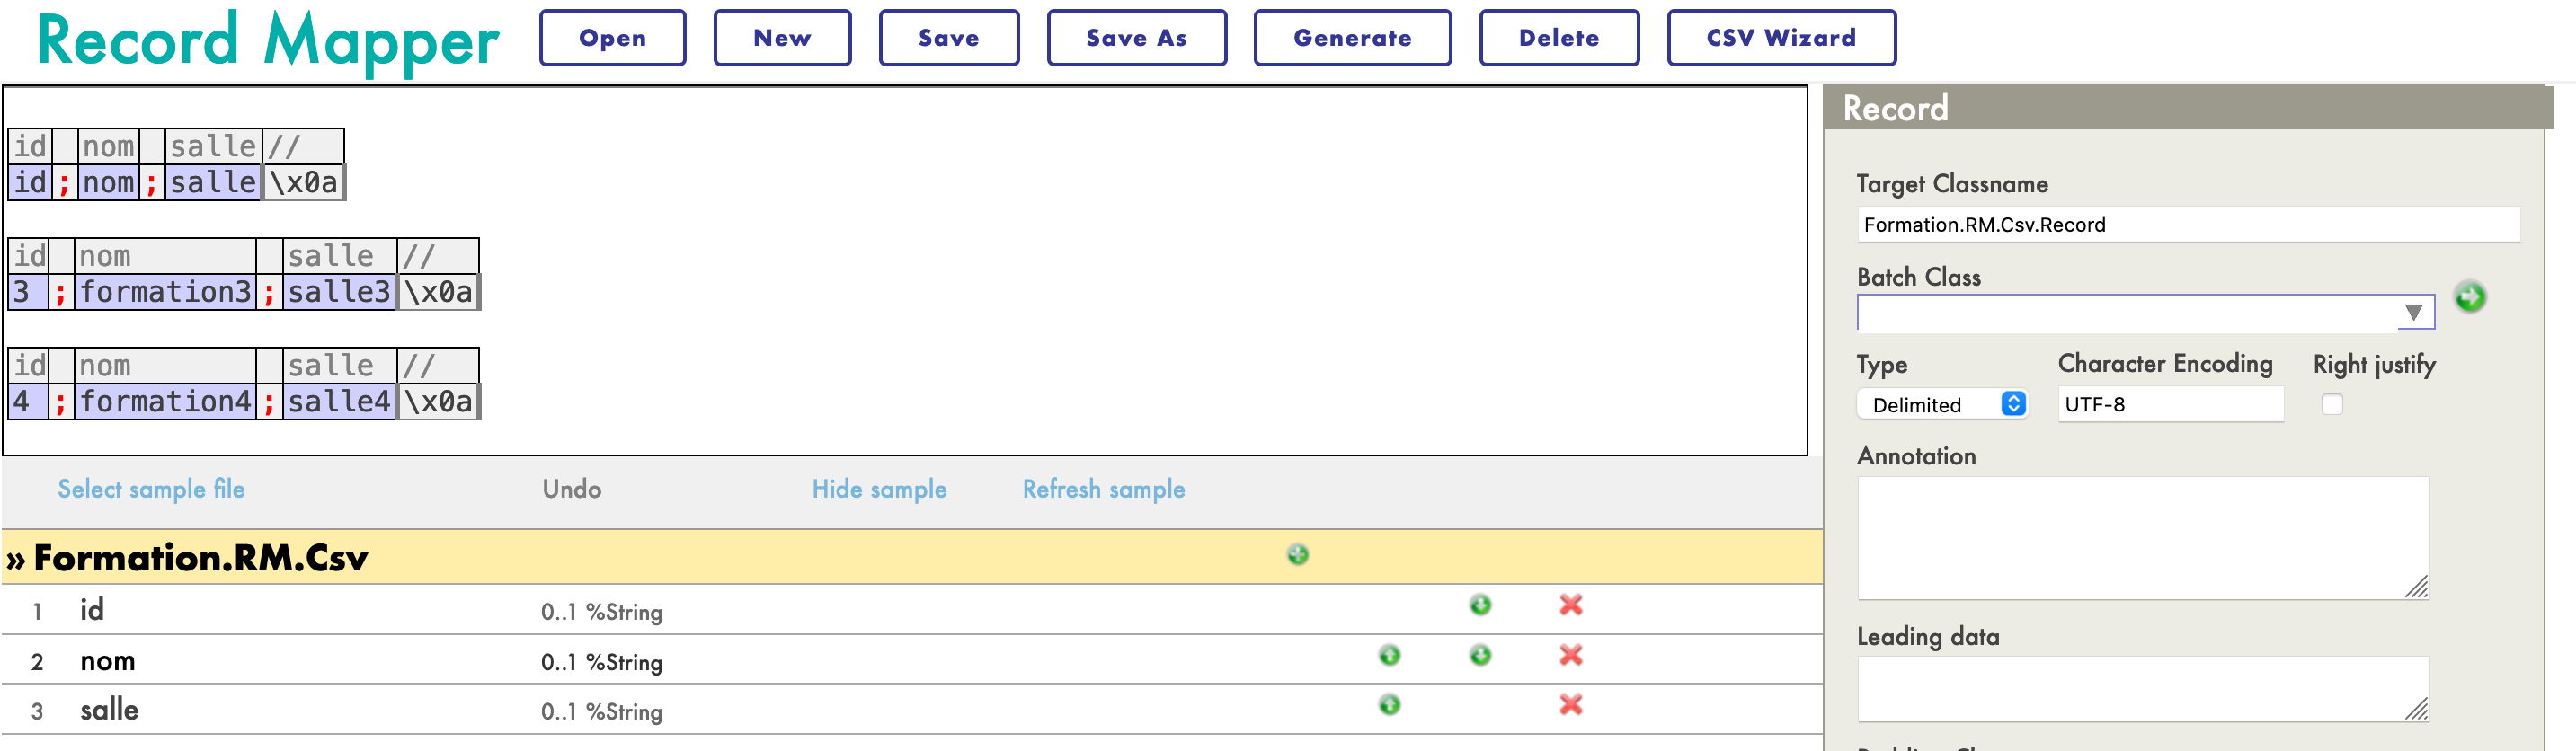
Now that the Map is created, we have to generate it (with the Generate button). We now need to have a Data Transformation from the record map format and an insertion message.
8.2.2. Creating a Data Transformation
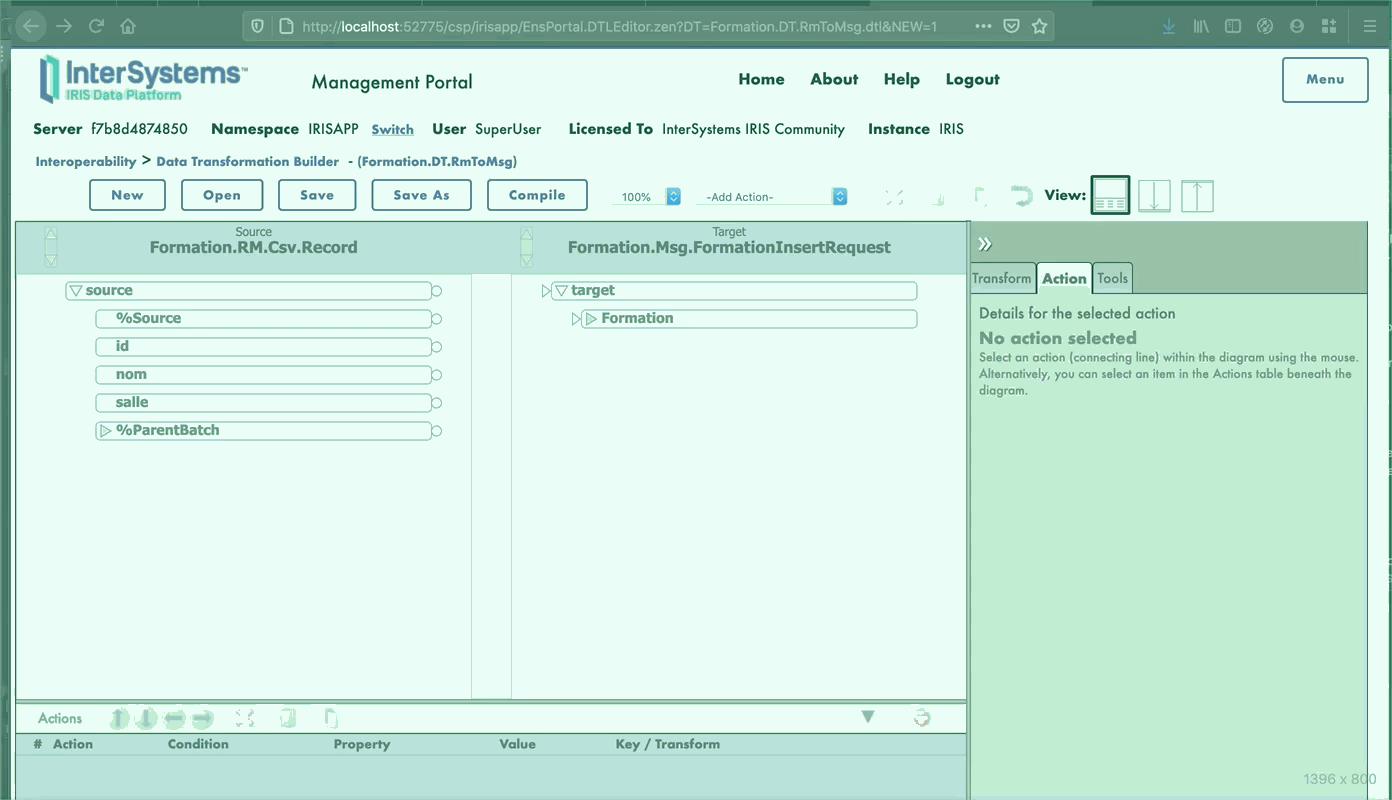
We will find the Data Transformation (DT) Builder in the [Interoperability > Builder] menu. We will create our DT like this (if you can't find Formation.RM.Csv.Record, maybe you didn't generate the record map):
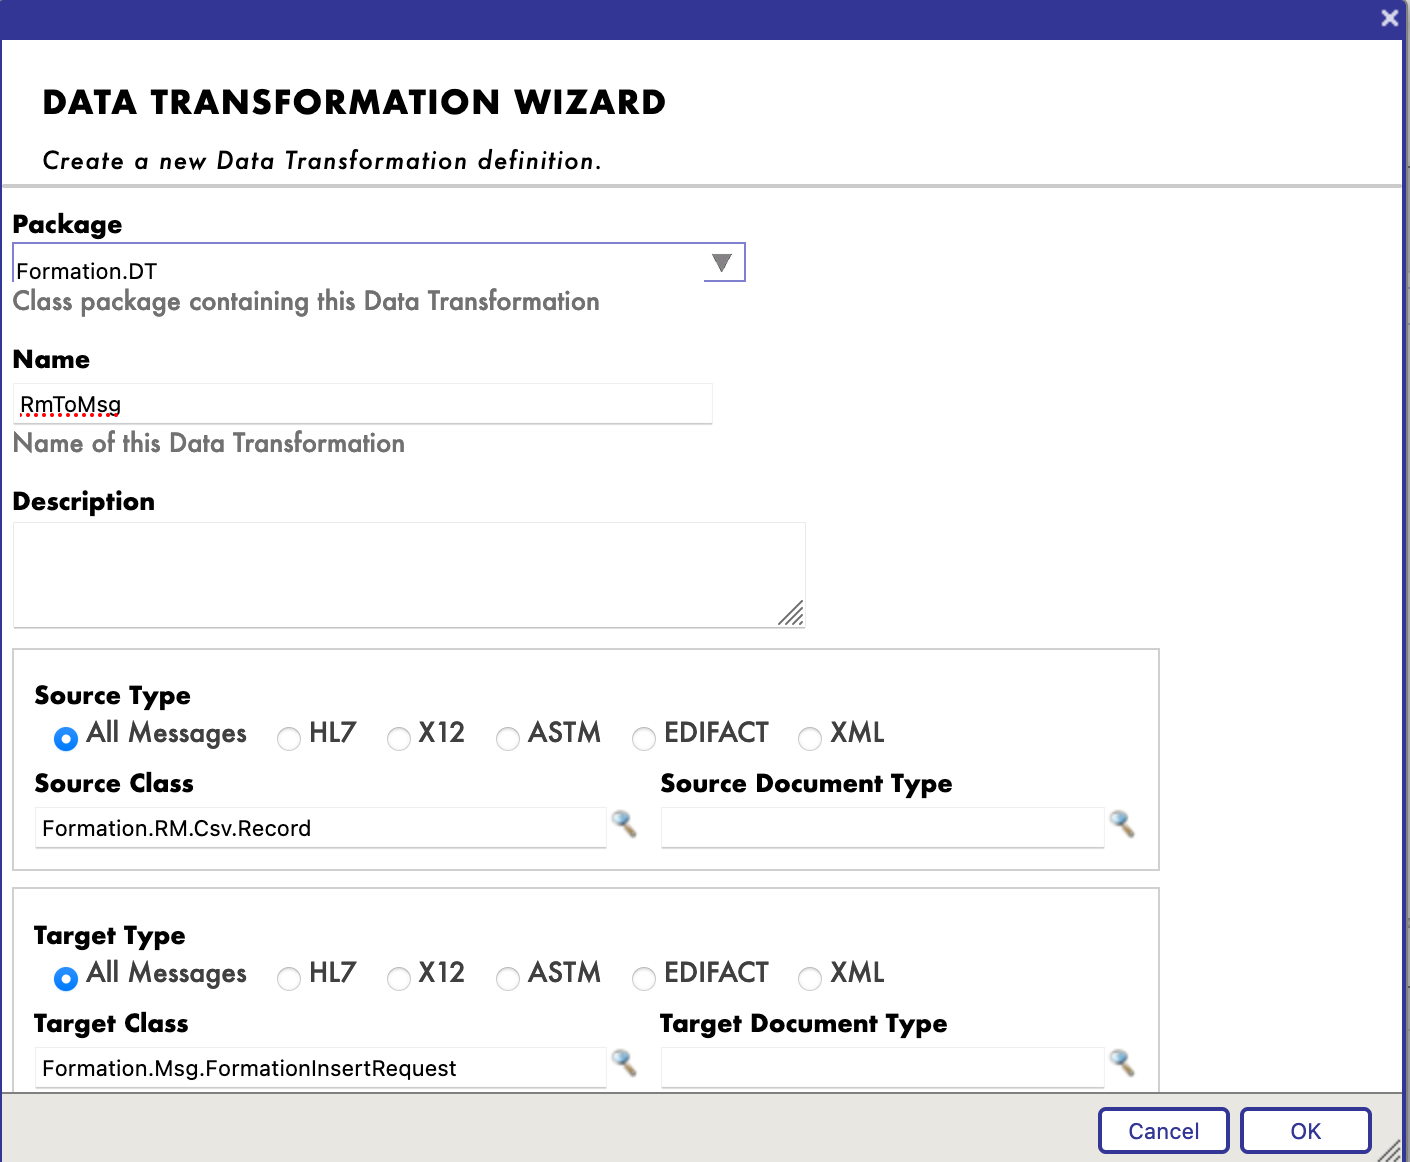
Now, we can map the different fields together:
8.2.3. Adding the Data Transformation to the Business Process
The first thing we have to change is the BP's request class, since we need to have in input the Record Map we created.
We can then add our transformation (the name of the process doesn't change anything, from here we chose to name it Main):
The transform activity will take the request of the BP (a Record of the CSV file, thanks to our Record Mapper), and transform it into a FormationInsertRequest message. In order to store that message to send it to the BO, we need to add a property to the context of the BP.
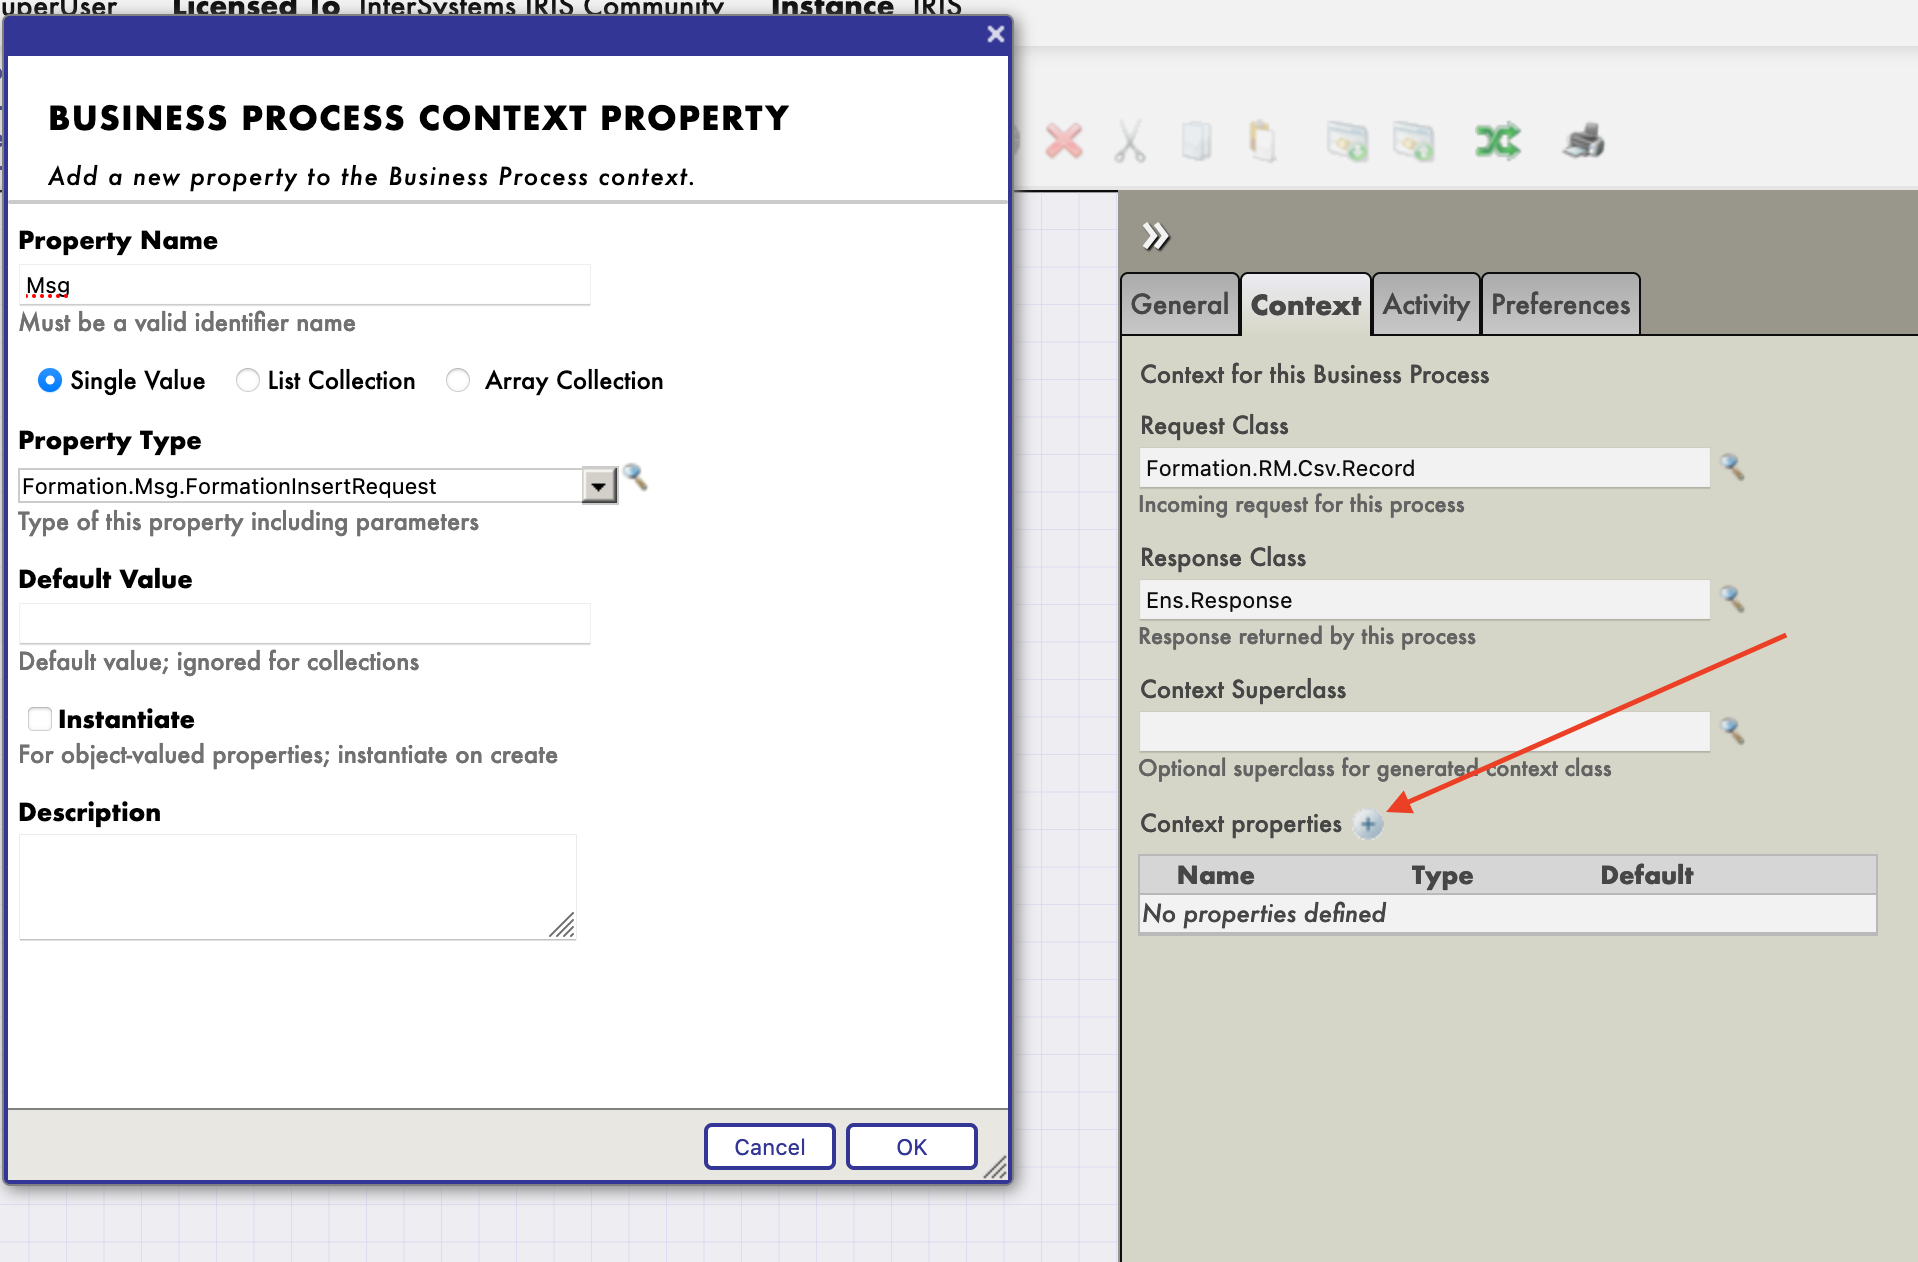
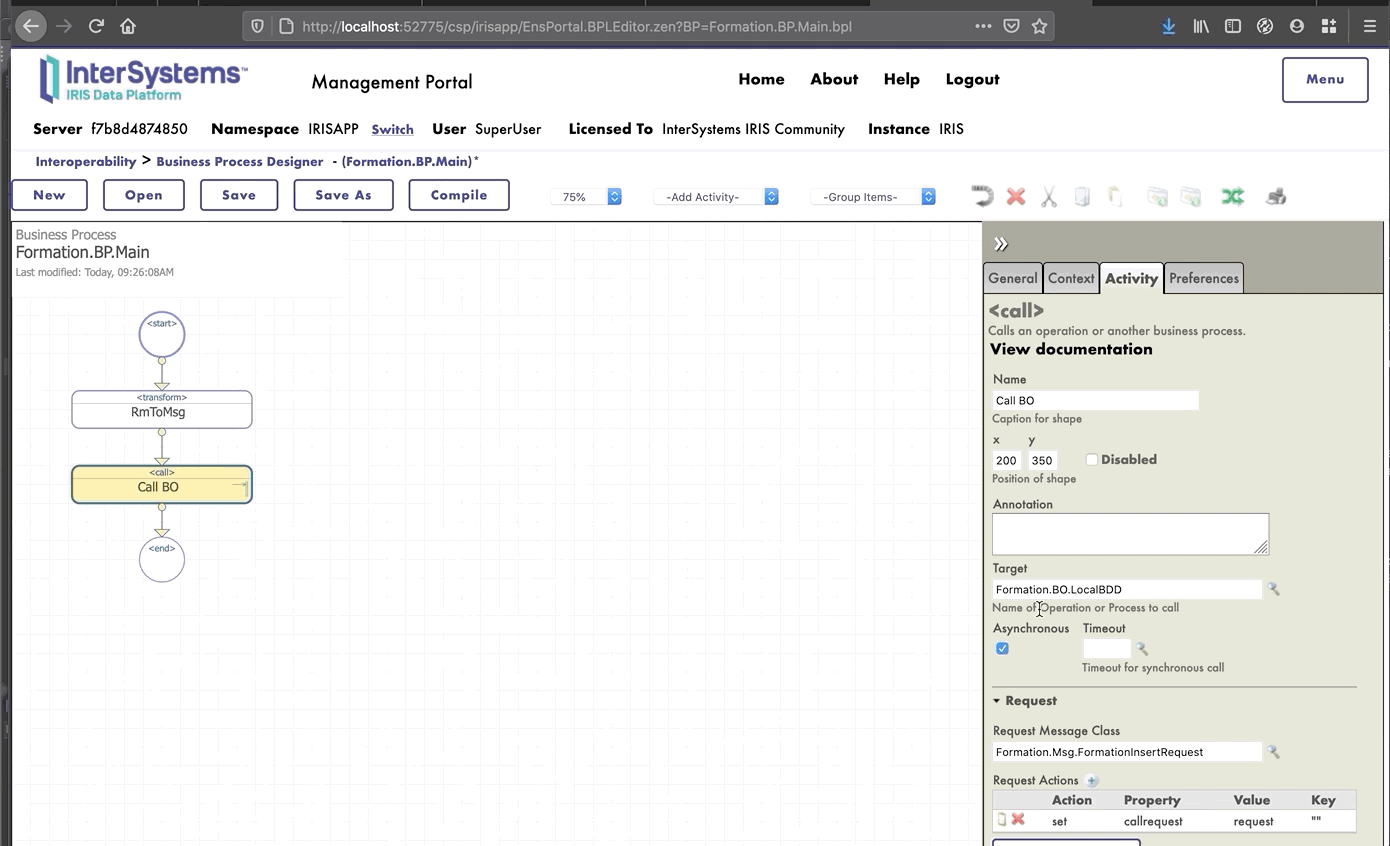
We can now configure our transform function so that it takes it input as the input of the BP and saves its output in the newly created property. The source and target of the RmToMsg transformation are respectively request and context.Msg:

We need to do the same for Call BO. Its input, or callrequest, is the value stored in context.msg:
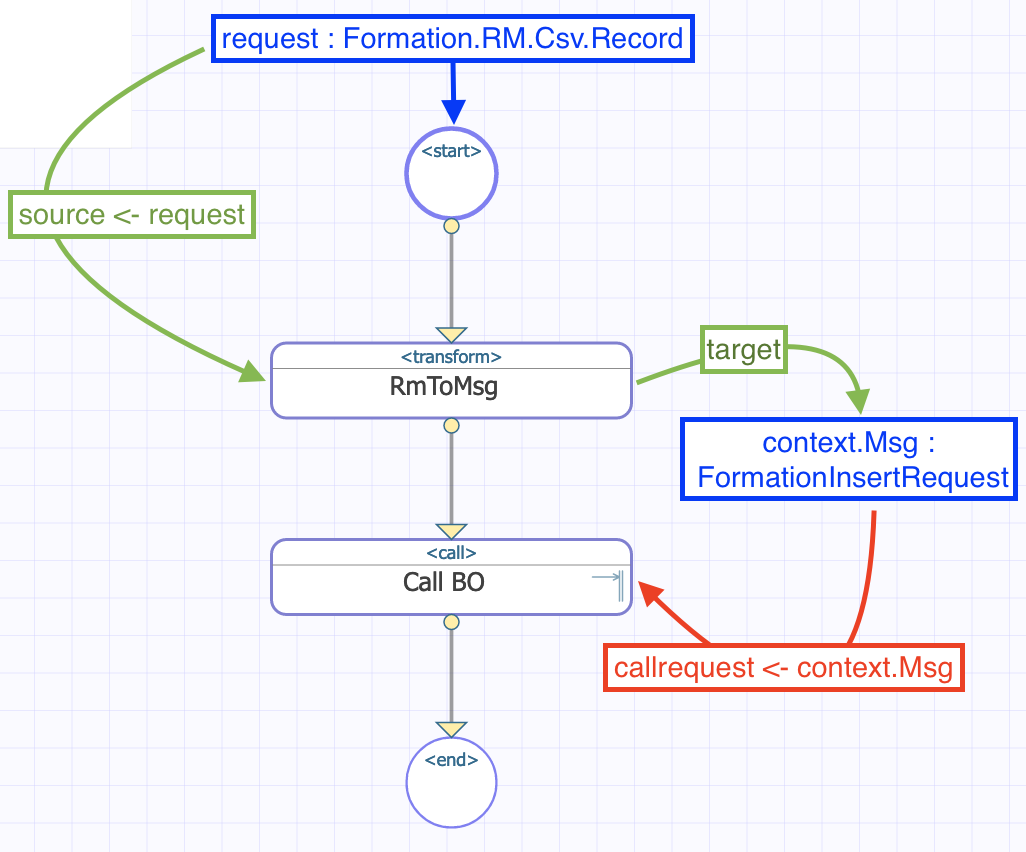
In the end, the flow in the BP can be represented like this:
8.2.4. Configuring Production
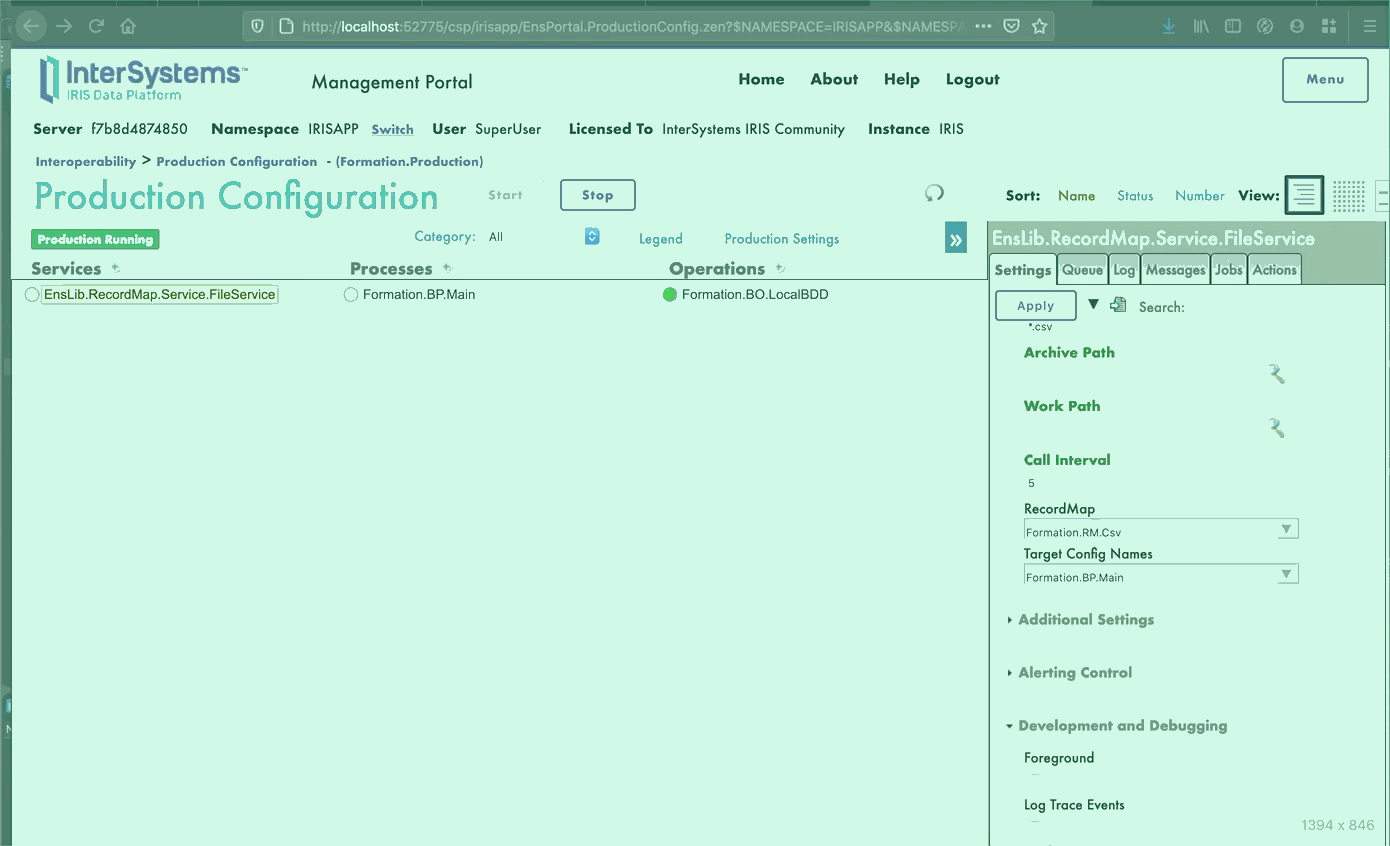
With the [+] sign, we can add our new process to the production (if not already done). We also need a generic service to use the record map, we use EnsLib.RecordMap.Service.FileService (we add it with the [+] button next to services). We then parameter this service:
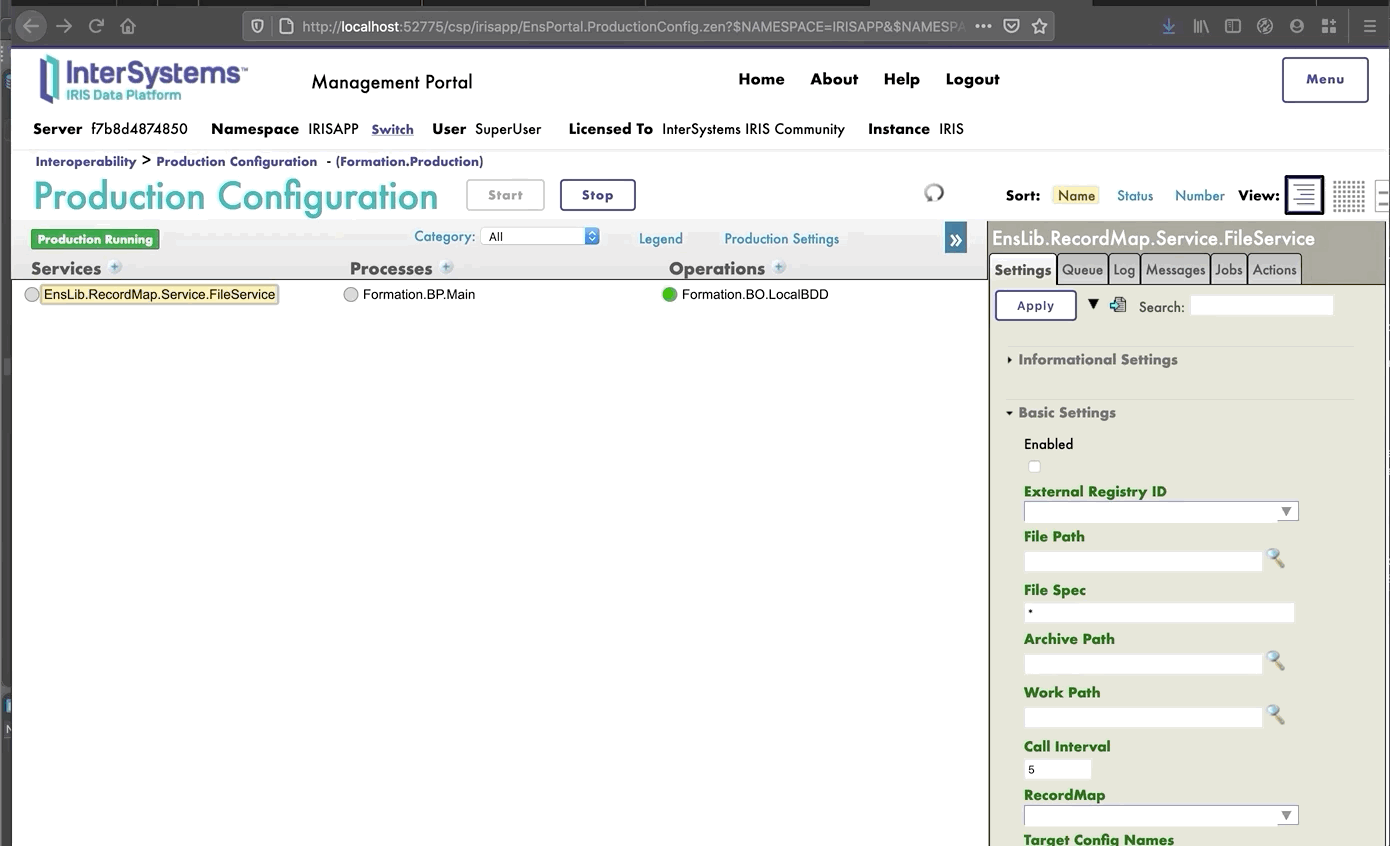
We should now be able to test our BP.
8.2.5. Testing
We test the whole production this way:
In System Explorer > SQL menu, you can execute the command
SELECT
ID, Name, Salle
FROM Formation_Table.Formation
to see the objects we just saved.
9. Getting access to an extern database using JDBC
In this section, we will create an operation to save our objects in an extern database. We will be using the JDBC API, as well as the other docker container that we set up, with postgre on it.
9.1. Creating our new operation
Our new operation, in the file Formation/BO/RemoteBDD.cls is as follows:
Include EnsSQLTypes

Class Formation.BO.RemoteBDD Extends Ens.BusinessOperation
{

Parameter ADAPTER = "EnsLib.SQL.OutboundAdapter";

Property Adapter As EnsLib.SQL.OutboundAdapter;

Parameter INVOCATION = "Queue";

Method InsertRemoteBDD(pRequest As Formation.Msg.FormationInsertRequest, Output pResponse As Ens.StringResponse) As %Status
{
	set tStatus = $$$OK

	try{
		set pResponse = ##class(Ens.Response).%New()
		set ^inc = $I(^inc)
		set tInsertSql = "INSERT INTO public.formation (id, nom, salle) VALUES(?, ?, ?)"
		$$$ThrowOnError(..Adapter.ExecuteUpdate(.nrows,tInsertSql,^inc,pRequest.Formation.Nom, pRequest.Formation.Salle ))
	}
	catch exp
	{
		Set tStatus = exp.AsStatus()
	}

	Quit tStatus
}

XData MessageMap
{
<MapItems>
	<MapItem MessageType="Formation.Msg.FormationInsertRequest">
		<Method>InsertRemoteBDD</Method>
	</MapItem>
</MapItems>
}

}
This operation is similar to the first one we created. When it will receive a message of the type Formation.Msg.FormationInsertRequest, it will use an adapter to execute SQL requests. Those requests will be sent to our postgre database.
9.2. Configuring the production
Now, through the Management Portal, we will instantiate that operation (by adding it with the [+] sign in the production).
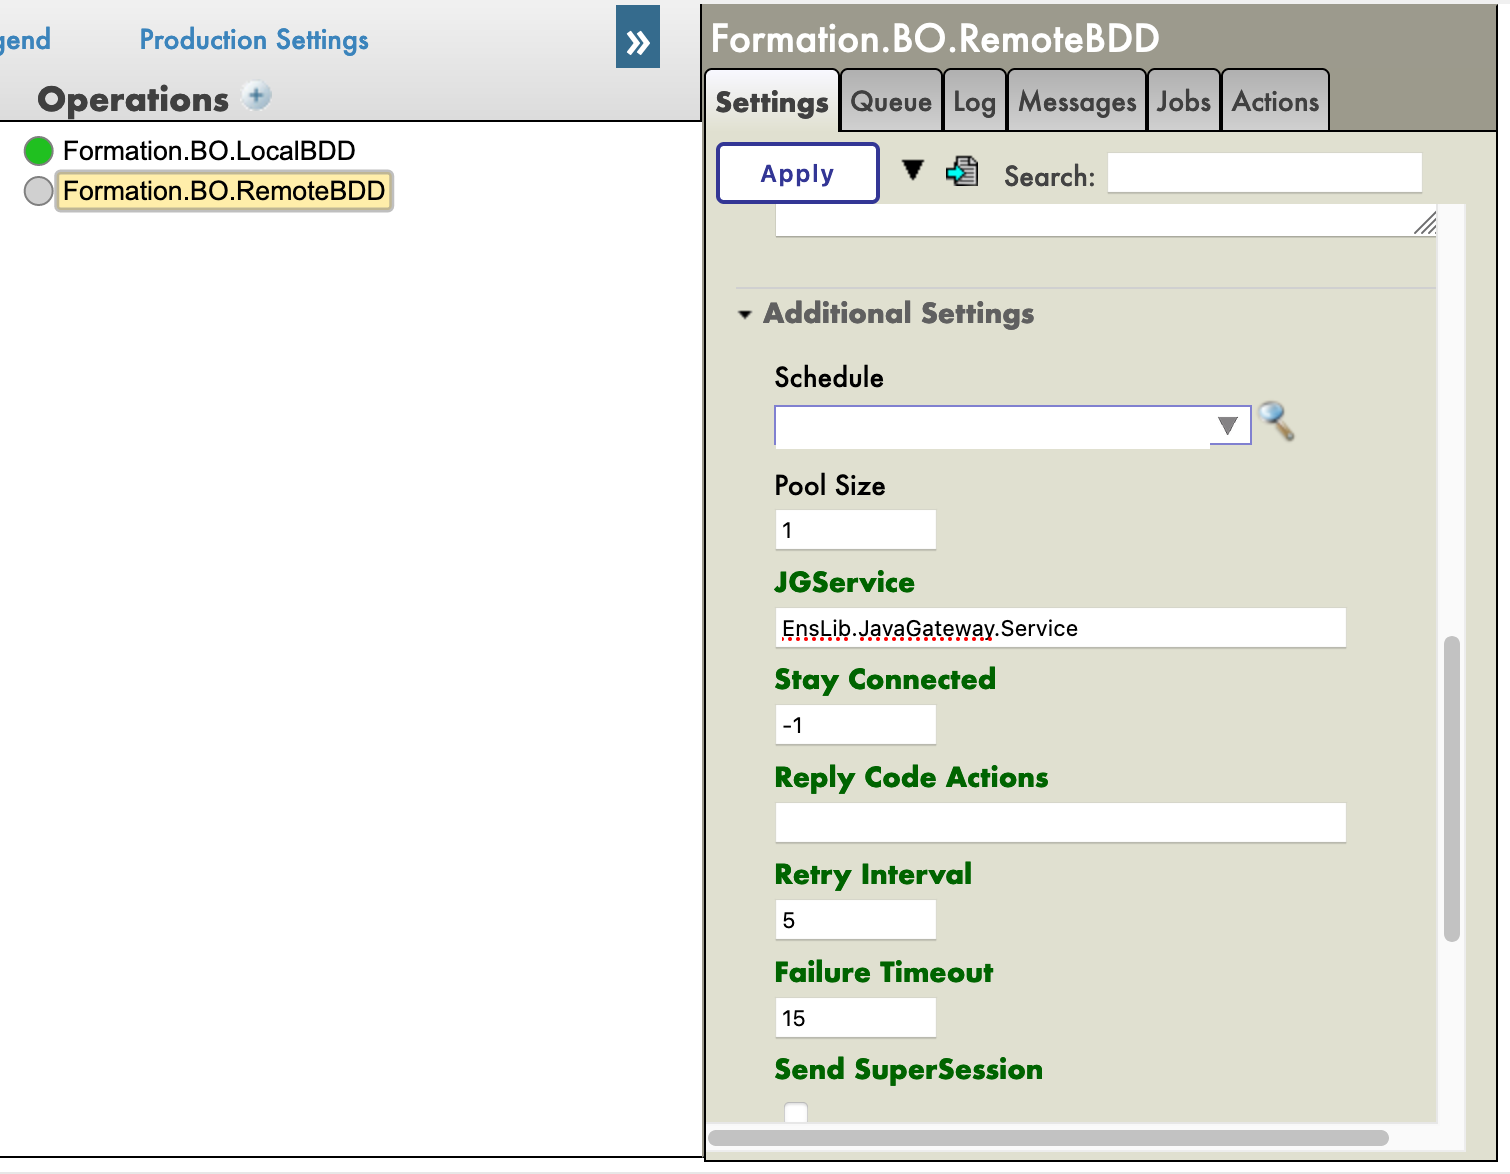
We will also need to add the JavaGateway for the JDBC driver in the services. The full name of this service is EnsLib.JavaGateway.Service.

We now need to configure our operation. Since we have set up a postgre container, and connected its port 5432, the value we need in the following parameters are:
DSN:
jdbc:postgresql://db:5432/DemoDataJDBC Driver:
org.postgresql.DriverJDBC Classpath:
/tmp/iris/postgresql-42.2.14.jar
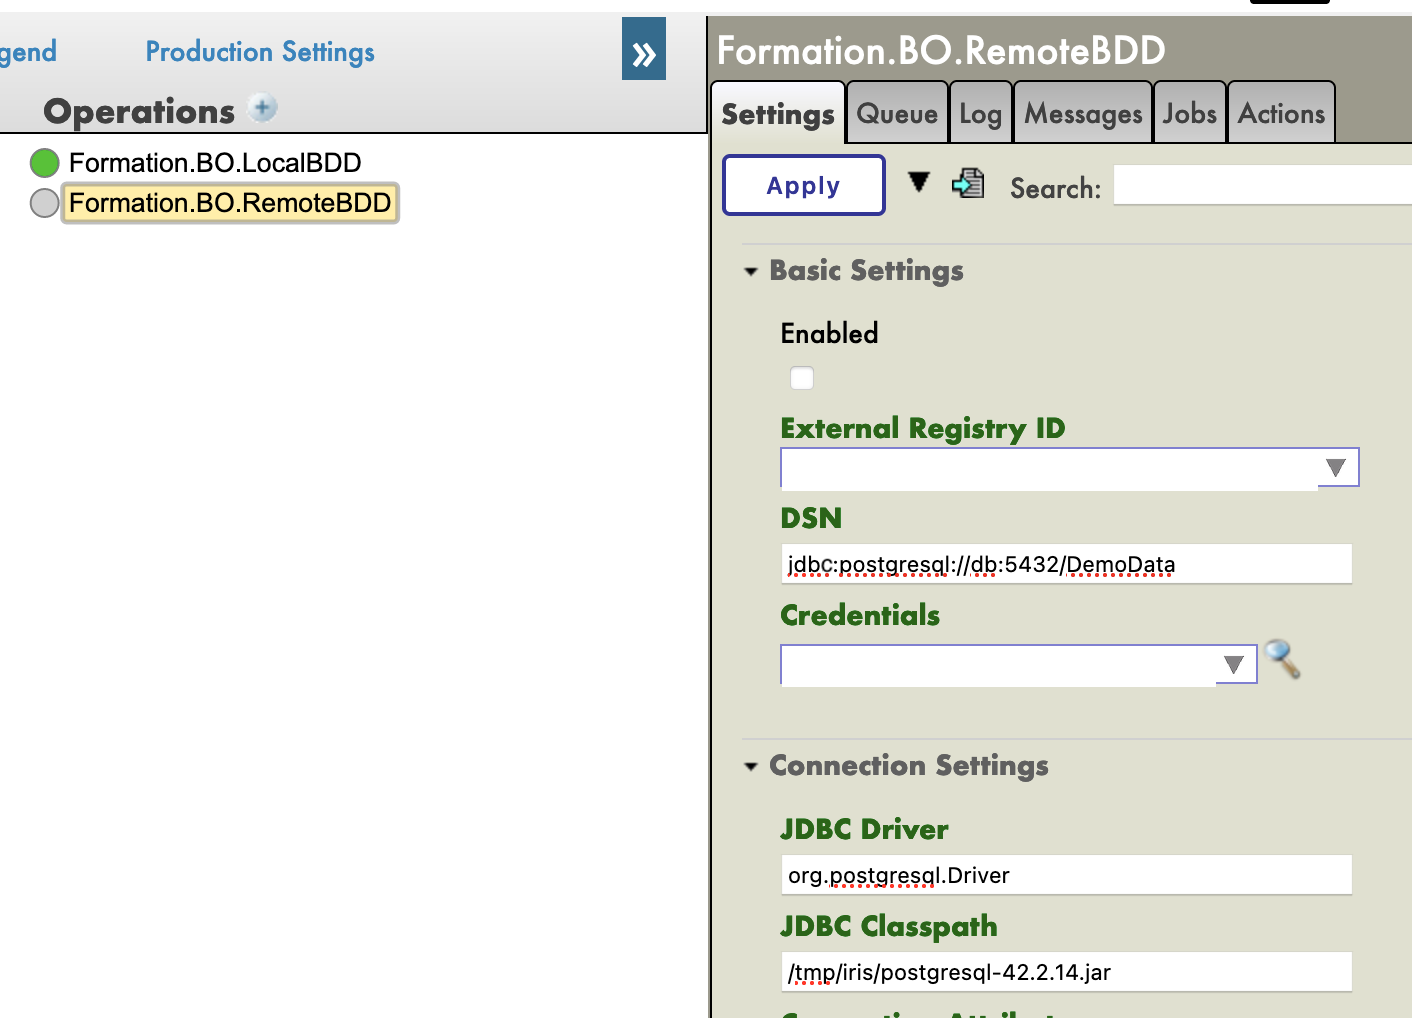
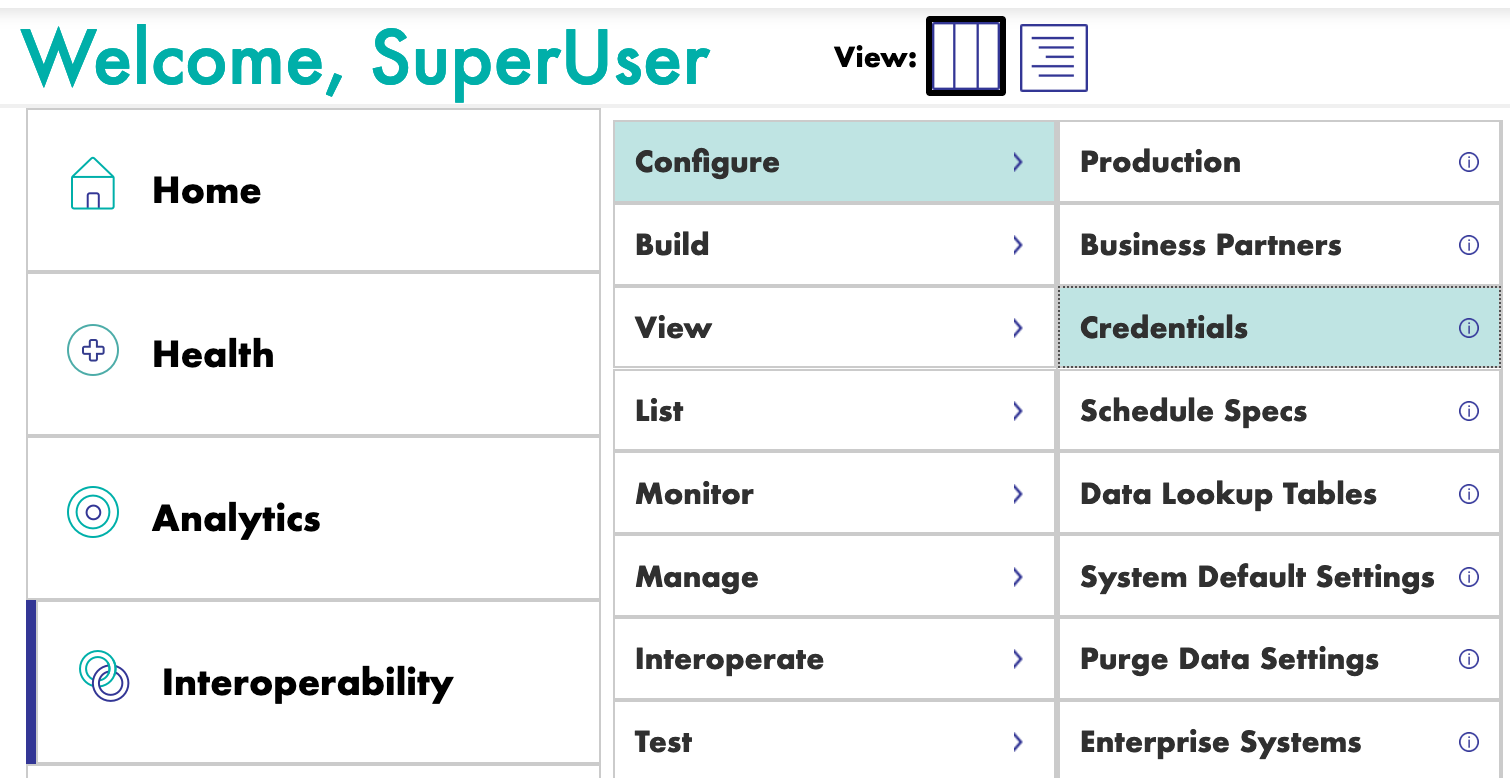
Finally, we need to configure the credentials to have access to the remote database. For that, we need to open the Credential Viewer:
The login and password are both DemoData, as we set up in the docker-compose.yml file.
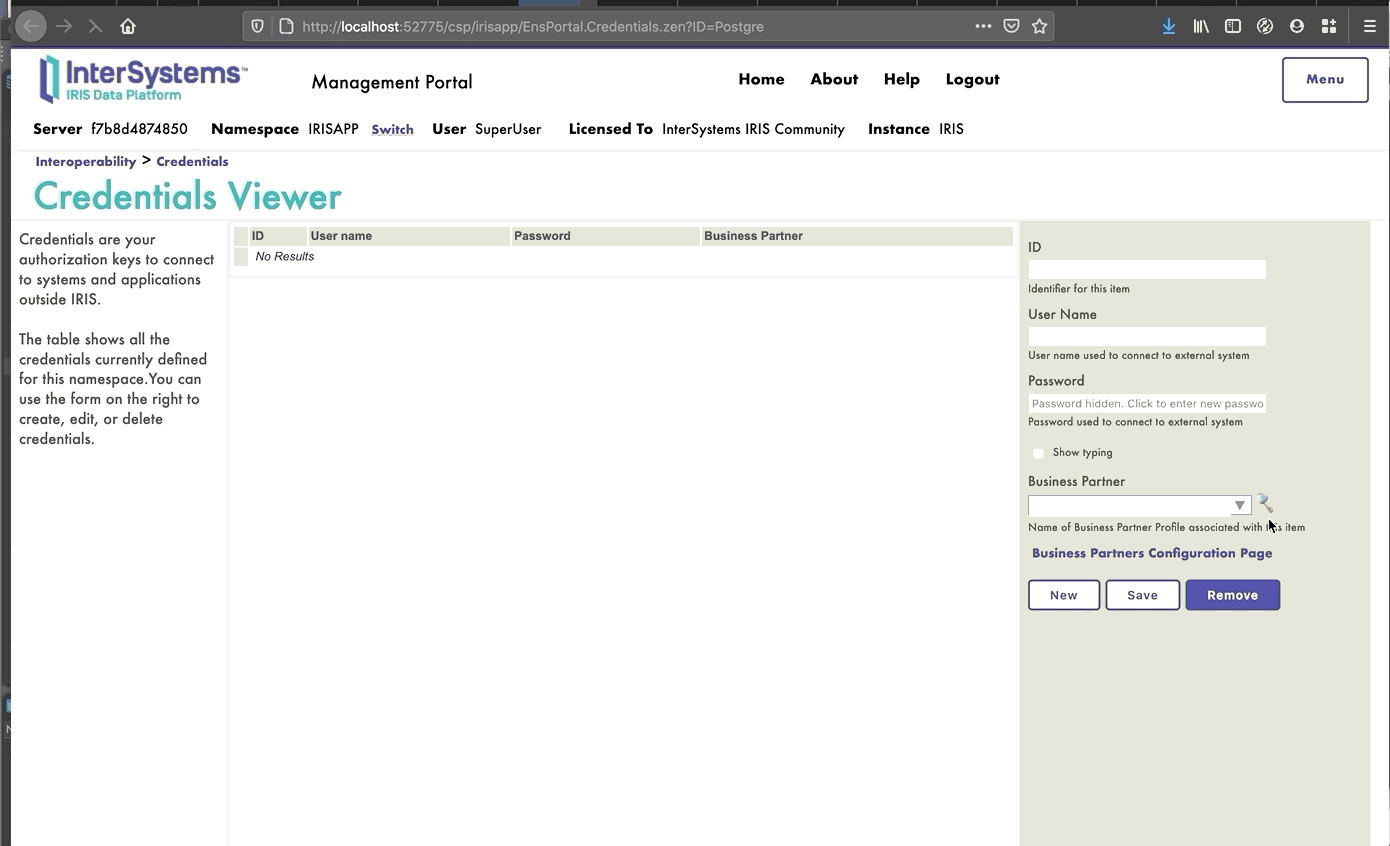
Back to the production, we can add "Postgre" in the [Credential] field in the settings of our operation (it should be in the scrolling menu). Before being able to test it, we need to add the JGService to the operation. In the [Settings] tab, in the [Additional Settings]:
9.3. Testing
When testing the visual trace should show a success:

We have successfully connected with an extern database.
9.4. Exercise
As an exercise, it could be interesting to modify BO.LocalBDD so that it returns a boolean that will tell the BP to call BO.RemoteBDD depending on the value of that boolean.
Hint: This can be done by changing the type of reponse LocalBDD returns and by adding a new property to the context and using the if activity in our BP.
9.5. Solution
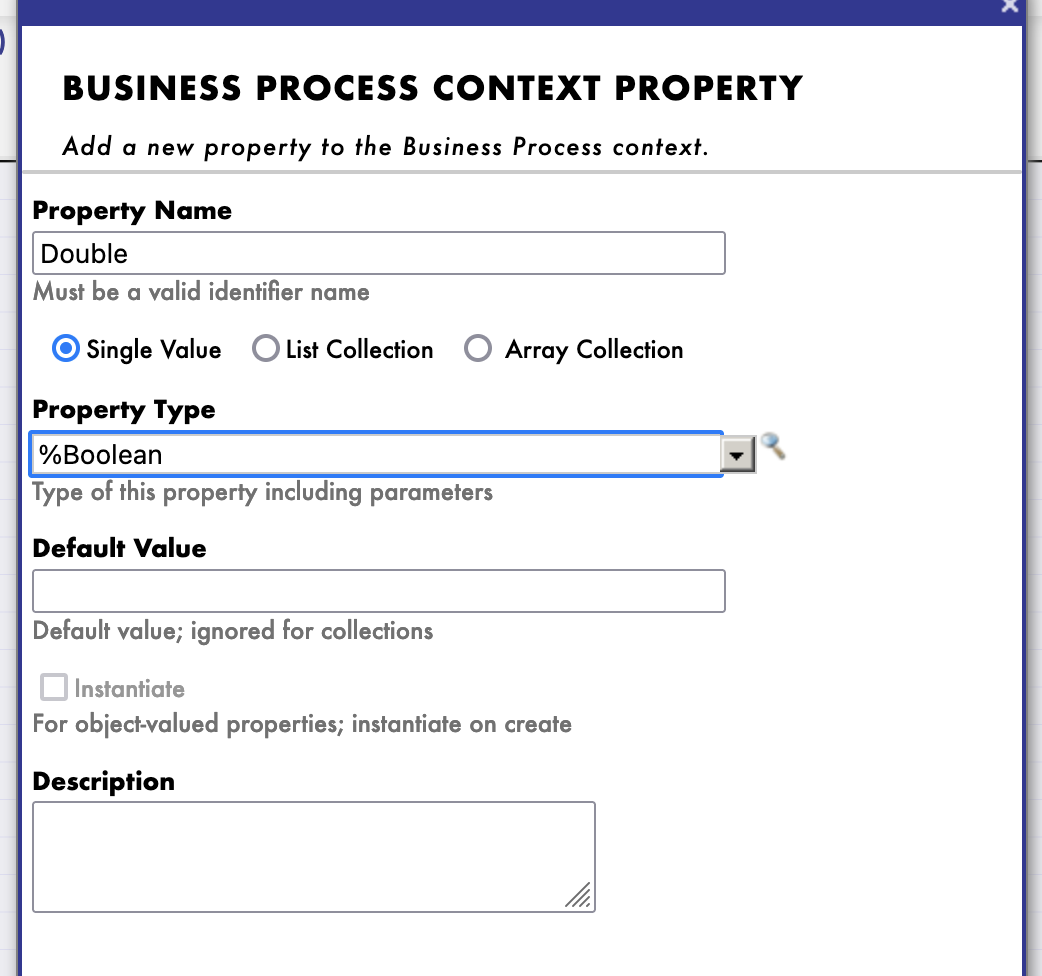
First, we need to have a response from our LocalBDD operation. We are going to create a new message, in the Formation/Msg/FormationInsertResponse.cls:
Class Formation.Msg.FormationInsertResponse Extends Ens.Response
{

Property Double As %Boolean;

}
Then, we change the response of LocalBDD by that response, and set the value of its boolean randomly (or not):
Method InsertLocalBDD(pRequest As Formation.Msg.FormationInsertRequest, Output pResponse As Formation.Msg.FormationInsertResponse) As %Status
{
    set tStatus = $$$OK

    try{
        set pResponse = ##class(Formation.Msg.FormationInsertResponse).%New()
        if $RANDOM(10) < 5 {
            set pResponse.Double = 1
        }
        else {
            set pResponse.Double = 0
        }
...
We will now create a new process (copied from the one we made), where we will add a new context property, of type %Boolean:
This property will be filled with the value of the callresponse.Double of our operation call (we need to set the [Response Message Class] to our new message class):
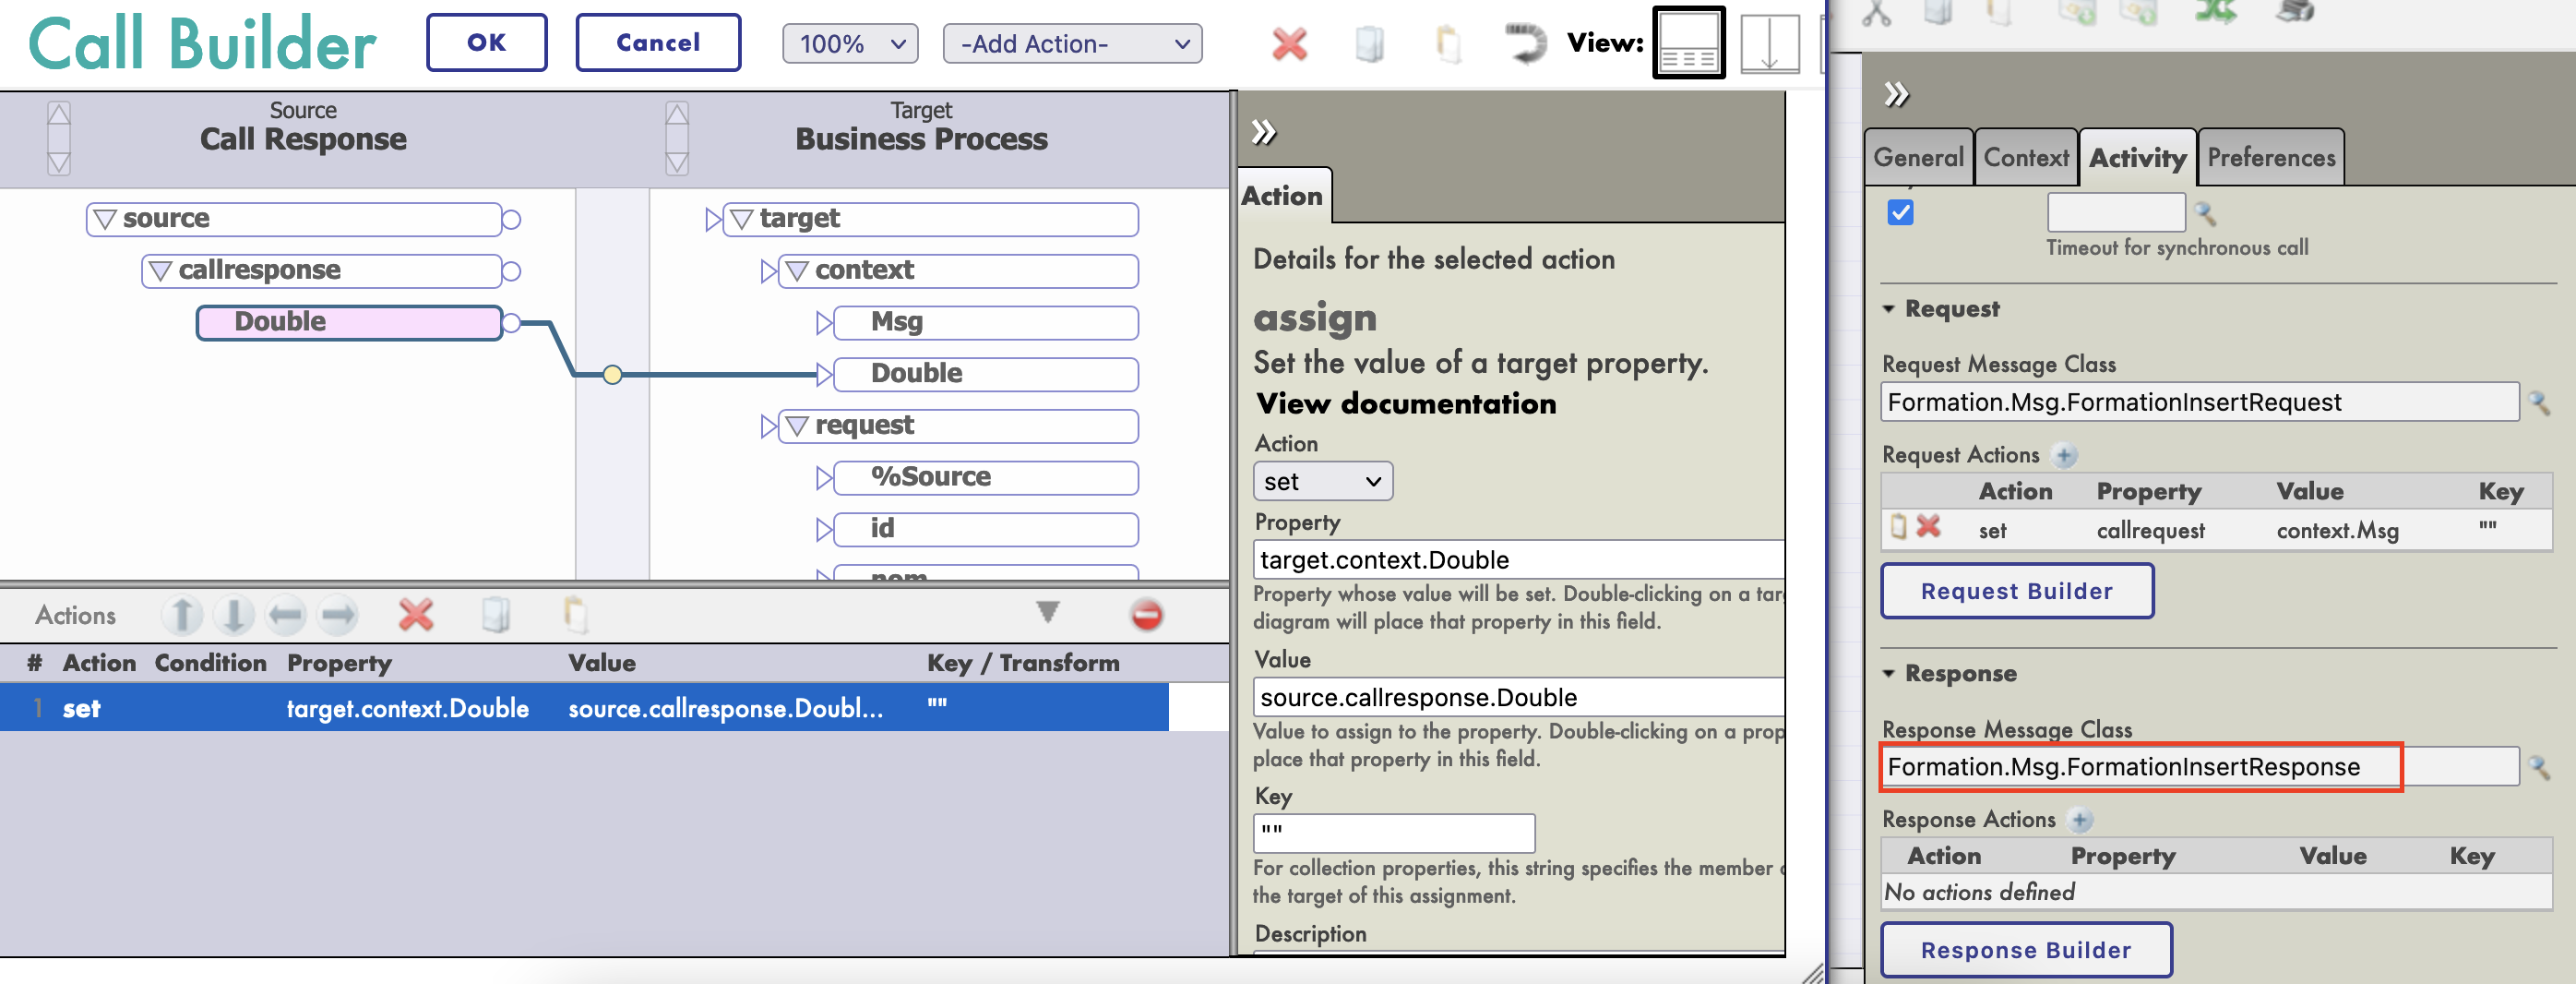
We then add an if activity, with the context.Double property as condition:
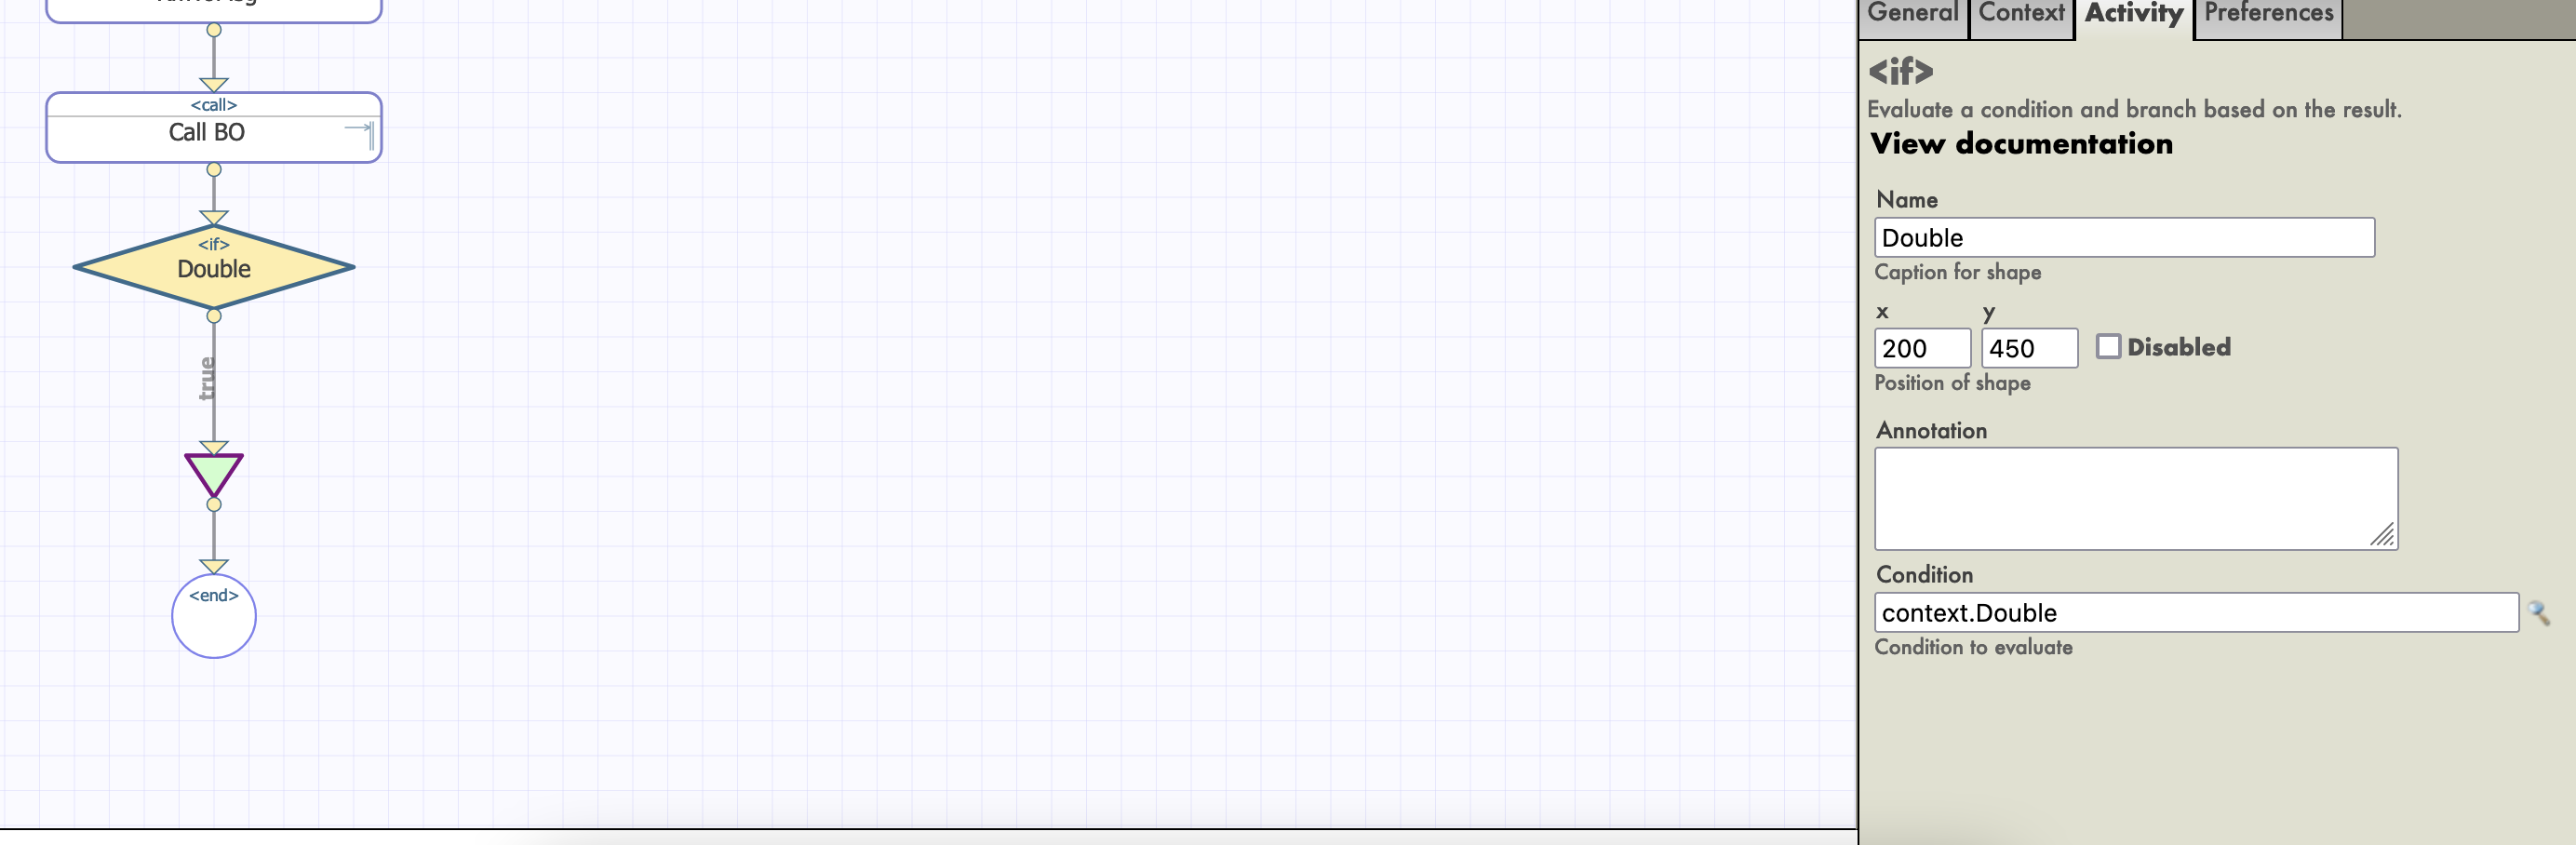
VERY IMPORTANT : we need to uncheck Asynchronous in the settings of our LocallBDD Call, or the if activity will set off before receiving the boolean response.
Finally we set up our call activity with as a target the RemoteBDD BO:
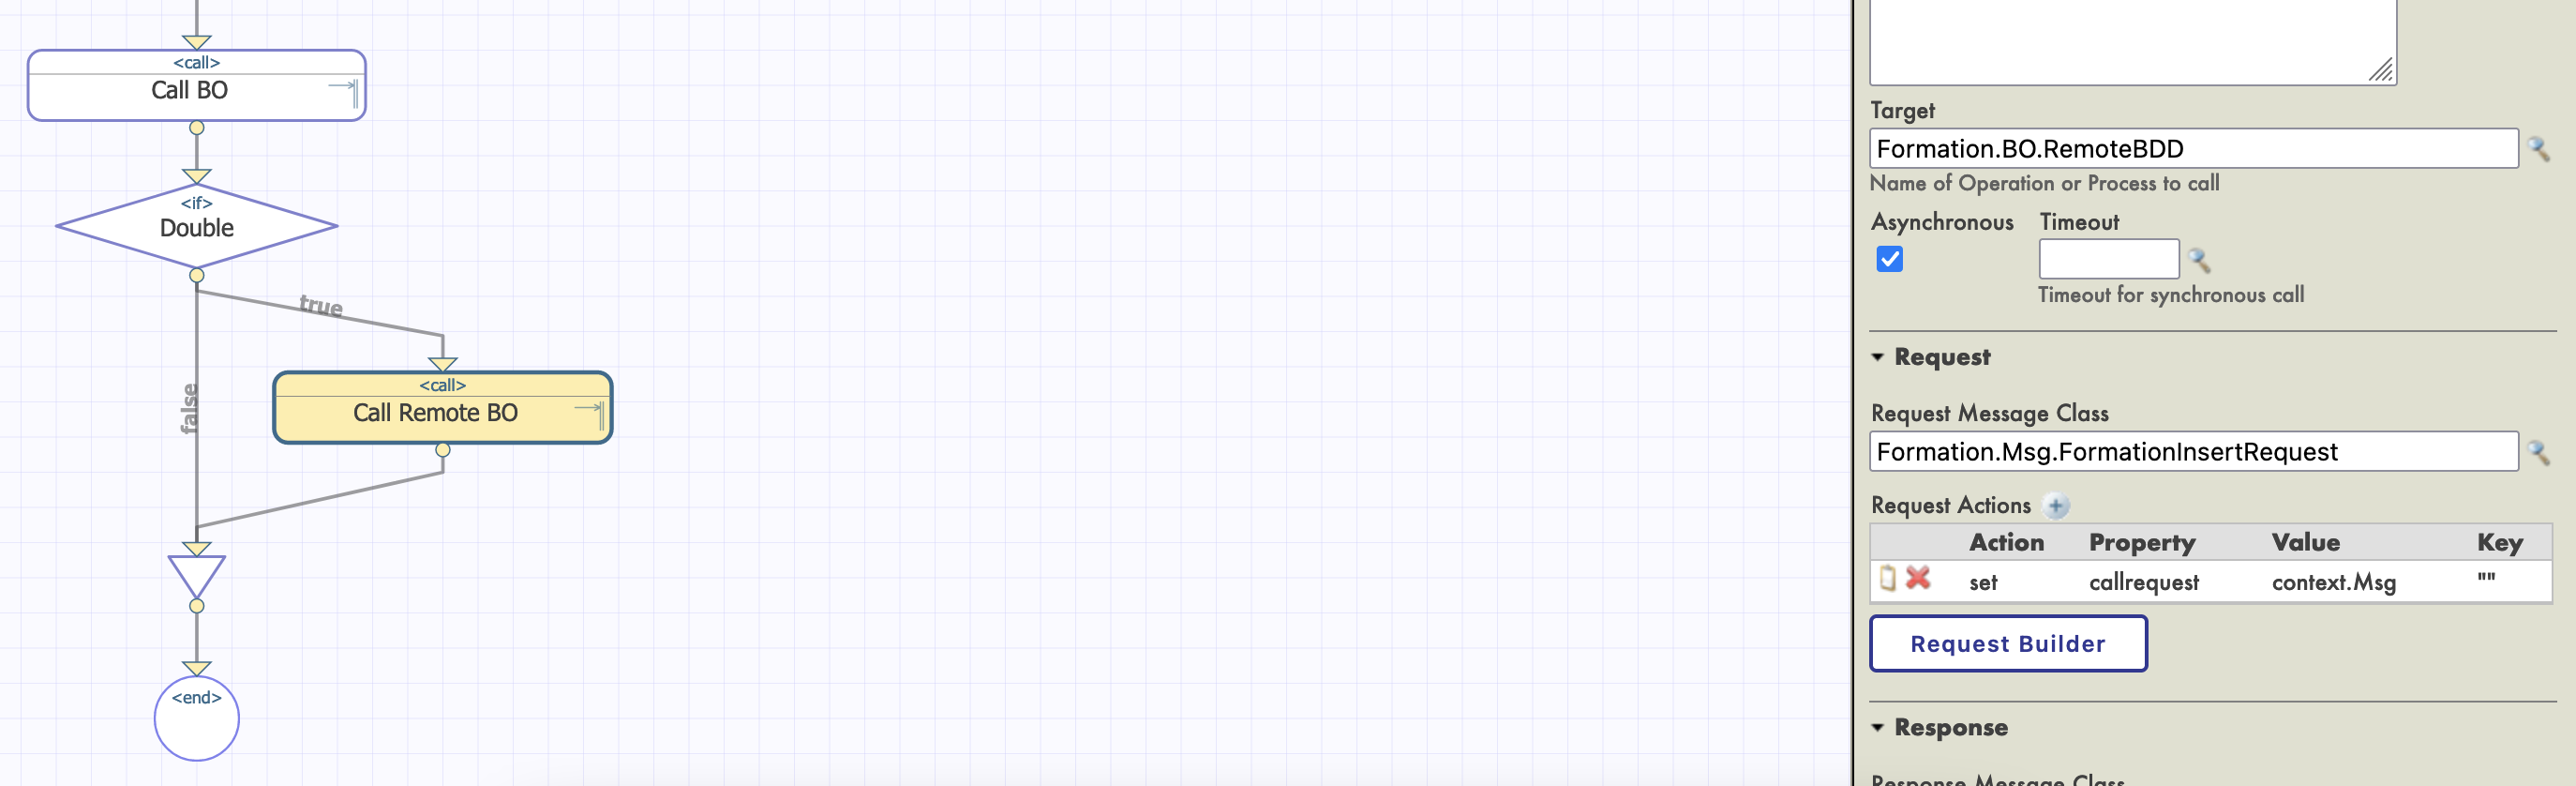
To complete the if activity, we need to drag another connector from the output of the if to the join triangle below. As we won't do anything if the boolean is false, we will leave this connector empty.
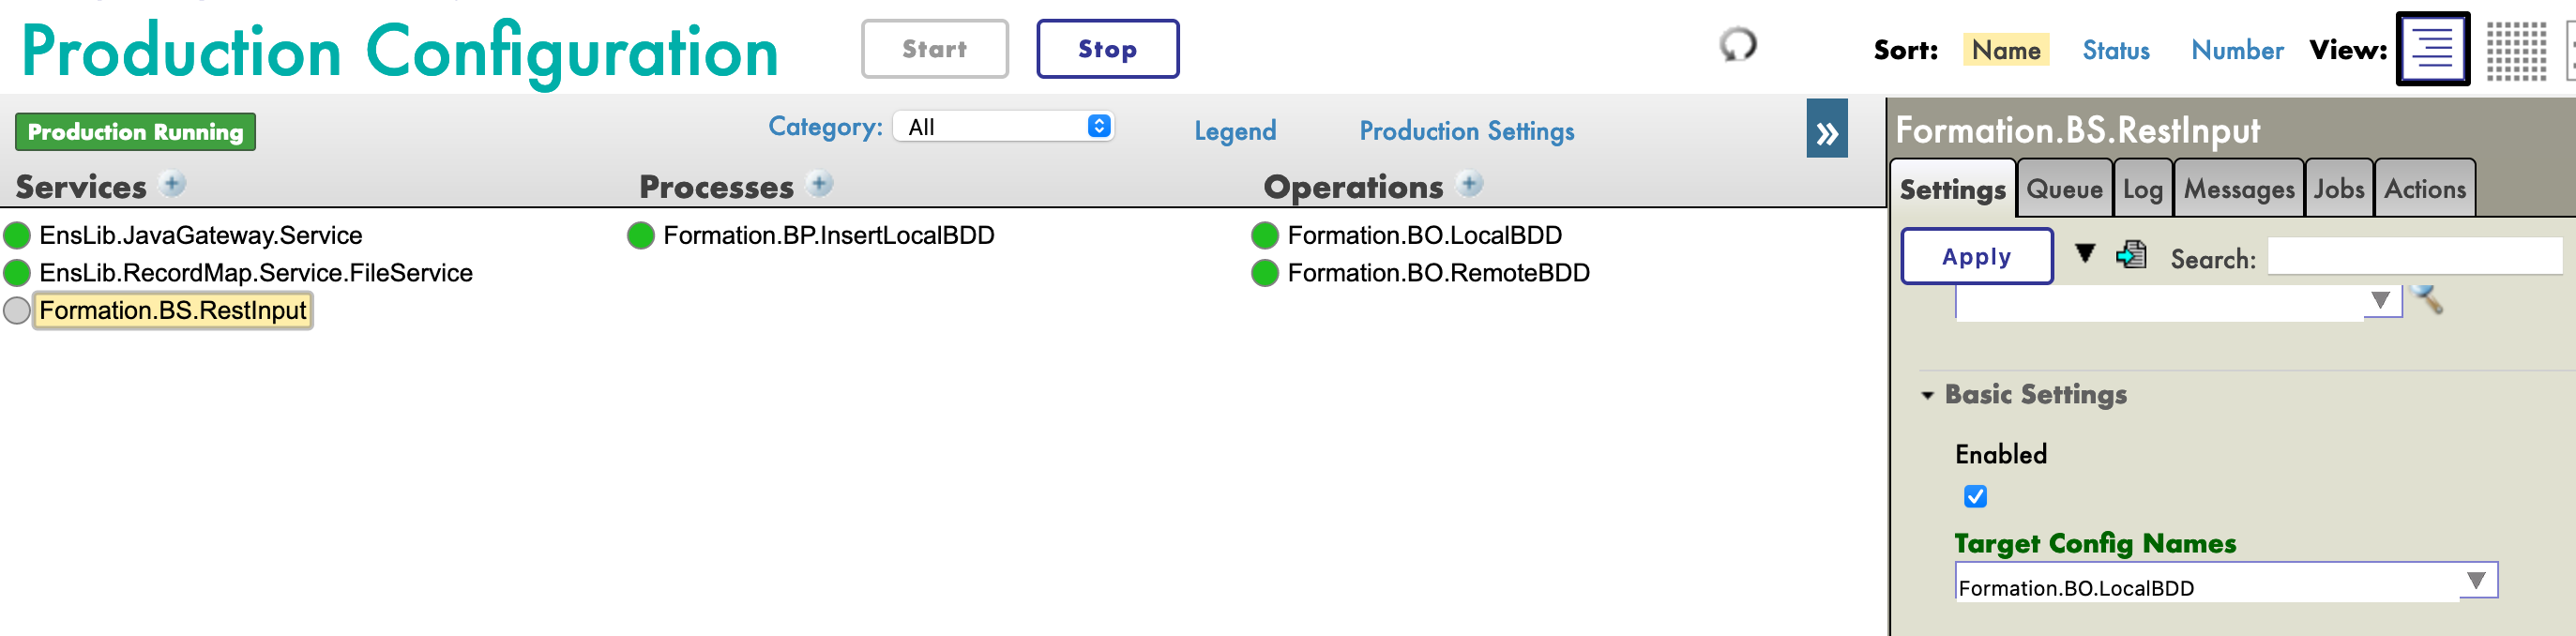
After compiling and instantiating, we should be able to test our new process. For that, we need to change the Target Config Name of our File Service.
In the trace, we should have approximately half of objects read in the csv saved also in the remote database.
10. REST service
In this part, we will create and use a REST Service.
10.1. Creating the service
To create a REST service, we need a cless that extends %CSP.REST, in Formation/REST/Dispatch.cls we have:
Class Formation.REST.Dispatch Extends %CSP.REST
{

/// Ignore any writes done directly by the REST method.
Parameter IgnoreWrites = 0;

/// By default convert the input stream to Unicode
Parameter CONVERTINPUTSTREAM = 1;

/// The default response charset is utf-8
Parameter CHARSET = "utf-8";

Parameter HandleCorsRequest = 1;

XData UrlMap [ XMLNamespace = "http://www.intersystems.com/urlmap" ]
{
<Routes>
  <!-- Get this spec -->
  <Route Url="/import" Method="post" Call="import" />
</Routes>
}

/// Get this spec
ClassMethod import() As %Status
{
  set tSc = $$$OK

  Try {

      set tBsName = "Formation.BS.RestInput"
      set tMsg = ##class(Formation.Msg.FormationInsertRequest).%New()

      set body = $zcvt(%request.Content.Read(),"I","UTF8")
      set dyna = {}.%FromJSON(body)

      set tFormation = ##class(Formation.Obj.Formation).%New()
      set tFormation.Nom = dyna.nom
      set tFormation.Salle = dyna.salle

      set tMsg.Formation = tFormation

      $$$ThrowOnError(##class(Ens.Director).CreateBusinessService(tBsName,.tService))

      $$$ThrowOnError(tService.ProcessInput(tMsg,.output))

  } Catch ex {
      set tSc = ex.AsStatus()
  }

  Quit tSc
}

}
This class contains a route to import an object, bound to the POST verb:
<Routes>
  <!-- Get this spec -->
  <Route Url="/import" Method="post" Call="import" />
</Routes>
The import method will create a message that will be sent to a Business Service.
10.2. Adding our BS
We are going to create a generic class that will route all of its sollicitations towards TargetConfigNames. This target will be configured when we will instantiate this service. In the Formation/BS/RestInput.cls file we have:
Class Formation.BS.RestInput Extends Ens.BusinessService
{

Property TargetConfigNames As %String(MAXLEN = 1000) [ InitialExpression = "BuisnessProcess" ];

Parameter SETTINGS = "TargetConfigNames:Basic:selector?multiSelect=1&context={Ens.ContextSearch/ProductionItems?targets=1&productionName=@productionId}";

Method OnProcessInput(pDocIn As %RegisteredObject, Output pDocOut As %RegisteredObject) As %Status
{
    set status = $$$OK

    try {

        for iTarget=1:1:$L(..TargetConfigNames, ",") {
		    set tOneTarget=$ZStrip($P(..TargetConfigNames,",",iTarget),"<>W")  Continue:""=tOneTarget
		    $$$ThrowOnError(..SendRequestSync(tOneTarget,pDocIn,.pDocOut))
	    }
    } catch ex {
        set status = ex.AsStatus()
    }

    Quit status
}

}
Back to the production configuration, we add the service the usual way. In the [Target Config Names], we put our BO LocalBDD:
To use this service, we need to publish it. For that, we use the [Edit Web Application] menu:
10.3. Testing
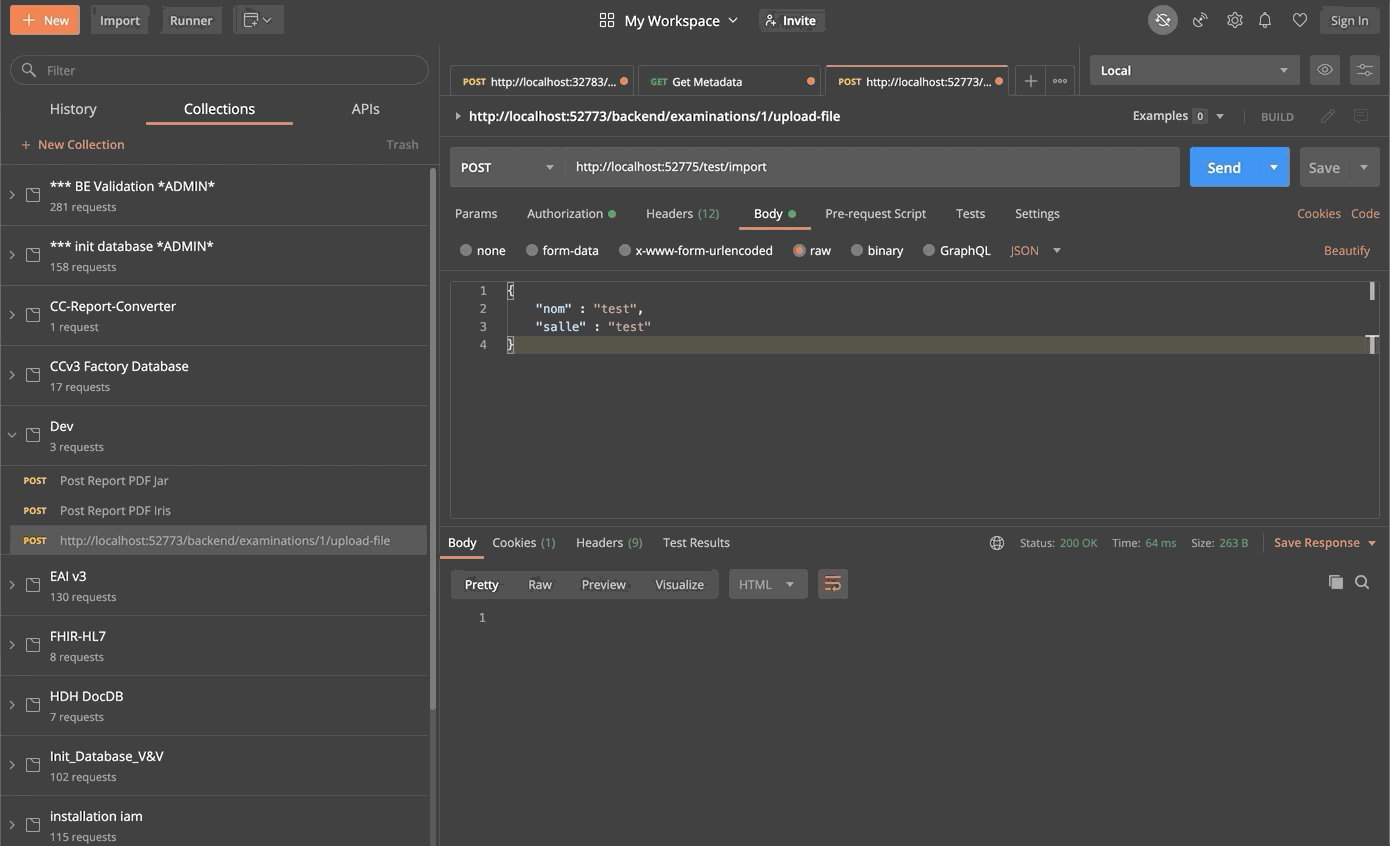
Finally, we can test our service with any kind of REST client:
Conclusion
Through this formation, we have created a production that is able to read lines from a csv file and save the read data into both the IRIS database and an extern database using JDBC. We also added a REST service in order to use the POST verb to save new objects.
We have discovered the main elements of InterSystems' interoperability Framework.
We have done so using docker, vscode and InterSystems' IRIS Management Portal.
Comments
Hi! thanks for sharing the course! Tried to build and it shows the following:
 => ERROR [internal] load metadata for containers.intersystems.com/intersystems/irishealth  2.2s
------
 > [internal] load metadata for containers.intersystems.com/intersystems/irishealth-community:2020.1.408.0:
------
failed to solve with frontend dockerfile.v0: failed to create LLB definition: containers.intersystems.com/intersystems/irishealth-community:2020.1.408.0: not found
ERROR: Service 'iris' failed to build
Hello! There is indeed a little typo in the Dockerfile. The last ARG line should be
ARG IMAGE=containers.intersystems.com/intersystems/irishealth-community:2020.1.1.408.0
It will be fixed shortly, thanks for the feedback!
Hi Théophile!
In 5.2. Management Portal the link is broken. Could you please indicate the correct one?
Thanks!
Hi Esther,
This link is working http://localhost:52775/csp/sys/UtilHome.csp?$NAMESPACE=IRISAPP
If you are not working with the docker version of this training, you may be need to adjust the port from 52775 to 52773 and adapt also the namespace.
Thanks Guillaume!