The Security Package - Editing Users Programmatically
 Have you ever thought of creating your own systems for editing users or, perhaps, even an API that you can call? Today, you’re going to join me in the %SYS namespace and get to know Security.Users!
This class has forty properties, many of which you’ve seen before in the System Management Portal. There are class methods for manipulating most of those properties. Every method in this class is a class method, and in most of them, the username is passed as an argument. These methods can be used when you do not want to open and directly manipulate the user’s objects, which is a bad idea anyway! You should not try to manipulate these objects through direct SQL access since doing so will bypass some validation steps which may cause problems with the program. In fact, in more recent versions of IRIS, there is a trigger defined for the class called NoSQL. It prevents you from using any SQL but a select statement on this class. In Cache, however, this trigger does not exist, so you should be careful!
Let’s start with the Create class method. There are two ways to call this method. You can either do it by calling it with eighteen parameters, or by passing the username and the properties as a one-dimensional array. I prefer the latter for several reasons:
- You don't have to remember the order of the parameters.
- This is more similar to the way the Modify method works
- The Get method gives you easy access to the properties array.
- We can pass the AutheEnabled property (NOTE: This property is missing in the current documentation. However, you can set it to $$$AutheTwoFactorSMS to enable SMS two-factor authentication or to $$$AutheTwoFactorPW for a time-based one-time password.
These are the properties that you can set after creating a user:
|
|
|
|
|
|
|
|
|
|
|
|
|
|
|
|
|
|
|
|
|
|
|
|
|
|
|
|
|
|
|
|
|
|
|
|
|
|
|
|
|
|
|
|
|
|
|
|
|
|
|
|
|
|
|
|
|
|
|
|
|
|
|
|
|
|
|
|
|
|
|
|
|
|
|
|
|
|
|
|
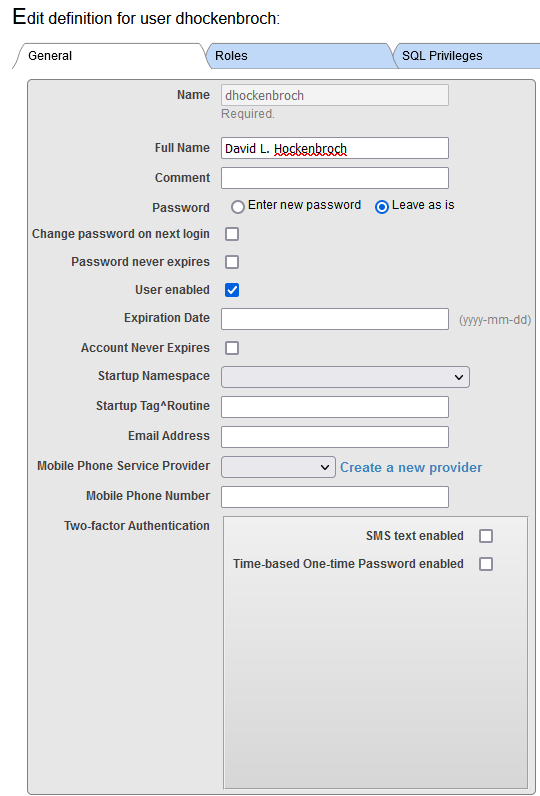
I could call the Create method by using ##class(Security.Users).Create("dhockenbroch","%Developer","80Proof$!",etc.) and enter all of those parameters in order. Alternatively, I could create an array with the properties I want to set to the following:
set props("UserRoles") = "%Developer"
set props("Password") = "80Proof$!"
set props("FullName") = "David Hockenbroch"
set props("Enabled") = 1
set props("Attributes","Looks") = $LB("tall","handsome")
set sc = ##class(Security.Users).Create("dhockenbroch",.props)
Personally, I find this approach much easier, and it is more consistent with other methods in the class that also use a properties array. Don’t worry! We'll get to some of those in a bit.
Once a user is created, we can get their properties as an array using the Get method. In my user's case, we would use ##class(Security.Users).Get("dhockenbroch",.props) first, and then add the props containing an array holding all of the properties of my user. We can later pass this array of properties to the Create or Modify method. The Create method will ignore all the properties besides those it can change. There is one caveat, though. Since passwords are sent in plain text, but the retrieved value is the hash, you wouldn't want to pass that value with the properties. You'll want to kill props("Password") or set it instead! An attempt to call a Create or Modify with the password hash still in there will probably cause errors due to invalid characters.
I assume the Attributes may be sticking out to you as something new. They aren't something you typically see anywhere. However, they exist for you to have the option to add your own custom pieces of information to a user. Going back to what we were doing, after using the Get method to get the properties array, I could address them as follows:
for x=1:1:$LL(props("Attributes","Looks")){
write $LG(props("Attributes","Looks"),x),!
}
The abovementinoed code would write out “tall” and “handsome”. You can use this trick in your code as you please, whether to store additional information like a mailing address, or perhaps, to keep something you use in a custom %ZSTART routine.
Once a user is live, it can be modified by using a properties array and calling the Modify class method, ##class(Security.Users).Modify("dhockenbroch",.props). It is similar to how we used the properties array to call the Create method. Yet what to do if you do not know whether or not the user exists? That's precisely what the Exists method is for! Once we've got our username and properties array, we can check if the user exists, and if it does, call Modify instead of Create.
if ##class(Security.Users).Exists("dhockenbroch",.userhandle,.errors) = 1{
//Kill the password from the array so we don't change the user's password without their knowledge!
kill props("Password")
set sc = ##class(Security.Users).Modify("dhockenbroch",.props)
}
else{
if errors = ""{
set sc = ##class(Security.Users).Create("dhockenbroch",.props)
}
}
The Exists method, which, by the way, is the only method in the class that returns a boolean rather than a status, will return 1 if the user exists, and the UserHandle will contain the object handle for the user. However, if this method returns 0, it can mean that either the user doesn't exist or there was an error determining if it did. In that case, the errors will be stored in errors after this method runs. This is why we must check the errors before calling the Create method.
If we wish to copy settings from an existing user to a new one, we could get the properties method, set the password in the properties array, and use all that to create a user, or we could simply use the Copy method! ##class(Security.Users).Copy("dhockenbroch","dhockenbroch2","David Hockenbroch II",1,1,"90Proof$!") would create another one of me, which is a great idea because I'm delightful! This new user would be have a username of "dhockenbroch2” and a full name of "David Hockenbroch II". It will also have SQL system privileges identical to mine (that's the first Boolean), and SQL object privileges (that's the second Boolean). Also, it would have a password of 90Proof$!. Depending on your programming needs, you may want to use that handy Exists method to ensure the source user exists first.
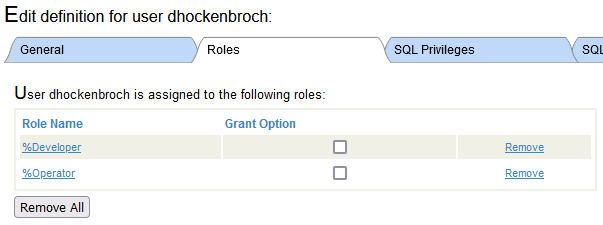
We can also add or remove roles using the AddRoles and RemoveRoles methods. ##class(Security.Users).AddRoles("dhockenbroch","%Operator,%Developer",1) would add the %Operator and the %Developer roles to my user and give them permission to add those roles to other users. If the last argument were 0 instead of a 1, my user would have the roles but would not be able to grant them. ##class(Security.Users).RemoveRoles("dhockenbroch","%Operator,%Developer") would remove the roles. Adding or removing %All also sets the SuperUser property accordingly.
You can also retrieve a user's roles and resources. If you only want to recover the roles, you can use ##class(Security.Users).GetRoleSet("dhockenbroch",.roles) and that will get a comma-separated list of the user's roles into the roles variable. If you use ##class(Security.Users).GetResourceSet("dhockenbroch",.roles,.resources), in addition to getting the roles as shown above, you'll also get a comma-separated list of resource:permission pairs, such as %Admin_Operate:U, that indicate that the user has Use permission for the %Admin_Operate resource.
Let’s suppose we want to get rid of a user programmatically. That would be a simple task to do as well. ##class(Security.Users).Delete("dhockenbroch") would erase my user account.
There are also methods for marking passwords as expired or not expired. Both of them can take a comma-separated list of usernames as an argument (which can also be a * to indicate all users) and a variable passed by reference to tell you how many users were affected. It means that ##class(Security.Users).ExpireUserPasswords("dhockenbroch",.count) would expire my password and set count to 1. ##class(Security.Users).UnExpireUserPasswords("dhoceknbroch",.count) would make it active again. If either one of those methods receives "*" instead of "dhockenbroch", it will attempt to expire or bring back to life all users' passwords, and would set the count to the number of users affected.
Last but certainly not least are the export and import methods. They work with users via XML files. The Export method takes a file name (by default it is UsersExport.xml) which is the name of the XML file that will be created in the mgr directory inside of your installation directory. Then a number can be passed by reference to reveal how many users got exported at the end of the process. Next, a comma-separated string of usernames which can be set to * for all users can be created. Then a comma-separated list of roles, which can as well be set to * for all roles can be assembled. It will tell the export method to export only the users with those roles. After that, there is a Boolean to tell whether or not to export SQL privileges for the included roles, and another number passed by reference to tell you how many SQL privileges got exported. So, ##class(Security.Users).Export("MyUsers.xml",.usersexported,"*","%Developer",1,.exportedprivs) will create a MyUser.xml file in the mgr directory containing all users with the %Developer role and the associated privileges. .usersexported will be equal to the number of users who had the %Developer role, and exportedprivs will disclose how many SQL privilege records were exported.
Import is the reverse process. You give it a file name and pass a number by reference to track how many users got imported followed by a flags argument, then a number by reference to track how many SQL privileges got imported. That flag argument can be set to 1not to import any users, but the two numbers passed by reference will still be set. This gives you a way to test a file before importing it because this is how you can see the number of users and privileges stored within the XML file. That is to say if we called ##class(Security.Users).Import("MyUsers.xml",.usersimported,1,.importedprivs), we will not import any users. However, we might see that usersimported got set to 20 or any other number representing the users that are located in the file. We might as well see that importedprives got set to 0, which means that SQL privileges were not exported when the file was created. After that, we could make the same call with the flag set to 0 to actually do the import. These two methods combined are a great way to move users between instances of IRIS!
That's all so far! The abovementioned information covers everything you need to know about managing your users programmatically. Stay alert for future articles covering further use of the Security package, including creating those roles and resources for your users!
Comments
interesting article!)
thank you, David)