OAuth Authorization and InterSystems IRIS: Taming Trust Protocols
How can you allow computers to trust one another in your absence while maintaining security and privacy?

“A Dry Martini”, he said. “One. In a deep champagne goblet.”
“Oui, monsieur.”
“Just a moment. Three measures of Gordons, one of vodka, half a measure of Kina Lillet. Shake it very well until it’s ice-cold, then add a large thin slice of lemon peel. Got it?”
"Certainly, monsieur." The barman seemed pleased with the idea.
Casino Royale, Ian Fleming, 1953
OAuth helps to separate services with user credentials from “working” databases, both physically and geographically. It thereby strengthens the protection of identification data and, if necessary, helps you comply with the requirements of countries' data protection laws.
With OAuth, you can provide the user with the ability to work safely from multiple devices at once, while "exposing" personal data to various services and applications as little as possible. You can also avoid taking on "excess" data about users of your services (i.e. you can process data in a depersonalized form).
If you use Intersystems IRIS, you get a complete set of ready-made tools for testing and deploying OAuth and OIDC services, both autonomously and in cooperation with third-party software products.
OAuth 2.0 and OpenID Connect
OAuth and OpenID Connect — known as OIDC or simply OpenID — serve as a universal combination of open protocols for delegating access and identification — and in the 21st century, it seems to be a favorite. No one has come up with a better option for large-scale use. It's especially popular with frontenders because it sits on top of HTTP(S) protocols and uses a JWT (JSON Web Token) container.
OpenID works using OAuth — it is, in fact, a wrapper for OAuth. Using OpenID as an open standard for the authentication and creation of digital identification systems is nothing new for developers. As of 2019, it is in its 14th year (and its third version). It is popular in web and mobile development and in enterprise systems.
Its partner, the OAuth open standard for delegating access, is 12 years old, and it's been nine years since the relevant RFC 5849 standard appeared. For the purposes of this article, we will rely on the current version of the protocol, OAuth 2.0, and the current RFC 6749. (OAuth 2.0 is not compatible with its predecessor, OAuth 1.0.)
Strictly speaking, OAuth is not a protocol, but a set of rules (a scheme) for separating and transferring user identification operations to a separate trusted server when implementing an access-rights restriction architecture in software systems.
Be aware: OAuth can't say anything about a specific user! Who the user is, or where the user is, or even whether the user is currently at a computer or not. But OAuth makes it possible to interact with systems without user participation, using pre-issued access tokens. This is an important point (see "User Authentication with OAuth 2.0" on the OAuth site for more information).
The User-Managed Access (UMA) protocol is also based on OAuth. Using OAuth, OIDC and UMA together make it possible to implement a protected identity and access management (IdM, IAM) system in areas such as:
- Using a patient's HEART (Health Relationship Trust) personal data profile in medicine.
- Consumer Identity and Access Management (CIAM) platforms for manufacturing and trading companies.
- Personalizing digital certificates for smart devices in IoT (Internet of Things) systems using the OAuth 2.0 Internet of Things (IoT) Client Credentials Grant.
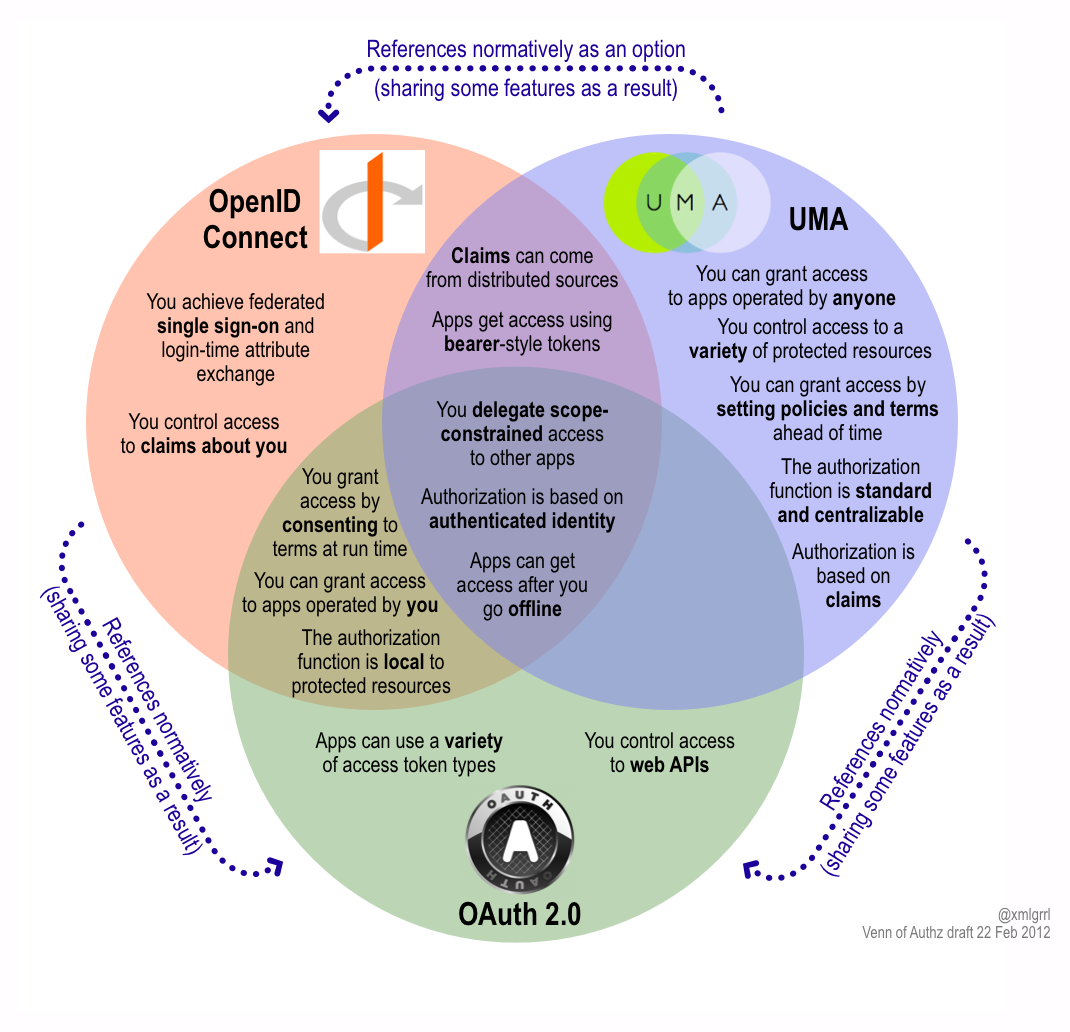
A New Venn Of Access Control For The API Economy
Above all, do not store personal data in the same place as the rest of the system. Separate authentication and authorization physically. And ideally, give the identification and authentication to the individual person. Never store them yourself. Trust the owner's device.
Trust and Authentication
It is not a best practice to store users' personal data either in one’s own app or in a combined storage location along with a working database. In other words, we choose someone we trust to provide us with this service.
It is made up of the following parts:
- The user
- The client app
- The identification service
- The resource server
The action takes place in a web browser on the user's computer. The user has an account with the identification service. The client app has a signed contract with the identification service and reciprocal interfaces. The resource server trusts the identification service to issue access keys to anyone it can identify.
The user runs the client web app, requesting a resource. The client app must present a key to that resource to gain access.
If the user doesn’t have a key, then the client app connects with an identification service with which it has a contract for issuing keys to the resource server (passing the user on to the identification service).
The Identification Service asks what kind of keys are required.
The user provides a password to access the resource. At this point, the user has been authenticated and identification of the user has been confirmed, thus providing the key to the resource (passing the user back to the client app), and the resource is made available to the user.
Implementing an Authorization Service
On the Intersystems IRIS platform, you can assemble a service from different platforms as needed. For example:
- Configure and launch an OAuth server with the demo client registered on it.
- Configure a demo OAuth client by associating it with an OAuth server and web resources.
- Develop client apps that can use OAuth. You can use Java, Python, C#, or NodeJS. Below is an example of the application code in ObjectScript.
There are multiple settings in OAuth, so checklists can be helpful. Let's walk through an example. Go to the IRIS management portal and select the section System Administration > Security > OAuth 2.0 > Server.
Each item will then contain the name of a settings line and a colon, followed by an example or explanation, if necessary. As an alternative, you can use the screenshot hints in Daniel Kutac's three-part article, InterSystems IRIS Open Authorization Framework (OAuth 2.0) implementation - part 1, part 2, and part 3.
Note that all of the following screenshots are meant to serve as examples. You’ll likely need to choose different options when creating your own applications.
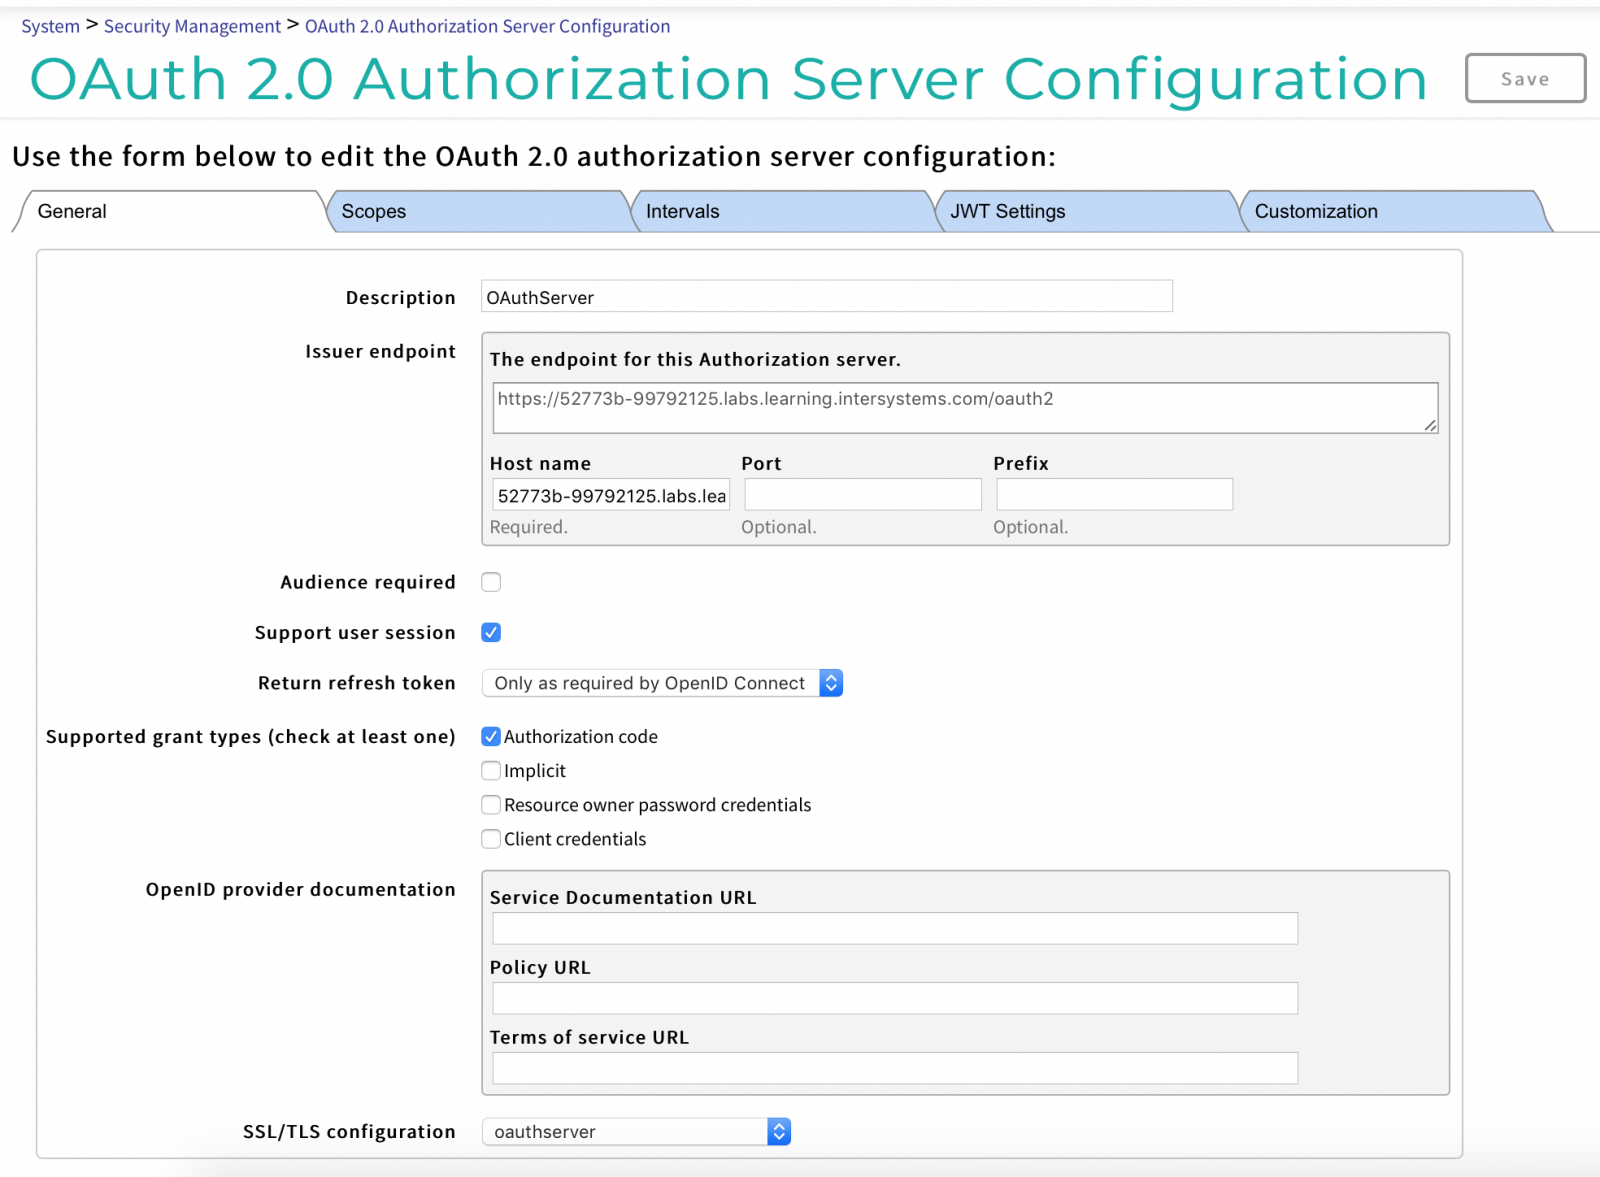
On the General Settings tab, use these settings:
- Description: provide a description of the configuration, such as "Authorization server".
- The endpoint of the generator (hereinafter EPG) host name: DNS name of your server.
- Supported permission types (select at least one):
- Authorization code
- Implicit
- Account details: Resource, Owner, Password
- Client account details
- SSL/TLS configuration: oauthserver
On the Scopes tab:
- Add supported scopes: scope1 in our example
On the Intervals tab:
- Access Key Interval: 3600
- Authorization Code Interval: 60
- Update Key Interval: 86400
- Session Interruption Interval: 86400
- Validity period of the client key (client secret): 0
On the JWT Settings tab:
- Entry algorithm: RS512
- Key Management Algorithm: RSA-OAEP
- Content Encryption Algorithm: A256CBC-HS512
On the Customization tab:
- Identify Class: %OAuth2.Server.Authenticate
- Check User Class: %OAuth2.Server.Validate
- Session Service Class: OAuth2.Server.Session
- Generate Key Class: %OAuth2.Server.JWT
- Custom Namespace: %SYS
- Customization Roles (select at least one): %DB_IRISSYS and %Manager
Now save the changes.
The next step is registering the client on the OAuth server. Click the Customer Description button, then click Create Customer Description.
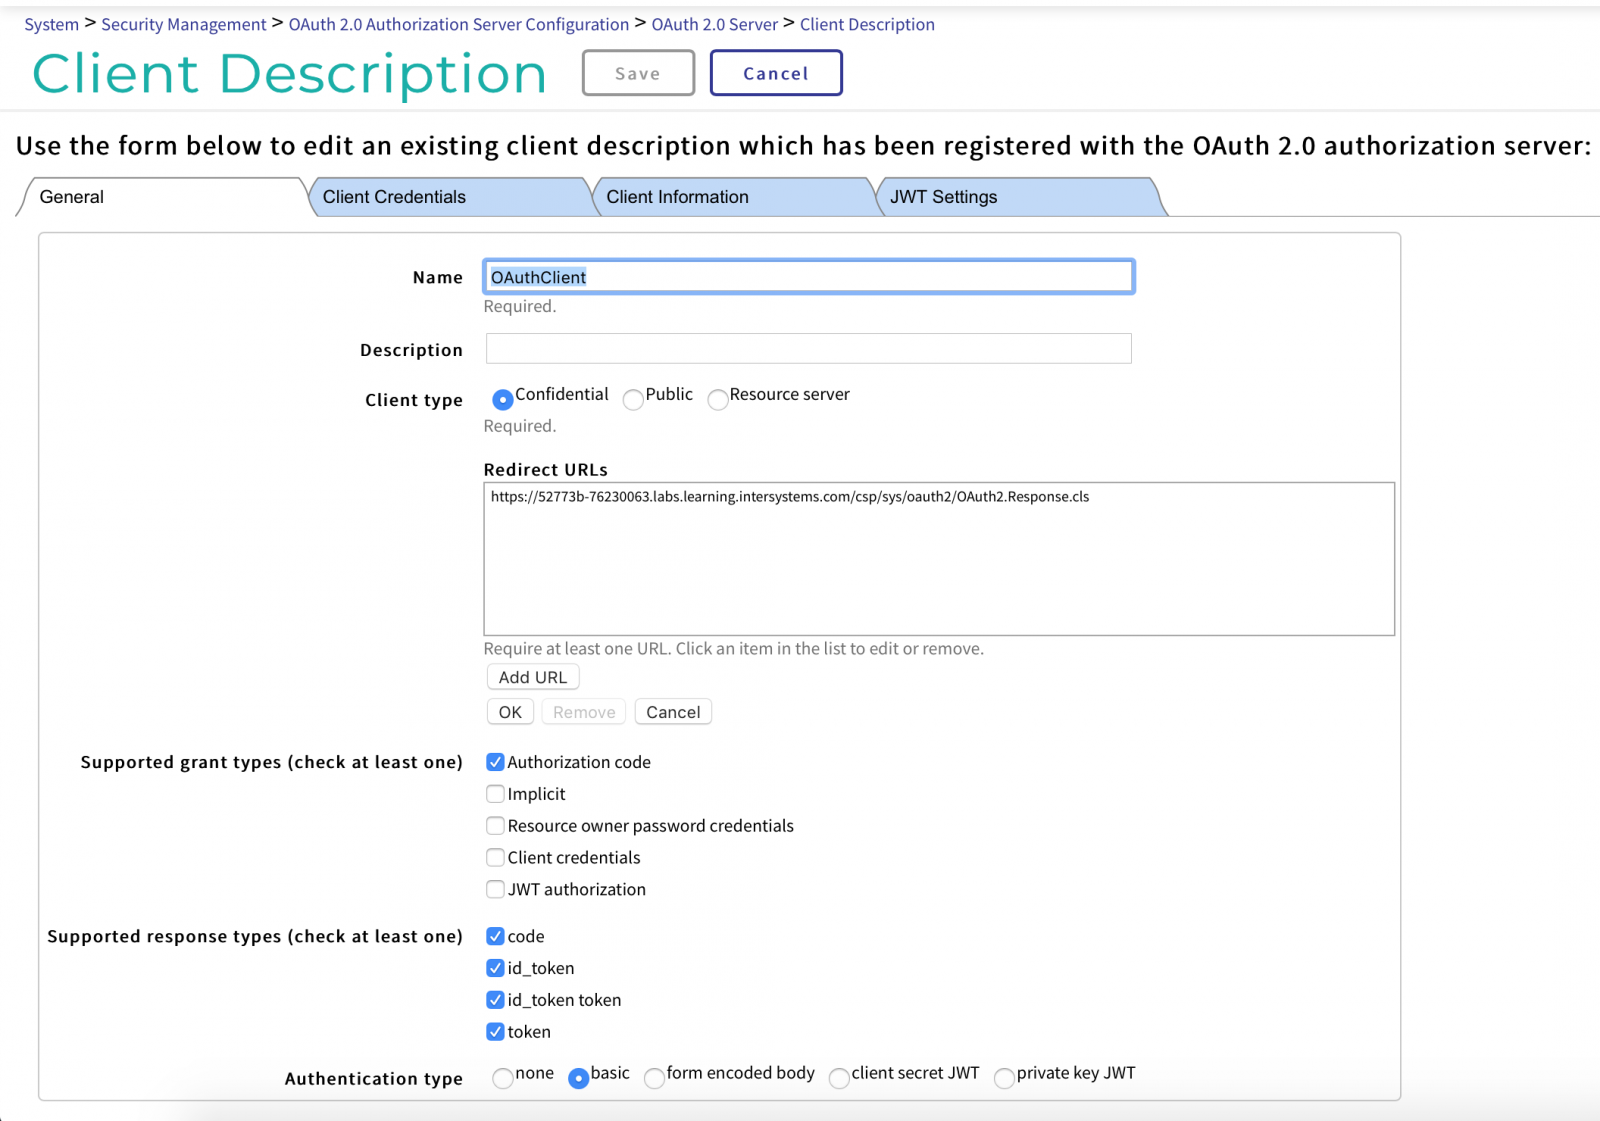
On the General Settings tab, enter the following information:
- Name: OAuthClient
- Description: provide a brief description
- Client Type: Confidential
- Redirect URLs: the address of the point to return to the app after identification from oauthclient.
- Supported grant types:
- Authorization code: yes
- Implicit
- Account details: Resource, Owner, Password
- Client account details
- JWT authorization
- Supported response types: Select all of the following:
- code
- id_token
- id_token key
- token
- Authorization type: Simple
The Client Account Details tab should be auto-completed, but ensure the information here is correct for the client.
On the Client Information tab:
- Authorization screen:
- Client name
- Logo URL
- Client homepage URL
- Policy URL
- Terms of Service URL
Now configure the binding on the OAuth server client by going to System Administration > Security > OAuth 2.0 > Client.
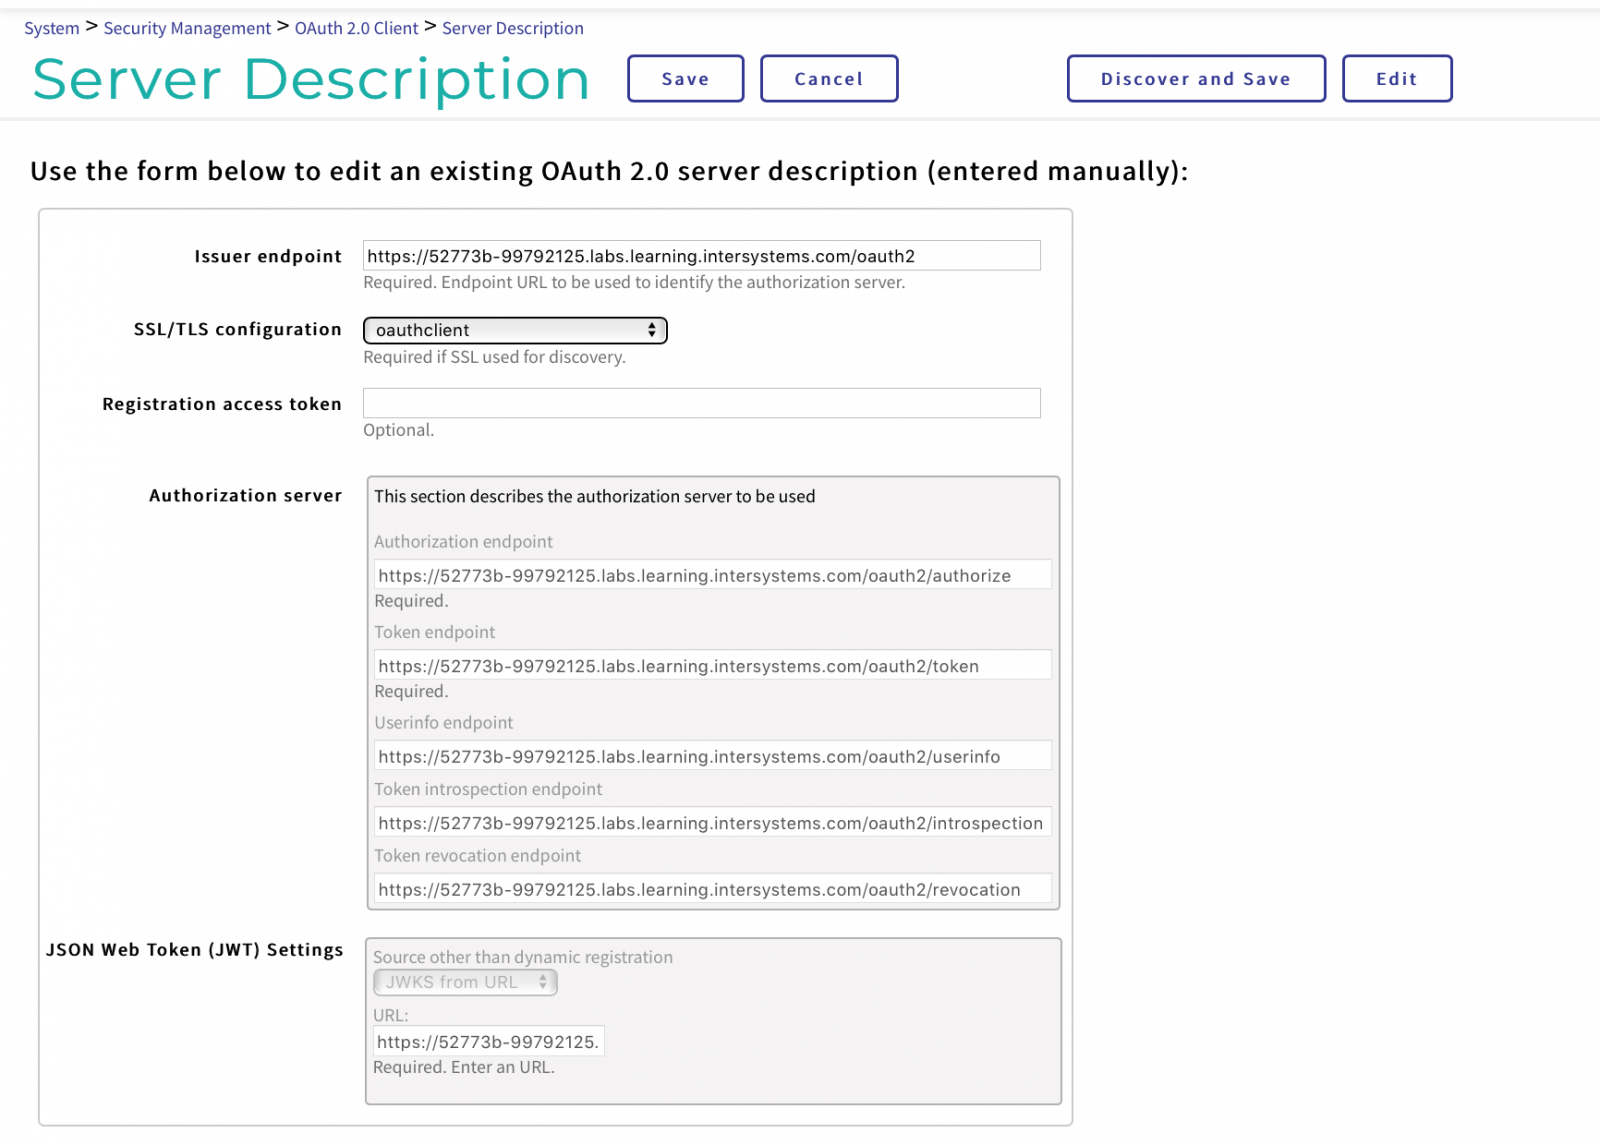
Create a Server Description:
- The endpoint of the generator: taken from the general parameters of the server (see above).
- SSL/TLS configuration: choose from the preconfigured list.
- Authorization server:
- Authorization endpoint: EPG + /authorize
- Key endpoint: EPG + /token
- User endpoint: EPG + /userinfo
- Key self-test endpoint: EPG + /revocation
- Key termination endpoint: EPG + /introspection
- JSON Web Token (JWT) settings:
- Other source besides dynamic registration: choose JWKS from URL
- URL: EPG + /jwks
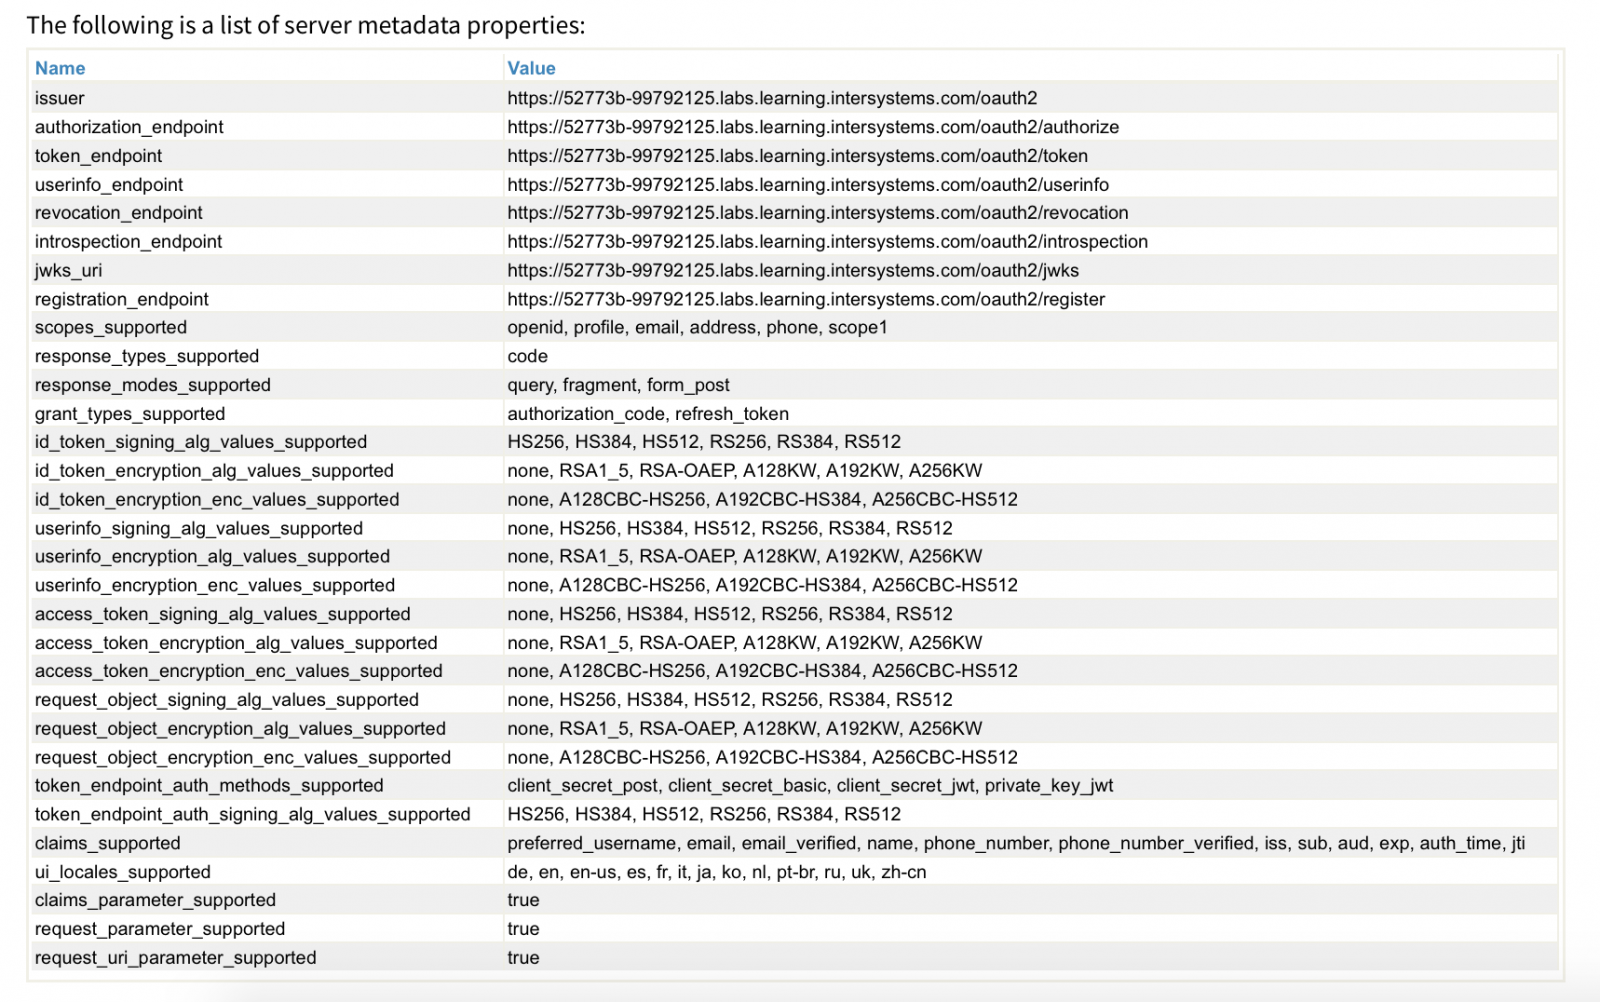
From this list, for example, you can see (scopes_supported and claims_supported) that the server can provide the OAuth-client with different information about the user. And it's worth noting that when implementing your application, you should ask the user what data they are ready to share. In the example below, we will only ask for permission for scope1.
Now save the configuration.
If there is an error indicating the SSL configuration, then go to Settings > System Administration > Security > SSL/TSL Configurations and remove the configuration.
Now we're ready to set up an OAuth client:
System Administration > Security > OAuth 2.0 > Client > Client configurations > Create Client configurations
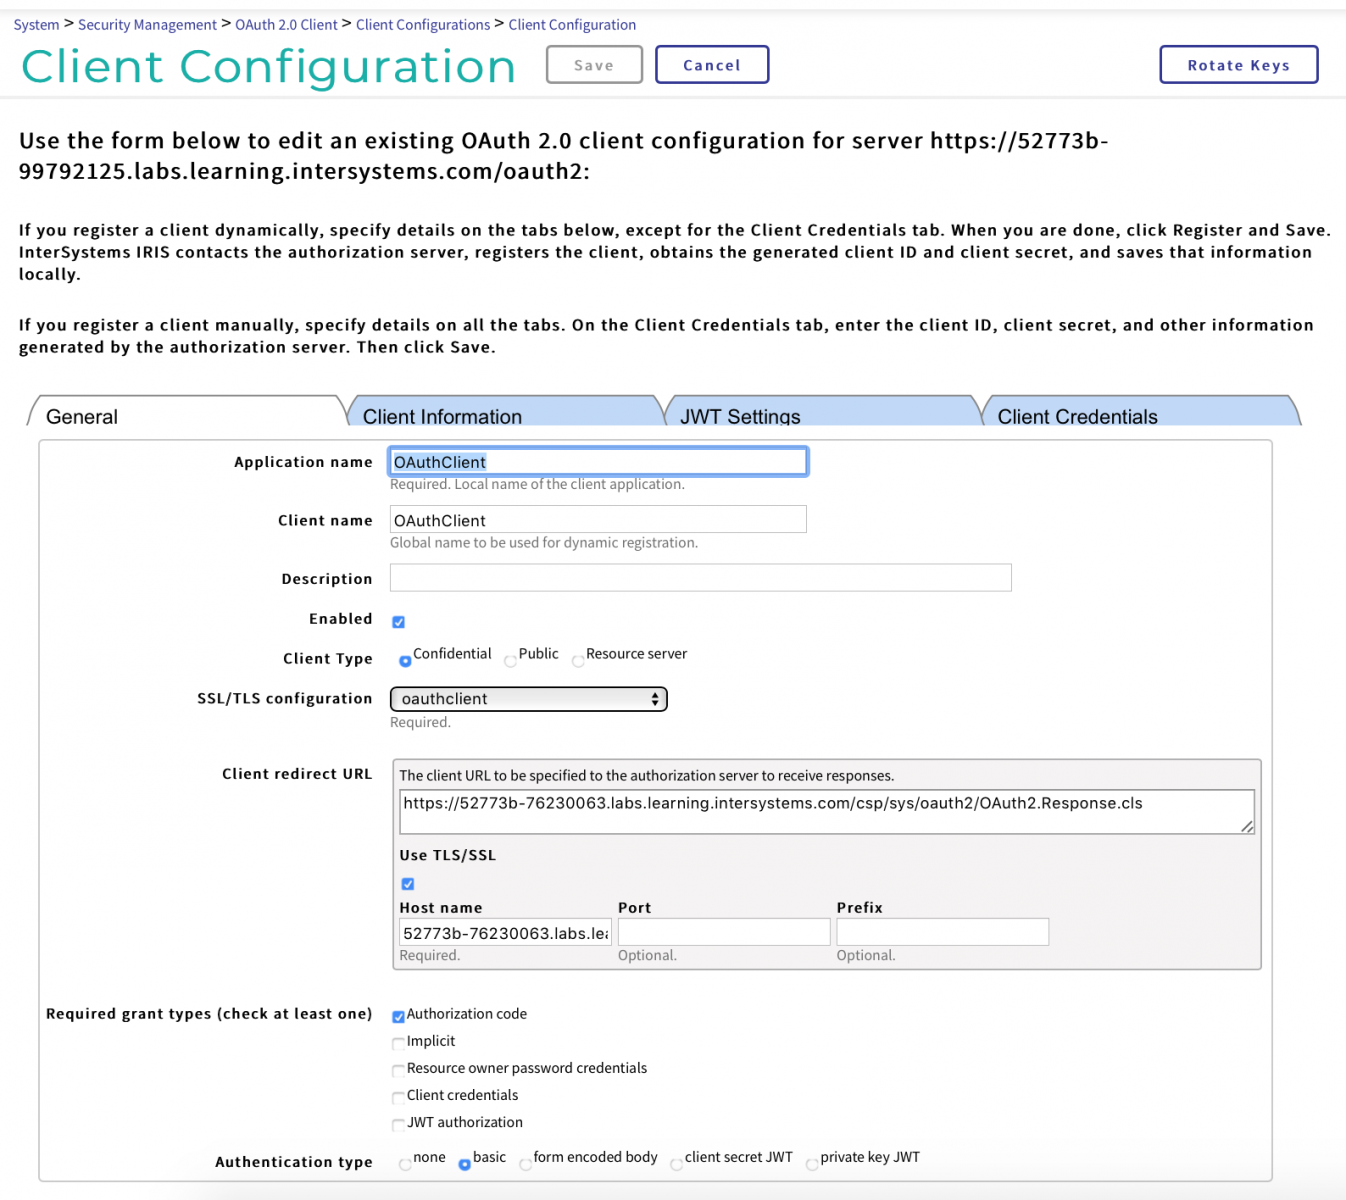
On the General tab, use these settings:
- Application Name: OAuthClient
- Client Name: OAuthClient
- Description: enter a description
- Enabled: Yes
- Client Type: Confidential
- SSL/TCL configuration: select oauthclient
- Client Redirect URL: the DNS name of your server
- Required Permission Types:
- Authorization code: Yes
- Implicit
- Account details: Resource, Owner, Password
- Client account details
- JWT authorization
- Authorization type: Simple
On Client Information tab:
- Authorization screen:
- Logo URL
- Client homepage URL
- Policy URL
- Terms of Service URL
- Default volume: taken from those specified earlier on the server (for example, scope1)
- Contact email addresses: enter addresses, separated by commas
- Default max age (in seconds): maximum authentication age or omit this option
On the JWT Settings tab:
- JSON Web Token (JWT) settings
- Creating JWT settings from X509 account details
- IDToken Algorithms:
- Signing: RS256
- Encryption: A256CBC
- Key: RSA-OAEP
- Userinfo Algorithms
- Access Token Algorithms
- Query Algorithms
On the Client Credentials tab:
- Client ID: as issued when the client registered on the server (see above).
- Client ID Issued: isn't filled in
- Client secret: as issued when the client registered on the server (see above).
- Client Secret Expiry Period: isn't filled in
- Client Registration URI: isn't filled in
Save the configuration.
Web app with OAuth authorization
OAuth relies on the fact that the communication channels between the interaction participants (server, clients, web application, user's browser, resource server) are somehow protected. Most often this role is played by protocols SSL/TLS. But OAuth will work and on unprotected channels. So, for example, server Keycloak, by default uses HTTP protocol and does without protection. It simplifies working out and debugging at working out. At real use of services, OAuth protection of channels should be included strictly obligatory is written down in the documentation Keycloak. Developers InterSystems IRIS adhere to a more strict approach for OAuth - use SSL/TSL is obligatory. The only simplification - you can use the self-signed certificates or take advantage of built-in IRIS service PKI (System administration >> Security >> Public key system).
Verification of the user's authorization is made with the explicit indication of two parameters - the name of your application registered on the OAuth server, and in the OAuth client scope.
Parameter OAUTH2APPNAME = "OAuthClient";
set isAuthorized = ##class(%SYS.OAuth2.AccessToken).IsAuthorized(
..#OAUTH2APPNAME,
.sessionId,
"scope1",
.accessToken,
.idtoken,
.responseProperties,
.error)
In the lack of authorization, we prepare a link to the request for user identification and obtaining permission to work with our application. Here we need to specify not only the name of the application registered on the OAuth server and in the OAuth client and the requested volume (scope) but also the backlink to which point of the web application to return the user.
Parameter OAUTH2CLIENTREDIRECTURI = "https://52773b-76230063.labs.learning.intersystems.com/oauthclient/"
set url = ##class(%SYS.OAuth2.Authorization).GetAuthorizationCodeEndpoint(
..#OAUTH2APPNAME,
"scope1",
..#OAUTH2CLIENTREDIRECTURI,
.properties,
.isAuthorized,
.sc)
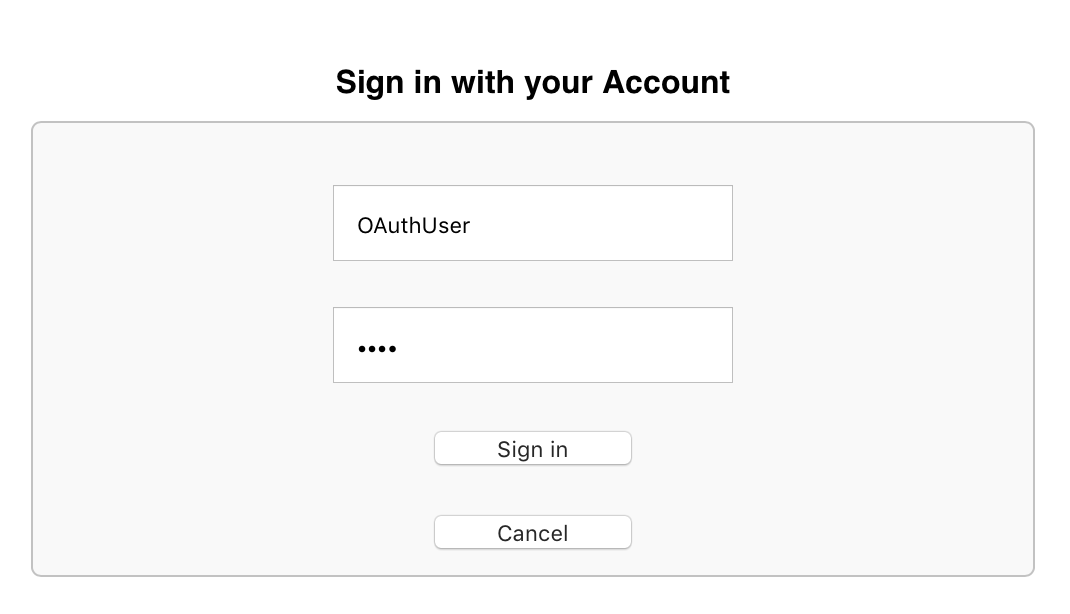
We use IRIS and register users on the IRIS OAuth server. For example it is enough to set to the user only a name and the password.
At transfer of the user under the received reference, the server will carry out the procedure of identification of the user and inquiry at it of the permissions for operation by the account data in the web application, and also will keep the result in itself in global OAuth2.Server.Session in the field %SYS:
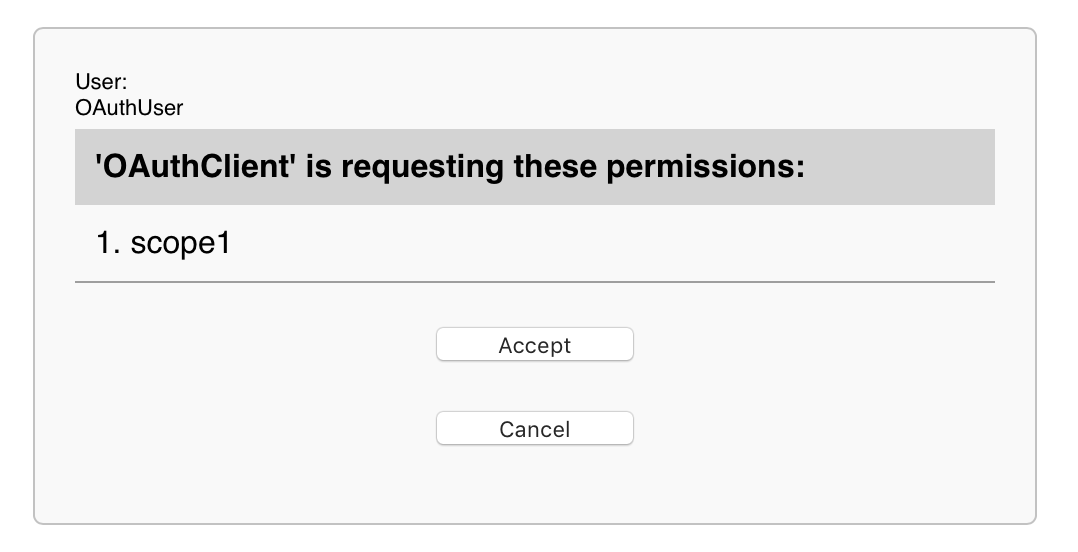
3. Demonstrate the data of an authorized user. If the procedures are successful, we have, for example, an access token. Let's get it:
set valid = ##class(%SYS.OAuth2.Validation).ValidateJWT(
.#OAUTH2APPNAME,
accessToken,
"scope1",
.aud,
.JWTJsonObject,
.securityParameters,
.sc
)
The full working code of the OAuth example:
Class OAuthClient.REST Extends %CSP.REST
{
Parameter OAUTH2APPNAME = "OAuthClient";
Parameter OAUTH2CLIENTREDIRECTURI = "https://52773b-76230063.labs.learning.intersystems.com/oauthclient/";
// to keep sessionId
Parameter UseSession As Integer = 1;
XData UrlMap [ XMLNamespace = "http://www.intersystems.com/urlmap" ]
{
    <Routes>
    	<Route Method="GET" Url = "/" Call = "Do" />
    </Routes>
}
ClassMethod Do() As %Status
{
    // Check for accessToken
    set isAuthorized = ##class(%SYS.OAuth2.AccessToken).IsAuthorized(
    	..#OAUTH2APPNAME,
    	.sessionId,
    	"scope1",
    	.accessToken,
    	.idtoken,
    	.responseProperties,
    	.error)
    // to show accessToken
    if isAuthorized {
   	 set valid = ##class(%SYS.OAuth2.Validation).ValidateJWT(
   		 ..#OAUTH2APPNAME,
   		 accessToken,
   		 "scope1",
   		 .aud,
   		 .JWTJsonObject,
   		 .securityParameters,
   		 .sc
   	 )
   	 &html< Hello!<br> >
   		 w "You access token = ", JWTJsonObject.%ToJSON()
   	 &html< </html> >
   	 quit $$$OK
    }
    // perform the process of user and client identification and get accessToken
    set url = ##class(%SYS.OAuth2.Authorization).GetAuthorizationCodeEndpoint(
    	..#OAUTH2APPNAME,
    	"scope1",
    	..#OAUTH2CLIENTREDIRECTURI,
    	.properties,
    	.isAuthorized,
    	.sc)
    if $$$ISERR(sc) {
     	 w "error handling here"
     	 quit $$$OK
    }
    // url magic correction: change slashes in the query parameter to its code
    set urlBase = $PIECE(url, "?")
    set urlQuery = $PIECE(url, "?", 2)
    set urlQuery = $REPLACE(urlQuery, "/", "%2F")
    set url = urlBase _ "?" _ urlQuery
	&html<
   	 <html>
   		 <h1>Authorization in IRIS via OAuth2</h1>
   		 <a href = "#(url)#">Authorization in <b>IRIS</b></a>
   	 </html>
	>
    quit $$$OK
}
}
You can also find a working copy of the code on the InterSystems GitHub repository: https://github.com/intersystems-community/iris-oauth-example.
If necessary, enable the advanced debug message mode on the OAuth server and OAuth client, which are written to the ISCLOG global in the %SYS area:
set ^%ISCLOG = 5
set ^%ISCLOG("Category", "OAuth2") = 5
set ^%ISCLOG("Category", "OAuth2Server") = 5
For more details, see the IRIS Using OAuth 2.0 and OpenID Connect documentation.
Conclusion
As you've seen, all OAuth features are easily accessible and completely ready to use. If necessary, you can replace the handler classes and user interfaces with your own. You can configure the OAuth server and the client settings from configuration files instead of using the management portal.
Comments
Then that wonderful Ian Flemming intro gets reduced down to "vodka martini, shaken not stirred"