InterSystems IRIS Open Authorization Framework (OAuth 2.0) implementation - part 3
Created by Daniel Kutac, Sales Engineer, InterSystems
Part 3. Appendix
InterSystems IRIS OAUTH classes explained
In the previous part of our series we have learned about configuring InterSystems IRIS to act as an OAUTH client as well as authorization and authentication server (by means of OpenID Connect). In this final part of our series we are going to describe classes implementing InterSystems IRIS OAuth 2.0 framework. We will also discuss use cases for selected methods of API classes.
The API classes implementing OAuth 2.0 can be separated into three different groups according to their purpose. All classes are implemented in %SYS namespace. Some of them are public (via % package), some not and should not be called by developers directly.
Internal classes
These classes belong to the OAuth2 package.
Following table lists some classes of interest (for full list of classes please refer to online Class Reference of your Caché instance.) None of these classes should be used directly by application developers except those listed below table.
|
Class name |
Description |
|
OAuth2.AccessToken |
Persistent OAuth2.AccessToken stores an OAuth 2.0 access token and its related information. This is an OAUTH client copy of the access token. OAuth2.AccessToken is indexed by the combination of SessionId and ApplicationName. Therefore, only one scope may be requested for each SessionId/ApplicationName. If a second request is made with a different scope and access token has yet been granted, the scope in the new request becomes the expected scope. |
|
OAuth2.Client |
Persistent The OAuth2.Application class describes an OAuth2 client and references the Authorization server that it uses to authorize the application based on RFC 6749. A client system may be used with multiple authorization servers for different applications. |
|
OAuth2.Response |
CSP page This is the landing page for responses from an OAuth 2.0 authorization server used from InterSystems IRIS OAuth 2.0 client code. The response is processed here and then redirected to the eventual target. |
|
OAuth2.ServerDefinition |
Persistent Stores authorization server information used by an OAUTH client (this InterSystems IRIS instance). There can be defined multiple client configurations for each authorization server definition. |
|
OAuth2.Server.AccessToken |
Persistent Access tokens are managed by the OAuth2.Server.AccessToken at the OAUTH server. The class stores the access token and related properties. This class is also the means of communication between the various parts of the authorization server. |
|
OAuth2.Server.Auth |
CSP page The authorization server supports the authorization control flow for the Authorization Code and Implicit grant types as specified in RFC 6749. The OAuth2.Server.Auth class is a subclass of %CSP.Page which acts as the Authorization Endpoint and controls the flow in accordance with RFC 6749. |
|
OAuth2.Server.Client |
Persistent OAuth2.Server.Configuration is a persistent class which describes the clients which have registered with this authorization server. |
|
OAuth2.Server.Configuration |
Persistent Stores authorization server configuration. All configuration classes have corresponding System Management Portal page where users fill-in configuration details. |
OAuth2.Client, OAuth2.ServerDefinition, OAuth2.Server.Client and OAuth2.Configuration objects may be opened, modified and saved to create or modify configurations without using the UI. You can use these classes to manipulate configurations programmatically.
Server customization classes
These classes belong to %OAuth2 package. The package contains a set of internal classes – utilities, we only describe those classes that can be used by developers. These classes are referred to in OAuth 2.0 Server Configuration page
|
%OAuth2.Server.Authenticate |
CSP Page %OAuth2.Server.Authenticate acts as the subclass for all user written Authenticate classes as well as the default Authenticate class. The Authenticate class is used by Authorization Endpoint at OAuth2.Server.Auth to authenticate the user. This class allows the customization of the authentication process. The following methods may be implemented to override the default in OAuth2.Server: · DirectLogin – use only when not willing to display login page · DisplayLogin – implements authorization server login form · DisplayPermissions – implements form with a list of requested scopes Further customization of look & feel can be done via modifying CSS. The CSS styles are defined in DrawStyle method. loginForm is for DisplayLogin form permissionForm is for DisplayPermissions form |
|
%OAuth2.Server.Validate |
CSP Page This is the default Validate User Class which is included with the server. The default class will use the user database of the Cache instance where the authorization server is located to validate the user. The supported properties will be issuer (Issuer), roles and sub (Username). The Validate User Class is specified in the Authorization Server Configuration. It must contain a ValidateUser method which will validate a username/password combination and return a set of properties associated with this user. |
|
%OAuth2.Server.Generate |
Registered object The %OAuth2.Server.Generate is the default Generate Token Class which is included with the server. The default class will generate a random string as the opaque access token. The Generate Token Class is specified in the Authorization Server Configuration. It must contain a GenerateAccessToken method that will be used to generate an access token based on the array of properties that is returned by the ValidateUser method. |
|
%OAuth2.Server.JWT |
Registered object The %OAuth2.Server.JWT is the Generate Token Class which creates a JSON Web Token which is included with the server. The Generate Token Class is specified in the Authorization Server Configuration. It must contain a GenerateAccessToken method that will be used to generate an access token based on the array of properties that is returned by the ValidateUser method. |
|
%OAuth2.Utils |
Registered object This class implements, among others, logging of various entities. A sample code in Customization chapter shows possible use. |
Following image shows corresponding section of the OAuth 2.0 authorization server configuration

In case you are going to use OpenID Connect with JWT formatted identity token (id_token), please replace default Generate Token Class %OAuth2.Server.Generate with %OAuth2.Server.JWT in the configuration, otherwise leave default Generate class.
We will discuss customization options in more details in a separate chapter later.
Public API classes
Public API classes are used by application developers to provide correct values for their web application message flow as well as perform access token validation, introspection and so on.
These classes are implemented in %SYS.OAuth2 package. The table lists some of implemented classes.
|
%SYS.OAuth2.AccessToken |
Registered object The %SYS.OAuth2.AccessToken class defines the client operations which allow an access token to be used to authorize to a resource server.
The underlying token is stored in OAuth2.AccessToken in the CACHESYS database. OAuth2.AccessToken is indexed by the combination of SessionId and ApplicationName. Therefore, only one scope may be requested for each SessionId/ApplicationName. If a second request is made with a different scope and access token has yet been granted, the scope in the new request becomes the expected scope. |
|
%SYS.OAuth2.Authorization |
Registered object The %SYS.OAuth2.Authorization class contains the operations which are used to authorize a client by obtaining an access token.
The underlying token is stored in OAuth2.AccessToken in the CACHESYS database. OAuth2.AccessToken is indexed by the combination of SessionId and ApplicationName. Therefore, only one scope may be requested for each SessionId/ApplicationName. If a second request is made with a different scope and access token has yet been granted, the scope in the new request becomes the expected scope. Note that this class is in CACHELIB and thus available everywhere. However, token storage is in CACHESYS and thus not directly available to most code. |
|
%SYS.OAuth2.Validation |
Registered object The %SYS.OAuth2.Validation class defines the methods used to validate (or invalidate) an access token.
The underlying token is stored in OAuth2.AccessToken in the CACHESYS database. OAuth2.AccessToken is indexed by the combination of SessionId and ApplicationName. Therefore, only one scope may be requested for each SessionId/ApplicationName. If a second request is made with a different scope and access token has yet been granted, the scope in the new request becomes the expected scope. |
Let’s have a look at some methods and classes from this group closely.
Every client application class, that uses access token, MUST check its validity. This is done somewhere in the OnPage method (or corresponding method in ZEN or ZENMojo page).
This is the code snippet:
 // Check if we have an access token from oauth2 server
 set isAuthorized=##class(%SYS.OAuth2.AccessToken).IsAuthorized(..#OAUTH2APPNAME,,"scope1,
     scope2",.accessToken,.idtoken,.responseProperties,.error)

 // Continue with further checks if an access token exists.
 // Below are all possible tests and may not be needed in all cases.
 // The JSON object which is returned for each test is just displayed.
 if isAuthorized {
    // do whatever – call resource server API to retrieve data of interest
 }
Every time we call API of the resource server, we need to supply access token. This is done by AddAccessToken method of %SYS.OAuth2.AccessToken class, see code snippet here
 set httpRequest=##class(%Net.HttpRequest).%New()
  // AddAccessToken adds the current access token to the request.
  set sc=##class(%SYS.OAuth2.AccessToken).AddAccessToken(
    httpRequest,,
    ..#SSLCONFIG,
    ..#OAUTH2APPNAME)
 if $$$ISOK(sc) {
    set sc=httpRequest.Get(.. Service API url …)
 }
In the sample code provided in previous parts of our series, we could see this code in OnPreHTTP method of the first application page (Cache1N). This is the best place to perform access token check for the application’s initial page.
ClassMethod OnPreHTTP() As %Boolean [ ServerOnly = 1 ]
{
 set scope="openid profile scope1 scope2"
    #dim %response as %CSP.Response
 if ##class(%SYS.OAuth2.AccessToken).IsAuthorized(..#OAUTH2APPNAME,,
    scope,.accessToken,.idtoken,.responseProperties,.error) {
      set %response.ServerSideRedirect="Web.OAUTH2.Cache2N.cls"
 }
 quit 1
}
The IsAuthorized method of SYS.OAuth2.AccessToken class in the above code is checking whether valid access token exists and if not, lets us display the page content with login button/link pointing to the authentication form of the authorization server, otherwise redirects us right to the second page that actually does the work of retrieving the data.
We can, however, change the code so it reads this:
ClassMethod OnPreHTTP() As %Boolean [ ServerOnly = 1 ]
{
 set scope="openid profile scope1 scope2"
 set sc=##class(%SYS.OAuth2.Authorization).GetAccessTokenAuthorizationCode(
    ..#OAUTH2APPNAME,scope,..#OAUTH2CLIENTREDIRECTURI,.properties)
 quit +sc
}
This variant has different effect. When using GetAccessTokenAuthorizationCode method of %SYS.OAuth2.Authorization class, we navigate directly to the authentication form of the authorization server, without displaying content of our application’s first page.
This can be handy in cases, where the web application is invoked from a mobile device native application, where some user information has already been shown by the native application (the launcher) and there is no need to display web page with a button pointing to the authorization server.
If you use signed JWT token, then you need to validate its content. This is done by the following method:
set valid=##class(%SYS.OAuth2.Validation).ValidateJWT(applicationName,accessToken,scope,,.jsonObject,.securityParameters,.sc)Detailed description of method parameters can be found at Class Reference documentation.
Customization
Let’s spend some time describing, what options OAUTH offers for Authentication / Authorization UI customization.
Suppose your company policy demands some more restrictive behavior of scope granting. For example, you may run home banking application that connects to various banking systems within your bank. The bank only grants access to scope that contains information about the actual bank account being retrieved. As bank runs millions of accounts, it is impossible to define static scope for every single account. Instead, you can generate scope on the fly – during authorization processing, as part of custom authorization page code.
For the purpose of the demo, we need to add one more scope to the server configuration – see image.
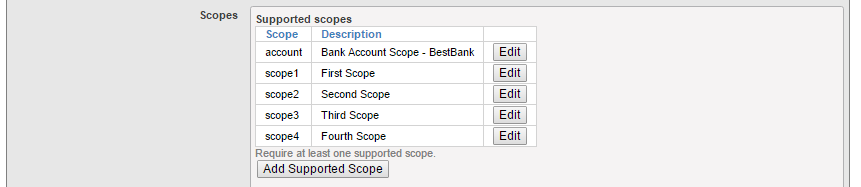
We also added reference to custom Authenticate class, named %OAuth2.Server.Authenticate.Bank.
So, how does the bank authentication class looks like? Here is possible variant of the class. It enhances standard authentication and authorization forms with user provided data. The information that flows between BeforeAuthenticate, DisplayPermissions and AfterAuthenticate methods is passed by properties variable of %OAuth2.Server.Properties class
Class %OAuth2.Server.Authenticate.Bank Extends %OAuth2.Server.Authenticate
{
/// Add CUSTOM BESTBANK support for account scope.
ClassMethod BeforeAuthenticate(scope As %ArrayOfDataTypes, properties As %OAuth2.Server.Properties) As %Status
{
 // If launch scope not specified, then nothing to do
 If 'scope.IsDefined("account") Quit $$$OK
 // Get the launch context from the launch query parameter.
 Set tContext=properties.RequestProperties.GetAt("accno")
 // If no context, then nothing to do
 If tContext="" Quit $$$OK

 try {
    // Now the BestBank context should be queried.
    Set tBankAccountNumber=tContext
    // Add scope for accno. -> dynamically modify scope (no account:<accno> scope exists in the server configuration)
    // This particular scope is used to allow the same accno to be accessed via account
    // if it was previously selected by account or account:accno when using cookie support
    Do scope.SetAt("Access data for account "_tBankAccountNumber,"account:"_tBankAccountNumber)
    // We no longer need the account scope, since it has been processed.
    // This will prevent existence of account scope from forcing call of DisplayPermissions.
    Do scope.RemoveAt("account")

    // Add the accno property which AfterAuthenticate will turn into a response property
    Do properties.CustomProperties.SetAt(tBankAccountNumber,"account_number")
 } catch (e) {
    s ^dk("err",$i(^dk("err")))=e.DisplayString()
 }
 Quit $$$OK
}

/// Add CUSTOM BESTBANK support for account scope.
/// If account_number custom property was added by either BeforeAuthenticate (account)
/// or DisplayPermissions (account:accno), then add the needed response property.
ClassMethod AfterAuthenticate(scope As %ArrayOfDataTypes, properties As %OAuth2.Server.Properties) As %Status
{
 // There is nothing to do here unless account_number (account) or accno (account:accno) property exists
 try {
    // example of custom logging
    If $$$SysLogLevel>=3 {
     Do ##class(%OAuth2.Utils).LogServerScope("log ScopeArray-CUSTOM BESTBANK",%token)
    }
    If properties.CustomProperties.GetAt("account_number")'="" {
     // Add the accno query parameter to the response.
     Do properties.ResponseProperties.SetAt(properties.CustomProperties.GetAt("account_number"),"accno")
    }
 } catch (e) {
    s ^dk("err",$i(^dk("err")))=e.DisplayString()
 }
 Quit $$$OK
}

/// DisplayPermissions modified to include a text for BEST BANK account.
ClassMethod DisplayPermissions(authorizationCode As %String, scopeArray As %ArrayOfDataTypes, currentScopeArray As %ArrayOfDataTypes, properties As %OAuth2.Server.Properties) As %Status
{
 Set uilocales = properties.RequestProperties.GetAt("ui_locales")
 Set tLang = ##class(%OAuth2.Utils).SelectLanguage(uilocales,"%OAuth2Login")
 // $$$TextHTML(Text,Domain,Language)
 Set ACCEPTHEADTITLE = $$$TextHTML("OAuth2 Permissions Page","%OAuth2Login",tLang)
 Set USER = $$$TextHTML("User:","%OAuth2Login",tLang)
 Set POLICY = $$$TextHTML("Policy","%OAuth2Login",tLang)
 Set TERM = $$$TextHTML("Terms of service","%OAuth2Login",tLang)
 Set ACCEPTCAPTION = $$$TextHTML("Accept","%OAuth2Login",tLang)
 Set CANCELCAPTION = $$$TextHTML("Cancel","%OAuth2Login",tLang)
 &html<<html>>
 Do ..DrawAcceptHead(ACCEPTHEADTITLE)
 Set divClass = "permissionForm"
 Set logo = properties.ServerProperties.GetAt("logo_uri")
 Set clientName = properties.ServerProperties.GetAt("client_name")
 Set clienturi = properties.ServerProperties.GetAt("client_uri")
 Set policyuri = properties.ServerProperties.GetAt("policy_uri")
 Set tosuri = properties.ServerProperties.GetAt("tos_uri")
 Set user = properties.GetClaimValue("preferred_username")
 If user="" {
    Set user = properties.GetClaimValue("sub")
 }
 &html<<body>>
 &html<<div id="topLabel"></div>>
 &html<<div class="#(divClass)#">>
 If user '= "" {
    &html<
     <div>
     <span id="left" class="userBox">#(USER)#<br>#(##class(%CSP.Page).EscapeHTML(user))#</span>
     >
 }
 If logo '= "" {
    Set espClientName = ##class(%CSP.Page).EscapeHTML(clientName)
   &html<<span class="logoClass"><img src="#(logo)#" alt="#(espClientName)#" title="#(espClientName)#" align="middle"></span>>
 }
 If policyuri '= "" ! (tosuri '= "") {
   &html<<span id="right" class="linkBox">>
    If policyuri '= "" {
     &html<<a href="#(policyuri)#" target="_blank">#(POLICY)#</a><br>>
    }
    If tosuri '= "" {
     &html<<a href="#(tosuri)#" target="_blank">#(TERM)#</a>>
    }
   &html<</span>>
 }
 &html<</div>>
 &html<<form>>
 Write ##class(%CSP.Page).InsertHiddenField("","AuthorizationCode",authorizationCode),!
 &html<<div>>
 If $isobject(scopeArray), scopeArray.Count() > 0 {
    Set tTitle = $$$TextHTML(" is requesting these permissions:","%OAuth2Login",tLang)
   &html<<div class="permissionTitleRequest">>
    If clienturi '= "" {
     &html<<a href="#(clienturi)#" target="_blank">#(##class(%CSP.Page).EscapeHTML(clientName))#</a>>
    } Else {
     &html<#(##class(%CSP.Page).EscapeHTML(clientName))#>
    }
   &html<#(##class(%CSP.Page).EscapeHTML(tTitle))#</div>>
    Set tCount = 0
    Set scope = ""
    For {
     Set display = scopeArray.GetNext(.scope)
     If scope = "" Quit
     Set tCount = tCount + 1
     If display = "" Set display = scope
     Write "<div class='permissionItemRequest'>"_tCount_". "_##class(%CSP.Page).EscapeHTML(display)_"</div>"
    }
 }

 If $isobject(currentScopeArray), currentScopeArray.Count() > 0 {
    Set tTitle = $$$TextHTML(" already has these permissions:","%OAuth2Login",tLang)
   &html<<div>>
   &html<<div class="permissionTitleExisting">>
    If clienturi '= "" {
     &html<<a href="#(clienturi)#" target="_blank">#(##class(%CSP.Page).EscapeHTML(clientName))#</a>>
    } Else {
     &html<#(##class(%CSP.Page).EscapeHTML(clientName))#>
    }
   &html<#(##class(%CSP.Page).EscapeHTML(tTitle))#</div>>
    Set tCount = 0
    Set scope = ""
    For {
     Set display = currentScopeArray.GetNext(.scope)
     If scope = "" Quit
     Set tCount = tCount + 1
     If display = "" Set display = scope
     Write "<div class='permissionItemExisting'>"_tCount_". "_##class(%CSP.Page).EscapeHTML(display)_"</div>"
    }
   &html<</div>>
 }

 /*********************************/
 /*  BEST BANK CUSTOMIZATION      */
 /*********************************/
 try {
    If properties.CustomProperties.GetAt("account_number")'="" {
     // Display the account number obtained from account context.
     Write "<div class='permissionItemRequest'><b>Selected account is "_properties.CustomProperties.GetAt("account_number")_"</b></div>",!

     // or, alternatively, let user add some more information at this stage (e.g. linked account number)
     //Write "<div>Account Number: <input type='text' id='accno' name='p_accno' placeholder='accno' autocomplete='off' ></div>",!
    }
 } catch (e) {
    s ^dk("err",$i(^dk("err")))=e.DisplayString()
 }

 /* original implementation code continues here... */
 &html<
   <div><input type="submit" id="btnAccept" name="Accept" value="#(ACCEPTCAPTION)#"/></div>
   <div><input type="submit" id="btnCancel" name="Cancel" value="#(CANCELCAPTION)#"/></div>
    >
 &html<</form>
 </div>>
 Do ..DrawFooter()
 &html<</body>>
 &html<<html>>
 Quit 1
}

/// For CUSTOM BESTBANK we need to validate that patient entered,
/// ! javascript in this method is only needed when we let user enter some addtional data
/// within DisplayPermissions method !
ClassMethod DrawAcceptHead(ACCEPTHEADTITLE)
{
 &html<<head><title>#(ACCEPTHEADTITLE)#</title>>
 Do ..DrawStyle()
 &html<
 <script type="text/javascript">
 function doAccept()
 {
    var accno = document.getElementById("accno").value;
    var errors = "";
    if (accno !== null) {
     if (accno.length < 1) {
       errors = "Please enter account number name";
     }
    }
    if (errors) {
     alert(errors);
     return false;
    }

    // submit the form
    return true;
 }
 </script>
 >
 &html<</head>>
}

}
As you could see, the %OAuth2.Server.Properties class contains several arrays, that are passed around. These are:
· RequestProperties – contains parameters from authorization request
· CustomProperties – container for exchanging data between above mention
· ResponseProperties – container for properties to be added to JSON response object to atoken request
· ServerProperties – contains shared properties that authorization server exposes to customization code (e.g. logo_uri, client_uri etc…)
Further it contains several “claims” properties, that are used to specify what claims have to be returned by the authorization server.
In order to call this authentication page correctly, we modified our initial client page code so it looks like this:
 set scope="openid profile scope1 scope2 account"
 // this data comes from application (a form data or so...) and sets a context for our request
 // we can, through subclassing the Authenticate class, display this data to user so he/she can decide
 // whether to grant access or not
 set properties("accno")="75-452152122-5320"
 set url=##class(%SYS.OAuth2.Authorization).GetAuthorizationCodeEndpoint(
   ..#OAUTH2APPNAME,
    scope,
   ..#OAUTH2CLIENTREDIRECTURI,
    .properties,
   .isAuthorized,
    .sc)
 if $$$ISERR(sc) {
    write "GetAuthorizationCodeEndpoint Error="
   write ..EscapeHTML($system.Status.GetErrorText(sc))_"<br>",!
 }
As you can see, we added account scope and properties array node “accno” with a context value, which can originate at different part of our application. This value is passed inside access token to the resource server for further processing.
There is a real life scenario that uses the above described logic – the FHIR standard for exchanging electronic patient records.
Debugging
The OAUTH framework comes with built-in debugging. This is very helpful as all communication between client and servers is encrypted. The debugging feature allows to capture traffic data generated by the API classes before they are sent over the wire. In order to debug your code, you can implement a simple routine or class according to the code below. Please bear in mind that you need to implement this code at all communicating InterSystems IRIS instances! In that case, you better provide a filename with name indicating its role within the process of OAUTH flow. (The sample code below is saved as rr.mac routine, but the name is up to you.)
 // d start^rr()
start() public {
 new $namespace
 set $namespace="%sys"
 kill ^%ISCLOG
 set ^%ISCLOG=5
 set ^%ISCLOG("Category","OAuth2")=5
 set ^%ISCLOG("Category","OAuth2Server")=5
 quit
}

 // d stop^rr()
stop() public {
 new $namespace
 set $namespace="%sys"
 set ^%ISCLOG=0
 set ^%ISCLOG("Category","OAuth2")=0
 set ^%ISCLOG("Category","OAuth2Server")=0
 quit

}

 // display^rr()
display() public {
 new $namespace
 set $namespace="%sys"
 do ##class(%OAuth2.Utils).DisplayLog("c:\temp\oauth2_auth_server.log")
 quit
}
Then, before you start testing, open a terminal and invoke d start^rr() at all InterSystems IRIS nodes (client, auth server or resource server). Once you’re finished, run d stop^rr() and d display^rr() to populate log files.
Summary
In this series of articles, we have learned how to use InterSystems IRIS OAuth 2.0 implementation. Beginning with simple client application demonstration in part 1, followed by complex sample described in part 2. Finally, we described most important classes of the OAuth 2.0 implementation and explained when they should be called within user applications.
My special thanks to Marvin Tener, for his endless patience when replying to my, sometimes dumb, questions and for reviewing the series.