Model Context Protocol (MCP) with InterSystems IRIS - From Zero to Hero
Introduction
Today, coding assistants like Claude, GitHub Copilot and Cursor have transformed the way developers write code. However, these tools are limited by being isolated from the systems and data sources that developers work with daily. This limitation can be overcome through the Model Context Protocol (MCP), an open standard designed to connect AI assistants to external data sources and tools in a secure and standardized way.
In this review article, we'll explore the current state-of-the-art regarding the MCP within the InterSystems ecosystem. Moreover, we will examine how this open standard connects AI assistants to external data sources, presenting a first example of a custom MCP server developed in Python and integrated with the intersystems-irispython package.
Table of Contents
Part 1: What is the Model Context Protocol?
1.1 Origins and Background
The Model Context Protocol (MCP) was introduced by Anthropic on November 25, 2024 [1] as open-source with the goal of connecting AI systems to data sources, replacing fragmented integrations. Before MCP, every AI application required custom integrations to access each data source, like a database or an API. MCP solves this by providing a single, standardized protocol that any AI application can use to connect to compatible servers.
1.2 Why MCP Matters
The protocol addresses three key challenges:
- Standardization: It is no longer necessary to write custom integrations for every new tool. Any AI assistant can use MCP servers that expose specific capabilities to interact with various resources in a standardized format that LLMs can easily understand.
- Security: MCP isolates each server, meaning the AI can only access the specific context required for the immediate task and cannot access other servers or the full conversation history.
- Seamless Integration: Since it is an open protocol, you can easily combine multiple servers at the same time, allowing you to build modular, customized AI workflows without overly complicating your architecture.
Official Resources:
- Anthropic Announcement: Introducing the Model Context Protocol [1]
- Model Context Protocol - Specification [2]
- GitHub Repository - Model Context Protocol [3]
- What is the Model Context Protocol (MCP)? [4]
Part 2: Understanding MCP Architecture
2.1 The Client-Host-Server Model
MCP follows a client-host-server architecture [5]:
- MCP Host: The AI application (Claude Desktop, Cursor, VS Code, etc.) that coordinates and manages one or more MCP clients.
- MCP Client: A component within the host that maintains a dedicated connection to an MCP server.
- MCP Server: A program that provides some functionalities to MCP clients. MCP servers can run locally on your machine or remotely.
Each host can create multiple clients, with each client maintaining a 1:1 dedicated connection with its corresponding server.
For example, Cursor acts as an MCP Host. When Cursor establishes a connection to an MCP server it instantiates an MCP client object that maintains the connection to that specific MCP server. When Cursor later connects to a different MCP server, it instantiates an additional MCP client object to maintain the new connection.
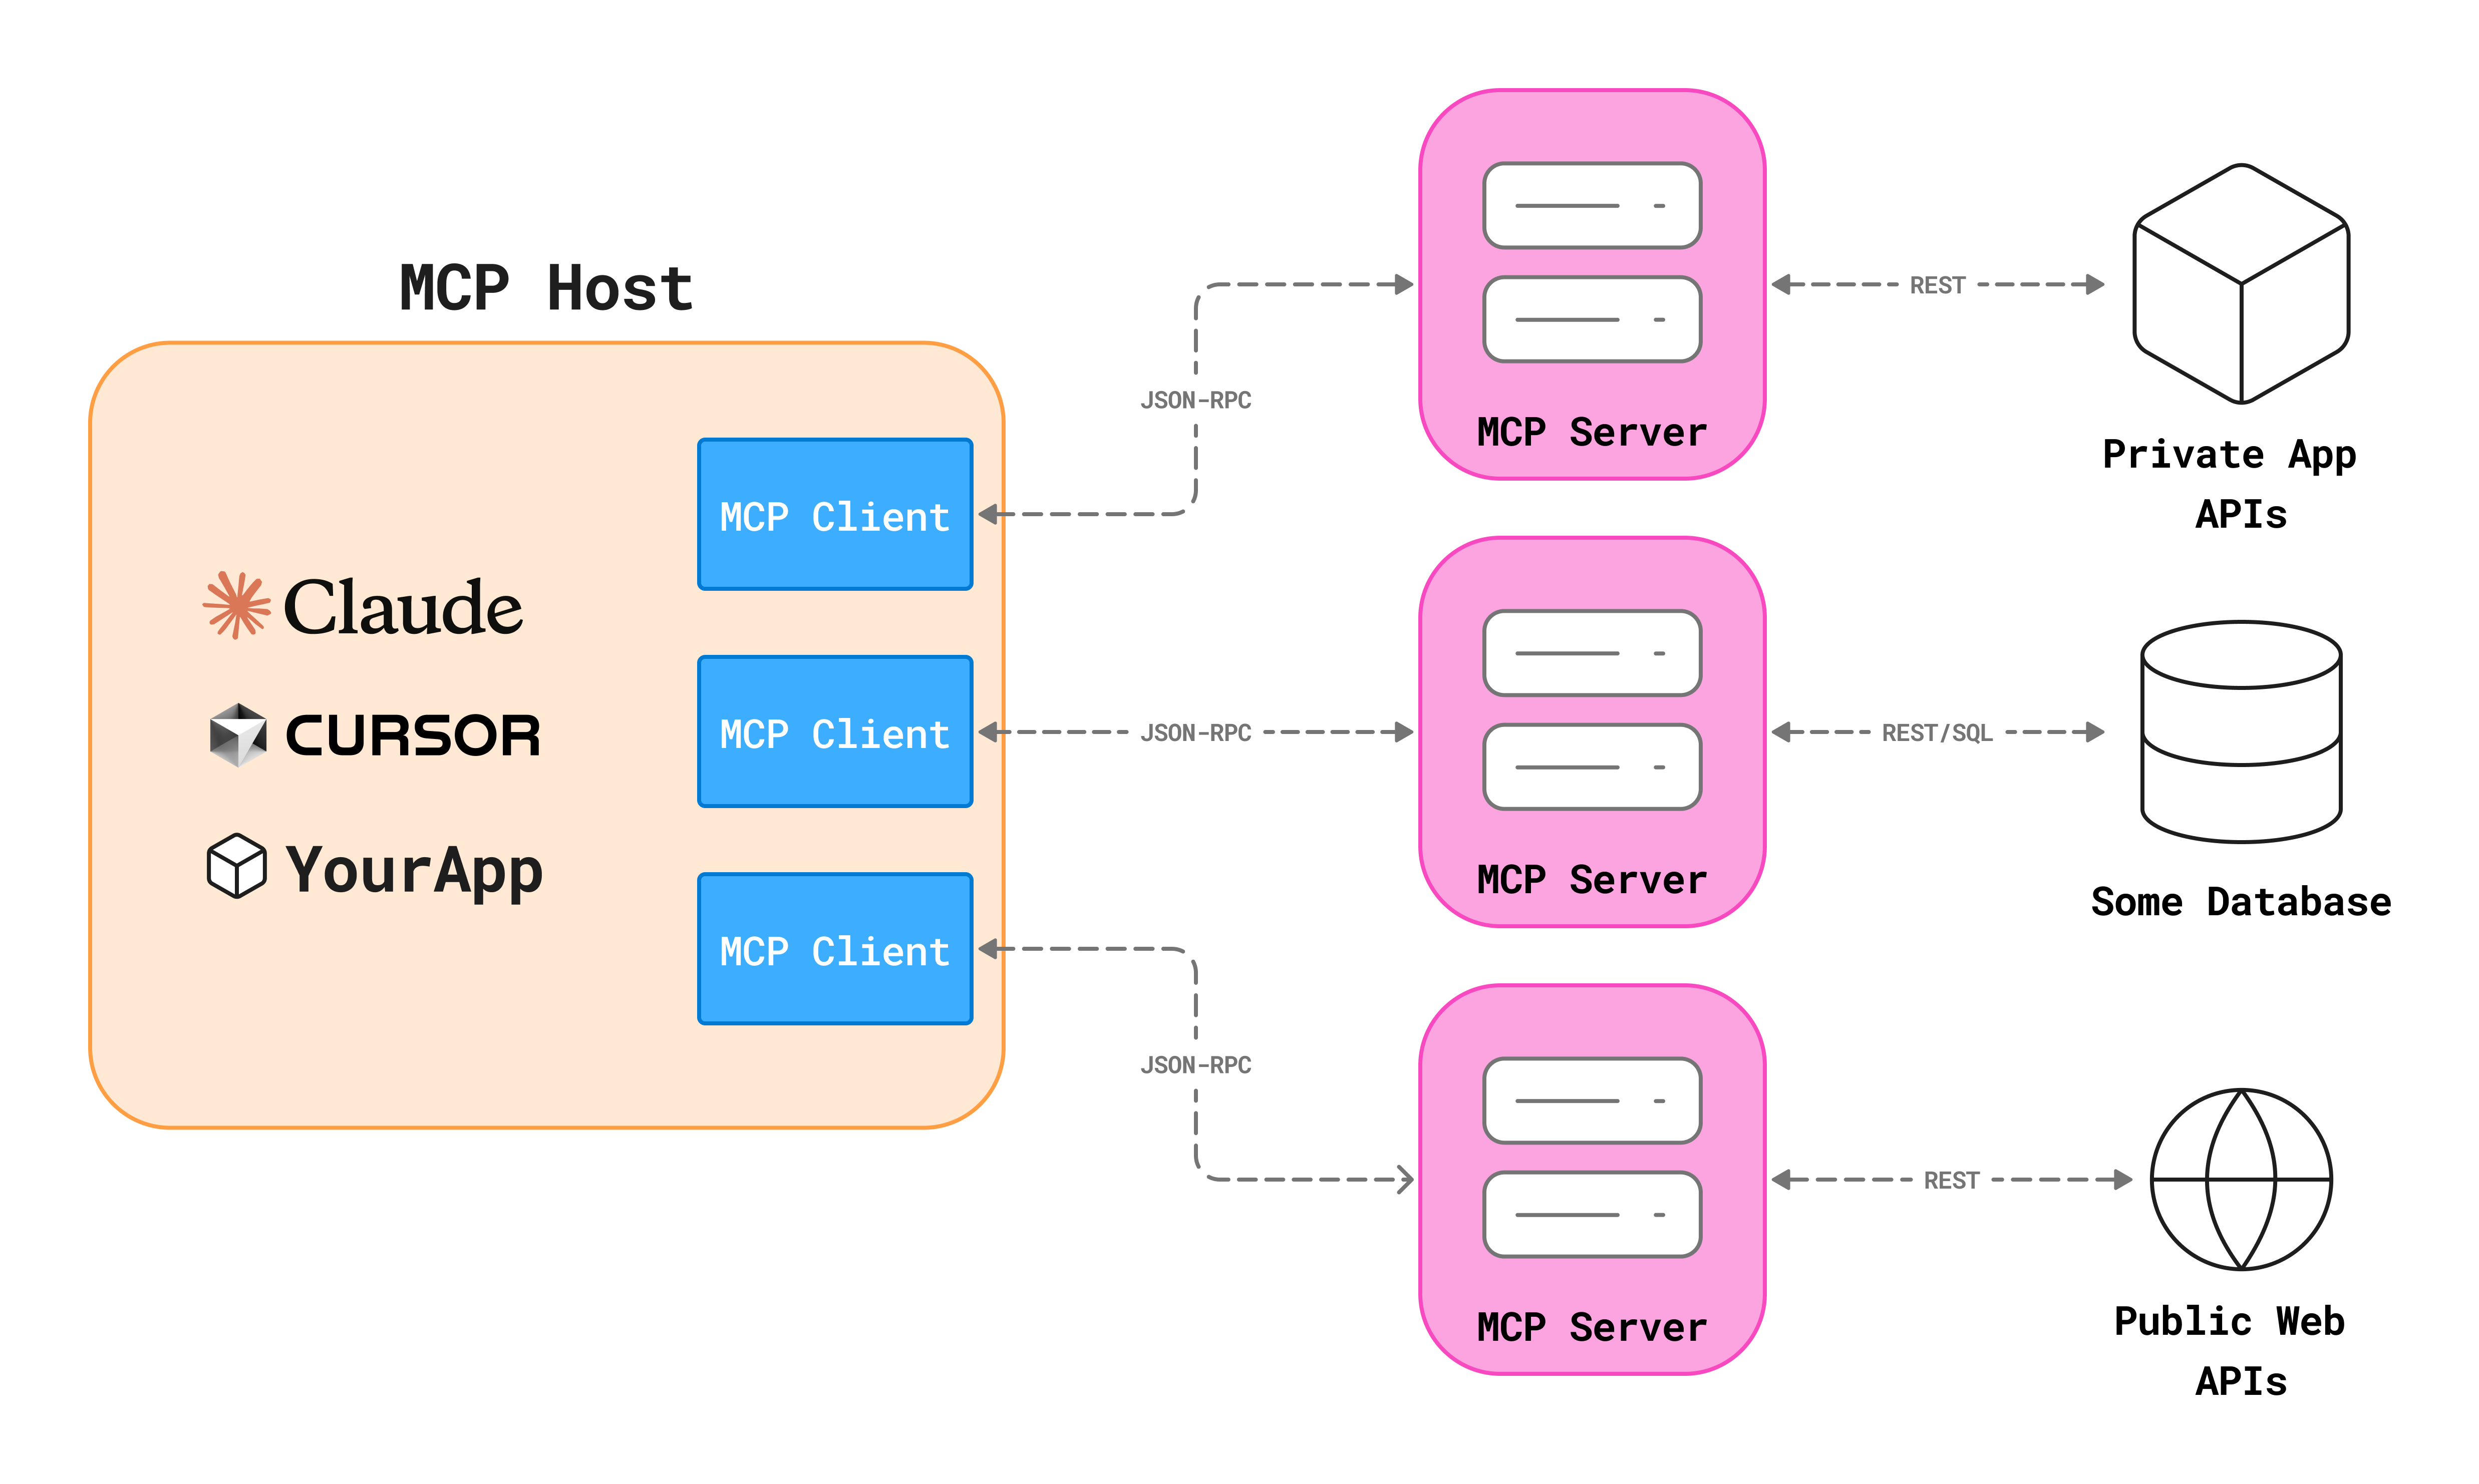
You can find the original image source here [6].
2.2 Transport Layer
MCP supports two transport mechanisms:
- Local servers: this uses standard Standard Input/Output (STDIO) streams for direct process communication between local processes on the same machine. Since this avoids avoids network overhead, it is a better choice for local integrations or CLI utilities. MCP currently uses STDIO as the default transport layer.
- Remote servers: this uses Streamable HTTP to manage interactions over a network. The client sends messages via HTTP POST, while the server optionally uses Server-Sent Events (SSE) for streaming data. This transport allows MPC servers to run remotely (on a different machine, in the cloud, etc.) and to be accessible via a URL.
2.3 Data Layer
In MCP, the message structure and semantics is based on JSON-RPC 2.0 protocol [7]. All communication follows a structure like the following:
2.4 Core Primitives
MCP defines three core primitives that servers can expose [5]:
- Tools: The functions your AI agent can call to perform actions according to user requests. Tools can for example write to the database, call APIs or modify files.
- Resources: Passive data sources that provide contextual information to AI applications offering read-only access to file contents, database schemas or API documentation.
- Prompts: Pre-built instruction templates that tell the model to work with specific tools and resources helping the user to structure interactions with the AI agent.
Part 3: Building MCP Servers from scratch with Python
Before diving into code examples, let's understand how to build MCP servers in Python.
MCP provides official SDKs for multiple programming languages, including TypeScript, Java, and Python [8]. In this article, we'll focus on Python as it's widely used in the InterSystems community and integrates well with IRIS through the Native SDK [9].
3.1 Using uv to create a new Python package
Before talking about code, we should understand how to create a proper environment for our application, which won't just contain the Python code, but it also includes:
- dependencies
- Python version
- entry points
To set up the environment we will use the uv Python package manager, a modern Python package manager that simplifies environment creation, dependency resolution, and reproducible execution of MCP servers [10].
You can initialize properly your folder structure for your MCP project using the uv init statement.
After creating the structure, you can add dependencies to the project using the uv add statement.
Finally, it's time to add an entry point to start the server.
3.2 Basic MCP Server Structure
Let's now take a look at the available packages that we can use to implement the MCP server. While the official mcp package provides the core protocol implementation [12], FastMCP package has emerged as one of the easiest and fastest frameworks for building MCP servers with Python [13]. This article will provide the minimal structure of an MCP server using FastMCP.
A server is defined by three main steps:
-
initializing the server
-
defining tools, resources and prompt decorating the functions
-
running the process
3.4 Implementing Core Primitives
Let's see how to implement each primitive type:
- Tools: Tools allow the AI to perform actions. In this example we define a tool that the AI agent can use to query the database using the
@mcp.tooldecorator. Note that the docstring becomes the tool's description shown to the AI. In fact, when using this decorator, FastMCP automatically generates a JSON schema from Python type hints and docstrings, telling the AI exactly how to use the function.
- Resources: Resources are passive data sources that the AI can read to gather context before it takes an action. They act as background information. In this example we define a resource using the
@mcp.resource("uri")decorator and assigning it a unique URI.
- Prompts: Prompts are reusable templates that help the user to interact with the AI. In this example we define a prompt through the
@mcp.promptdecorator that can guide the AI assistant to perform specific repetitive tasks like writing queries or importing data into the database.
Part 4: Using MCP with AI Development Tools
AI development tools are rapidly evolving from simple chat interfaces into sophisticated orchestrators capable of interacting with your local environment and remote servers by adopting the MCP protocol. Currently, while several platforms now support the protocol, the setup process is generally standardized across them.
Most popular platforms nowadays are:
-
Cursor: An AI-powered IDE built on Visual Studio Code that includes AI agent's capabilities and MCP integrations into the code editor [14].
-
Claude Desktop: Anthropic's official client, which uses MCP to give Claude "skills" like searching your local files or databases [15].
-
Claude Code: A CLI-based agent that can integrate MCP servers directly from the terminal [16].
4.1 Configuring MCP servers
- Cursor allows you to configure MCP servers at two different levels:
- Project-level configuration: Uses a local
.cursor/mcp.jsonfile within your repository. - Global configuration: Defined in user settings (found at
~/.cursor/mcp.jsonon macOS/Linux or the equivalent AppData path on Windows).
- Project-level configuration: Uses a local
- Claude Desktop supports only a single user-level configuration file, called
claude_desktop_config.json, that you can find within the application itself using the menu- Settings → Developer → Edit Config.
The following JSON structure shows how to connect Cursor or Claude to an IRIS MCP server:
{
  "mcpServers": {
    "my-server-name": {
      "command": "executable-or-runtime",
      "args": ["path/to/script-or-package", "--option", "value"],
      "env": {
        "KEY_1": "value-1",
        "KEY_2": "value-2"
      }
    }
  }
}
Every MCP server configuration is based on a few key fields that tell the AI how to launch and communicate with the server.
Let's look at the JSON fields to understand how this configuration works:
mcpServers: The root object that lists all your connected servers. You can have multiple servers running simultaneously (for example: one for IRIS, one for Google Drive, one for Atlassian, etc.).command: The command used to start the server. Common examples includepython,node,uvx, ornpx. In particular, useuvx(for Python) ornpx(for Node.js) to run packages directly from the web without manually installing them (see the next chapter for more information).args: An array of arguments passed to the command. This usually includes the MCP server file path or the name of a package to execute.env: An array containing your environment variables. This is the standard way to pass sensitive or environment-specific data like hostnames, port numbers, and credentials without hardcoding them into the server logic itself.
Once you have this configured, the AI assistant can directly interact with your IRIS database, execute queries, and access schema information without you manually copying and pasting context.
Part 5: Distributing and running MCP servers with uv and uvx
pyproject.toml and uv.lock ee already created in Part 3.1, which is what makes the MCP server runnable as a single command. 5.1 Local clone (development mode)
uv run:{
"command": "uv",
"args": ["run", "<mcp-server-name>"],
"env": { "...": "..." }
}5.2 GitHub repository
Once the repo is pushed, anyone with uv installed can run the server without cloning it by pointing uvx at the GitHub URL:
{
  "command": "uvx",
  "args": [
    "--from", "git+https://github.com/<repository>.git",
    "<mcp-server-name>"
  ],
  "env": { "...": "..." }
}uvx clones the repo into an isolated cache, builds the wheel, and runs the entry-point. Subsequent launches reuse the cache and start quickly.5.3 PyPI
{
  "command": "uvx",
  "args": ["<mcp-server-name>"],
  "env": { "...": "..." }
}
uvx resolves the latest wheel over HTTP and Git is not required at runtime. The first start is the fastest of the three modes and the install instructions consist only in one line. 5.3.1 Publishing a package to PyPI
Part 6: MCP and InterSystems IRIS
Nowadays we already have several example of MCP servers working with InterSystems IRIS. Since IRIS is a multi-model database, it’s a perfect candidate for this protocol. Instead of just giving an AI your code, you’re giving it a live connection to your data, your globals, and your system metrics.
6.1 Existing MCP Server for IRIS
Several developers have shared MCP implementations or MCP-related tools on the InterSystems Developer Community. Among these, the following:
- mcp-server-iris [17] by @Dmitry Maslennikov: An MCP server to monitor and manage Interoperability productions using natural language
- intersystems-objectscript-mcp [18] by Chen Jinyao: An MCP server that fetches compiled routines (
.int,.mac,.inc) directly from the IRIS server. - iris-mcp-atelier [19] by @Ernest Salas: A specialized MCP server that uses the Atelier REST API to give AI assistants direct read/write access to ObjectScript code on a live IRIS instance.
- servAI [20] by @John Murray: A VS Code extension that acts as a secure credential wrapper for MCP servers, automatically pulling connection details and passwords from the InterSystems Server Manager and avoiding the need to hardcode sensitive credentials in configuration JSON files.
- IRIS MCP Server Suite [21] by @Joshua Brandt: A comprehensive suite of services to work with InterSystems IRIS including five different MCP servers related to different domains.
-
InterSystems IRIS AI Hub [22]: currently in Early Access and recently presented at READY 2026, it provides a unified SDK and MCP Server integration to securely connect AI models and external agents with InterSystems IRIS business logic.
Feel free to cite in the comments all the applications and developers you believe worth to be mentioned.
Part 7: Building Your Own MCP Server for IRIS
While the community tools are excellent, you may eventually need a server tailored to your specific application logic or you may want to understand how the previously mentioned tools work. In this section I'm providing an example of how to implement an MCP server to work with InterSystems IRIS.
To build an MCP server for InterSystems IRIS I recommend you to follow two main approaches:
- Using the InterSystems Python Native SDK [9][23]:
intersystems-irispythonis the official Python package to connect with InterSystems IRIS providing a lightweight interface to access through Python all the resources once only available to ObjectScript, like Globals or Class Methods. This is best for heavy data operations, manipulating Globals, calling existing Business Logic and high-speed SQL execution. - Using the Source Code File REST API (a.k.a. Atelier API) [24]: The Atelier API provides a RESTful interface (
/api/atelier/) designed specifically for source code management. This was originally built for the Atelier IDE (and now it is used by the InterSystems Server Manager VS Code extension) and it is useful to work with source code files, compile classes, or manage development workflows.
7.1 The blueprint implementation of an IRIS MCP server
mcp.json snippets for Cursor and Claude Desktop in each of the three distribution modes, the list of every tool and prompt with example arguments refer to the repository's README.7.2 Highlights of the code
-
SQL data access (
sql.py)-
The Native SDK provides a fast way to run SQL from Python using a DB-API cursor. You can perform queries both on custom and system tables. The latter, for example the
INFORMATION_SCHEMA, can be used to retrieve information and helping the AI to write its own SQL queries later.
-
-
Direct global access (
globals.py)-
Globals are IRIS's physical storage layer. The blueprint reads them through the Native SDK helpers:
iris_obj.isDefined("^GlobalName")to check global status (it returns 0 if node is empty, 1 if node has a value, 10 if node has children (subscripts), 11 if node has both a value and children).iris_obj.get("^Global", sub1)andiris_obj.set(val, "^Global", sub1)to get or set values from/in a global subscript.
-
- Executing existing Logic via ClassMethods (
class_methods.py)- You can execute already existing ClassMethods in IRIS using the
iris_obj.classMethodValue("Package.Class", "MethodName", *args). This effectively turns your entire IRIS codebase into a library of functions the AI can call, including both custom and built-in methods.
- You can execute already existing ClassMethods in IRIS using the
- Atelier REST API usage (
atelier_api.py)-
The Atelier API provides a REST interface for source code management and it is used by the InterSystems Server Manager VS Code extension as well.The API has a lot of different features, but the blueprint shows two representative endpoints used to:
- fetch the raw
.clsclass definition to explain the ObjectScript logic - search for a specific string into the codebase
- fetch the raw
-
- Interoperability productions (
interoperability.py)- Beyond data access, the blueprint also provide a set of simple tools to manage an IRIS Production environment without the user ever open the Management Portal.
This implementation contains a limited number of use cases designed to explain of how to use both the native Python SDK and the Atelier API. Again, this example is not a complete implementation of services but rather a blueprint to be used as a guide to develop your own MCP server, tailored to satisfy the specific needs of your project.
If you want more information about how this blueprint work, check the related video on YouTube:
Part 8: Conclusion
Part 9: Sources
Comments
Ciao Pietro,
Great comprehensive article, especially, the Python project details clearly explained and the IRIS MCP servers list you've found! And of course, great blueprint if anyone wants to expand on. Thanks for sharing it and compiling the whole thing so nicely.
Hi Luca, I'm glad you liked the article! Hope this helps to build your own MCP servers.