Implementing IRIS Integrations with .NET or Java using PEX
Introduction {#Webinar:ImplementingIntegrationswith.NetorJava-Introduction}
InterSystems IRIS 2020.1 includes PEX (Production EXtension Framework) to facilitate the development of IRIS Interoperability productions with components written in Java or .NET.
Thanks to PEX, an integration developer with knowledge of Java or .NET can benefit from the power, scalability, and robustness of the InterSystems IRIS Interoperability framework and be productive in no time.
For an IRIS Interoperability framework expert, PEX makes it easy to enrich integrations with pre-existing Java- or .NET-language external components.
This tutorial will explore PEX and guide .NET developers along their first steps with PEX. The code is available at https://github.com/es-comunidad-intersystems/webinar-PE
The tutorial supplements the PEX documentation available online at https://docs.intersystems.com/irislatest/csp/docbook/DocBook.UI.Page.cls?KEY=EPEX.
InterSystems IRIS Interoperability Architecture {#Webinar:ImplementarIntegracionescon.NetoJava-ArquitecturadeInteroperabilidadInterSystemsIRIS}
PEX allows you to choose the programming language (currently Java or .NET, and later Python) to implement any of the components (Business Service, Business Process, Business Operation, InboundAdapter, OutboundAdapter, Messages) that form an IRIS Interoperability production.
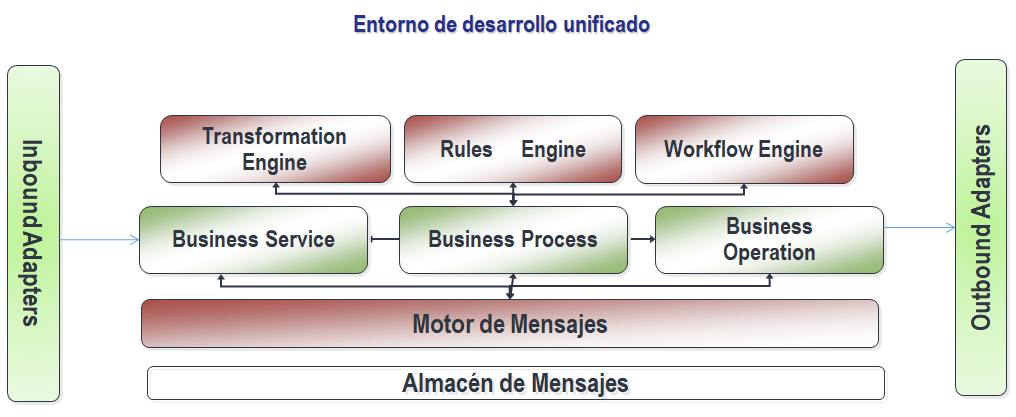
There are 3 main components of IRIS interoperability:
- Business Services: Components that offer a service can be used from outside. Examples of Business Services are a REST Service and SOAP Web Service, but also a Service that reads and processes new files that have been written in a directory, a service that reads and processes rows of a database table, and/or a service that reads files via FTP, etc. The Business Service can have an associated Inbound Adapter, which takes care of the implementation details of a specific protocol (SQLInboundAdapter for reading SQL tables, FileInboundAdapter for reading files, etc.). The Business Service is responsible for processing the information, copying it to an IRIS Interoperability message, and sending the message to a Business Process or Business Operations and possibly waiting for a response if there is one.
- Business Operation: A component that receives an IRIS interoperability message and operates on an external system, possibly with the help of an OutboundAdapter that takes care of protocol implementation details (TCP, REST, SOAP, Files, SQL, etc.). The Business Operation may or may not return a response to the caller.
- Business Process: An orchestration process that, when receiving an IRS Interoperability message, can make processes and calls to one or more other business processes or operations to perform complex operations and/or return a message with information added to the Business Service that has sent it.
The components configuration is grouped in a "Production", an InterSystems IRIS class that contains the definition of all the integrations that start together when IRIS initiates and the configuration for each component of these integrations. It can be edited as an IRIS class or modified from the management portal.
PEX Architecture {#Webinar:ImplementarIntegracionescon.NetoJava-ArquitecturadePEX}
To run the .NET or Java code, InterSystems IRIS uses the corresponding Object Gateway. This Gateway can be instantiated locally or on a remote server.
Java and .Net Gateways {#Webinar:ImplementarIntegracionescon.NetoJava-LosJavay.NetGateways}
The Gateway is a native .NET or Java component that listens on a specific TCP/IP port and receives requests from the IRIS process, executes them, and returns the results.
.png)
Pre-Built PEX Components {#Webinar:ImplementarIntegracionescon.NetoJava-LosComponentesPEXpre-construidos}
To use PEX in an IRIS production, a pre-built component must be added to the Production for each component developed in Java or .NET. The pre-built component serves as a wrapper for the external element it refers to and allows its properties and configuration to be defined within the production.
Java or .NET components running from the corresponding Gateway must inherit (be subclassed) from a pre-existing PEX component. Here is an overview of these elements:
IRIS Components {#Webinar:ImplementarIntegracionescon.NetoJava-ComponentesdeIRIS}
For .NET and Java
| Function | Class | Comment |
|---|---|---|
| Business Service | EnsLib.PEX.BusinessService | Configured adapter: Ens.InboundAdapter |
| Business Process | EnsLib.PEX.BusinessProcess. | |
| Business Operation | EnsLib.PEX.BusinessOperation | |
| Inbound Adapter | EnsLib.PEX.InboundAdapter | |
| Outbound Adapter | EnsLib.PEX.OutboundAdapter | |
| PEX Message | EnsLib.PEX.Message | Message to send to a PEX component |
| IRIS Message | Maps to the IRIS Message | The PEX component's message to the IRIS component |
Java or .NET Components
These components are available in libraries that must be added to the Java or .NET project. The minimum library to reference in a PEX project is the same as the Gateway's. Additionally, if you want to use IRISObject messages to call IRIS components from PEX, you must reference the IRISClient library:
| Language | Libraries |
|---|---|
| .NET | <installdir>\dev\dotnet\bin\v4.5\InterSystems.Data.Gateway64.exe <installdir>\dev\dotnet\bin\v4.5\InterSystems.Data.IRISClient.dll |
| Java | <installdir>\dev\java\lib\JDK18\intersystems-gateway-3.1.0.jar <installdir>\dev\java\lib\JDK18\intersystems-jdbc-3.1.0.jar <installdir>\dev\java\lib\gson\gson-2.8.5.jar |
Superclass to use for .NET components
| Function | .NET class |
|---|---|
| Business Service | InterSystems.EnsLib.PEX.BusinessService |
| Business Process | InterSystems.EnsLib.PEX.BusinessProcess |
| Business Operation | InterSystems.EnsLib.PEX.BusinessOperation |
| Inbound Adapter | InterSystems.EnsLib.PEX.InboundAdapter |
| Outbound Adapter | InterSystems.EnsLib.PEX.OutboundAdapter |
| PEX Message | InterSystems.EnsLib.PEX.Message |
| IRIS Message | InterSystems.Data.IRISClient.ADO.IRISObject |
Superclass to use for Java components
| Function | Java class |
|---|---|
| Business Service | com.intersystems.enslib.BusinessService |
| Business Process | com.intersystems.enslib.BusinessProcess |
| Business Operation | com.intersystems.enslib.BusinessOperation. |
| Inbound Adapter | com.intersystems.enslib.pex.InboundAdapter |
| Outbound Adapter | com.intersystems.enslib.pex.OutboundAdapter |
| PEX message | com.intersystems.enslib.pex.Message |
| IRIS message | <...>.IRISObject |
Utility Functions {#Webinar:ImplementarIntegracionescon.NetoJava-FuncionesdeUtilidades}
In the components implemented in ObjectScript, InterSystems IRIS offers some commands in the form of MACRO to populate information to the IRIS Event log. These methods are available in Java and .NET as follows:
| Method | Description |
|---|---|
| LOGINFO(message) | Add a message to the Events Log with the status "info" |
| LOGALERT(message) | Add a message to the Events Log with the status "alert" |
| LOGWARNING(message) | Add a message to the Events Log with the status "warning" |
| LOGERROR(message) | Add a message to the Events Log with the status "error" |
| LOGASSERT(message) | Add a message to the Events Log with the status "assert" |
Interoperability between native and PEX components {#Webinar:ImplementarIntegracionescon.NetoJava-InteroperabilidadentrecomponentesnativosycomponentesPEX}
It's possible to combine components in InterSystems IRIS's native ObjectScript language with PEX components developed in Java or .NET.
- When both components are BusinessService type — InboundAdapter or BusinessOperation — OutboundAdapter, the developer can choose the type of data/object to use in the calls: Calls are made between IRIS and the Java/.NET gateway following the data transformation rules that determine the Gateway.
- When both components that exchange information are Business Hosts (BS, BP, BO), the component that must receive the message (request or response) imposes the type of objects to use for the message:
- A PEX component always receives the message EnsLib.PEX.Message
- An IRIS component receives the message IRISObject
EnsLib.PEX.Message {#Webinar:ImplementarIntegracionescon.NetoJava-EnsLib.PEX.Message}
EnsLib.PEX.Message allows a message whose structure has been defined in .NET or Java to be represented in the IRIS ObjectScript. IRIS uses the DynamicObject function to manipulate properties. Internally, IRIS uses JSON as the transport medium between IRIS and .NET/Java. When creating a PEX message in IRIS, the name of the NET/Java class that must be instantiated to use the message must be set as %classname.
IRISObject {#Webinar:ImplementarIntegracionescon.NetoJava-IRISObject}
To call a pre-built InterSystems IRIS component from a PEX component, an IRISObject type message must be defined (in .NET, the complete class is InterSystems.Data.IRISClient.ADO.IRISObject).
The First Steps with PEX and .NET {#Webinar:ImplementarIntegracionescon.NetoJava-PrimerosPasosconPEXy.NET}
In these first steps, we:
- Create a .NET project with the necessary PEX libraries, version 4.5 of the .NET framework
- Add a BusinessOperation and a Simple message to the .NET project
- Configure the Intersystems IRIS's .NET Gateway
- Create an Interoperability Production
- Add a pre-built BO
Creating a .NET Project with Visual Studio 2019 {#Webinar:ImplementingIntegrationswith.NetorJava-Creatinga.NETProjectwithVisualStudio2019}
We create a new "Class Library .Net Standard in C #" type project In Visual Studio. We'll name it "PEX.Webinar.FirstDemo":

To work with PEX, we add the necessary dependencies from "Solution Explorer" and the "Add Reference" context menu:

and we add two libraries (.NET Framework 4.5! compatible ) located in a subdirectory of the InterSystems IRIS installation with the "Browse" button:
| <installdir>\dev\dotnet\bin\v4.5\InterSystems.Data.Gateway64.exe <installdir>\dev\dotnet\bin\v4.5\InterSystems.Data.IRISClient.dll |
|---|
It's then renamed from the solution Explorer Class1.cs to "FirstOperation.cs", and the class is modified to inherit from the BusinessOperation PEX class (InterSystems.EnsLib.PEX.BusinessOperation). All 3 PEX.BusinessOperation methods are overwritten:
| Method | Description |
|---|---|
| OnInit | It runs 1 time when this component is started in the production. It allows libraries, connections, and variables to be initiated... |
| OnTearDown | It runs 1 time when this component or the production stop. It makes it possible to free up resources used in the component's life cycle |
| OnMessage | It runs for each Message received. It allows the message to be processed and return a response |
As of now, no messages or tasks to perform have been defined. For that reason, LOGINFO functions are added in the 3 methods. On the other hand, the superclass method doesn't need to be called, so we can eliminate the calls to the base class (base.OnInit (), base.OnTearDown(), base.OnMessage). We leave the implementation as follows:
| Method | Initial Deploy |
|---|---|
| OnInit | OnInit public override void OnInit() { LOGINFO("PEX.Webinar.FirstDemo.FirstOperation:OnInit()"); } |
| OnTearDown | OnTearDown public override void OnTearDown() { LOGINFO("PEX.Webinar.FirstDemo.FirstOperation:OnTearDown()"); } |
| OnMessage | OnMessage public override object OnMessage(object request) { LOGINFO("PEX.Webinar.FirstDemo.FirstOperation:OnMessage()"); return request; } |
This allows the initial version of the .NET project to be compiled with the "Build Solution" menu. IRIS then generates the following file, which is used next:
| 1>------ Build started: Project: PEX.Webinar.FirstDemo, Configuration: Debug Any CPU ------1>PEX.Webinar.FirstDemo -> C:\Dev\PEX\PEX.Webinar.FirstDemo\bin\Debug\netstandard2.0\PEX.Webinar.FirstDemo.dll========== Build: 1 succeeded, 0 failed, 0 up-to-date, 0 skipped ========== |
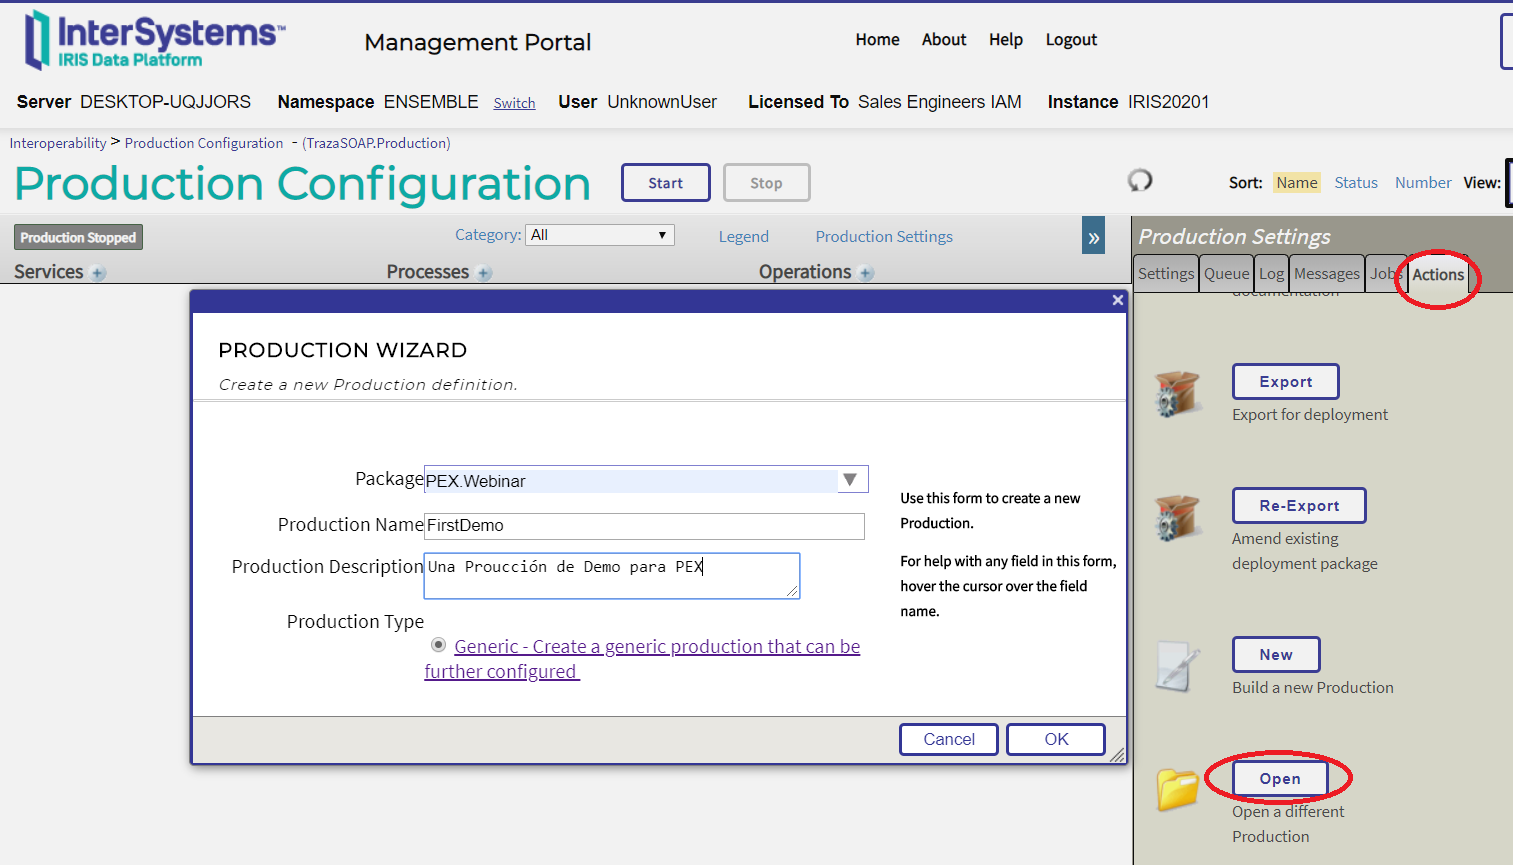
InterSystems IRIS Interoperability Production Creation {#Webinar:ImplementingIntegrationswith.NetorJava-InterSystemsIRISInteroperabilityProductionCreation}
The IRIS Management Portal now lets you choose the "Interoperability" menu, the "Ensemble" namespace, and the "Configure" and "Production" menus. The "Actions" tab and the "New" button allow you to define a new IRIS Integration production.
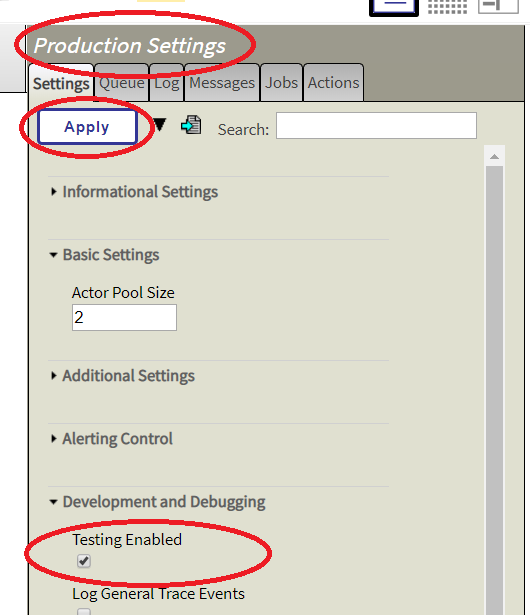
To activate the Testing Service, select the "Settings" tab, enable "Testing Enabled" in the last section of the list ("Development and Debugging"), and click the Apply button:
Adding the .NET Gateway to the Production {#Webinar:ImplementingIntegrationswith.NetorJava-Addingthe.NETGatewaytotheProducción}
To work with the PEX, the corresponding Java or .NET Gateway should start. InterSystems recommends configuring and starting these gateways from the menu "System Administration/Configuration/Connectivity/Object Gateways" for production environments (live). For this development environment, a component can be added directly to the production to start the Gateway. This allows the gateway to be started and stopped at the same time as the production in a single click, thus freeing up access to the .NET project's .DLL when you want to recompile it (Visual Studio can't recompile it if the .NET gateway has been started).
To add the ".Net Gateway" component, add a Business Service to the production using the "+" button next to "Services". "EnsLib.DotNetGateway.Service" is the component class name (Service Class) to be added, and "Enable now" is selected to enable the component.

The added component's configuration parameters can be edited by clicking it, filling in the values in the "Settings" tab, and clicking the "Apply" button:
| Parameter | Value | Description |
|---|---|---|
| Port | 44444 | This can be changed to the port if port 55000 is busy with another process by default. |
| FilePath | <installdir>\dev\dotnet\bin\v4.5\ | This indicates the location where the executable Gateway (InterSystems.Data.Gateway64.exe) is located <InstallDir> is the IRIS installation directory: For example: C:\InterSystems\IRIS20201\dev\dotnet\bin\v4.5\ |
| Exec64 | true | Select the 64-bit gateway version |
| .NET Version | 4.5 | The .Net version must be 4.5 |
Adding the Business Operation created in .NET {#Webinar:ImplementingIntegrationswith.NetorJava-AddingtheBusinessOperationcreatedin.NET}
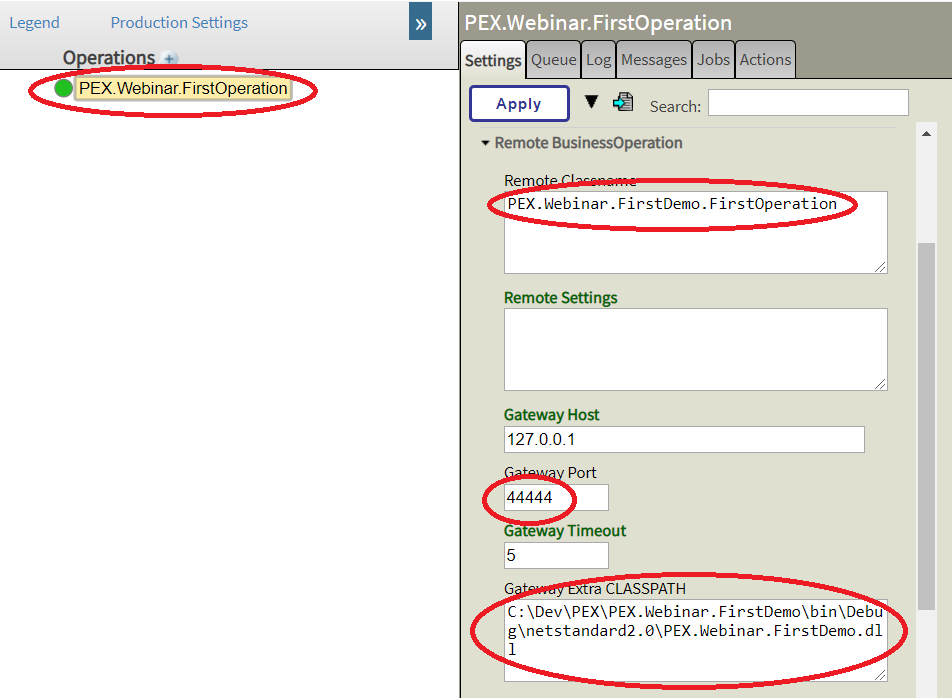
Now we add a PEX Business Operation using the "+" button next to "Operations" to reference the previously created .NET code. "EnsLib.PEX.BusinessOperation" is the class type, the (optional) component is called "PEX.Webinar.FirstOperation", and it's enabled using "Enable Now".
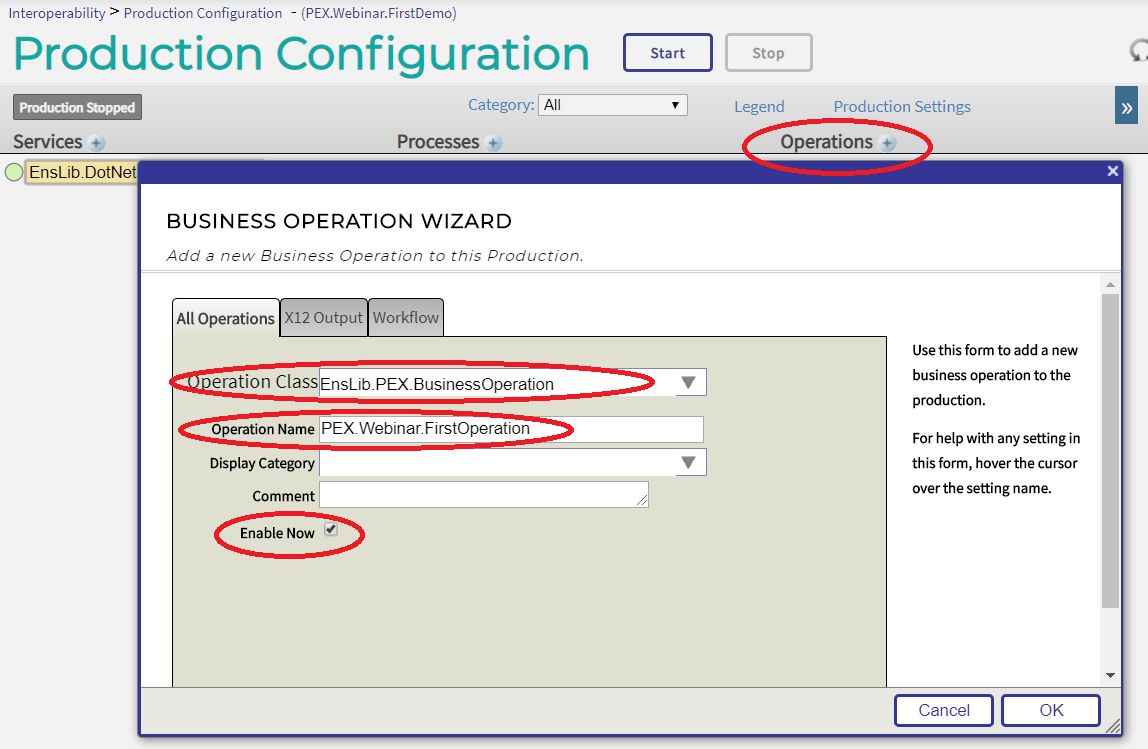
Next, the component is configured (by clicking the added component) and selecting the "Settings" tab on the right:
| Parameter | Value | Description |
|---|---|---|
| Remote Classname | PEX.Webinar.FirstDemo.FirstOperation | Name of the generated .NET class |
| Gateway Port | 44444 | The TCP port in which the .NET Gateway is configured |
| Gateway Extra CLASSPATH | C:\Dev\PEX\PEX.Webinar.FirstDemo\bin\Debug\ netstandard2.0\PEX.Webinar.FirstDemo.dll | Location of the .DLLs to include. This is the location where the Visual Studio build generated the .DLL |
To apply the changes, click the "Apply" button:
Adding and Testing the Production {#Webinar:ImplementingIntegrationswith.NetorJava-AddingandStartingtheProduction}
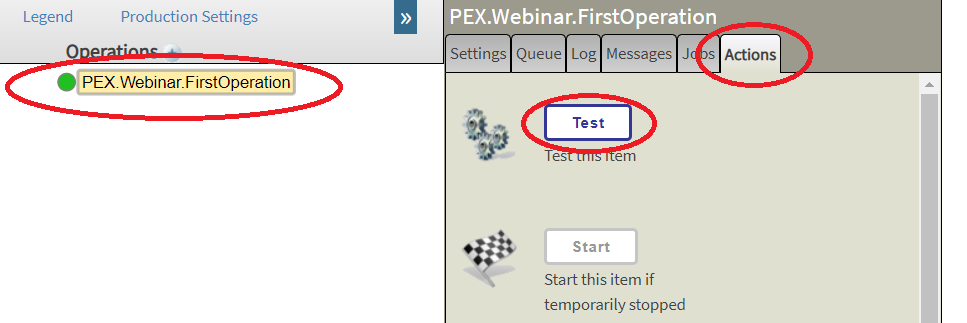
The "Start" button starts the production and all its components:

InterSystems IRIS allows simple, isolated testing of a component. Click to select the "Business Operation" called "PEX.Webinar.FirstOperation" and select the "Test" button from the Actions tab:
The following data is filled on the next screen as follows:
| Parameter | Value | Description |
|---|---|---|
| Request Type | EnsLib.PEX.Message | The type of IRIS message sent. It's always EnsLib.PEX.Message. It allows dynamic properties to pass values to the Java or .NET PEX component. |
| %classname | InterSystems.EnsLib.PEX.Message | It's the classname for the message defined in Java or .NET as a component request. For .NET, this must be InterSystems.EnsLib.PEX.Message or a subclass |
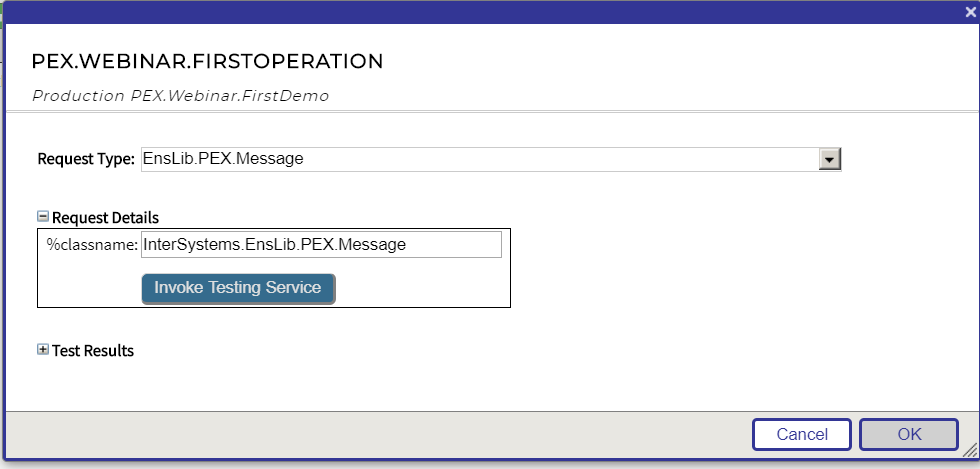
When clicking "Invoke Testing Service", the IRIS Interoperability framework sends the message to the component, and the .NET code is executed.
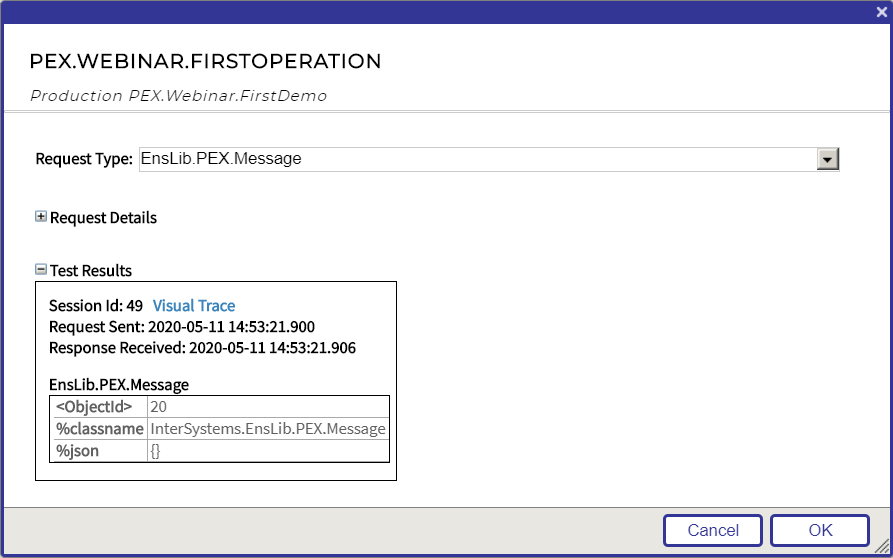
Clicking "Visual Trace" allows the details to be viewed. The white dot (#3) displays the "LOGINFO" trace implemented in .NET.
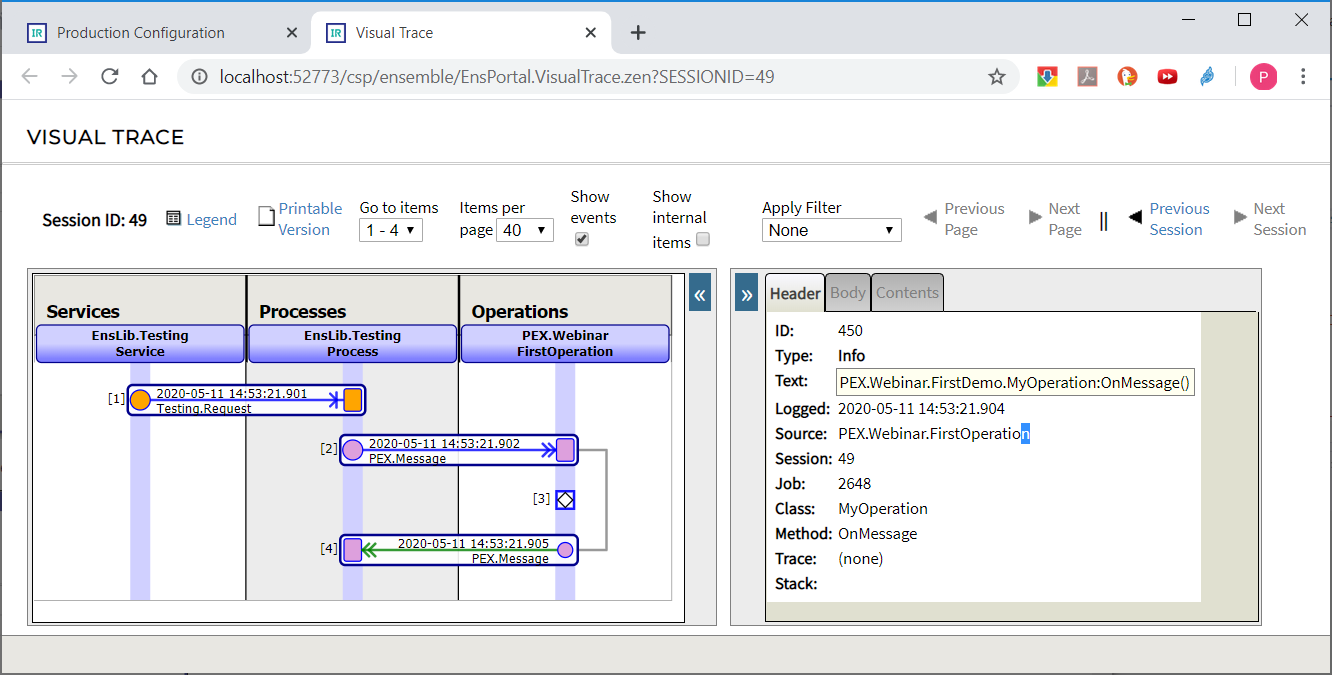
The IRIS Events Log contains a compilation of all the generated LOGINFO() messages, including in OnInit() and OnTearDown().
The Next Steps with PEX: Completing the Production {#Webinar:ImplementingIntegrationswith.NetorJava-NextStepswithPEX:CompletingtheProduction}
Below, other types of components are created in .NET:
- .NET Messages
- .NET Business Services
- .NET Business Process
Creating and Using a PEX Message with Data {#Webinar:ImplementingIntegrationswith.NetorJava-CreatingandUsingaPEXMessagewithData}
To pass information from Ensemble to PEX components, define a class in .NET as the subclass InterSystems.EnsLib.PEX.Message with properties for the information to be passed. Continuing with a simplified example, we add a string "value" property to the message. The PEX Business Operation will become the same type of message with the content transformed to capital letters.
Message class in .NET {#Webinar:ImplementarIntegracionescon.NetoJava-Clasedemensajeen.NET}
A new "FirstMessage.cs" file is added to the .NET project with the following definition:
FirstMessage
| using System; using System.Collections.Generic; using System.Text; namespace PEX.Webinar.FirstDemo { class FirstMessage : InterSystems.EnsLib.PEX.Message { public string value; } } |
Using a message from .NET {#Webinar:ImplementarIntegracionescon.NetoJava-Usodelmensajedesde.NET}
In the FirstOperation Business Operation, the data type for OnMessage is defined as an Object. It should be cast to the "FirstMessage" class to use it:
OnMessageV2
| public override object OnMessage(object request) { LOGINFO("PEX.Webinar.FirstDemo.FirstOperation:OnMessage()"); ///the response message instantiates FirstMessage response = new FirstMessage(); //The value is copied in "uppercase" from the request response.value = ((FirstMessage)request).value.ToUpper(); //The response is returned return response; } |
The IRIS production has to be stopped (with the "Stop" button), or the .NET Gateway has to at least be disabled (double-click the component) and compile the .NET project.
Using a class from InterSystems IRIS {#Webinar:ImplementarIntegracionescon.NetoJava-UsodelaclasedesdeInterSystemsIRIS}
The "Test" button (Testing Service) doesn't allow the dynamic properties of the EnsLib class to be filled.PEX.Message. However, the Testing Service can be used with an IRIS-native "Ens.StringRequest" message type and can be transformed (through Data Transformation) to a PEX message. The transformation is invoked from a pre-built Router-type Business Process.
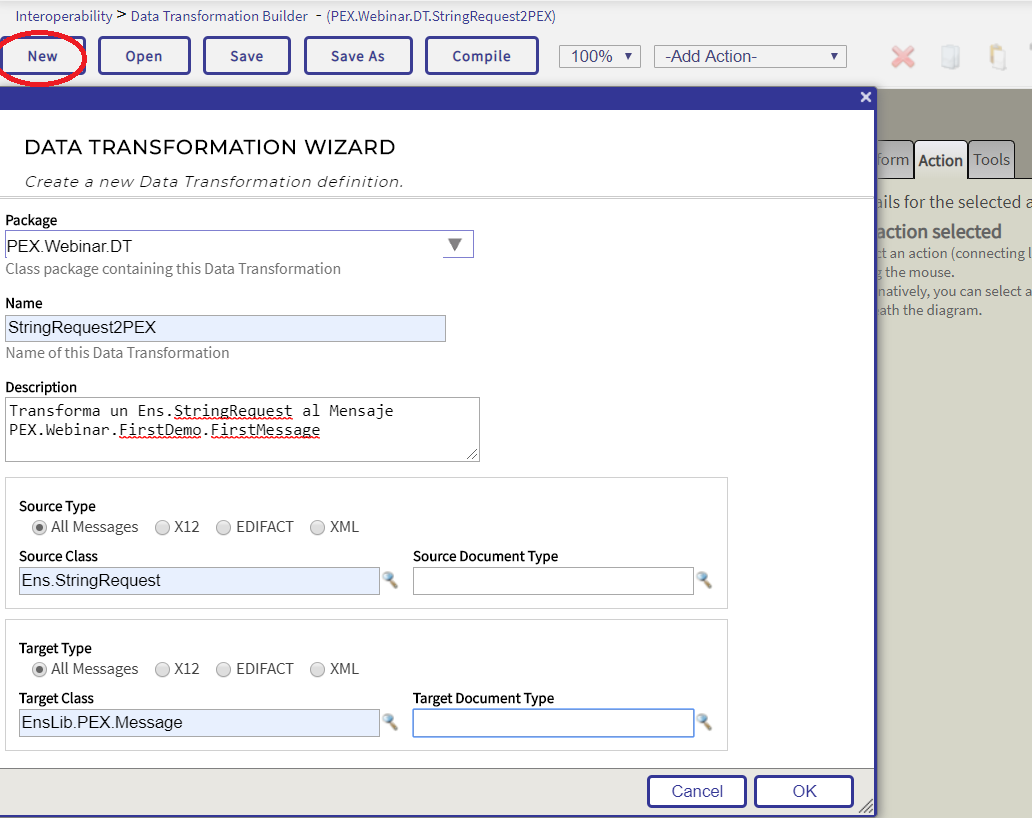
Data Transformation {#Webinar:ImplementingIntegrationswith.NetorJava-DataTransformation}
A Data Transformation is created to copy data from the native ensemble message:
| Source | Target | Comment | |
|---|---|---|---|
| Class | EnsLib.StringRequest | EnsLib.PEX.Message | The classes for the transformation source and target |
| %classname | n/a | PEX.Webinar.FirstDemo.FirstMessage | For a PEX message (target), %classname defines the .NET/Java classname to be used. |
| property | source.StringValue | target.%jsonObject.value | In the target PEX message, the dynamic properties are located inside %jsonObject. |
The Data Transformation can be created from the "Interoperability"/"Build"/"Data Transformations" management portal with the "New" button:
After that, the parameters for the transformation from the "source" to the "target" message are defined as described in the previous table using the graphic tool and completing the text in the "Action" tab to the right to obtain the two lines of text displayed at the bottom. Then, you can Save, Compile, and Test in the "Tools" tab.
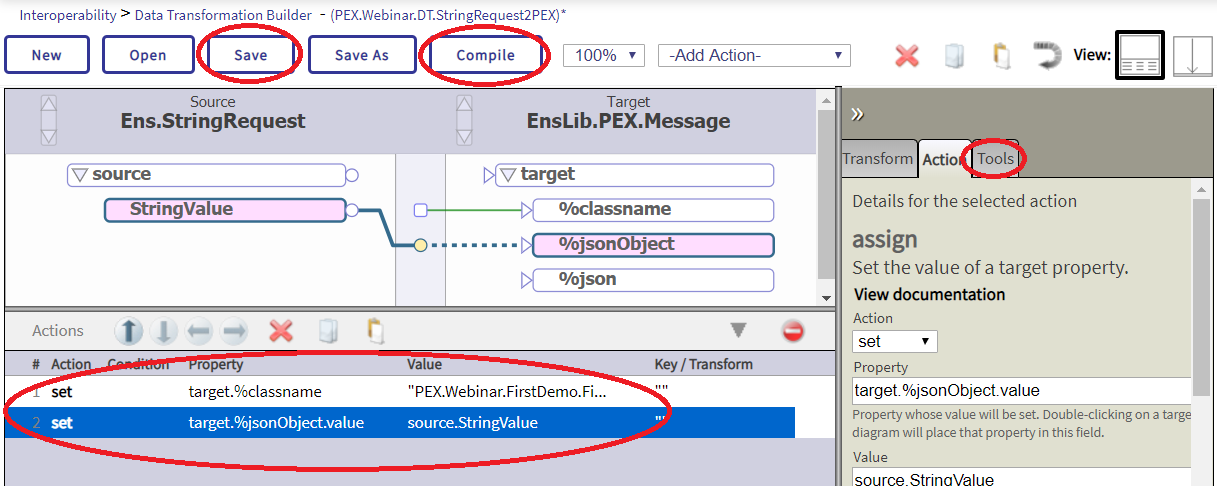
Now, by opening the tools tab, you can test this Data Transformation:

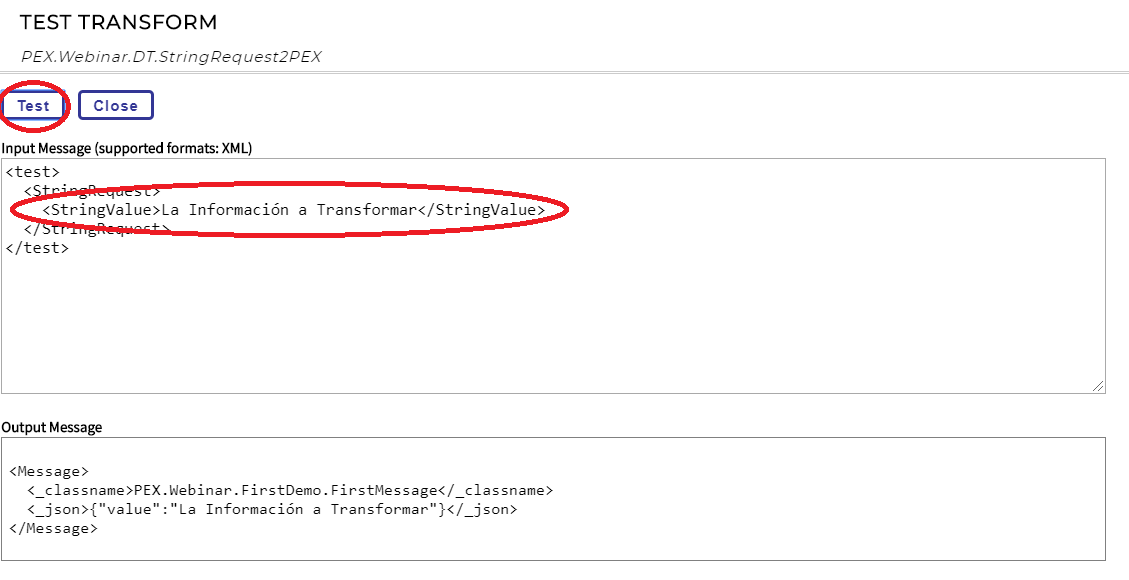
The Test Window opens, where you can specify values for the source message (in StringValue) and verify the result:
As you can see, the PEX message uses an internal JSON representation to transfer the values between IRIS and Java or .NET.
Creating a Router-type Business Process {#Webinar:ImplementingIntegrationswith.NetorJava-CreatingaRoutertypeBusinessProcess}
It's now possible to add a Router type Business Process to the Production and define a Routing rule that calls the created Data Transformation and sends a message to the existing Business Operation.
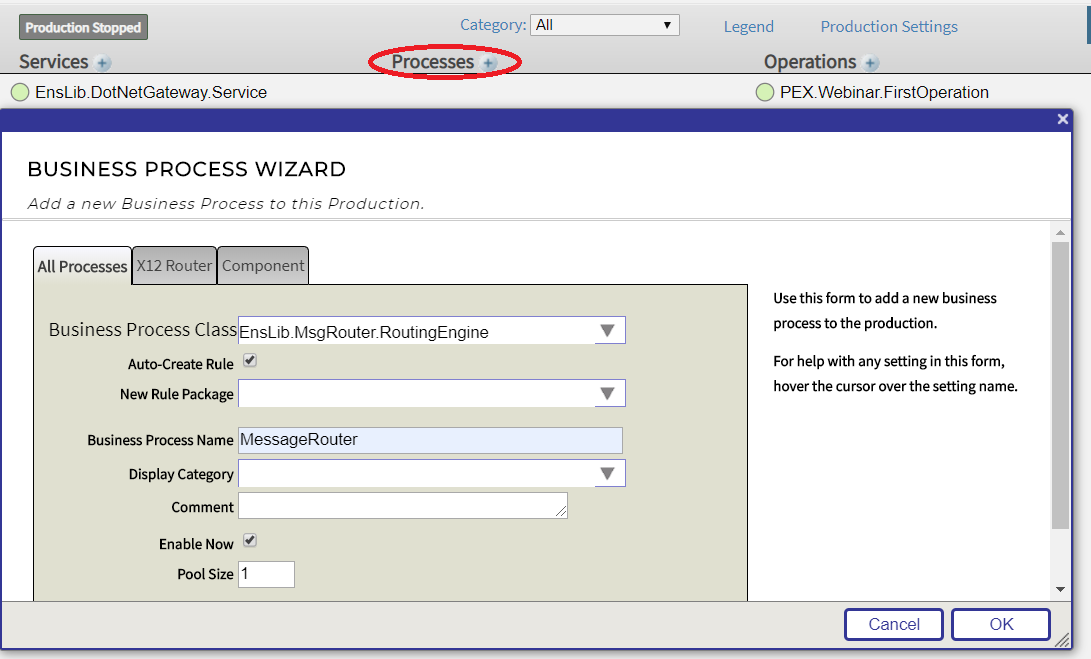
In the management portal, return to the Production Configuration screen ("Interoperability" / "Configure" / "Production"), and add the Business Process type "EnsLib.Message.Router", by clicking the "+" next to "Processes", and filling in as follows:
| Parameter | Value | Description |
|---|---|---|
| Business Process Class | EnsLib.MsgRouter.RoutingEngine | A Business Process for rule-based message routing |
| Auto-Create Rule | TRUE | Defining the skeleton of a routing rule |
| Business Process Name | MessageRouter | A name for this component in the production |
| Enable Now | TRUE | Activate this component immediately |
| Pool Size | 1 | Scalability. It allows the number of active processes running simultaneously to be defined. |
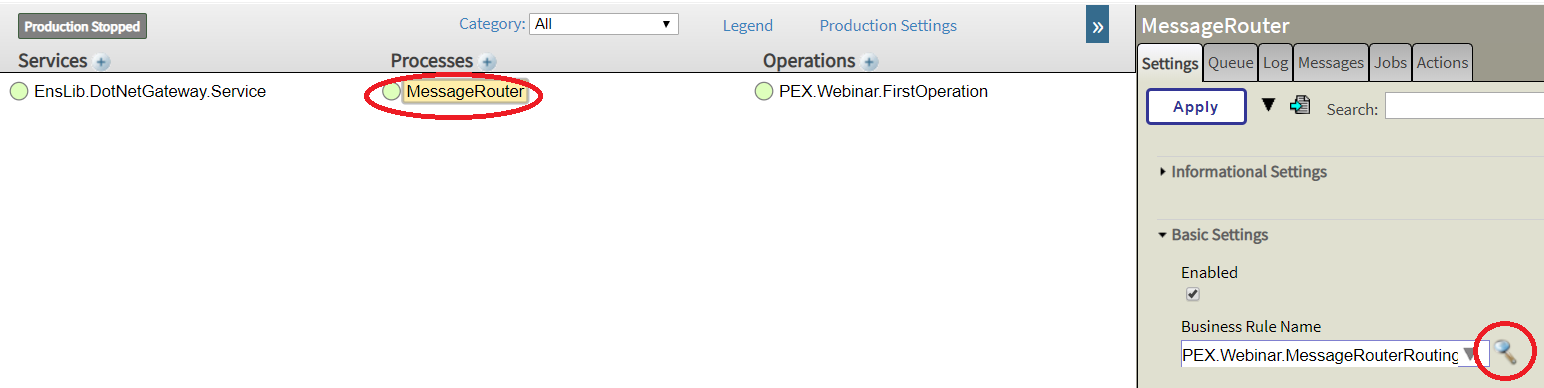
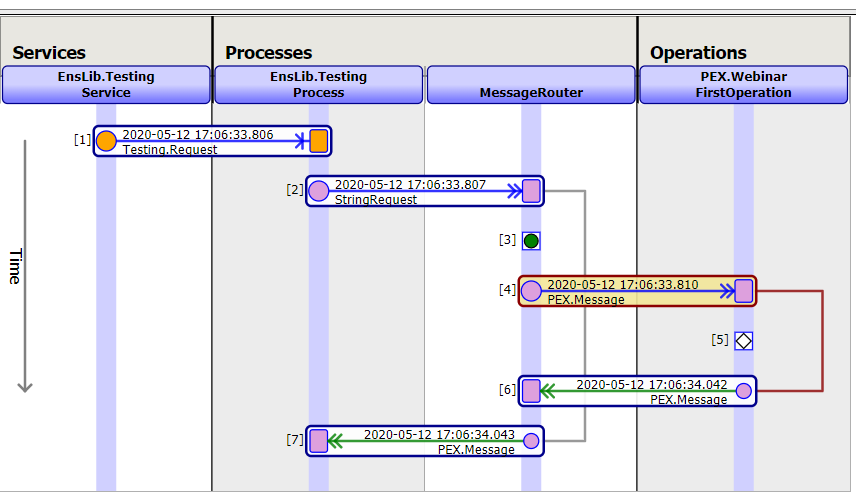
The Routing Rule for this component remains to be edited. To do this, select the "MessageRouter" component in the production, and click on the magnifying glass next to the Business Rule Name:
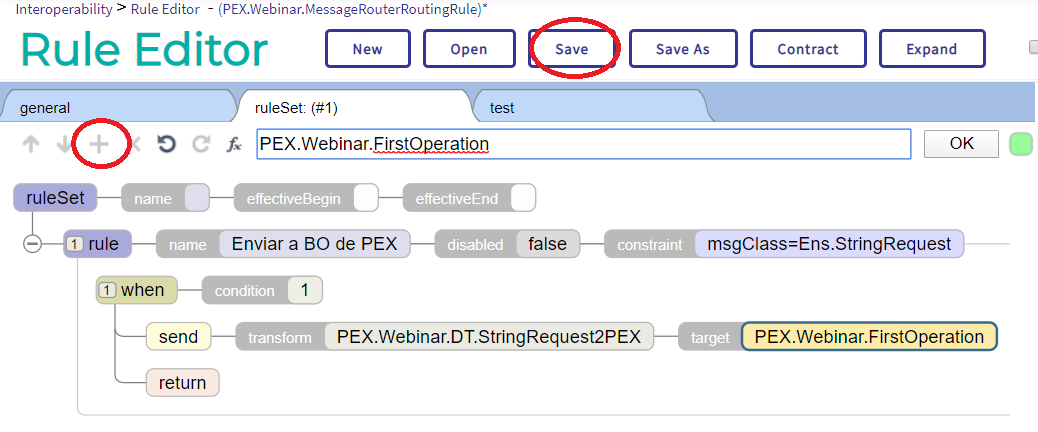
The Rules editor makes it possible to edit the Rule to send all "Ens.StringRequest" messages to the "PEX.Webinar.FirstOperation" Business Operation after the transformation is applied to them. The "+" button lets you add elements to rules and edit an element when selecting it in advance. The rule to keep should be as follows:
By default, this component doesn't expect a response. Change your settings in the component's "Settings" tab to receive the response from the Business Operation:

Testing the Router with the Testing Service {#Webinar:ImplementarIntegracionescon.NetoJava-PruebadelEnrutadorconelServiciodePruebas}
Back to the production page, you can use the "Start" button to start the production, select the "MessageRouter" component, and with the "Actions" tab, click the "Test" button, to send an "Ens.StringRequest" type message:
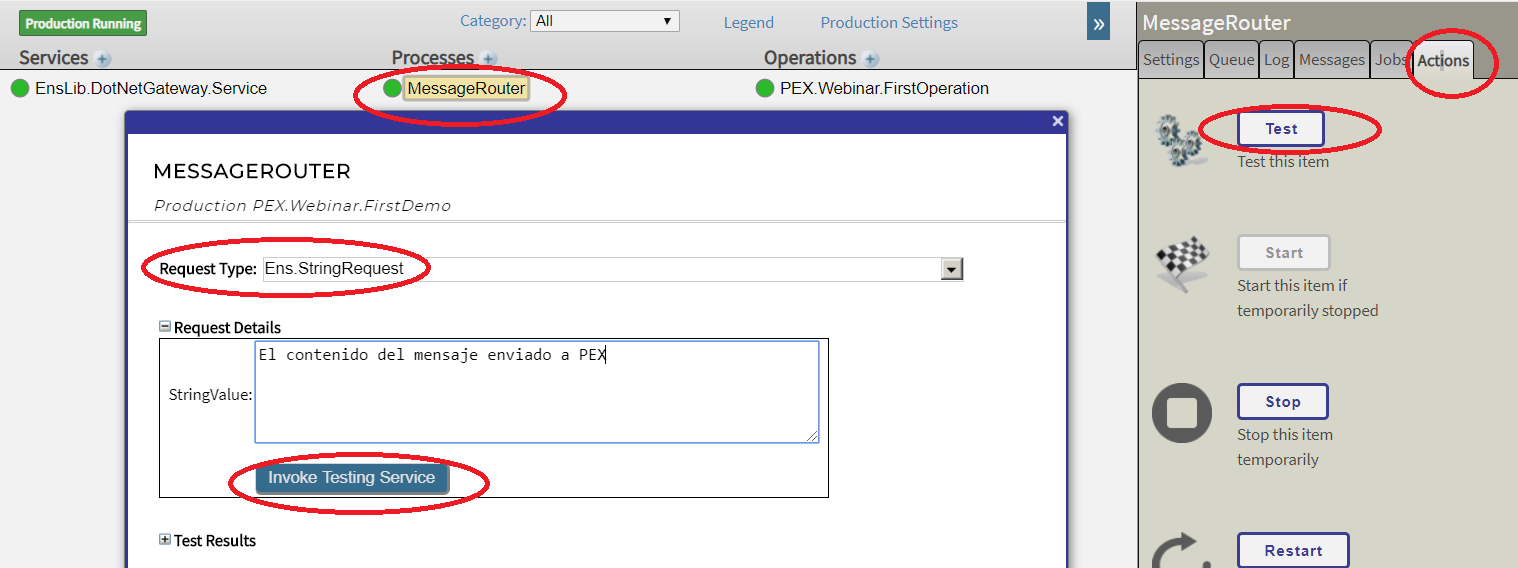
The Test Response message can be viewed under "Test Results", and the full message log shows all details of the execution on the various components of the IRIS Interoperability production:
Response:

{#Webinar:ImplementarIntegracionescon.NetoJava-}
Tracing the messages:
.NET Business Services {#Webinar:ImplementarIntegracionescon.NetoJava-BusinessServiceen.NET}
.NET Implementation {#Webinar:ImplementingIntegrationswith.NetorJava-Implementationin.NET}
Return to Visual Studio to create a .NET Business Service. In this initial example, this Business Service has no specific "Inbound Adapter" associated; it uses the "EnsLib.InboundAdapter", a component that runs at regular intervals (according to set CallInterval value) and makes a call to the Business Service every CallInterval.
In Visual Studio, a new file "FirstService.cs" is generated for the "FirstService" class. The processing of each event detected by the Inbound Adapter is done using the "OnProcessInput" method. The object set in parameter depends on the implementation of the InboundAdapter; in this case, it's not used:
FirstService:OnProcessInput
| public override object OnProcessInput(object messageInput) { //create a new Request Object FirstMessage myRequest = new FirstMessage(); myRequest.value = "The send time is: " + System.DateTime.Now.ToString(); //To send without waiting for a response: //SendRequestAsync("PEX.Webinar.FirstOperation", myRequest); //To send and wait for a response with a 20-second timeout: FirstMessage myResponse=(FirstMessage) SendRequestSync("PEX.Webinar.FirstOperation", myRequest, 20); return null; } |
To send the message to any component of the production without recompiling it, you can use a parameter configured from the management portal; the values are specified as a JSON string within the "RemoteSettings" configuration parameter.
Parameters
| class FirstService : InterSystems.EnsLib.PEX.BusinessService { /// <summary> /// A parameter that can be changed from the Portal /// </summary> public string TargetConfigName; (...) |
If the value specified for "TargetConfigName" is set to null, the Business Service won't send the message to any destination. To detect this problem as soon as possible, one option is to validate the value of TargetConfigName when the component is started, in the OnInit() call:
FirstService:OnInit
| public override void OnInit() { //Verify that the properties are correctly reported if (TargetConfigName==null ) { LOGWARNING("TargetConfigName is missing; assign it a value in RemoteSettings"); }else { LOGINFO("TargetConfigname=" + TargetConfigName); } } |
Now, you can change the OnProcessInput to use the value of TargetConfigName:
OnProcessInput
| //Send and wait for the answer with a timeout of 20 seconds: FirstMessage myResponse=(FirstMessage) SendRequestSync(TargetConfigName, myRequest, 20); |
PEX Business Service in InterSystems IRIS {#Webinar:ImplementarIntegracionescon.NetoJava-BusinessServicePEXenInterSystemsIRIS}
In the management portal, add a Business Service type component to the Production definition by clicking the "+" next to
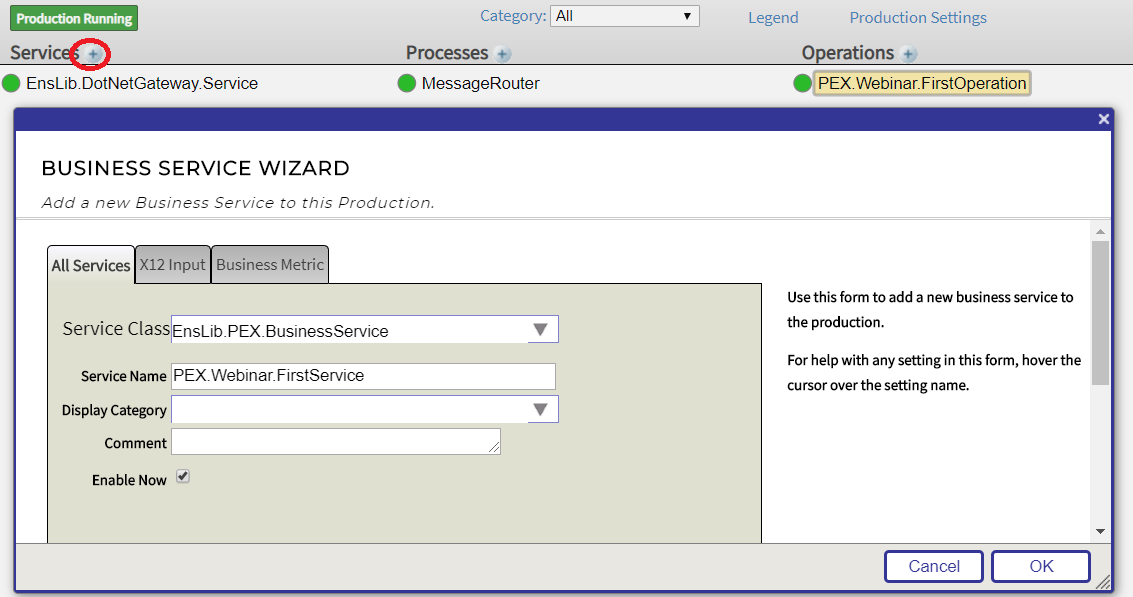
Then, configure the component (by clicking on the added component) and select the "Settings" tab on the right:
| Parameter | Value | Description |
|---|---|---|
| CallInterval | 20 | The time between each execution of the OnTask() of the Associated Adapter and each call to the OnProcessInput() |
| Remote Classname | PEX.Webinar.FirstDemo.FirstService | Name of the generated .NET class |
| Remote Settings | TargetConfigName=PEX.Webinar.FirstOperation | A List of parameters in param=value format, separated by <newline> |
| Gateway Port | 44444 | The TCP port in which the .NET Gateway is configured |
| Gateway Extra CLASSPATH | C:\Dev\PEX\PEX.Webinar.FirstDemo\bin\Debug\ netstandard2.0\PEX.Webinar.FirstDemo.dll | Location of the .DLLs to include. This is the location where the Visual Studio build generated the .DLL |
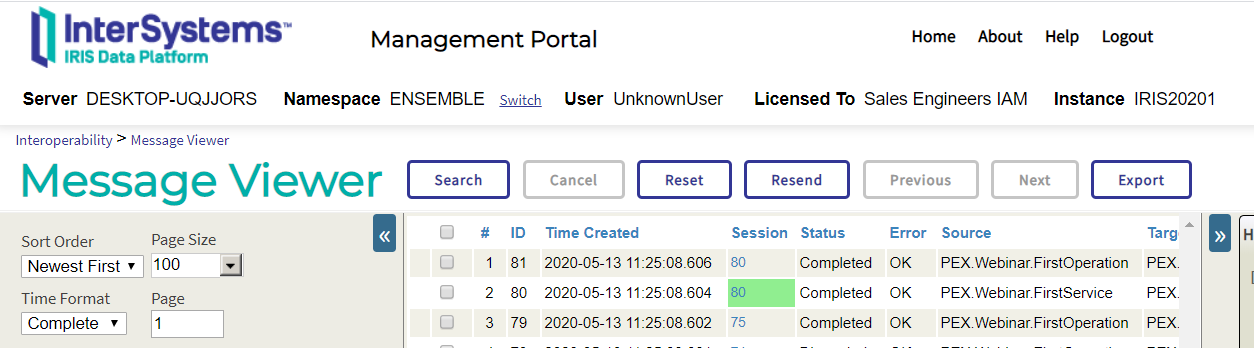
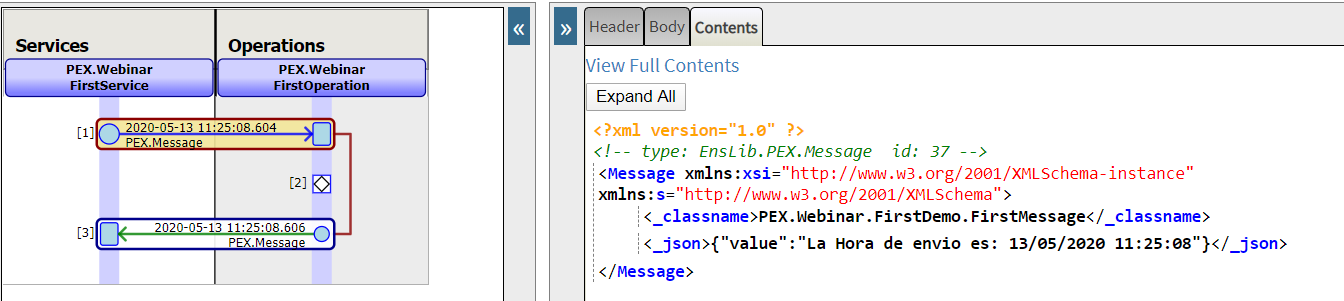
When this Business Service is activated, each CallIntervall of the OnTask() associated adapter (Ens.InboundAdapter) is executed. Here the OnTask just calls FirstService.OnProcessInput(). That is, each callInterval and FirstService.OnProcessInput() generates a message that sends to the component defined in "TargetConfigName". This can be verified in the Message Viewer:
With details of a call:
.NET Business Process {#Webinar:ImplementarIntegracionescon.NetoJava-BusinessProcess.NET}
.NET Implementation {#Webinar:ImplementingIntegrationswith.NetorJava-.NETImplementation}
Like every Business Host, the Business Process has the CallBack OnInit() and OnTearDown() Methods. The specific Business Process methods are the following:
| Method | Description |
|---|---|
| OnRequest(message) | It's executed for each message sent to the Business Process. It's the place to implement the initial actions of the Process and make asynchronous deliveries to other components (Processes or Operations) |
| OnResponse | It's executed 1 time for each answer of the asynchronous calls made. It allows responses to be managed and the results to be saved. |
| OnComplete | It's executed 1 time at the end of the Business Process execution. It allows the Process's final response message to be built. |
It's important to note that a Business Process can have an extended execution time (hours or days, waiting for an asynchronous response). To enable this, the IRIS Framework can interrupt and resume the process execution. All values that you want to keep during a process have to be put in properties of the class that IRIS saves persistently. It's necessary to indicate it with the notation "[persistent]".
In this example, a minimal implementation is done, where the Business Process routes the PEX message it receives to a destination:
Two variables that can be modified from the management portal are used:
FirstProcess
| class FirstProcess: InterSystems.EnsLib.PEX.BusinessProcess { //Timeout for Calls public string Timeout = "PT10S"; public string TargetConfigName; public override void OnInit() { //Ensure that the properties are correctly entered if (TargetConfigName == null) { LOGWARNING("Missing value for TargetConfigName; It must be assigned a value in RemoteSettings"); } else { LOGINFO("TargetConfigname=" + TargetConfigName); } } |
When you receive a message, it's sent asynchronously to TargetConfigName:
FirstProces:OnRequest
| public override object OnRequest(object request) { LOGINFO("OnRequest"); SendRequestAsync(TargetConfigName, (InterSystems.EnsLib.PEX.Message)request, true); //ResponseRequired=true SetTimer(Timeout, "HasTimedOut"); return null; } |
OnResponse allows call responses to be managed:
FirstProcess:OnResponse
| public override object OnResponse(object request, object response, object callRequest, object callResponse, string completionKey) { LOGINFO("OnResponse, CompletionKey=" + completionKey); if (completionKey!= "HasTimedOut") { response = (FirstMessage)callResponse; } LOGINFO("Response:" + response.ToString()); return response; } |
At the end of the process, the response is returned:
FirstProcess:OnComplete
| public override object OnComplete(object request, object response) { LOGINFO("OnComplete"); return response; } |
PEX Business Process in InterSystems IRIS {#Webinar:ImplementarIntegracionescon.NetoJava-BusinessProcessPEXenIntersystemsIRIS}
We add an EnsLib.PEX.BusinessProcess Business Process, configure it as needed, and change the TargetConfigName for the "PEX.Webinar.FirstProcess" Business Service to send the messages to the new Process instead of sending them directly to the BO.

The component's "Settings" are defined as follows:
| Parameter | value |
|---|---|
| Remote Classname | PEX.Webinar.FirstDemo.FirstProcess |
| Remote Settings | Timeout=PT20STargetConfigName=PEX.Webinar.FirstOperation |
| Gateway Port | 44444 |
| Gateway Extra Classpath | C:\Dev\PEX\PEX.Webinar.FirstDemo\bin\Debug\netstandard2.0\PEX.Webinar.FirstDemo.dll |
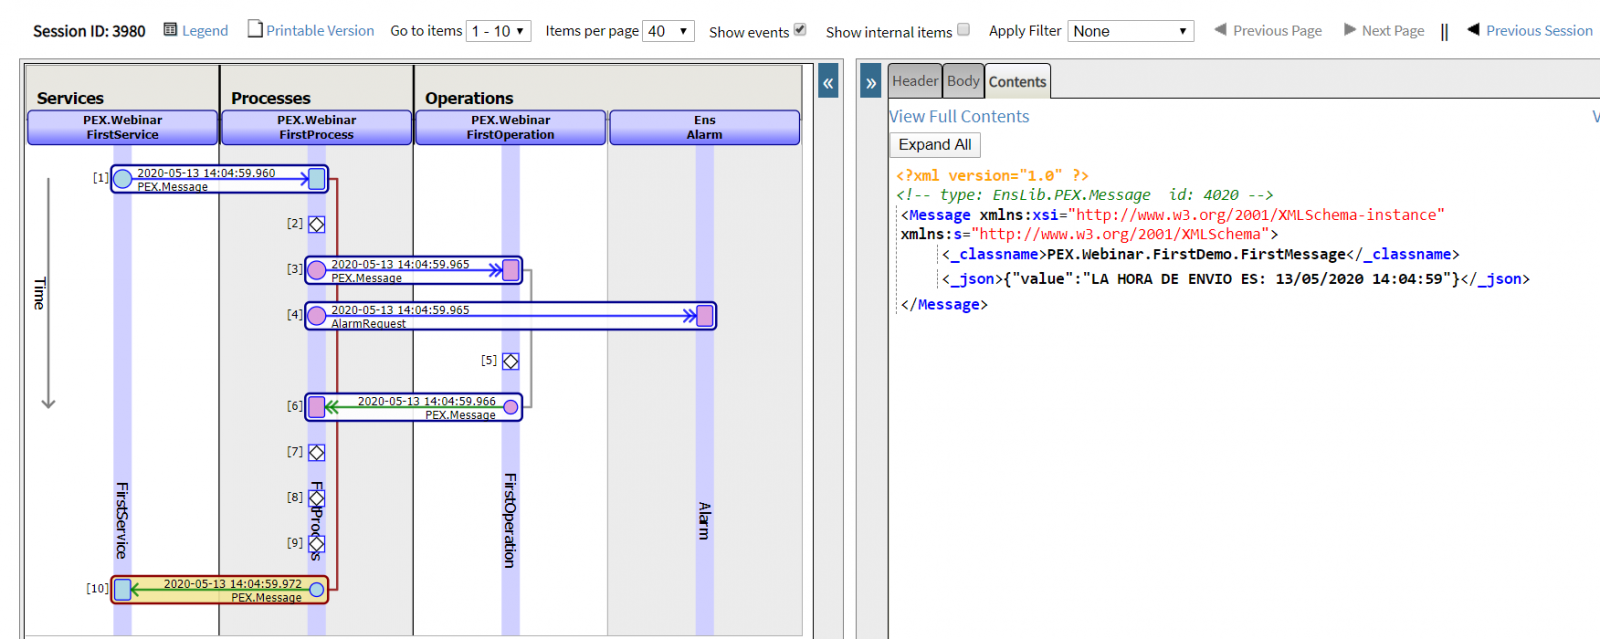
The result in the trace is the following:
Conclusion
PEX allows integrations to be implemented in .NET or Java very fluently and offers the full power and robustness of the InterSystems IRIS interoperability layer for developers experienced in these languages.
Comments
EXCELLENT ! ![]()
![]()
![]()
This is very thorough. Well done!
Great presentation from a high-level, diagrammatic point of view to all the implementation details! It will be very useful to many people. Great job @Pierre-Yves Duquesnoy
💡 This article is considered as InterSystems Data Platform Best Practice.