Creating a Custom Application Monitor Class and an Alert
When an error occurs in your application, simply logging it might be enough. But for certain errors, you might want to send a notification to people right away. There are three ways to generate custom email notifications from InterSystems IRIS.
- Write code that uses ##class(%SYS.System).WriteToConsoleLog() to write a custom message to the Messages Log with the appropriate Alert Level. Then, configure InterSystems IRIS Monitor to send email when any messages with that Alert Level appear in the Messages Log. This is the simplest option. It requires editing your application code to call WriteToConsoleLog(). Also note that application errors, other than truly serious ones, probably don't belong in the Messages Log. Documentation for this option is here: https://docs.intersystems.com/irislatest/csp/docbook/Doc.View.cls?KEY=G…
- Create a custom Application Monitor class, by extending %Monitor.Adaptor, that collects sample data (usually some application-specific data or condition) and records the sample history. Then, configure an Application Monitor Alert to send an email notification when the sampled information satisfies a custom condition. This option provides more control and flexibility than option #1. This article provides step-by-step instructions for this option, along with sample code. Documentation for this option is here: https://docs.intersystems.com/irislatest/csp/docbook/DocBook.UI.Page.cl…
- Create custom sensor, subscriber and notifier classes by extending %SYS.Monitor.AbstractSensor, %SYS.Monitor.AbstractSubscriber, and %SYS.Monitor.AbstractNotification, respectively, and configure them to collect sample data, test the data, and send email notifications. This option, while being more complex than the first two, provides the most control and flexibility. For example, multiple subscriber classes could share the same notifier class. Documentation for this option is here: https://docs.intersystems.com/irislatest/csp/docbook/DocBook.UI.Page.cl….
OK, here are the step-by-step instructions. Be strong...there are 12 steps.
Step 1. Create a custom Application Monitor class that inherits from %Monitor.Adaptor. You'll write custom methods in this class to collect and store sample data. Once the class is running, you can query this data and/or view it using a generated web page. In a later step, you'll define an Application Monitor Alert, with conditions on this data that trigger notifications.
Step 2. Add properties to your class for the sample data that you want to collect, store, and test. The datatypes for these properties must be one of: %Monitor.Gauge, %Monitor.Integer, %Monitor.Numeric, %Monitor.String. Optionally, provide a CAPTION parameter as a more human-readable name for each property. The generated web page will use the CAPTION instead of the property name as the label for the data.
Step 3. If your class collects and stores multiple rows of data (as our example class does), add an INDEX property that specifies the property or properties (comma-delimited) that form the unique primary key for a row of sample data.
Step 4. If the methods in your class need some additional helper properties (our example class has several), add them to your class. Mark these properties [Internal], so that the data in these properties isn't stored as part of the sample data.
Step 5. There are four methods inherited from %Monitor.Adaptor that you can override.
- Startup(): (optional) code called once for this class when Application Monitor starts.
- Shutdown(): (optional) code called once for this class when Application Monitor stops.
- Initialize(): (optional) code called at the beginning of each sampling interval for this class to start the collection of samples. To signal that no sample data was retrieved, Initialize() returns 0. If sample data was retrieved, it returns $$$OK.
- GetSample(): (required) code called repeatedly to collect a row of sample data. To signal that there are no more rows of sample data, GetSample() returns 0. Otherwise, it returns $$$OK.
Step 6. Compile your class. This generates another class that is both a persistent class (for storage of the sample data) and a web page (for viewing the sample data). If your custom class is named MyPackage.MyClass, the generated class is named MyPackage.Sample.MyClass, and the associated SQL table is named MyPackage_Sample.MyClass.
Do the rest of the steps below using the %SYSMONMGR utility in Terminal. The steps use this syntax (1>2>3) as a convention for navigating the menus and sub-menus of %SYSMONMGR (choose option 1, then option 2, then option 3).
Step 7. In the namespace where you want to run your custom Application Monitor class, run ^%SYSMONMGR. Use 5>2>1 to activate your custom class. Enter ? at the Class? prompt to see a list of Application Monitor classes. Yours will probably be listed at the end, after all the built-in %classes.
%SYS>do ^%SYSMONMGR

1) Start/Stop System Monitor
2) Set System Monitor Options
3) Configure System Monitor Classes
4) View System Monitor State
5) Manage Application Monitor
6) Manage Health Monitor
7) View System Data
8) Exit

Option? 5

1) Set Sample Interval
2) Manage Monitor Classes
3) Change Default Notification Method
4) Manage Email Options
5) Manage Alerts
6) Exit

Option? 2

1) Activate/Deactivate Monitor Class
2) List Monitor Classes
3) Register Monitor System Classes
4) Remove/Purge Monitor Class
5) Set Class Sample Interval
6) Exit

Option? 1

Class? ?

 Num  MetricsClassName               Activated

  1)  %Monitor.System.HistoryMemory  N
 <… output omitted …>
 19)  Demo.MonitorErrors             N

Class? 19 Demo.MonitorErrors
Activate class? Yes => Yes
Step 8. (Optional) Use 5>2>5 to set a custom sampling interval for your class. The default class sampling interval of 0 means that your class doesn't have a custom interval. Instead, the interval will be the longer of the Application Monitor interval (set using 5>1, default = 30 seconds) or the System Monitor interval (set using 2>1, default = 30 seconds).
Step 9. Use 5>4 to specify the following email settings for the Application Monitor in this namespace:
- Use option 3 to set the outgoing email server name.
- (Optional) Use option 5 to set the username and password used to authenticate to the outgoing email server.
- Use option 2 to set the sender's email address.
- Use option 4 to set the list of email recipients.
- Use option 6 to send a test email to all recipients.
- Once everything is configured correctly, use option 1 to enable email.
%SYS>do ^%SYSMONMGR

1) Start/Stop System Monitor
2) Set System Monitor Options
3) Configure System Monitor Classes
4) View System Monitor State
5) Manage Application Monitor
6) Manage Health Monitor
7) View System Data
8) Exit

Option? 5

1) Set Sample Interval
2) Manage Monitor Classes
3) Change Default Notification Method
4) Manage Email Options
5) Manage Alerts
6) Exit

Option? 4

1) Enable/Disable Email
2) Set Sender
3) Set Server
4) Manage Recipients
5) Set Authorization
6) Test Email
7) Exit

Option? 3

Mail server? mail.YourCompany.com

1) Enable/Disable Email
2) Set Sender
3) Set Server
4) Manage Recipients
5) Set Authorization
6) Test Email
7) Exit

Option? 2

Sender? sender@YourCompany.com

1) Enable/Disable Email
2) Set Sender
3) Set Server
4) Manage Recipients
5) Set Authorization
6) Test Email
7) Exit

Option? 4

1) List Recipients
2) Add Recipient
3) Remove Recipient
4) Exit

Option? 1
name1@YourCompany.com

1) List Recipients
2) Add Recipient
3) Remove Recipient
4) Exit

Option? 2

Email Address? name2@YourCompany.com

1) List Recipients
2) Add Recipient
3) Remove Recipient
4) Exit

Option?

1) Enable/Disable Email
2) Set Sender
3) Set Server
4) Manage Recipients
5) Set Authorization
6) Test Email
7) Exit

Option? 6

Sending email on Mail Server mail.YourCompany.com
From: sender@YourCompany.com
To: name1@ YourCompany.com, name2@YourCompany.com

Option? 1
Email is currently OFF
Change Email setting? No => yes
Step 10. Use 5>5>1 to create an Alert, by answering the following prompts. The new Alert is automatically enabled.
- Alert Name. You'll see this name when listing existing Alerts.
- Application Name. This name appears as data in the SQL table along with the sample data. This allows different Alerts to share the same Application Monitor class.
- Action. 1 (Email). Note: Option 5>3 of %SYSMONMGR allows you to set Email as the default action for all Application Monitor Alerts.
- Raise this alert during sampling? Accept the default Yes. This causes the next 3 prompts to appear (Class, Property, and Evaluation Expression).
- Class. Your custom class.
- Property. Enter ? to see a list of your sample data properties. It's common to simply select all the properties, one at a time, from your custom class (the properties marked [Internal] won't appear). Complete the list by pressing <Enter> at the prompt. The next prompt (Evaluation Expression) can only test properties you select here. The selected properties will also appear in the email notification.
- Evaluation Expression. A condition using ObjectScript syntax, using %1 for the first property in the list from the last step, %2 for the second property, and so on. Note that values such as dates and times are evaluated while in external format, so the expression might require conversion functions such as $zdh or $zth for converting dates/times. (our example Alert uses time conversion functions).
- Notify once only? Should the notification be sent the first time the Alert is triggered or each time the Alert is triggered?
%SYS>do ^%SYSMONMGR

1) Start/Stop System Monitor
2) Set System Monitor Options
3) Configure System Monitor Classes
4) View System Monitor State
5) Manage Application Monitor
6) Manage Health Monitor
7) View System Data
8) Exit

Option? 5

1) Set Sample Interval
2) Manage Monitor Classes
3) Change Default Notification Method
4) Manage Email Options
5) Manage Alerts
6) Exit

Option? 5

1) Create Alert
2) Edit Alert
3) List Alerts
4) Delete Alert
5) Enable/Disable Alert
6) Exit

Option? 1
Alert name? Demo
Application? %SYS => Demo
Action (0=default,1=email,2=method)? 1 =>
Raise this alert during sampling? Yes => Yes
Class? Demo.MonitorErrors
Property? ?

 Num  Name                           Activated
  1)  Earliest                       Y
  2)  ErrorCount                     Y
  3)  Latest                         Y
  4)  Name                           Y
  5)  Phone                          Y

Property? 4 Name
Property? 5 Phone
Property? 2 ErrorCount
Property? 1 Earliest
Property? 3 Latest
Property? Properties list: Name,Phone,ErrorCount,Earliest,Latest

Evaluation expression (e.g., "%1=99")? (%3>3)&&($zth(%5)>$zth(%4))
Expression expands to: If (ErrorCount>3)&&($zth(Latest)>$zth(Earliest)). OK? Yes => Yes
Notify once only? No => No
Step 11. To activate your class and your Alert, you must restart System Monitor, using 1>2 to stop it, and 1>1 to start it again. If you want, you can use option 4 to check the System Monitor State. You should see "%SYS.Monitor.AppMonSensor OK" in the list.
Step 12. If you ever need to edit your custom class, recompiling it deactivates the class and resets the (optional) Class Sample Interval override. Therefore, you must reactivate the class, reset the Class Sample Interval, and restart the System Monitor (repeat steps, 7, 8, and 11).
Congratulations, you're done!
Now you can run the provided test code to generate some data that meets the condition to trigger the alert.
%SYS>do ##class(Demo.TestErrorMonitor).Errors()
Problem with Employee: Roger Kovalev (822-825-8470)
Problem with Employee: Roger Kovalev (822-825-8470)
Problem with Employee: Roger Kovalev (822-825-8470)
Problem with Employee: Roger Kovalev (822-825-8470)
Problem with Employee: Roger Kovalev (822-825-8470)
Look at the sampled data in the SQL table, running this query in %SYS:
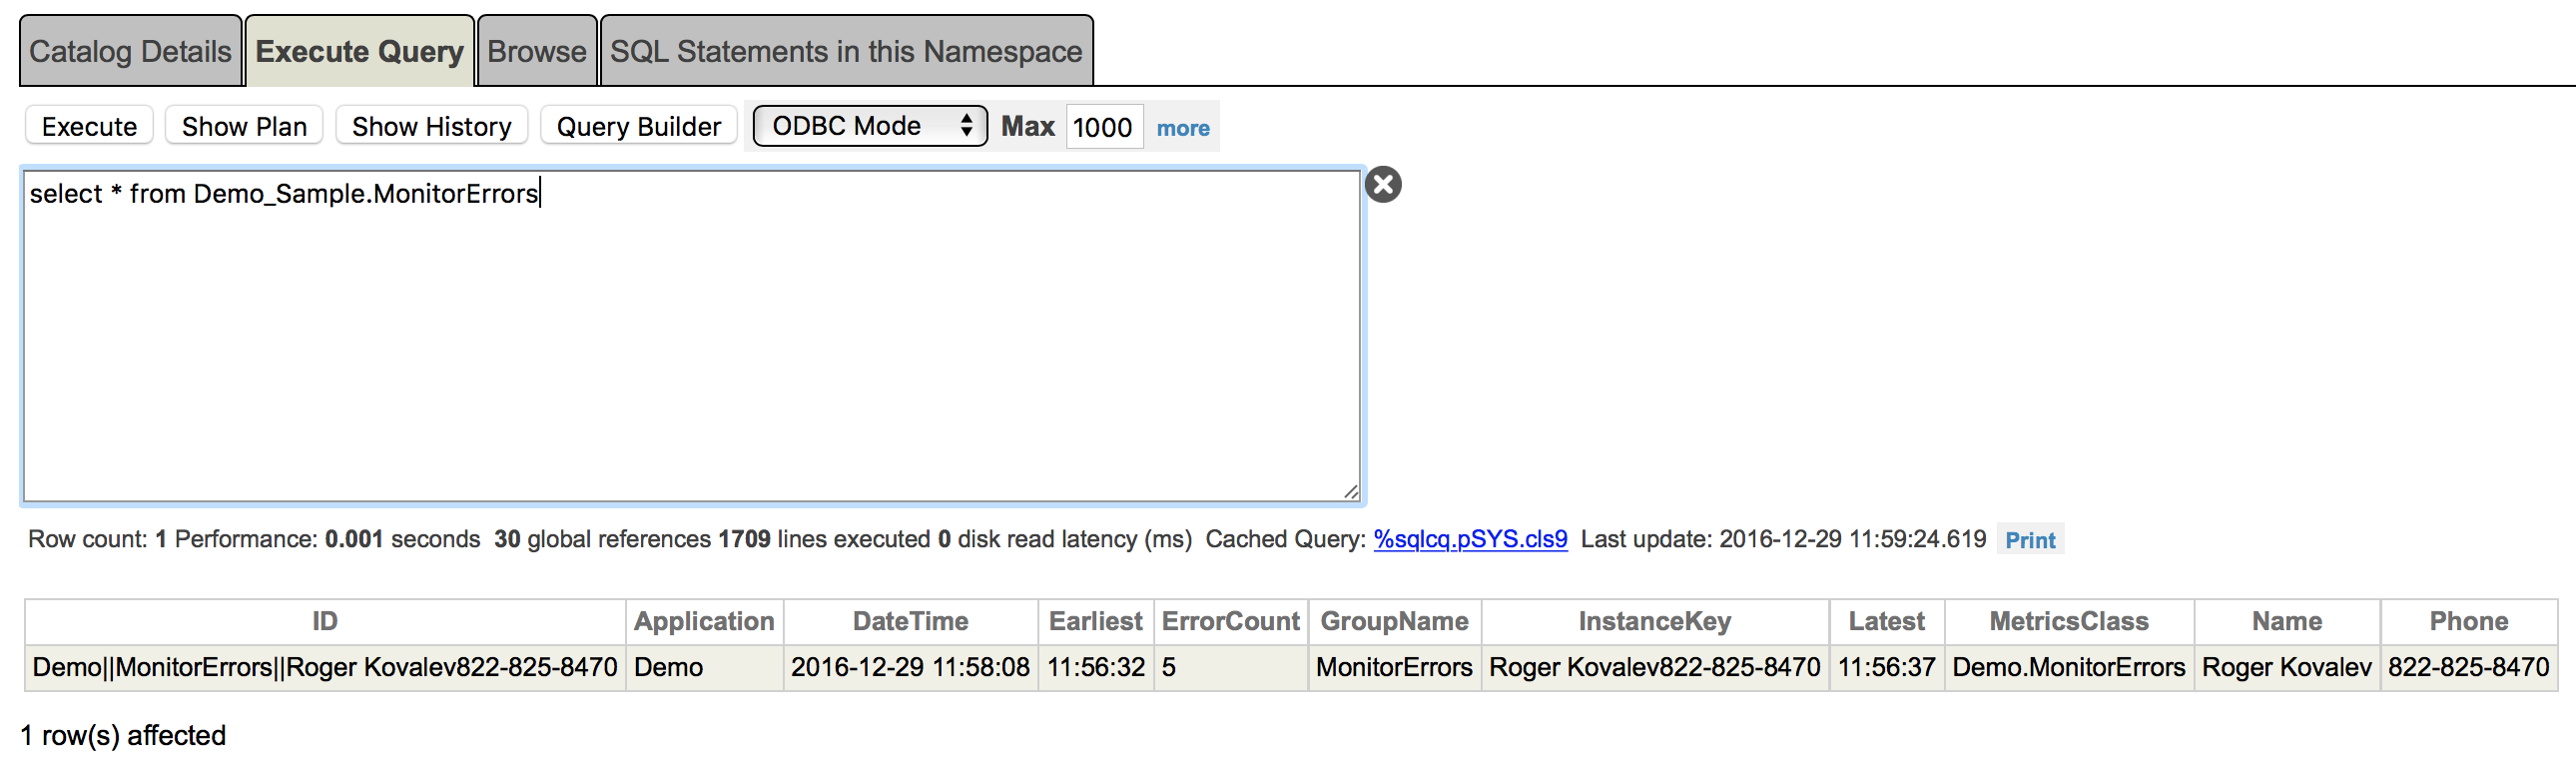
Look at the web page. The URL will be something like this: http://localhost:57772/csp/sys/Demo.Sample.MonitorErrors.cls.

Important notes and reminders about the provided example classes:
Demo.MonitorErrors and Demo.TestErrorMonitor must be loaded and compiled in %SYS.
The examples of the Initialize() and GetSample() methods in the documentation (http://docs.intersystems.com/latest/csp/docbook/DocBook.UI.Page.cls?KEY…) use Initialize() to execute a query, and GetSample() to retrieve a row of the result set and copy the data into the sample properties for storage. The example we're using for this article takes a different approach:
- Initialize() executes a query and loops through all the rows, filtering them so only rows with a particular error are stored in the FilteredRows multidimensional property. This method also initializes a Key property for later use by GetSample().
- GetSample() loops through the FilteredRows (using the Key Property), retrieves each filtered row, and copies the data into the sample properties for storage.
While this article is about InterSystems IRIS, it also applies to Caché.
Comments
Hi, Joel!
Thanks for the nice sample! Would you please upload the code to a Github repo too to let it be forked and pull-requested?
Thanks!
Files are now also here: https://github.com/joelsolon/DevCommunity/tree/master/AppMon
Off-topic: tried now google who is mister "Roger Kovalev" and found this article on DC in top-10 results :)
