Basic Automation: The IRIS/Cache Task Manager
Pouring The Coffee: Creating and scheduling a task
Don't you wish a fresh, hot cup of coffee could be waiting for you right when you get into the office? Let's automate that!
Cache and IRIS come with a built-in Task Manager, which should have a familiar feel to those used to using the Windows task scheduler or using cron on Linux. Your user account will need access to the %Admin_Task resource to use it, and you can access it in the management portal under System Operation -> Task Manager. When first installed, there are roughly 20 types of task that you can schedule.
If you want to add your own tasks, start by creating a class that extends %SYS.Task.Definition. At the very minimum, it must override the OnTask method, which has a signature of Method OnTask() As %Status. Any code in that method is what will run whenever the task is scheduled. In fact, if your task results in Error #5003: Not Implemented every time it runs, it is because this method isn't correctly overridden. To be very basic, it could be:
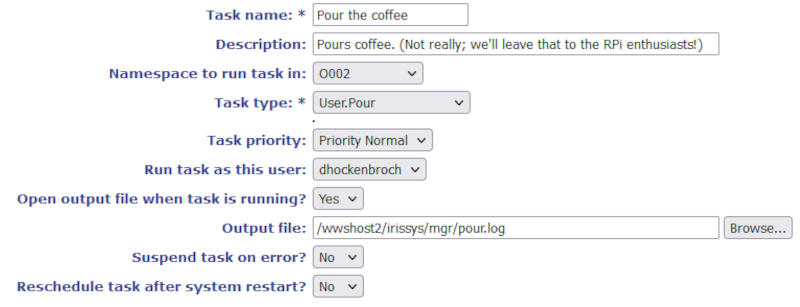
Class User.Pour Extends %SYS.Task.Definition{ Method OnTask() As %Status { write "Pour the coffee!",! quit $$$OK }}Once you've built that class, you can go back to the management portal and go to System Operation -> Task Manager -> New Task. This time, if you change the Namespace to run task in drop down to the namespace where you created this class, then click on the "Task type" drop down, you should see your new class - in this case User.Pour. You can also give your task a name and a description. These will show on the Task Schedule once you've scheduled your task. Choose a user to run the task as. This user will need to have appropriate permissions to be able to run whatever code is in the OnTask method.
You should also set "Open output file when task is running" to Yes, and select a file to output to. Any write or similar statements in the task will be written to that file, and since that's all our task does, we won't see much of a result if we don't choose one.This file will be started anew every day, not appended to, so you will only see what has been written from the most recent execution of your task.

Click "Next" to see your scheduling options. You'll see that you can automatically run the task daily, weekly, monthly (as in "on the 15th of every month"), or monthly by day (as in "on the second Tuesday of every month"). The last two options are a little bit different in that they don't necessarily run a task at a specific scheduled time.
"After another task completes" is useful for chaining several tasks together in a set order. For instance, once we've got this task on the schedule, we could create a second task and name it "Add the creamer" and every time the Pour the coffee task completed, the Add the creamer task would also execute, and they would always occur in that order, even if for some reason pouring the coffee took longer than usual one day. If the Pour the coffee task failed, the Add the creamer task wouldn't run.
"On Demand" doesn't add the task to the schedule. Instead, it only creates and entry in the management portal under System Operation -> Task Manager -> On Demand Task. In fact, any task, including those on the schedule can be run on demand from there, or from the Task Schedule itself. Just be aware that when you run a task this way, it doesn't run quite immediately. It gets scheduled within the next minute.
Once you've set your schedule and clicked on "Finish", congratulations! You've scheduled your first task! If you look in the Task Manager's Task Schedule, you'll now see your task at the bottom of the schedule. In my case, I'm making it Pour the coffee at 9AM (I know sleeping in that late is a little fanciful for most of us!) every weekday. On the scheduled days, my ouput file will be rewritten to say "Pour the coffee!" just after 9:00 AM.
It's Five O'Clock Somewhere: Creating options for your task
But what about quitting time?! We don't always want coffee. We need to be able to add some options to our task. Anything you define as a property within your task class will create a prompt when scheduling the task. Let's add a property to our task and modify the OnTask method to use it:
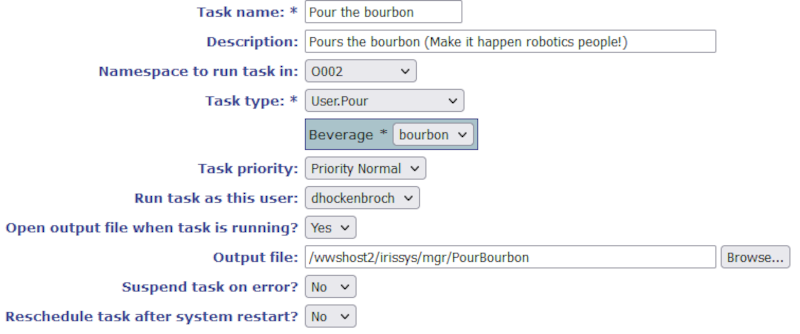
Class User.Pour Extends %SYS.Task.Definition{Property Beverage As %String(DISPLAYLIST = ",coffee,bourbon", VALUELIST = ",coffee,bourbon") [ Required ]; Method OnTask() As %Status { write "Pour the "_..Beverage_"!",! quit $$$OK }}In this example, I've made my property a string, but it can be any datatype, and the form will have an input for it. Most data types will default to having a plain text input. Booleans will have a check box. If you define a DISPLAYLIST and a VALUELIST for the property, as above, you will get a drop-down instead, but the first option must be blank or it will just show the default text box. If the property is marked as required, the prompt will show a * and the user will not be able to proceed without providing a value.

Now I can create a task the writes "Pour the coffee!" to a log file at 9:00 AM and one that writes "Pour the bourbon!" at 5:00 PM by adding the same type of task to the schedule with with the same task type, but a different option.
Bad Service, 0 Stars: Handling task failures
I didn't get my coffee this morning! What happened?
There are a couple of ways to check the task history. If you select "Task History" from the Task Manager menu in the management portal, you get a chronological, combined list of history for all tasks. If you go the Task Schedule and click on "History" to the right of the task you're interested in, you can see the history for just that particular task. You'll see any errors there.
You can also be more proactive, though, to avoid that bad Yelp reviews. Go back to your management portal and select System Administration -> Additional Settings -> Task Manager Email. This is where you can configure your outgoing email settings for Task Manager notifications. SMTP settings are beyond the scope of this article, but you should be able to get them from your email administrator. You can set subject lines and messages for both success and failure. You can't create a different set of settings per task, but at the bottom you can see a list of variables you can include in your emails to give the information you need. The defaults do provide all of the information you'd typically need.
Now, let's schedule a task one more time. At the bottom, you have to fields that weren't there before if your SMTP settings weren't configured. "Send completion email notification to" is where you put the email address to send the email to when the task completes successfully. "Send error email notification to" is where to send a notification email when the task doesn't complete successfully. If you've chosen an output file, that file will also be attached to the email notifications.
Let's pause here to add clarity. When dealing with these settings, "Error" means the task executed completely, but the OnTask method returned an error status. All of the settings on the task configuration page pertaining to error or success use that definition. If the OnTask method returned an error status, the error notification email will be sent, and if "Suspend task on error?" is set to yes, the task will be suspended until you tell it to resume. That's not to be confused with an error where a bug in the OnTask method prevented it from completing. In that kind of error, no email notifications are sent, and the task will always be suspended. Because of that, please be very careful of your error handling!
There is also a drop-down box for "Reschedule task after system restart?" This option determines how the system handles tasks that were supposed to run, but your system was down at the time. If it's set to "No", that particular run of the task is just missed and it will resume as normal at the next time it's supposed to run. If set to "Yes" and the task was supposed to run while the system was down, the task will run shortly after the system restarts.
But I'm IMPORTANT!: That one option we've been ignoring
Priority Normal. Just do it.
That's actually what you'll want the vast majority of the time. The Task Priority setting has to do with how various processes compete for resources from your server when it's busy, and you'll rarely want to change that. If you're concerned that you have your CPU pegged at 99% all day and you want the task to receive a higher or lower priority than other things that are happening, you can change this setting to address how to handle that problem, but I'd like to humbly suggest that changing this setting doesn't solve the real problem!
That's it! I've kept my OnTask method very basic here in order to keep the focus on the actual use of the task manager and the %SYS.Task.Definition class, but you can put whatever you want in there. You should be able to automate a lot of work this way. For example, on our servers, we've got a service hosted on Tomcat that prints, emails, and/or archives Crystal Reports, and we automate a %Net.HttpRequest to call that process. You can schedule anything that you can write in a method. If you've got good ideas or existing examples, please share in the comments!
Comments
Hi David
This is a great article. I am currently working for a company that has used the task manager as a fundamental part of the application architecture. If I had been involved in the design of their application I would probably have used an Ensemble Production with services for each automation and then specify a time when the service should run. The application I am working on has given me a whole different view on how the Task Manager can be used so your article couldn't come at a better time from my point of view.
Nigel
I'm glad you found it helpful, Nigel. A fair number of our customers are still on Cache 2018. That required additional licensing costs for Ensemble, which is why I've done some of these automation projects this way. I didn't have Ensemble as an option! The Task Manager has been sufficient for our needs so far.
Hi David,
This was very helpful and I have the script working. Thanks for your help.
Gary
A good article.
I did write something on Open Exchange ages ago that uses this and could be an example
GitHub - davidpeterunderhill/Intersystems-Database-Metrics-example
the example breaks on Win and in Docker with <DIVIDE>. PullRequest for fix is pending
Hi, apologies, I missed that, the fix is now merged.
BTW, do you have an example of the OS commands output when this fails?
THX ![]()