InterSystems IRIS Open Authorization Framework (OAuth 2.0) implementation - part 2
Created by Daniel Kutac, Sales Engineer, InterSystems
Warning: if you get confused by URLs used: the original series used screens from machine called dk-gs2016. The new screenshots are taken from a different machine. You can safely treat url WIN-U9J96QBJSAG as if it was dk-gs2016.
Part 2. Authorization server, OpenID Connect server
In the previous part of this short series, we have learned about simple use case – acting as an OAUTH[1] client. Now, it’s time to bring our experience to a whole new level. We are going to build much more complex environment, where InterSystems IRIS is going to play all OAUTH roles.
We know already how to make a client, so let’s concentrate on authorization server and even more, the OpenID Connect[2] provider.
As in the previous part, we need to prepare environment. This time it is going to be trickier, as there are more moving parts.
Before we go into the details of our example, we need to spend a few words about OpenID Connect.
As you may recall from previous part, we were asked – in order to be authorized by Google – to authenticate ourselves with Google first. The authentication is not part of OAUTH framework. In fact, there are many authentication frameworks around, independent of OAUTH. One of them is called OpenID. Started originally as an independent initiative, it recently leverages infrastructure provided by OAUTH framework, namely communication and data structures. Thus, OpenID Connect was born. In fact, many people call it OAUTH on steroids. Indeed, with OpenID Connect, you can not only authorize, but also authenticate using well known interfaces of OAUTH framework.
Complex OpenID Connect demo
We will leverage much of the client code from the part 1. This saves us a lot of work, so we can concentrate on setting up environment.
Prerequisites
This time we need to add, to already existing web server with SSL enabled, a PKI infrastructure. We need some cryptography required by OpenID Connect. If you want authenticate someone, you want to be absolutely sure that no-one else can impersonate the agent (client, auth server,...) who sends his/her confidential data over the network. This is where X.509 based cryptography comes in.
PKI
Strictly said, we do not need to use Caché PKI infrastructure at all, but it is more convenient way than using tools like openssl directly to generate all certificates.
We are not going into details of generating certificates here, as you can find details either within InterSystems IRISdocumentation or elsewhere. As a result of generating certificates, we will create 3 public/private key pairs and associated certificates.
Let’s call them
· root_ca (root_ca.cer) for our issuing certification authority
· auth (auth.cer and auth.key) for authorization & OpenID server
· client (client.cer and client.key) for client application server
X.509 Credentials
We need to define X.509 credentials at individual servers so they can sign and validate JSON Web Tokens (JWT) exchanged during our demo
Authorization & Authentication server configuration
Without going into details about how to define X.509 Credentials, we just show a screenshot of AUTHSERVER instance credentials.
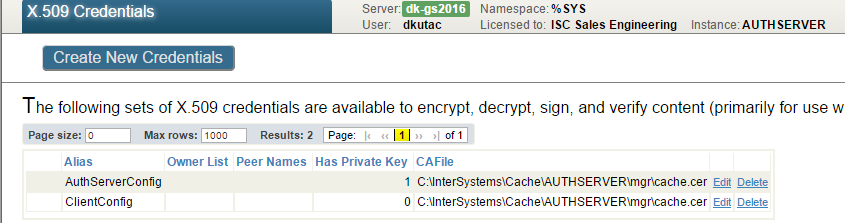
As image indicates, the AUTHSERVER owns its private key and certificate , whilst it only has certificate with public key of the CLIENT
Client server configuration
And similarly, credentials defined at CLIENT instance
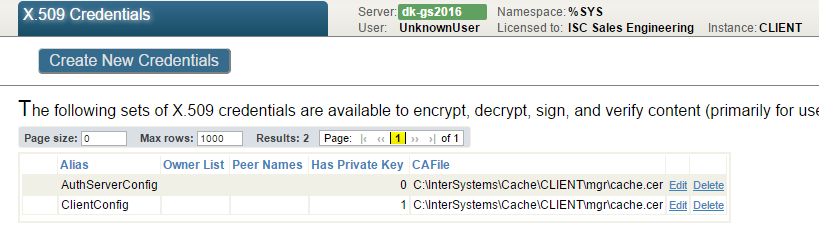
Here the CLIENT owns private key and certificate, but only certificate with public key of AUTHSERVER.
Resource server configuration
We do not need to define X509 credentials at RESSERVER instance in our example setup.
OAUTH Configuration
Similarly to configuration described in part 1 of this series, we need to configure our servers for OAUTH. Let’s start with AUTHSERVER instance, as this is the central component in overall OAUTH configuration.
AUTHSERVER
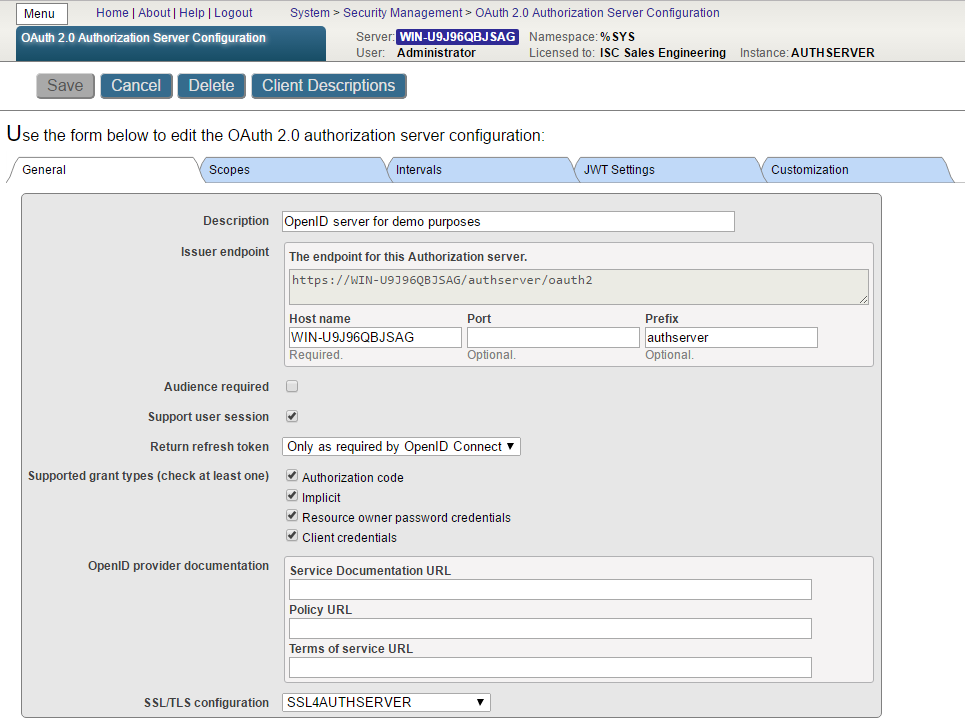
In System Management Portal, navigate to System Administration > Security > OAuth 2.0 > Server Configuration.
Click the menu link and fill form items:
· host name
· port (optional)
· prefix (optional) – these three fields compose Issuer endpoint
· specify conditions for return refresh token
· check supported grant types, for our demo just check all four types. However only Authorization code is used.
· optionally check Audience required – this adds aud property into authorization code and implicit requests
· optionally check Support user session - this means that an httpOnly cookie is used by the authorization server to keep the current user of this browser logged in. The second and subsequent requests for the access token will not prompt for user name and password.
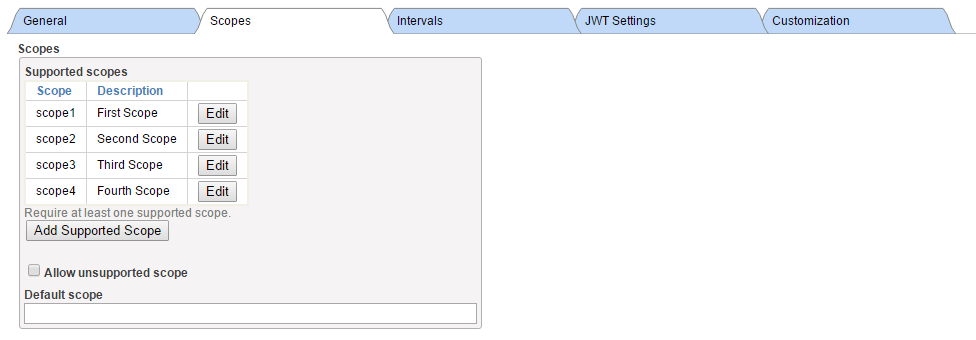
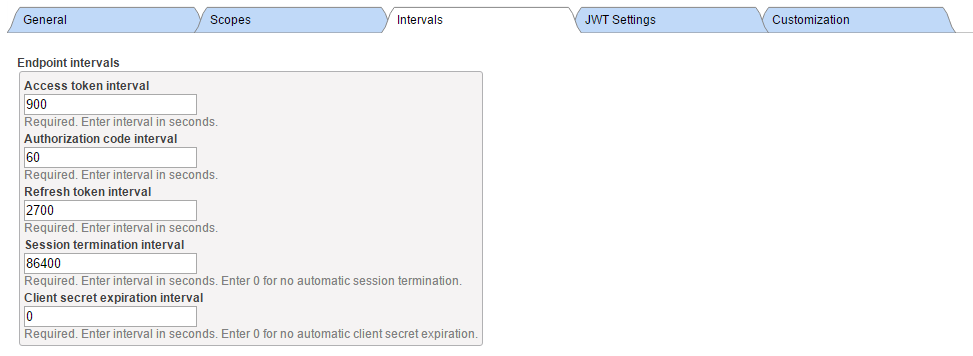
· specify endpoint intervals
· define scopes supported by this server
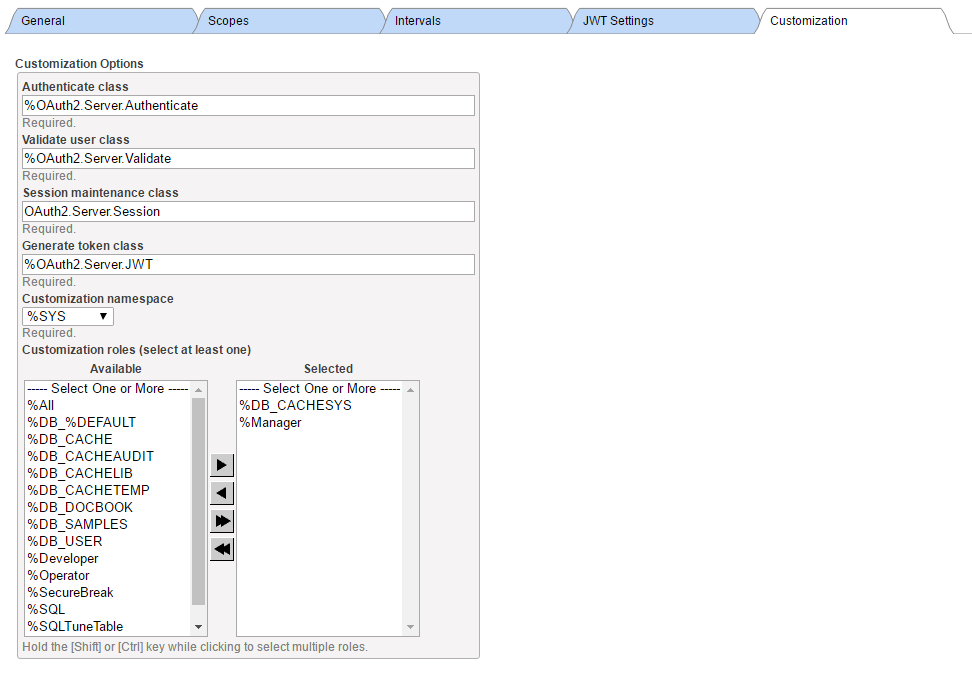
· accept default or enter custom values of customization options – please note – change Generate token class valued from %OAuth2.Server.Generate to %OAuth2.Server.JWT so that a JWT is used as the access token rather than just an opaque token.
· provide name of registered SSL configuration to establish SSL over HTTP as required by OAuth 2.0
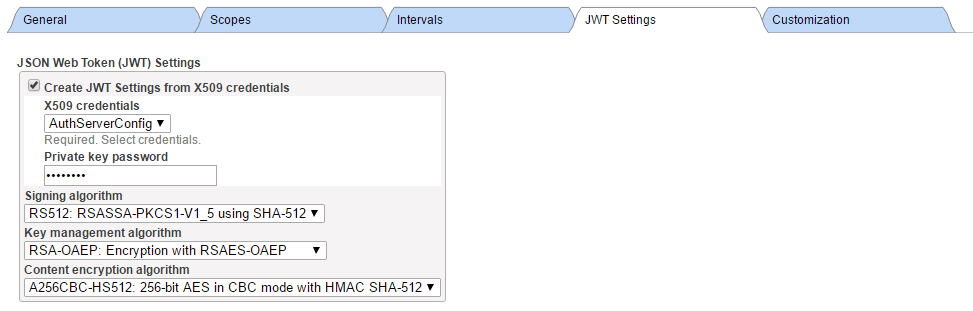
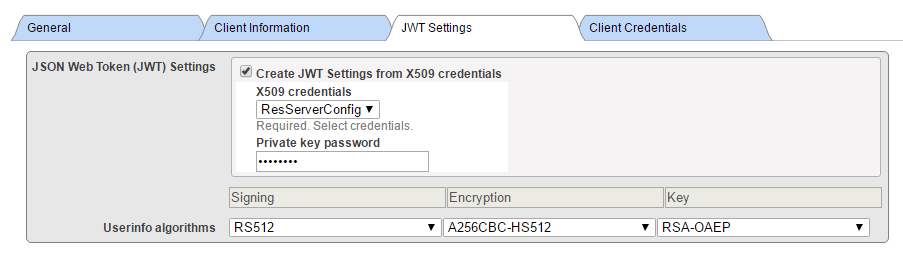
· Fill in settings for JSON Web Token (JWT)
Here is a screenshot of sample configuration
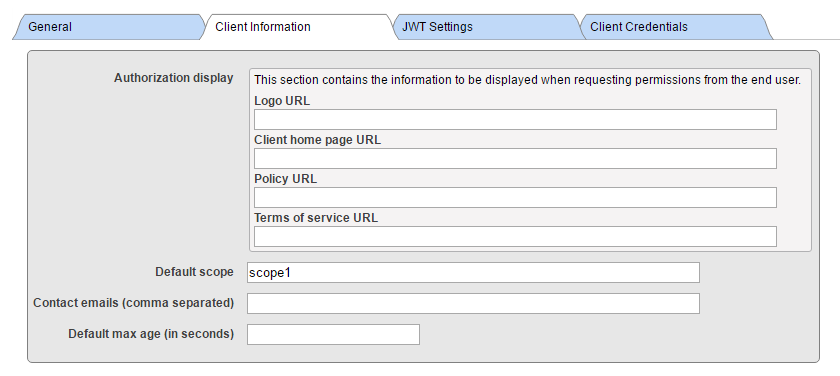
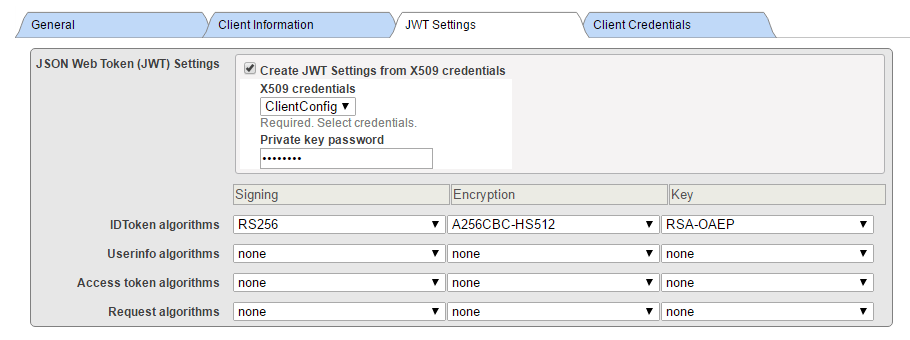
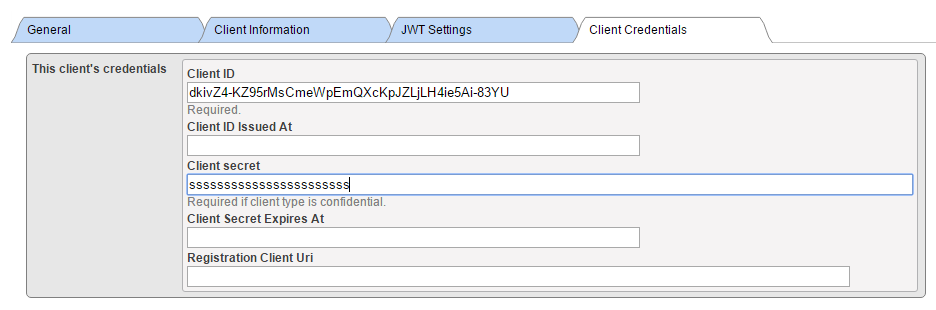
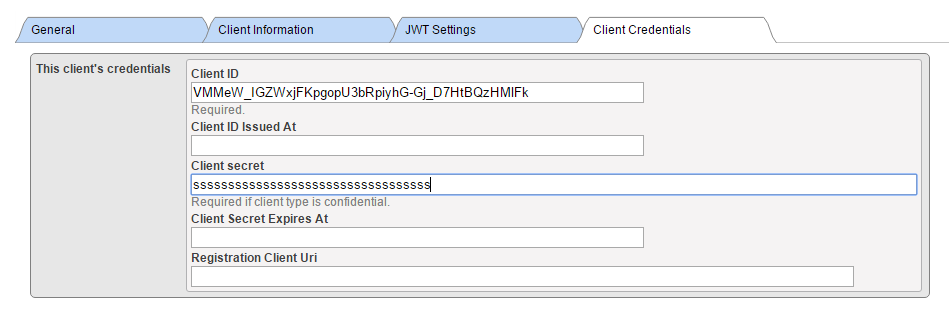
Having defined server configuration, we need to supply server client configuration. Within the page with server configuration form, click Client Configurations button and then press Create New Configuration for your CLIENT and RESSERVER instances.
This image shows CLIENT configuration.
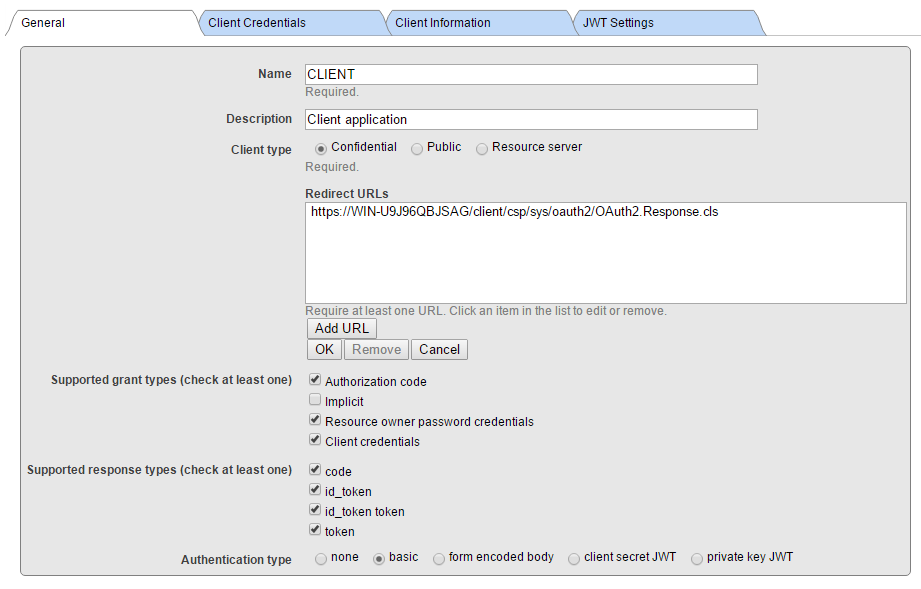

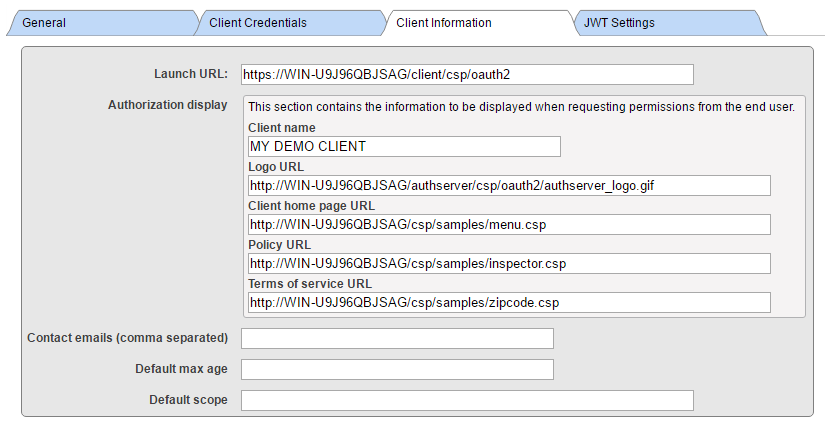
Leave JWT Token tab empty - with default values. As you can see, we populated fields with meaningless data, unlike in real application case.
And similarly, RESSERVER configuration
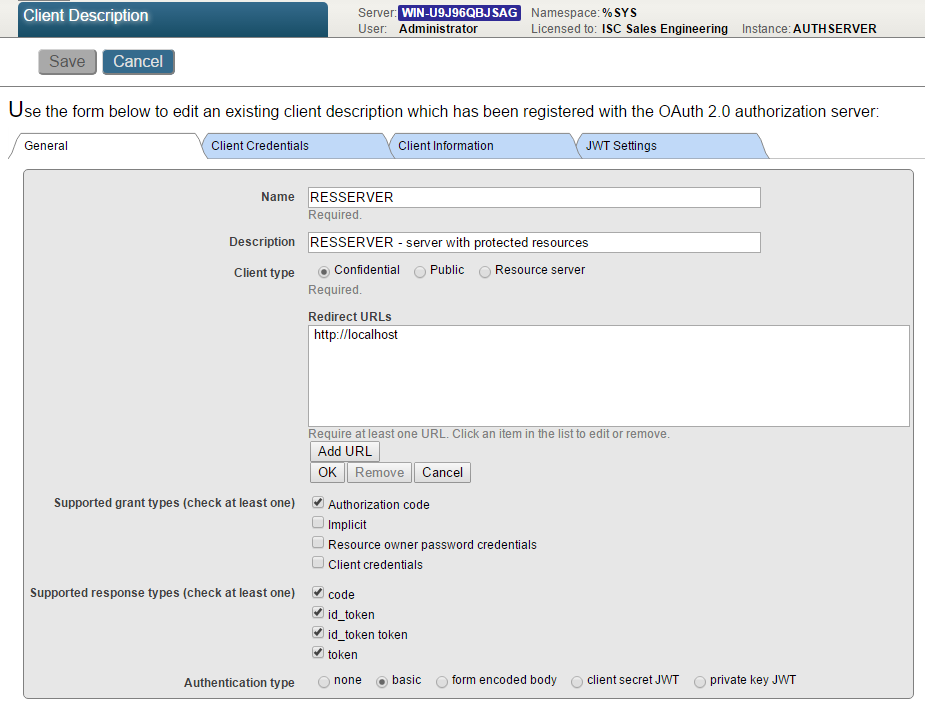

As you can see, there is only very basic information needed for resource server, namely you need to set client type to Resource server. With CLIENT, you need to provide more information, the Client type (confidential as our client runs as web application capable of keeping client secret at server, not sending it to client agent).
CLIENT
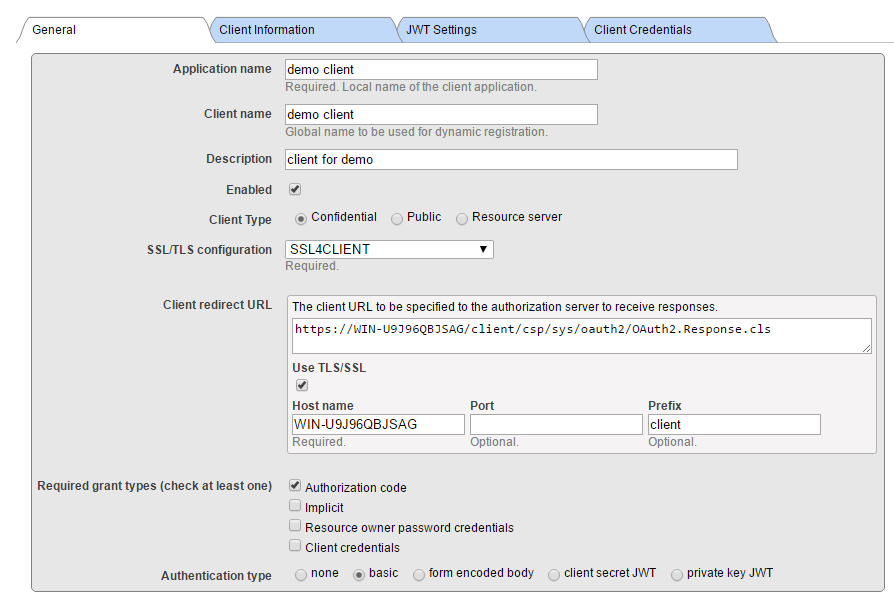
In SMP, navigate to System Administration > Security > OAuth 2.0 > Client Configurations.
Click Create Server Configuration button, fill the form and save it.
Make sure that Issuer Endpoint corresponds to the value we defined earlier at the AUTHSERVER instance! You also need to modify authorization server endpoints according to your web server configuration. In our case we just embedded ‘authserver’ into each input field.
Now, click Client Configurations link next to the newly created Issuer Endpoint and click Create Client Configuration button.
Good! At this moment we have both CLIENT and AUTHSERVER configured. That could be enough for many use cases, as resource server may be just a namespace of AUTHSERVER, thus protected already. But let’s consider that we want to cover a use case where an external doctor is trying to retrieve data from our internal clinical system. So in order to allow such doctor to retrieve data, we definitely want to store his account information INSIDE our resource server for auditing and forensic reasons. In that case, we need to continue and define configurations at RESSERVER.
RESSERVER
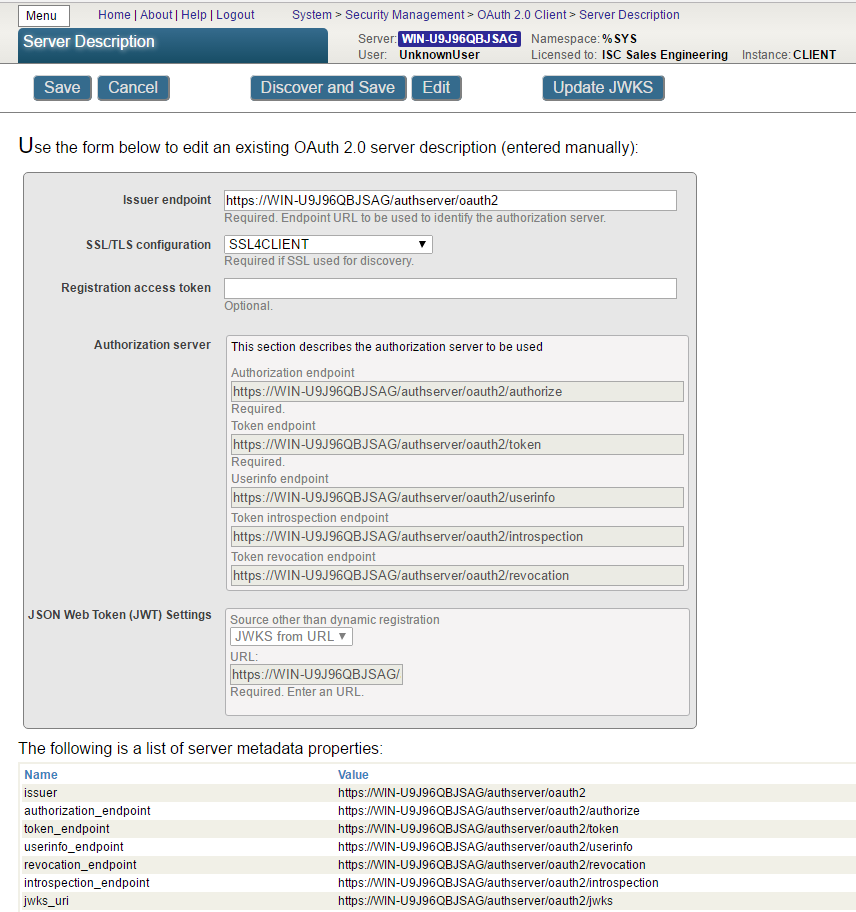
In SMP, navigate to System Administration > Security > OAuth 2.0 > Client Configurations.
Click Create Server Configuration button, fill the form and save it.
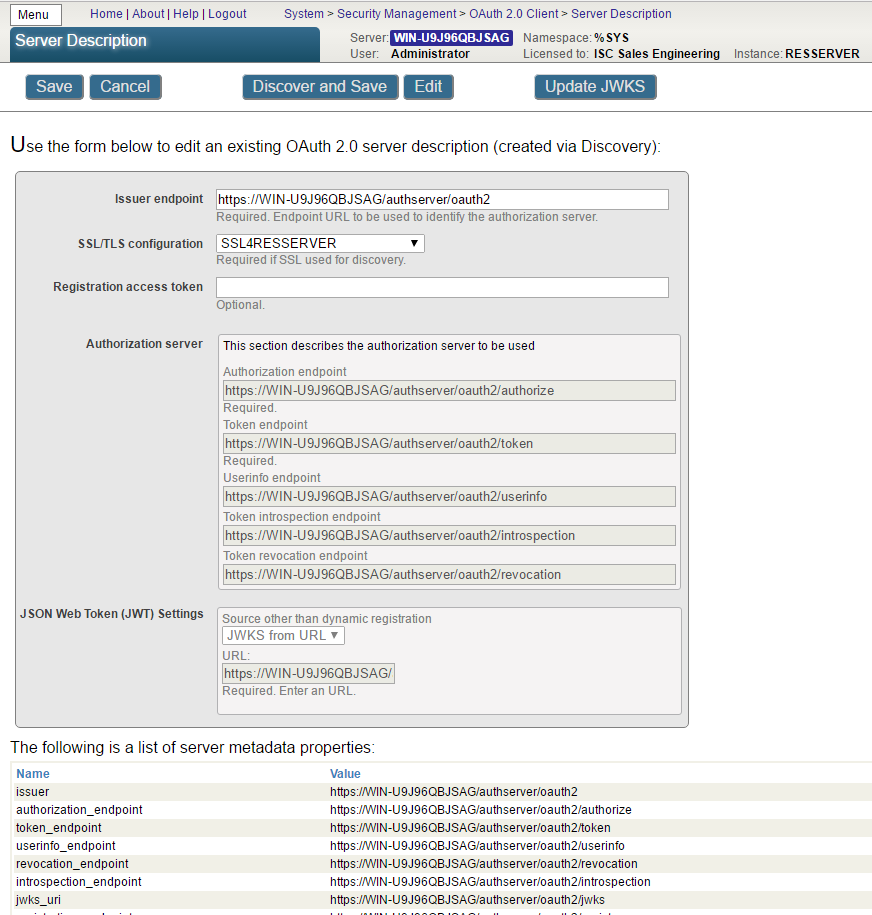
We used discovery function here, this is a new feature implemented in Cache 2017.1
As you can see, this configuration is using the same data as corresponding configuration at CLIENT instance.
Now, click Client Configurations link next to the newly created Issuer Endpoint and click Create Client Configuration button.

Creating WT from X.509 Credentials is not recommended, but we used it for compatibility.
Oh yes! Indeed, this was tedious, but necessary process. But now we can move forward, and start coding!
Client Application
To keep things as simple as possible, we will recycle much of code from our Google example we described in part 1.
The client application is just two CSP pages, running in /csp/myclient application, with no security enforced – it just runs as unauthenticated user.
Page 1
Class Web.OAUTH2.Cache1N Extends %CSP.Page
{
Parameter OAUTH2CLIENTREDIRECTURI = "https://dk-gs2016/client/csp/myclient/Web.OAUTH2.Cache2N.cls";
Parameter OAUTH2APPNAME = "demo client";
ClassMethod OnPage() As %Status
{
&html<<html>
<head>
<style>
.portalLogo {
color: rgb(53,107,141);
position: relative;
font-weight: bold;
font-size: 12pt;
top: 0px;
right: 0px;
border: 2px solid rgb(53,107,141);
padding: 2px;
padding-left: 5px;
padding-right: 5px;
border-radius: 4px;
background: #E0E0F0;
}
.portalLogoBox {
position: static;
padding: 10px;
padding-bottom: 4px;
padding-right: 30px;
text-align: center;
}
.portalLogoSub {
position: relative;
color: #808080;
font-size: 8pt;
top: 3px;
right: 0px;
}
</style>
</head>
<body>
<h1>Authenticating and Authorizing against Cache´ OAuth2 provider</h1>
<p>This page demo shows how to call Cache´ API functions using OAuth2 authorization.
<p>We are going to call Cache´ authentication and authorization server to grant our application access to data stored at another
Cache´ server.
>
// Get the url for authorization endpoint with appropriate redirect and scopes.
// The returned url is used in the button below.
// DK: use 'dankut' account to authenticate!
set scope="openid profile scope1 scope2"
set url=##class(%SYS.OAuth2.Authorization).GetAuthorizationCodeEndpoint(
..#OAUTH2APPNAME,
scope,
..#OAUTH2CLIENTREDIRECTURI,
.properties,
.isAuthorized,
.sc)
if $$$ISERR(sc) {
write "GetAuthorizationCodeEndpoint Error="
write ..EscapeHTML($system.Status.GetErrorText(sc))_"<br>",!
}
&html<
<div class="portalLogoBox"><a class="portalLogo" href="#(url)#">Authorize for <b>ISC</b></a></div>
</body></html>>
Quit $$$OK
}
ClassMethod OnPreHTTP() As %Boolean [ ServerOnly = 1 ]
{
#dim %response as %CSP.Response
set scope="openid profile scope1 scope2"
if ##class(%SYS.OAuth2.AccessToken).IsAuthorized(..#OAUTH2APPNAME,,scope,.accessToken,.idtoken,.responseProperties,.error) {
set %response.ServerSideRedirect="Web.OAUTH2.Cache2N.cls"
}
quit 1
}
}Page 2
Class Web.OAUTH2.Cache2N Extends %CSP.Page
{

Parameter OAUTH2APPNAME = "demo client";

Parameter OAUTH2ROOT = "https://dk-gs2016/resserver";

Parameter SSLCONFIG = "SSL4CLIENT";

ClassMethod OnPage() As %Status
{
    &html<<html>
<head>
</head>

<style>
body { font-family: verdana; }

h4 { color:#2080E0 ;}
</style>

<body>>

    // Check if we have an access token from oauth2 server
    set isAuthorized=##class(%SYS.OAuth2.AccessToken).IsAuthorized(..#OAUTH2APPNAME,,"scope1 scope2",.accessToken,.idtoken,.responseProperties,.error)

    // Continue with further checks if an access token exists.
    // Below are all possible tests and may not be needed in all cases.
    // The JSON object which is returned for each test is just displayed.
    if isAuthorized {
        write "<h3>Authorized!</h3>",!


        // Validate and get the details from the access token, if it is a JWT.
        set valid=##class(%SYS.OAuth2.Validation).ValidateJWT(..#OAUTH2APPNAME,accessToken,"scope1 scope2",,.jsonObject,.securityParameters,.sc)
        if $$$ISOK(sc) {
            if valid {
                write "Valid JWT"_"<br>",!
            } else {
                write "Invalid JWT"_"<br>",!
            }
            write "Access token="
            do jsonObject.%ToJSON()
            write "<br>",!
        } else {
            write "JWT Error="_..EscapeHTML($system.Status.GetErrorText(sc))_"<br>",!
        }
        write "<br>",!

        // Call the introspection endpoint and display result -- see RFC 7662.
        set sc=##class(%SYS.OAuth2.AccessToken).GetIntrospection(..#OAUTH2APPNAME,accessToken,.jsonObject)
        if $$$ISOK(sc) {
            write "Introspection="
            do jsonObject.%ToJSON()
            write "<br>",!
        } else {
            write "Introspection Error="_..EscapeHTML($system.Status.GetErrorText(sc))_"<br>",!
        }
        write "<br>",!

        if idtoken'="" {
            // Validate and display the IDToken -- see OpenID Connect Core specification.
            set valid=##class(%SYS.OAuth2.Validation).ValidateIDToken(
                ..#OAUTH2APPNAME,
                idtoken,
                accessToken,,,
                .jsonObject,
                .securityParameters,
                .sc)
            if $$$ISOK(sc) {
                if valid {
                    write "Valid IDToken"_"<br>",!
                } else {
                    write "Invalid IDToken"_"<br>",!
                }
                write "IDToken="
                do jsonObject.%ToJSON()
                write "<br>",!
            } else {
                write "IDToken Error="_..EscapeHTML($system.Status.GetErrorText(sc))_"<br>",!
            }
        } else {
            write "No IDToken returned"_"<br>",!
        }
        write "<br>",!

        // not needed for the application logic, but provides information about user that we can pass to Delegated authentication

        // Call the userinfo endpoint and display the result -- see OpenID Connect Core specification.
        set sc=##class(%SYS.OAuth2.AccessToken).GetUserinfo(
            ..#OAUTH2APPNAME,
            accessToken,,
            .jsonObject)
        if $$$ISOK(sc) {
            write "Userinfo="
            do jsonObject.%ToJSON()
            write "<br>",!
        } else {
            write "Userinfo Error="_..EscapeHTML($system.Status.GetErrorText(sc))_"<br>",!
        }
        write "<p>",!

        /***************************************************
        *                                                  *
        *   Call the resource server and display result.   *
        *                                                  *
        ***************************************************/

        // option 1 - resource server - by definition - trusts data coming from authorization server,
        //     so it serves data to whoever is asking
        //  as long as access token passed to resource server is valid

        // option 2 - alternatively, you can use delegated authentication (OpenID Connect)
        //  and call into another CSP application (with delegated authentication protection)
        //  - that's what we do here in this demo


        write "<h4>Call resource server (delegated auth)","</h4>",!
        set httpRequest=##class(%Net.HttpRequest).%New()
        // AddAccessToken adds the current access token to the request.
        set sc=##class(%SYS.OAuth2.AccessToken).AddAccessToken(
            httpRequest,,
            ..#SSLCONFIG,
            ..#OAUTH2APPNAME)
        if $$$ISOK(sc) {
            set sc=httpRequest.Get(..#OAUTH2ROOT_"/csp/portfolio/oauth2test.demoResource.cls")
        }
        if $$$ISOK(sc) {
            set body=httpRequest.HttpResponse.Data
            if $isobject(body) {
                do body.Rewind()
                set body=body.Read()
            }
            write body,"<br>",!
        }
        if $$$ISERR(sc) {
            write "Resource Server Error="_..EscapeHTML($system.Status.GetErrorText(sc))_"<br>",!
        }
        write "<br>",!

        write "<h4>Call resource server - no auth, just token validity check","</h4>",!
        set httpRequest=##class(%Net.HttpRequest).%New()
        // AddAccessToken adds the current access token to the request.
        set sc=##class(%SYS.OAuth2.AccessToken).AddAccessToken(
            httpRequest,,
            ..#SSLCONFIG,
            ..#OAUTH2APPNAME)
        if $$$ISOK(sc) {
            set sc=httpRequest.Get(..#OAUTH2ROOT_"/csp/portfolio2/oauth2test.demoResource.cls")
        }
        if $$$ISOK(sc) {
            set body=httpRequest.HttpResponse.Data
            if $isobject(body) {
                do body.Rewind()
                set body=body.Read()
            }
            write body,"<br>",!
        }
        if $$$ISERR(sc) {
            write "Resource Server Error="_..EscapeHTML($system.Status.GetErrorText(sc))_"<br>",!
        }
        write "<br>",!
    } else {
        write "Not Authorized!<p>",!
        write "<a href='Web.OAUTH2.Cache1N.cls'>Authorize me</a>"
    }
    &html<</body></html>>
    Quit $$$OK
}

}
Following screenshots illustrate processing:
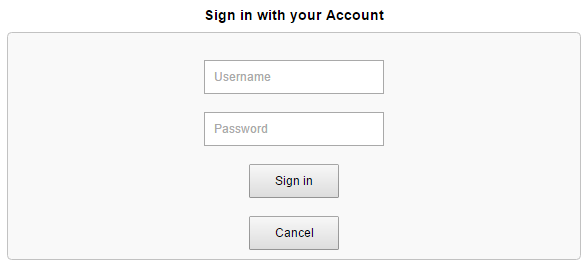
Authorization / OpenID Connect Authentication server login page at AUTHSERVER instance
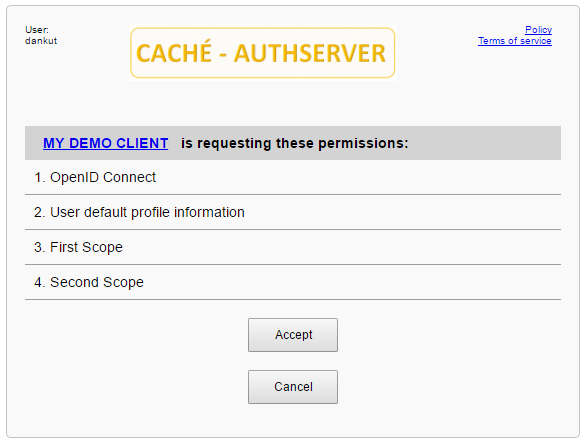
User consent page at AUTHSERVER
And, finally, resulting page
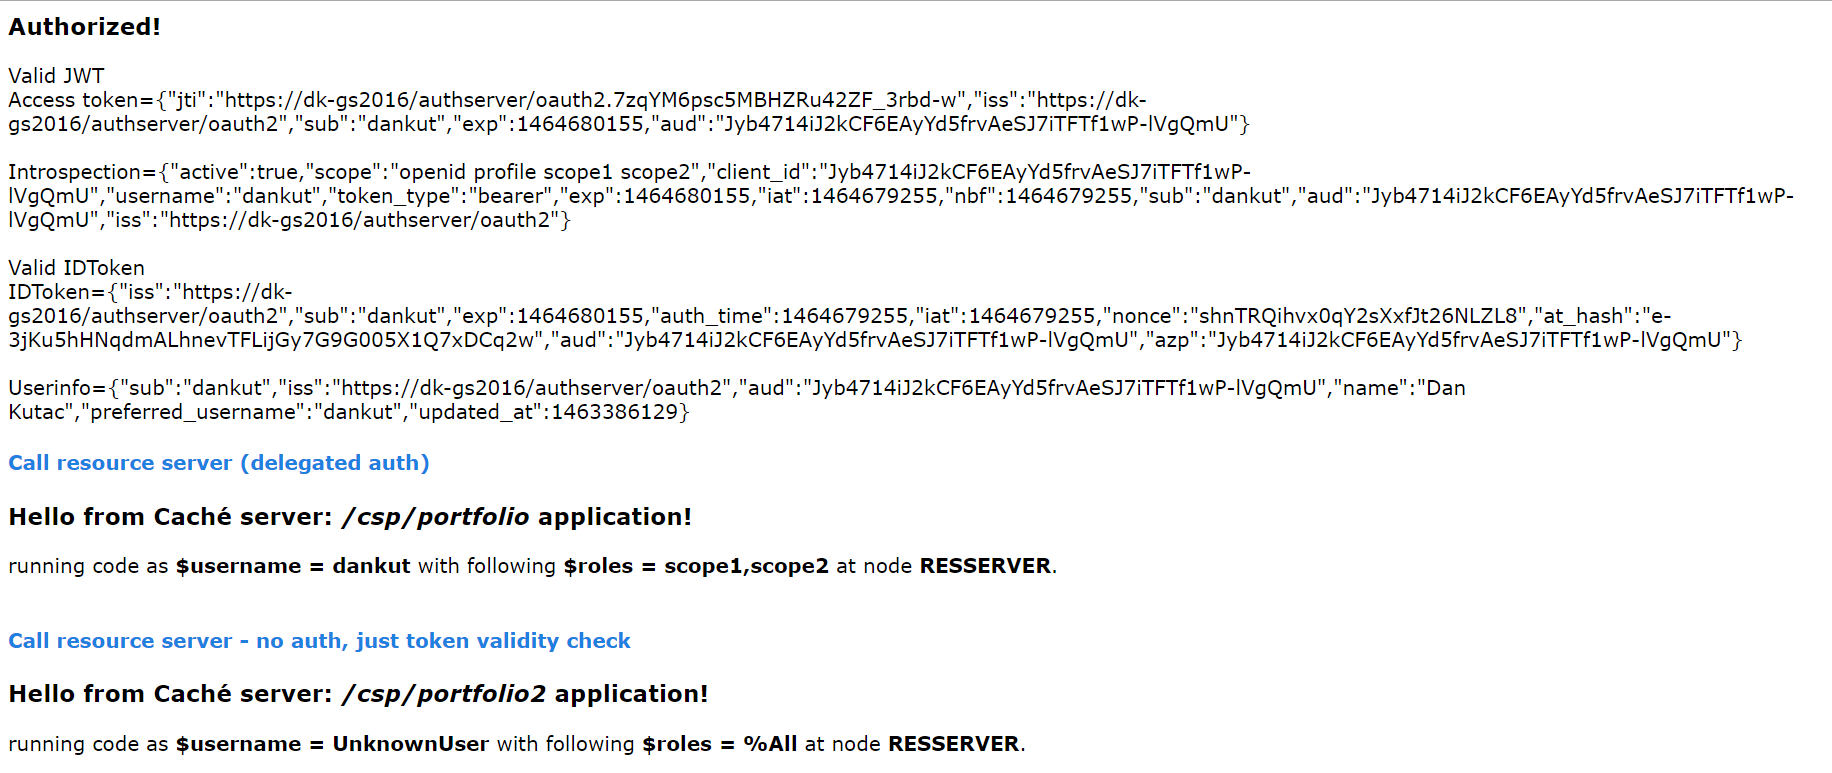
As you could see, reading through the code, indeed, there is almost no difference to client code we showed in part 1. There is something new that comes with page 2. This is some debugging information, and checking validity of JWT. Once we validated returned JWT, we could introspect data coming from AUTHSERVER about the user identity. We simply presented this information to the page output, but we can do more with it. As in the above mentioned use case of an external doctor, we can use the identity information and pass it to the resource server for the authentication purposes if required. Or just passing this information as parameter to API call to resource server.
Next paragraphs will describe how we used the user identity information, in more details.
Resource Application
The resource server can be the same server as authorization / authentication server and in many cases that would be the case. But in our demo, we made the two servers separate InterSystems IRIS instances.
So, we have two possible cases, how to work with security context on the resource server.
Alternative 1 – no authentication
This is the simple case. Authorization/ authentication server are just the same Caché instance. In this case we can simply pass access token to a csp application, which is specifically created for a single purpose – serve data to client applications that use OAUTH to authorize them to ask for data.
The configuration of the resource csp application (we called it /csp/portfolio2) can look like the screenshot below.
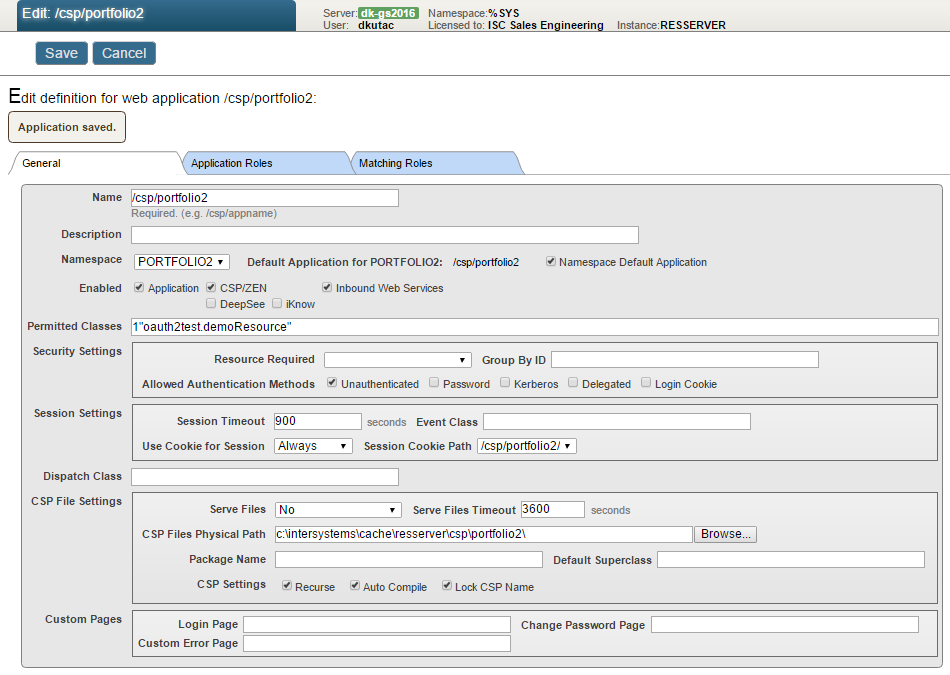
We put just minimum security into the application definition – allowing only specific CSP page to be executed.
Alternatively, the resource server can provide a REST API instead of classic web pages. In real life scenarios, this is all up to the user to fine-tune security context.
An example of source code:
Class oauth2test.demoResource Extends %CSP.Page
{
ClassMethod OnPage() As %Status
{
set accessToken=##class(%SYS.OAuth2.AccessToken).GetAccessTokenFromRequest(.sc)
if $$$ISOK(sc) {
set sc=##class(%SYS.OAuth2.AccessToken).GetIntrospection("RESSERVER resource",accessToken,.jsonObject)
if $$$ISOK(sc) {
// optionally validate against fields in jsonObject
w "<p><h3>Hello from Caché server: <i>/csp/portfolio2</i> application!</h3>"
w "<p>running code as <b>$username = "_$username_"</b> with following <b>$roles = "_$roles_"</b> at node <b>"_$p($zu(86),"*",2)_"</b>."
}
} else {
w "<h3>NOT AUTHORIZED!</h3>"
w "<pre>"
w
i $d(%objlasterror) d $system.OBJ.DisplayError()
w "</pre>"
}
Quit $$$OK
}
}Alternative 2 – delegated authentication
This is another extreme case, we want to utilize user’s identity at resource server to the maximum possible extent – as if the user was working with equal security context as internal users of resource server.
One of possible potions we have, is using delegated authentication.
To get this setup running, we need to perform a few more steps to configure the resource server.
· Enable Delegated Authentication
· Provide ZAUTHENTICATE routine
· Configure Web application (in our case we called in /csp/portfolio)
The ZAUTHENTICATE routine implementation is very simple and straightforward, as we trust the AUTHSERVER who provided user identity as well as his/her scope (security profile), so we simply accept whatever username is coming and pass it along with scope to resource server user database (with necessary translation between OAUTH scope and InterSystems IRIS roles). That’s it. The rest is done seamlessly by InterSystems IRIS.
Here is an example of ZAUTHENTICATE routine
#include %occErrors
#include %occInclude

ZAUTHENTICATE(ServiceName, Namespace, Username, Password, Credentials, Properties) PUBLIC
{
    set tRes=$SYSTEM.Status.OK()
    try {
        set Properties("FullName")="OAuth account "_Username
        //set Properties("Roles")=Credentials("scope")
        set Properties("Username")=Username
        //set Properties("Password")=Password
        // temporary hack as currently we can't pass Credentials array from GetCredentials() method
        set Properties("Password")="xxx"    // we don't really care about oauth2 account password
        set Properties("Roles")=Password
    } catch (ex) {
        set tRes=$SYSTEM.Status.Error($$$AccessDenied)
    }
    quit tRes
}

GetCredentials(ServiceName,Namespace,Username,Password,Credentials) Public
{
    s ts=$zts
    set tRes=$SYSTEM.Status.Error($$$AccessDenied)

     try {
         If ServiceName="%Service_CSP" {
            set accessToken=##class(%SYS.OAuth2.AccessToken).GetAccessTokenFromRequest(.sc)
            if $$$ISOK(sc) {
                set sc=##class(%SYS.OAuth2.AccessToken).GetIntrospection("RESSERVER resource",accessToken,.jsonObject)
                if $$$ISOK(sc) {
                    // todo: watch out for potential collision between standard account and delegated (openid) one!
                    set Username=jsonObject.username
                    set Credentials("scope")=$p(jsonObject.scope,"openid profile ",2)
                    set Credentials("namespace")=Namespace
                    // temporary hack
                    //set Password="xxx"
                    set Password=$tr(Credentials("scope")," ",",")
                    set tRes=$SYSTEM.Status.OK()
                } else {
                    set tRes=$SYSTEM.Status.Error($$$GetCredentialsFailed)
                }
            }
        } else {
            set tRes=$SYSTEM.Status.Error($$$AccessDenied)
        }
     } catch (ex) {
         set tRes=$SYSTEM.Status.Error($$$GetCredentialsFailed)
    }
    Quit tRes
}
The CSP page itself can then be very simple:
Class oauth2test.demoResource Extends %CSP.Page
{
ClassMethod OnPage() As %Status
{
// access token authentication is performed by means of Delegated authentication!
// no need to do it, again, here
// This is a dummy resource server which just gets the access token from the request and
// uses the introspection endpoint to ensure that the access token is valid.
// Normally the response would not be security related, but would contain some interesting
// data based on the request parameters.
w "<p><h3>Hello from Caché server: <i>/csp/portfolio</i> application!</h3>"
w "<p>running code as <b>$username = "_$username_"</b> with following <b>$roles = "_$roles_"</b> at node <b>"_$p($zu(86),"*",2)_"</b>."
Quit $$$OK
}
}And, lastly, the Web application configuration for /csp/portfolio
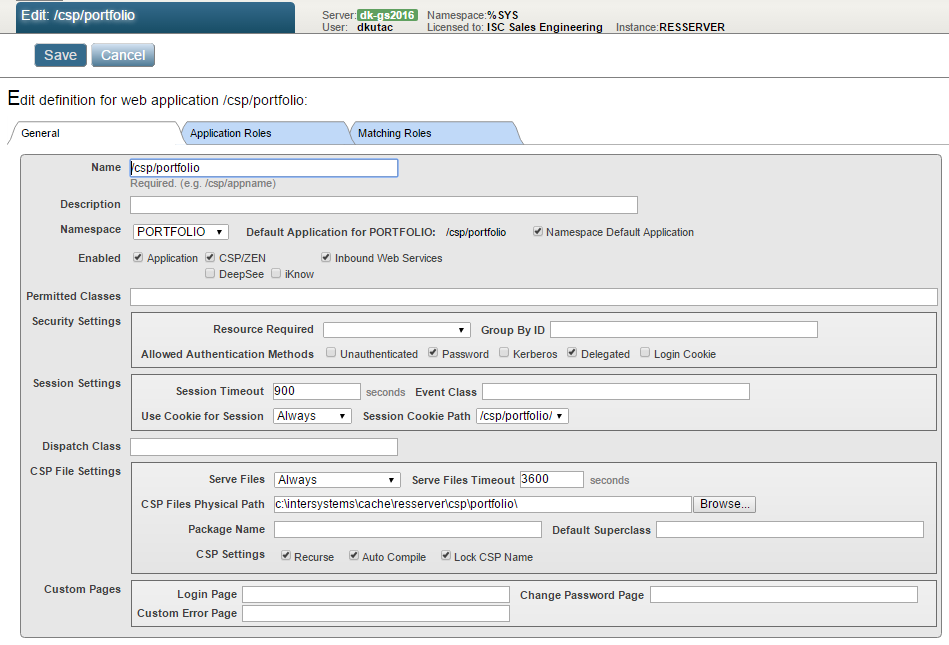
If you were really paranoid, you could set Permitted classes as we did in first variant. Or, again, use REST API. But all this is way beyond the scope of our topic.
Next time, we are going to explain individual classes, introduced by the InterSystems IRIS OAUTH framework. We will describe their APIs, and when / where to call them.
[1] Whenever we mention OAUTH we mean OAuth 2.0 as specified in RFC 6749 - https://tools.ietf.org/html/rfc6749. We use shortcut OAUTH just for simplicity.
[2] OpenID Connect is maintained by OpenID Foundation – http://openid.net/connect
Comments
Very interesting article series. I've just started to look into the OAuth 2.0 options supported by Caché. We are considering it as a method to secure an Angular (2+) application for communition with a Caché REST backend. Do you know if anyone else testing/using a similar approach?
I noticed that there are a few missing images in the AUTHSERVER section. Would it be possible for you to add these to the article again?
Lasse, can you be more specific please? I'll be happy to add more information, but I need to know what are you missing.
Thank you!
Hi Daniel
I was referring to images in the AUTHSERVER section that should show a sample configuration for the authentication server. The following images fail to load for me: 4_4.png, 5_3.png, 6_2.png, 7_0.png.
Fixed
Oh, now I see. I'm using Microsoft Edge as default browser and it displays them OK. Chrome is the troublemaker.
I'll see what can I do to fix it.
Fixed, can you check?
All images are displaying correctly for me now (in Chrome as you correctly guessed). Thanks!
Hello Daniel, I'm trying to figure how to make a REST resource available through JWT access token.
I noticed that you used:
set accessToken=##class(%SYS.OAuth2.AccessToken).GetAccessTokenFromRequest(.sc)
For your resource oauth2test.demoResource, but it doesn't seem like this method validates the access token itself.
As it only checks for http header validity.
Does this means I'm obligated to call the introspection method or should I simply use:
##class(%SYS.OAuth2.Validation).ValidateJWT(..#OAUTH2APPNAME,accessToken,"scope1 scope2",,.jsonObject,.securityParameters,.sc)
Any help regarding this doubt is appreciated.
Hi Daniel,
I am trying to implement OAuth auth server, a client and a resource REST service. I am using password grant type. I want to set up delegated authentication for the OAuth client. I have been able to get most of the setup working and am having trouble with the last part. As per instructions, I am using %session.Login in my oauth client, but when I try to go to the resource url, the session is changing and so I cannot access the resource page.
I have tried setting groupid for the client and resource web applications, used CSPSHARE and CSPCHD. Wondering if the trouble might be that the client application is unauthenticated, but resource application is delegated auth.
Is there any way to use delegated auth for password grant type. Any help you can provide is greatly appreciated.
Thank you!
Just wanted to post an update on this. I was able to resolve this issue. After a call to GetIntrospection, we need to check for the value of jsonObject.active. If the token is invalid, GetIntrospection might return ok status, but active will be false in jsonObject.
Thank you
Hello Padma,
sorry for delay in answering, I'm on vacation with limited access to computer. Glad you have resolved the issue!
I was wondering what exactly are you trying to achieve, as grant type is determining messages flow between client and OAuth2 server. The way you authenticate yourself against Cache CSP (client) application is not related to the grant type at all. You can set your client CSP/ZEN app to use any Cache authentication. In one of project, where a Cache is issuing a HTTP request to a OAuth2 protected resource I'm using this code for password type grant:
… main code
    try {
        set pResponse=##class(User.Response).%New()
        set tHttpRequest=##class(%Net.HttpRequest).%New()
        $$$THROWONERROR(tSC,..GetAccessToken())
        $$$THROWONERROR(tSC,##class(%SYS.OAuth2.AccessToken).AddAccessToken(tHttpRequest,,tSSLConfig,..#oAUTH2aPPnAME,"NOTCSP"))   // hardcoded sessionid to NOTCSP

        set tHttpRequest.Server=<server>
        set tHttpRequest.SSLCheckServerIdentity=0

        set tURL=<whatever URL points to the resource>
        $$$THROWONERROR(tSC,tHttpRequest.Get(tURL))
        #dim tHttpResponse as %Net.HttpResponse = tHttpRequest.HttpResponse

        $$$THROWONERROR(tSC,pResponse.Content.CopyFrom(tHttpResponse.Data))
      } catch (e) {
       Set tSC=e.AsStatus()
   }
and GetAccessToken method
Method GetAccessToken() As %Status
{
    #dim tSC as %Status = $$$OK
    try {
        //obtain Oauth2 token
        set tScope="user/*"
        set tApplication=..#oAUTH2aPPnAME
        set tSessionId="NOTCSP"
        set tUsername=<username>
        set tPassword=<password>

        #dim tError as %OAuth2.Error


        // verify we have already access token
        if '##class(%SYS.OAuth2.AccessToken).IsAuthorized(tApplication,tSessionId,tScope,.tAccessToken,.tIdToken,.tResponseProperties,.tError) {
            // we shall check whether we have access privileges, not done here
            //eventuallyt call ##class(%SYS.OAuth2.Validation).ValidateJWT()

            // retrieve token from auth server and store to internal peristent store
            $$$THROWONERROR(tSC,##class(%SYS.OAuth2.Authorization).GetAccessTokenPassword(tApplication,tUsername,tPassword,tScope,.tResponseProperties,.tError))
            // load token to memory
            set tIsAuthorized=##class(%SYS.OAuth2.AccessToken).IsAuthorized(tApplication,tSessionId,tScope,.tAccessToken,.tIdToken,.tResponseProperties,.tError)
        }
        if $isobject(tError) throw
     } catch (e) {
        throw e
    }
    Quit tSC
}Hi Daniel, thanks for this article. I am wondering what's the well-known address, I've tried in different ways but no success. e.g from authorization server URI: https://localhost:<PORT>/<PREFIX>/oauth2/.well-known/openid-configurati…
Can you please help me to find out the right well known URL?