検索

Article
· Feb 14 2m read

New Live URL Link Replacement Tokens within CCR Text Fields: meet <smp>, <smpPrefix> and <homepage>!

CCR users can now take advantage of an enhanced syntax for substituting pre-defined tokens with live URL links within phase-related text fields. In addition to the existing <env> token which automatically updates to reflect the Environment of the relevant CCR Record, CCR now introduces three new keywords: <smp> , <smpPrefix> , and <homepage>.

The new <smp> token automatically replaces itself with the URL of the Management Portal's homepage for the System associated with the CCR Record in the Environment that most recently received changes to the Record. For example, if a CCR Record is under a BASE-TEST-LIVE System and currently in the LIVE Environment, using <smp> within the 'Testing Plan' text field and clicking on the generated link will direct the user to the LIVE Environment's Management Portal, since that is where the Record currently resides.

<smpPrefix>, meanwhile, manifests as the most basic prefix included in every URL for the System's Management Portal. This makes it easy to dynamically link to any specific Management Portal page in the correct environment - you just need to append the correct suffix! For example, to access the SQL tab of the System Explorer you would write <smpPrefix>exp/%25CSP.UI.Portal.SQL.Home.zen.

Finally, the new <homepage> token behaves like the previous two tokens, but it links to the homepage of the CCR Record’s System in the relevant Environment instead of the Management Portal.

See these changes in action in a short demo below!


2 Comments
Discussion (2)2
Log in or sign up to continue
Article
· Feb 14 5m read

HTTP e HTTPS com API REST

HTTP e HTTPS com API REST


Olá,

O protocolo HTTP permite a obtenção de recursos, como documentos HTML. É a base de qualquer troca de dados na Web e um protocolo cliente-servidor, o que significa que as requisições são iniciadas pelo destinatário, geralmente um navegador da Web.

As API REST se beneficiam deste protocolo para trocar mensagens entre cliente e servidor. Isso torna as APIs REST rápidas, leves e flexíveis. As API REST utilizam os verbos HTTP GET, POST, PUT, DELETE e outros para indicar as ações que desejam realizar.

Quando realizamos uma chamada a uma API RESt na verdade o que ocorre é uma chamada HTTP. A API recebe esta chamada e de acordo com o verbo e o caminho solicitados a API executa a ação desejada. No caso da implementação em Iris podemos ver isso claramente na área de definição da URLMap:

XData UrlMap
{
<Routes>
        <Route Url="/cliente" Method="POST" Call="Incluir"  Cors="true"/>
        <Route Url="/cliente/:chave" Method="PUT" Call="Alterar"  Cors="true"/>
        <Route Url="/cliente/:chave" Method="DELETE" Call="Deletar"  Cors="true"/>
        <Route Url="/cliente/:chave" Method="GET" Call="Pesquisar"  Cors="true"/>
        <Route Url="/cliente" Method="GET" Call="Listar"  Cors="true"/>
    </Routes>
}

Veja que temos o caminho (Url) e o verbo (Method) definido para cada chamada (Call). Assim o código que atende a API sabe o que deve realizar.

Quando utilizamos o HTTP temos que ter em mente que os dados que estamos trafegando estão abertos, ou seja, não estão protegidos por nenhum tipo de criptografia ou segurança. Qualquer um que tenha condição de capturar o pacote de dados trafegado poderá ver o que está sendo transferido entre o cliente e o servidor.

Vamos, por exemplo, ver a chamada a uma API REST que utiliza a Basic Authentication. Para isso vamos usar o Postman como cliente, acessando uma API REST no Iris e vamos usar o TCPTrace para fazer o forward dos dados e visualizar o que trafegou.

Primeiro vamos publicar nossa API. Vamos utilizar a mesma API do artigo https://community.intersystems.com/post/using-rest-api-flask-and-iam-intersystems-iris-part-1-rest-api

Basta então seguir as orientações e utilizar o código que o artigo disponibiliza para termos nossa API publicada.

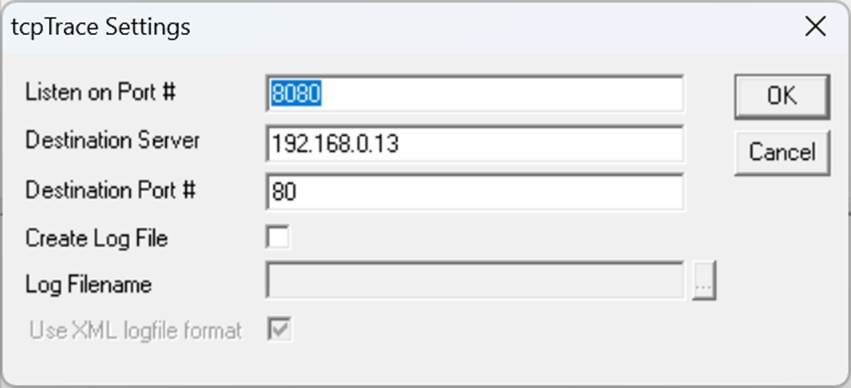
Agora vamos ativar o TCPTrace. Ele pode ser obtido facilmente na web. Voc~e também pode utilizar qualquer outro software que faça o forward de pacotes TCP/IP:


Configure o TCPTrace para escutar na porta 8080 e desviar para o servidor que atenderá a requisição na porta 80, que é a porta padrão do protocolo HTTP:


Abrindo o Postman vamos consumir nossa API, só que vamos mudar a nossa chamada. Não vamos chamar o servidor de destino, e sim o local onde o TCPTrace está escutando as chamadas:

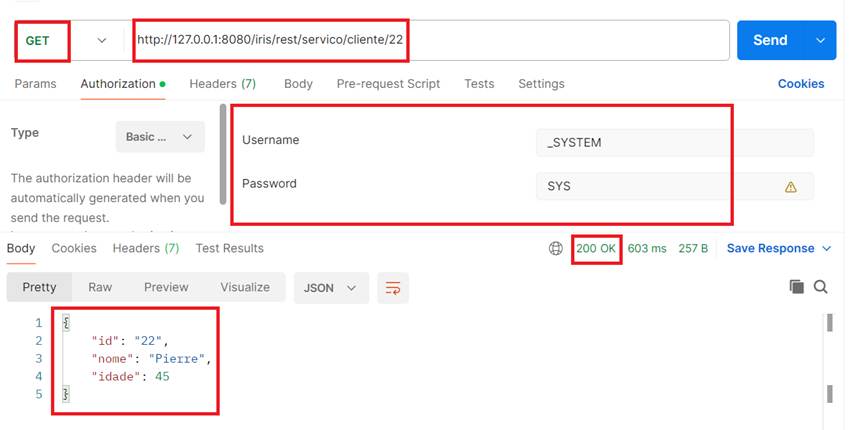
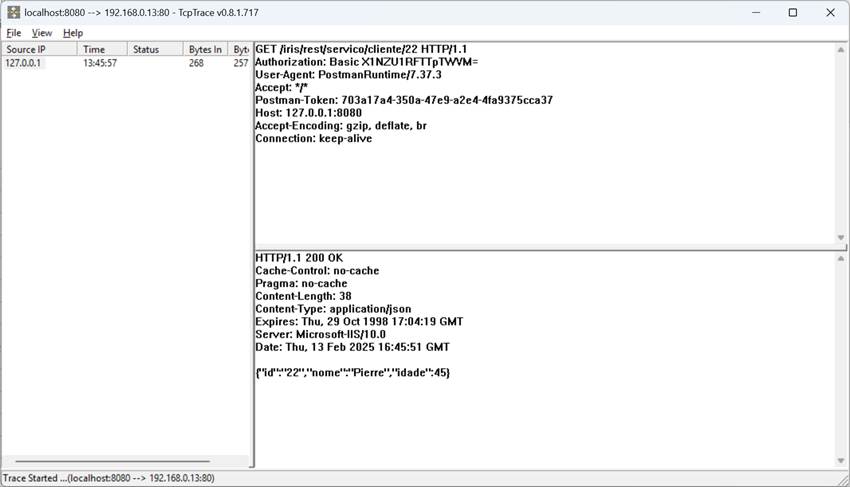
Veja que realizamos um GET e recebemos um STATUS code 200 (sucesso). Usamos autenticação para acessar nossa API e recebemos o pacote de informação como resposta.

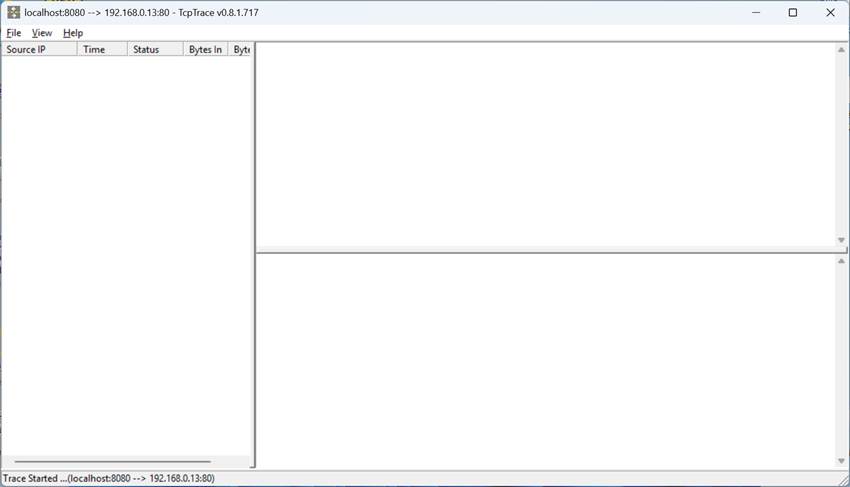
Agora vamos ver o TCPTrace:

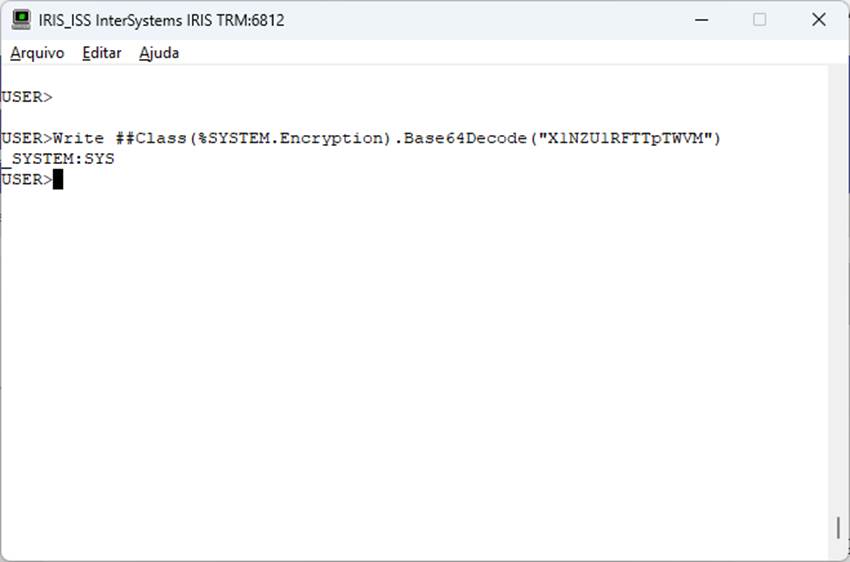
Veja que tudo que trafegou está visível. As credenciais de autenticação estão no header Authorization como uma string Base64:


Tudo que trafegou está acessível e visível para quem coletou os dados. Isso pode se tornar potencialmente perigoso quando transferimos dados sensíveis. Mas como podemos resolver o caso? Podemos ativar o HTTPS no nosso web server, o que coloca uma camada de criptografia na nossa comunicação.

A ativação do HTTPS exige a instalação de um certificado SSL no web server. Existem entidades autenticadoras que emitem certificados que são válidos e reconhecidos na web, ou podemos utilizar os chamados certificados auto-assinados. Os certificados auto-assinados não são reconhecidos automaticamente, e nem sempre é uma solução de segurança recomendada, então sempre verifique qual tipo de certificado voc~e deve utilizar.

No nosso caso vamos utilizar um certificado auto-assinado pois ele atende a nossa demanda de segurança, ou seja, criptografar o nosso tráfego.

A instalação do certificado e ativação do HTTP depende do seu web server. Procure a documentação apropriada e veja como criar e instalar o certificado e ativar o HTTPS.

Para este artigo estamos utilizando o IIS que tem disponível uma opção de criação de certificado auto-assinado.

Uma vez ativo o HTTPS vamos testar nosso servidor web. Ele atende as requisições HTTPS na porta padrão 443, ou informando o protocolo “https” na chamada da URL.

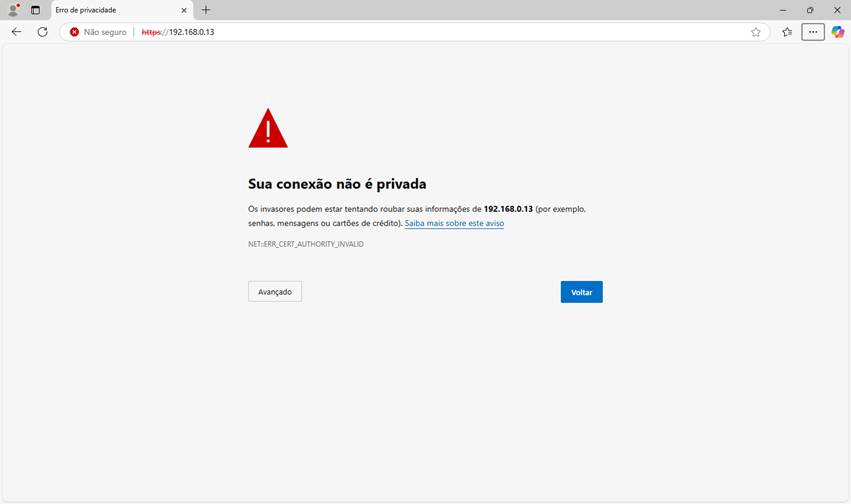
Vamos fazer um teste. Abra seu navegador e acesse o web server com o https:

Veja que o navegador informou que sua conexão não é privada. Isso acontece por conta do certificado auto-assinada que não é reconhecido automaticamente, Clique em Avançado:

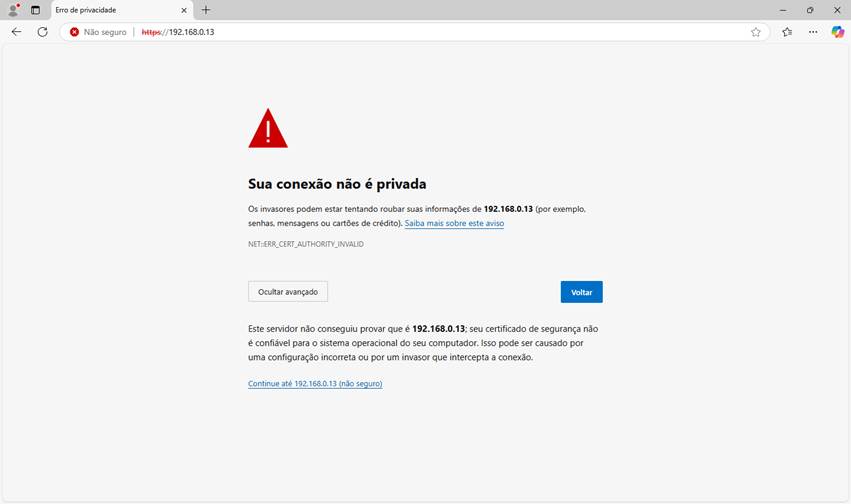
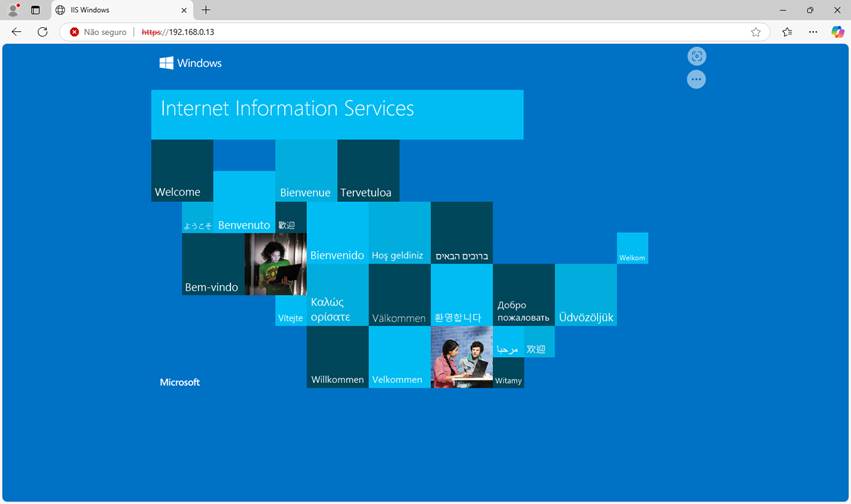
Agora o navegador completou as informações informando que o certificado não é confiável. Isso acontece pois ele não tem como confirmar se esse certificado é de quem diz ser por ser auto-assinado. Clique em Continue e veja a página que foi chamada:

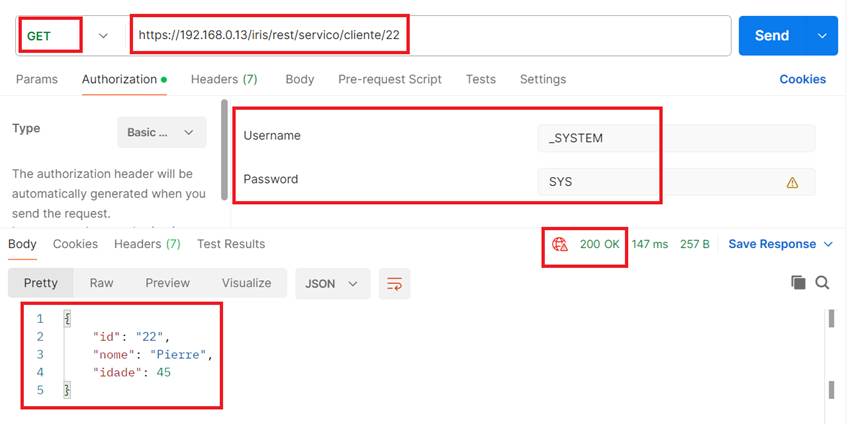
Até aqui tudo bem. Já temos nosso servidor web respondendo requisições HTTPS. Agora vamos voltar no Postman e vamos realizar uma chamada para a nossa API utilizando o HTTPS. Para isso vamos mudar a chamada no Postman para utilizar o https ao invés do http. Neste mmento vamos direto no servidor, e não no TCPTrace. Lembre de colocar o endereço do seu servidor Web então:


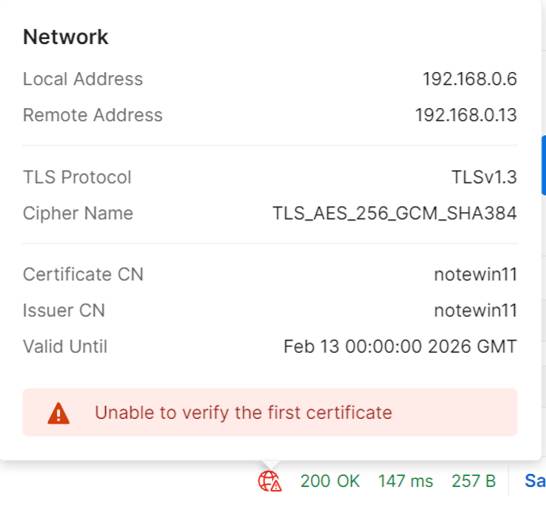
Veja que recebemos a mesma resposta que a dada pelo HTTP, só que temos um ícone de informação ao lado do HTTP Status. Clique no ícone e você verá um balão de informações. Ele nos informa a situação do certificado e alguns dados de segurança.


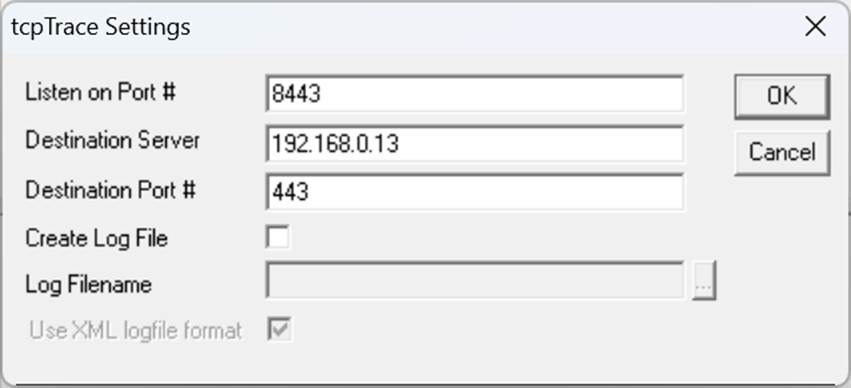
Agora vamos mudar a nossa chamada para trafegar pelo TCPTrace. Vamos ativar e configurar nosso aplicativo:

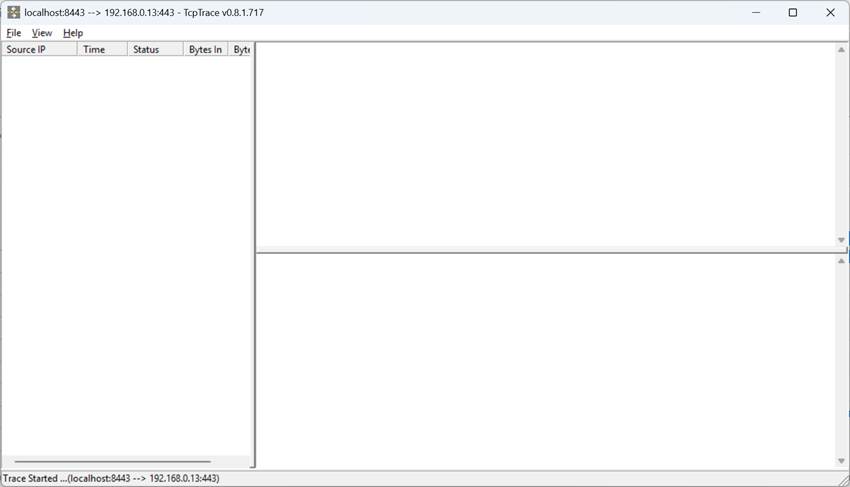
Na sequencia clique em OK e o TCPTrace começará a escutar as requisições:

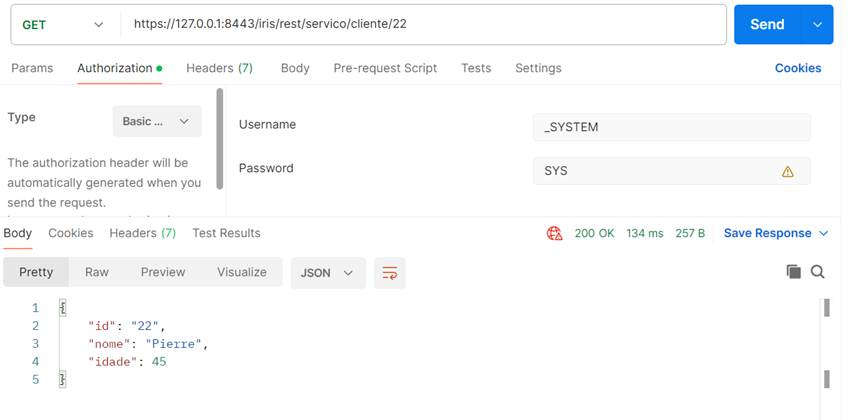
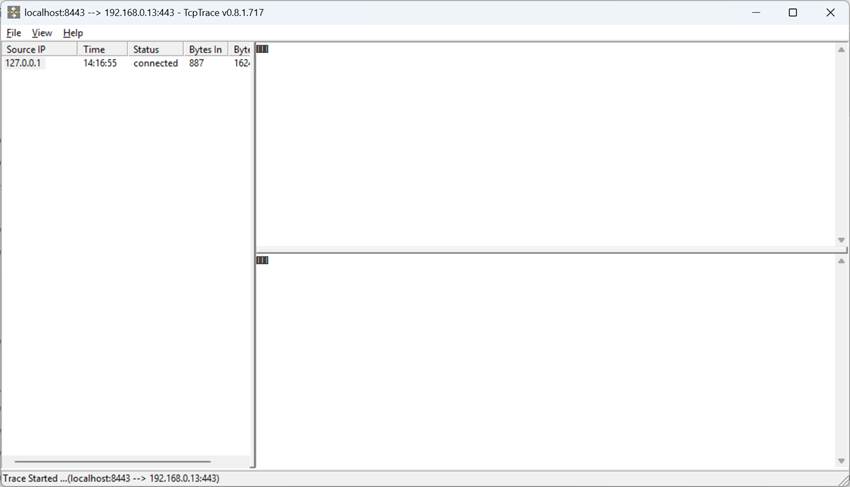
Volte ao Postman e mude a chamada informando que você agora quer acessar o endereço do TCPTrace na porta 8443 (aquela configurada para escutar as requisições). Clique em Enviar e veja a requisição respondendo:


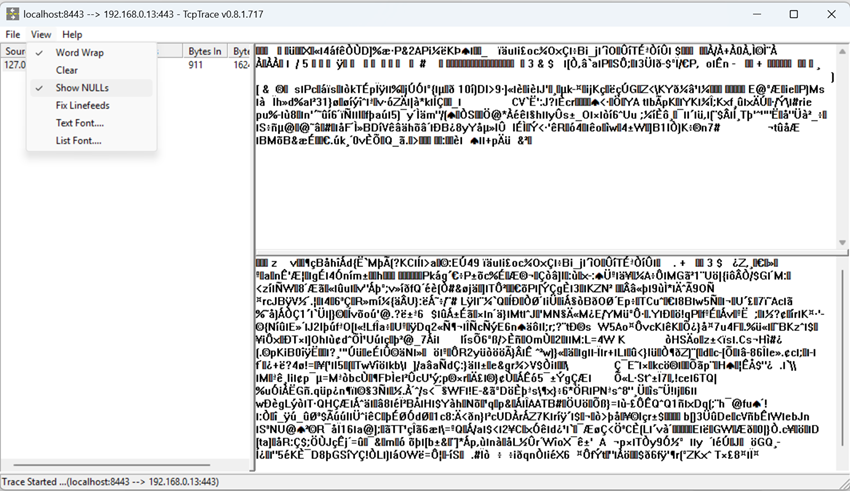
Note que nada mudou em relação a última chamada. Mas agora ela correu pelo TCPTrace. Vamos ver o que foi logado no aplicativo?


Não conseguimos visualizar nenhuma informação pois os dados trafegados então criptografados. No meu de opções do TCPTrace clique em View e a seguir em Show NULLS e veja o que o TCPTrace realmente coletou:


Assim, sem qualquer mudança na nossa API REST, incluímos uma camada de criptografia no tráfego ao utilizar o HTTPS, aumentando o segurança da informação na nossa comunicação.

Até a próxima!

Discussion (0)1
Log in or sign up to continue
Article
· Feb 14 5m read

HTTP and HTTPS with REST API

HTTP and HTTPS with REST API

Hello

The HTTP protocol allows you to obtain resources, such as HTML documents. It is the basis of any data exchange on the Web and a client-server protocol, meaning that requests are initiated by the recipient, usually a Web browser.

REST APIs take advantage of this protocol to exchange messages between client and server. This makes REST APIs fast, lightweight, and flexible. REST APIs use the HTTP verbs GET, POST, PUT, DELETE, and others to indicate the actions they want to perform.

When we make a call to a RESt API, what actually happens is an HTTP call. The API receives this call and according to the requested verb and path, the API performs the desired action. In the case of the Iris implementation we can see this clearly in the URLMap definition area:

XData UrlMap
{
<Routes>
        <Route Url="/cliente" Method="POST" Call="Incluir"  Cors="true"/>
        <Route Url="/cliente/:chave" Method="PUT" Call="Alterar"  Cors="true"/>
        <Route Url="/cliente/:chave" Method="DELETE" Call="Deletar"  Cors="true"/>
        <Route Url="/cliente/:chave" Method="GET" Call="Pesquisar"  Cors="true"/>
        <Route Url="/cliente" Method="GET" Call="Listar"  Cors="true"/>
    </Routes>
}

Notice that we have the path (Url) and the verb (Method) defined for each call (Call). Thus, the code that meets the API knows what it should do.

When we use HTTP, we have to keep in mind that the data we are traveling with is open, that is, it is not protected by any type of encryption or security. Anyone who is able to capture the data packet being trafficked will be able to see what is being transferred between the client and the server.

Let's, for example, look at the call to a REST API that uses Basic Authentication. For this we will use Postman as a client, accessing a REST API in Iris and we will use TCPTrace to forward the data and visualize what has trafficked.

First let's publish our API. Let's use the same API as in article https://community.intersystems.com/post/using-rest-api-flask-and-iam-intersystems-iris-part-1-rest-api

Just follow the guidelines and use the code that the article provides to have our API published.

Now let's turn on TCPTrace. It can be obtained easily on the web. You can also use any other software that forwards TCP/IP packets:


Configure TCPTrace to listen on port 8080 and divert to the server that will service the request on port 80, which is the default port of the HTTP protocol:


Opening Postman we will consume our API, but we will change our call address. We are not going to call the destination server, but the server where TCPTrace is listening for the calls:

See that we performed a GET and received a STATUS code 200 (success). We use authentication to access our API and receive the packet as a response.

Now let's see TCPTrace:

We can check everything that has traveled is visible. The authentication credentials are in the Authorization header  as a Base64 string:


Everything that has trafficked is accessible and visible to those who collected the data. This can become potentially dangerous when we transfer sensitive data. But how can we solve the case? We can enable HTTPS on our web server, which puts a layer of encryption on our communication.

Enabling HTTPS requires the installation of an SSL certificate on the web server. There are authenticating entities that issue certificates that are valid and recognized on the web, or we can use the so-called self-signed certificates. Self-signed certificates are not automatically recognized, and it is not always a recommended security solution, so always check which type of certificate you should use. In our article we will use a self-signed certificate.

Certificate installation and HTTP activation depends on your web server. Browse the appropriate documentation and see how to create and install the certificate and enable HTTPS.

For this article we are using IIS which has available an option to create a self-signed certificate.

Once HTTPS is active, let's test our web server. It serves HTTPS requests on standard port 443, or by entering the "https" protocol in the URL call.

Let's do a test. Open your browser and access the web server with https:

Notice that the browser has informed you that your connection is not private. This happens because of the self-signed certificate that is not automatically recognized, Click Advanced:

Now the browser has completed the information by stating that the certificate is not trusted. This happens because he has no way to confirm if this certificate belongs to who he says he is because he is self-signed. Click Continue and see the page that was called:

So far so good. We already have our web server responding to HTTPS requests. Now let's go back to Postman and make a call to our API using HTTPS. For this we will change the call in Postman to use https instead of http. In this moment we go straight to the server, and not to TCPTrace. Remember to enter the address of your web server then:


Notice that we receive the same response as the one given by HTTP, only we have an information icon next to the HTTP Status. Click on the icon and you will see an information bubble. It informs us of the status of the certificate and some security data.


Now let's route our call to traffic through TCPTrace. Let's activate and configure our app:

Note we are now using the HTTPS port 443 to the Destination. Click OK and TCPTrace will start listening for the requests:

Go back to Postman and change the call by saying that you now want to access the TCPTrace address on port 8443 (the one configured to listen for requests). Click Send and see the request responding:


Note that nothing has changed from the last call. But now it ran for TCPTrace. Let's see what was logged into the application?


We were unable to view any information because the data trafficked was then encrypted. In my TCPTrace options click on View and then on Show NULLS and see what TCPTrace actually collected:


Thus, without any change in our REST API, we have included an encryption layer in the traffic when using HTTPS, increasing the security of information in our communication.

See you next time!

Discussion (0)1
Log in or sign up to continue
Question
· Feb 14

Disable Shared Memory in JDBC Driver URL

Hey guys! I'm working on a Java application that connects to Iris via JDBC. I need to disable SharedMemory via connection URL. I would like to know how I can check if the parameter was turned on or off within Iris when connecting to Java. Thanks for your help!

5 Comments
Discussion (5)2
Log in or sign up to continue
Question
· Feb 14

Error message “Invalid CSRF token”

Hello, community!

I am working on implementing OAuth 2.0 authentication in InterSystems IRIS and need to correctly define a CSRF token that will be validated by OAuth.Response. However, I am having trouble finding a clear method to configure the CSRF token correctly.

So far, I have tried:

  • Setting the CSRF token in the request header.
  • Inserting the CSRF token via InsertCookie.

Despite these attempts, I haven’t been successful. On the OAuth.Response page, the CSRF token is empty, and I get the error message “Invalid CSRF token” because the csrfToken is empty.

If csrfToken '= state { $$$ThrowStatus($$$ERROR($$$OAuth2ResponseError, "Invalid CSRF token")) }

Has anyone faced a similar issue or could suggest the best approach to configure the CSRF token for validation by OAuth.Response?

Any guidance or insights would be greatly appreciated!

Thank you in advance for your help!

1 Comment
Discussion (1)2
Log in or sign up to continue