Find

Question
· Oct 12, 2020

MESH integration to send Documents to GP's.

Hi,

I've successfully installed and configured the custom MESH API supplied by intersystems. I'm able to send HTML rendered documents directly to GP's using Kettering.xml. 

Ideally, I'd like to be able to send PDF/RTF files rather than HTML. Is this possible and if so can I still use Kettering xml? I know FHIR is the preferred method of transmission but i've tried sending a test FHIR message through MESH to EMIS but it's not displaying so I'm not sure if EMIS is able to display FHIR formatted messages. 

Thanks.

Anthony Breen

21 Comments
Discussion (21)0
Log in or sign up to continue
Question
· Oct 7, 2020

System for Cross-Domain Identity Management (SCIM)

Our organization is going to implement an Identity provisioning service using SCIM standard (1.1), I am just wondering if Intersystems System IRIS for health has SCIM adapter or any class that already built for SCIM standard...

Thanks,

Hoi

1 Comment
Discussion (1)0
Log in or sign up to continue
Article
· Oct 5, 2020 9m read

Caché .Net BindingアプリケーションをIRISの.Net Native APIを利用して書き換える方法(その3)

ここで紹介するサンプルは、以下のGitHubから入手可能です。


IRIS .Netサンプル


jpegファイルを読んで、IRISデータベースに格納するサンプル


上記GitHub上のinsertbinary\insertbinary\binread.csというファイル名です。

処理内容は、ファイルシステム上のjpeg形式のファイルを読み込んで、BLOB形式でIRISデータベースに格納します。

Caché ではADO.NET Managed Providerを使用して実装していましたが、それをIRISのInterSystems Managed Provider for .NETを使用して書き換えました。
(名前が変わっていますが、ADO.NETに関しては、機能はほとんど同じです)

従って、厳密に言うと.Net Native APIを使用していませんが、コネクションオブジェクトの使用方法は共通なので、この部分は、Native APIを使用していると言うこともできます。

Caché での実装は、以下の通りです。


// binread.cs
using System;
using System.IO;

CacheCommand            spCache;
CacheConnection        cnCache;
CacheDataAdapter        daCache;
CacheTransaction        txCache=null;
DataSet                dsCache;
DataTable            dtCache;
DataRow                drCache;

class BinaryRead {
  static void Main(string[] args) {
    //存在するファイルを指定する
    FileStream fs = new FileStream(
      @"c:\temp\picture\xxx.jpeg", FileMode.Open, FileAccess.Read)
    int fileSize = (int)fs.Length; // ファイルのサイズ
    byte[] buf = new byte[fileSize]; // データ格納用配列
    int readSize; // Readメソッドで読み込んだバイト数
    int remain = fileSize; // 読み込むべき残りのバイト数
    int bufPos = 0; // データ格納用配列内の追加位置
    readSize = fs.Read(buf, 0, fs.Length)
    string cacheConnectString = "Server = localhost;Port=1972;Namespace=User;Password=SYS;User ID = _SYSTEM;";

    cnCache = new CacheConnection(cacheConnectString);
    cnCache.Open();
    spCache = new CacheCommand("Insert into MyApp.Person2(Name, Picture) Values(?, ?)", cnCache, txCache);
    CacheParameter    pName    = new CacheParameter();
    pName.ParameterName        = "Name";
    pName.CacheDbType        = CacheDbType.NVarChar;
    pName.Direction            = ParameterDirection.Input;
    pName.Value                = "Hoge Hoge;
    CacheParameter    pPicture = new CacheParameter();
    pDOB.ParameterName        = "Picture";
    pName.CacheDbType        = CacheDbType.LONGVARBINARY;
    pDOB.Direction        = ParameterDirection.Input;
    pDOB.Value                = buf;
    spCache.ExecuteNonQuery();
    fs.Dispose();
    cnCache.close();
  }
}


IRISで書き換えたソースは以下の通りです。


// binread.cs
using System;
using System.IO;
using System.Data;
using InterSystems.Data.IRISClient;
using InterSystems.Data.IRISClient.ADO;

namespace binaryfileread {
    class binaryfileread 
    {
    [STAThread]
    static void Main(string[] args) {
        IRISCommand spIRIS;
        IRISConnection cnIRIS;
        IRISTransaction txIRIS = null;

        //存在するファイルを指定する
        FileStream fs = new FileStream(
        @"c:\temp\test.jpeg", FileMode.Open, FileAccess.Read);
        int fileSize = (int)fs.Length; // ファイルのサイズ
        byte[] buf = new byte[fileSize]; // データ格納用配列
        long readSize; // Readメソッドで読み込んだバイト数
        int remain = fileSize; // 読み込むべき残りのバイト数
        readSize = fs.Read(buf, 0, (int)fs.Length);
        string IRISConnectString = "Server = localhost;Port=1972;Namespace=User;Password=SYS;User ID = _SYSTEM;";

        cnIRIS = new IRISConnection(IRISConnectString);
        cnIRIS.Open();
        spIRIS = new IRISCommand("Insert into MyApp.Person2(Name, Picture) Values(?, ?)", cnIRIS, txIRIS); 

        IRISParameter pName = new IRISParameter();
        pName.ParameterName = "Name";
        pName.IRISDbType = IRISDbType.NVarChar;
        pName.Direction = ParameterDirection.Input;
        pName.Value = "Hoge Hoge";
        spIRIS.Parameters.Add(pName);

        IRISParameter pPicture = new IRISParameter();
        pPicture.ParameterName = "Picture";
        pPicture.IRISDbType = IRISDbType.LongVarBinary;
        pPicture.Direction = ParameterDirection.Input;
        pPicture.Value = buf;
        spIRIS.Parameters.Add(pPicture);

        spIRIS.ExecuteNonQuery();
        fs.Dispose();
        cnIRIS.Close();
    }
   }
}


CachéとIRISでは、ADO.NETに関しては、関数等の名前がCacheからIRISに変更になっているという違いがあります。


参照の変更


まず以前の参照を削除します。

Visual Studioのソリューションエクスプローラーの所で参照をクリックします。

表示されるInterSystems.Data.CacheClientを削除します。
(右クリックして削除を選ぶ)


次にプロジェクトメニューから参照の追加をクリックして、以下の2つのファイルを選択します。
(プロジェクトの.Net Frameworkバージョンに合わせて、それに対応するファイルを選択する
以下の例は、v4.5を選択)


c:\InterSystems\IRIS\dev\dotnet\bin\v4.5 
InterSystems.Data.IRISClient.dll


jpegファイルを読んで、フォーム上にそのjpegファイルの内容を表示するサンプル


上記GitHub上の\VBImage\VBImage\Forms1.vbというファイル名です。


処理内容は、ファイルシステム上のjpeg形式のファイルを読み込んで、VB.NETのフォーム上のPictureオブジェクトとして表示します。

Caché では.NET Managed Providerの.Net Bindingを使用して実装していましたが、それをIRISの.Net Native APIを使用して書き換えました。

Caché での実装は以下の通りです。


Imports InterSystems.Data.CacheClient
Imports InterSystems.Data.CacheTypes
Imports System.Drawing
Public Class Form1
    Private Sub Button1_Click(ByVal sender As System.Object, ByVal e As System.EventArgs) Handles Button1.Click
        Dim cn As CacheConnection
        cn = New CacheConnection("Server=127.0.0.1;Port=1972;Namespace=User;Username=_system;Password=SYS")
        cn.Open()
        Dim img As System.IO.FileStream
        img = New System.IO.FileStream("C:\temp\test.jpg", System.IO.FileMode.Open, IO.FileAccess.Read)
        Dim f As User.Fax
        ' NEW -----------
        f = New User.Fax(cn)
        img.CopyTo(f.pic)
        f.memo = "abcde"
        f.Save()
        f.Dispose()
        MsgBox("Done!")
        cn.Close()
    End Sub
 
 Private Sub Button2_Click(sender As System.Object, e As System.EventArgs) Handles Button2.Click
        Dim cn As CacheConnection
        cn = New CacheConnection("Server=127.0.0.1;Port=1972;Namespace=User;Username=_system;Password=SYS")
        cn.Open()
       Dim f As User.Fax
        f = User.Fax.OpenId(cn, 1)
        PictureBox1.Image = Image.FromStream(f.pic)
        cn.Close()
    End Sub
End Class


IRISで書き換えたソースです。


Imports InterSystems.Data.IRISClient
Imports InterSystems.Data.IRISClient.ADO
Imports System.Drawing
Imports System.IO
Public Class Form1
    Private Sub Button1_Click(ByVal sender As System.Object, ByVal e As System.EventArgs) Handles Button1.Click
        Dim cn As IRISConnection
        cn = New IRISConnection("Server=127.0.0.1;Port=1972;Namespace=User;Username=_system;Password=SYS")
        cn.Open()
        Dim iris As IRIS
        Dim irisobject As IRISObject
        Dim memstream As New MemoryStream
        Dim str As String
        Dim buf As Byte()
        Dim pic As IRISObject
        iris = IRIS.CreateIRIS(cn)
        irisobject = iris.ClassMethodObject("User.Fax", "%New")
        Dim img As System.IO.FileStream
        img = New System.IO.FileStream("C:\temp\test.jpg", System.IO.FileMode.Open, IO.FileAccess.Read)
        buf = New Byte(img.Length) {}
        img.Read(buf, 0, img.Length)
        str = System.Text.Encoding.GetEncoding("ISO-8859-1").GetString(buf)
        pic = irisobject.GetObject("pic")
        pic.InvokeVoid("Write", str)
        irisobject.InvokeIRISStatusCode("%Save")
        'Dim f As User.Fax
        ' NEW -----------
        'f = New User.Fax(cn)
        'img.CopyTo(f.pic)
        'f.memo = "abcde"
        'f.Save()
        'f.Dispose()
        MsgBox("Done!")
        cn.Close()
    End Sub

    Private Sub Button2_Click(sender As System.Object, e As System.EventArgs) Handles Button2.Click
        Dim cn As IRISConnection
        Dim iris As IRIS
        Dim irisobject As IRISObject
        Dim pic As IRISObject
        Dim memorystream As New MemoryStream
        Dim buf As Byte()
        Dim str As String
        Dim len As Long
        cn = New IRISConnection("Server=127.0.0.1;Port=1972;Namespace=User;Username=_system;Password=SYS")
        cn.Open()
        iris = IRIS.CreateIRIS(cn)
        irisobject = iris.ClassMethodObject("User.Fax", "%OpenId", 1)
        pic = irisobject.GetObject("pic")
        len = pic.InvokeLong("SizeGet")
        str = pic.InvokeString("Read", len)
        buf = System.Text.Encoding.GetEncoding("ISO-8859-1").GetBytes(str)
        memorystream.Write(buf, 0, len)
        PictureBox1.Image = Image.FromStream(MemoryStream)
        cn.Close()
    End Sub
End Class


良くコードを見るとわかりますが、IRIS版のほうが処理がかなり長くなっています。


結論を言うとこのケースはIRIS .Net Native APIを使用して書き換えるのは得策ではありません。
ADO.NETを使用したほうが簡単に処理できます。


上記GitHub上の\VBImageADO配下にADO.NETで書き換えたサンプルも用意しましたので、ご参考下さい。

Discussion (0)1
Log in or sign up to continue
Article
· Sep 29, 2020 4m read

Debugging “Server Availability Error” message when loading Web Application

In the WRC, we frequently see customers contact us because their Web Gateway is unable to serve web pages. This article will explain a frequent reason why these errors can occur, and explain some tools which can be used to debug the problem. This explanation is focused on the Web Gateway serving InterSystems IRIS instances, but the same explanation should apply to the CSP Gateway serving Caché instances as well.

The Problem:

Attempting to load a Web Application (either a custom application or the System Management Portal) results in one of the following errors (depending on your browser):

In addition, the CSP.log file shows:

Why this happens:

To understand why this happens, we need to take a look at the architecture which the Web Gateway functions in:

When you try to load your application in a browser, the browser sends a request to your Web Server. The Web Server passes this request off to the Web Gateway. The Web Gateway then has to reach out to InterSystems IRIS to understand what to do with the request. But given that the Web Gateway lives outside of InterSystems IRIS (and might be on another machine entirely), we require that the Web Gateway process authenticate to IRIS. This is the same as we would require for any other new processes connecting to IRIS, such as remote ODBC connections or a simple local IRIS Terminal Sessions.

The reason we are seeing the above errors when loading the application are because this authentication from the Web Gateway to IRIS is failing. The Web Gateway configuration stores within its CSP.ini file a set of credentials for each InterSystems IRIS server it connects to. Normally, these credentials are for the “CSPSystem” user, which is an account created by default when IRIS is installed. These credentials are then used to try and authenticate using the settings configured for the %Service_WebGateway Service in IRIS.

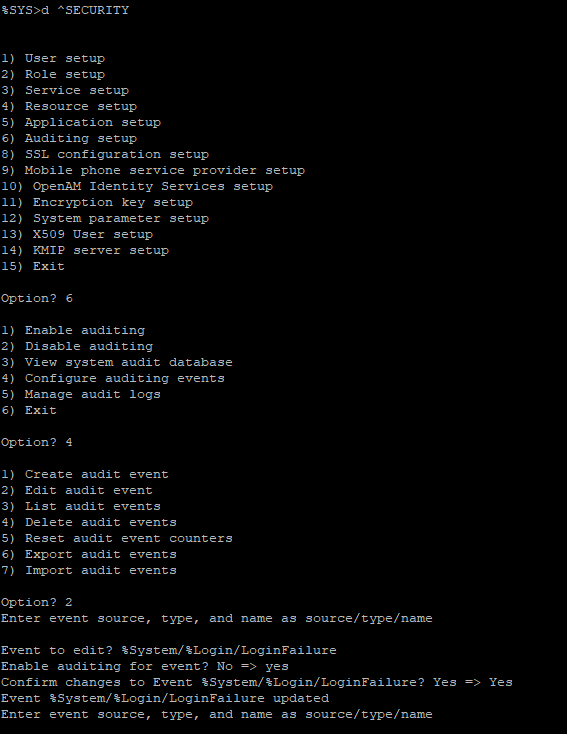
 To understand more information about why this authentication is failing, you can use the Audit capabilities offered by InterSystems IRIS. Given that you likely cannot use the Management Portal at this time, you can use the ^SECURITY routine in an IRIS Terminal Session in order to configure Auditing and view the Audit Log.

First off, you will need to Enable Auditing, if it has not already been enabled:

Next, make sure that Auditing for the %System/%Login/LoginFailure Event is enabled:

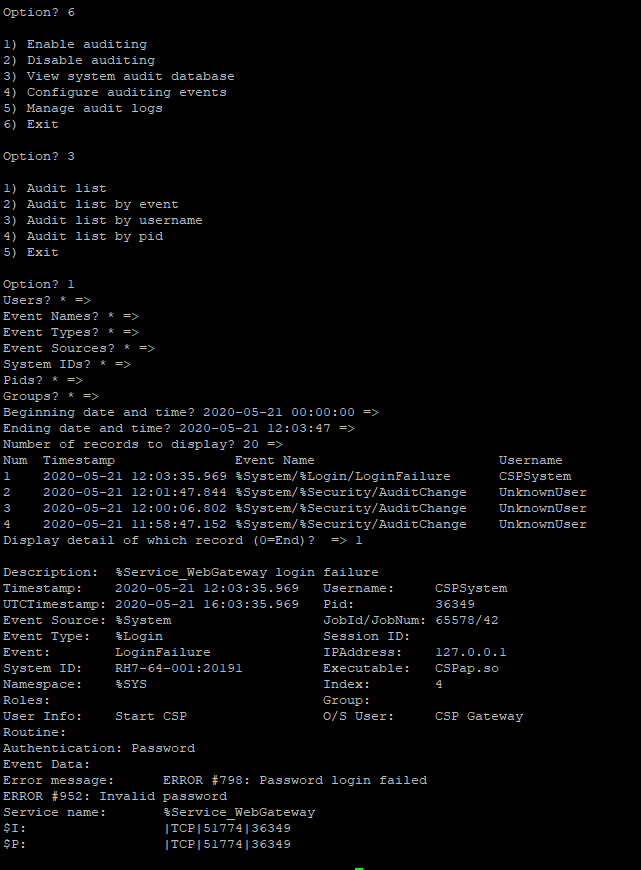
Once you’ve done that, you can reproduce the “Server Availability Error” problem. This should result in a LoginFailure Audit Event being logged, and you can examine the details for this event to find out more:

The “Error message” section should provide more information about why we are seeing the LoginFailure. Common problems include “User CSPSystem is disabled” or “Service %Service_WebGateway is not enabled for Password authentication”, which suggest changes which should be made to the IRIS Security Settings.

The most common problem that we see in the WRC is that authentication is failing due to “Invalid password”. This means that the CSPSystem password stored in the Web Gateway does not match the CSPSystem password stored in IRIS.

How to fix the problem:

Now that the Audit Log entry gives you a clear indication of what the mismatch is between the Web Gateway and InterSystems IRIS, you have to fix that mismatch. The IRIS-side CSPSystem credentials can be modified through the ^SECURITY menu in a Terminal session.

There are a few ways to modify the CSPSystem credentials stored in the Web Gateway. The easiest way will be to access the Web Gateway Management Portal, which is documented here: https://docs.intersystems.com/irislatest/csp/docbook/DocBook.UI.Page.cls?KEY=GCGI_oper_config  Once you’ve loaded the Web Gateway Management Page, you can edit the credentials used to authenticate to IRIS by clicking the Server Access link, and editing the Connection Security settings for the relevant Server.

If you are not able to access the Web Gateway Management Page, then you are left with editing the CSP.ini file. The CSP.ini file should have sections for each Server Definition configured in the Web Gateway. You should be able to edit the “Username” and “Password” sections in the relevant section to match what is stored in InterSystems IRIS. Note that the [SYSTEM] section controls access to the Web Gateway Management Portal, not an InterSystems IRIS instance named [SYSTEM].

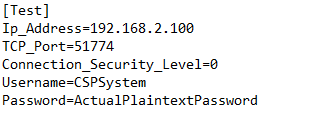
For example, if you have a definition to server “Test” where the CSPSystem password is incorrect:

You can edit the CSP.ini file to have the correct plaintext password:

The next time you try to authenticate from the Web Gateway to InterSystems IRIS, the password will be encrypted:

1 Comment
Discussion (1)1
Log in or sign up to continue
Article
· Sep 17, 2020 5m read

Native API for ObjectScript Demo

The demo is based on the raw class descriptions.
The data classes used are Address, Person, Employee, Company
For a more attractive demo, a JSONtoString method by ID was added.

After installation with ZPM just run from Terminal

USER>do ##class(ONAPI.demo).Run()
Adjust Parameters
host[127.0.0.1]:
port[1972]:
namespace[USER]:
user[_SYSTEM]:
pwd[SYS]:
timeout[5]:
****** connected ********

Next, you get a list of possible demo actions.
No input means no action.
The menu loops until you exit.

Populate Person by:100
     100
Populate Company by:10
     10
Populate Employee by:50
     50
Show Person by ID:3
{
  "Name":"O'Donnell,Mark I.",
  "SSN":"871-87-4555",
  "DOB":"1934-05-24",
  "Home":{
    "Street":"3012 Elm Drive",
    "City":"Ukiah",
    "State":"IN",
    "Zip":"11758"
  },
  "Office":{
    "Street":"1326 Maple Street",
    "City":"Jackson",
    "State":"MD",
    "Zip":"61987"
  },
  "FavoriteColors":[
    "Green"
  ],
  "Age":91
}
Show Company by ID:3
{
  "Name":"TeleData Gmbh.",
  "Mission":"Experts in innovative nano-connectivity for social networks.",
  "TaxID":"E4116",
  "Revenue":33297336,
  "Employees":[
    {
      "Name":"Larson,Dave G.",
      "SSN":"761-57-3123",
      "DOB":"2011-09-28",
      "Home":{
        "Street":"6346 Second Street",
        "City":"Chicago",
        "State":"NJ",
        "Zip":"16814"
      },
      "Office":{
        "Street":"6702 Clinton Drive",
        "City":"Tampa",
        "State":"CT",
        "Zip":"91275"
      },
      "Spouse":{
        "Name":"Willeke,Rhonda A.",
        "SSN":"434-63-3541",
        "DOB":"1974-02-15",
        "Home":{
          "Street":"1910 Oak Blvd",
          "City":"St Louis",
          "State":"ND",
          "Zip":"62884"
        },
        "Office":{
          "Street":"5148 Ash Court",
          "City":"St Louis",
          "State":"DE",
          "Zip":"36764"
        },
        "FavoriteColors":[
          "White",
          "Yellow"
        ],
        "Age":51
      },
      "FavoriteColors":[
        "Black"
      ],
      "Age":14,
      "Title":"Product Specialist",
      "Salary":28870
    },
    {
      "Name":"Quincy,Mo V.",
      "SSN":"345-36-6735",
      "DOB":"1945-05-14",
      "Home":{
        "Street":"399 Oak Court",
        "City":"Youngstown",
        "State":"LA",
        "Zip":"75634"
      },
      "Office":{
        "Street":"6307 Clinton Avenue",
        "City":"Oak Creek",
        "State":"NH",
        "Zip":"85911"
      },
      "Spouse":{
        "Name":"Iacobelli,Barb E.",
        "SSN":"951-91-9488",
        "DOB":"2020-09-04",
        "Home":{
          "Street":"8413 Elm Blvd",
          "City":"Denver",
          "State":"ID",
          "Zip":"91025"
        },
        "Office":{
          "Street":"4276 Oak Court",
          "City":"Oak Creek",
          "State":"ID",
          "Zip":"20879"
        },
        "Age":5
      },
      "FavoriteColors":[
        "Blue"
      ],
      "Age":80,
      "Title":"Global Sales Rep.",
      "Salary":89381
    }
  ]
}
Show Employee by ID:103
{
  "Name":"Larson,Dave G.",
  "SSN":"761-57-3123",
  "DOB":"2011-09-28",
  "Home":{
    "Street":"6346 Second Street",
    "City":"Chicago",
    "State":"NJ",
    "Zip":"16814"
  },
  "Office":{
    "Street":"6702 Clinton Drive",
    "City":"Tampa",
    "State":"CT",
    "Zip":"91275"
  },
  "Spouse":{
    "Name":"Willeke,Rhonda A.",
    "SSN":"434-63-3541",
    "DOB":"1974-02-15",
    "Home":{
      "Street":"1910 Oak Blvd",
      "City":"St Louis",
      "State":"ND",
      "Zip":"62884"
    },
    "Office":{
      "Street":"5148 Ash Court",
      "City":"St Louis",
      "State":"DE",
      "Zip":"36764"
    },
    "FavoriteColors":[
      "White",
      "Yellow"
    ],
    "Age":51
  },
  "FavoriteColors":[
    "Black"
  ],
  "Age":14,
  "Title":"Product Specialist",
  "Salary":28870
}
Show Global PersonD by ID:4
     $Data()=1
     Value=$lb("","Eastman,Mary C.","887-18-3730",44711,$lb("3889 Ash Blvd","Washington","TX",67862),$lb("5709 Oak Blvd","Chicago","IL",30845),"","")

Index list for Person & Employee (n,y):y
     $Employee
     $Person
     NameIDX
     SSNKey
     ZipCode
Exit Demo (n,y,*):y
****** done ********
 
USER>

GitHub

Discussion (0)0
Log in or sign up to continue