Clear filter
Question
Ponnumani Gurusamy · May 4, 2020
Hi Team,
We weren't able to start the InterSystems cache server. I attached error screenshot and console log details on below.
Console log error:
Retry CLNDMN job start after timeout with last job error = <UNKNOWN ERROR>.JOBTRACE: Create job indirect, rtnref = START^CLNDMN.JOBTRACE: Create job by control, rtnref = START^CLNDMN, pid = 6944.JOBTRACE: Timed out waiting for child (6944) to appear in PIDTAB.Error: ERROR #5001: Cannot start CLNDMN job - Shutting down the system
Please guide me, how we resolve this issue.
Thanks & Regards,
Ponnumani G. First, check if the Caché SERVICE (in win sense) gets started as account With enough privileges
Next, check that the installation directory and all sub dir are accessible with all right from this account
Eventually, consider a reinstall / Update with enough ADMINISTRATOR rights
We tried with administrator credential also. But we are facing this same issue.
Article
Yuri Marx · Jun 3, 2020
SAP offers a broad support to OData in all your products. So, OData can be an excellent option to exchange data between SAP and InterSystems IRIS.
Follow the instructions in the article https://community.intersystems.com/post/odata-and-intersystems-iris to expose your IRIS data as REST OData services.
To consume InterSystems IRIS data from SAP using OData, follow these steps (credits to the next steps of this tutorial: https://sapyard.com/sapui5-for-abapers-consuming-odata-service-from-sapui5-application-crud-operations/) :
Create a new SAPUI5 application by the name crud_demo.
Create a XML view ‘crud_demo.view’. Write below code in it.
<core:View xmlns:core="sap.ui.core" xmlns:mvc="sap.ui.core.mvc" xmlns="sap.m"
controllerName="crud_demo.crud_demo" xmlns:html="http://www.w3.org/1999/xhtml" xmlns:l="sap.ui.commons.layout">
<Page title="CRUD Operations">
<content>
<l:AbsoluteLayout width="10rem" height="10rem"></l:AbsoluteLayout>
<VBox xmlns="sap.m" id="vboxid">
<items>
<HBox xmlns="sap.m">
<items>
<l:AbsoluteLayout width="20px" height="20px"></l:AbsoluteLayout>
<Button xmlns="sap.m" id="cbtn" press="oDataCall" text="Create"></Button>
<l:AbsoluteLayout width="20px" height="20px"></l:AbsoluteLayout>
<Button xmlns="sap.m" id="rbtn" press="oDataCall" text="Read"></Button>
<l:AbsoluteLayout width="20px" height="20px"></l:AbsoluteLayout>
<Button xmlns="sap.m" id="ubtn" press="oDataCall" text="Update"></Button>
<l:AbsoluteLayout width="20px" height="20px"></l:AbsoluteLayout>
<Button xmlns="sap.m" id="dbtn" press="oDataCall" text="Delete"></Button>
</items>
</HBox>
<HBox xmlns="sap.m">
<items>
<l:AbsoluteLayout width="20px" height="20px"></l:AbsoluteLayout>
<Input xmlns="sap.m" id="uniqueid" placeholder="ID" value="1"></Input>
<l:AbsoluteLayout width="20px" height="20px"></l:AbsoluteLayout>
<Input xmlns="sap.m" id="nameid" placeholder="Name" value="test"></Input>
<l:AbsoluteLayout width="20px" height="20px"></l:AbsoluteLayout>
<Input xmlns="sap.m" id="emailid" placeholder="Email" value="test@gmail.com"></Input>
<l:AbsoluteLayout width="20px" height="20px"></l:AbsoluteLayout>
<Input xmlns="sap.m" id="mobid" placeholder="Mobile" value="8888888888"></Input>
</items>
</HBox>
<HBox xmlns="sap.m">
<items>
<l:AbsoluteLayout width="20px" height="20px"></l:AbsoluteLayout>
<Table xmlns="sap.m"
id="userdatatable" headerText="User Data">
<items>
<ListItemBase xmlns="sap.m" id="id1"></ListItemBase>
</items>
<columns> <!-- sap.m.Column -->
<Column xmlns="sap.m"> <header> <Text xmlns="sap.m" text="Id" ></Text></header></Column>
<Column xmlns="sap.m"> <header> <Text xmlns="sap.m" text="Name" ></Text></header></Column>
<Column xmlns="sap.m"> <header> <Text xmlns="sap.m" text="Email" ></Text></header></Column>
<Column xmlns="sap.m"> <header> <Text xmlns="sap.m" text="Mobile" ></Text></header></Column>
</columns>
</Table>
</items>
</HBox>
</items> <!-- sap.ui.core.Control -->
</VBox>
</content>
</Page>
</core:View>
Create crud_demo.controller.js. Write below code in it.
onInit: function() {
that = this;
// Create Model Instance of the oData service
var oModel = new sap.ui.model.odata.v2.ODataModel("/sap/opu/odata/sap/ZCRUD_DEMO_SRV");
sap.ui.getCore().setModel(oModel, "myModel");
},
oDataCall:function(oEvent)
{
// call oData service's function based on which button is clicked.
debugger;
var myModel = sap.ui.getCore().getModel("myModel");
myModel.setHeaders({
"X-Requested-With" : "X"
});
// CREATE******************
if ('Create' == oEvent.oSource.mProperties.text) {
var obj = {};
obj.id = that.getView().byId("uniqueid").getValue();
obj.name = that.getView().byId("nameid").getValue();
obj.email = that.getView().byId("emailid").getValue();
obj.mobile = that.getView().byId("mobid").getValue();
myModel.create('/userdataSet', obj, {
success : function(oData, oResponse) {
debugger;
alert('Record Created Successfully...');
},
error : function(err, oResponse) {
debugger;
alert('Error while creating record - '
.concat(err.response.statusText));
}
});
}
// READ******************
else if ('Read' == oEvent.oSource.mProperties.text) {
var readurl = "/userdataSet?$filter=(id eq '')";
myModel.read(readurl, {
success : function(oData, oResponse) {
debugger;
var userdata = new sap.ui.model.json.JSONModel({
"Result" : oData.results
});
var tab = that.getView().byId("userdatatable");
tab.setModel(userdata);
var i = 0;
tab.bindAggregation("items", {
path : "/Result",
template : new sap.m.ColumnListItem({
cells : [ new sap.ui.commons.TextView({
text : "{id}",
design : "H5",
semanticColor : "Default"
}), new sap.ui.commons.TextView({
text : "{name}",
design : "H5",
semanticColor : "Positive"
}), new sap.ui.commons.TextView({
text : "{email}",
design : "H5",
semanticColor : "Positive"
}), new sap.ui.commons.TextView({
text : "{mobile}",
design : "H5",
semanticColor : "Positive"
}), ]
})
});
},
error : function(err) {
debugger;
}
});
}
// UPDATE******************
if ('Update' == oEvent.oSource.mProperties.text) {
var obj = {};
obj.id = that.getView().byId("uniqueid").getValue();
obj.email = that.getView().byId("emailid").getValue();
var updateurl = "/userdataSet(id='"
+ that.getView().byId("uniqueid").getValue() + "')";
myModel.update(updateurl, obj, {
success : function(oData, oResponse) {
debugger;
alert('Record Updated Successfully...');
},
error : function(err, oResponse) {
debugger;
alert('Error while updating record - '
.concat(err.response.statusText));
}
});
}
// DELETE******************
if ('Delete' == oEvent.oSource.mProperties.text) {
var delurl = "/userdataSet(id='"
+ that.getView().byId("uniqueid").getValue() + "')";
myModel.remove(delurl, {
success : function(oData, oResponse) {
debugger;
alert('Record Removed Successfully...');
},
error : function(err, oResponse) {
debugger;
alert('Error while removing record - '
.concat(err.response.statusText));
}
});
}
}
Save, Deploy and Run the application. You should be able to run the application using below URL http://hostname:8000/sap/bc/ui5_ui5/sap/zcrud_demo/index.html.
Output:
Announcement
Evgeny Shvarov · Sep 14, 2020
Hi Developers!
Here're the technology bonuses for the Full Stack Contest that will give you extra points in the voting:
InterSystems IRIS REST API Usage
InterSystems Native API Usage
InterSystems JDBC Usage
Unit Testing
ZPM Package deployment
Docker container usage
See the details below.
InterSystems IRIS REST API usage - 1 point
You get the bonus if you access InterSystems IRIS via REST API in your Full Stack application. You either can build the REST API by yourself, or use any built-in or install it via ZPM.
Learn more on InterSystems REST API.
InterSystems Native API usage - 1 point
You get this bonus if you access the data in your Full Stack application using any of the InterSystems Native API options: .NET, Java, Python, Node.js. Learn more here.
InterSystems JDBC usage - 1 point
InterSystems IRIS provides JDBC driver to access the data. You get the bonus if you refer to the data in your Full Stack application using SQL and InterSystems JDBC.
Documentation.
Unit Testing - 1 point
Applications that have Unit Testing for the InterSystems IRIS code will collect the bonus.
Learn more about ObjectScript Unit Testing in Documentation and on Developer Community.
ZPM Package deployment - 1 point
You can collect the bonus if you build and publish the ZPM(ObjectScript Package Manager) package for your Full Stack application so it could be deployed with:
zpm "install your-full-stack-solution-name"
command on IRIS with ZPM client installed.
ZPM client. Documentation.
Docker container usage - 1 point
The application gets a 'Docker container' bonus if it uses InterSystems IRIS running in a docker container.
You can collect the bonus if you use any of the following docker templates:
Basic InterSystems IRIS Docker template
IRIS REST API template
Native API template
IntegratedML template
IRIS Analytics template
So!
Feel free to ask any questions about using the listed technologies.
Good luck in the competition! Is Native API for ObjectScript also included for Bonus Points ? You've just posted an article!) I wasn't aware too.
We need to check and maybe we'll include this as well!
We may add more bonuses - the contest will start next Monday, we still have time to add more ;) until a few minutes before I wasn't aware myself Unit Testing bonus is introduced. I suggest more two bonus points.
1 - If you use BPL or integration adapter;
2 - If you use iris analytics, consuming bi cube from the frontend using mdx, api or sql.
Announcement
Anastasia Dyubaylo · Dec 5, 2020
Hi Community!
We are pleased to invite all the developers to the upcoming InterSystems Analytics Contest Kick-off Webinar! The topic of this webinar is dedicated to the Analytics contest.
On this webinar, we’ll demo the iris-analytics-template and answer the questions on how to develop, build, and deploy Analytics applications using InterSystems IRIS.
Date & Time: Monday, December 7 — 12:00 PM EDT
Speakers: 🗣 @Carmen.Logue, InterSystems Product Manager - Analytics and AI🗣 @Evgeny.Shvarov, InterSystems Developer Ecosystem Manager
So!
We will be happy to talk to you at our webinar!
✅ JOIN THE KICK-OFF WEBINAR! We're starting! Please join us here! Do you have this webinar record? My Internet down and I did not watch the end. Hey Developers!
The recording of this webinar is available on InterSystems Developers YouTube! Please welcome:
⏯ InterSystems Analytics Contest Kick-off Webinar
Big applause to our speakers! 👏🏼
And thanks to everyone for joining our webinar! Just published! Please check the video in the comments below 😉
Article
Guillaume Rongier · Mar 26, 2021

This article contains the materials, examples, exercises to learn the basic concepts of IAM.
You have all resources available on this git : https://github.com/grongierisc/iam-training.
Solutions are in [training branch](https://github.com/grongierisc/iam-training/tree/training).
This article will cover the following points :
- [1. Introduction](#1-introduction)
- [1.1. What is IAM ?](#11-what-is-iam-)
- [1.2. What is an API Management ?](#12-what-is-an-api-management-)
- [1.3. IAM Portal](#13-iam-portal)
- [1.4. Flow of this training](#14-flow-of-this-training)
- [2. Installation](#2-installation)
- [2.1. What do you need to install?](#21-what-do-you-need-to-install)
- [2.2. How IAM works with IRIS](#22-how-iam-works-with-iris)
- [2.3. Setup](#23-setup)
- [2.4. Install IAM](#24-install-iam)
- [2.4.1. Iris Image](#241-iris-image)
- [2.4.2. IAM Image](#242-iam-image)
- [2.4.3. Update the docker file](#243-update-the-docker-file)
- [2.4.4. Update the docker-compose](#244-update-the-docker-compose)
- [2.4.5. Option : add IRIS_PASSWARD as .env](#245-option--add-iris_passward-as-env)
- [2.4.6. Test it !](#246-test-it-)
- [3. First Service/Route](#3-first-serviceroute)
- [3.1. Create a service](#31-create-a-service)
- [3.2. Create a route](#32-create-a-route)
- [3.3. Test it !](#33-test-it-)
- [4. Second, go further with plugin](#4-second-go-further-with-plugin)
- [4.1. Add a plugin to the service](#41-add-a-plugin-to-the-service)
- [4.2. Test it !](#42-test-it-)
- [5. Third, add our own authentication](#5-third-add-our-own-authentication)
- [5.1. Add consumers](#51-add-consumers)
- [5.2. Add Basic auth plugin](#52-add-basic-auth-plugin)
- [5.3. Add ACL Plugin](#53-add-acl-plugin)
- [5.4. Configure USER with ACL and credentials](#54-configure-user-with-acl-and-credentials)
- [5.5. Test it !](#55-test-it-)
- [6. Exercice, Rate-Limiting](#6-exercice-rate-limiting)
- [6.1. Solution](#61-solution)
- [7. Dev Portal](#7-dev-portal)
- [7.1. Overview](#71-overview)
- [7.2. Enable it !](#72-enable-it-)
- [7.3. Add your first spec](#73-add-your-first-spec)
- [7.4. Test it !](#74-test-it-)
- [7.5. Exercise](#75-exercise)
- [7.5.1. Solution](#751-solution)
- [8. Dev Portal, Part two, Authentication](#8-dev-portal-part-two-authentication)
- [8.1. Enable Basic Auth](#81-enable-basic-auth)
- [8.2. Limit access](#82-limit-access)
- [8.2.1. Create a role](#821-create-a-role)
- [8.2.2. Add role to Spec](#822-add-role-to-spec)
- [8.2.3. Test it !](#823-test-it-)
- [8.2.3.1. Register a new developer](#8231-register-a-new-developer)
- [8.2.3.2. Approve this developer](#8232-approve-this-developer)
- [8.2.3.3. Add role for this developer](#8233-add-role-for-this-developer)
- [8.3. Add Oauth2 for developer](#83-add-oauth2-for-developer)
- [8.3.1. First, remove basic auth](#831-first-remove-basic-auth)
- [8.3.2. Second, add application-registration plugin](#832-second-add-application-registration-plugin)
- [8.3.3. Link service and documentation](#833-link-service-and-documentation)
- [8.3.3.1. Test it !](#8331-test-it-)
- [9. Secure Management Portal](#9-secure-management-portal)
- [9.1. Create an admin](#91-create-an-admin)
- [9.2. Enable Basic Auth for Kong Manager](#92-enable-basic-auth-for-kong-manager)
- [9.3. Use Kong Admin API with RBAC](#93-use-kong-admin-api-with-rbac)
- [9.3.1. Create and admin user with a token](#931-create-and-admin-user-with-a-token)
- [10. Plugins](#10-plugins)
- [10.1. Import a community plugin](#101-import-a-community-plugin)
- [10.1.1. Build a new Kong/IAM docker image with the community plugin](#1011-build-a-new-kongiam-docker-image-with-the-community-plugin)
- [10.1.2. Test it !](#1012-test-it-)
- [10.1.2.1. Use it !](#10121-use-it-)
- [10.2. Create a new plugin](#102-create-a-new-plugin)
- [10.2.1. File structure](#1021-file-structure)
- [10.2.1.1. handler.lua](#10211-handlerlua)
- [10.2.1.1.1. Example](#102111-example)
- [10.2.1.2. schema.lua](#10212-schemalua)
- [10.2.1.3. *.rockspec](#10213-rockspec)
- [10.2.2. Build it](#1022-build-it)
- [10.2.3. Tips](#1023-tips)
- [11. CI/CD](#11-cicd)
- [11.1. Create the postman collection](#111-create-the-postman-collection)
- [11.1.1. Is IAM startup ?](#1111-is-iam-startup-)
- [11.1.2. Delete old datas](#1112-delete-old-datas)
- [11.1.3. Create Service/Route](#1113-create-serviceroute)
- [11.1.3.1. Tips](#11131-tips)
- [11.2. Run it with newman](#112-run-it-with-newman)
# 1. Introduction

## 1.1. What is IAM ?
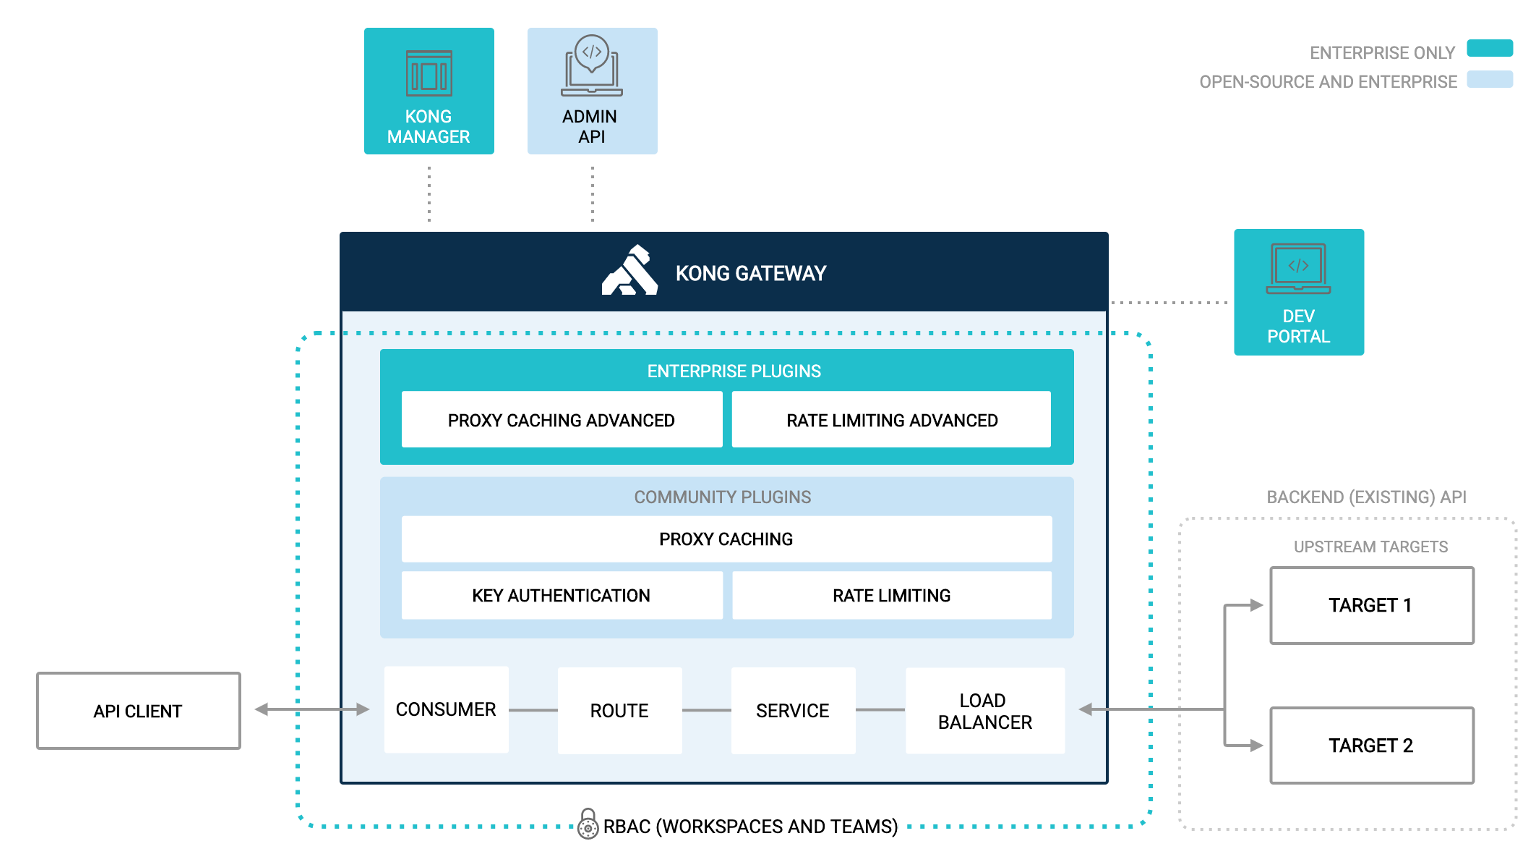
IAM stand for InterSystems API Manager, it's based on **Kong Enterprise Edition**.
This mean you have access on top of Kong Open Source edition to :
* Manager Portal
* Developer Portal
* Advance plugin
* Oauth2
* Caching
* ...
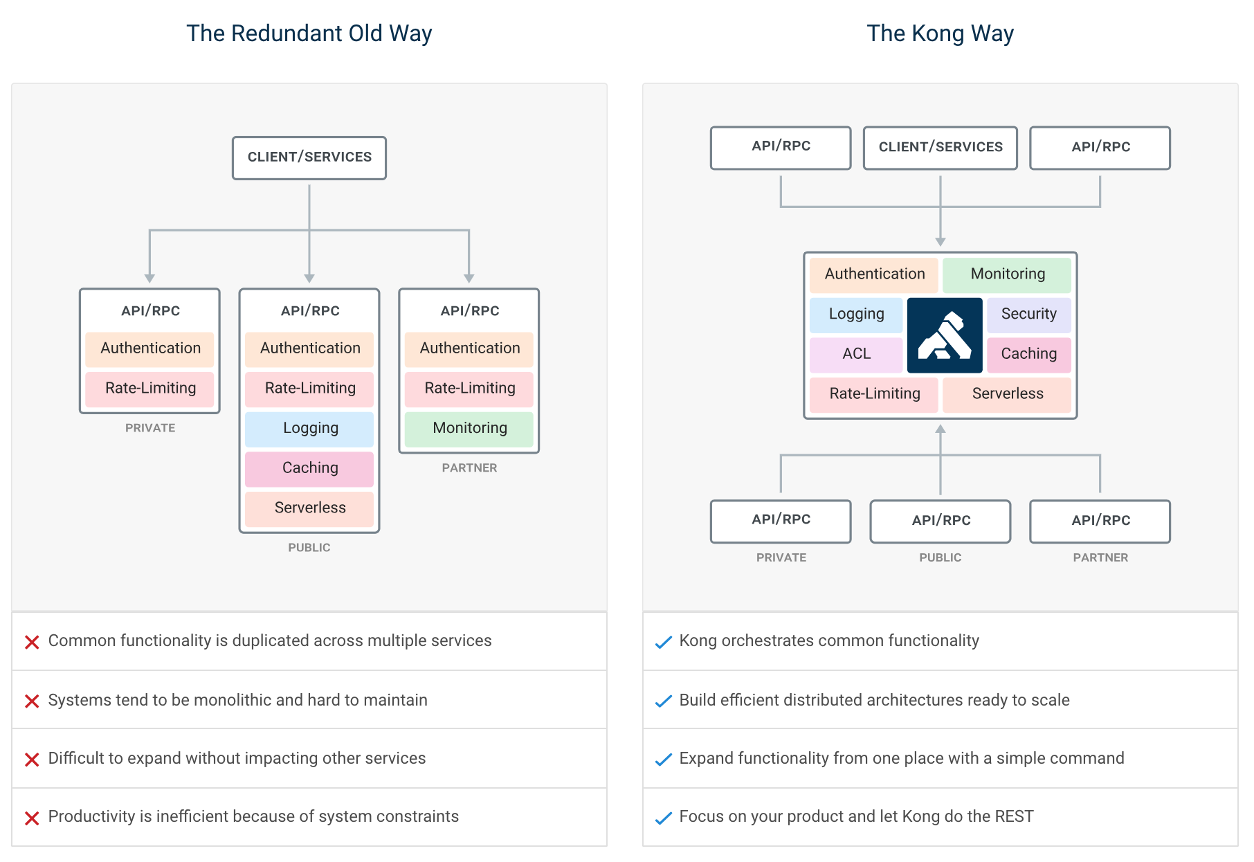
## 1.2. What is an API Management ?
API management is the process of creating and publishing web application programming interfaces (APIs), enforcing their usage policies, controlling access, nurturing the subscriber community, collecting and analyzing usage statistics, and reporting on performance. API Management components provide mechanisms and tools to support developer and subscriber community.
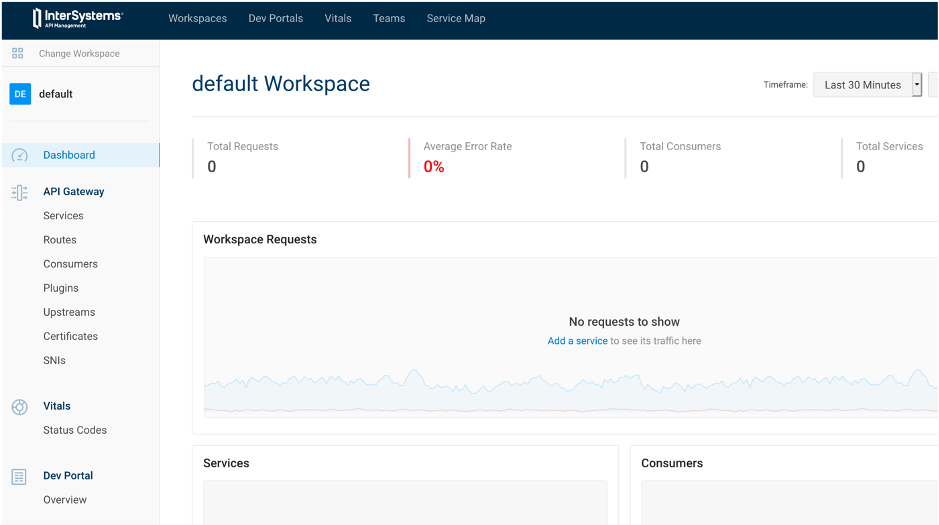
## 1.3. IAM Portal
Kong and IAM are design as API first, this mean, everything done in Kong/IAM can be done by rest calls or the manager portal.
During this article all example / exercise will present both this way:
|IAM Portal|Rest API|
|-----------------|--------------|
|||
## 1.4. Flow of this article
The aim of this article is to use IAM as a proxy of an IRIS rest API.
Definition of this rest API can be found here :
```url
http://localhost:52773/swagger-ui/index.html#/
```
or here
```url
https://github.com/grongierisc/iam-training/blob/training/misc/spec.yml
```
Start this article with the main branch.
At the end of the article, you should have the same result as the training branch.
# 2. Installation

## 2.1. What do you need to install?
* [Git](https://git-scm.com/downloads)
* [Docker](https://www.docker.com/products/docker-desktop) (if you are using Windows, make sure you set your Docker installation to use "Linux containers").
* [Docker Compose](https://docs.docker.com/compose/install/)
* [Visual Studio Code](https://code.visualstudio.com/download) + [InterSystems ObjectScript VSCode Extension](https://marketplace.visualstudio.com/items?itemName=daimor.vscode-objectscript)
* InterSystems IRIS IAM enabled license file.
* IAM Docker image
## 2.2. How IAM works with IRIS
At Kong/IAM start, the container check for the Kong/IAM license with a curl call.
The endpoint of this call is a rest API on the IRIS container.
FYI : Kong license is embedded in IRIS one.

## 2.3. Setup
Git clone this repository.
git clone https://github.com/grongierisc/iam-training
Run the initial rest API :
docker-compose up
Test it :
```url
http://localhost:52773/swagger-ui/index.html#/
```
Login/Password :
SuperUser/SYS
## 2.4. Install IAM
### 2.4.1. Iris Image
First you need to switch for the community edition to a licensed one.
To do so, you need to setup your access to InterSystems Container Registry to download IRIS limited access images.
Have a look at this [Introducing InterSystems Container Registry](https://community.intersystems.com/post/introducing-intersystems-container-registry) on [Developer Community](https://community.intersystems.com).
* Log-in into https://containers.intersystems.com/ using your WRC credentials and get a *token*.
* Set up docker login in your computer:
```bash
docker login -u="user" -p="token" containers.intersystems.com
```
* Get InterSystems IRIS image:
```bash
docker pull containers.intersystems.com/intersystems/irishealth:2020.4.0.524.0
```
### 2.4.2. IAM Image
In [WRC Software Distribution](https://wrc.intersystems.com/wrc/coDistribution.csp):
* Components > Download *IAM-1.5.0.9-4.tar.gz* file, unzip & untar and then load the image:
```bash
docker load -i iam_image.tar
```
### 2.4.3. Update the docker file
Change IRIS community edition to a licensed one.
* containers.intersystems.com/intersystems/irishealth:2020.4.0.524.0
* add iris.key in key folder
Edit the dockerfile to add on top of it this part
```dockerfile
ARG IMAGE=containers.intersystems.com/intersystems/irishealth:2020.4.0.524.0
# Frist stage
FROM $IMAGE as iris-iam
COPY key/iris.key /usr/irissys/mgr/iris.key
COPY iris-iam.script /tmp/iris-iam.script
RUN iris start IRIS \
&& iris session IRIS < /tmp/iris-iam.script \
&& iris stop IRIS quietly
# Second stage
FROM iris-iam
```
This part will create a multi-stage dockerfile.
* the first stage is to enable IRIS to serve IAM license.
* the second stage is for the REST API build
Create a new file iris-iam.script to build a new IRIS Image to enable IAM endpoint and user.
```objectscript
zn "%SYS"
write "Create web application ...",!
set webName = "/api/iam"
set webProperties("Enabled") = 1
set status = ##class(Security.Applications).Modify(webName, .webProperties)
write:'status $system.Status.DisplayError(status)
write "Web application "_webName_" was updated!",!
set userProperties("Enabled") = 1
set userName = "IAM"
Do ##class(Security.Users).Modify(userName,.userProperties)
write "User "_userName_" was updated!",!
halt
```
### 2.4.4. Update the docker-compose
Update the docker-compose file to :
* db
* postgres database for IAM
* iam-migration
* bootstrap the database
* iam
* actual IAM instance
* a volume for data persistent
Add this part to the end of the docker-compose file.
```yml
iam-migrations:
image: intersystems/iam:1.5.0.9-4
command: kong migrations bootstrap up
depends_on:
- db
environment:
KONG_DATABASE: postgres
KONG_PG_DATABASE: ${KONG_PG_DATABASE:-iam}
KONG_PG_HOST: db
KONG_PG_PASSWORD: ${KONG_PG_PASSWORD:-iam}
KONG_PG_USER: ${KONG_PG_USER:-iam}
KONG_CASSANDRA_CONTACT_POINTS: db
KONG_PLUGINS: bundled,jwt-crafter
ISC_IRIS_URL: IAM:${IRIS_PASSWORD}@iris:52773/api/iam/license
restart: on-failure
links:
- db:db
iam:
image: intersystems/iam:1.5.0.9-4
depends_on:
- db
environment:
KONG_ADMIN_ACCESS_LOG: /dev/stdout
KONG_ADMIN_ERROR_LOG: /dev/stderr
KONG_ADMIN_LISTEN: '0.0.0.0:8001'
KONG_ANONYMOUS_REPORTS: 'off'
KONG_CASSANDRA_CONTACT_POINTS: db
KONG_DATABASE: postgres
KONG_PG_DATABASE: ${KONG_PG_DATABASE:-iam}
KONG_PG_HOST: db
KONG_PG_PASSWORD: ${KONG_PG_PASSWORD:-iam}
KONG_PG_USER: ${KONG_PG_USER:-iam}
KONG_PROXY_ACCESS_LOG: /dev/stdout
KONG_PROXY_ERROR_LOG: /dev/stderr
KONG_PORTAL: 'on'
KONG_PORTAL_GUI_PROTOCOL: http
KONG_PORTAL_GUI_HOST: '127.0.0.1:8003'
KONG_ADMIN_GUI_URL: http://localhost:8002
KONG_PLUGINS: bundled
ISC_IRIS_URL: IAM:${IRIS_PASSWORD}@iris:52773/api/iam/license
volumes:
- ./iam:/iam
links:
- db:db
ports:
- target: 8000
published: 8000
protocol: tcp
- target: 8001
published: 8001
protocol: tcp
- target: 8002
published: 8002
protocol: tcp
- target: 8003
published: 8003
protocol: tcp
- target: 8004
published: 8004
protocol: tcp
- target: 8443
published: 8443
protocol: tcp
- target: 8444
published: 8444
protocol: tcp
- target: 8445
published: 8445
protocol: tcp
restart: on-failure
db:
image: postgres:9.6
environment:
POSTGRES_DB: ${KONG_PG_DATABASE:-iam}
POSTGRES_PASSWORD: ${KONG_PG_PASSWORD:-iam}
POSTGRES_USER: ${KONG_PG_USER:-iam}
volumes:
- 'pgdata:/var/lib/postgresql/data'
healthcheck:
test: ["CMD", "pg_isready", "-U", "${KONG_PG_USER:-iam}"]
interval: 30s
timeout: 30s
retries: 3
restart: on-failure
stdin_open: true
tty: true
volumes:
pgdata:
```
Add the .env file in root folder :
```env
IRIS_PASSWORD=SYS
```
BTW : Here are the definition of Kong ports :
|Port|Protocol|Description|
|----|--------|-----------|
|:8000|HTTP|Takes incoming HTTP traffic from Consumers, and forwards it to upstream Services.|
|:8443|HTTPS|Takes incoming HTTPS traffic from Consumers, and forwards it to upstream Services.|
|:8001|HTTP|Admin API. Listens for calls from the command line over HTTP.|
|:8444|HTTPS|Admin API. Listens for calls from the command line over HTTPS.|
|:8002|HTTP|Kong Manager (GUI). Listens for HTTP traffic.|
|:8445|HTTPS|Kong Manager (GUI). Listens for HTTPS traffic.|
|:8003|HTTP|Dev Portal. Listens for HTTP traffic, assuming Dev Portal is enabled.|
|:8446|HTTPS|Dev Portal. Listens for HTTPS traffic, assuming Dev Portal is enabled.|
|:8004|HTTP|Dev Portal /files traffic over HTTP, assuming the Dev Portal is enabled.|
|:8447|HTTPS|Dev Portal /files traffic over HTTPS, assuming the Dev Portal is enabled.|
### 2.4.5. Option : add IRIS_PASSWARD as .env
For ease of use (and may be security), you can use the .env file in the IRIS dockerfile.
To do so, edit the docker-compose with this in the iris service part :
```yml
build:
context: .
dockerfile: dockerfile
args:
- IRIS_PASSWORD=${IRIS_PASSWORD}
```
And the dockerfile (second or first stage of the build):
```dockerfile
ARG IRIS_PASSWORD
RUN echo "${IRIS_PASSWORD}" > /tmp/password.txt && /usr/irissys/dev/Container/changePassword.sh /tmp/password.txt
```
### 2.4.6. Test it !
docker-compose -f "docker-compose.yml" up -d --build
# 3. First Service/Route

Remember how Kong/IAM works ?

Here, we will build :
* a service
* for our crud API
* a route
* to access this service
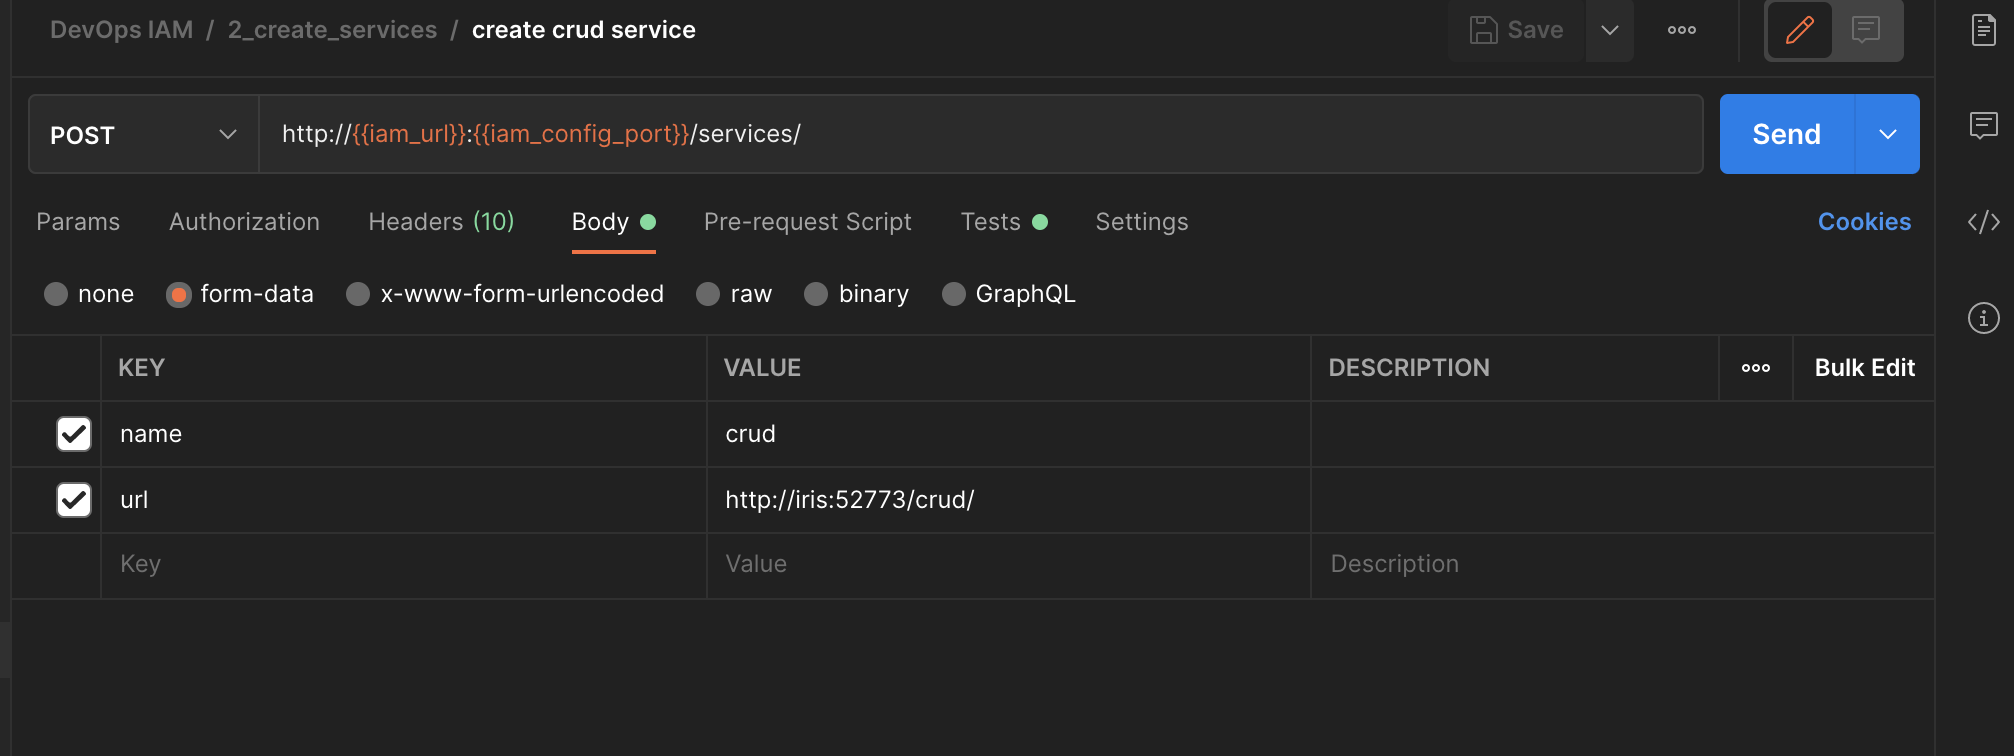
## 3.1. Create a service
IAM Portal
Rest API
# Create service
curl -i -X POST \
--url http://localhost:8001/services/ \
--data 'name=crud' \
--data 'url=http://iris:52773/crud/'
What do we see here, to create a service we simply need it's url.
## 3.2. Create a route
IAM Portal
Rest API
# Create route
curl -i -X POST \
--url http://localhost:8001/services/crud/routes \
--data 'name=crud-route' \
--data 'paths=/persons/*' \
--data 'strip_path=false'
What do we see here, to create a route we need :
* it's service name
* a path where RegEx is allowed
## 3.3. Test it !
**Original API**
# Legacy
curl –i --location --request GET 'http://localhost:52773/crud/persons/all' \
--header 'Authorization: Basic U3VwZXJVc2VyOlNZUw=='
**Proxy API**
# KONG
curl –i --location --request GET 'http://localhost:8000/persons/all' \
--header 'Authorization: Basic U3VwZXJVc2VyOlNZUw=='
What do we see here :
* Nothing new on legacy side.
* On kong side :
* We change the port
* The path corresponds to the route
* We still need to authenticate
# 4. Second, go further with plugin
To go further, we will try to auto-authenticate Kong to the IRIS endpoint.
To do so, we will use and plugin, resquest-transformer.
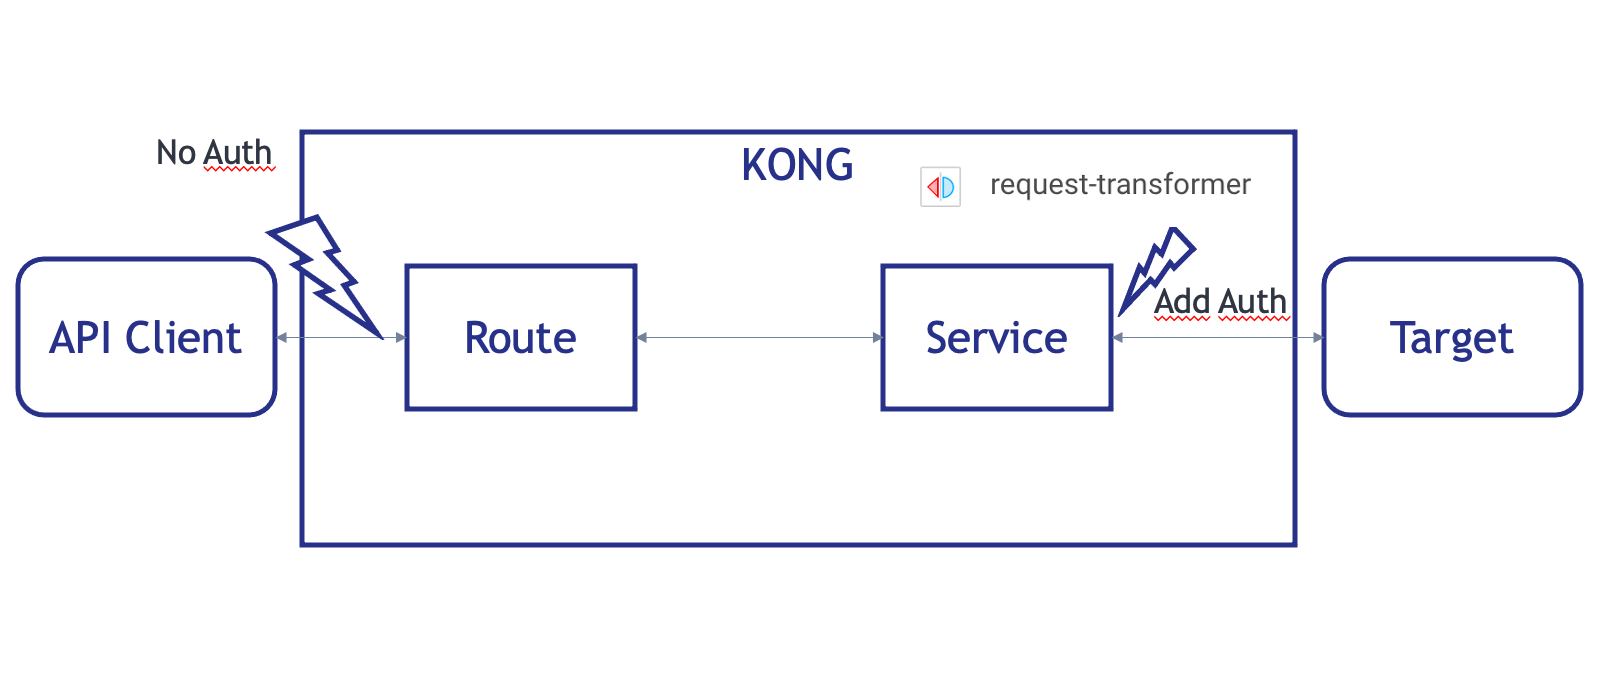
## 4.1. Add a plugin to the service
IAM Portal
Rest API
# Create plugin
curl -i -X POST \
--url http://localhost:8001/services/crud/plugins \
--data 'name=request-transformer' \
--data 'config.add.headers=Authorization:Basic U3VwZXJVc2VyOlNZUw==' \
--data 'config.replace.headers=Authorization:Basic U3VwZXJVc2VyOlNZUw=='
## 4.2. Test it !
# Legacy
**Original API**
curl –i --location --request GET 'http://localhost:52773/crud/persons/all'
**Proxy API**
# KONG
curl –i --location --request GET 'http://localhost:8000/persons/all'
What do we see here :
* Error 401 on the original API
* We reach the data without authentication
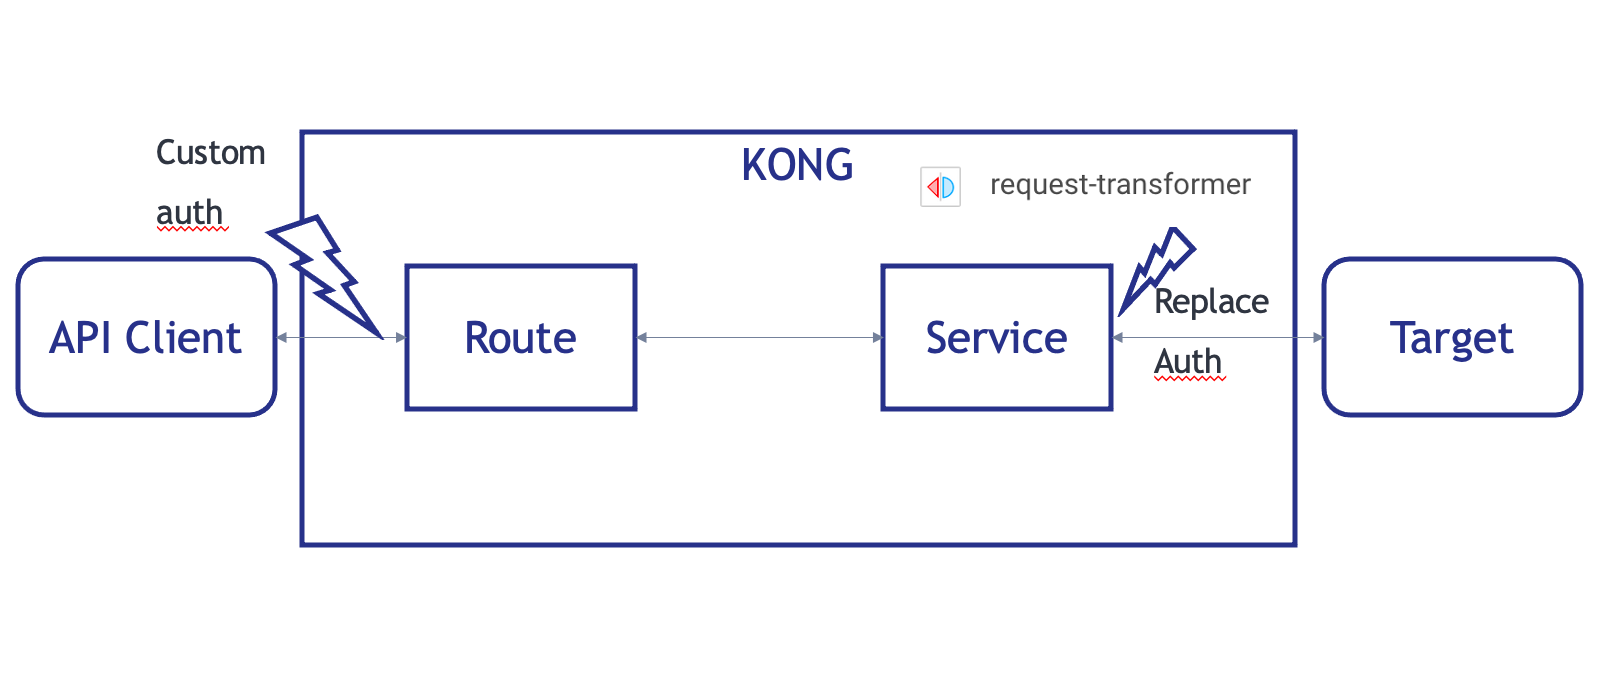
# 5. Third, add our own authentication
What we want to achieved here is to add our own authentication without any distuption of the original API.
## 5.1. Add consumers
IAM Portal
Rest API
# Add consumer anonymous
curl -i -X POST \
--url http://localhost:8001/consumers/ \
--data "username=anonymous" \
--data "custom_id=anonymous"
# Add consumer user
curl -i -X POST \
--url http://localhost:8001/consumers/ \
--data "username=user" \
--data "custom_id=user"
## 5.2. Add Basic auth plugin
IAM Portal
Rest API
# Enable basic auth for service
curl -i -X POST http://localhost:8001/routes/crud-route/plugins \
--data "name=basic-auth" \
--data "config.anonymous=5cc8dee4-066d-492e-b2f8-bd77eb0a4c86" \
--data "config.hide_credentials=false"
Where :
* config.anonymous = uuid of anonymous consumer
## 5.3. Add ACL Plugin
IAM Portal
Rest API
# Enable ACL
curl -i -X POST http://localhost:8001/routes/crud-route/plugins \
--data "name=acl" \
--data "config.whitelist=user"
## 5.4. Configure USER with ACL and credentials
IAM Portal
Rest API
# Add consumer group
curl -i -X POST \
--url http://localhost:8001/consumers/user/acls \
--data "group=user"
# Add consumer credentials
curl -i -X POST http://localhost:8001/consumers/user/basic-auth \
--data "username=user" \
--data "password=user"
## 5.5. Test it !
**Original API**
# Legacy
curl –i --location --request GET 'http://localhost:52773/crud/persons/all' \
--header 'Authorization:Basic dXNlcjp1c2Vy'
**Proxy API **
# KONG
curl –i --location --request GET 'http://localhost:8000/persons/all' \
--header 'Authorization:Basic dXNlcjp1c2Vy'
# 6. Exercice, Rate-Limiting
1. Enable Unauthenticated user
2. Limit rate by 2 calls per minutes to Unauthenticated user
## 6.1. Solution
1. Enable Unauthenticated user
IAM Portal
Rest API
# Add consumer group
curl -i -X POST \
--url http://localhost:8001/consumers/anonymous/acls \
--data "group=user"
2. Limit rate by 2 calls per minutes to Unauthenticated user
IAM Portal
Rest API
# Add rate limit consumer
curl -i -X POST \
--url http://localhost:8001/consumers/anonymous/plugins \
--data "name=rate-limiting" \
--data "config.limit_by=consumer" \
--data "config.minute=2"
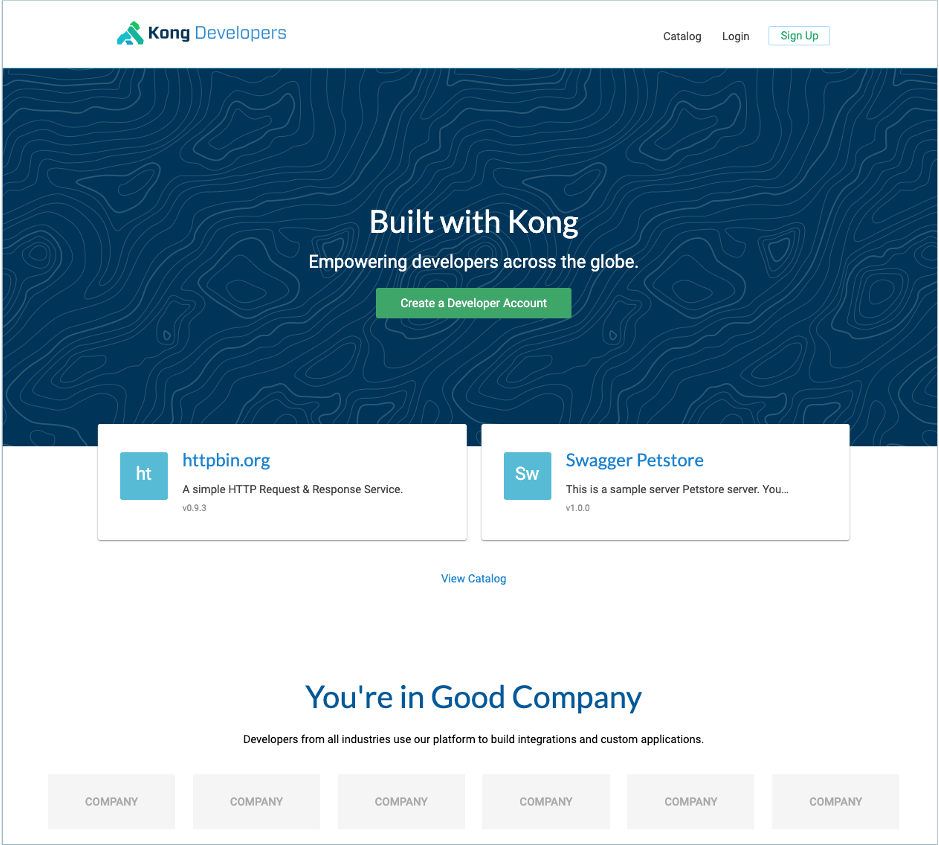
# 7. Dev Portal

## 7.1. Overview
The Kong Developer Portal provides :
* a single source of truth for all developers
* intuitive content management for documentation
* streamlined developer onboarding
* role-based access control (RBAC)
## 7.2. Enable it !
IAM Portal
Rest API
curl -X PATCH http://localhost:8001/workspaces/default --data "config.portal=true"
## 7.3. Add your first spec
**IAM Portal**
**Rest API**
curl -X POST http://localhost:8001/default/files -F "path=specs/iam-training.yml" -F "contents=@misc/spec.yml"
## 7.4. Test it !
```url
http://localhost:8003/default/documentation/iam-training
```
What happen ?
How-to solve it ?
## 7.5. Exercise
1. Add CORS plugin on route
### 7.5.1. Solution
IAM Portal
Rest API
# Enable CORS
curl -i -X POST http://localhost:8001/routes/crud-route/plugins \
--data "name=cors"
# 8. Dev Portal, Part two, Authentication
## 8.1. Enable Basic Auth
IAM Portal
Session Config (JSON)
{
"cookie_secure": false,
"cookie_name": "portal_session",
"secret": "SYS",
"storage": "kong"
}
Now authentication is enabled for the dev portal.
## 8.2. Limit access
By default, all is accessible for unauthenticated user.
We can create role to limit some access.
For example, let restrict access to our CRUD API documentation.
### 8.2.1. Create a role
IAM Portal
Rest API
# Enable role
curl -i -X POST http://localhost:8001/default/developers/roles \
--data "name=dev"
### 8.2.2. Add role to Spec
**IAM Portal**
**Rest API**
# Enable role
curl 'http://localhost:8001/default/files/specs/iam-training.yml' -X PATCH -H 'Accept: application/json, text/plain, */*' --compressed -H 'Content-Type: application/json;charset=utf-8' -H 'Origin: http://localhost:8002' -H 'Referer: http://localhost:8002/default/portal/permissions/' --data-raw $'{"contents":"x-headmatter:\\n readable_by:\\n - dev\\nswagger: \'2.0\'\\ninfo:\\n title: InterSystems IRIS REST CRUD demo\\n description: Demo of a simple rest API on IRIS\\n version: \'0.1\'\\n contact:\\n email: apiteam@swagger.io\\n license:\\n name: Apache 2.0\\n url: \'http://www.apache.org/licenses/LICENSE-2.0.html\'\\nhost: \'localhost:8000\'\\nbasePath: /\\nschemes:\\n - http\\nsecurityDefinitions:\\n basicAuth:\\n type: basic\\nsecurity:\\n - basicAuth: []\\npaths:\\n /:\\n get:\\n description: \' PersonsREST general information \'\\n summary: \' Server Info \'\\n operationId: GetInfo\\n x-ISC_CORS: true\\n x-ISC_ServiceMethod: GetInfo\\n responses:\\n \'200\':\\n description: (Expected Result)\\n schema:\\n type: object\\n properties:\\n version:\\n type: string\\n default:\\n description: (Unexpected Error)\\n /persons/all:\\n get:\\n description: \' Retreive all the records of Sample.Person \'\\n summary: \' Get all records of Person class \'\\n operationId: GetAllPersons\\n x-ISC_ServiceMethod: GetAllPersons\\n responses:\\n \'200\':\\n description: (Expected Result)\\n schema:\\n type: array\\n items:\\n $ref: \'#/definitions/Person\'\\n default:\\n description: (Unexpected Error)\\n \'/persons/{id}\':\\n get:\\n description: \' Return one record fo Sample.Person \'\\n summary: \' GET method to return JSON for a given person id\'\\n operationId: GetPerson\\n x-ISC_ServiceMethod: GetPerson\\n parameters:\\n - name: id\\n in: path\\n required: true\\n type: string\\n responses:\\n \'200\':\\n description: (Expected Result)\\n schema:\\n $ref: \'#/definitions/Person\'\\n default:\\n description: (Unexpected Error)\\n put:\\n description: \' Update a record in Sample.Person with id \'\\n summary: \' Update a person with id\'\\n operationId: UpdatePerson\\n x-ISC_ServiceMethod: UpdatePerson\\n parameters:\\n - name: id\\n in: path\\n required: true\\n type: string\\n - name: payloadBody\\n in: body\\n description: Request body contents\\n required: false\\n schema:\\n type: string\\n responses:\\n \'200\':\\n description: (Expected Result)\\n default:\\n description: (Unexpected Error)\\n delete:\\n description: \' Delete a record with id in Sample.Person \'\\n summary: \' Delete a person with id\'\\n operationId: DeletePerson\\n x-ISC_ServiceMethod: DeletePerson\\n parameters:\\n - name: id\\n in: path\\n required: true\\n type: string\\n responses:\\n \'200\':\\n description: (Expected Result)\\n default:\\n description: (Unexpected Error)\\n /persons/:\\n post:\\n description: \' Creates a new Sample.Person record \'\\n summary: \' Create a person\'\\n operationId: CreatePerson\\n x-ISC_ServiceMethod: CreatePerson\\n parameters:\\n - name: payloadBody\\n in: body\\n description: Request body contents\\n required: false\\n schema:\\n type: string\\n responses:\\n \'200\':\\n description: (Expected Result)\\n default:\\n description: (Unexpected Error)\\ndefinitions:\\n Person:\\n type: object\\n properties:\\n Name:\\n type: string\\n Title:\\n type: string\\n Company:\\n type: string\\n Phone:\\n type: string\\n DOB:\\n type: string\\n format: date-time\\n"}'
What's important here is this part :
```yml
x-headmatter:
readable_by:
- dev
```
Refere to this documentation :
[readable_by attribute](https://docs.konghq.com/enterprise/1.5.x/developer-portal/administration/developer-permissions/#readable_by-attribute)
### 8.2.3. Test it !
#### 8.2.3.1. Register a new developer
#### 8.2.3.2. Approve this developer
#### 8.2.3.3. Add role for this developer
curl 'http://localhost:8001/default/developers/dev@dev.com' -X PATCH --compressed -H 'Content-Type: application/json;charset=utf-8' -H 'Cache-Control: no-cache' -H 'Origin: http://localhost:8002' -H 'DNT: 1' -H 'Connection: keep-alive' -H 'Referer: http://localhost:8002/default/portal/permissions/dev/update' -H 'Pragma: no-cache' --data-raw '{"roles":["dev"]}'
## 8.3. Add Oauth2 for developer
In this part we will add an Oauth2 authentication for developers to use securely our crud API.
This flow will provide self-registration from developer and grant them access to the crud API.
### 8.3.1. First, remove basic auth
To do so, we will replace our basic auth to a bearToken one.
First disable our basic auth/acl.
**IAM Portal**
**Rest API**
# Disable ACL Plugin
curl 'http://localhost:8001/default/routes/afefe836-b9be-49a8-927a-1324a8597a9c/plugins/3f2e605e-9cb6-454a-83ec-d1b1929b1d30' -X PATCH --compressed -H 'Content-Type: application/json;charset=utf-8' -H 'Cache-Control: no-cache' -H 'Origin: http://localhost:8002' -H 'DNT: 1' -H 'Connection: keep-alive' -H 'Referer: http://localhost:8002/default/plugins/acl/3f2e605e-9cb6-454a-83ec-d1b1929b1d30/update' -H 'Pragma: no-cache' --data-raw '{"enabled":false,"name":"acl","route":{"id":"afefe836-b9be-49a8-927a-1324a8597a9c"},"config":{"hide_groups_header":false,"whitelist":["user","dev","crud"]}}'
### 8.3.2. Second, add application-registration plugin
IAM Portal
Rest API
# Create application-registration plugin
curl -i -X POST \
--url http://localhost:8001/services/crud/plugins \
--data 'name=application-registration' \
--data 'config.auth_header_name=authorization' \
--data 'config.auto_approve=true' \
--data 'config.display_name=auth' \
--data 'config.enable_client_credentials=true'
### 8.3.3. Link service and documentation
**IAM Porta**
**Rest API**
curl 'http://localhost:8001/default/document_objects' --compressed -H 'Content-Type: application/json;charset=utf-8' -H 'Cache-Control: no-cache' -H 'Origin: http://localhost:8002' -H 'DNT: 1' -H 'Connection: keep-alive' -H 'Referer: http://localhost:8002/default/services/create-documentation' -H 'Pragma: no-cache' --data-raw '{"service":{"id":"7bcef2e6-117c-487a-aab2-c7e57a0bf61a"},"path":"specs/iam-training.yml"}'
#### 8.3.3.1. Test it !
From the dev portal logged as dev@dev.com, create a new application.
This will give you client_id and client_secret.
Theses can be used in the swagger dev portal.
Register this application to the crud service :
Get token:
curl --insecure -X POST https://localhost:8443/persons/oauth2/token \
--data "grant_type=client_credentials" \
--data "client_id=2TXNvDqjeVMHydJbjv9t96lWTXOKAtU8" \
--data "client_secret=V6Vma6AtIvl04UYssz6gAxPc92eCF4KR"
Use token :
curl --insecure -X GET https://localhost:8443/persons/all \
--header "authorization: Bearer u5guWaYR3BjZ1KdwuBSC6C7udCYxj5vK"
# 9. Secure Management Portal
## 9.1. Create an admin
As we have bootstrap Kong without a seed password.
We have to create an admin before enforcing RBAC.
To do so:
* Go to Teams
* Invite admin
* Set Mail
* Set Username
* Set role to super admin
* Invite
* Go to Invited Admin
* View
* Generate link
## 9.2. Enable Basic Auth for Kong Manager
To enable this feature, we have to change the docker-compose file.
Add this to the iam service, environment
```yml
KONG_ENFORCE_RBAC: 'on'
KONG_ADMIN_GUI_AUTH: 'basic-auth'
KONG_ADMIN_GUI_SESSION_CONF: '{"secret":"${IRIS_PASSWORD}","storage":"kong","cookie_secure":false}'
```
Restart the container
docker-compose down && docker-compose up -d
Go to the invited admin link :
```url
http://localhost:8002/register?email=test.test%40gmail.com&username=admin&token=eyJhbGciOiJIUzI1NiIsInR5cCI6IkpXVCJ9.eyJleHAiOjE2MTYzMzYzNzEsImlkIjoiY2JiZGE5Y2UtODQ3NS00MmM2LTk4ZjItNDgwZTI4MjQ4NWNkIn0.sFeOc_5UPIr3MdlQrgyGvmvIjRFvSn3nQjo2ph8GrJA
```
## 9.3. Use Kong Admin API with RBAC
As RBAC is set, we can't use kong admin api anymore :
curl -s -X GET \
--url http://localhost:8001/routes
Get this error :
```json
{"message":"Invalid credentials. Token or User credentials required"}
```
### 9.3.1. Create and admin user with a token
* Go to Teams
* RBAC Users
* Add new user
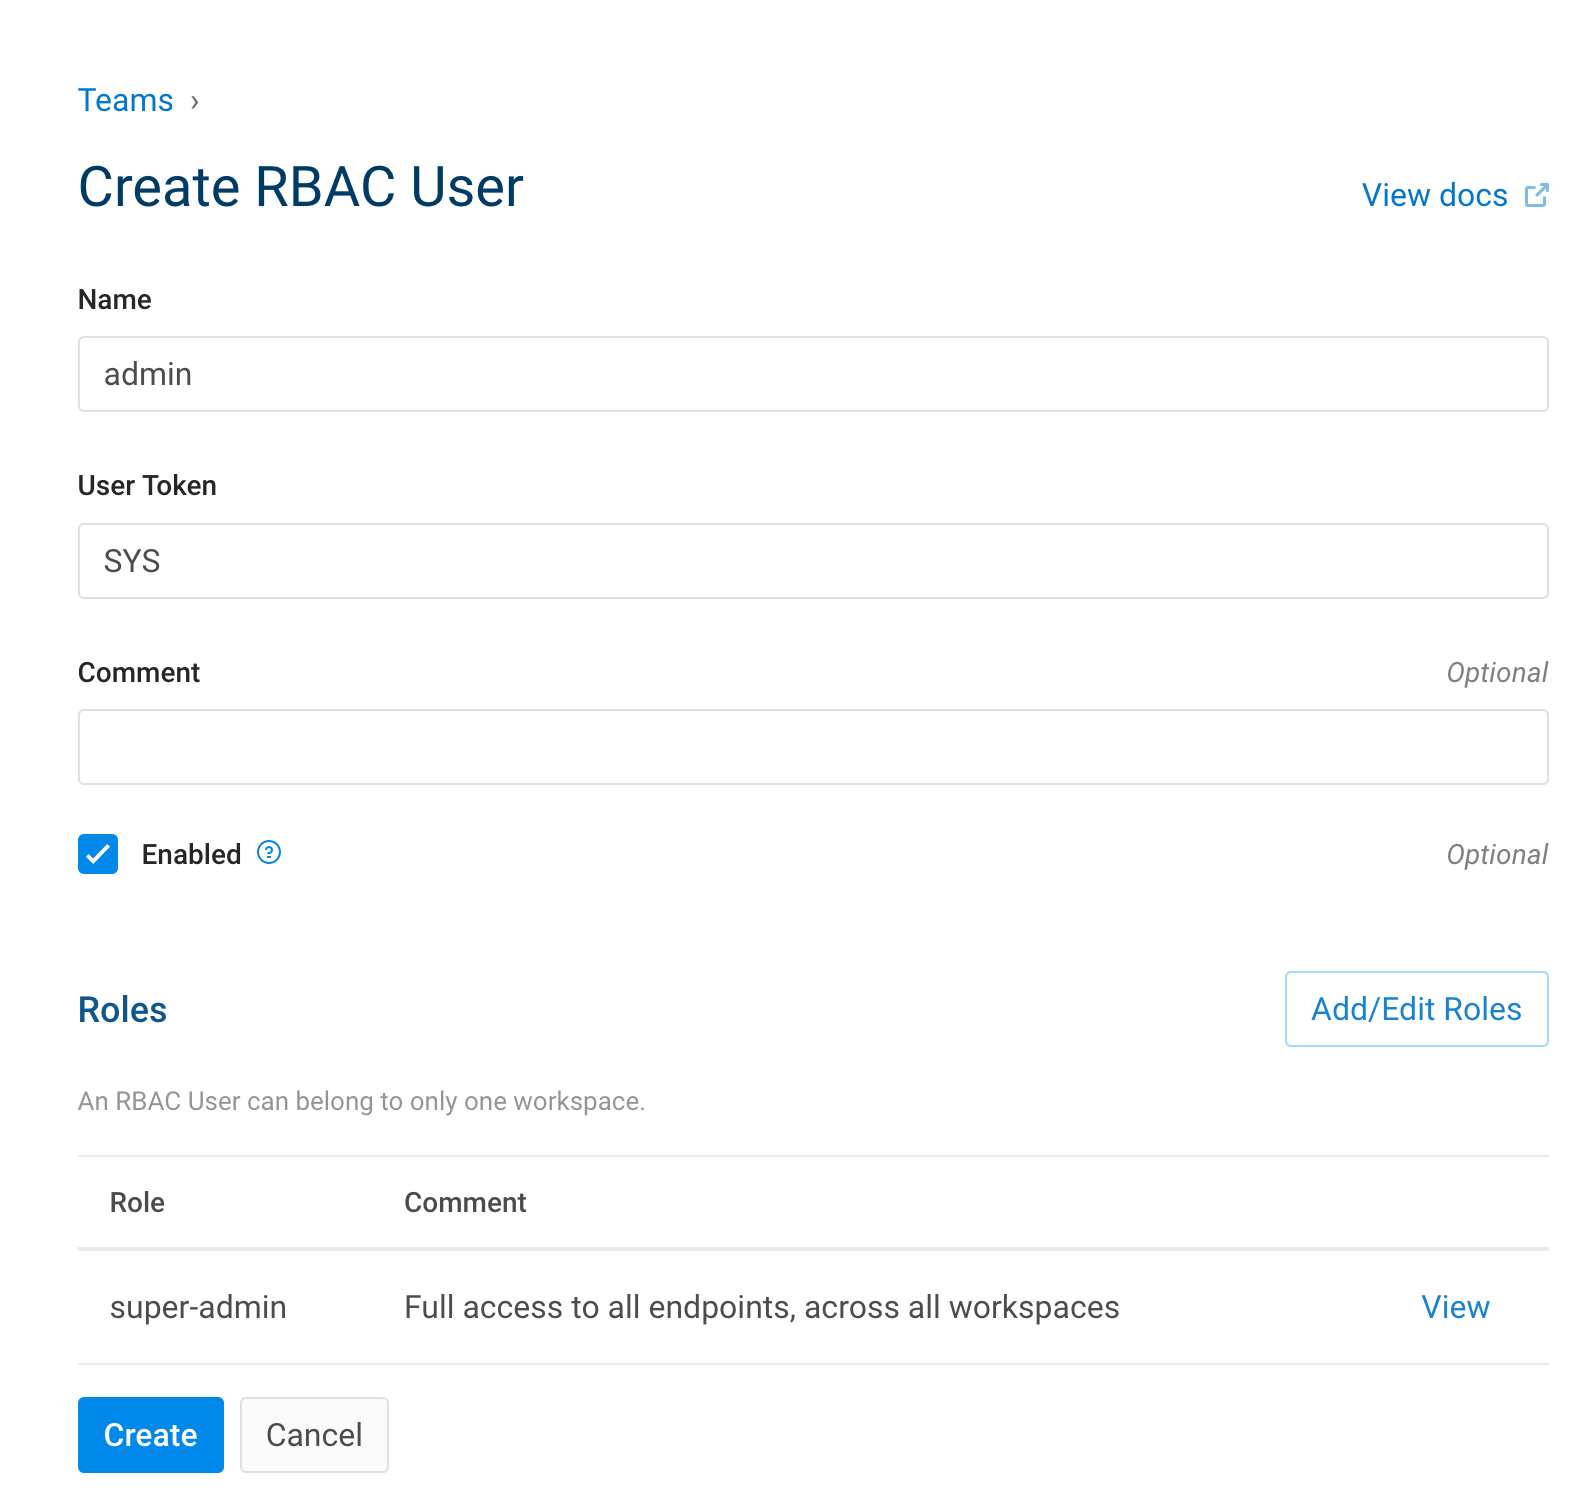
curl -s -X GET \
--url http://localhost:8001/routes \
--header "Kong-Admin-Token: SYS"
# 10. Plugins

Kong come with high quality plugins.
But, what if, we need plugin that are not embedded. If we want community plugins ?
In this chapiter, we will talk about community plugins, how to import them.
Then, we will see how-to build our own plugin.
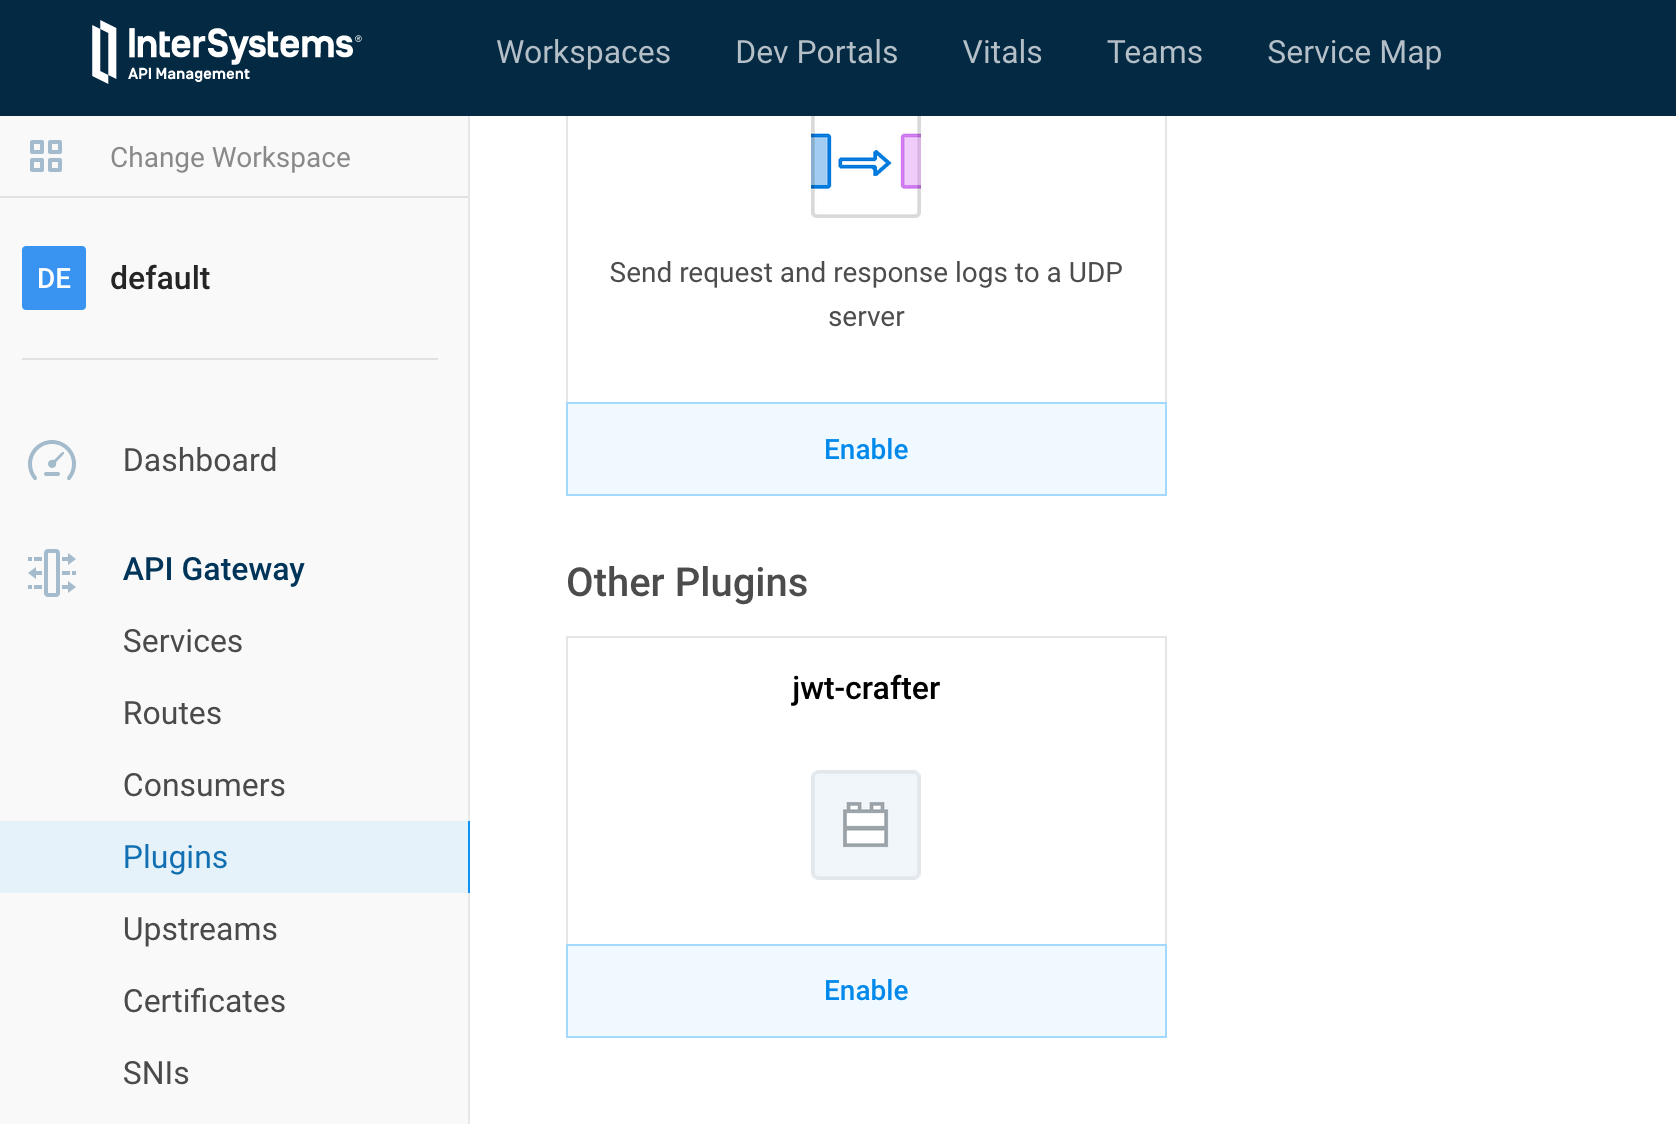
## 10.1. Import a community plugin
For this part, we will be using the jwt-crafter plugin.
This plugin adds the possibility to generate a JWT token within Kong itself, eliminating the need for an upstream service doing the token generation.
Here is the plugin :
```
https://github.com/grongierisc/kong-plugin-jwt-crafter
```
To install this plugin, as we are using the docker version, we have to build a new image who embed the plugin.
### 10.1.1. Build a new Kong/IAM docker image with the community plugin
1. Create a folder named iam at root of this git.
2. Create a dockerfile in this new folder
3. Create a folder named plugins
1. This is where we will add all our community plugins
4. Update the docker-compose file to enable the new plug in
In the plugins folder, git clone our community plugin.
git clone https://github.com/grongierisc/kong-plugin-jwt-crafter
The dockerfile should look like this:
```dockerfile
FROM intersystems/iam:1.5.0.9-4
USER root
COPY ./plugins /custom/plugins
RUN cd /custom/plugins/kong-plugin-jwt-crafter && luarocks make
USER kong
```
What we see in this dockerfile ?
Simply to install a community plugin, we have to move to its root folder (where the rockspec is) and call luarocks make. That's it. You have installed the plugin.
For the docker-compose part :
1. Edit the iam iamge tag
1. intersystems/iam:1.5.0.9-4 -> intersystems/iam-custom:1.5.0.9-4
2. Add a build context
```yml
build:
context: iam
dockerfile: dockerfile
```
3. Enable the plugin in the environment variables
```yml
KONG_PLUGINS: 'bundled,jwt-crafter'
```
Now build our new iam image :
docker-compose build iam
### 10.1.2. Test it !
docker-compose up -d
If you go to plugin -> new, at the bottom of the list you should see the jwt-crafter plugin.
#### 10.1.2.1. Use it !
1. Create a new service :
IAM Portal
Rest API
# Create service
curl -i -X POST \
--url http://localhost:8001/services/ \
--data 'name=crud-persons' \
--data 'url=http://iris:52773/crud/persons/'
2. Create a route
IAM Portal
Rest API
# Create route
curl -i -X POST \
--url http://localhost:8001/services/crud-persons/routes \
--data 'name=crud-route-jwt' \
--data 'paths=/crud/persons/*' \
--data 'strip_path=true'
3. Re-use our auto-auth
IAM Portal
Rest API
# Create plugin
curl -i -X POST \
--url http://localhost:8001/services/crud-persons/plugins \
--data 'name=request-transformer' \
--data 'config.add.headers=Authorization:Basic U3VwZXJVc2VyOlNZUw==' \
--data 'config.replace.headers=Authorization:Basic U3VwZXJVc2VyOlNZUw=='
Now we are set. The real use of jwt-crafter.
```bash
# Add acl to route
curl -i -X POST http://localhost:8001/routes/crud-route-jwt/plugins \
--data "name=acl" \
--data "config.whitelist=test" \
--data "config.hide_groups_header=false"
# Create service
curl -i -X POST \
--url http://localhost:8001/services/ \
--data 'name=jwt-login' \
--data 'url=http://neverinvoked/'
# Create route
curl -i -X POST \
--url http://localhost:8001/services/jwt-login/routes \
--data 'name=jwt-login-route' \
--data 'paths=/jwt/log-in'
# Enable basic auth for service
curl -i -X POST http://localhost:8001/routes/jwt-login-route/plugins \
--data "name=basic-auth" \
--data "config.hide_credentials=false"
# Enable basic auth for service
curl -i -X POST http://localhost:8001/routes/jwt-login-route/plugins \
--data "name=jwt-crafter" \
--data "config.expires_in=86400"
# Add consumer
curl -i -X POST \
--url http://localhost:8001/consumers/ \
--data "username=test"
# Add consumer group
curl -i -X POST \
--url http://localhost:8001/consumers/test/acls \
--data "group=test"
# Add consumer credentials
curl -i -X POST http://localhost:8001/consumers/test/basic-auth \
--data "username=test" \
--data "password=test"
curl -i -X POST http://localhost:8001/consumers/test/jwt \
--data "key=test" \
--data "algorithm=HS256"
# JWT plugins
curl -i -X POST http://localhost:8001/routes/crud-route-jwt/plugins \
--data "name=jwt"
```
Test it !
```bash
# test:test is base64 encoded
curl -H 'Authorization: basic dGVzdDp0ZXN0' localhost:8000/jwt/log-in
```
```bash
curl --location --request GET 'http://localhost:8000/crud/persons/all' \
--header 'Authorization: Bearer eyJhbGciOiJIUzI1NiIsInR5cCI6IkpXVCJ9.eyJuYW0iOiJ0ZXN0Iiwic3ViIjoiODJiNjcwZDgtNmY2OC00NDE5LWJiMmMtMmYxZjMxNTViN2E2Iiwicm9sIjpbInRlc3QiXSwiZXhwIjoxNjE2MjUyMTIwLCJpc3MiOiJ0ZXN0In0.g2jFqe0hDPumy8_gG7J3nYsuZ8KUz9SgZOecdBDhfns'
```
## 10.2. Create a new plugin
This is not the place to learn lua.
But I'll give you some tips like how to quickly restart IAM to test our new development.
### 10.2.1. File structure
```
kong-plugin-helloworld
├── kong
│ └── plugins
│ └── helloworld
│ ├── handler.lua
│ └── schema.lua
└── kong-plugin-helloworld-0.1.0-1.rockspec
```
By convention, kong plugins must be prefix by kong-plugin.
In our example, the name of the plugin is helloworld.
Three files are mandatory :
* handler.lua: the core of your plugin. It is an interface to implement, in which each function will be run at the desired moment in the lifecycle of a request / connection.
* schema.lua: your plugin probably has to retain some configuration entered by the user. This module holds the schema of that configuration and defines rules on it, so that the user can only enter valid configuration values.
* *.rockspec: Rockspec: a package specification file A declarative Lua script, with rules on how to build and package rocks *.rockspec - a Lua file containing some tables.
#### 10.2.1.1. handler.lua
The plugins interface allows you to override any of the following methods in your handler.lua file to implement custom logic at various entry-points of the execution life-cycle of Kong:
|Function name |Phase |Description|
|----|----|----|
|:init_worker() |init_worker |Executed upon every Nginx worker process’s startup.|
|:certificate() |ssl_certificate |Executed during the SSL certificate serving phase of the SSL handshake.|
|:rewrite() |rewrite |Executed for every request upon its reception from a client as a rewrite phase handler. NOTE in this phase neither the Service nor the Consumer have been identified, hence this handler will only be executed if the plugin was configured as a global plugin!|
|:access() |access |Executed for every request from a client and before it is being proxied to the upstream service.|
|:response() |access |Replaces both header_filter() and body_filter(). Executed after the whole response has been received from the upstream service, but before sending any part of it to the client.|
|:header_filter() |header_filter |Executed when all response headers bytes have been received from the upstream service.|
|:body_filter() |body_filter |Executed for each chunk of the response body received from the upstream service. Since the response is streamed back to the client, it can exceed the buffer size and be streamed chunk by chunk. hence this method can be called multiple times if the response is large. See the lua-nginx-module documentation for more details.|
|:log() |log |Executed when the last response byte has been sent to the client.|
##### 10.2.1.1.1. Example
```lua
local BasePlugin = require "kong.plugins.base_plugin"
local HelloWorldHandler = BasePlugin:extend()
function HelloWorldHandler:new()
HelloWorldHandler.super.new(self, "helloworld")
end
function HelloWorldHandler:access(conf)
HelloWorldHandler.super.access(self)
if conf.say_hello then
ngx.log(ngx.ERR, "============ Hello World! ============")
ngx.header["Hello-World"] = "Hello World!!!"
else
ngx.log(ngx.ERR, "============ Bye World! ============")
ngx.header["Hello-World"] = "Bye World!!!"
end
end
return HelloWorldHandler
```
#### 10.2.1.2. schema.lua
Simply the configuration file see in the portal.
```lua
return {
no_consumer = true,
fields = {
say_hello = { type = "boolean", default = true },
say_hello_body = { type = "boolean", default = true }
}
}
```
#### 10.2.1.3. *.rockspec
```rockspec
package = "kong-plugin-helloworld" -- hint: rename, must match the info in the filename of this rockspec!
-- as a convention; stick to the prefix: `kong-plugin-`
version = "0.1.0-1" -- hint: renumber, must match the info in the filename of this rockspec!
-- The version '0.1.0' is the source code version, the trailing '1' is the version of this rockspec.
-- whenever the source version changes, the rockspec should be reset to 1. The rockspec version is only
-- updated (incremented) when this file changes, but the source remains the same.
-- TODO: This is the name to set in the Kong configuration `plugins` setting.
-- Here we extract it from the package name.
local pluginName = package:match("^kong%-plugin%-(.+)$") -- "myPlugin"
supported_platforms = {"linux", "macosx"}
source = {
url = "https://github.com/grongierisc/iam-training",
branch = "master",
-- tag = "0.1.0"
-- hint: "tag" could be used to match tag in the repository
}
description = {
summary = "This a demo helloworld for Kong plugin",
homepage = "https://github.com/grongierisc/iam-training",
license = "Apache 2.0"
}
dependencies = {
"lua >= 5.1"
-- other dependencies should appear here
}
build = {
type = "builtin",
modules = {
["kong.plugins."..pluginName..".handler"] = "kong/plugins/"..pluginName.."/handler.lua",
["kong.plugins."..pluginName..".schema"] = "kong/plugins/"..pluginName.."/schema.lua",
}
}
```
### 10.2.2. Build it
We will be doing the same as here :
[11.1.1. Build a new Kong/IAM docker image with the community plugin](#1111-build-a-new-kongiam-docker-image-with-the-community-plugin)
But adapted to our plugin :
Dockerfile :
```dockerfile
FROM intersystems/iam:1.5.0.9-4
USER root
COPY ./plugins /custom/plugins
RUN cd /custom/plugins/kong-plugin-jwt-crafter && luarocks make
RUN cd /custom/plugins/kong-plugin-helloworld && luarocks make
#USER kong #Stay with root use, we will see why later
```
Enable the plugin in the environment variables
```yml
KONG_PLUGINS: 'bundled,jwt-crafter,helloworld'
```
Now build our new iam image :
docker-compose build iam
Then docker-compose up and test it.
### 10.2.3. Tips
To run the IAM container in "debug mode", to easily stop/restart it, modify the dockerfile to add/remove plugin and so on.
You can stop iam service :
docker-compose stop iam
And start it in run mode with a shell :
docker-compose run -p 8000:8000 -p 8001:8001 -p 8002:8002 iam sh
In the container :
./docker-entrypoint.sh kong
Happy coding :)
# 11. CI/CD

We are close to the end of this article.
To finish let's talk about DevOps/CI/CD. The aim of this chapter is to give you some ideas about how to implement/script ci/cd for IAM/Kong.
As Kong is API first, the idea is to script all the rest calls and play then on each environment.
The easiest way to script rest calls is with postman and his best friend newman (command line version of postman).
## 11.1. Create the postman collection
One thing handy with postman is its ability to run script before and after a rest call.
We will use this functionality in most cases.
### 11.1.1. Is IAM startup ?
Our first script will check if IAM is up and running.
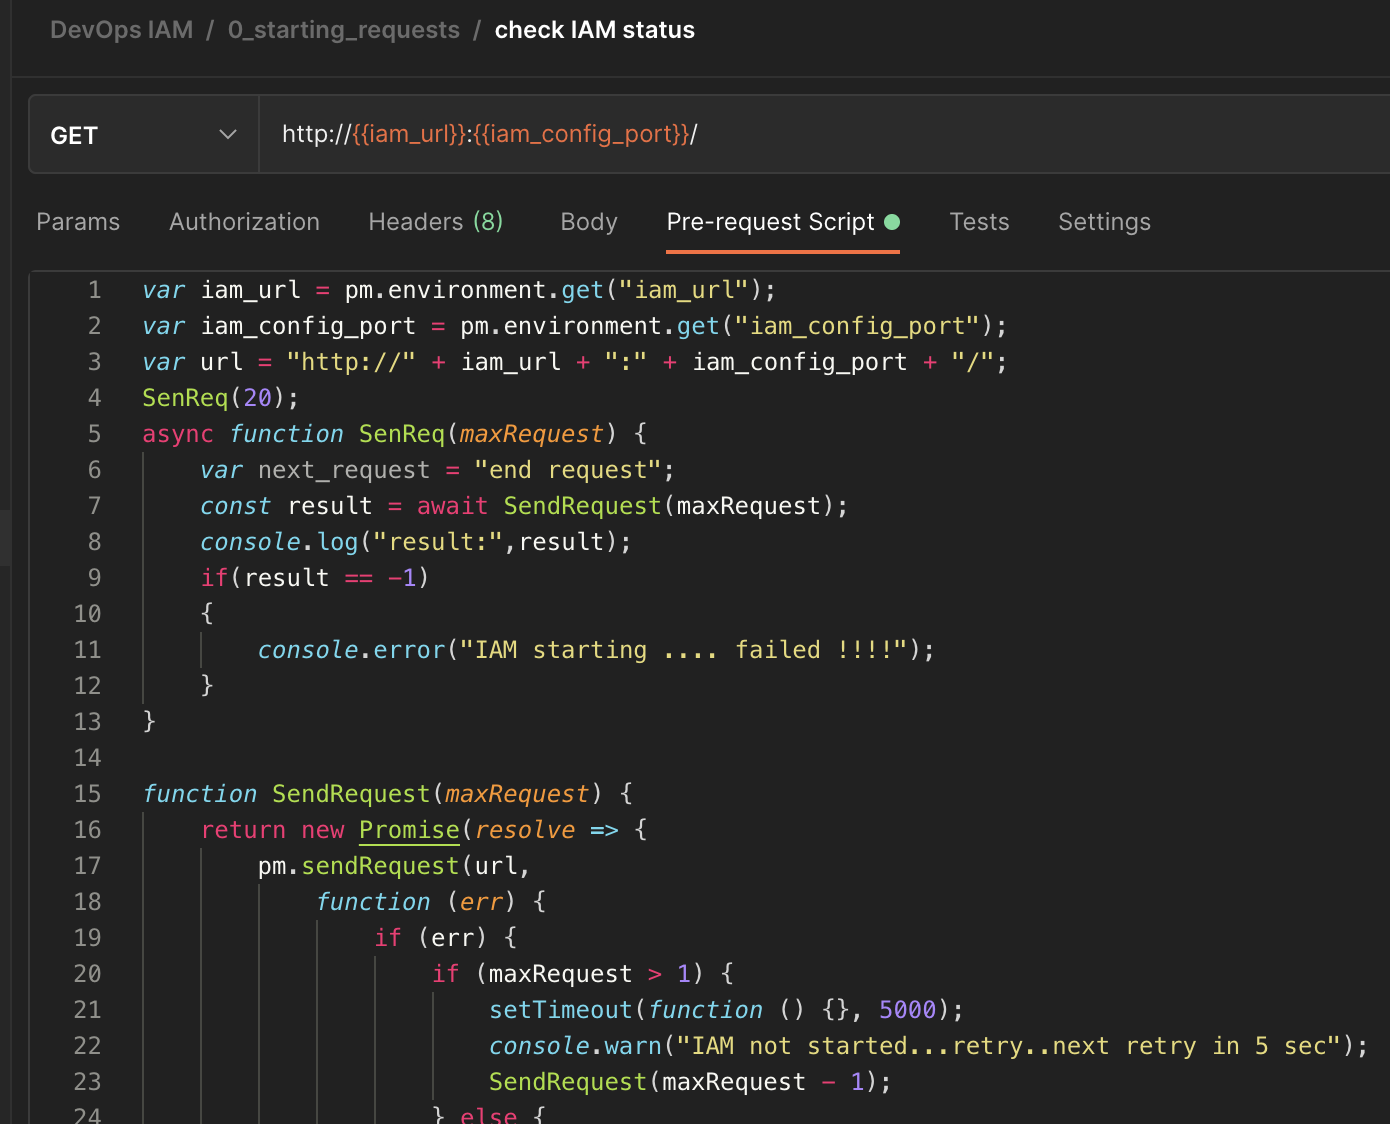
```javascript
var iam_url = pm.environment.get("iam_url");
var iam_config_port = pm.environment.get("iam_config_port");
var url = "http://" + iam_url + ":" + iam_config_port + "/";
SenReq(20);
async function SenReq(maxRequest) {
var next_request = "end request";
const result = await SendRequest(maxRequest);
console.log("result:",result);
if(result == -1)
{
console.error("IAM starting .... failed !!!!");
}
}
function SendRequest(maxRequest) {
return new Promise(resolve => {
pm.sendRequest(url,
function (err) {
if (err) {
if (maxRequest > 1) {
setTimeout(function () {}, 5000);
console.warn("IAM not started...retry..next retry in 5 sec");
SendRequest(maxRequest - 1);
} else {
console.error("IAM starting .... failed");
resolve(-1);
}
} else {
console.log("IAM starting .... ok");
resolve(1);
}
}
);
});
}
```
### 11.1.2. Delete old datas
```javascript
var iam_url=pm.environment.get("iam_url");
var iam_config_port=pm.environment.get("iam_config_port");
pm.sendRequest("http://"+iam_url+":"+iam_config_port+"/plugins", function (err, res) {
if (err) {
console.log("ERROR : ",err);
}
else {
var body_json=res.json();
if(body_json.data)
{
for( i=0; i < body_json.data.length; i++)
{
// Example with a full fledged SDK Request
route_id = body_json.data[i].id;
const delete_route = {
url: "http://"+iam_url+":"+iam_config_port+"/plugins/" + route_id,
method: 'DELETE',
};
pm.sendRequest(delete_route, function(err, res){
console.log(err ? err : res);
});
}
}
}
});
```
Do the same for routes, services and consumers.
This order is important beause you can't remove services with routes.
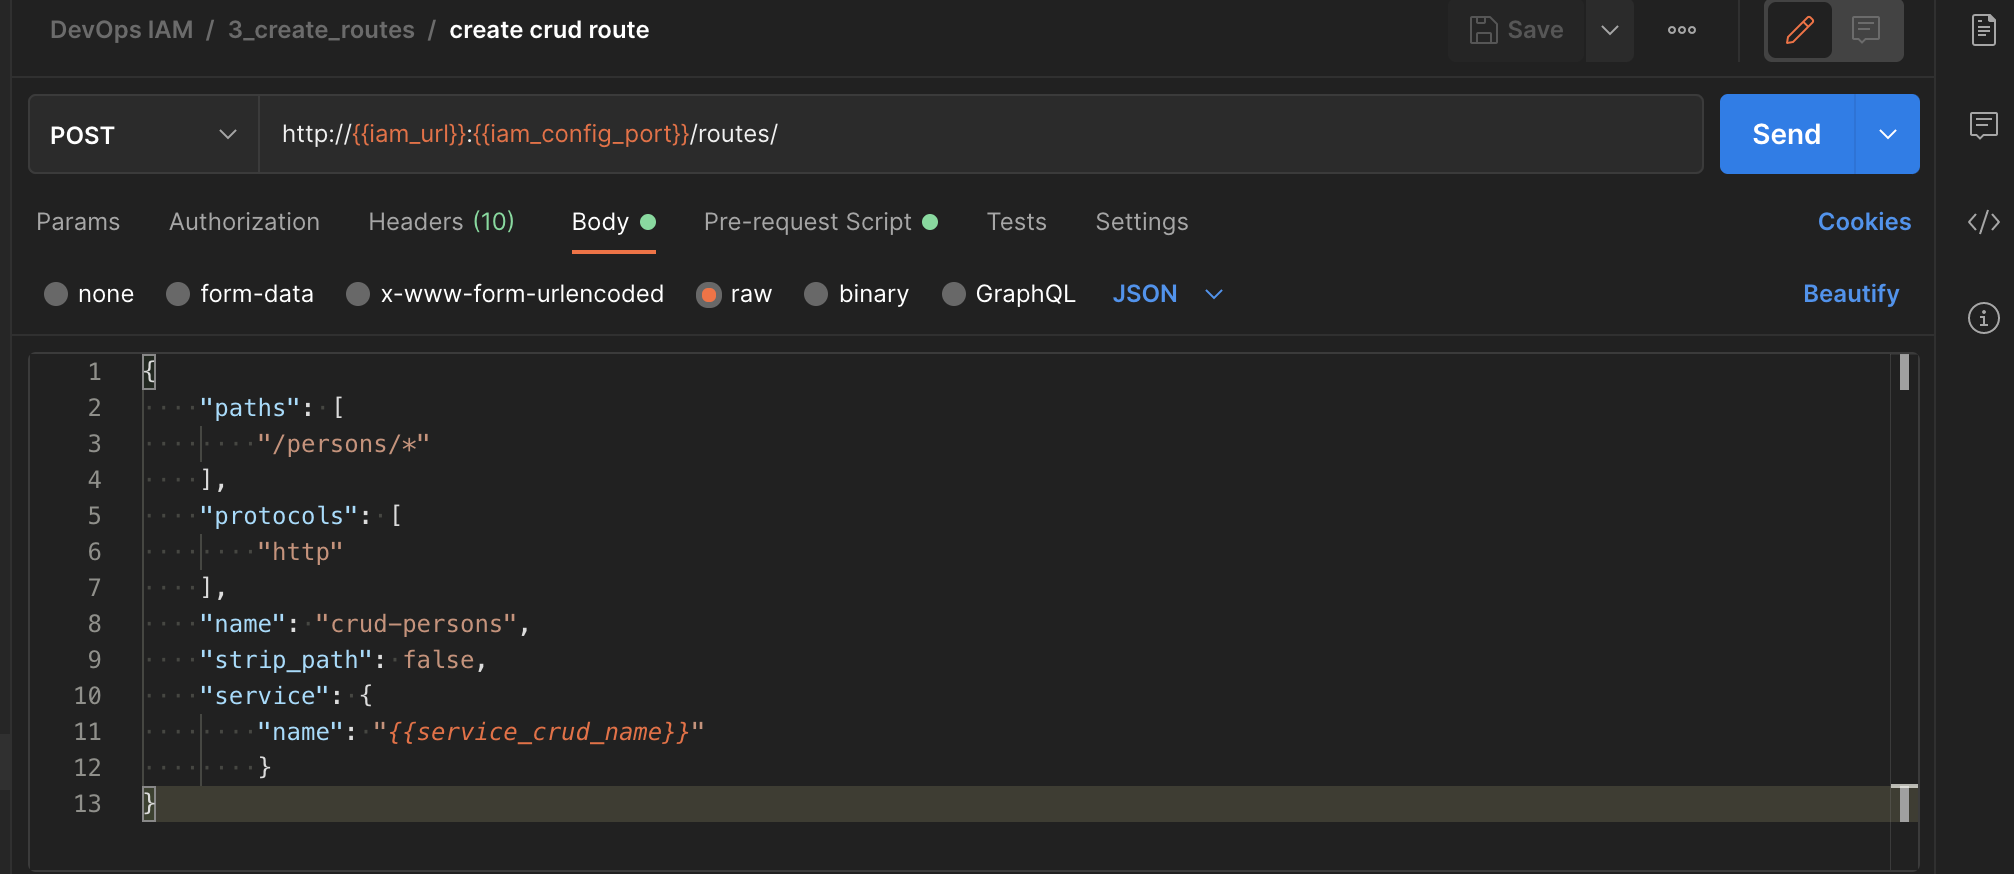
### 11.1.3. Create Service/Route
Routes are dependent from services. For this type of cases we can use Test function of postman to retrieve data :
Screen
Script
var id = pm.response.json().id;
var name = pm.response.json().name;
pm.globals.set("service_crud_id", id);
pm.globals.set("service_crud_name", name);
Here we save from the response the id and name of the new services.
Then we can use it in the next route creation :
Screen
Script
service_crud_name = pm.globals.get("service_crud_name");
Here we retrieve the global variable "service_crud_name".
Then, use it in the actual call.
Screen
Script
{
"paths": [
"/persons/*"
],
"protocols": [
"http"
],
"name": "crud-persons",
"strip_path": false,
"service": {
"name": "{{service_crud_name}}"
}
}
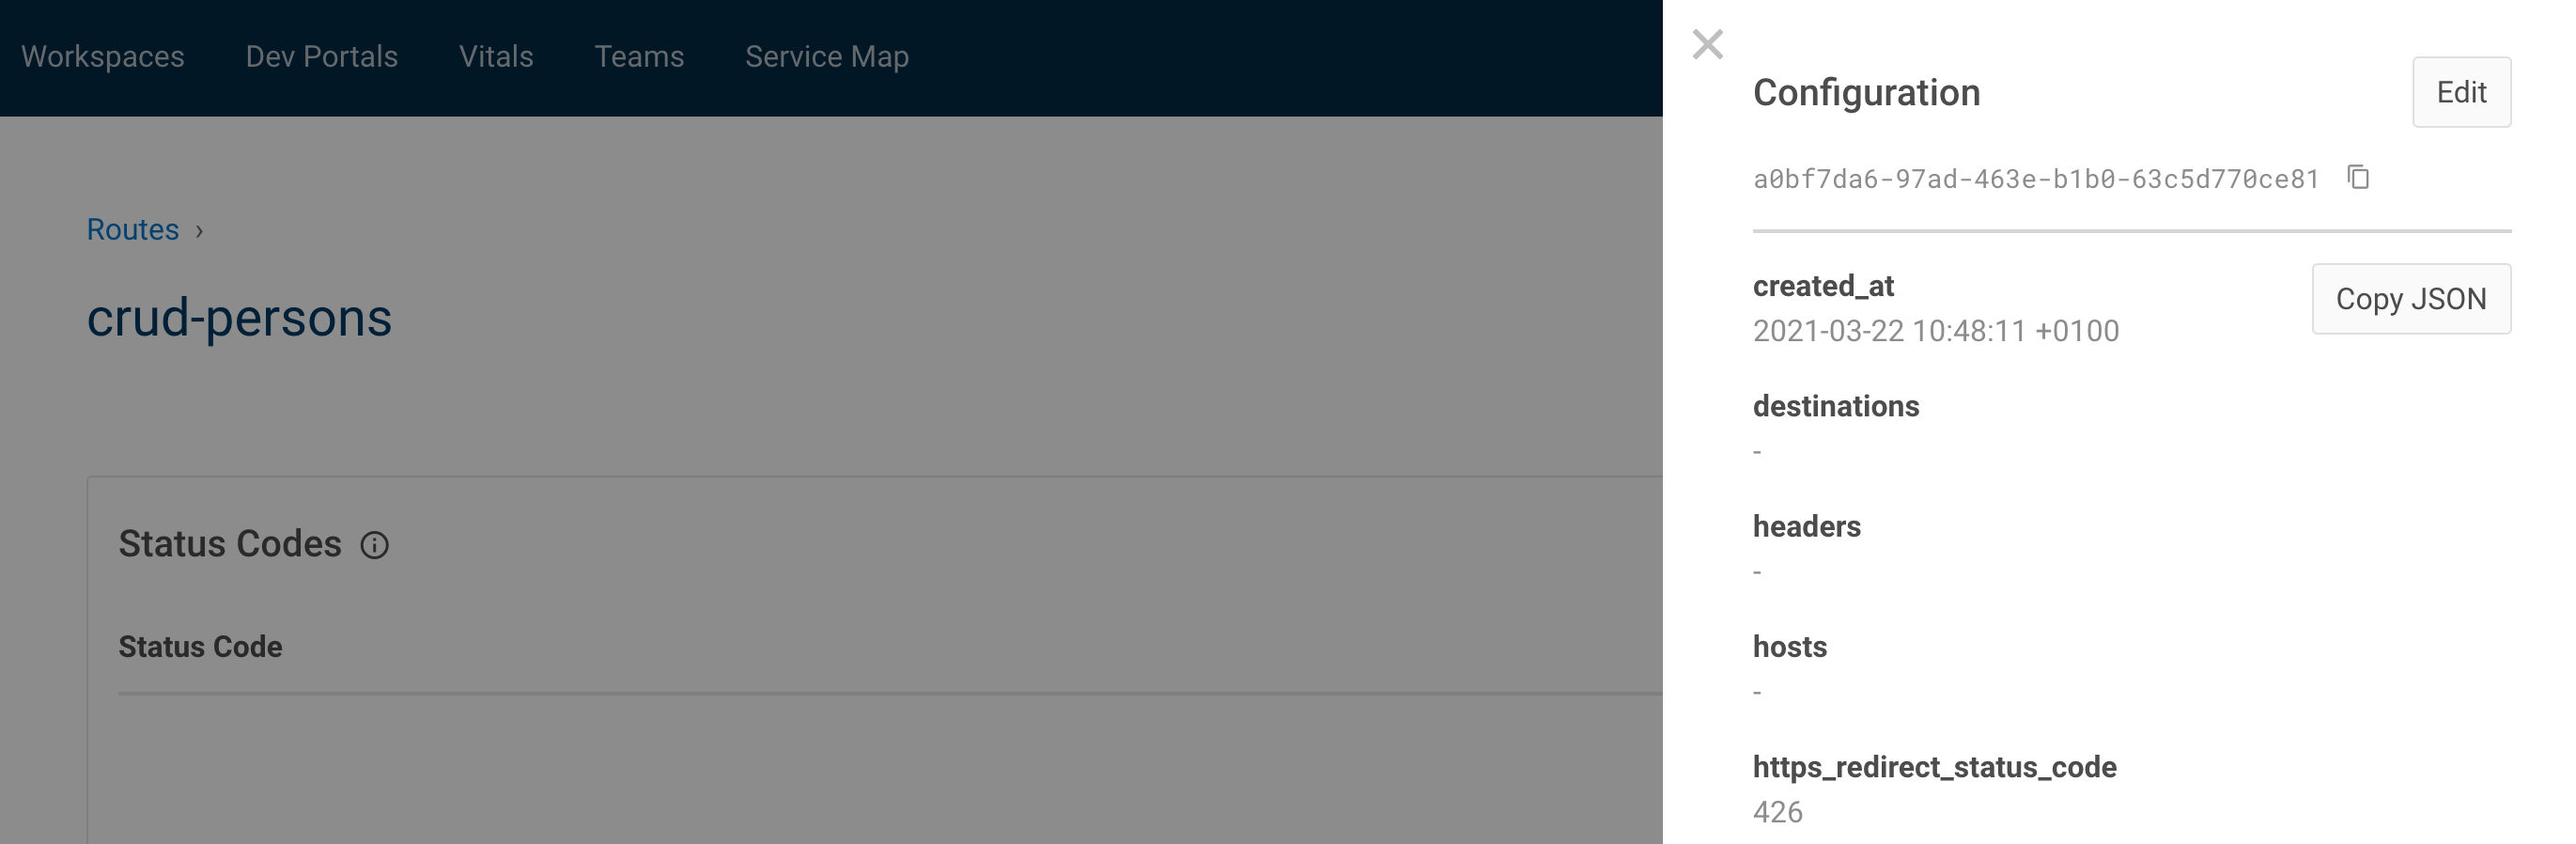
#### 11.1.3.1. Tips
* paylaod can be either json or form-data
* form-data :

* json :
Easy way to get the json format, go to the manager portal, view, copy json :
## 11.2. Run it with newman
docker run --rm -v "`pwd`/ci/":"/etc/newman" \
--network="iam-training_default" \
-t postman/newman run "DevOps_IAM.postman_collection.json" \
--environment="DevOps_IAM.postman_environment.json"
Announcement
Evgeny Shvarov · Mar 26, 2021
Hi Developers!
Here're the technology bonuses for the InterSystems Developer Tools Contest that will give you extra points in the voting.
Docker container usage - 2 points
The application gets a 'Docker container' bonus if it uses InterSystems IRIS running in a docker container. Here is the simplest template to start from.
ZPM Package deployment - 2 points
You can collect the bonus if you build and publish the ZPM(ObjectScript Package Manager) package for your Full-Stack application so it could be deployed with:
zpm "install your-multi-model-solution"
command on IRIS with ZPM client installed.
ZPM client. Documentation.
Unit Testing - 2 points
Applications that have Unit Testing for the InterSystems IRIS code will collect the bonus.
Learn more about ObjectScript Unit Testing in Documentation and on Developer Community.
Online Demo of your project - 3 pointsCollect 3 more bonus points if you provision your project to the cloud as an online demo. You can use this template or any other deployment option. Example. Learn more on deployment in Monday's Kick-Off webinar.
Code quality analysis with zero bugs - 2 points
Include the code quality Github action for code static control and make it show 0 bugs for ObjectScript. Learn more in Monday's Kick-Off webinar.
Article on Developer Community - 2 points
Post an article on Developer Community that describes features of your project. Collect 2 points for each article. Translations to different languages work too.
Video on YouTube - 3 points
Make the Youtube video that demonstrates your product in action and collect 3 bonus points per each. Example.
The list of bonuses is subject to change. Stay tuned!
Article
Yuri Marx · Jun 22, 2020
The Intersystems IRIS is a great platform to develop, run and consume Data Science services. IRIS can ingest data from any type, format, protocol and time using adapters. These datasets can be prepared with BPL, DTL and Object Script and stored as SQL or NoSQL data. Finally, it can be consumed by open ML algorithms inside IRIS and visualized in the IRIS dashboards. See more in: https://docs.intersystems.com/irislatest/csp/docbook/Doc.View.cls?KEY=PAGE_data_science.
Announcement
Anastasia Dyubaylo · Oct 5, 2020
Hey Developers!
This week is a voting week for the InterSystems Full Stack Contest!
So, it's time to give your vote to the best solutions built with InterSystems IRIS.
🔥 You decide: VOTING IS HERE 🔥
How to vote? This is easy: you will have one vote, and your vote goes either in Experts Nomination or in Community Nomination.
Experts Nomination
If you are InterSystems Product Manager, or DC moderator, or Global Master from Specialist level and above cast your vote in the Expert nomination.
Community Nomination
If you ever contributed to DC (posts or replies) and this was not considered as spam you are able to vote for the applications in the Community nomination.
Voting
Voting takes place on the Open Exchange Contest Page and you need to sign in to Open Exchange – you can do it with your DC account credentials.
If you changed your mind, cancel the choice and give your vote to another application – you have 7 days to choose!
Contest participants are allowed to fix the bugs and make improvements to their applications during the voting week, so don't miss and subscribe to application releases!
➡️ Also, please check out the Judgment and Voting Rules for the Contest here.
OK! After the first day of the voting we have:
Expert Nomination, Top 3
npm-iris – 3
apptools-admin – 3
qewd-conduit – 3
➡️ The leaderboard.
Community Nomination, Top 3
npm-iris – 9
apptools-admin – 1
qewd-conduit – 1
WebSocket_with_Fhir – 1
➡️ The leaderboard.
Experts, we are waiting for your votes! 🔥
Participants, improve & promote your solutions!
Here are the results after 2 days of voting:
Expert Nomination, Top 3
npm-iris – 7
apptools-admin – 6
realworld-intersystems-iris – 3
qewd-conduit – 3
➡️ The leaderboard.
Community Nomination, Top 3
npm-iris – 11
apptools-admin – 4
restoreUI – 3
➡️ The leaderboard.
So, the voting continues.
Please support the application you like!
Hey Developers,
Technology bonuses for the contest apps have been published.
Check them out and cast your vote for the application you like! ✅
Developers! Only 3 days left before the end of voting.
Please check out the Contest Board and vote for the solutions you like! 👍🏼
Article
Yuri Marx · Jan 4, 2021
Big Data 5V with InterSystems IRIS
See the table below:
Velocity: Elastic velocity delivered with horizontal and vertical node scalingEnablers: Distributed memory cache, Distributed processing, Sharding and Multimodel Architecturehttps://www.intersystems.com/isc-resources/wp-content/uploads/sites/24/ESG_Technical_Review-InterSystems-IRIS.pdf and https://learning.intersystems.com/course/view.php?id=1254&ssoPass=1
Value: exponential data value produced by Analytics and IAEnablers: BI, NLP, ML, AutoML and Multimodel Architecturehttps://docs.intersystems.com/irislatest/csp/docbook/Doc.View.cls?KEY=SETAnalytics e https://docs.intersystems.com/irislatest/csp/docbook/DocBook.UI.Page.cls?KEY=GIML_AUTOML
Veracity: single data source of truth unified at a corporate levelEnablers: Connectors, Data BUS, BPL to Data Integration and API Managementhttps://docs.intersystems.com/irislatest/csp/docbook/Doc.View.cls?KEY=PAGE_interoperability and https://docs.intersystems.com/irislatest/csp/docbook/DocBook.UI.Page.cls?KEY=AFL_iam
Volume: many tera/petabytes data repositories with great performanceEnablers: Distributed memory cache, Distributed processing, Sharding and Multimodel Architecturehttps://www.intersystems.com/isc-resources/wp-content/uploads/sites/24/ESG_Technical_Review-InterSystems-IRIS.pdf and https://learning.intersystems.com/course/view.php?id=1254&ssoPass=1
Variety: the data formats in the same place (XML, JSON, SQL, Object)Enablers: Repositório e Arquitetura Multimodelohttps://docs.intersystems.com/irislatest/csp/docbook/DocBook.UI.Page.cls?KEY=PAGE_multimodel
Announcement
Anastasia Dyubaylo · Dec 29, 2020
Hi Community,
Learn how to use validation tools in InterSystems IRIS to assess and validate the behavior of a production:
⏯ Validating Your InterSystems Productions
Subscribe to InterSystems Developers YouTube and stay tuned!
Article
Yuri Marx · Feb 23, 2021
I'm participating in the Developing with InterSystems Objects and SQL with Joel Solon. The course is very nice and I will share with you some tips I got during the training. Tips presented in the day 1:
InterSystems IRIS unifies: InterSystems IRIS Database (Caché), IRIS Interoperability (Ensemble), IRIS Business Intelligence (DeepSee) and IRIS Text Analytics (iKnow).
IRIS is multimodel: object, relational, document and multidimensional.
Interoperable: native access from Java, .NET, other languages, like ObjectScript; ODBC and JDBC data access, SOAP/REST service access; message driven with data routing, transformations and workflows; SOA architecture with ESB.
IRIS is Transactions and analytics together.
IRIS scales Horizontal with ECP (distributed cache for user volume) and Sharding for data volume.
Deploy in public or private containers with Cloud Manager.
3 IDE options to develop: VSCode (most popular), Studio (windows only), Atelier (deprecated).
Terminal tool for CLI commands.
Management Portal to browser commands.
IRIS is multiplatform (UNIX, Linux, Windows) with docker option to Linux.
It has year releases 20##.1 (EM - Extended Maintenance) and Quarterly releases (CD - continuous delivery).
IRIS is case sensitive and case camel notation is a good practice.
Classes are a containers to methods and properties.
Methods performs specific tasks and is not allowed method overload (two methods with same name in a class).
There are 2 types of methods: ClassMethod (action not associated with object instance) and Method (action associated with object instance).
Use ##class() to run class methods and create an instance (with %New or %OpenId) to execute Methods.
The default type to method arguments is %String.
The notation ... indicates variable arguments. Example: Method Sample(a As %String, b... as %String) as %Status.
When you pass arguments as method caller:
If you use . you pass as reference;
The arguments are optional, and you can use $data() to test with the caller passed the argument;
string is the default type to variables.
ObjectScript supports dynamic types.
In ObjectScript 0 is for false and other values is true.
Packages allows you organize classes into folders.
If you use import in a class or method you don't need reference the qualified name to a class.
Persistent classes (stored in the disk) extends %Persistent.
Persistent classes have properties to persist class attributes/values.
Each persistent class has an unique ID number immutable.
PS 1: I redeemed this 5 day course (if you pay $2800) with 40,000 points (https://globalmasters.intersystems.com/rewards/34/reward_redemptions/new)
PS 2: Joel Solon is an excellent instructor (great tips to iris certification)
PS 3: the course material is excellent and the course resources, tools and support are fantastic.
Tomorrow I will post day 2 resume.
Good to hear that!
I was thinking about this reward on Global Masters. Maybe I'll redeem my 40k on this. 😃 Good to know. I'll be taking the course before I try for my certification, I'll just need to save up the $2,800 since my points game isn't quite up to snuff! Thanks Yuri, really great information! Yuri,
This is great information, however, on your point "PS 2:" I'd be surprised to hear if your instructor's name wasn't actually @Joel.Solon -- but you're right, he's a great instructor, and one heckuva nice guy to boot! That looks like a fun course! One correction on point 20: the default datatype for variables is string, not %String. And there's more to know about what that means, but come and take the course to find out... A great teaser for the course, thanks for sharing, @Yuri.Gomes! Thanks Joel! The course is great, exercises are great to learn more, I loved! I fixed Joel name, thanks the alert and sorry joel. really excellent course! and Joel is a great teacher!!!
Article
Yuri Marx · Feb 25, 2021
I'm participating in the Developing with InterSystems Objects and SQL with Joel Solon. The course is very nice and I will share with you some tips I got during the training. Tips presented in the day 3:
You can see your class catalog using %Dictionary classes and see your sql objects into INFORMATION_SCHEMA table.
Is possible use SQL inside your ObjectScript methods using Dynamic SQL or Embedded SQL.
You can pass parameters into Dynamic SQL string using ? (eg.: where country = ?) and pass parameters to Embedded SQL using colon (ed.: where country = :variable).
Dynamic SQL Sample (from Intersystems documentation):
SET tStatement = ##class(%SQL.Statement).%New(,"Sample")
SET myquery = 3
SET myquery(1) = "SELECT TOP ? Name,DOB,Home_State"
SET myquery(2) = "FROM Person"
SET myquery(3) = "WHERE Age > 60 AND Age < 65"
SET qStatus = tStatement.%Prepare(.myquery)
IF qStatus'=1 {WRITE "%Prepare failed:" DO $System.Status.DisplayError(qStatus) QUIT}
DO tStatement.%Display()
WRITE !,"End of %Prepare display"
Embedded SQL Sample (from Intersystems documentation):
#SQLCompile Select=Display
&sql(SELECT DOB INTO :a FROM Sample.Person)
IF SQLCODE<0 {WRITE "SQLCODE error ",SQLCODE," ",%msg QUIT}
ELSEIF SQLCODE=100 {WRITE "Query returns no results" QUIT}
WRITE "1st date of birth is ",a,!
DO $SYSTEM.SQL.Util.SetOption("SelectMode",1)
WRITE "changed select mode to: ",$SYSTEM.SQL.Util.GetOption("SelectMode"),!
&sql(SELECT DOB INTO :b FROM Sample.Person)
WRITE "2nd date of birth is ",b
Embedded SQL Sample - Insert:
&sql(INSERT INTO Sample.Person (Name, Age, Phone) VALUES (:name, :age, :phone)
If you need process data in batch use SQL, if you process a single record, use Persistent Object API.
You can create SQLQuery methods and if you use [SqlProc] in the method, will be created a SQL procedure in the SQL side.
From terminal is possible go to SQL Shell, a terminal to SQL commands, from terminal, execute do $system.SQL.Shell().
Persistent classes have a system generated ID, if you need ID controled by you, use IDKEY index with one or more properties. Eg: Index Key on SocialNumber [IdKey, PrimaryKey, Unique].
There two strategies to control concurrency when two or more process try process the same data at same time: Pessimistic and Optimistic.
To acquire a pessimistic control, lock the object with %OpenId(ID, 4), where 4 lock the table to exclusive access. After process ran the lock can be released.
To do optimistic control (indicated to web apps), create in your persistent class Parameter VERSIONPROPERTY = "Version"; Property Version as %Integer [ InitialExpression = 1 ]. IRIS will increment property version in each instance update, allowing coordinate the order of updates, instead lock table.
When you have methods that update, insert or delete data, use transactions, to keep the data consistency. Example:
Transfer(from,to,amount) // Transfer funds from one account to another
{
TSTART
&SQL(UPDATE A.Account
SET A.Account.Balance = A.Account.Balance - :amount
WHERE A.Account.AccountNum = :from)
If SQLCODE TRollBack Quit "Cannot withdraw, SQLCODE = "_SQLCODE
&SQL(UPDATE A.Account
SET A.Account.Balance = A.Account.Balance + :amount
WHERE A.Account.AccountNum = :to)
If SQLCODE TROLLBACK QUIT "Cannot deposit, SQLCODE = "_SQLCODE
TCOMMIT
QUIT "Transfer succeeded"
}
InterSystems IRIS has an Architecture based in Namespaces (logical groups of databases) and Databases.
There two types of data to hold in the databases: for data (globals) and for code (source code - procedures).
You can do horizontal processing scaling to your databases using ECP - Enterprise Cache Protocol, allowing see different databases in several servers in the same namespace.
You can do horizontal data volume scaling (distributed database partitions) using Sharding (only IRIS), allowing partitioning data into distributed nodes (like MongoDB).
The maximum size to a database is 32TB.
To change from a namespace to another do zn "Namespace" or set $namespace = "Namespace".
PS 1: the course show in details how to do transactions control, this is very important.
Tomorrow I will post day 4 resume. Point #16: There is only one type of database. Databases can hold code only, data only, or code and data together. Fixed, thanks!
Article
Yuri Marx · Feb 24, 2021
I'm participating in the Developing with InterSystems Objects and SQL with Joel Solon. The course is very nice and I will share with you some tips I got during the training. Tips presented in the day 2:
You can create persistent classes (classes with a correspondent table in the database to persist class properties).
An Persistent class example:
Class dc.Person extends (%Persistent)
{
Property Name As %String;
Property BirthDate As %Date;
}
When you extends %Persistent, you get %New() to create a new instance in the memory, %Save() to save in the database and %Id() to get the unique ID to the instance in the Database and %OpenId() to load the instance with database values.
Persistent classes allow you calls %Deleteid() to delete an instance from the database, %DeleteExtent() to delete all saved objects (delete without where!) and %ValidateObject() to validate data passed before save (validate required, sizes, etc).
Persistent classes have %IsModified() to check with the data changed in the memory (see joel tip in the comments) and %Reload() to get these changes.
To get possible errors when you try to %Save() or %Delete(): set status = person.%Save(), write status. If success in save will return 1.
We can use do $system.Status.DisplayError(status) to see error details.
To call persistent class methods do: ##class(dc.Person).%Save().
To call a persistent instance method do: ..Method(). It's the same to refer a properties, do: write ..Name.
To remove an object ou variable from program or terminal memory use kill person or set person = "". If you use kill only, all references wiil be removed from memory (not from database, to database use killextent).
If you want a utility method to populate test data, extend your persistent class with %Populate and call Populate(number of rows).
You can create embedded classes to a persistent class extendind %SerialObject (a persistent class without Id, because is linked with a persistent class). Example:
Class PackageName.ClassName Extends %SerialObject
{
Property Phone As %String;
Property Email As %String;
}
This serial will be a property into your persistent class:
Class dc.Person extends (%Persistent)
{
Property Name As %String;
Property BirthDate As %Date;
Property Contact As dc.Contact;
}
In IRIS Database will be create only one table with Person and Contact properties.
You can create Indexes to get uniqueness or to tunning queries. Example: Index NameIndex On Name [Unique].
If you create an index you need to build the index in the Management Portal if table is not empty.
To create a constructor method override %OnNew(). This is a callback method called when call %New(). There are other callback methods.
IRIS has a great support to JSON. You can load a JSON to a object calling set name = {}.%FromJSON("{""Name"":""Yuri""}").
You can write a JSON from the object executing: name.%ToJSON().
To JSON arrays exists in the IRIS and Caché (thanks @Robertcc.Cemper alert), but only in IRIS we have fomatter and zwrite to JSON.
Tomorrow I will publish the day 3.
PS.: this is a resume, but there are more content learned in the course. #20. Is slightly exaggeratedofficial docs present it differently.https://docs.intersystems.com/latest/csp/docbook/DocBook.UI.Page.cls?KEY=ITECHREF_json https://docs.intersystems.com/latest/csp/documatic/%25CSP.Documatic.cls?LIBRARY=%25SYS&CLASSNAME=%25Library.DynamicArray Fixed! Thanks On #5: %IsModified() and propertynameIsModified() methods tell you whether the object in memory has been changed in memory (not on disk). Thanks the revision, fixed!
Article
Bob Binstock · Apr 26, 2021
Like hardware hosts, virtual hosts in public and private clouds can develop resource bottlenecks as workloads increase. If you are using and managing InterSystems IRIS instances deployed in public or private clouds, you may have encountered a situation in which addressing performance or other issues requires increasing the capacity of an instance's host (that is, vertically scaling).
One common reason to scale is insufficient memory. As described in Memory Management and Scaling for InterSystems IRIS in the Scalability Guide, providing enough memory for all of the entities running on the host of an InterSystems IRIS instance under all normal operating circumstances is a critical factor in both performance and availability. In one common scenario, as the workload of an InterSystems IRIS instance increases, its working set becomes too large to be held by the instance's allocated database cache. This forces some queries to fall back to disk, greatly increasing the number of disk reads required and creating a major performance problem. Increasing the size of the cache solves that problem, but if doing so would leave insufficient memory remaining for other purposes, you also need to increase the total physical memory on the host to avoid pushing the bottleneck to another part of the system.
Fortunately, scaling a virtual host is typically a lot easier than scaling hardware. This post discusses the two stages of the process:
Scaling the cloud host's resources
You can change the resource specification of a virtual host on AWS, GCP, and Azure, using the platform's command line, API, or portal. VMWare vSphere allows you to easily change a number of resource parameters for a VM through its vSphere Client interface..
Reconfiguring InterSystems IRIS to take advantage of the scaled resources
There are a number of ways to reconfigure InterSystems IRIS to take advantage of scaled host resources. This document describes the use of the configuration merge feature, which merges new parameter values, specified in a merge file, into an instance's CPF. Configuration merge is an easy and effective method because it lets you address only the configuration settings you want to modify, make multiple changes to an instance's configuration in one operation, and easily make the same set of changes to multiple instances.
The procedures described here are manual, but in production they would very likely be automated, for example using a script that would apply a specific merge file in an accessible location to a list of instances.
Scaling Cloud Host Resources
Public cloud platforms provide a range of resource templates to choose from that specify CPU, memory, network interfaces, and other resources for virtual hosts (storage is provisioned and sized separately). To resize a host, you change the template selected when the host was provisioned to one that specifies more of the resources you want to increase. On Amazon Web Services, the resource template is called an instance type; for example, the t3.large instance type specifies 2 CPUs and 8 GB of memory. On Google Cloud Platform it's a machine type, such as the e2-standard-2 (which also includes 2 CPUs and 8 GB), and on Microsoft Azure it's a size (the Standard_B2ms calls for the same 2 CPUs and 8 GB). By redefining the instance type, machine type, or size of an existing public cloud host, you can scale its resource specifications. In a VMware vSphere private cloud, you can use the vSphere Client interface to the vCenter Server management console to directly modify one or more individual resource settings of an existing virtual machine. (You can also simultaneously scale groups of hosts on each platform.)
The following sections provide brief examples of resizing individual virtual hosts on the various platforms, with links to the documentation for all available methods. Please note that these methods (APIs, command line interfaces, and portal interfaces) are offered and maintained by the cloud vendors, and the examples included here are for informational purposes, to illustrate how easily you can adapt InterSystems IRIS to take advantage of increased resources
AWS
To modify the instance type of an AWS host (called an instance, not to be confused with an InterSystems IRIS instance), you can use the modify-instance-attribute CLI command, as shown in the following example:
$ aws ec2 describe-instances --instance-ids i-01519f663af48a55e
{
"Instances": [
{
"AmiLaunchIndex": 0,
"ImageId": "ami-0abcdef1234567890,
"InstanceId": "i-1234567890abcdef0,
"InstanceType": "m5n.large",
...
$ aws ec2 stop-instances --instance-ids i-01519f663af48a55e
{
"StoppingInstances": [
{
"InstanceId": "i-1234567890abcdef0",
...
$ aws ec2 describe-instances --instance-ids i-01519f663af48a55e
{
"Instances": [
{
...
"State": {
"Code": 80,
"Name": "stopped"
}
...
$ aws ec2 modify-instance-attribute --instance-ids i-01519f663af48a55e \
--instance-type "{\"Value\": \"m5n.xlarge\"}"
$ aws ec2 start-instances --instance-ids i-01519f663af48a55e
{
"StartingInstances": [
{
"InstanceId": "i-1234567890abcdef0",
"CurrentState": {
"Code": 0,
"Name": "pending"
},
"PreviousState": {
"Code": 80,
"Name": "stopped"
...
$ aws ec2 describe-instances --instance-ids i-01519f663af48a55e
{
"Instances": [
{
"AmiLaunchIndex": 0,
"ImageId": "ami-0abcdef1234567890,
"InstanceId": "i-1234567890abcdef0,
"InstanceType": "m5n.xlarge",
...
You can also make this change using the ModifyInstanceAttribute AWS API call or the AWS EC2 console.
GCP
To modify the machine type of a GCP host (also known as an instance), you can use the gcloud CLI to stop, modify, and restart the instance. For example, you would use the following commands to change the machine type of an instance named scalingTest to n1-highmem-96:
$ gcloud compute instances stop scalingTest
$ gcloud compute instances set-machine-type scalingTest --machine-type n1-highmem-32
$ gcloud compute instances start scalingTest
You can also make this change using the Google Cloud Console or GCP API.
Azure
When you use the Azure CLI to modify the size of a Linux VM , you can view a list of the sizes available on the hardware cluster where the VM is hosted using the list-vm-resize-options command, for example:
az vm list-vm-resize-options --resource-group testingGroup --name scalingTest --output table
You can then use the resize command to change the VM's size to one of the listed options, as shown. This command restarts the VM automatically.
az vm resize --resource-group testingGroup --name scalingTest --size Standard_E32d_v4
If the size you want to change the VM to is not available, you can deallocate the VM, which can then be resized to any size supported by the region and restarted; the commands involved are illustrated below:
az vm deallocate --resource-group testingGroup --name scalingTest
az vm resize --resource-group testingGroup --name scalingTest --size Standard_M128s
az vm start --resource-group testingGroup --name scalingTest
You can resize a Windows VM on Azure using either the Azure portal or Powershell commands.
vSphere
To resize a VMware vSphere VM, do the following:
Open vSphere Client or Web Client and display the VM inventory.
Right-click the VM you want to modify and select Edit Settings.
On the Virtual Hardware tab,
Expand Memory and change the amount of RAM configured for the VM.
Expand CPU and change the number of cores and optionally the number of cores per socket.
Make any other desired changes to the hardware resources allocated to the VM.
Reconfiguring InterSystems IRIS for Scaled Resources
Once you have scaled the host, the next step is to reconfigure InterSystems IRIS to take advantage of the increased resources by changing one or more parameters in the instance's configuration parameter file (CPF). For example, to continue with the common scenario mentioned at the start of this post, now that you have increased the host's memory resources, you will want to take advantage of this by increasing the size of the InterSystems IRIS instance's database cache (which is done by changing the value of the globals parameter) so it can keep more data in memory.
An easy way to make such a change, and far the easiest and most repeatable way to make multiple changes to an instance's configuration in one operation or make the same changes to multiple instances, is to use the configuration merge feature, which is available on UNIX® and Linux systems. As described in Using Configuration Merge to Deploy Customized InterSystems IRIS Instances in Running InterSystems Products in Containers and Using the Configuration Merge Feature in the Configuration Parameter File Reference, configuration merge lets you specify a merge file containing the settings you want merged into an instance's CPF immediately prior to a restart. (In release 2021.1 you'll be able to do this on a running instance without restarting it.) Not only is this more convenient than editing an instance's CPF directly, but it is highly repeatable across multiple instances, and supports reliable change management by enabling you to keep an accurate record of changes simply by versioning the configuration merge files you apply.
To execute a configuration merge, you need to do the following:
Create the merge file with the parameters you want to modify.
Stage the merge file in a location accessible to the instance. If the instance you are modifying is in a container (which is likely on a cloud host), you can stage the file in the instance's durable %SYS directory (see Durable %SYS for Persistent Instance Data in Running InterSystems Products in Containers).
Specify the merge file's location using the ISC_CPF_MERGE_FILE environment variable before restarting the instance.
For example, continuing with the case of the database cache that needs updating, suppose you wanted a containerized instance's database cache size increased to 100 GB. The setting for this, in the [config] section of the CPF, would be globals=102400, which sets the database cache for 8-kilobyte blocks to 102,400 MB, or 100 GB. (As explained in the globals description in the Configuration Parameter File Reference, the parameter sets the size of the cache for multiple block sizes; if only one value is provided, however, it is applied to the 8-kilobyte block size, and 0 [zero] is assumed for the other sizes; globals=102400 is therefore the equivalent of globals=0,0,102400,0,0,0.)
To make this change, you might do the following on the cloud host:
1. Create a configuration merge file, called for example mergefile2021.06.30.cpf, containing these lines:
[config]
globals=102400
2. Stage the merge file in the durable %SYS directory on the host's file system, which if you mounted the external volume /data as /external in the container and used the ISC_DATA_DIRECTORY variable to specify /external/iris_durable as the durable %SYS directory for the instance, would be /data/iris_durable.
3. Use the docker exec command on the host's command line to specify the variable and restart the instance with the iris command; if the instance's container is named iris and the instance is named IRIS, for example, the command would look like this:
docker exec iris ISC_CPF_MERGE_FILE=/data/iris_durable/mergefile2021.06.30.cpf iris stop IRIS restart
4. When the instance is restarted, you can confirm the new globals setting with this command:
docker exec iris grep globals /data/iris_durable/iris.cpf
💡 This article is considered as InterSystems Data Platform Best Practice.
Announcement
Evgeny Shvarov · Aug 11, 2020
Hi Developers!
InterSystems FHIR contest has been started and in this post, I want to introduce several topics you may find interesting and use to build FHIR applications with InterSystems IRIS for Health.
Amongst them are:
a frontend mobile or web app for FHIR server FHIR REST API or SQL;
Backend apps to perform complex queries and maintain rules;
work with different HL7 data standards.
See the details below.
Mobile or Web application
Mobile and web frontend applications are perhaps the most typical use cases to work with a FHIR server. If you use InterSystems IRIS for Health e.g. with the template we provide for the contest you get a FHIR server which exposes REST API ready to service the API calls to any FHIR resources according to FHIR R4 documentation. The related task. Tagging @Patrick.Jamieson3621 to provide more information.
Also, you can consume FHIR data using SQL working with HSFHIR_I0001_R schema for full FHIR resources and HSFHIR_I0001_S schema to have SQL queries for certain entities of resources.
E.g. you can visualize the blood pressure change of a patient with the time, the related task request.
Another idea of the application is to maintain electronic immunization history, the request, tagging @Yuri.Gomes to provide more info.
Examples of complex queries
The medical information is very complex and thus implementations and examples of queries for FHIR data to support different real-life scenarios seem very helpful and demanded.
E.g. the example of a query which looks for patients that have diabetes medications but no diabetes diagnosis. Tagging @Qi.Li to provide more information.
Backend app upon rulesYou could build a backend application which analyzes the FHIR data and send alerts or perform different business operations. For example, consider the rule where the patient meets criteria (new lab result and new diagnosis) and send notifications. E.g. COVID-19 positive results. Related task requests: One, two. Tag @Rasha.Sadiq and @Qi.Li for more details.
Data transformation apps
As you know there are numerous legacy and comprehensive data formats for health data and all of them even the oldest are still in use or could be met. Thus the application which can deal with them and transfer it into FHIR R4 format and back could be always in demand.
InterSystems IRIS for Health supports the majority of health standards and its data transformations so use it and introduce apps that can work with it handily and robustly.
The related task request, tagging @Udo.Leimberger3230 for more details.
CDA to FHIR data transformation
iPhone can export health data to CDA, see the details. Transform this data into FHIR format using IRIS for Health and submit to the FHIR server.
Here is an example of how you can transform CDA to FHIR data using IRIS for HEalth. Tagging @Guillaume.Rongier7183 for more details. A current set of proposed topics could be found here. Great topics! Thanks, @Evgeny.Shvarov for organizing everything Here is the new topic for the FHIR contest:
CDA to FHIR data transformation
iPhone can export health data to CDA, see the details. Transform this data into FHIR format using IRIS for Health and submit to the FHIR server.
Here is an example of how you can transform CDA to FHIR data using IRIS for HEalth. Tagging @Guillaume.Rongier7183 for more details.
The main announcement is updated too. Hey @Evgeny.Shvarov, I had an idea about creating a heat map using google or bing maps based on fhir data that shows a geographic representation of certain observation results? Looks like a great idea, please go ahead, @Rehman.Masood!