IAM (InterSystems API Manager), Zero to Hero

This article contains the materials, examples, exercises to learn the basic concepts of IAM.
You have all resources available on this git : https://github.com/grongierisc/iam-training.
Solutions are in training branch.
This article will cover the following points :
- 1. Introduction
- 2. Installation
- 3. First Service/Route
- 4. Second, go further with plugin
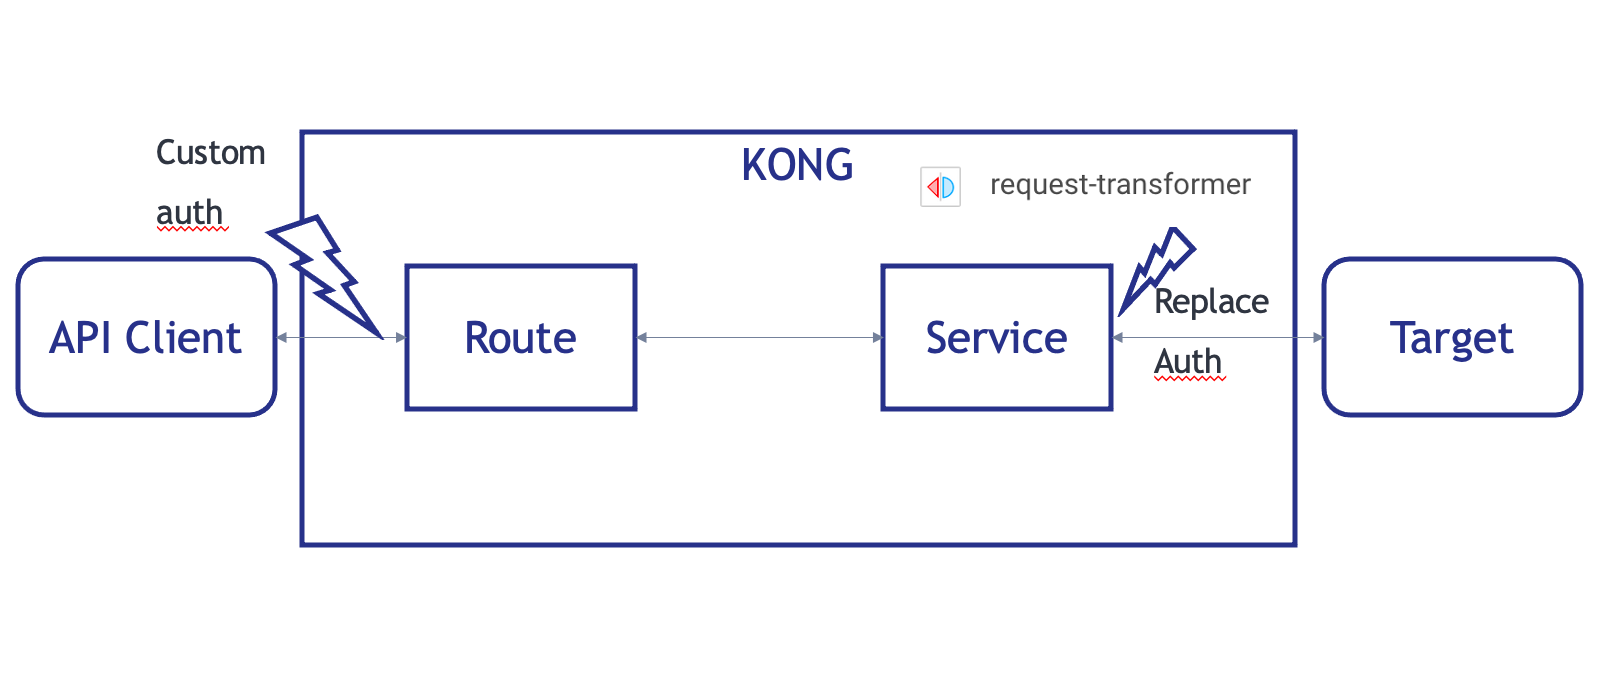
- 5. Third, add our own authentication
- 6. Exercice, Rate-Limiting
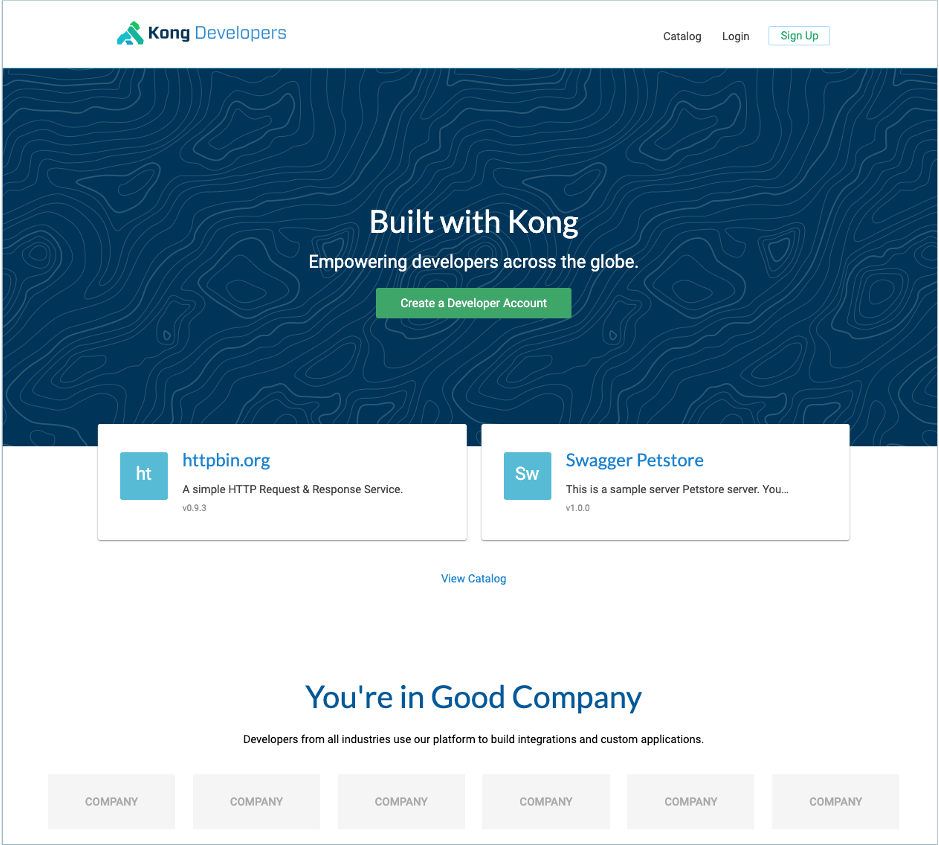
- 7. Dev Portal
- 8. Dev Portal, Part two, Authentication
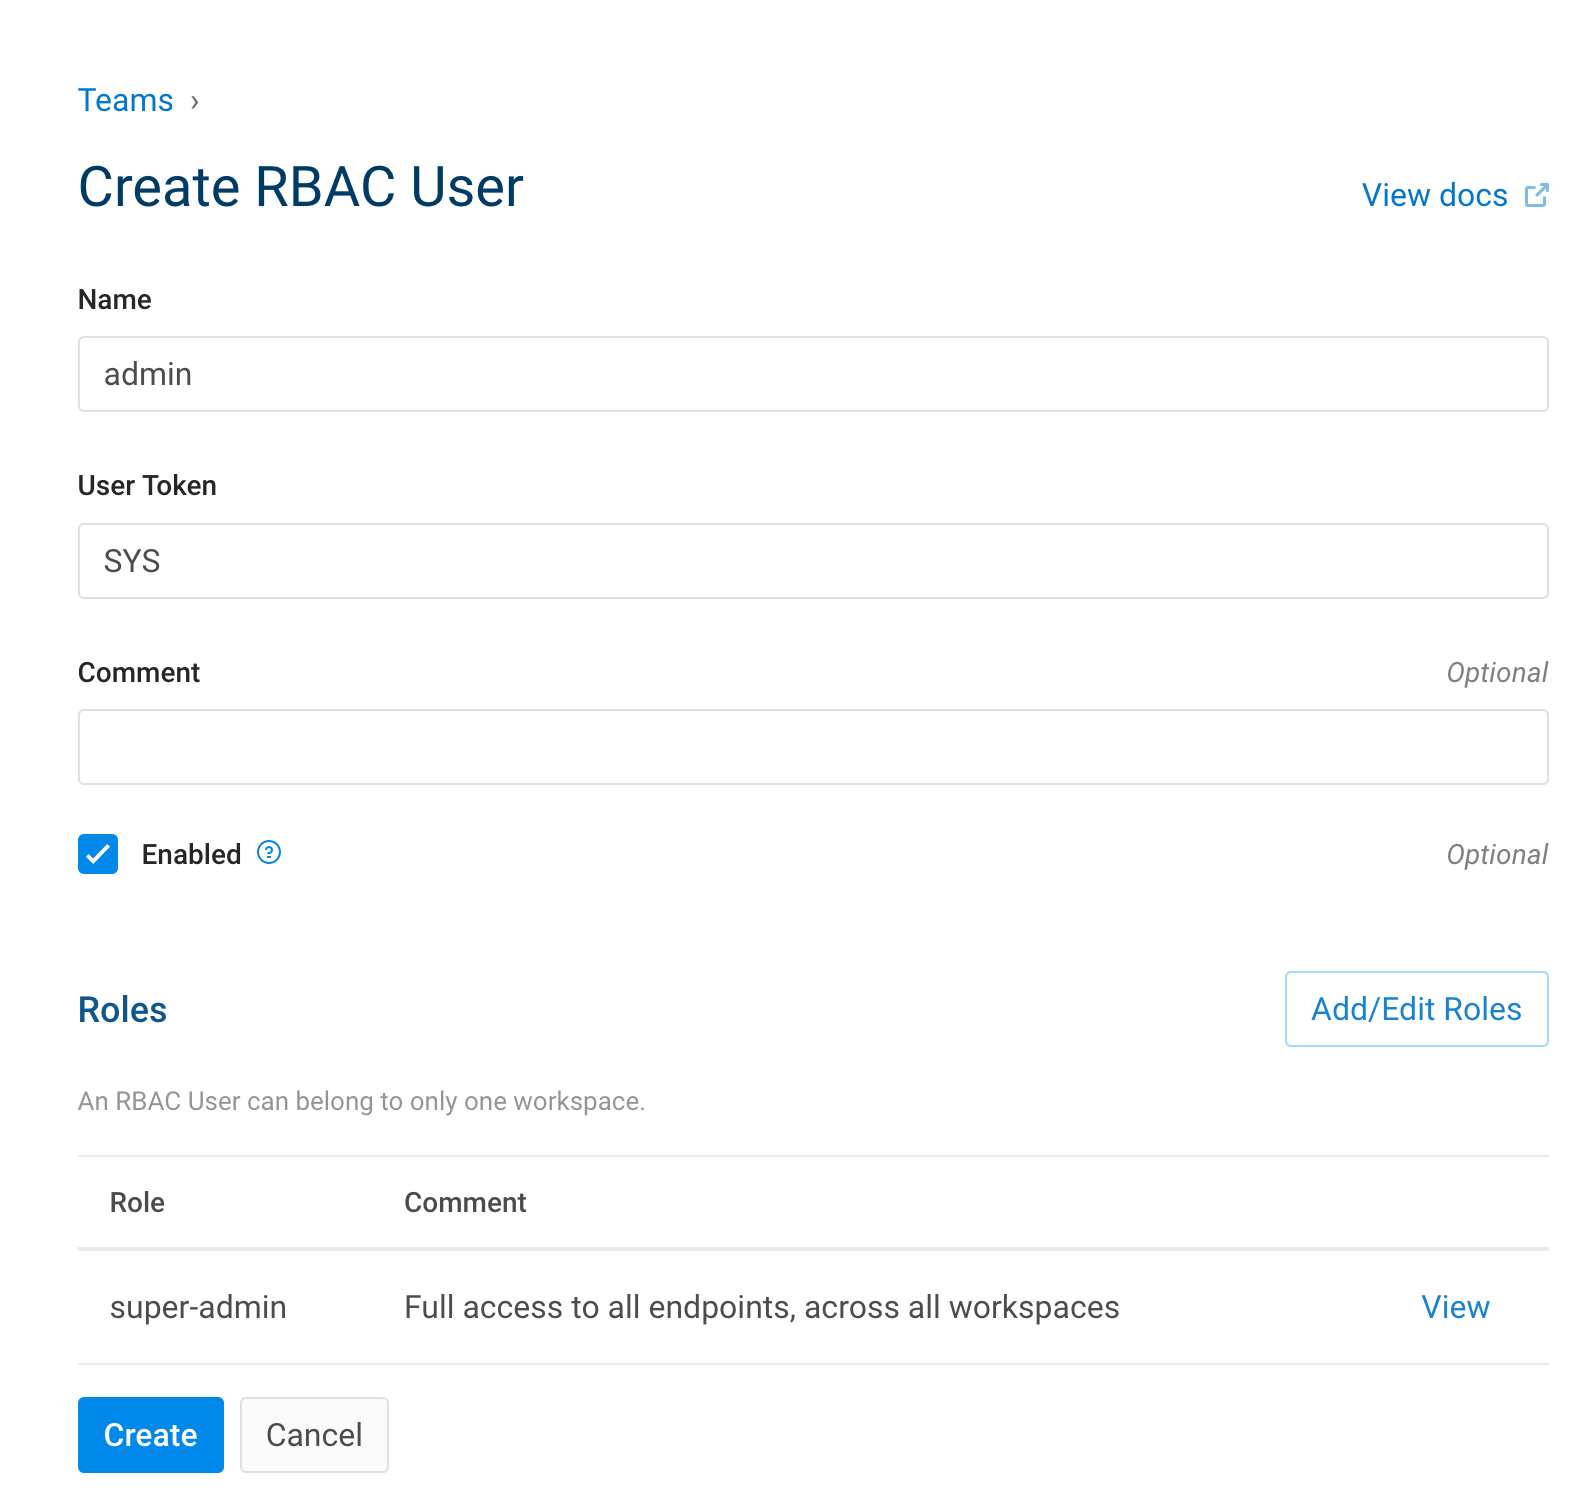
- 9. Secure Management Portal
- 10. Plugins
- 11. CI/CD
1. Introduction
1.1. What is IAM ?
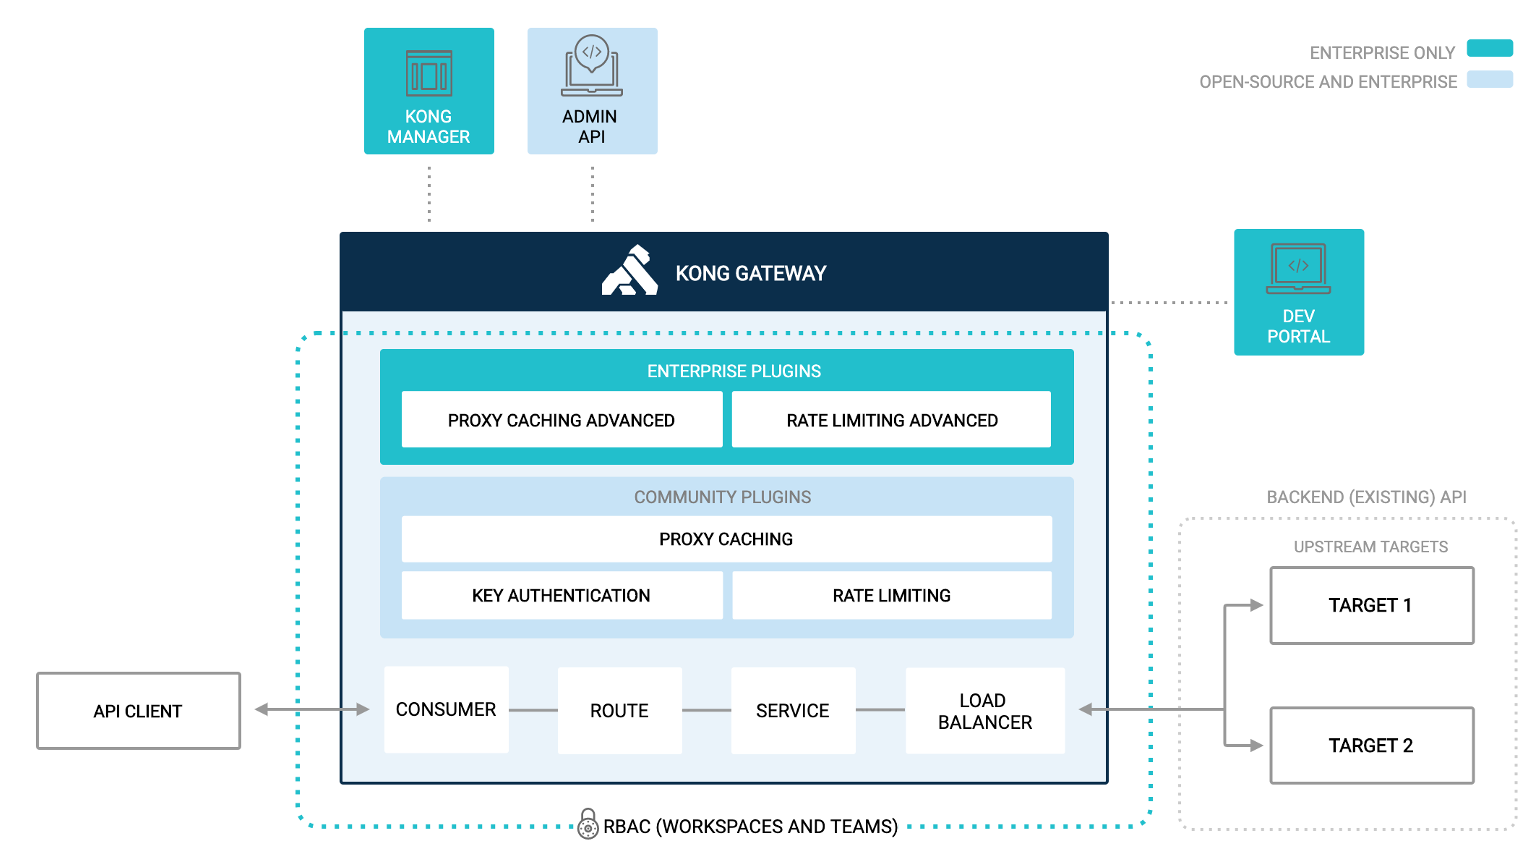
IAM stand for InterSystems API Manager, it's based on Kong Enterprise Edition.
This mean you have access on top of Kong Open Source edition to :
- Manager Portal
- Developer Portal
- Advance plugin
- Oauth2
- Caching
- ...
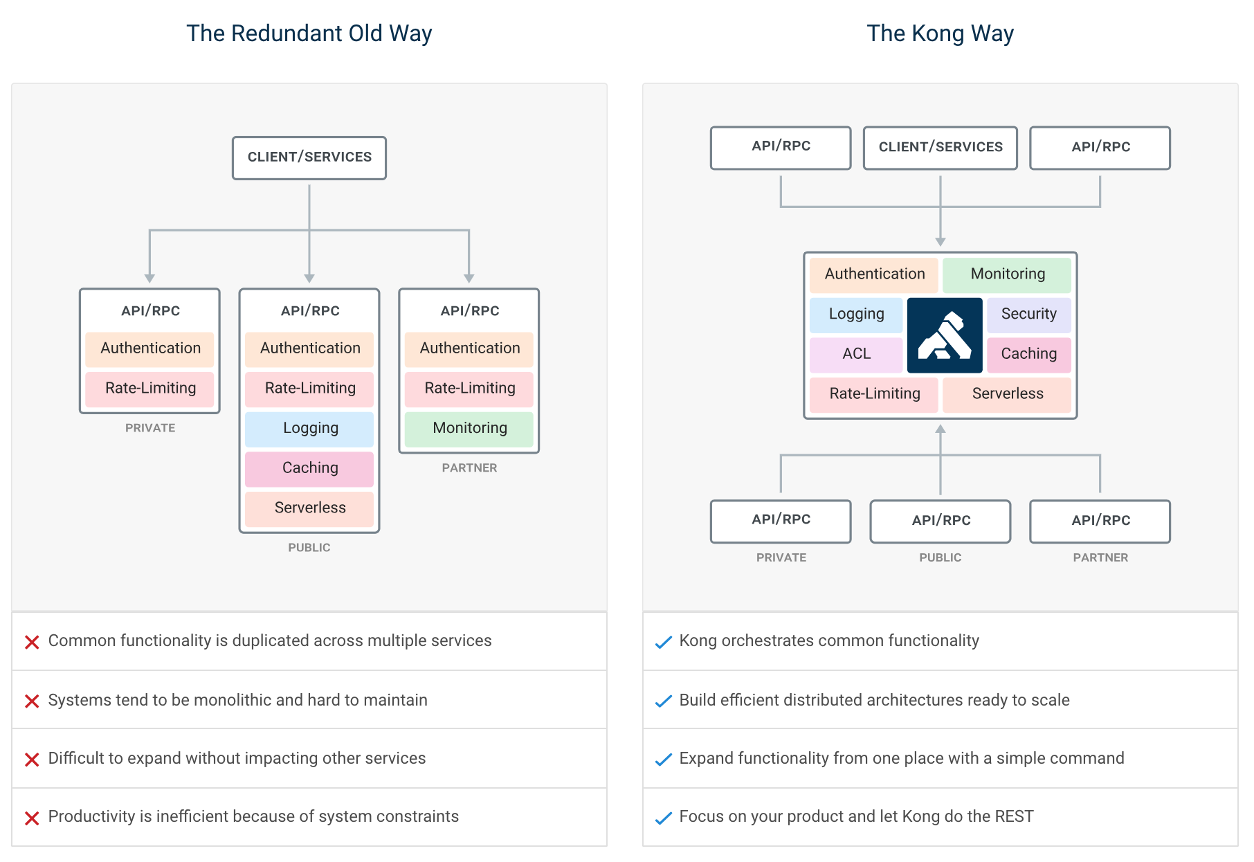
1.2. What is an API Management ?
API management is the process of creating and publishing web application programming interfaces (APIs), enforcing their usage policies, controlling access, nurturing the subscriber community, collecting and analyzing usage statistics, and reporting on performance. API Management components provide mechanisms and tools to support developer and subscriber community.
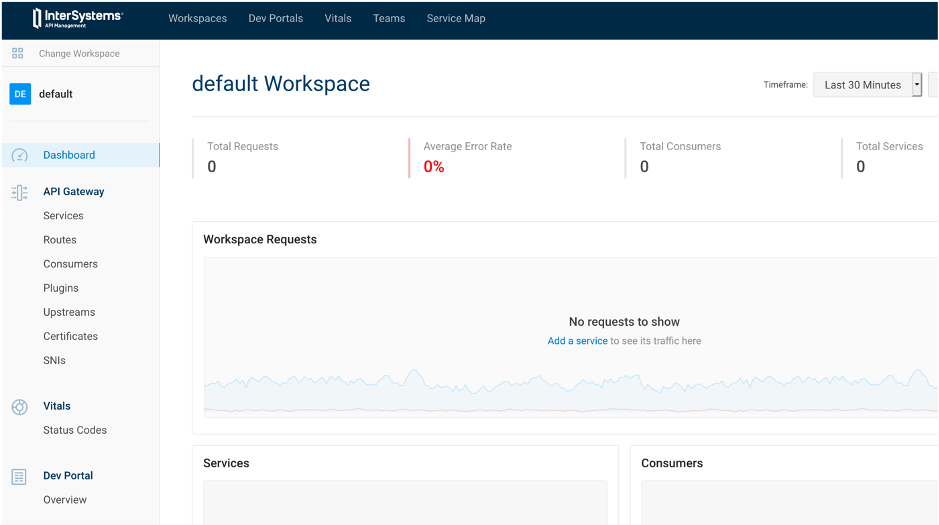
1.3. IAM Portal
Kong and IAM are design as API first, this mean, everything done in Kong/IAM can be done by rest calls or the manager portal.
During this article all example / exercise will present both this way:
| IAM Portal | Rest API |
|---|---|
 |
 |
1.4. Flow of this article
The aim of this article is to use IAM as a proxy of an IRIS rest API.
Definition of this rest API can be found here :
http://localhost:52773/swagger-ui/index.html#/
or here
https://github.com/grongierisc/iam-training/blob/training/misc/spec.yml
Start this article with the main branch.
At the end of the article, you should have the same result as the training branch.
2. Installation

2.1. What do you need to install?
- Git
- Docker (if you are using Windows, make sure you set your Docker installation to use "Linux containers").
- Docker Compose
- Visual Studio Code + InterSystems ObjectScript VSCode Extension
- InterSystems IRIS IAM enabled license file.
- IAM Docker image
2.2. How IAM works with IRIS
At Kong/IAM start, the container check for the Kong/IAM license with a curl call.
The endpoint of this call is a rest API on the IRIS container.
FYI : Kong license is embedded in IRIS one.

2.3. Setup
Git clone this repository.
git clone https://github.com/grongierisc/iam-training
Run the initial rest API :
docker-compose up
Test it :
http://localhost:52773/swagger-ui/index.html#/
Login/Password : SuperUser/SYS
2.4. Install IAM
2.4.1. Iris Image
First you need to switch for the community edition to a licensed one.
To do so, you need to setup your access to InterSystems Container Registry to download IRIS limited access images.
Have a look at this Introducing InterSystems Container Registry on Developer Community.
- Log-in into https://containers.intersystems.com/ using your WRC credentials and get a token.
- Set up docker login in your computer:
docker login -u="user" -p="token" containers.intersystems.com
- Get InterSystems IRIS image:
docker pull containers.intersystems.com/intersystems/irishealth:2020.4.0.524.0
2.4.2. IAM Image
- Components > Download IAM-1.5.0.9-4.tar.gz file, unzip & untar and then load the image:
docker load -i iam_image.tar
2.4.3. Update the docker file
Change IRIS community edition to a licensed one.
- containers.intersystems.com/intersystems/irishealth:2020.4.0.524.0
- add iris.key in key folder
Edit the dockerfile to add on top of it this part
ARG IMAGE=containers.intersystems.com/intersystems/irishealth:2020.4.0.524.0
# Frist stage
FROM $IMAGE as iris-iam
COPY key/iris.key /usr/irissys/mgr/iris.key
COPY iris-iam.script /tmp/iris-iam.script
RUN iris start IRIS \
&& iris session IRIS < /tmp/iris-iam.script \
&& iris stop IRIS quietly

# Second stage
FROM iris-iam
This part will create a multi-stage dockerfile.
- the first stage is to enable IRIS to serve IAM license.
- the second stage is for the REST API build
Create a new file iris-iam.script to build a new IRIS Image to enable IAM endpoint and user.
zn "%SYS"
write "Create web application ...",!
set webName = "/api/iam"
set webProperties("Enabled") = 1
set status = ##class(Security.Applications).Modify(webName, .webProperties)
write:'status $system.Status.DisplayError(status)
write "Web application "_webName_" was updated!",!

set userProperties("Enabled") = 1
set userName = "IAM"
Do ##class(Security.Users).Modify(userName,.userProperties)
write "User "_userName_" was updated!",!
halt
2.4.4. Update the docker-compose
Update the docker-compose file to :
- db
- postgres database for IAM
- iam-migration
- bootstrap the database
- iam
- actual IAM instance
- a volume for data persistent
Add this part to the end of the docker-compose file.
  iam-migrations:
    image: intersystems/iam:1.5.0.9-4
    command: kong migrations bootstrap up
    depends_on:
      - db
    environment:
      KONG_DATABASE: postgres
      KONG_PG_DATABASE: ${KONG_PG_DATABASE:-iam}
      KONG_PG_HOST: db
      KONG_PG_PASSWORD: ${KONG_PG_PASSWORD:-iam}
      KONG_PG_USER: ${KONG_PG_USER:-iam}
      KONG_CASSANDRA_CONTACT_POINTS: db
      KONG_PLUGINS: bundled,jwt-crafter
      ISC_IRIS_URL: IAM:${IRIS_PASSWORD}@iris:52773/api/iam/license
    restart: on-failure
    links:
      - db:db
  iam:
    image: intersystems/iam:1.5.0.9-4
    depends_on:
      - db
    environment:
      KONG_ADMIN_ACCESS_LOG: /dev/stdout
      KONG_ADMIN_ERROR_LOG: /dev/stderr
      KONG_ADMIN_LISTEN: '0.0.0.0:8001'
      KONG_ANONYMOUS_REPORTS: 'off'
      KONG_CASSANDRA_CONTACT_POINTS: db
      KONG_DATABASE: postgres
      KONG_PG_DATABASE: ${KONG_PG_DATABASE:-iam}
      KONG_PG_HOST: db
      KONG_PG_PASSWORD: ${KONG_PG_PASSWORD:-iam}
      KONG_PG_USER: ${KONG_PG_USER:-iam}
      KONG_PROXY_ACCESS_LOG: /dev/stdout
      KONG_PROXY_ERROR_LOG: /dev/stderr
      KONG_PORTAL: 'on'
      KONG_PORTAL_GUI_PROTOCOL: http
      KONG_PORTAL_GUI_HOST: '127.0.0.1:8003'
      KONG_ADMIN_GUI_URL: http://localhost:8002
      KONG_PLUGINS: bundled
      ISC_IRIS_URL: IAM:${IRIS_PASSWORD}@iris:52773/api/iam/license
    volumes:
      - ./iam:/iam
    links:
      - db:db
    ports:
      - target: 8000
        published: 8000
        protocol: tcp
      - target: 8001
        published: 8001
        protocol: tcp
      - target: 8002
        published: 8002
        protocol: tcp
      - target: 8003
        published: 8003
        protocol: tcp
      - target: 8004
        published: 8004
        protocol: tcp
      - target: 8443
        published: 8443
        protocol: tcp
      - target: 8444
        published: 8444
        protocol: tcp
      - target: 8445
        published: 8445
        protocol: tcp
    restart: on-failure
  db:
    image: postgres:9.6
    environment:
      POSTGRES_DB: ${KONG_PG_DATABASE:-iam}
      POSTGRES_PASSWORD: ${KONG_PG_PASSWORD:-iam}
      POSTGRES_USER: ${KONG_PG_USER:-iam}
    volumes:
      - 'pgdata:/var/lib/postgresql/data'
    healthcheck:
      test: ["CMD", "pg_isready", "-U", "${KONG_PG_USER:-iam}"]
      interval: 30s
      timeout: 30s
      retries: 3
    restart: on-failure
    stdin_open: true
    tty: true
volumes:
  pgdata:
Add the .env file in root folder :
IRIS_PASSWORD=SYS
BTW : Here are the definition of Kong ports :
| Port | Protocol | Description |
|---|---|---|
| :8000 | HTTP | Takes incoming HTTP traffic from Consumers, and forwards it to upstream Services. |
| :8443 | HTTPS | Takes incoming HTTPS traffic from Consumers, and forwards it to upstream Services. |
| :8001 | HTTP | Admin API. Listens for calls from the command line over HTTP. |
| :8444 | HTTPS | Admin API. Listens for calls from the command line over HTTPS. |
| :8002 | HTTP | Kong Manager (GUI). Listens for HTTP traffic. |
| :8445 | HTTPS | Kong Manager (GUI). Listens for HTTPS traffic. |
| :8003 | HTTP | Dev Portal. Listens for HTTP traffic, assuming Dev Portal is enabled. |
| :8446 | HTTPS | Dev Portal. Listens for HTTPS traffic, assuming Dev Portal is enabled. |
| :8004 | HTTP | Dev Portal /files traffic over HTTP, assuming the Dev Portal is enabled. |
| :8447 | HTTPS | Dev Portal /files traffic over HTTPS, assuming the Dev Portal is enabled. |
2.4.5. Option : add IRIS_PASSWARD as .env
For ease of use (and may be security), you can use the .env file in the IRIS dockerfile.
To do so, edit the docker-compose with this in the iris service part :
    build:
      context: .
      dockerfile: dockerfile
      args:
        - IRIS_PASSWORD=${IRIS_PASSWORD}
And the dockerfile (second or first stage of the build):
ARG IRIS_PASSWORD
RUN echo "${IRIS_PASSWORD}" > /tmp/password.txt && /usr/irissys/dev/Container/changePassword.sh /tmp/password.txt
2.4.6. Test it !
docker-compose -f "docker-compose.yml" up -d --build
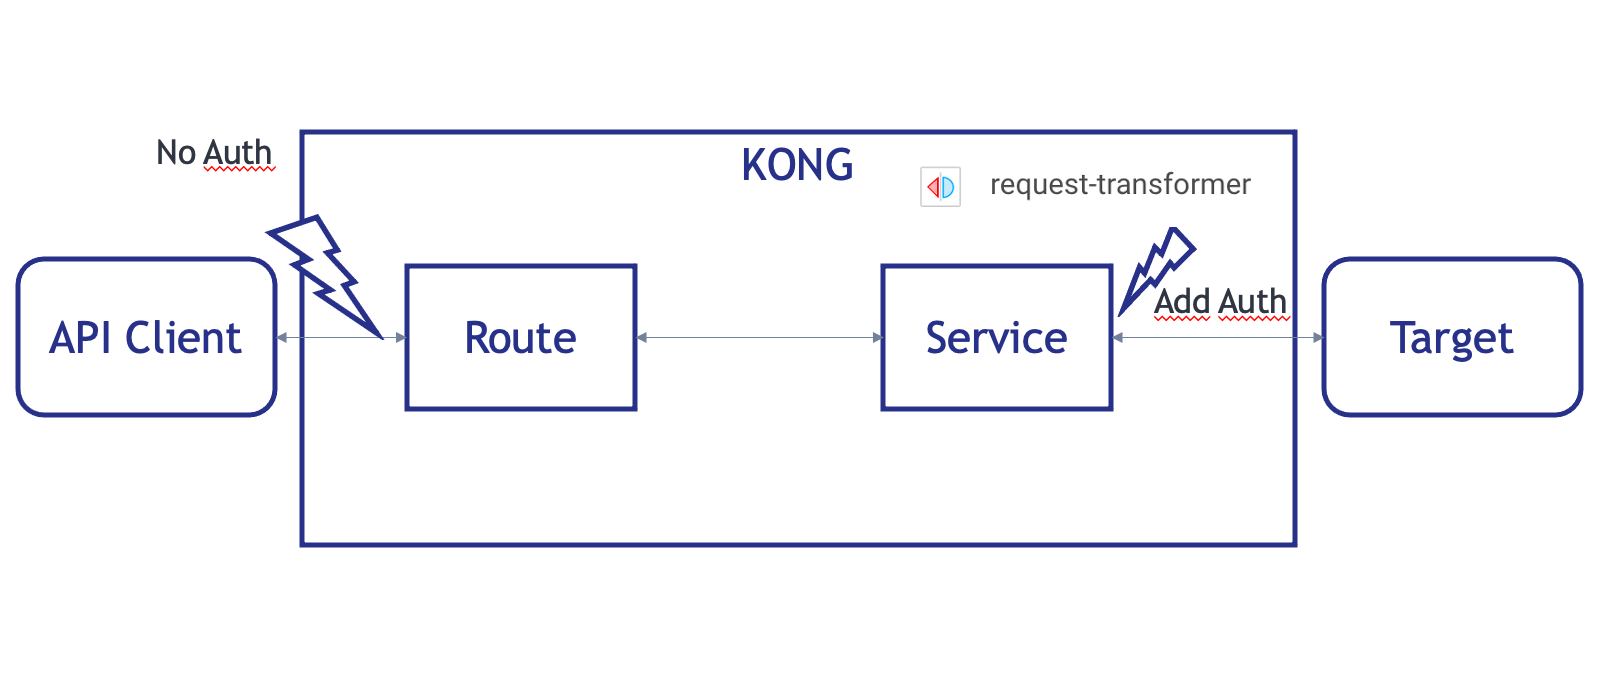
3. First Service/Route
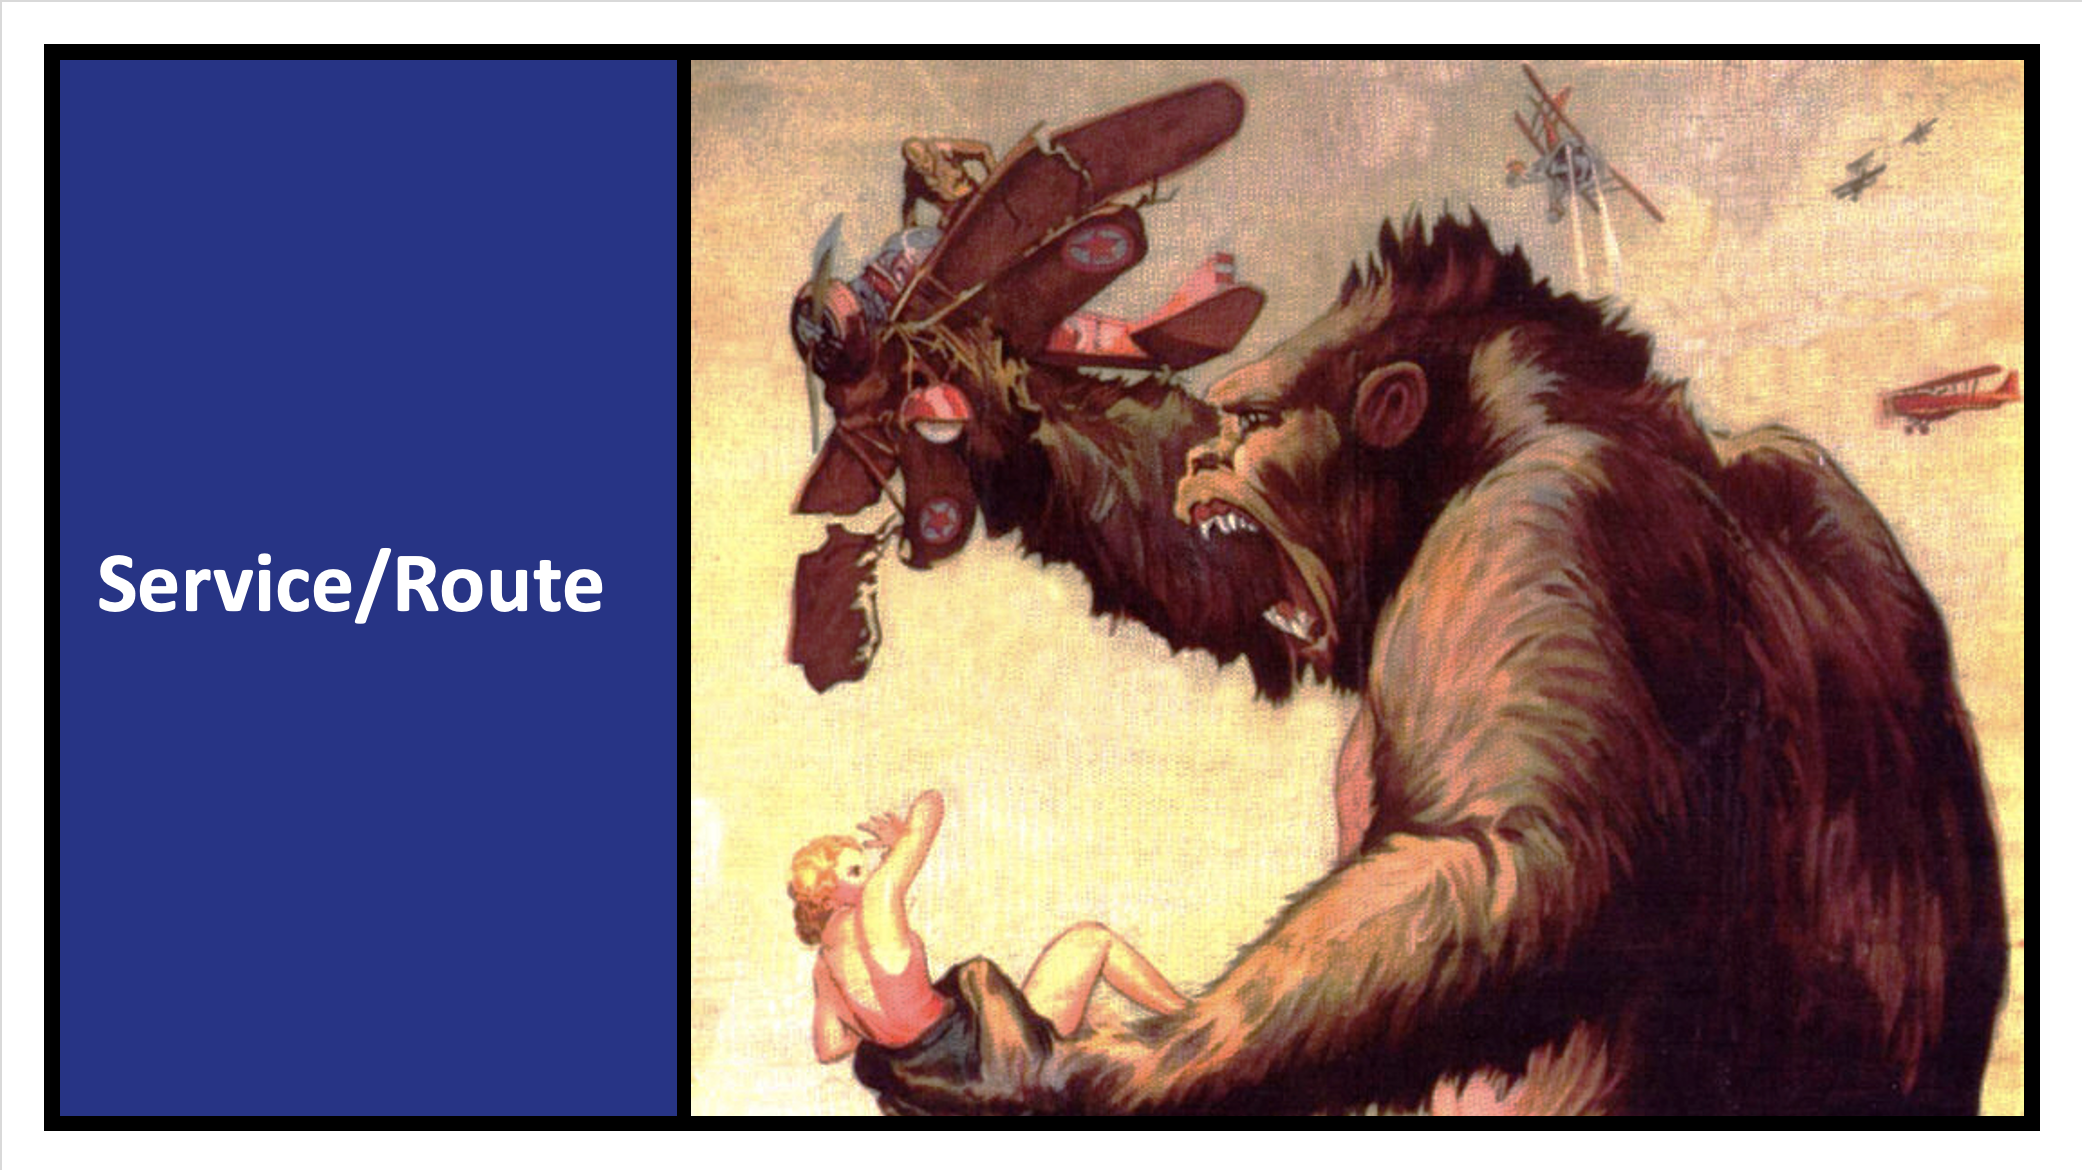
Remember how Kong/IAM works ?
Here, we will build :
- a service
- for our crud API
- a route
- to access this service
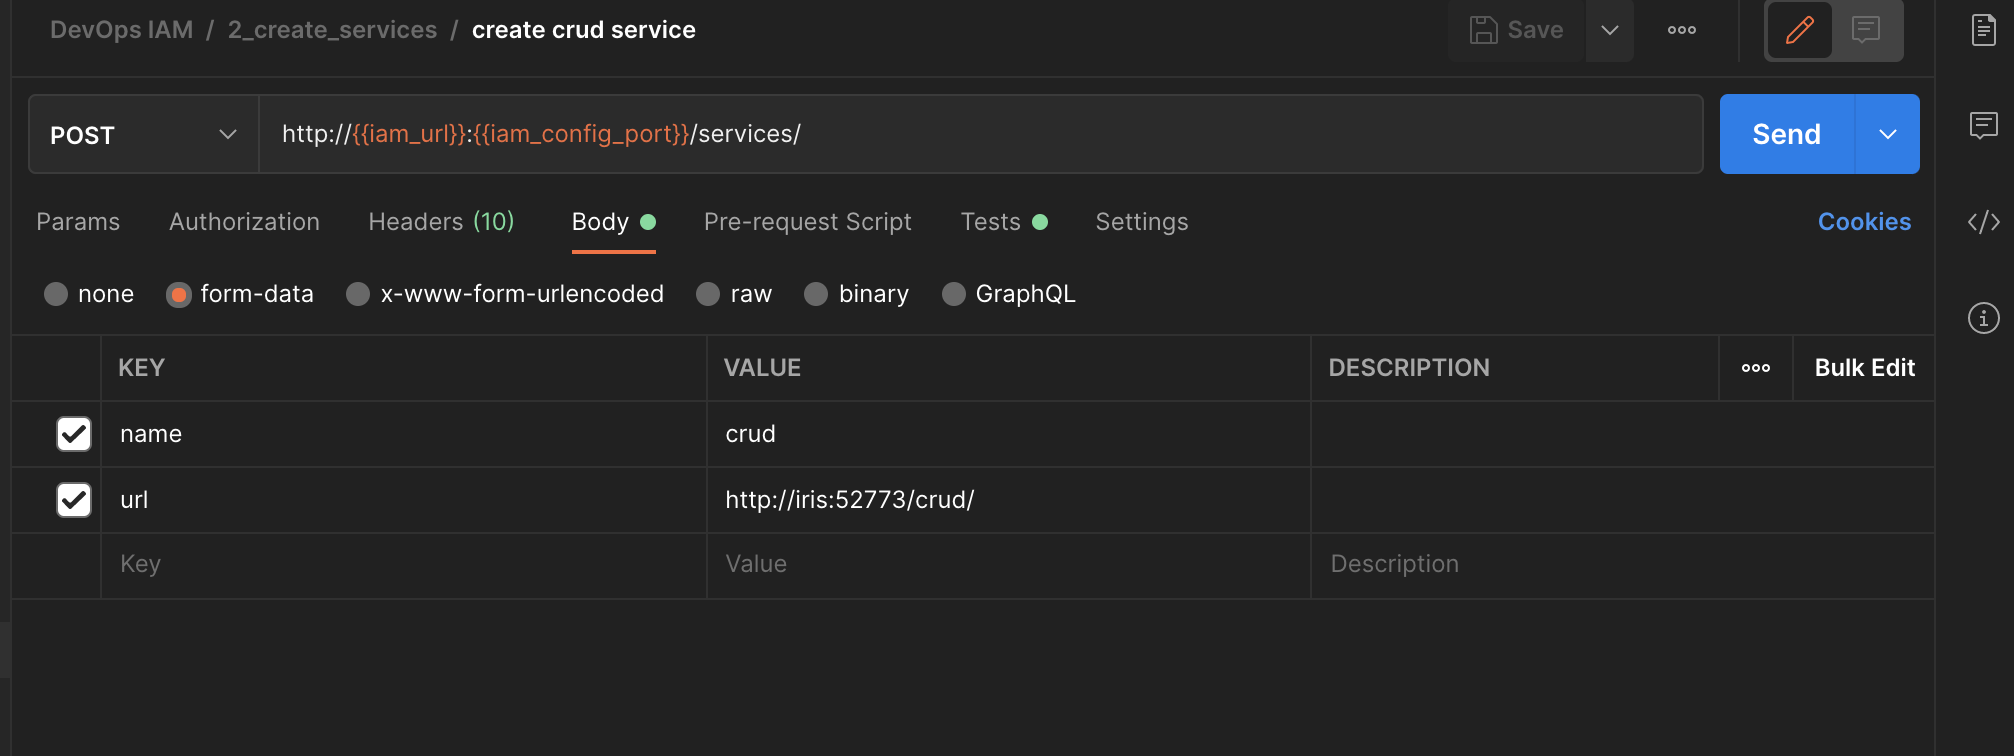
3.1. Create a service
| IAM Portal | Rest API | |||||||||||||||||||||||||||||||||||
|---|---|---|---|---|---|---|---|---|---|---|---|---|---|---|---|---|---|---|---|---|---|---|---|---|---|---|---|---|---|---|---|---|---|---|---|---|
|
|


Now authentication is enabled for the dev portal.
8.2. Limit access
By default, all is accessible for unauthenticated user.
We can create role to limit some access.
For example, let restrict access to our CRUD API documentation.
8.2.1. Create a role
| IAM Portal | Rest API | ||||||||
|---|---|---|---|---|---|---|---|---|---|
|
|


- Re-use our auto-auth
| IAM Portal | Rest API | ||||||||||||||||||||||||||
|---|---|---|---|---|---|---|---|---|---|---|---|---|---|---|---|---|---|---|---|---|---|---|---|---|---|---|---|
|
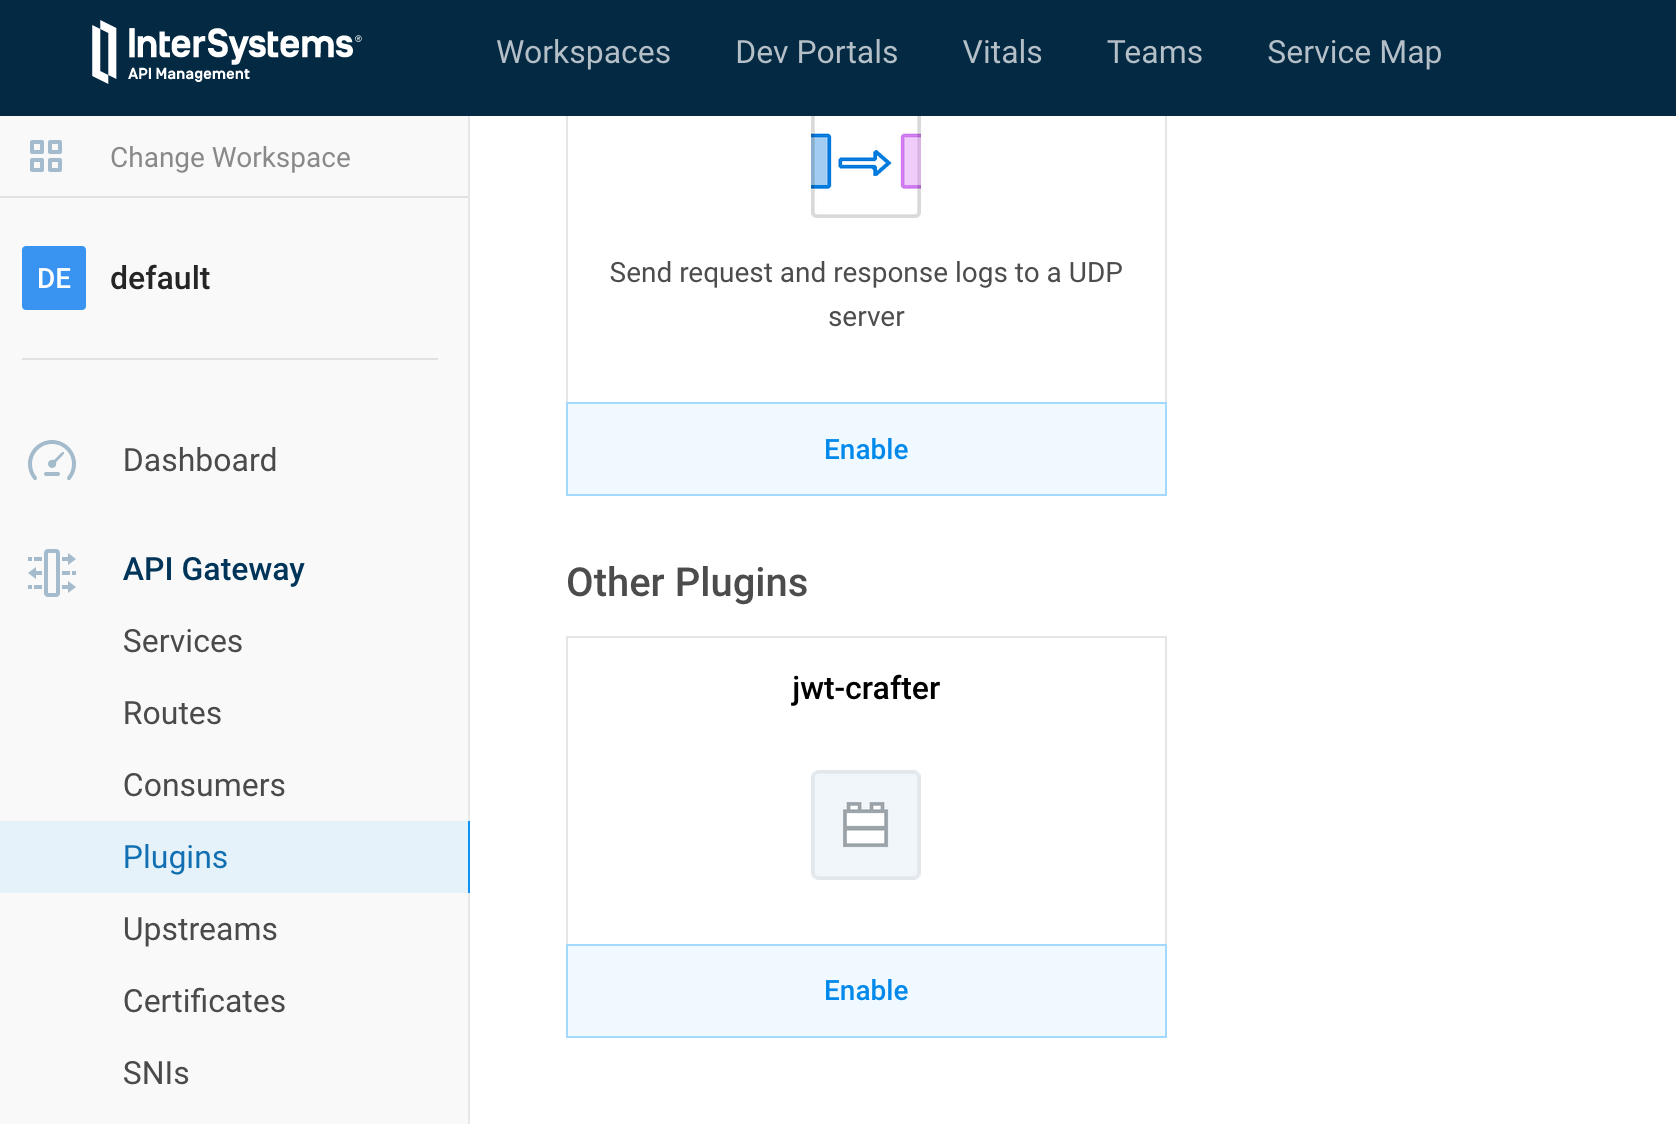
Now we are set. The real use of jwt-crafter. Test it ! 10.2. Create a new pluginThis is not the place to learn lua. But I'll give you some tips like how to quickly restart IAM to test our new development. 10.2.1. File structureBy convention, kong plugins must be prefix by kong-plugin. In our example, the name of the plugin is helloworld. Three files are mandatory :
10.2.1.1. handler.luaThe plugins interface allows you to override any of the following methods in your handler.lua file to implement custom logic at various entry-points of the execution life-cycle of Kong:
|
10.2.1.1.1. Example
local BasePlugin = require "kong.plugins.base_plugin"

local HelloWorldHandler = BasePlugin:extend()

function HelloWorldHandler:new()
  HelloWorldHandler.super.new(self, "helloworld")
end

function HelloWorldHandler:access(conf)
  HelloWorldHandler.super.access(self)
  if conf.say_hello then
    ngx.log(ngx.ERR, "============ Hello World! ============")
    ngx.header["Hello-World"] = "Hello World!!!"
  else
    ngx.log(ngx.ERR, "============ Bye World! ============")
    ngx.header["Hello-World"] = "Bye World!!!"
  end
end

return HelloWorldHandler
10.2.1.2. schema.lua
Simply the configuration file see in the portal.
return {
    no_consumer = true,
    fields = {
      say_hello = { type = "boolean", default = true },
      say_hello_body = { type = "boolean", default = true }
    }
  }
10.2.1.3. *.rockspec
package = "kong-plugin-helloworld"  -- hint: rename, must match the info in the filename of this rockspec!
                                  -- as a convention; stick to the prefix: `kong-plugin-`
version = "0.1.0-1"               -- hint: renumber, must match the info in the filename of this rockspec!
-- The version '0.1.0' is the source code version, the trailing '1' is the version of this rockspec.
-- whenever the source version changes, the rockspec should be reset to 1. The rockspec version is only
-- updated (incremented) when this file changes, but the source remains the same.

-- TODO: This is the name to set in the Kong configuration `plugins` setting.
-- Here we extract it from the package name.
local pluginName = package:match("^kong%-plugin%-(.+)$")  -- "myPlugin"

supported_platforms = {"linux", "macosx"}
source = {
  url = "https://github.com/grongierisc/iam-training",
  branch = "master",
--  tag = "0.1.0"
-- hint: "tag" could be used to match tag in the repository
}

description = {
  summary = "This a demo helloworld for Kong plugin",
  homepage = "https://github.com/grongierisc/iam-training",
  license = "Apache 2.0"
}

dependencies = {
   "lua >= 5.1"
   -- other dependencies should appear here
}

build = {
  type = "builtin",
  modules = {
    ["kong.plugins."..pluginName..".handler"] = "kong/plugins/"..pluginName.."/handler.lua",
    ["kong.plugins."..pluginName..".schema"] = "kong/plugins/"..pluginName.."/schema.lua",
  }
}
10.2.2. Build it
We will be doing the same as here : 11.1.1. Build a new Kong/IAM docker image with the community plugin
But adapted to our plugin :
Dockerfile :
FROM intersystems/iam:1.5.0.9-4

USER root
COPY ./plugins /custom/plugins

RUN cd /custom/plugins/kong-plugin-jwt-crafter && luarocks make
RUN cd /custom/plugins/kong-plugin-helloworld && luarocks make

#USER kong #Stay with root use, we will see why later
Enable the plugin in the environment variables
KONG_PLUGINS: 'bundled,jwt-crafter,helloworld'
Now build our new iam image :
docker-compose build iam
Then docker-compose up and test it.
10.2.3. Tips
To run the IAM container in "debug mode", to easily stop/restart it, modify the dockerfile to add/remove plugin and so on.
You can stop iam service :
docker-compose stop iam
And start it in run mode with a shell :
docker-compose run -p 8000:8000 -p 8001:8001 -p 8002:8002 iam sh
In the container :
./docker-entrypoint.sh kong
Happy coding :)
11. CI/CD
We are close to the end of this article.
To finish let's talk about DevOps/CI/CD. The aim of this chapter is to give you some ideas about how to implement/script ci/cd for IAM/Kong.
As Kong is API first, the idea is to script all the rest calls and play then on each environment.
The easiest way to script rest calls is with postman and his best friend newman (command line version of postman).
11.1. Create the postman collection
One thing handy with postman is its ability to run script before and after a rest call.
We will use this functionality in most cases.
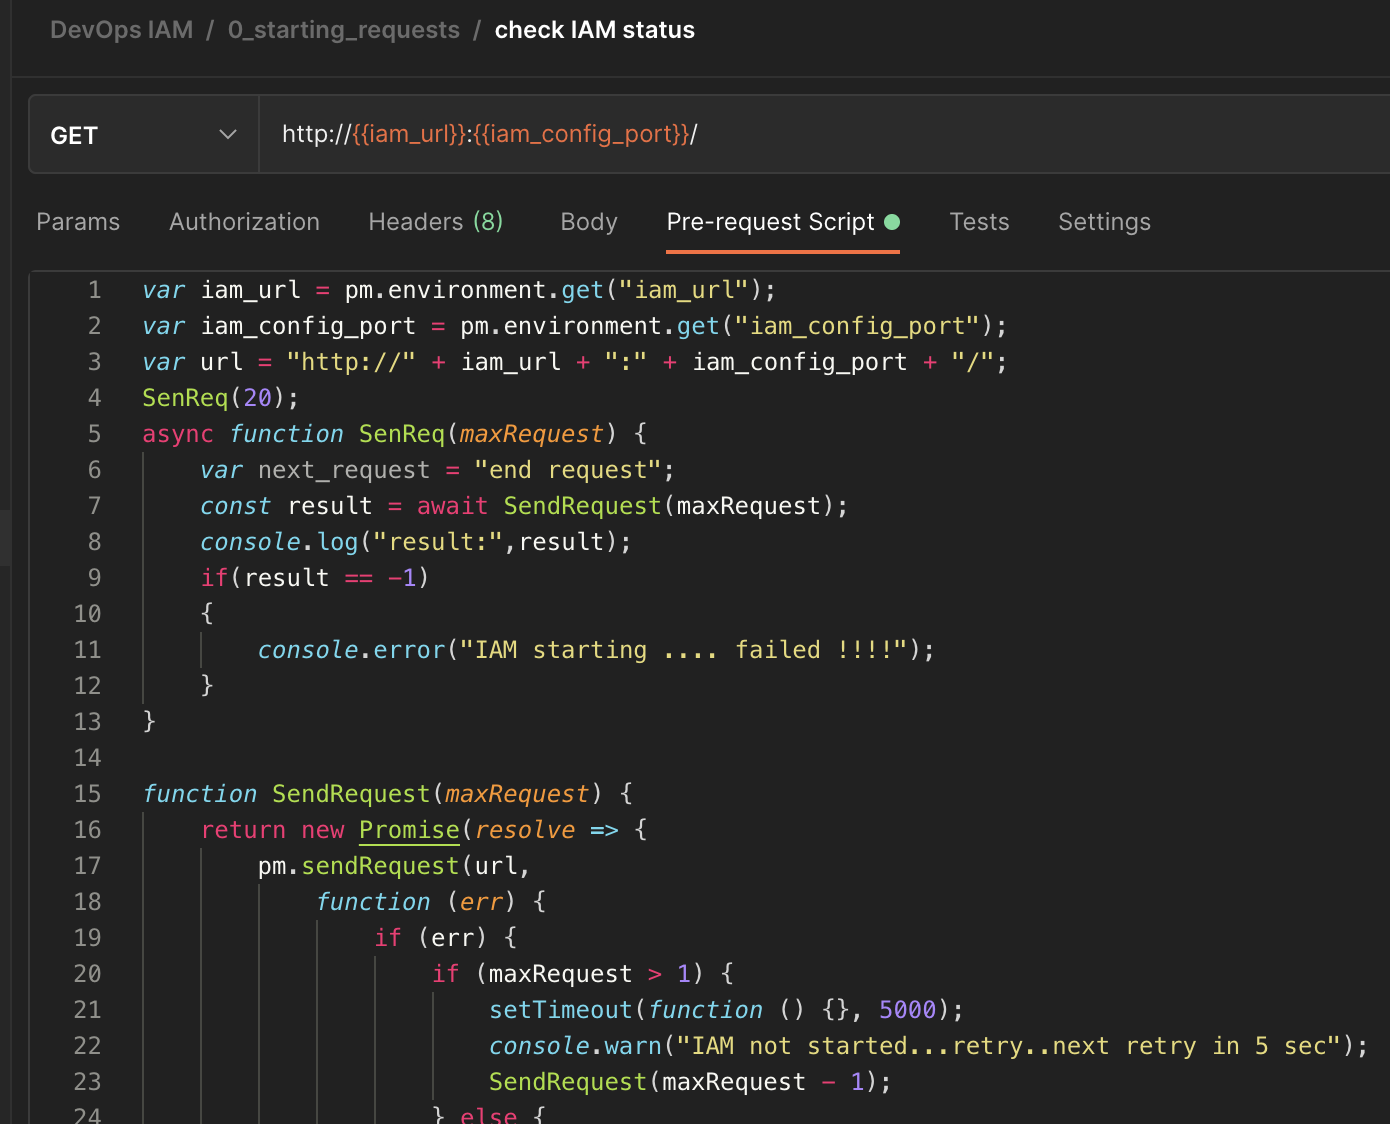
11.1.1. Is IAM startup ?
Our first script will check if IAM is up and running.
var iam_url = pm.environment.get("iam_url");
var iam_config_port = pm.environment.get("iam_config_port");
var url = "http://" + iam_url + ":" + iam_config_port + "/";
SenReq(20);
async function SenReq(maxRequest) {
    var next_request = "end request";
    const result = await SendRequest(maxRequest);
    console.log("result:",result);
    if(result == -1)
    {
        console.error("IAM starting .... failed !!!!");
    }
}

function SendRequest(maxRequest) {
    return new Promise(resolve => {
        pm.sendRequest(url,
            function (err) {
                if (err) {
                    if (maxRequest > 1) {
                        setTimeout(function () {}, 5000);
                        console.warn("IAM not started...retry..next retry in 5 sec");
                        SendRequest(maxRequest - 1);
                    } else {
                        console.error("IAM starting .... failed");
                        resolve(-1);
                    }
                } else {
                    console.log("IAM starting .... ok");
                    resolve(1);
                }

            }
        );
    });
}
11.1.2. Delete old datas
var iam_url=pm.environment.get("iam_url");
var iam_config_port=pm.environment.get("iam_config_port");

pm.sendRequest("http://"+iam_url+":"+iam_config_port+"/plugins", function (err, res) {
    if (err) {
        console.log("ERROR : ",err);
    }
    else {

        var body_json=res.json();
        if(body_json.data)
        {
            for( i=0; i < body_json.data.length; i++)
            {
                // Example with a full fledged SDK Request
                route_id = body_json.data[i].id;
                const delete_route = {
                  url: "http://"+iam_url+":"+iam_config_port+"/plugins/" + route_id,
                  method: 'DELETE',
                };
                pm.sendRequest(delete_route, function(err, res){
                    console.log(err ? err : res);
                });
            }
        }
    }
});
Do the same for routes, services and consumers.
This order is important beause you can't remove services with routes.
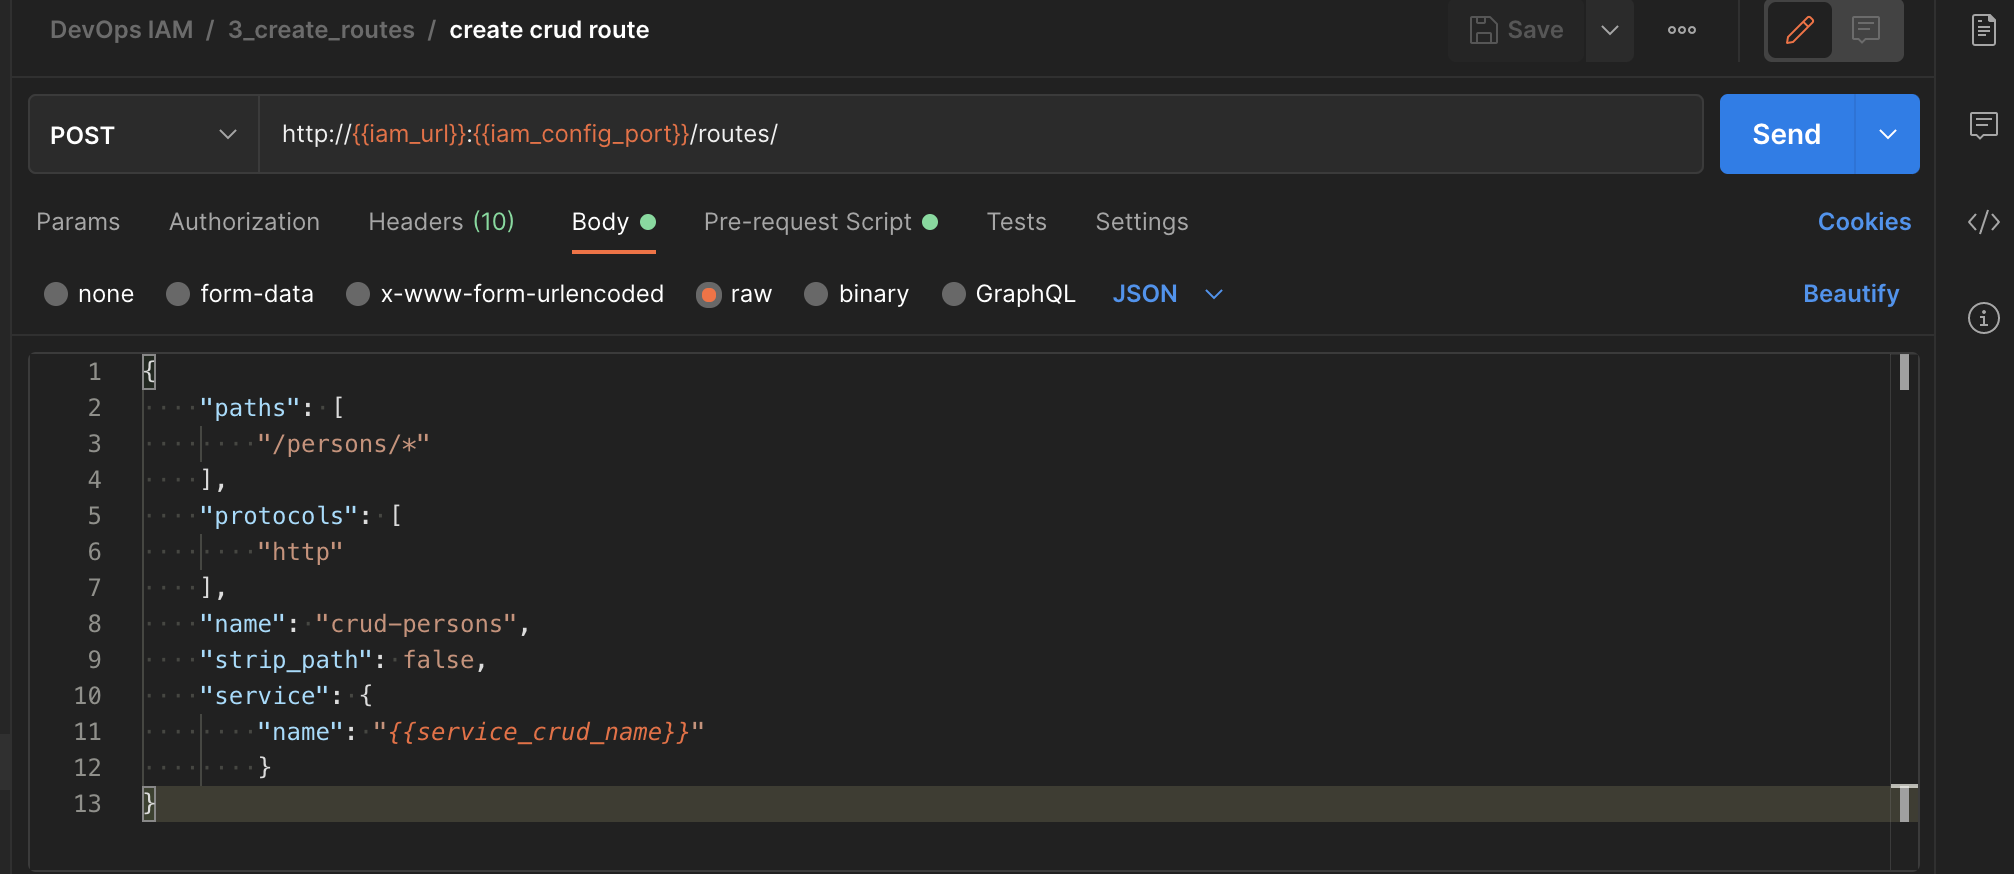
11.1.3. Create Service/Route
Routes are dependent from services. For this type of cases we can use Test function of postman to retrieve data :
| Screen | Script | |||||
|---|---|---|---|---|---|---|
|
|