A portal to manage storage made with Django - Part 2
Our objective
Today we continue expanding our last article by sharing information about some features we added to our portal. We will include a pinch of CSS to visualize the available data better and export it. Finally, we will study how to add some filtering and ordering options. By the end of this article, you should be able to display a complete simple query beautifully.
Previously, on "A portal to manage storage made with Django"...
We should pick up where we left off before proceeding to the development of the portal. We have previously created the basis for the project on the command line with some Django built-in commands such as startproject. Then, we added the requirements for connecting with the database to the requirements.txt file and its parameters to the settings.py file to simplify the installation. Later on, we created a Globals application with proper URLs and paths, directing the users from the main project to the views that communicate with the data via models. We have also created an API folder with a few methods of raising information from a remote database. With everything above-mentioned, we left an option of creating communication between different IRIS instances available for users. Finally, we made the index.html to display it on the link http://127.0.0.1:8000/globals/.
At this point, the backstages should look as shown in the picture below.
.png)
.png)
Yet, not as neat as the previous illustration, the stage looks like the following screenshot.
.png)
Adding CSS
The Cascading Style Sheets can transform this project into something more presentable, better looking, and more pleasant to work with. In this section, you will learn how to use CSS in your project. We will also guide you through some basic concepts of this language. However, our main objective will be to connect the styles file and the project.
First of all, create a folder called “static” inside the directory /globals. We will need it to store all our static files there later. Inside the folder, you can add the styles.css file.
.png)
Now we can finally get tidy and colorful. However, if you don’t know anything about CSS, don’t worry! I have some good news for you! It is relatively intuitive to get started. All you need is to write the element and add the design between the brackets. You can access classes after a dot, and ID’s after a hashtag. If you want a pro tip, you can use an asterisk to add the style to every element in the HTML file.
For instance, if we add an ID and a class to the last three paragraphs from the index.html, we will be able to access them separately and add different colors, backgrounds, and fonts.
<p>showing results for {{globals.count}} globals</p>
<p class="totalSize">total size: {{sumSize.size__sum}}</p>
<p id="allocatedSize">total allocated size: {{sumAllocated.allocatedsize__sum}}</p>
* {
font-family: 'Lucida Sans';
}
p {
background-color: yellow;
}
.totalSize {
color: brown;
}
#allocatedSize {
font-weight: bold;
}
According to this asset, after configuring the appropriate connections, every font displayed on the page should belong to the family of Lucida Sans, all three paragraphs should have a yellow background, the paragraph with the class totalSize should have a brown font, and the paragraph with the allocatedSize ID should have a bold font.
.png)
You should notice a few peculiarities if you play around with the elements, adding IDs, classes, and styles. The first one is the hierarchy: the definitions of IDs override the classes, which in their turn override the general styles. Second, you can have various elements sharing a single class. Also, child items will inherit most of their parent’s style (some things won’t be inherited though, but it is a more advanced topic so we will not cover it in this article). If you wish, share with us in the comments section which behavior from those you have noticed, you hadn’t known about before.
Next, we need to make the project understand what a style file is and where to find it. Then, we can get the HTML file referring to the styles.css.
First, go to settings.py, look for the STATIC_URL variable, and change its value to the following.
STATIC_URL = '/static/'This configuration should notify the project that all static files could be found in a folder called “static” inside the app’s folder. In this case, it is the directory /globals/static. If we had another app used by this project, it would only recognize its internal folder static (unless specified to have a general one).
Static files are those that do not change when the application is running. You can use them to store functions, definitions, constants, and images that assist the code (in this case, .py files) execution. In practice, this is where you store JavaScript and CSS.
The next step is to reference it from the index.html. Add a <head> tag before the body. Inside the body, use a <link> tag to relate to a stylesheet of type text/CSS, with the reference “{% static 'styles.css' %}” and media “screen”. Besides, you need to tell Django to load the statics. Remember that we can “tell Django” things via the HTML file by adding code between brackets and percent signs as shown in the example: “{% your code here %}”.
<head>
{% load static %}
<link rel="stylesheet" type="text/CSS" href="{% static 'styles.css' %}" media="screen"/>
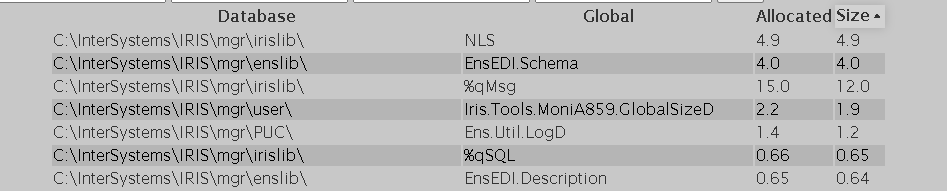
</head>I changed our list of globals to a table of globals with a similar syntax. Then I added to the project a nice spacing between the elements as well as the Innovatium’s colors. You can check the CSS file I created on my GitHub and see how this table got the look illustrated below. I am not an expert in CSS or web design. However, if you have any questions, I will be happy to help you and even learn new tricks together. Leave a comment or send me a message!
<table>
    <thead>
        <tr>
            <th>Database</th>
            <th>Global</th>
            <th>Size</th>
            <th>Allocated</th>
        </tr>
    </thead>
    <tbody>
        {% for global in globals %}
        <tr>
            <td>{{ global.database }}</td>
            <td>{{ global.name }}</td>
            <td>{{ global.size }}</td>
            <td>{{ global.allocatedsize }}</td>
        </tr>
        {% endfor %}
    </tbody>
</table>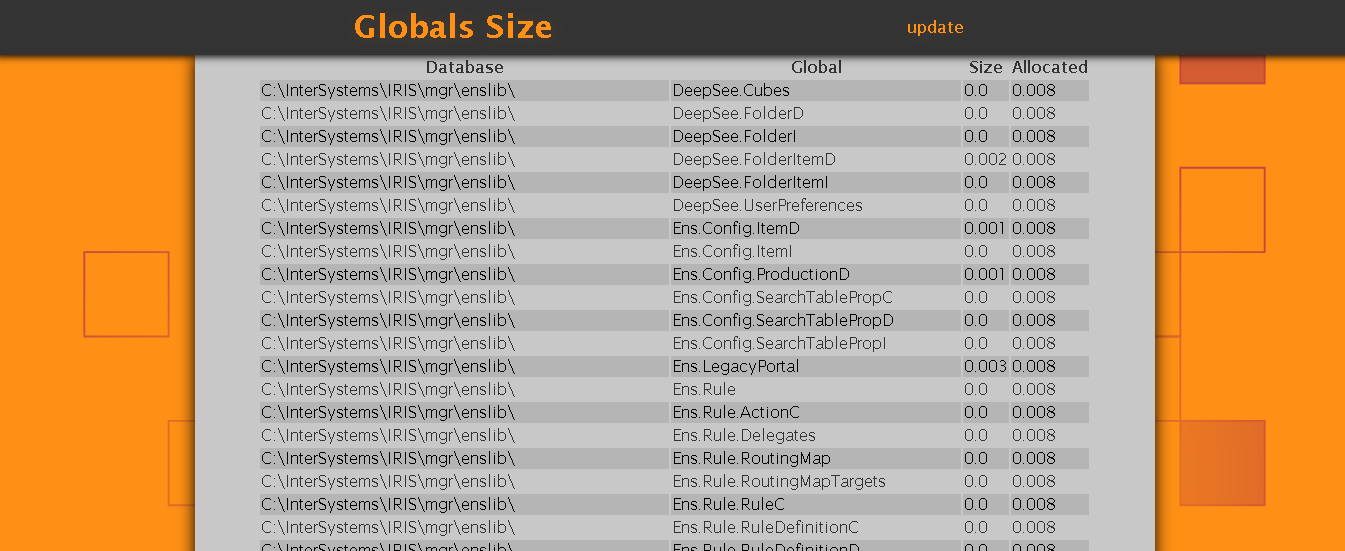
PS. If the static files are cached, you might not see any changes when reloading. You can press Ctrl+Shift+Delete and remove the stored cache when you use Google Chrome as the navigator. Then you should reload your page once more. If you have done everything right, you will see the following in your terminal:
.png)
TIP: to avoid the necessity to clear the cache every time you use the program, add the following line to the head of your HTML file: <meta http-equiv="cache-control" content="no-cache" />. This tag should prevent the page from storing the cache.
Exporting data
In this section, we are returning to the back end. You will find it helpful to review Part 1 of this series of articles in case you are not familiar with the path the requests follow (template -> URL -> view -> database and back).
We will set a form for the user to decide on exporting to CSV, XML, or JSON since it covers most of the usage for transferring data. Yet, you can add any languages you want. To do our job, we will need a form with an HTTP method, a security token, three radio inputs, and a submit button.
<form method="GET">
    {% csrf_token %}
    <input type="radio" name="exportLanguage" value="CSV"/>
    <label for="CSV">CSV</label>
    <input type="radio" name="exportLanguage" value="XML"/>
    <label for="XML">XML</label>
    <input type="radio" name="exportLanguage" value="JSON"/>
    <label for="JSON">JSON</label>
    <button type="submit" formaction="{% url 'export' %}"> Export </button>
</form>
If you want the labels to show a “clickable” text for the corresponding value, add the property onclick to the label with the value getElementById(‘The corresponding ID’).checked = true as well as corresponding IDs for each option. The formaction property specified in the button directs to the URL. As a result, you can have as many buttons as you want to point to different URLs and submit the form accordingly.
When finished with the previous step, we can add the path directing us to the view on urls.py and finally create the view on views.py. This view might seem a bit more complex compared to those we have done earlier, but, step by step, we will get through it together.
from .views import home, update, export

urlpatterns = [
    path('', home),
    path('update', update, name="update"),
    path('export', export, name="export")
]
First, we need to assign a variable to reference the globals. Then, we need to create a path where the file will appear when the user clicks the export button (we can later make it editable on the client side). Also, we need to know which language was selected and make the appropriate exporting for each one.
import os

def export(request):
    globals = irisGlobal.objects.all()           # gets the globals
    cd = os.getcwd()                             # gets current directory
    language = request.GET.get("exportLanguage") # gets language selected in the form
    if language == "CSV":
        pass
    elif language == "XML":
        pass
    elif language == "JSON":
        pass
    return redirect(home)
For the CSV, all we need to do is to put every record on a line and separate every column by a comma. The most intuitive way to do that would be to concatenate all the information for each global in a string between commas, followed by a line terminator, and write each row to the file.
if language == "CSV":
    with open(cd+"\\test.csv", "w") as file:
        for eachGlobal in globals:
            row = eachGlobal.database+", "+eachGlobal.name+", "+str(eachGlobal.size)+", "+str(eachGlobal.allocatedsize)+"\n"
            file.write(row)
For JSON and XML, we will require Django’s serializers. They may seem complex, but in reality, they are quite simple. The serializers module has two methods: serialize and deserialize, which can convert information from and to your preferred language. You can also design custom serializers. Luckily, XML and JSON are built-in options.
from django.core import serializers

[...]

elif language =="XML":
    with open(cd+"\\test.xml", "w") as file:
        globals = serializers.serialize("xml", globals)
        file.write(globals)

elif language =="JSON":
    with open(cd+"\\test.json", "w") as file:
        globals = serializers.serialize("json", globals)
        file.write(globals)
Well done! The application is finally ready for reloading and testing. After exporting, your workspace should magically start looking like the image below.
.png)
Filters
Let’s start by filtering by a database. We need to make a form tag with text input to enter the database’s name and a reference to the URL. We can use the home view with some adaptations.
<form method="GET" action="{% url 'home' %}">
    {% csrf_token %}
    <input type="text" name="database" placeholder="Database"/>
</form>
Since now we are referring to the home path from the index, we should name it on the patterns, on urls.py.
path('', home, name="home"),Remember that in the home view, we get all the globals from the model with irisGlobal.objects.all() and return them to the index. At this point, we need to return only a filtered set of those globals instead of all. The good news is that we will solve this issue with only four lines of code.
First, just as we did with the export, we need to get information from the input with request.GET.get() and reduce our globals set according to what our user wishes. Thanks to the help of the query object from Django.db.models, we will be able to use the filter function to achieve our goal.
from django.db.models import Sum, Q
from .models import irisGlobal

def home(request):
    globals = irisGlobal.objects.all()
    databaseFilter = request.GET.get("database")

    if databaseFilter:
        query = Q(database__contains=databaseFilter)
        globals = globals.filter(query)
The Q() is the query object. Inside that object, you can add a column’s name, two underlines, and an SQL statement to refine the search. After that, you can pass whichever Q objects you want as arguments of the filter function, and they will be united by “AND” operators (unless specified not to do so). There are a lot more things you can do with the Q class. If you wish, you can read everything about it and other ways of making queries with Django in the official documentation.
Now you can reload and test your filters. Remember to pay attention to how the aggregators at the end of the page adapt to the filters since we have built them from the globals variable.
More filters!
If you feel comfortable with the last section, we can get more confident, with the subject. It is time to add more filters and combine them. To get started, add a few more inputs to our form.
<form method="GET">
    {% csrf_token %}
    <input type="text" name="database" placeholder="Database"/>
    <input type="text" name="global" placeholder="Global name"/>
    <input type="number" name="size" placeholder="Size" step="0.001"/>
    <input type="number" name="allocated" placeholder="Allocated size" step="0.001"/>
    <button type="submit" formaction="{% url 'home' %}"> Filter </button>
</form>
On the view, add the new filters to the variable globals. They should chain and be equivalent to the SQL statement below.
SELECT * FROM globals
WHERE database LIKE ‘%databaseFilter%’ AND
globals LIKE ‘%globalsFilter%’ AND
size >=sizeFilter AND
allocatedsize>=allocFilter
globals = irisGlobal.objects.all()
databaseFilter = request.GET.get("database")
globalFilter = request.GET.get("global")
sizeFilter = request.GET.get("size")
allocFilter = request.GET.get("allocated")

if databaseFilter:
    globals = globals.filter(Q(database__contains=databaseFilter))
else:
    databaseFilter=""
if globalFilter:
    globals = globals.filter(Q(name__contains=globalFilter))
else:
    globalFilter=""
if sizeFilter:
    globals = globals.filter(Q(size__gte=sizeFilter))
else:
    sizeFilter=""
if allocFilter:
    globals = globals.filter(Q(allocatedsize__gte=allocFilter))
else:
    allocFilter=""
The filter is working already, but we can still slightly improve it. If we pass the received variables on the return, we will be able to use them as values in the inputs. They will also not disappear when we reload the page or press the filter button.
return render(request, "index.html", {"globals": globals,
    "sumSize": sumSize,
    "sumAllocated":sumAllocated,
    "database":databaseFilter
    "global":globalFilter
    "size":sizeFilter,
    "allocated":allocFilter
})<form method="GET">
{% csrf_token %}
<input type="text" name="{{database}}" placeholder="Database"/>
<input type="text" name="{{global}}" placeholder="Global name"/>
<input type="number" name="{{size}}" placeholder="Size" step="0.001"/>
<input type="number" name="{{allocated}}" placeholder="Allocated size" step="0.001"/>
<button type="submit" formaction="{% url 'home' %}"> Filter </button>
</form>We can supply the filters with options for updates that are less than or equal to a specific value. We can even program live updates (update at each key the user presses while typing in the inputs). However, for now, we will keep it in mind just as ideas and move on to adding order.
Exporting a filtered set
After everything we have done, it is reasonable that you want to adapt the exporting view to work with all the filters we added.
We can put all the logic we have added from the filters in a function that we will call handle_filters, and instead of using the array created from irisGlobals.objects.all() to obtain the information, we will use the one created by this function. To make it all work, we should put the two forms together.
def handle_filters(request):
    globals = irisGlobal.objects.all()
    databaseFilter = request.GET.get("database")
    globalFilter = request.GET.get("global")
    sizeFilter = request.GET.get("size")
    allocFilter = request.GET.get("allocated")

    if databaseFilter:
        globals = globals.filter(Q(database__contains=databaseFilter))
    else:
        databaseFilter=""
    if globalFilter:
        globals = globals.filter(Q(name__contains=globalFilter))
    else:
        globalFilter=""
    if sizeFilter:
        globals = globals.filter(Q(size__gte=sizeFilter))
    else:
        sizeFilter=""
    if allocFilter:
        globals = globals.filter(Q(allocatedsize__gte=allocFilter))
    else:
        allocFilter=""
    return globals, databaseFilter, globalFilter, sizeFilter, allocFilter
def export(request):
globals = handle_filters(request)[0]<form method="GET">
{% csrf_token %}
<input type="radio" name="exportLanguage" value="CSV"/>
<label for="CSV">CSV</label>
<input type="radio" name="exportLanguage" value="XML"/>
<label for="XML">XML</label>
<input type="radio" name="exportLanguage" value="JSON"/>
<label for="JSON">JSON</label>
<button type="submit" formaction="{% url 'export' %}"> Export </button>
<br/>
<input type="text" name="{{database}}" placeholder="Database"/>
<input type="text" name="{{global}}" placeholder="Global name"/>
<input type="number" name="{{size}}" placeholder="Size" step="0.001"/>
<input type="number" name="{{allocated}}" placeholder="Allocated size" step="0.001"/>
<button type="submit" formaction="{% url 'home' %}"> Filter </button>
</form>Order table (with JavaScript)
This section will show you how I added order options to the table. There are many ways to do it, but today we will use JavaScript to learn something different from what we have done previously. Of course, it would be better if you had some knowledge of the language’s basics, but you will be able to follow up anyway. Nevertheless, the main focus is to understand the connections. They will be very similar to the CSS’s and will open even more doors for you to manage data from the portal.
Let’s begin! Open the index.html and add two <script> tags at the very bottom of the body. The first one should reference the dependencies. The second one will point to a .js file in our project (we will create it in the next step). Since we already added ‘{% load static %}’, this will be enough for the JavaScript file to start working.
<script src="https://ajax.googleapis.com/ajax/libs/jquery/1.11.1/jquery.min.js"></script>
<script src="{% static 'index.js'%}"></script>
Once this connection has been established, create a file inside the folder /static, and name it index.js (or whatever you called it in the reference). If, at this stage, you add a console.log(“Hello world!”); to the file and reload the page, you will see that it is already working. It means that we can finally start creating the ordering logic.
We want the table to be in order when the user clicks a header. To make it possible, we have to tell the display to listen to the user whenever he clicks any of those headers. We have the document from which we select every <th> element on the table, and, for each one of them, we want to know when it gets clicked.
document.querySelectorAll("table th").forEach(header => {
    header.addEventListener("click", () => {

    });
})
Now we can tell it what to do once it hears the event “click.” We will need the table (the parent of <thead>, which is the parent of <tr>, which is the parent of the clicked <th>) and a number indicating which header was selected. We also must know whether the table is already in the ascending order for that column. Then, we can call a function to sort the table.
document.querySelectorAll("table th").forEach(header => {
    header.addEventListener("click", () => {
        const table = header.parentElement.parentElement.parentElement;
        const columnIndex = Array.prototype.indexOf.call(header.parentElement.children, header);
        const isAscending = header.classList.contains("ascending");
        sortTable(table, columnIndex+1, !isAscending);
    });
})
There are many pre-built sorting table algorithms. You can even download and use some of them. I want to avoid adding more dependencies to this project. For that reason, I will stick to using the following algorithm.
function sortTable(table, columnIndex, ascending = true) {
    const direction = ascending ? 1 : -1;                 // if its ascending, direction is 1, else is -1
    const header = $('th:nth-child('+columnIndex+')');    // gets the header with index columnIndex
    const body = table.children[1]                        // gets the body (second children of table)
    const rows = Array.from(body.querySelectorAll("tr")); // creates an array for the rows in the body
    // removes previous order from every header
    table.querySelectorAll("th").forEach(th => th.classList.remove("ascending", "descending"));

    // adds the order to the clicked header
    header[0].classList.toggle("ascending", ascending);
    header[0].classList.toggle("descending", !ascending);

    // algorithm for sorting the rows
    const sorted = rows.sort((a, b) => {
        const aColumn = a.querySelector('td:nth-child('+columnIndex+')').textContent;
        const bColumn = b.querySelector('td:nth-child('+columnIndex+')').textContent;

        return aColumn > bColumn ? (1*direction) : (-1*direction);
    });

    // removes the rows from the body and add the sorted rows
	while (body.firstChild) {
		body.removeChild(body.firstChild);
	}
	body.append(...sorted);

}
The following link explains the above-mentioned algorithm. https://dcode.domenade.com/tutorials/how-to-easily-sort-html-tables-with-css-and-javascript
Now, with some CSS, you have a beautifully ordered table.
.ascending::after {
    content: "\25be";
}

.descending::after {
    content: "\25b4";
}

.ascending, .descending {
    background-color: #ffffff30;
    box-shadow: .1px .1px 10.px #aaa;
}
A different approach to adding order
Another way to add order would be to create a form with an option to pick each column (with a little bit of JavaScript, you can also use the headers for selecting), direct it to a view that uses the function .order_by(“column name”) on the globals object, and return it ordered on the render function. Both options are implemented on my GitHub if you want to check it out. Pay attention to the fact that in the first method, we are not changing the data or the result set. Since we are only adjusting the way it is displayed, it will not affect the exportation.
One more tip on JavaScript
Here I have prepared one more thing for you that might be useful to know when using Django and JavaScript. If you want to redirect to a URL (for example, the update), you can use document.location.href = “update”; on the .js file.
Why would I want to know that if I am an IRIS Dev?
You may have noticed that this entire article has not used IRIS directly. The tutorials from Part 2 would be very similar if we were using any other database. However, if we build everything described above using InterSystems’ technology as the foundation, we will get a chance to adapt this portal to perform or show way more things with ease. If you already are an IRIS developer, you can easily imagine how this simple portal can combine information from multiple origins (not necessarily globals), besides the ability to provide all sorts of data treatment and data analysis, with the Cloud tools, IntegratedML (Machine Learning), Business Intelligence, Text Analytics and Natural Language Processing (NLP), etc. When all the tools given by InterSystems meet complete, easy, and beautiful interactivity with the users, provided all the necessary security is in place, the possibilities go beyond imagination.
Here I have collected some examples to illustrate my point. You can have a sensor machine that sends information to the InterSystems Callin API, integrated with a program in C++. This data can be interpreted, treated, and stored in IRIS, and its analysis can be displayed with Django, allowing the user to interact with it. Combined with InterSystems IRIS for Health and HealthShare, this portal becomes a tracking tool for patients in therapy. It can use Machine Learning and BI to detect and predict dangerous changes and send alerts with SAM (System Alerting and Monitoring) to the responsible doctor, who can be displayed on the portal along with all the information about the case required to make a quick decision.
In another context, but with a similar logic, InterSystems IRIS for Supply Chain can be used along with this portal to enable the user to see what might be compromising the system’s abidance. Such collaboration allows us to make and transmit decisions in a way that makes the whole operation easily understood and controlled.
Comments
@Heloisa Paiva
Thank you Heloisa, great article! 👏
Thanks a lot, @Vadim Aniskin !