Let's write an Angular 1.x app with a Caché REST backend - Part 9
In our last lesson, we implemented a linkage to our WidgetAccessory class, and debugged some errors we encountered along the way. We now have our data being returned by REST, but what if we want to update or add new data to our application?
So far we have only used HTTP GET commands with our REST Services, we now have to implement PUT (which roughly corresponds to an Update) and a POST (which roughly corresponds to a Create. Author's note: there is a lot of writing online about why this statement isn't entirely correct, I'm not going to go into the detail here). However, before we start, we notice that we should probably do some refactoring, since we want to be interacting with Widgets. REST typically involves accessing a logical, human readable URL pattern, so we should really tie our Widget methods to a Widget URL. We could just add these into the REST.Dispatch class, but this will lead to a very bulky class. Luckily, we can set a forward from the Dispatch class to another class which also inherits from %CSP.REST. So with this in mind, we want to create a REST.Widget class, and route all widgetmaster/rest/widget/ calls to it.

This will unpack the URL, and forward all calls onto the specified class (and will remove the prefix from the URL, so /widget/1 will just be forwarded as /1)
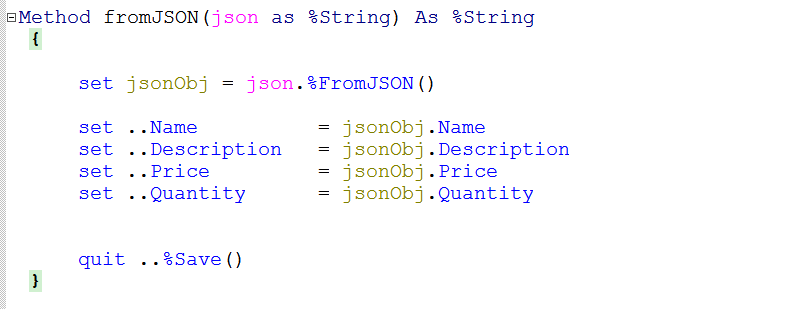
We are getting a little ahead of ourselves though. Before we start creating new Services, we should make sure we have a way to read a JSON string, and use it to update our Widget object. Since we have a toJSON() to convert an object instance to a JSON string, we will implement a fromJSON to do the reverse and update the properties of an object instance and %Save() it. We could do this in a very basic way, by unpacking all of the JSON properties and assigning them directly to the object, but this isn't very robust as it assumes that all properties will always be populated, and is also quite unmanageable for larger numbers of properties
So, instead, let's iterate over the properties of our JSON input, using the %GetIterator and %GetNext in a loop to unpack all of our properties, filter them (for example, we wouldn't want to try to update an Id value), and then assign these to the object instance using $PROPERTY
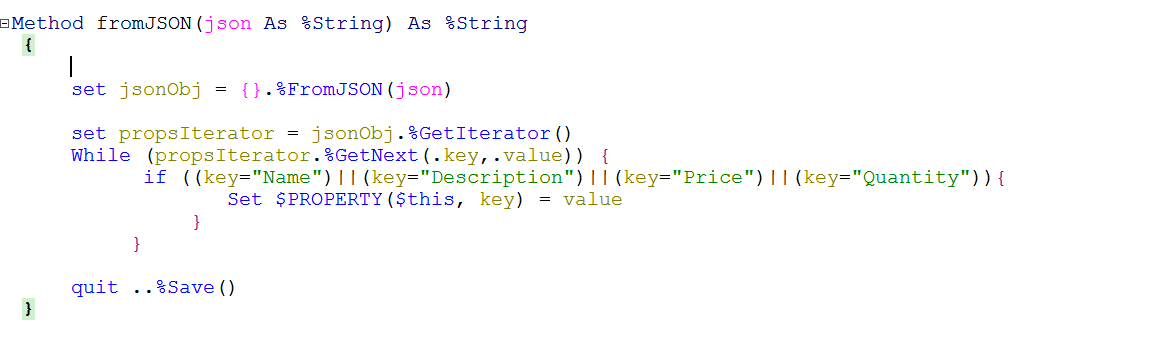
Much neater. We can now use this method to apply a JSON update to our object instance. Let's get back to our new REST.Widget class. Create the class, inheriting from the %CSP.REST superclass. We will then hook up the most common usage patterns to the appropriate verb
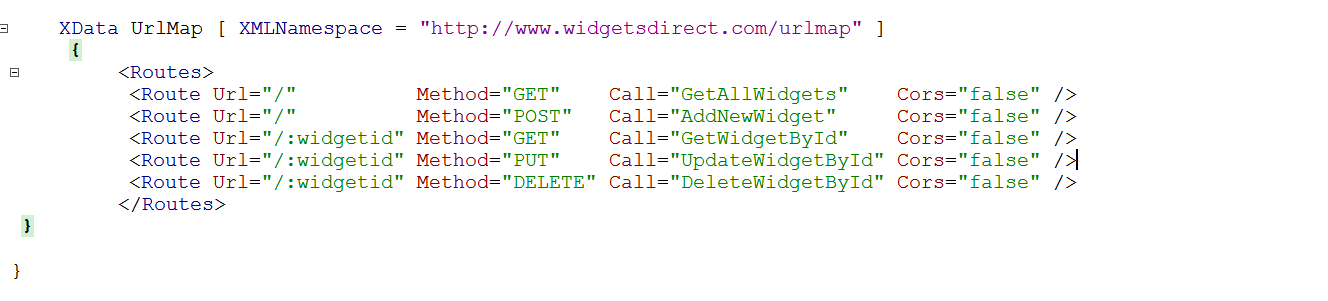
With these 5 Services, we can implement a full CRUD system for our class. By GETing the default path, we can return all instances (for browsing/searching), or we can GET a specific record by its ID (useful for returning more detail on larger objects). We can PUT an update to a specified object instance, and we can POST a new object entirely to the default path. Finally, we can implement a DELETE call, which will perform some form of Deletion or Archiving to the specified object.
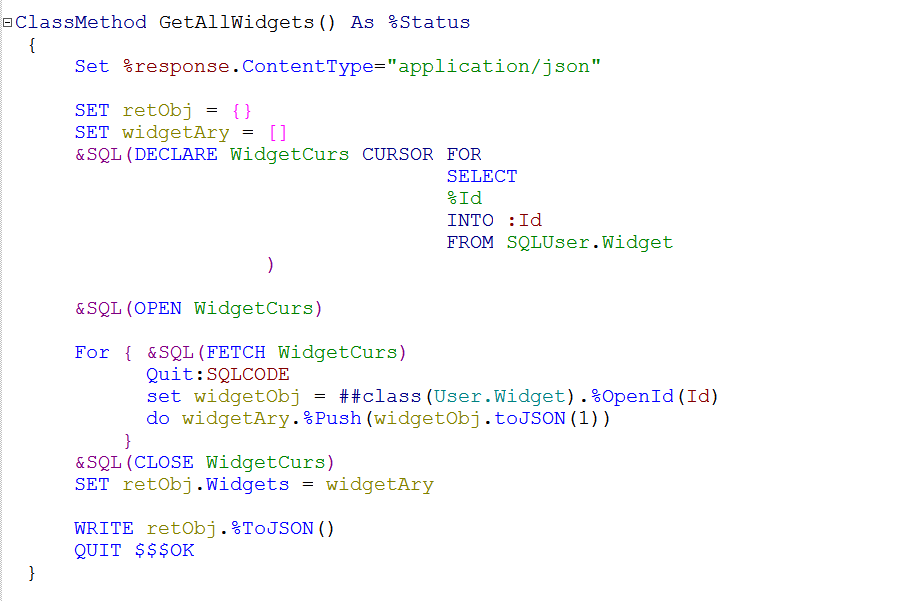
We can implement the GetAllWidgets first, as we already have the code in our REST.Dispatch class. We create the GetAllWidgets classmethod (with no params) and paste over the code from REST.Dispatch, removing it from that class when we're done.

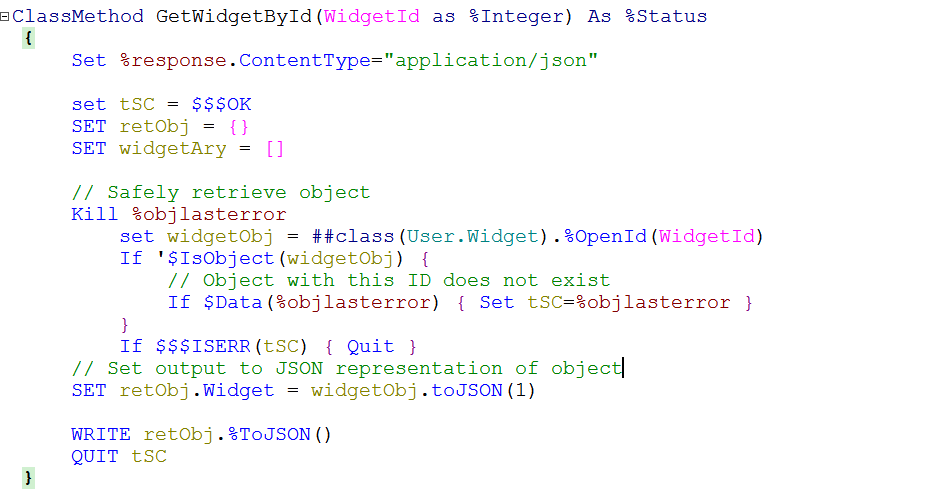
Next, we can implement the GetWidgetById. This is a very easy pattern to implement. We unpack the Id value passed in, use it to open the relevant object instance, and return the toJSON() output via a write. If the object fails to load, then we pass that error back out as a return value
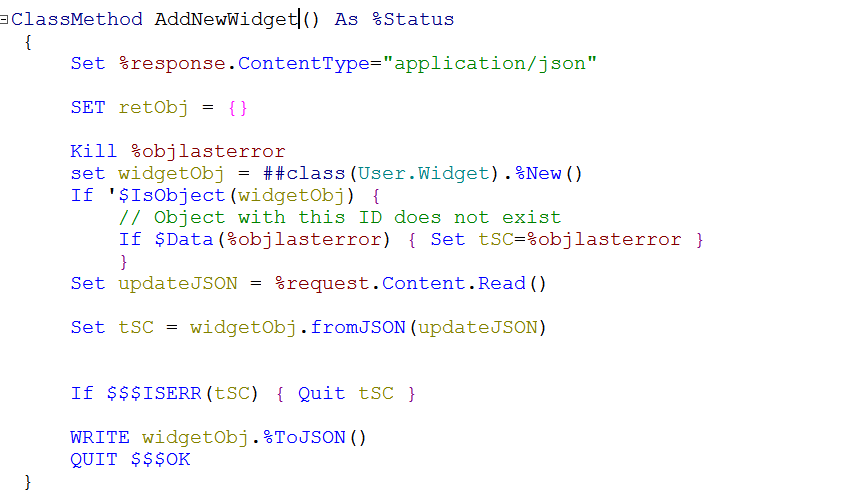
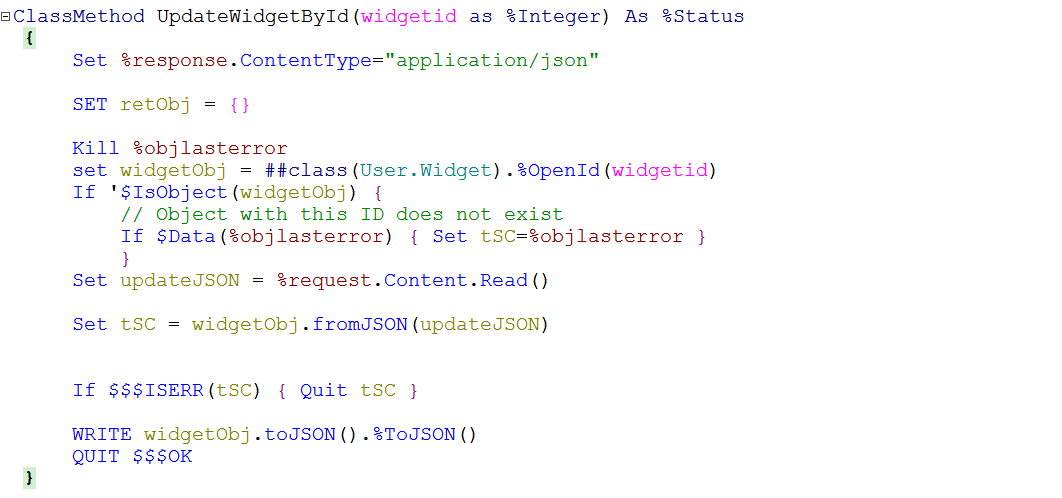
Now, we move to using our new fromJSON method to update or add objects. These 2 classmethods are basically identical, with the UpdateWidgetById using the supplied ID value to open a specific object instance, while the AddNewWidget just performs a %New() to get a new object instance to write to. Once an object instance has been loaded, the fromJSON is run. This takes the contents of the Request as the JSON input - Set updateJSON = %request.Content.Read(). Any Save errors are passed back to the client. As a final step, the current state of the object is returned using the toJSON(). This is very useful when we start implementing these calls in our application, as we can instantly rebind the current state of the object to the display, without having to make a secondary call to a GET.
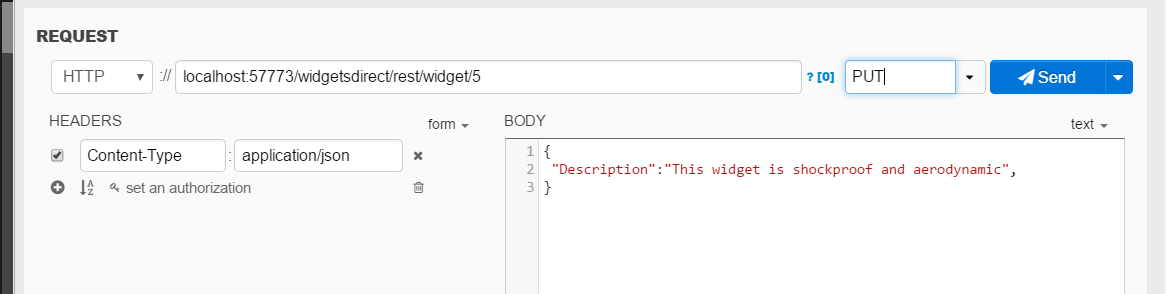
We can test these operations out in our REST debugger. When the PUT or POST verb is selected, you should get an option to include a request Payload. We will include a full object for the POST (Create) and will update one field for our POST. On each call, we should get the current state of the object (including our changes) as a response. Note that in the first example (POST), the Id value is discarded, and instead comes from the %Save(), as we would expect
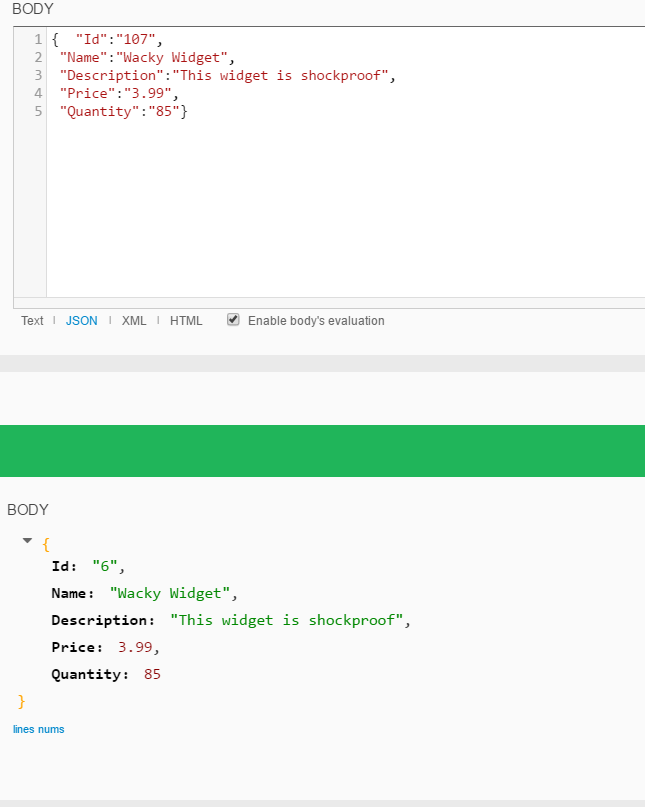
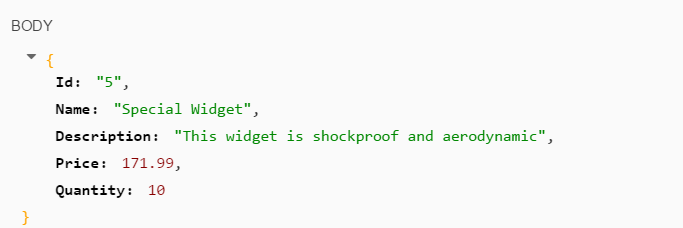
Now for our Description update
And we can see from the response that the Description has been updated, while all other fields remain the same
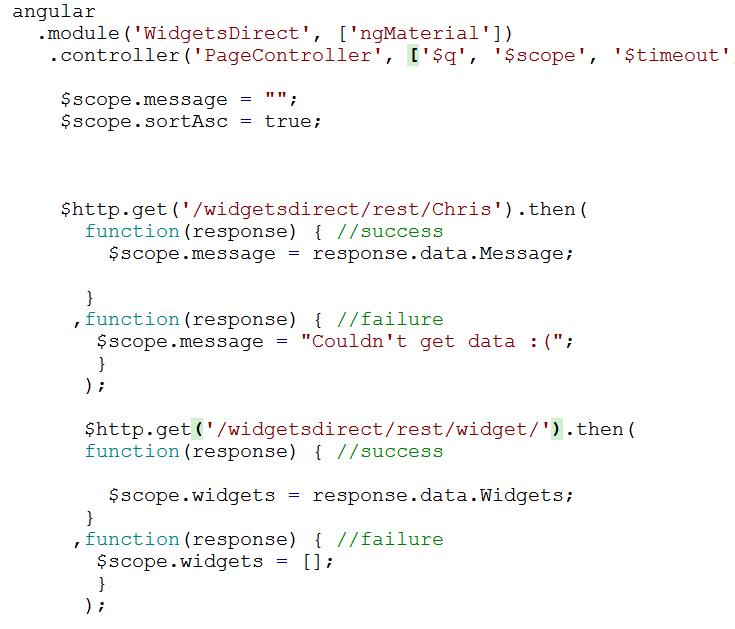
Let's check that our new and updated data is available on our Welcome page. First, however, we need to point the pageController at our new service to get the full list of Widgets (since they are no longer returned from our HelloWorld service). We implement a second $http.get and assign the response to the Widgets array. If we fail in our call to the Widgets service, we set the Widgets array to empty, to prevent warnings from anything trying to read the array.
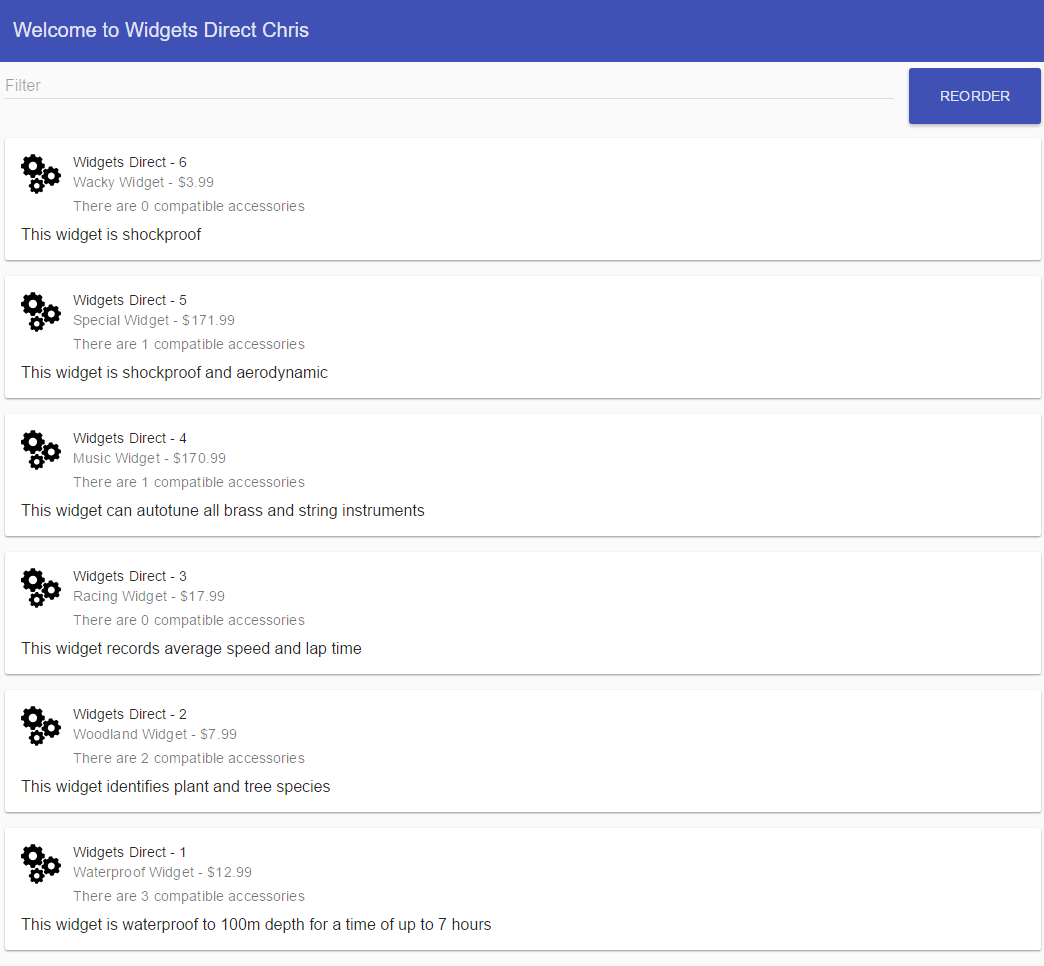
A quick reload and we can see our updated data
Today we:
- Implemented a new Widget REST service, with CRU operations (we don't want to do a Delete just yet)
- Implemented a forwarder from the REST.Dispatch to our new REST.Widget class
- Created a fromJSON() to assign the properties of a JSON string to our Widget object
- Implemented a GetAllWidgets REST Service
- Implemented a GetWidgetById REST Service
- Implemented an AddNewWidget REST Service
- Implemented an UpdateWidgetById REST Service
- Refactored our controller to read from the new Service
Next time we will:
- Implement a fromJSON() for WidgetAccessory
- Create a basic form to add new Widgets
This article is part of a multi-part series on using Angular on top of Caché REST services. The listing of the full series can be found at the Start Here page
Comments
Hi Chris
I was going alone fine until the logo would not load (Part 4). I am still not sure why. So I went to getHub and and loaded the latest version through part 9. I am now able to load the toolbar and the reorder button. However, I have not been able to load the widgets. I looked at the console messages and I get this message
Failed to load resource the rest/widget/ server respond with a status of 500 (Internal Server Error)
Any ideas why this error would come up?
Thanks for your help.
Joe
Hi Joe,
Are you using Chrome to debug? You should be able to click through to the error on the Network tab from the Deubgger. Anything that returns an error code should be highlighted in red, and if you click that red text, then it should give you the specific error coming from Caché. If you get this error, I should be able to find my mistake in the exported code.
There's example of this debug process at the end of part 7. I've also added an example logo to the github repo
Thanks
Chris
P.S. It's probably Security, I've developed this example in Minimal Security, so you may need to assign Read/Write permissions to the Role attached to your web applications
Thanks Chris
I found the issue. do widgetAry.%Push in GetAllWidgets User.Widget.cls does not exist in Cache 2016.1 at least in the version I have been using.
Very cool stuff
Joe
Looks like some of the images are missing.
I'm getting 404 errors for:
https://community.intersystems.com/sites/default/files/inline/images/pa…
https://community.intersystems.com/sites/default/files/inline/images/pa…
https://community.intersystems.com/sites/default/files/inline/images/pa…
https://community.intersystems.com/sites/default/files/inline/images/pa…
https://community.intersystems.com/sites/default/files/inline/images/pa…
https://community.intersystems.com/sites/default/files/inline/images/pa…
https://community.intersystems.com/sites/default/files/inline/images/pa…
https://community.intersystems.com/sites/default/files/inline/images/pa…
https://community.intersystems.com/sites/default/files/inline/images/pa…
Hi, Ed! Thank you! We'll try to fix the problem.