InterSystems for Dummies – Record Map

I am truly excited to continue my "InterSystems for Dummies" series of articles, and today, we want to tell you everything about one of the most powerful features we have for interoperability.
Hey, even if you have already had a go, we plan to take a really close look at how to get the most out of them and make our production even better.
What Is Record Mapper?
In essence, a Record Mapper is a tool that lets you map data from text files to production messages and vice versa. The Management Portal interface, on the other hand, allows you to create a visual representation of a text file and a valid object model of that data to map them to a single persistent production message object.
Therefore, if you wish to import data from a CSV file into your persistent class, you can play with a couple of inbound classes to do it (by FTP or File directory... ). Do not rush, though! We will get to each of those points in due course.
TIP: All the examples and classes described in this article can be downloaded from the following link: https://github.com/KurroLopez/iris-recordmap-fordummies.git
How to Start?
Let's get to the point and specify our scenario!.
We need to import information from our customers, including their name, date of birth, national identification number, address, city, and country.
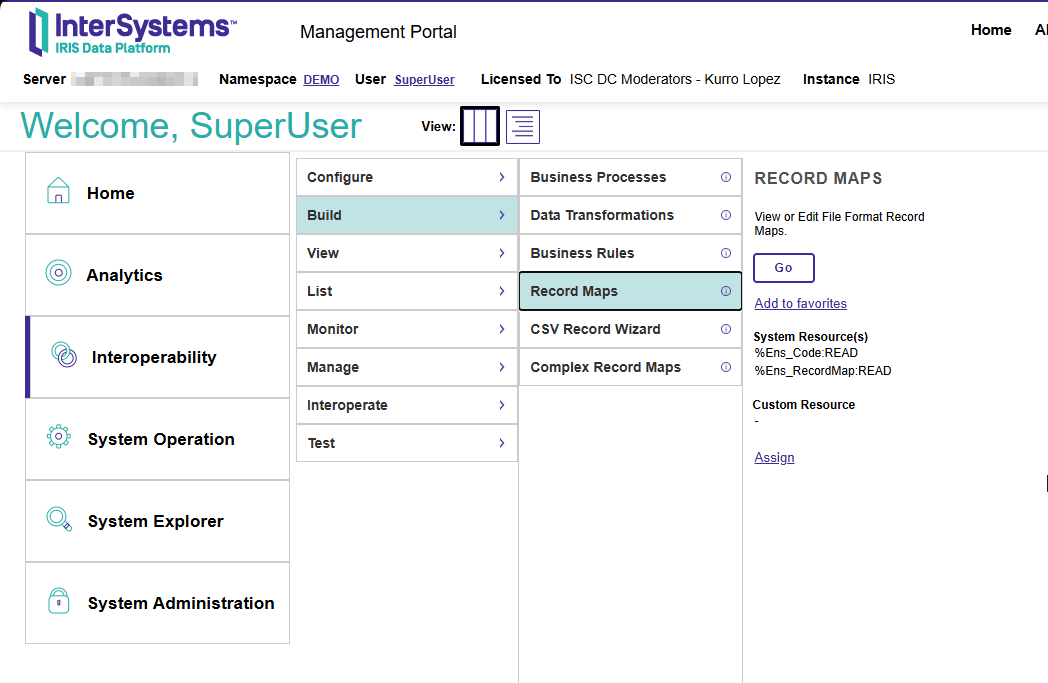
Open your IRIS portal and select Interoperability – Build – Record Maps:
Create a new Record Map with the package and class name.
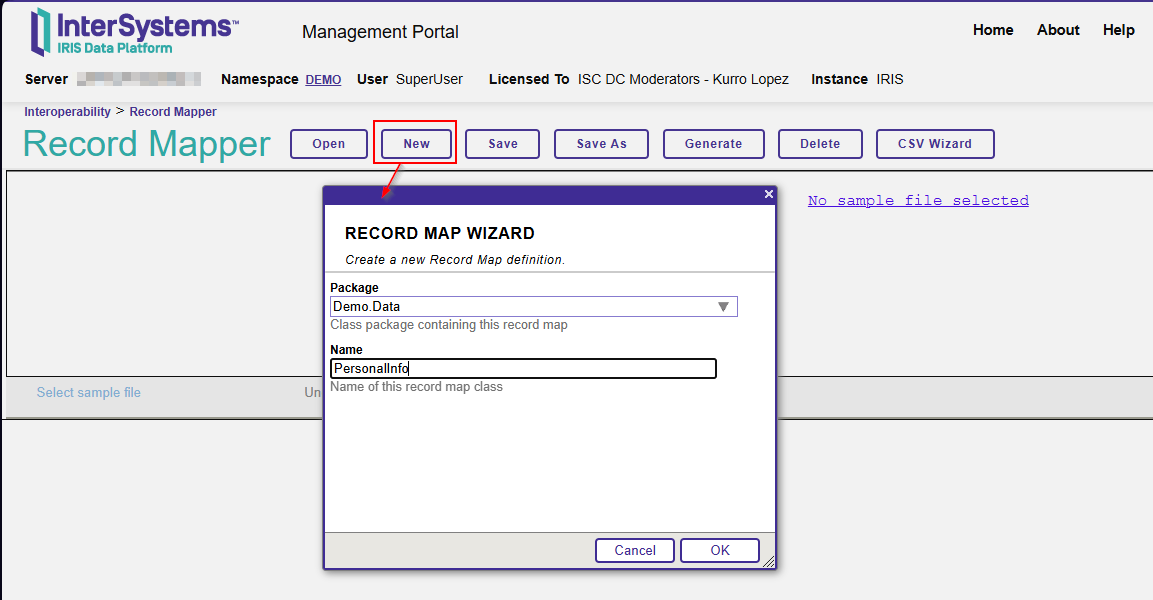
In our example, the package name is Demo.Data, whereas the class name is PersonalInfo.
The first step is to configure the CSV file. What I mean by that is to determine the separator character if the string fields have double quotes, etc..
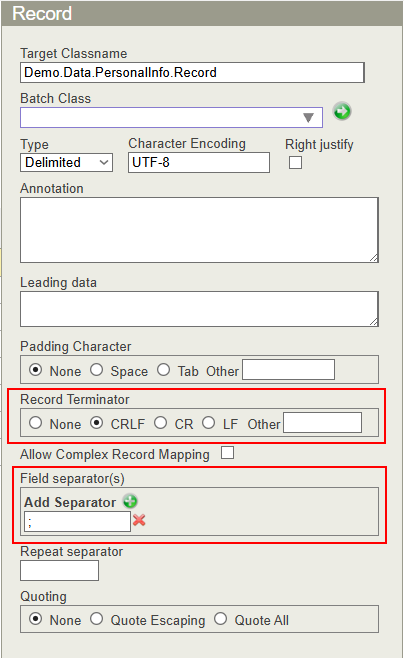
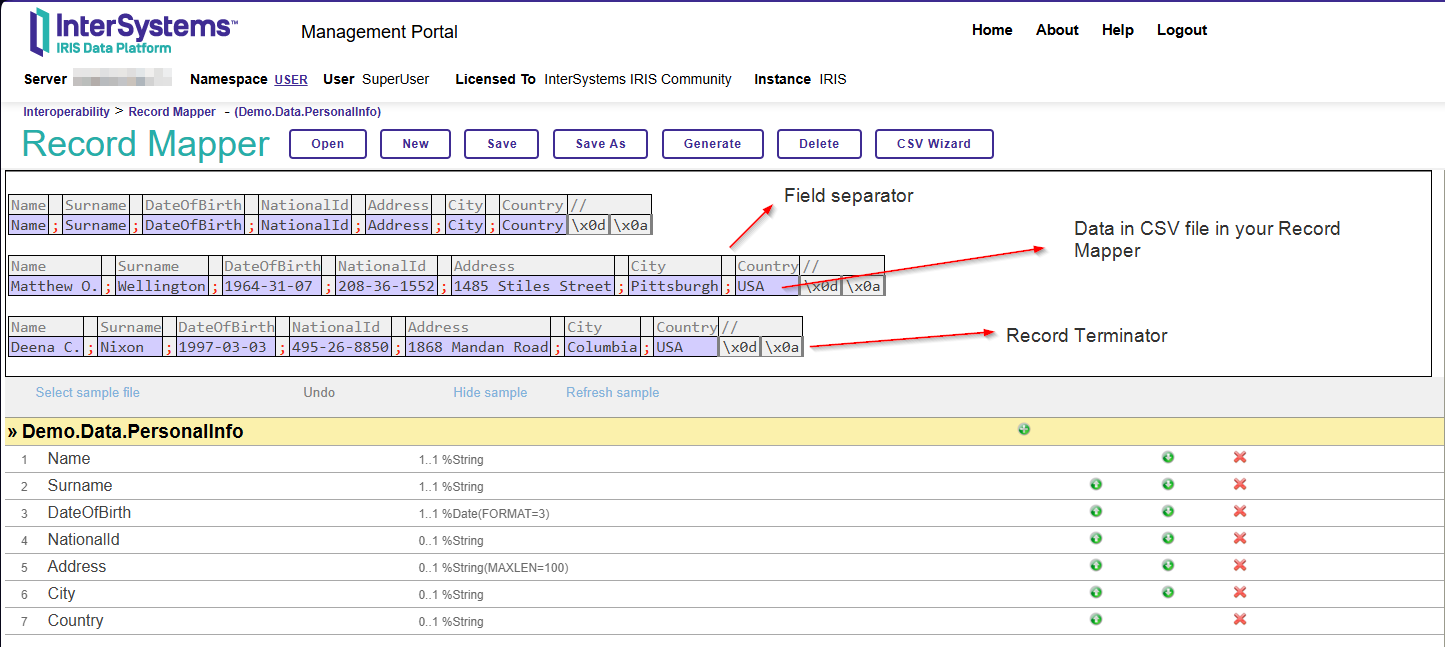
If you use Windows OS, the common record terminator is CRLF (Char(10) Char(12)).
Since my CSV file is a standard one, separated by a semicolon (;), I must define the character of the field separator.
Now, I am going to declare the fields of the customer profile (name, surname, date of birth, national identification number, address, city, and country).

This is a basic definition, but you can set more conditions regarding your CSV file if you wish.
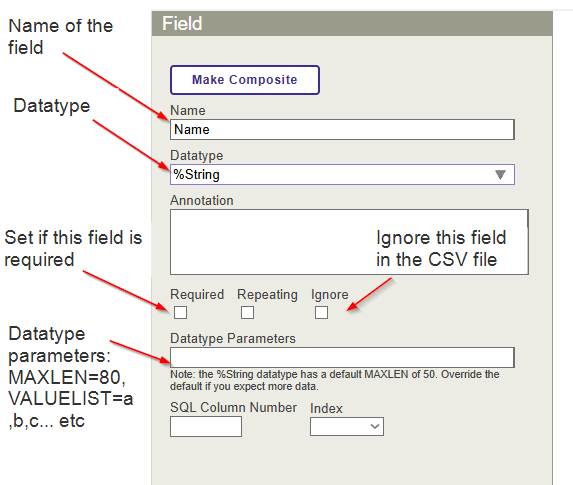
Remember that by default, a %String field has a maximum length of 50 characters. Therefore, I will update this value to allow more characters in the address field (a maximum of 100).
I will also define the date format using the ISO layout (yyyy-mm-dd), which corresponds to the number 3.
In addition, I will make the first name, surname, and date of birth fields mandatory.
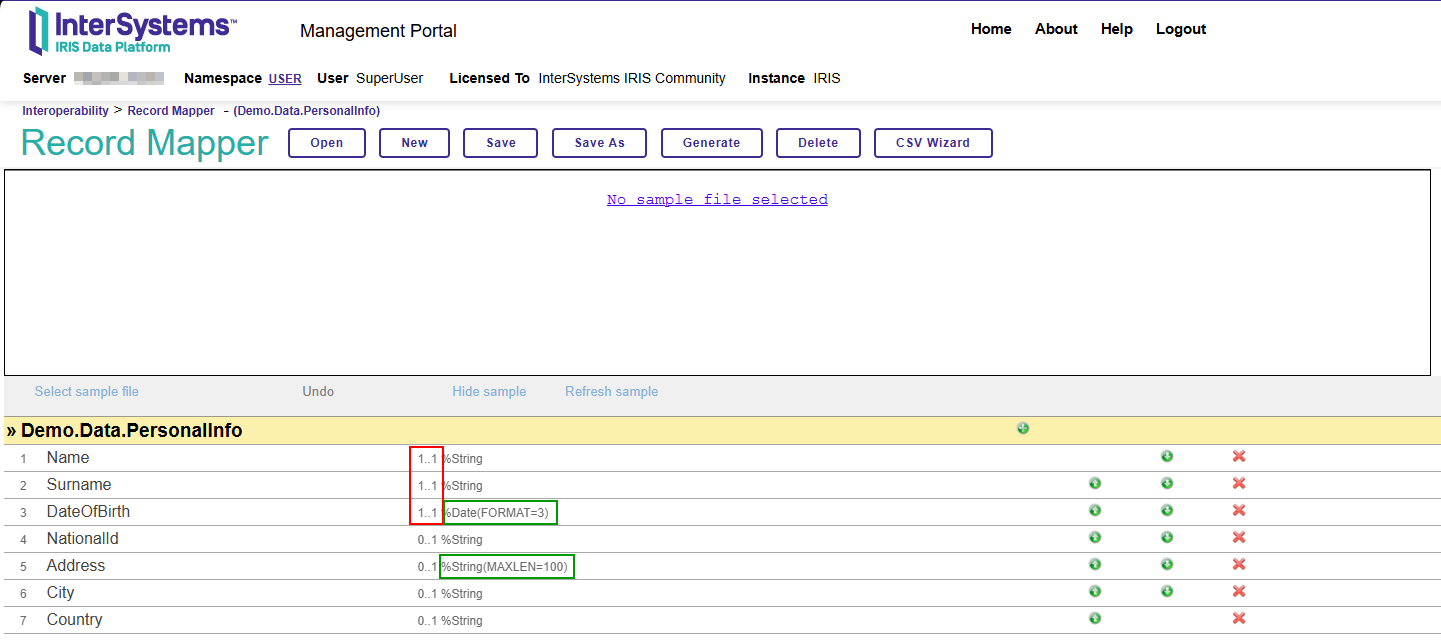
Everything is ready! Let’s go and press the “Generate” button to create the persistent class!
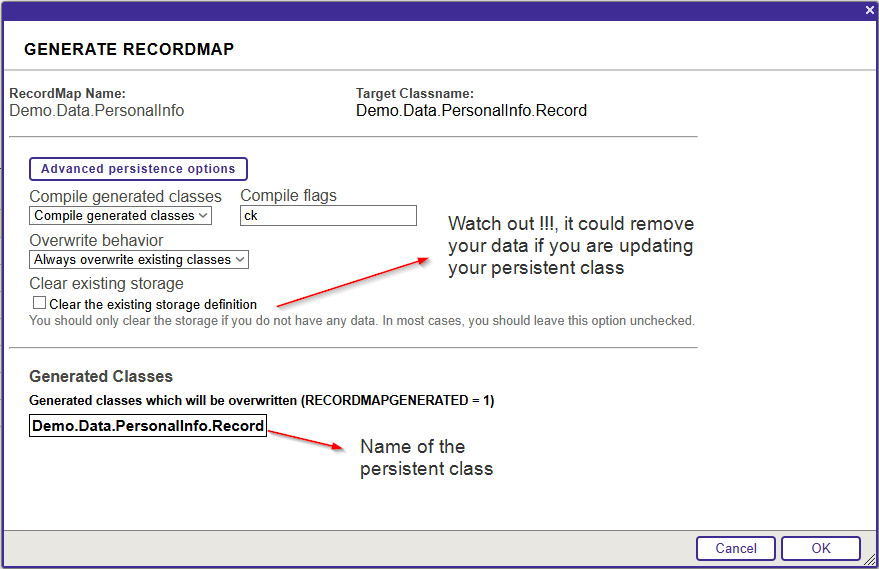
Let's take a look at the generated class:
/// THIS IS GENERATED CODE. DO NOT EDIT.<br/>
/// RECORDMAP: Generated from RecordMap 'Demo.Data.PersonalInfo'
/// on 2025-07-14 at 08:37:00.646 [2025-07-14 08:37:00.646 UTC]
/// by user SuperUser
Class Demo.Data.PersonalInfo.Record Extends (%Persistent, %XML.Adaptor, Ens.Request, EnsLib.RecordMap.Base) [ Inheritance = right, ProcedureBlock ]
{

Parameter INCLUDETOPFIELDS = 1;

Property Name As %String [ Required ];

Property Surname As %String [ Required ];

Property DateOfBirth As %Date(FORMAT = 3) [ Required ];

Property NationalId As %String;

Property Address As %String(MAXLEN = 100);

Property City As %String;

Property Country As %String;

Parameter RECORDMAPGENERATED = 1;

Storage Default
{
<Data name="RecordDefaultData">
<Value name="1">
<Value>%%CLASSNAME</Value>
</Value>
<Value name="2">
<Value>Name</Value>
</Value>
<Value name="3">
<Value>%Source</Value>
</Value>
<Value name="4">
<Value>DateOfBirth</Value>
</Value>
<Value name="5">
<Value>NationalId</Value>
</Value>
<Value name="6">
<Value>Address</Value>
</Value>
<Value name="7">
<Value>City</Value>
</Value>
<Value name="8">
<Value>Country</Value>
</Value>
<Value name="9">
<Value>Surname</Value>
</Value>
</Data>
<DataLocation>^Demo.Data.PersonalInfo.RecordD</DataLocation>
<DefaultData>RecordDefaultData</DefaultData>
<ExtentSize>2000000</ExtentSize>
<IdLocation>^Demo.Data.PersonalInfo.RecordD</IdLocation>
<IndexLocation>^Demo.Data.PersonalInfo.RecordI</IndexLocation>
<StreamLocation>^Demo.Data.PersonalInfo.RecordS</StreamLocation>
<Type>%Storage.Persistent</Type>
}

}
As you can see, each property has the name of the fields in our CSV file.
At this point, we will create a CSV file with the structure below to test our Record Mapper:
Name;Surname;DateOfBirth;NationalId;Address;City;Country Matthew O.;Wellington;1964-31-07;208-36-1552;1485 Stiles Street;Pittsburgh;USA Deena C.;Nixon;1997-03-03;495-26-8850;1868 Mandan Road;Columbia;USA Florence L.;Guyton;2005-04-10;21 069 835 790;Invalidenstrasse 82;Contwig;Germany Maximilian;Hahn;1945-10-17;92 871 402 258;Boxhagener Str. 97;Hamburg;Germany Amelio;Toledo Zavala;1976-06-07;93789292F;Plaza Mayor, 71;Carbajosa de la Sagrada;Spain
You can use it as a test now.
Click “Select sample file”, pick the sampling in /irisrun/repo/Samples, and choose PersonalInfo-Test.csv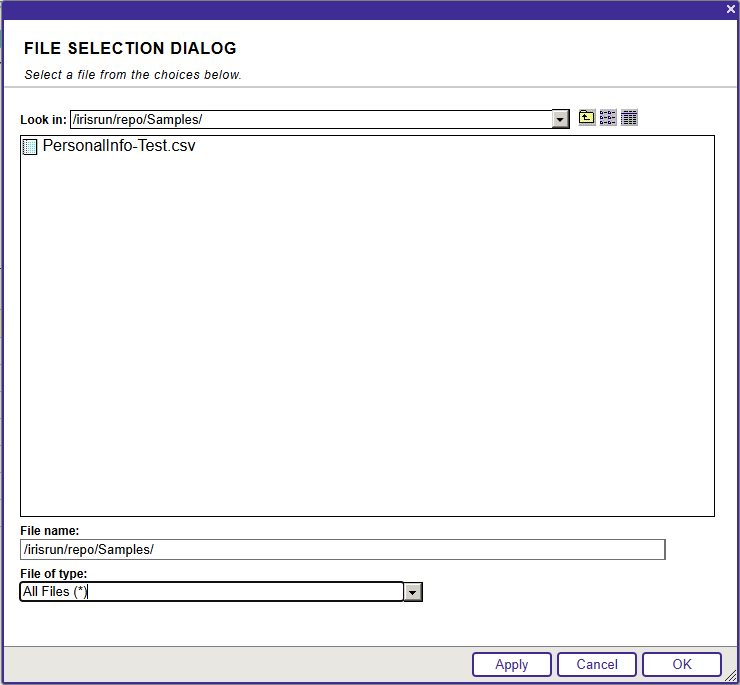
At this moment, you can observe how your data is being imported:
The Problems Grow
Just as you think everything is ready, you receive a new specification from your boss:
"We need the data to be able to load the client's phone number and store more than one of them (landline, cell phone, etc.)"
Ops… I need to upgrade my Record Map and add a phone number. However, it should have more than one of them… How can I do it?
Note: You can do it directly in the same class. Yet, I will create a new one for explanation purposes and store it in the examples. This way, you can review and run the code, following all the steps in this article.
Okay, it is time to reopen the Record Map we have just created.
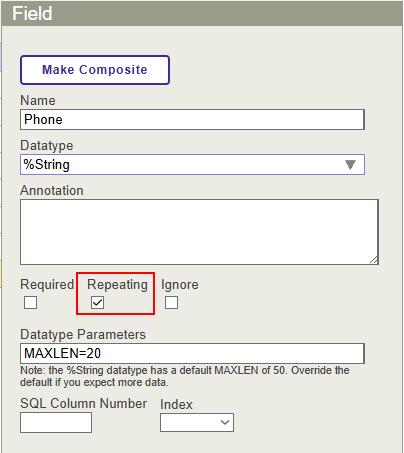
Add the new field “Phone”, but remember to indicate that this field is “Repeating” this time.
Since we have appointed this field as "Repeating", we must define the separator character for replicated data. This indicator is in the same place where we typically specify the field separator.
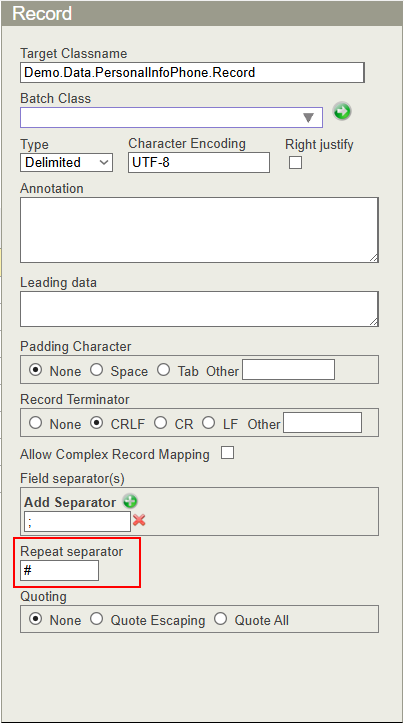
Perfect! Let's load the example CSV file with phone numbers separated by #.

If we take a look at the persistent class we produced, we can notice that the "Phone" field is of a type List of %String:
Property Phone As list Of %String(MAXLEN = 20);
Ok Kurro, but How Can We Upload This File?
It is a really nice question, my dear reader.
Intersystems IRIS provides us with two inbound classes: EnsLib.RecordMap.Service.FileServiceEnsLib.RecordMap.Service.FTPService
I will not go in depth with these classes because it would be too long. Yet, we can check out their main functions.
In summary, the service monitors processes in a defined folder, captures files stored in that directory, loads them, reads them line by line, and sends that record to the designated business process.
It happens in both the server and FTP directories.
Let's get to the point…
Note: I will present my examples using the EnsLib.RecordMap.Service.FileService class. However, EnsLib.RecordMap.Service.FTPService class has the same operations.
If you have downloaded the sample code, you should notice that a production has been built with two components:
A service class (EnsLib.RecordMap.Service.FileService), which will load the files, and a business class (Demo.BP.ProcessData), which will process each of the records read from the file. The latter, in this case, we will use ONLY to view communication traces.
It is important to configure some parameters in the business service class.
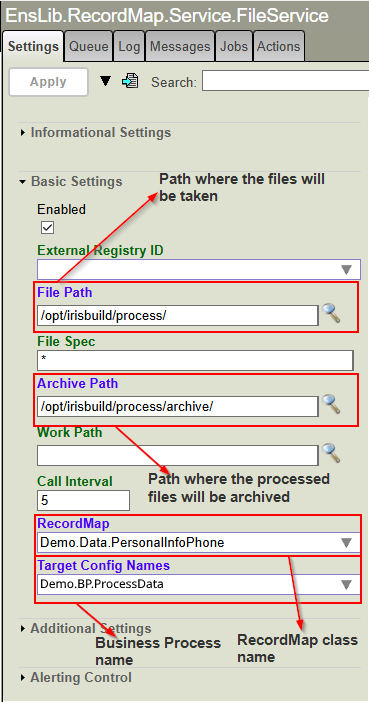
File Path: It is a trail for the class to monitor whether any files are pending processing. When a file is placed in this directory, the upload process automatically triggers and sends each record to the class defined as Business Process.
File Spec: It is a file pattern to search for (by default, it is *, but we can define some files we wish to differentiate from other processes). For instance, we can have two inbound listening classes in the same directory, with each using a different RecordMap class. We can assign the extension .pi1 for the files to be processed by the PersonalInfo class, whereas .pi2 will flag files to be processed by the PersonalInfoPhone class.
Archive Path: It is a directory where files are moved after being processed.
Work Path: It is a trackway where the adapter should place the input file while processing the data in it. This setting is beneficial when the same filename is used for repeated file submissions. If WorkPath is not specified, the adapter will not move the file during processing.
Call Interval: It is the frequency (calculated in seconds) of the adapter checkups for input files in the specified locations.
RecordMap: It is the name of the RecordMap class, containing the definition of the data in the file.
Target Config Name: It is the name of the Business Process that handles the data stored in the file.

Subdirectory Levels: It is a space where the process searches for a new file. For instance, if we have a process that adds a file every day (Monday, Tuesday, Wednesday, Thursday, and Friday), it will search all subdirectories starting from the root directory, provided that we specify level 1. By default, level 0 means that it will only search in the root directory.
Delete From Server: This function indicates that if the directory of processed files is not specified, the file will be deleted from the root directory.
File Access Timeout: It is a defined time (calculated in seconds) set to access the file. If the file is read-only or there is another problem obstructing access to the directory, it will display an error.
Header Count: It is an important feature indicating the number of headers to ignore. For example, if the file has a header specifying the fields it contains, you must reveal how many header lines it consists of, so that they can be ignored and only the data lines can be read.
Uploading a File
As I previously mentioned, the upload process is triggered when a file is placed in the process directory. Note: The following instructions are based on the sample code. In the “samples” folder, you can find the file PersonalInfoPhone-Test.csv. You should copy this file to the process folder, and it will be handled automatically.
NOTE: If you are working with a Docker sample, use the following command:
docker cp .\PersonalInfoPhone-Test.csv containerId:/opt/irisbuild/process/
containerId is the id of your container, ex: docker cp .\PersonalInfoPhone-Test.csv 66f96b825d43398ba6a1edcb2f02942dc799d09f1b906627e0563b1392a58da1:/opt/irisbuild/process/`

For each record, it throws a call to the business process with all the data.

Amazing job! With just a few steps, you managed to create a process that can read files from a directory and manage that data quickly and easily. What else could you possibly ask for in your Interoperability processes?
Complex Record Map
Nobody wants to have a complex life, but I promise you will fall in love with complex Record Maps!.
Complex Record Maps are precisely what their name indicates. It is a combination of several Record Maps that provides us with more complete and structured information.
Let's imagine that our boss came to us and gave us the following requirements:
“We need customer information with more phone numbers, including country codes and prefixes. We also need more contact addresses, including postal codes, countries, and state names.
One customer can have one phone number, two, or none.”
If we require more information about phone numbers and addresses, as we have previously seen, including this information in a single line would be too complicated. Let's separate the different parts we need:
- Customer information that is required.
- Phone numbers, which can be from 0 to 5.
- Mailing address information, which can be from 0 to 2.
For each section, we will create an alias to differentiate what type of information it includes.
Let's build each of the sections:
Step 1
Design a new Record Map for customer information (First Name, Last Name, Date of Birth, and National Identity Document), and include an identifier to indicate that it is the USER section.
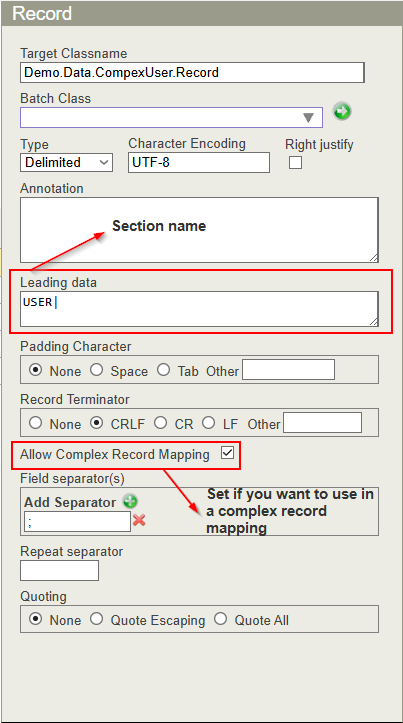
The section name must be unique for "User" data types, since they are responsible for setting the columns and positions for each piece of information. The content should look like the following: USER|Matthew O.;Wellington;1964-07-31;208-36-1552 In BOLD, the section name, in ITALIC, the content.
Step 2 Create PHONE and ADDR sections for phone numbers and postal addresses.
Remember to specify the section name and activate the Complex Record Map option.


Now, we should have three classes:
- Demo.Data.ComplexUser
- Demo.Data.ComplexPhone
- Demo.Data.ComplexAddress
Step 3 Complete the Complex Record Map.
Open the “Complex Record Maps” option:

The first thing we can see here is a structure with a header and a footer. The header can be another Record Map to hold information from the data packet (e.g., user department information, etc).
Since these sections are optional, we will ignore them in our example.

Set the name of this record (e.g., PersonalInfo), and add new records for each section.

If we wish one of the sections to have repetitions, we must indicate the minimum and maximum repetition values.

According to the specifications above, the file with the information will look like the following:
USER|Matthew O.;Wellington;1964-07-31;208-36-1552
PHONE|1;305;2089160
PHONE|1;805;9473136
ADDR|1485 Stiles Street;Pittsburgh;15286;PA;USA
If we want to upload a file, we require a service that can read these kinds of files, and Intersystems IRIS provides us with two inbound classes for that:
EnsLib.RecordMap.Service.ComplexBatchFileServiceEnsLib.RecordMap.Service.ComplexBatchFTPService As I mentioned earlier, we will use the EnsLib.RecordMap.Service.ComplexBatchFileService class as an example. However, the process for FTP is identical.
It uses the same configuration as the Record Map, except for the Header line number, because this kind of file does not need one:

As I stated before, the upload process is triggered when a file is placed in the process directory.
Note: The following instructions are based on the sample code.
In the “samples” folder, you can find the file PersonalInfoComplex.txt. You should copy this file to the process folder, and it will handle things automatically.
NOTE: If you work with the Docker sample, use the following command:
docker cp .\ PersonalInfoComplex.txt containerId:/opt/irisbuild/process/
containerId is the id of your container, ex: docker cp .\ PersonalInfoComplex.txt 66f96b825d43398ba6a1edcb2f02942dc799d09f1b906627e0563b1392a58da1:/opt/irisbuild/process/
Here, we can see each row calling the Business Service:

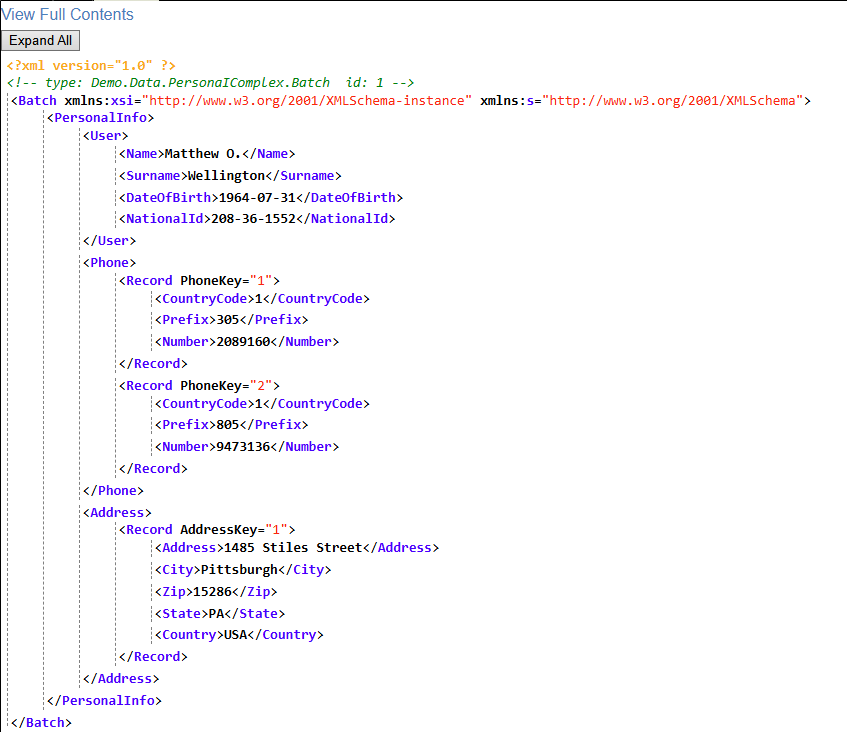

As you must have realized by now, Record Maps are a powerful tool for importing data in a complex and structured way. It allows us to save information in related tables or process each piece of data independently.
Thanks to this tool, you can quickly create batch data loading processes and store them without having to perform complex data reading, field separation, data type validation, and so on.
I hope you find this article helpfull.
See you in the next “InterSystems for Dummies.”
Comments
That's a great resource and it is very helpful! Thanks
Nice!