Implementing FHIR Profiles on IRIS
What is a FHIR Profile?
A FHIR profile is a collection of rules and constraints used to customize and refine a base Fast Healthcare Interoperability Resources (FHIR) resource. Profiling is a vital process that adapts the base FHIR resource standard to satisfy the unique requirements of a specific use case, geographic region, medical institution, or clinical workflow.
While the base FHIR specification provides generic, flexible definitions for resources (such as Patient, Observation, or Medication), profiles transform these generic resources into more precise ones. This ensures consistent and interoperable data exchange tailored for a particular community or implementation.
FHIR is designed to cover various healthcare scenarios globally. Profiles allow implementers to adapt this general platform without losing the benefits of standardization.
When to Use FHIR Profiles?
FHIR profiles act as computable rules used by systems to validate data. You should implement them whenever you need to ensure that exchanged data is not only technically valid FHIR, but also clinically relevant and compliant with local regulations for a specific task.
Use Cases of Profiles
There are two primary methods within the FHIR RESTful API to declare the use of a profile
1. Via Query Parameter (?_profile or $validate)
- _profile = Search Filter (It is NOT used for validation, but is effective for retrieving stored resources). Used only for searching resources that already claim conformance. Example:
GET /Patient?_profile=http://example.org/fhir/StructureDefinition/MyProfile
Wrong: /Patient/$validate?_profile=http://example.org/fhir/StructureDefinition/MyProfile
- $validate = Validation Operation (It is correct for profile validation, and it is an Operation Parameter for the $validate operation.) It is utilized to ask the server to validate a resource against a specific profile. Example:
POST /Patient/$validate?profile=http://example.org/fhir/StructureDefinition/MyProfile
- IRIS-specific validation – InterSystems IRIS requires version numbers when performing $validate. Example:
POST /Patient/$validate?profile=http://examples.com/fhir/StructureDefinition/aktestpatient|1.0.0
Bear in mind that without the version number, IRIS returns an error:
"Profile URI ... does not include a version number. Version number is required for profile validation."
Note: Standard FHIR allows a canonical URL without a version, but IRIS enforces it for determinism and safety.
2. Via Resource Content (meta.profile) [Preferred]
You can specify the profile inside the resource itself:
{
	"resourceType": "Patient",
	"meta": {
		"profile": [
			"http://hl7.org/fhir/us/core/StructureDefinition/us-core-patient"
		]
	}
}
Key FHIR Artifacts for Profiling
1. StructureDefinition (The Profile Itself)
The StructureDefinition resource is the core artifact of a FHIR profile. It serves as a blueprint or schema that the data must follow. It describes the rules and constraints for a resource or datatype, specifying the next:
- Mandatory or optional fields.
- Cardinality (minimum/maximum repetitions).
- Fixed values or patterns.
- Permissible terminologies (ValueSets).
- Applicable Extensions.
Key Contents:
- url (Canonical URL): A stable, unique identifier used in the meta.profile of a resource instance.
- baseDefinition: A link to the resource (or profile) being constrained.
- snapshot: A comprehensive, "flattened" view of the resource with all the restrictions being applied.
- differential: A list of changes or constraints applied to the base definition (the profile creator determines it).
2. ValueSet
It specifies a set of permissible codes for a field
- Purpose: It indicates which values are allowed for a particular element.
3. CodeSystem
It defines a list of codes and their meanings (it is essentially a dictionary).
- Purpose: It provides building blocks for ValueSets.
- Relationship:
- CodeSystem = "all possible codes"
- ValueSet = "subset used for this profile"
4. OperationDefinition
It describes custom operations or functions on FHIR resources.
- It is optional and used for special endpoints only (e.g., $submit, $calculate-risk, $aggregate).
5. Extension
FHIR resources have a fixed schema that follows the 80/20 rule (the most common elements are predefined).
- Extensions provide a safe, standardized way to add fields that are not present in the base resource.
- They are defined using StructureDefinition with kind set for "complex-type" or "datatype".
Types of Extensions:
- Simple Extension: It is a single value (e.g., valueString, valueBoolean, valueDate).
- Complex Extension: It consists of nested elements similar to mini-resources.
Example: Adding nationality to a Patient:
{
  "resourceType": "Patient",
  "id": "123",
  "extension": [
    {
      "url": "http://example.org/fhir/StructureDefinition/patient-nationality",
      "valueString": "Indian"
    }
  ]
}
Servers that do not recognize an extension can safely ignore it.
Profile example requiring an extension comes below:
{
  "id": "Patient.nationality",
  "path": "Patient.extension",
  "sliceName": "patientNationality",
  "min": 1,
  "max": "1",
  "type": [
    {
      "code": "Extension",
      "profile": [
        "http://example.org/fhir/StructureDefinition/patient-nationality"
      ]
    }
  ]
}
Example of StructureDefinition:
Spoiler
FHIR Extensions: Best Practices
Although FHIR resources have a fixed structure, real-world implementations often require additional data fields. Extensions provide a standardized way to add this extra information without modifying the base resource. To maintain interoperability and avoid unnecessary complexity, follow the best practices listed below:
- Reuse Before Creating – First, check if a suitable, community-approved extension already exists.
- Create New Extensions Only When Necessary – Generate custom extensions only if existing fields or extensions cannot meet your requirements.
- Keep Extensions Simple and Modular – Opt for simple extensions (e.g., valueString, valueDate, valueBoolean) whenever possible. Use complex extensions only when needed.
- Document and Share – Clearly define your extension in a StructureDefinition and provide examples for others to understand and reuse it.
FHIR Profile Slicing (Summary with an Example)
In FHIR, some elements of a resource can be repeated (e.g., Patient.identifier or Observation.component). Slicing is a mechanism that allows you to apply different rules or constraints to different subsets of a repeating element (each slice is validated independently according to its own rule). For instance, a patient may have multiple identifiers: a Social Security Number (SSN) and a Medical Record Number (MRN). Without slicing, you could only enforce generic rules for all identifiers, but you cannot distinguish between the types or apply separate constraints. With slicing, you can define each type of identifier as a distinct “slice" with its own cardinality, data type, and fixed values.
- Key points:
- Each slice has its own sliceName, cardinality (min/max), and constraints (ValueSets, fixed codes, etc.).
- Single-valued elements (max=1) do not require slicing, since constraints can be applied directly in the differential.
A sample slicing definition for a patient profile might look like the following:
[
	{
		"id": "Patient.identifier",
		"path": "Patient.identifier",
		"sliceName": "ssn",
		"min": 1,
		"max": "1",
		"type": [
			{
				"code": "Identifier"
			}
		],
		"fixedSystem": "http://hl7.org/fhir/sid/us-ssn"
	},
	{
		"id": "Patient.identifier",
		"path": "Patient.identifier",
		"sliceName": "mrn",
		"min": 0,
		"max": "1",
		"type": [
			{
				"code": "Identifier"
			}
		],
		"fixedSystem": "http://hospital.org/mrn"
	}
]
Constraints and ValueSet Bindings in FHIR Profiles
In FHIR profiles, multiple elements use coded values, e.g., Patient.gender or Observation.code. While the base FHIR specification may already define allowed codes, profiles can further constrain these values to meet specific use cases, regions, or organizational rules. This can be achieved by either binding the element to a ValueSet, which defines the set of permissible codes, or by specifying a binding strength (required, extensible, or preferred) to control how strictly the codes must be followed.
For instance, the Patient.gender field globally allows four codes: male, female, other, and unknown. A local system may choose to accept only male or female. With the help of a profile, you can bind Patient.gender to a ValueSet containing only those two codes with the required binding strength. It will ensure that any resource not using one of the allowed codes will fail profile validation.
Sample Binding in a Profile:
{
  "id": "Patient.gender",
  "path": "Patient.gender",
  "min": 1,
  "max": "1",
  "type": [{ "code": "code" }],
  "binding": {
    "strength": "required",
    "valueSet": "http://example.org/fhir/ValueSet/local-gender"
  }
}
Cardinality in FHIR Profiles
Cardinality defines how many times an element can appear in a resource. It is specified with the min (minimum) and max (maximum) values in a profile’s differential.
- min → the minimum number of times the element must appear.
- max → the maximum number of times the element can appear. Use "*" to indicate unlimited repetitions
{
  "id": "Patient.telecom",
  "path": "Patient.telecom",
  "min": 0,
  "max": "*"
}
Profile Hierarchy and Inheritance
FHIR profiles do not have to constrain only the base resources. They can also build on other existing profiles. This means a profile can inherit all the rules, constraints, and bindings from another profile and then add extra requirements for a specific use case. This hierarchical approach helps promote reuse, consistency, and modular design.
For example, the US-Core-Patient profile defines such mandatory fields as name and gender. A hospital could create a custom profile that will build on US-Core-Patient by adding a national identifier or insurance information. By setting the US-Core-Patient as its baseDefinition, the custom profile will automatically inherits all constraints from the base, while also enforcing its own additional rules:
{
  "resourceType": "StructureDefinition",
  "url": "http://example.org/fhir/StructureDefinition/HospitalPatient",
  "name": "HospitalPatient",
  "status": "draft",
  "fhirVersion": "4.0.1",
  "kind": "resource",
  "abstract": false,
  "type": "Patient",
  "baseDefinition": "http://hl7.org/fhir/us/core/StructureDefinition/us-core-patient",
  "derivation": "constraint",
  "differential": {
    "element": [
      {
        "id": "Patient.identifier",
        "path": "Patient.identifier",
        "sliceName": "nationalId",
        "min": 1,
        "max": "1",
        "type": [{"code": "Identifier"}],
        "fixedSystem": "http://example.org/fhir/sid/national-id"
      }
    ]
  }
}
The "baseDefinition" field determines the profile or resource that your profile constrains, creating hierarchical or inheritance relationships. This means your HospitalPatient profile inherits all constraints from the US-Core-Patient profile.
Using $validate with Parameters vs Direct Resource
The FHIR standard allows the $validate operation to accept a resource in two ways: either directly in the POST body or wrapped inside a Parameters resource. The Parameters resource is a standard FHIR resource type designed to pass named input values to operations. Using it is optional for simple validations but recommended when multiple parameters are needed (e.g., specifying a profile version, validation mode, or additional inputs).
Example – Direct Resource:
POST /Patient/$validate?_profile=...|1.0.0
Content-Type: application/fhir+json

{
  "resourceType": "Patient",
  "id": "123",
  "name": [{"family": "Doe", "given": ["John"]}],
  "gender": "male"
}
Example – Parameters Wrapper (Recommended for Flexibility):
{
  "resourceType": "Parameters",
  "parameter": [
    {
      "name": "resource",
      "resource": { "resourceType": "Patient", "id": "123", "name": [{"family": "Doe", "given": ["John"]}], "gender": "male" }
    }
  ]
}
{
  "resourceType": "StructureDefinition",
  "url": "https://example.org/fhir/StructureDefinition/TutorialPatient",
  "name": "TutorialPatient",
  "status": "draft",
  "version": "1.0.1",
  "fhirVersion": "4.0.1",
  "kind": "resource",
  "abstract": false,
  "type": "Patient",
  "baseDefinition": "http://hl7.org/fhir/StructureDefinition/Patient",
  "derivation": "constraint",
  "differential": {
    "element": [
      { "id": "Patient.identifier", "path": "Patient.identifier", "min": 1 },
      { "id": "Patient.name", "path": "Patient.name", "min": 1 },
      { "id": "Patient.gender", "path": "Patient.gender", "min": 1 },
      { "id": "Patient.birthDate", "path": "Patient.birthDate", "min": 1 }
    ]
  }
}
IRIS supports both methods. Using the Parameters wrapper ensures future-proofing and flexibility when additional parameters are required.
Implementing FHIR Profiles in InterSystems IRIS
Prerequisites for Implementing FHIR Profiles in InterSystems IRIS
Before beginning your FHIR profile implementation, make sure that your environment meets the following requirements and architectural constraints:
- Version Compatibility: Profile validation is currently optimized for FHIR R4. Support for FHIR R5 is planned for future releases.
- Runtime Environment: The system must have Java 11 installed. This is a strict requirement for executing validation logic against FHIR resources.
- Service Configuration: The FHIR Validation Server must be active. This component is essential for processing and verifying profiles within the IRIS ecosystem.
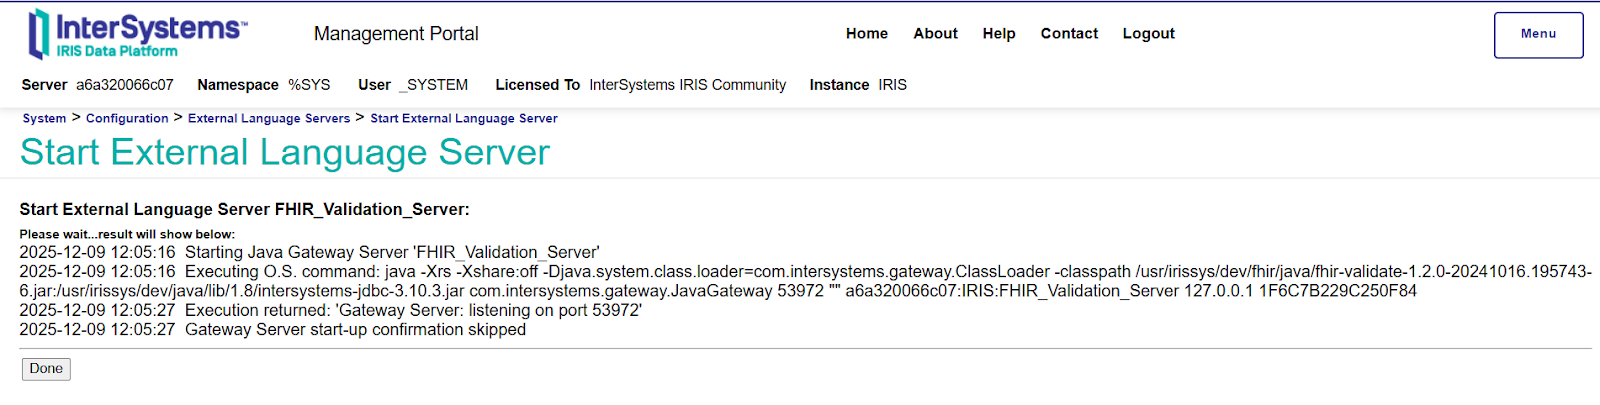
Importing FHIR Profiles into InterSystems IRIS
Before you can perform resource validation, you must first import the relevant FHIR profiles into the IRIS platform. To ensure a successful import, your profile package must adhere to a specific directory structure.
Profile Package Structure
The import utility requires two critical files to be located within the same directory:
- package.json: This manifest file determines the metadata, dependencies, and versioning for your FHIR profile.
- StructureDefinition: This file (in JSON format) contains the actual constraints and rules for the FHIR resources you are defining.
Note: Both files are mandatory. The import process will fail if the package.json and the StructureDefinition files are not stored together in the same source folder.
Package.json:
{
  "name": "finalpatient.profile",
  "version": "1.0.0",
  "description": "Example finalpatient snapshot profile validation package",
  "dependencies": {
    "hl7.fhir.r4.core":"4.0.1"
  }
}
StructureDefinition:
Spoiler
{
	"resourceType": "StructureDefinition",
	"id": "FinalPatient",
	"url": "http://example.org/fhir/StructureDefinition/FinalPatient",
	"version": "1.0.0",
	"name": "FinalPatient",
	"status": "active",
	"fhirVersion": "4.0.1",
	"kind": "resource",
	"abstract": false,
	"type": "Patient",
	"baseDefinition": "http://hl7.org/fhir/StructureDefinition/Patient",
	"derivation": "constraint",
	"text": {
		"status": "generated",
		"div": "<div xmlns=\"http://www.w3.org/1999/xhtml\">Profile for patients with mandatory identifier, name, and gender.</div>"
	},
	"snapshot": {
		"element": [
			{
				"id": "Patient",
				"path": "Patient",
				"min": 0,
				"max": "*",
				"short": "Demographics and administrative information for an individual",
				"definition": "Demographics and other administrative information about an individual or animal receiving care or other health-related services.",
				"base": {
					"path": "Patient",
					"min": 0,
					"max": "*"
				}
			},
			{
				"id": "Patient.identifier",
				"path": "Patient.identifier",
				"min": 1,
				"max": "*",
				"short": "An identifier for this patient",
				"definition": "An identifier for this patient: a medical record number, resource identifier, international patient identifier, social security number, etc. **(CONSTRAINT: REQUIRED)**",
				"type": [
					{
						"code": "Identifier"
					}
				],
				"base": {
					"path": "Patient.identifier",
					"min": 0,
					"max": "*"
				}
			},
			{
				"id": "Patient.name",
				"path": "Patient.name",
				"min": 1,
				"max": "*",
				"short": "A name associated with the patient",
				"definition": "A name associated with the patient. **(CONSTRAINT: REQUIRED)**",
				"type": [
					{
						"code": "HumanName"
					}
				],
				"base": {
					"path": "Patient.name",
					"min": 0,
					"max": "*"
				}
			},
			{
				"id": "Patient.gender",
				"path": "Patient.gender",
				"min": 1,
				"max": "1",
				"short": "male | female | other | unknown **(CONSTRAINT: REQUIRED)**",
				"definition": "Administrative Gender - the gender that the patient is legally considered to have or that should be used for administrative purposes.",
				"type": [
					{
						"code": "code"
					}
				],
				"binding": {
					"strength": "required",
					"valueSet": "http://hl7.org/fhir/ValueSet/administrative-gender"
				},
				"base": {
					"path": "Patient.gender",
					"min": 0,
					"max": "1"
				}
			}
		]
	}
}
Step-by-Step: Importing the FHIR Profile
Once your package files are prepared and organized, follow these steps within the Management Portal (SMP) to ingest the profile into your InterSystems IRIS environment:
Navigation Path
- Open the Management Portal: Log in and navigate to the Health section.
- Select Your Namespace: Choose the specific namespace where your FHIR server is configured.
- Access FHIR Configuration: Go to FHIR Server Management > Package Management.
- Once you are in the Package Management dashboard, do the following:
- Click Import: Select the Import button.
- Specify Source: Point the system to the directory containing your package.json and StructureDefinition files.
- Confirm: Complete the wizard to load the definitions into your instance.
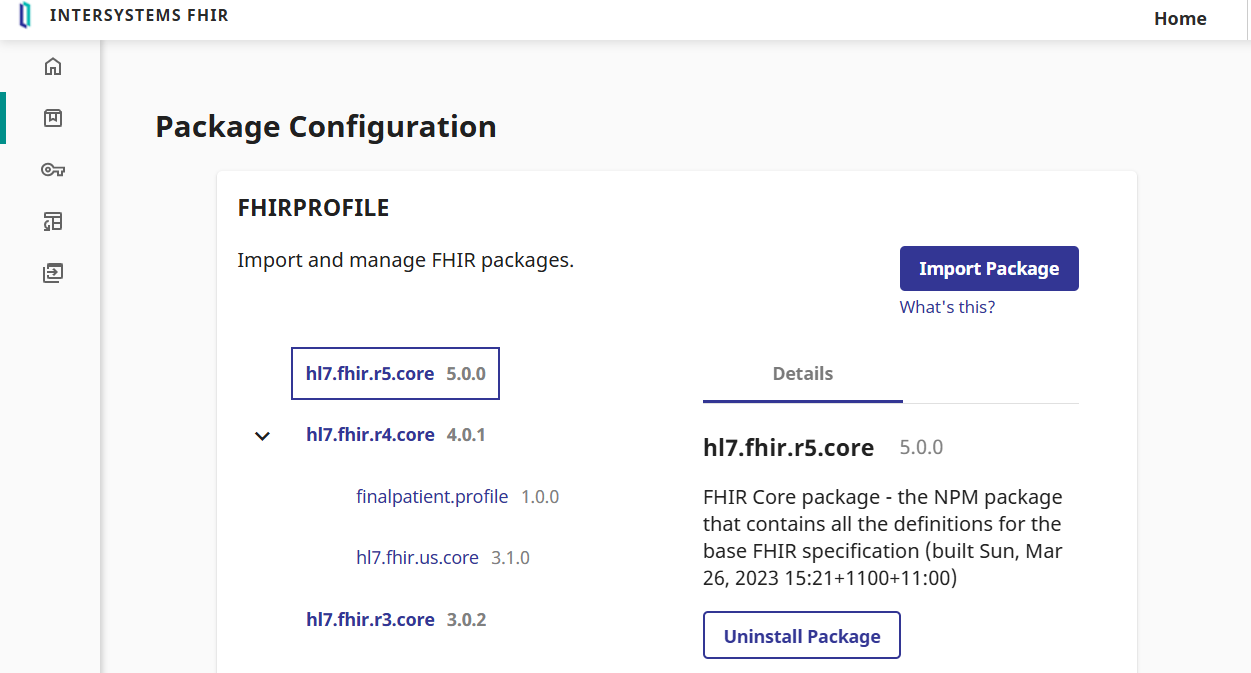
After the import finishes, check the Package Management list. Your new profile should appear under the FHIR core package:
Associating Profiles with FHIR Endpoints
Importing a package into InterSystems IRIS makes the definitions available to the system, but it does not automatically apply them to your FHIR endpoints. To enable profile validation, you must manually link the imported package to your specific endpoint.
Option A: Updating an Existing Endpoint
If you already have a FHIR endpoint configured, follow these steps to add your profile:
- Navigate to Settings: Open your endpoint configuration and click Edit.
- Select Packages: Locate the Custom Packages section. From the list, select the package(s) you imported previously.
- Apply Changes: Click Save.
Note: Please be patient after clicking save. It may take several moments for the system to index the new definitions and update the endpoint metadata.
Option B: Creating a New Endpoint
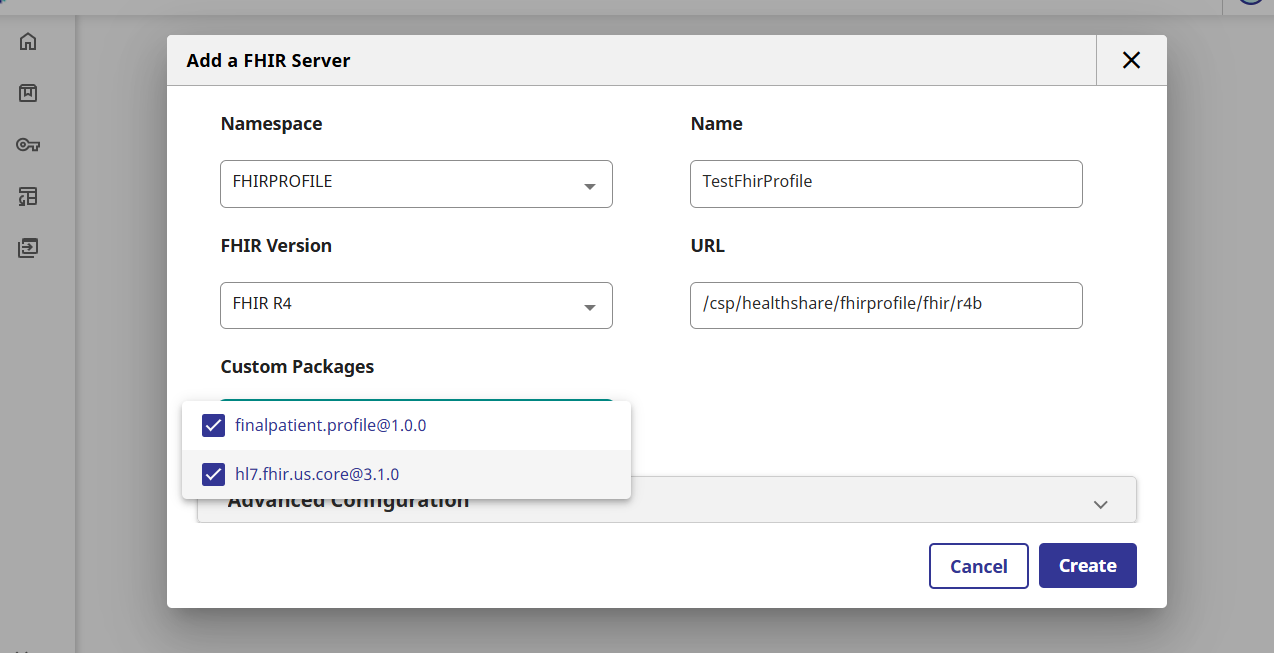
If you are setting up a fresh FHIR service, take the next steps:
- Configure Basics: Fill in your endpoint URL and core settings.
- Add Custom Definitions: Before clicking save for the first time, navigate to the Custom Packages field and select your imported package.
- Finalize: Save the endpoint to initialize it with the profile definitions already in place.
Validating Resources Against Your FHIR Profile
With the packages imported and successfully linked to your endpoint, your environment is now fully configured. You can begin validating FHIR resources against your custom profiles.
Executing Validation
You can now send POST requests to your FHIR endpoint using the $validate operation. The server will employ the rules defined in your StructureDefinition to ensure that incoming resources comply with your specific business logic and data requirements.
Get Started with Sample Code
You can find the full codebase and ready-to-use samples in this fhir-profile-demo repo. Clone the repo to quickly test the profile import and validation process in your own IRIS environment.
Comments
Does this only pertain to those that use IRIS as a FHIR Repository?
If you're using IRIS to transform other message formats to and from FHIR using DTLs/Apis or some other way then you'll need to implement the profiles yourself. You can create your own DTLs based on the ones in IRIS to implement the profile constraints and extensions or you can code it yourself.