Fullstack demo of IntegratedML and Embedded Python.
1. Integrated ML Demonstration
This repository is a demonstration of IntegratedML and Embedded Python.

- 1. Integrated ML Demonstration
- 2. Building the demo
- 3. Running the demo
- 4. Python back-end
- 5. IntegratedML
- 6. Using COS
- 7. More explainability with DataRobot
- 8. Conclusion
2. Building the demo
To build the demo, you just have to run the command:
docker compose up
2.1. Architecture
Two containers will be built: one with IRIS and one with an nginx server.
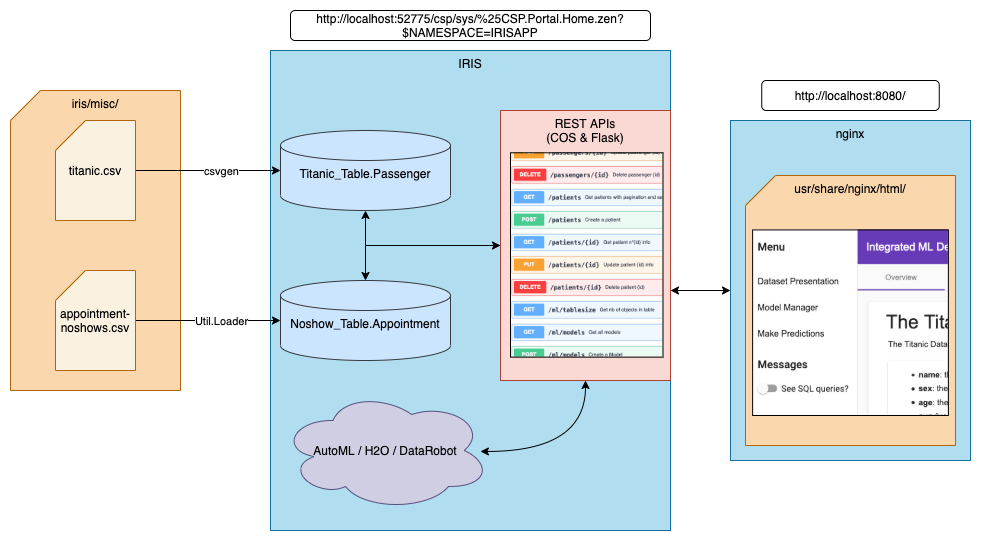
The IRIS image used contains Embedded Python. After building, the container will run a wsgi server with the Flask API.
We are using the community package csvgen to import the titanic dataset into iris. For the noshow dataset, we use another custom method (the Load() classmethod of the Util.Loader class). In order for the container to have access to the csv files, we bind the iris/ local directory to the /opt/irisapp/ directory in the container.
2.2. Building the nginx container
In order to build our nginx container, docker uses multi-stage building. First, it creates a container with node. It then installs npm and copy all of our files in that container. It builds the project with the command ng build, and the output file is copied in a new container that only contains nginx.
Thanks to that manoeuvre, we obtain a very light container that does not contain all of the librairies and tools needed to build the webpage.
You can check the details of that multi-build in the angular/Dockerfile file. We also set up our nginx server parameters thanks to the angular/nginx.default.conf file.
3. Running the demo
Just go to the address: http://localhost:8080/ and That's it! Enjoy!
4. Python back-end
The back-end is made with Python Flask. We use Embedded Python in order to call iris classes and execute queries from python.
4.1. Embedded Python
4.1.1. Setting up the container
In the dockerfile, we first need to explicit two environment variables that Embedded Python will use:
ENV IRISUSERNAME "SuperUser"
ENV IRISPASSWORD $IRIS_PASSWORD
With $IRIS_PASSWORD setup like this in the docker-compose file:
iris:
  build:
    args:
      - IRIS_PASSWORD=${IRIS_PASSWORD:-SYS}
(The password tranferred is the one setup on your local machine or -if not setup- will be by default "SYS")
4.1.2. Using Embedded Python
In order to use embedded Python, we use irispython as a python interepreter, and do:
import iris
Right at the beginning of the file.
We will then be able to run methods such as:
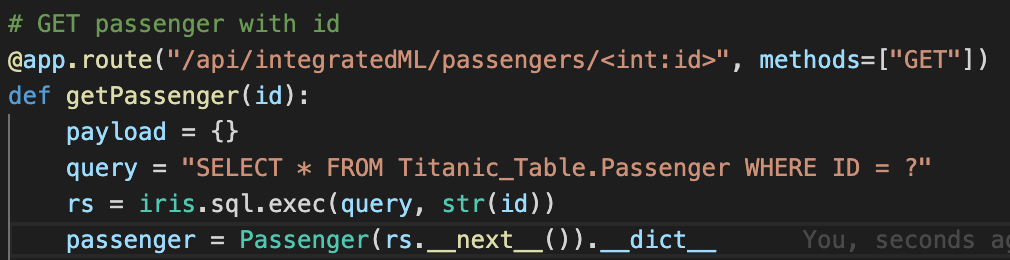
As you can see, in order to GET a passenger with an ID, we just execute a query and use its result set.
We can also directly use the IRIS objects:
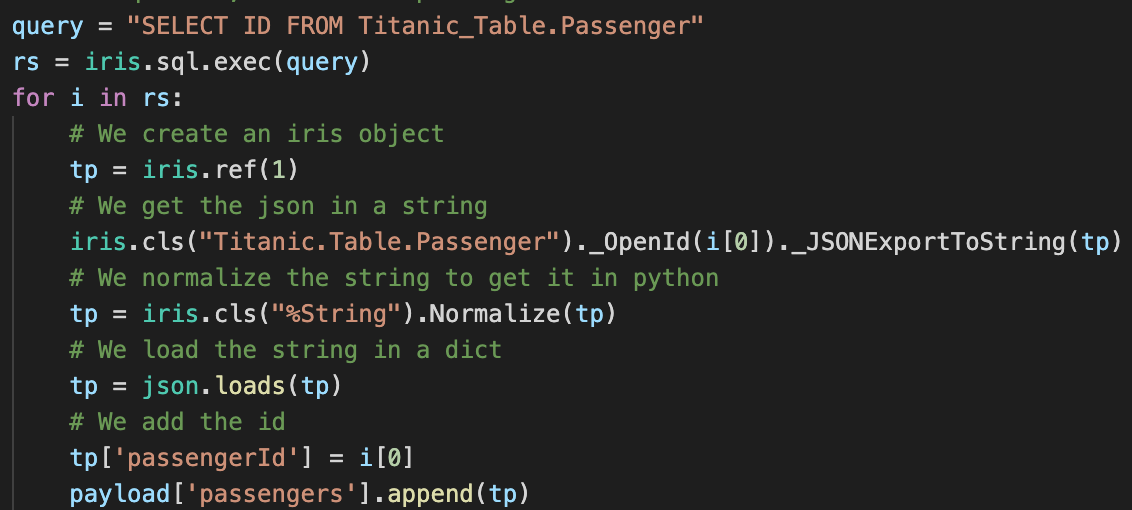
Here, we use an SQL query to get all the IDs in the table, and we then retreive each passenger from the table with the %OpenId() method from the Titanic.Table.Passenger class (note that since % is an illegal character in Python, we use _ instead).
Thanks to Flask, we implement all of our routes and methods that way.
4.1.3. Side By Side Comparaison
On this screenshot you have a side by side comparaison between an Flask implementation and an ObjectScript implementation.
As you can see there is a lot of similarities.
4.2. Launching the server
To launch the server, we use gunicorn with irispython.
In the docker-compose file, we add the following line:
iris:
  command: -a "sh /opt/irisapp/flask_server_start.sh"
That will launch, after the container is started (thanks to the -a flag), the following script:
#!/bin/bash

cd ${FLASK_PATH}

${PYTHON_PATH} /usr/irissys/bin/gunicorn --bind "0.0.0.0:8080" wsgi:app -w 4 2>&1

exit 1
With the environment variables defined in the Dockerfile as follows:
ENV PYTHON_PATH=/usr/irissys/bin/irispython
ENV FLASK_PATH=/opt/irisapp/python/flask
We will then have access to the Flask back-end through the local port 4040, since we bound the container's 8080 port to it.
5. IntegratedML
5.1. Exploring both datasets
For both datasets, you'll have access to a complete CRUD, enabling you to modify at will the saved tables.
In order to switch from one dataset to the other, you can press the button in the top right-hand corner.
5.2. Managing models
5.2.1. Creating a model
Once you have discovered the data, you can create model predicting the value you want.
By pressing in the side navigation menu Model Manager, in the Model List you'll have access to the following page (here in the case of the NoShow dataset):
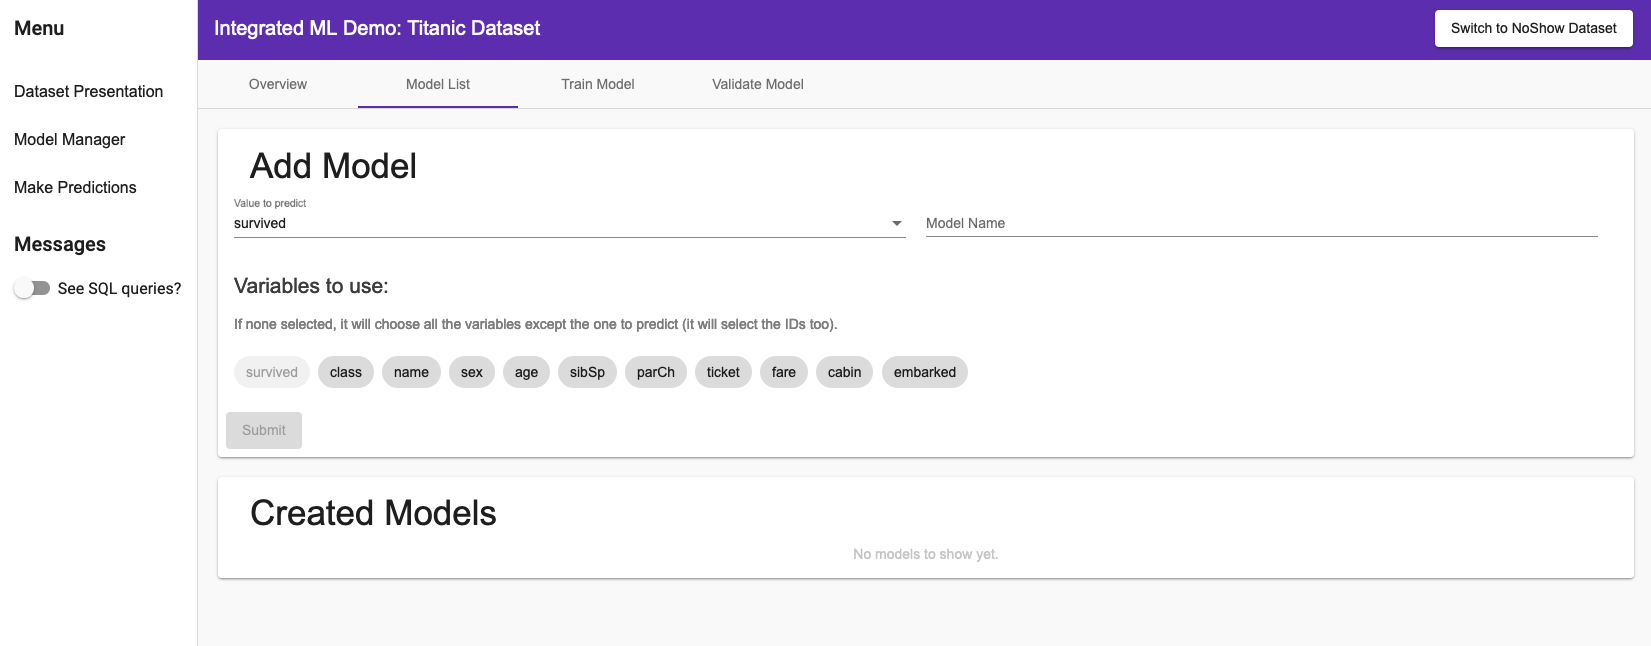
You can choose what value you want to predict, the name of your model, and with what variables you want to predict.
In the side menu, you can toggle See SQL queries? to see how the models are managed in IRIS.
After creating a model you should see this:
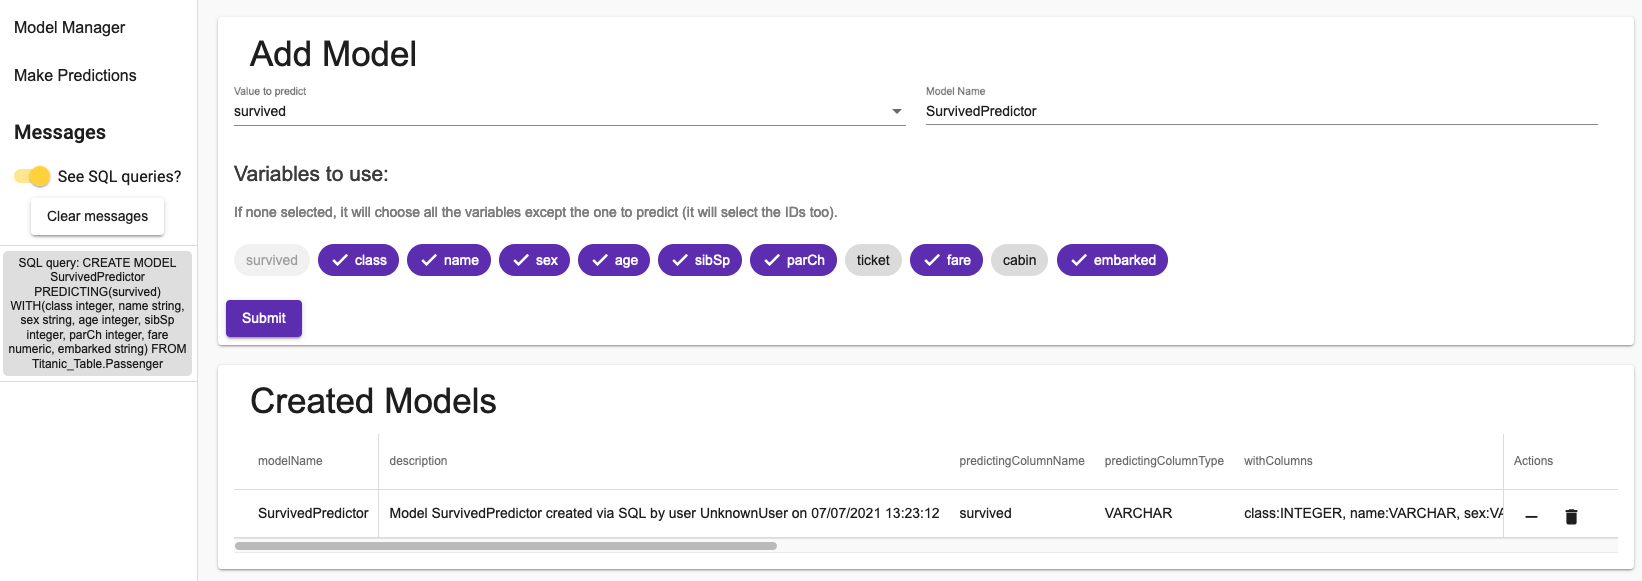
As you can see, creating a model only takes one SQL query. The informations you have are all the information you can retreive from IRIS.
In the actions column, you can delete a model or purge it. Purging a model will remove all of its training runs (and their validation runs) except for the last one.
5.2.2. Training a model
In the next tab, you will be able to train your models.
You have the choice between 3 providers. InterSystems' AutoML, H2O, an open-source solution, and DataRobot, of which you can have a free 14-day trial if you register on their site.
You can select the percentage of the dataset you want to use to train your model. Since it can take a long time to train for large datasets, for the purpose of demonstrations, it is possible to take a smaller dataset.
Here we have trained a model using all of the Titanic Dataset:
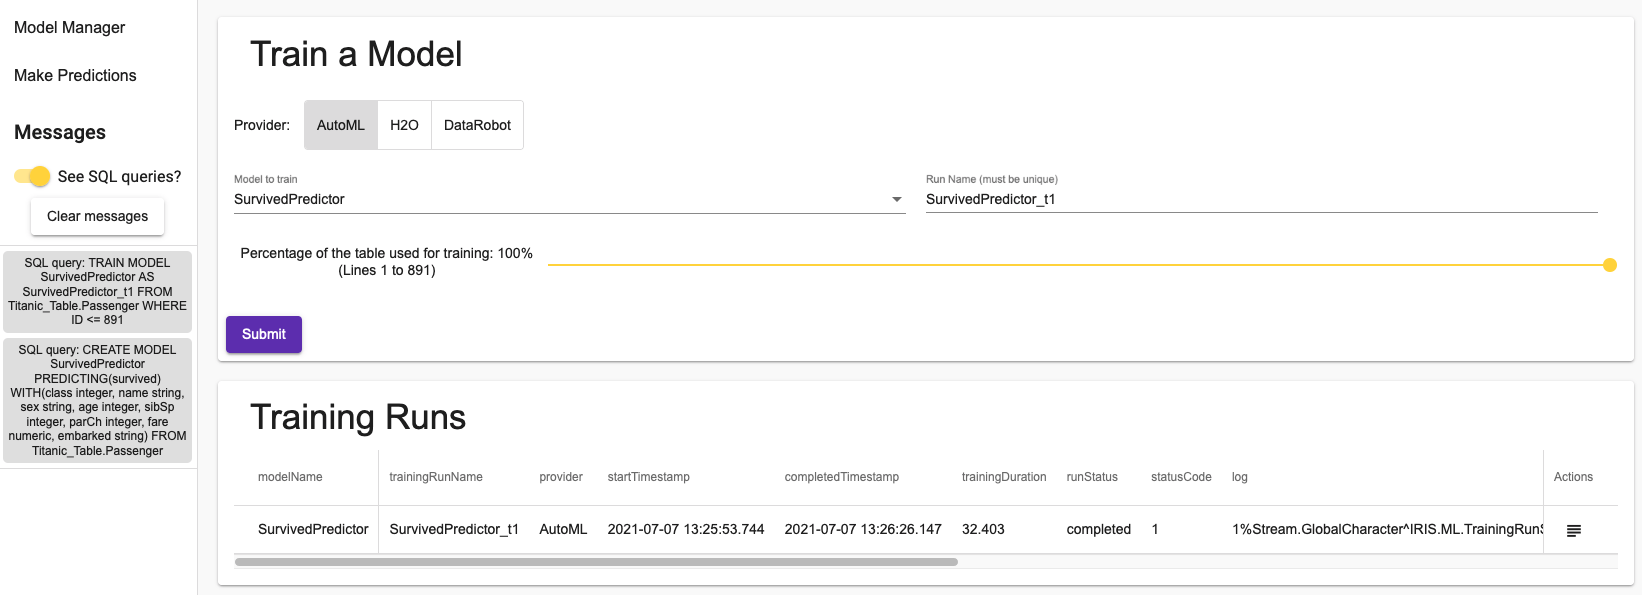
The button in the actions column will enable you to see the log. For the AutoML, you will see what the algorithm actually did: how it has prepared the data and how it has chosen the model to use.
Training a model only takes a single SQL query, as you can see in the messages section of the sidenav menu.
Keep in mind that in these two tabs, you will only see the models that concern the dataset you are actually using.
5.2.3. Validating a model
Finally, you can validate a model in the final tab. Clicking on a validation run will pop up a dialog with the metrics associated with the validation. There again, you can choose a percentage of the dataset to use for the validation.
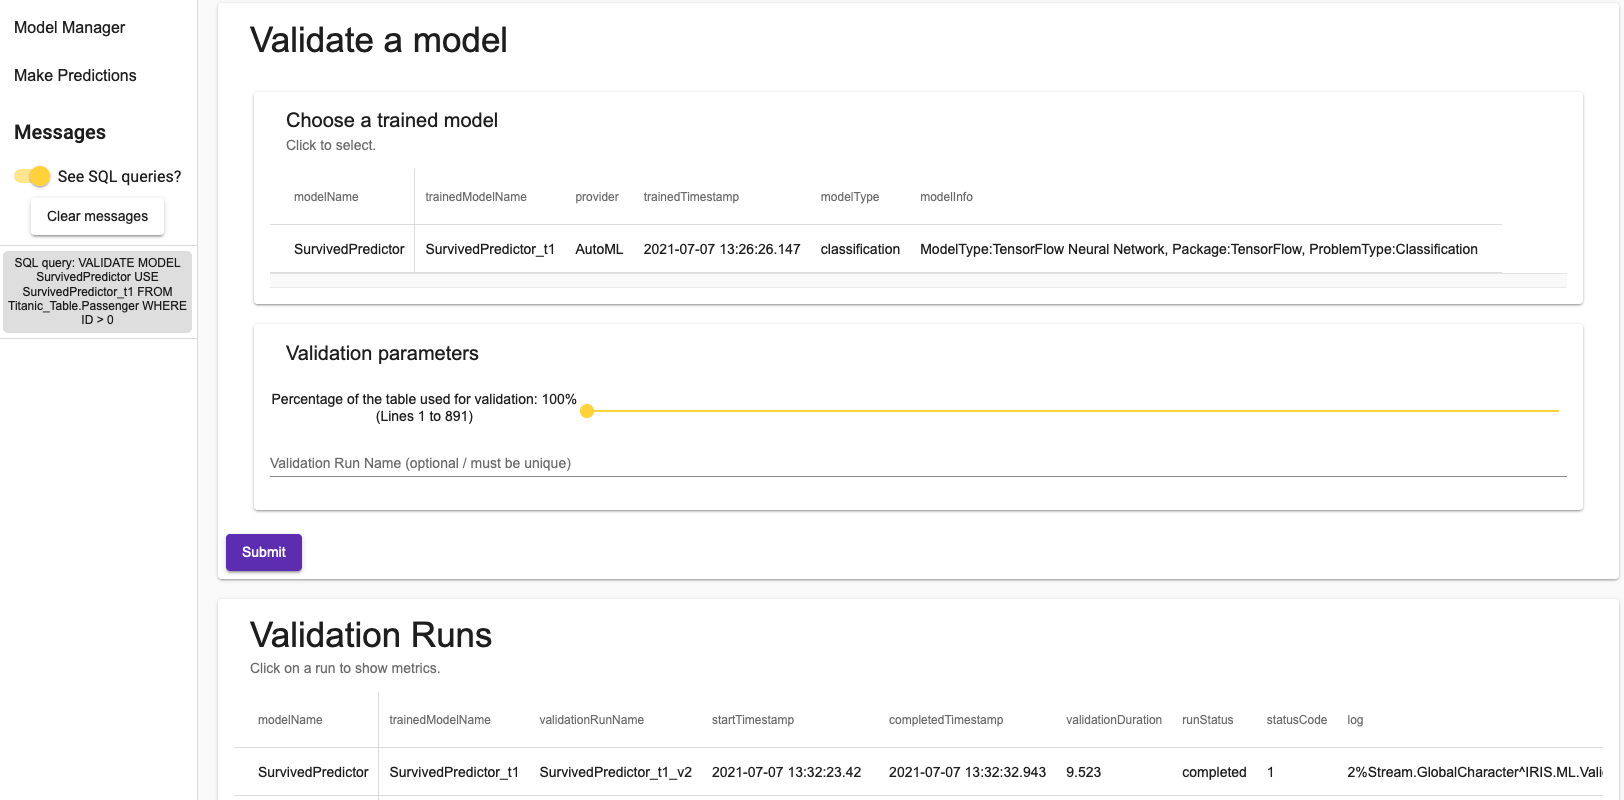
Once again, it only takes a single SQL query.
5.2.4. Making predictions
In the Make Predictions menu, last tab, you can make predictions using your newly trained models.
You just have to search for a passenger / patient and select it, select one of the trained model and press predict.
In the case of a classification model (like in this example, for predicting the survival), the prediction will be associated with the probability of being in the predicted class.
In the case of Mrs. Fatima Masselmani, the model correctly predicted that she survived, with a probability of 73%. Just below this prediction, you can see the data used by the model:
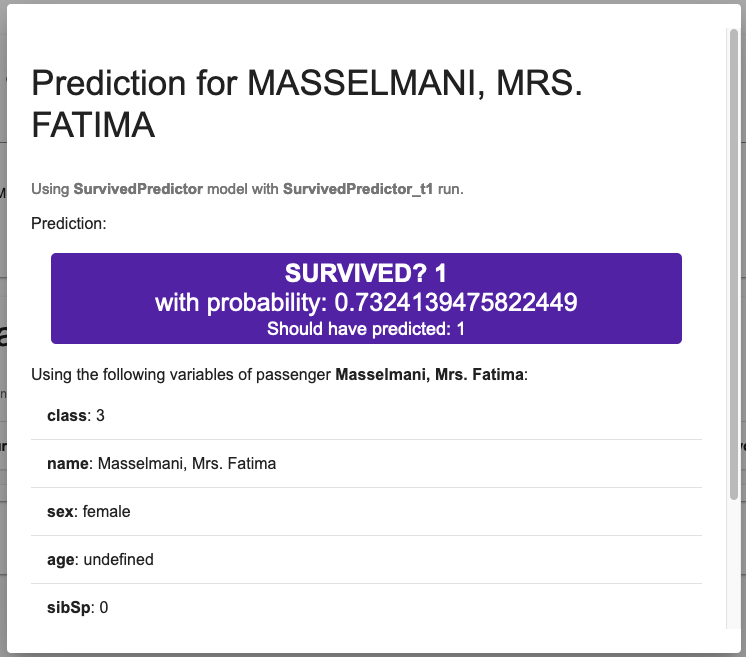
Once again, it takes on query to retreive the prediction and one for the probability.
6. Using COS
The demonstration actually provides two APIs. We use the Flask API with Embedded Python, but a REST service in COS has also been setup at the building of the container.
By pressing the button in the top right-hand side "Switch to COS API", you will be able to use this service.
Notice how nothing changes. Both APIs are equivalent and work in the same way.
7. More explainability with DataRobot
If you want more explainability (more than what the log can offer you), we suggest you using the DataRobot provider.
For that, you need to go at the address of your DataRobot instance, and look for the Developer Tools to get your token. Upon trainnig your model, the webpage will ask you your token.
Once the training started, you can access your DataRobot instance to know a lot more about your dataset and your models:
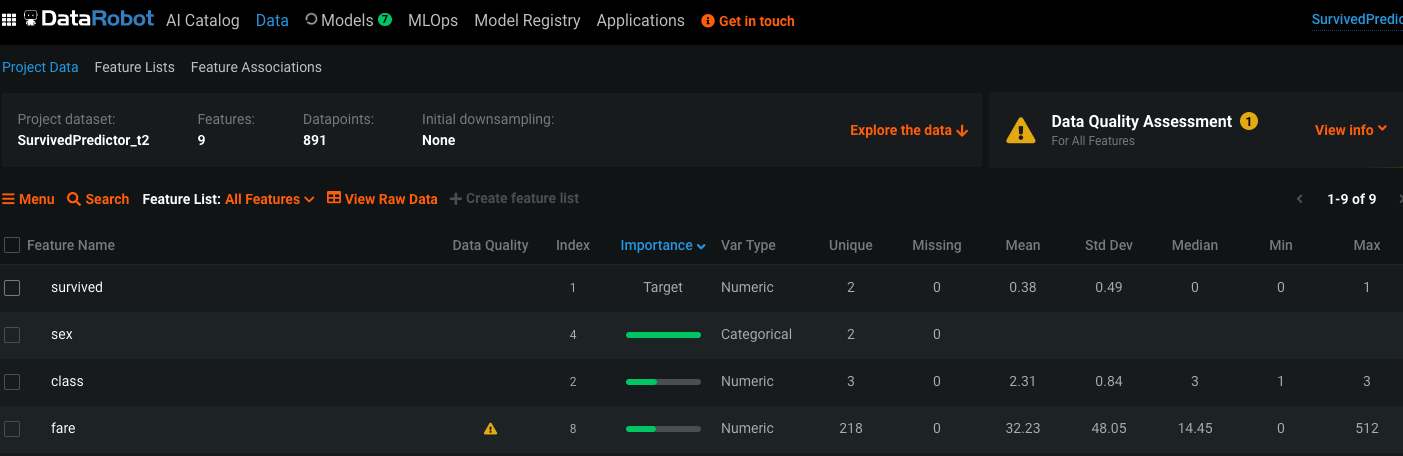
Here, we can see that the sex and the name fields of every Passenger are the most important values to predict the survival. We can also see that the fare field contains outliers.
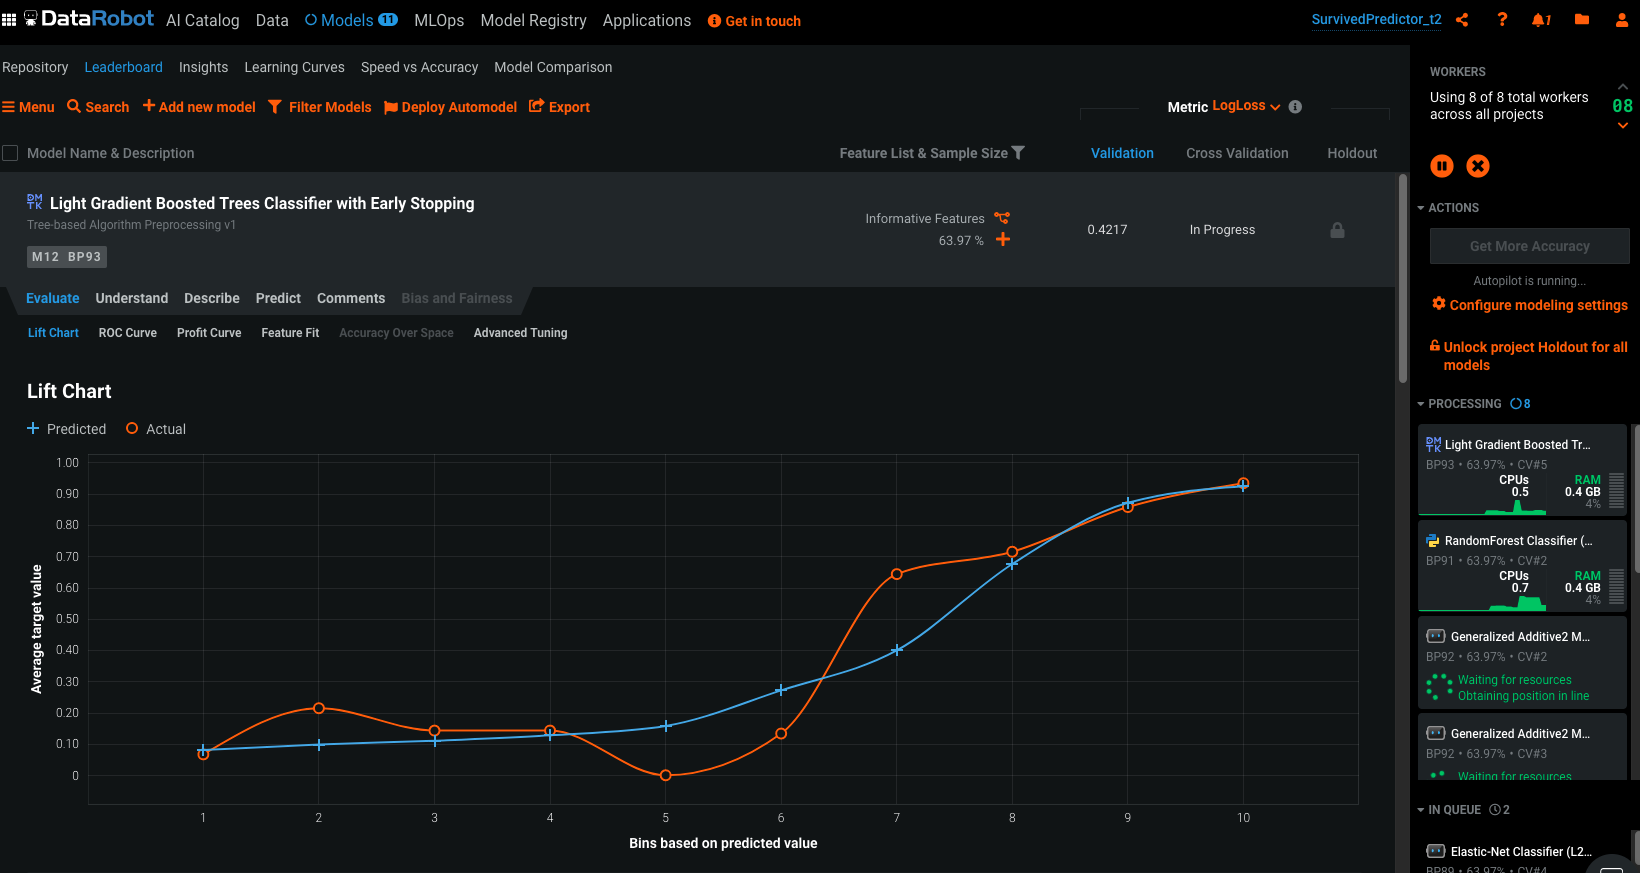
Once the models trained, you can have access to a lot of details, here's a peek:
8. Conclusion
Through this demonstration, we have been able to see how easy it was to create, train and validate a model as well as to predict values through very few SQL queries.
We did this using a RESTful API with Python Flask, using Embedded Python, and we have done a comparison with a COS API.
The front-end has been made with Angular.
9. Thanks
To Théophile, intern who built this beautiful demo during the summer of 2021.
Comments
Thanks @Guillaume Rongier
Wonderful materials.