Deploying InterSystems IRIS Solution into GCP Kubernetes Cluster GKE Using CircleCI
Most of us are more or less familiar with Docker. Those who use it like it for the way it lets us easily deploy almost any application, play with it, break something and then restore the application with a simple restart of the Docker container.
InterSystems also likes Docker. The InterSystems OpenExchange project contains a number of examples that run InterSystems IRIS images in Docker containers that are easy to download and run. You’ll also find other useful components, such as the Visual Studio IRIS plugin.
It’s easy enough to run IRIS in Docker with additional code for specific use cases, but if you want to share your solutions with others, you’ll need some way to run commands and repeat them after each code update. In this article, we’ll see how to use Continuous Integration/Continuous Delivery (CI/CD) practices to simplify that process.
Setting Up
We’ll start with a simple REST API application based on IRIS. The details of the application can be found in the video Creating REST API with InterSystems IRIS, ObjectScript and Docker. Let’s see how we could share similar applications with others using CI/CD.
Initially, we’ll clone the code into a personal GitHub repository. If you don’t have an account on GitHub, sign up for one. For convenience, add access via SSH so you don’t need to enter a password with each pull or push. Then go to the intersystems-community/objectscript-rest-docker-template project page on GitHub and click the "Use this Template" button to create your own version of the repo based on the template. Give it a name like “my-objectscript-rest-docker-template”.

Now pull the project to your local machine:
Next, we’ll add a REST endpoint in the spirit of “hello, world!”.
Endpoints are defined in the src/cls/Sample/PersonREST.cls class. Our endpoint will look like this (defined before the first <Route>):
<Route Url="/all" Method="GET" Call="GetAllPersons"/>
...
It calls the HelloWorld method:
{
Write "Hello, world!"
Quit $$$OK
}
Now we need to consider how this works when pushing to a remote repository. We need to:
- Build a Docker image.
- Save the Docker image.
- Run the container based on this image.
We’ll use the CircleCI service, which is already integrated with GitHub, to build the Docker image. And we’ll use Google Cloud, which allows you to store Docker images and run containers based on them in Kubernetes. Let’s delve into this a little.
Google Cloud Prerequisites
Let’s assume you’ve registered for an account with Google Cloud, which provides a free tier of services. Create a project with the name "Development", then create a Kubernetes cluster by clicking the "Create cluster" button:

For the demo, select "Your first cluster" on the left. Choose a newer version of Kubernetes and a machine type of n1-standard-1. For our purposes, one machine should be enough.
Click the Create button, then set up a connection to the cluster. We’ll use the kubectl and gcloud utilities:
[2] Create a new configuration
Configuration name. “development”
[2] Log in with a new account
Pick cloud project to use
configure a default Compute Region and Zone? (Y/n)? y
Here europe-west-1b was chosen
$ gcloud container clusters get-credentials dev-cluster --zone europe-west1-b --project <project_id>
You can get the last command by clicking the "Connect" button:

Check the status from kubectl:
gke_possible-symbol-254507_europe-west1-b_dev-cluster
$ kubectl get nodes
NAME STATUS ROLES AGE VERSION
gke-dev-cluster-pool-2-8096d93c-fw5w Ready <none> 17m v1.14.7-gke.10
Now create a directory called k8s/ under the root project directory to hold the three files that describe the future application in Kubernetes: Namespace, which describes the workspace, Deployment, and Service:
apiVersion: v1
kind: Namespace
metadata:
name: iris
$ cat deployment.yaml
apiVersion: apps/v1beta1
kind: Deployment
metadata:
name: iris-rest
namespace: iris
spec:
replicas: 1
strategy:
type: Recreate
selector:
matchLabels:
app: iris
template:
metadata:
labels:
app: iris
spec:
containers:
- image: eu.gcr.io/iris-rest:v1
name: iris-rest
ports:
- containerPort: 52773
name: web
$ cat service.yaml
apiVersion: v1
kind: Service
metadata:
name: iris-rest
namespace: iris
spec:
selector:
app: iris
ports:
- protocol: TCP
port: 52773
targetPort: 52773
type: LoadBalancer
Send those definitions from your k8s/ directory to the Google Kubernetes Engine (GKE):
$ kubectl apply -f deployment.yaml -f service.yaml
Things won’t be working correctly yet, since we haven’t yet sent the eu.gcr.io/iris-rest:v1 image to the Docker registry, so we see an error:
NAME READY STATUS RESTARTS AGE
iris-rest-64cdb48f78-5g9hb 0/1 ErrImagePull 0 50s
$ kubectl -n iris get svc
NAME TYPE CLUSTER-IP EXTERNAL-IP PORT(S) AGE
iris-rest LoadBalancer 10.0.13.219 <pending> 52773:31425/TCP 20s
When Kubernetes sees a LoadBalancer service, it tries to create a balancer in the Google Cloud environment. If it succeeds, the service will get a real IP address instead of External IP = <pending>.
Before leaving Kubernetes for a bit, let's give CircleCI the ability to push Docker images into the registry and restart Kubernetes deployments by creating a service account. Give your service account EDITOR permission to the project. You’ll find information here on creating and storing a service account.
A bit later, when we create and set up the project in CircleCI, you’ll need to add the following three environment variables:
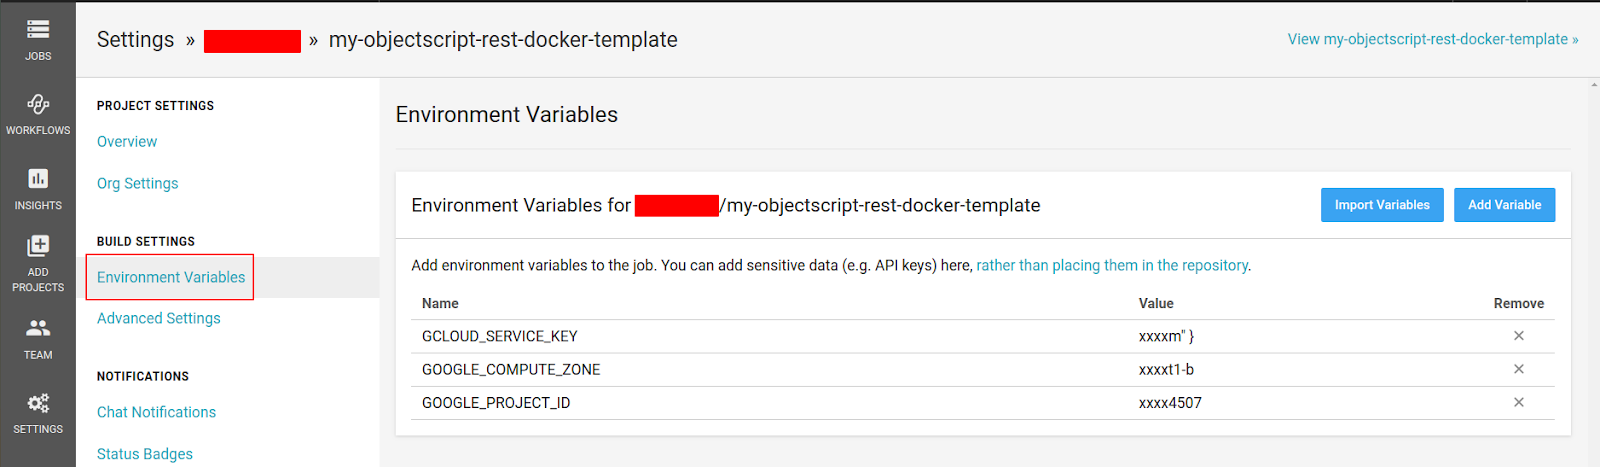
The names of these variables speak for themselves. The value of GCLOUD_SERVICE_KEY is the JSON structure Google sends you when you press “Create key” and select a key in the JSON format after creating the Service Account:

CircleCI
Let's turn our attention to CircleCI now, where we’ll register using our GitHub account (click Sign Up, then Sign Up with GitHub). After registration, you’ll see the dashboard with projects from your GitHub repository listed on the Add Project tab. Click the Set Up Project button for “my-objectscript-rest-docker-template” or whatever you named the repository created from the objectscript-rest-docker-template repo:

Note: all CircleCI screenshots are made as of October 2019. Changes may occur in new versions.
The page that opens tells you how to make your project work with CircleCI. The first step is to create a folder called .circleci and add a file named config.yml to it. The structure of this configuration file is well described in the official documentation. Here are the basic steps the file will contain:
- Pull the repository
- Build the Docker image
- Authenticate with Google Cloud
- Upload image to Google Docker Registry
- Run the container based on this image in GKE
With any luck, we’ll find some already created configurations (called orbs) we can use. There are certified orbs and third-party ones. The certified GCP-GKE orb has a number of limitations, so let's take a third-party orb — duksis — that meets our needs. Using it, the configuration file turns into (replace names — for example, the cluster name — with correct ones for your implementation):
version: 2.1
orbs:
gcp-gke: duksis/gcp-gke@0.1.9
workflows:
main:
jobs:
- gcp-gke/publish-and-rollout-image:
google-project-id: GOOGLE_PROJECT_ID
gcloud-service-key: GCLOUD_SERVICE_KEY
registry-url: eu.gcr.io
image: iris-rest
tag: ${CIRCLE_SHA1}
cluster: dev-cluster
namespace: iris
deployment: iris-rest
container: iris-rest
The initial configuration of the publish-and-rollout-image task can be viewed on the project page.
We don’t actually need the final three notification steps of this orb, which is good because they won’t work anyway without some additional variables. Ideally, you can prepare your own orb once and use it many times, but we won’t get into that now.
Note that the use of third-party orbs has to be specifically allowed on the "Organization settings" tab in CircleCI:

Finally, it’s time to send all our changes to GitHub and CircleCI:
$ git commit -m "Deploy project to GKE using CircleCI"
$ git push
Let’s check the CircleCI dashboard:

If you forgot to add Google Service Account keys, here’s what you’ll soon see:

So don’t forget to add those environment variables as described in the end of the Google Cloud Prerequisites section. If you forgot, update that information, then click "Rerun workflow."
If the build is successful you’ll see a green bar:

You can also check the Kubernetes pod state separately from the CircleCI Web UI:
NAME READY STATUS RESTARTS AGE
iris-rest-64chdb48f78-q5sbw 0/1 ImagePullBackOff 0 15m
…
iris-rest-5c9c86c768-vt7c9 1/1 Running 0 23s
That last line — 1/1 Running — is a good sign.
Let’s test it. Remember, your IP address will differ from mine. Also, you’ll have to figure out about passwords over HTTP yourself as it’s out of scope for this article.
NAME TYPE CLUSTER-IP EXTERNAL-IP PORT(S) AGE
iris-rest LoadBalancer 10.0.4.242 23.251.143.124 52773:30948/TCP 18m
$ curl -XGET -u _system:SYS 23.251.143.124:52773/person/helloworld
Hello, world!
$ curl -XPOST -H "Content-Type: application/json" -u _system:SYS 23.251.143.124:52773/person/ -d '{"Name":"John Dou"}'
$ curl -XGET -u _system:SYS 23.251.143.124:52773/person/all
[{"Name":"John Dou"},]
It seems the application works. You can continue with tests described on project page.
In sum, the combination of using GitHub, CircleCI, and Google Cloud Kubernetes Engine looks quite promising for testing and deployment of IRIS applications, even though it’s not completely free. Also, do not forget that running Kubernetes cluster can gradually eat your virtual (and then real) money. We are not responsible for any charges you may incur.

Comments
💡 This article is considered as InterSystems Data Platform Best Practice.