Sharding and Scalability in InterSystems IRIS: A Beginner's Guide
As applications grow, every database eventually hits scaling limits. Whether it's storage capacity, concurrent users, query throughput, or I/O bandwidth, single-server architectures have inherent constraints. This guide explains fundamental approaches to database scalability and shows how InterSystems IRIS implements these patterns to support enterprise-scale workloads.
We'll explore two complementary scaling strategies: horizontal scaling for user volume (distributing computational load) and sharding for data volume (partitioning datasets). Understanding the general principles behind these approaches will help you make informed decisions about when and how to scale your IRIS applications.
The examples in this guide use InterSystems IRIS in Docker containers.
Understanding Database Scalability: General Concepts
When one database server isn't enough, the bottleneck determines your scaling strategy: storage capacity, CPU/memory limits, connection limits, or I/O throughput.
Vertical vs Horizontal Scaling
Vertical Scaling (scaling up): Add more resources to a single server—CPU, RAM, faster disks.
Pros: No application changes, simple architecture, full ACID support.
Cons: Physical limits, exponential hardware costs, single point of failure, upgrade downtime.
Horizontal Scaling (scaling out): Distribute workload across multiple servers.
Pros: No theoretical server limit, commodity hardware, better fault tolerance, incremental capacity.
Cons: Distributed system complexity, consistency challenges, network dependency.
Two Patterns for Horizontal Scaling
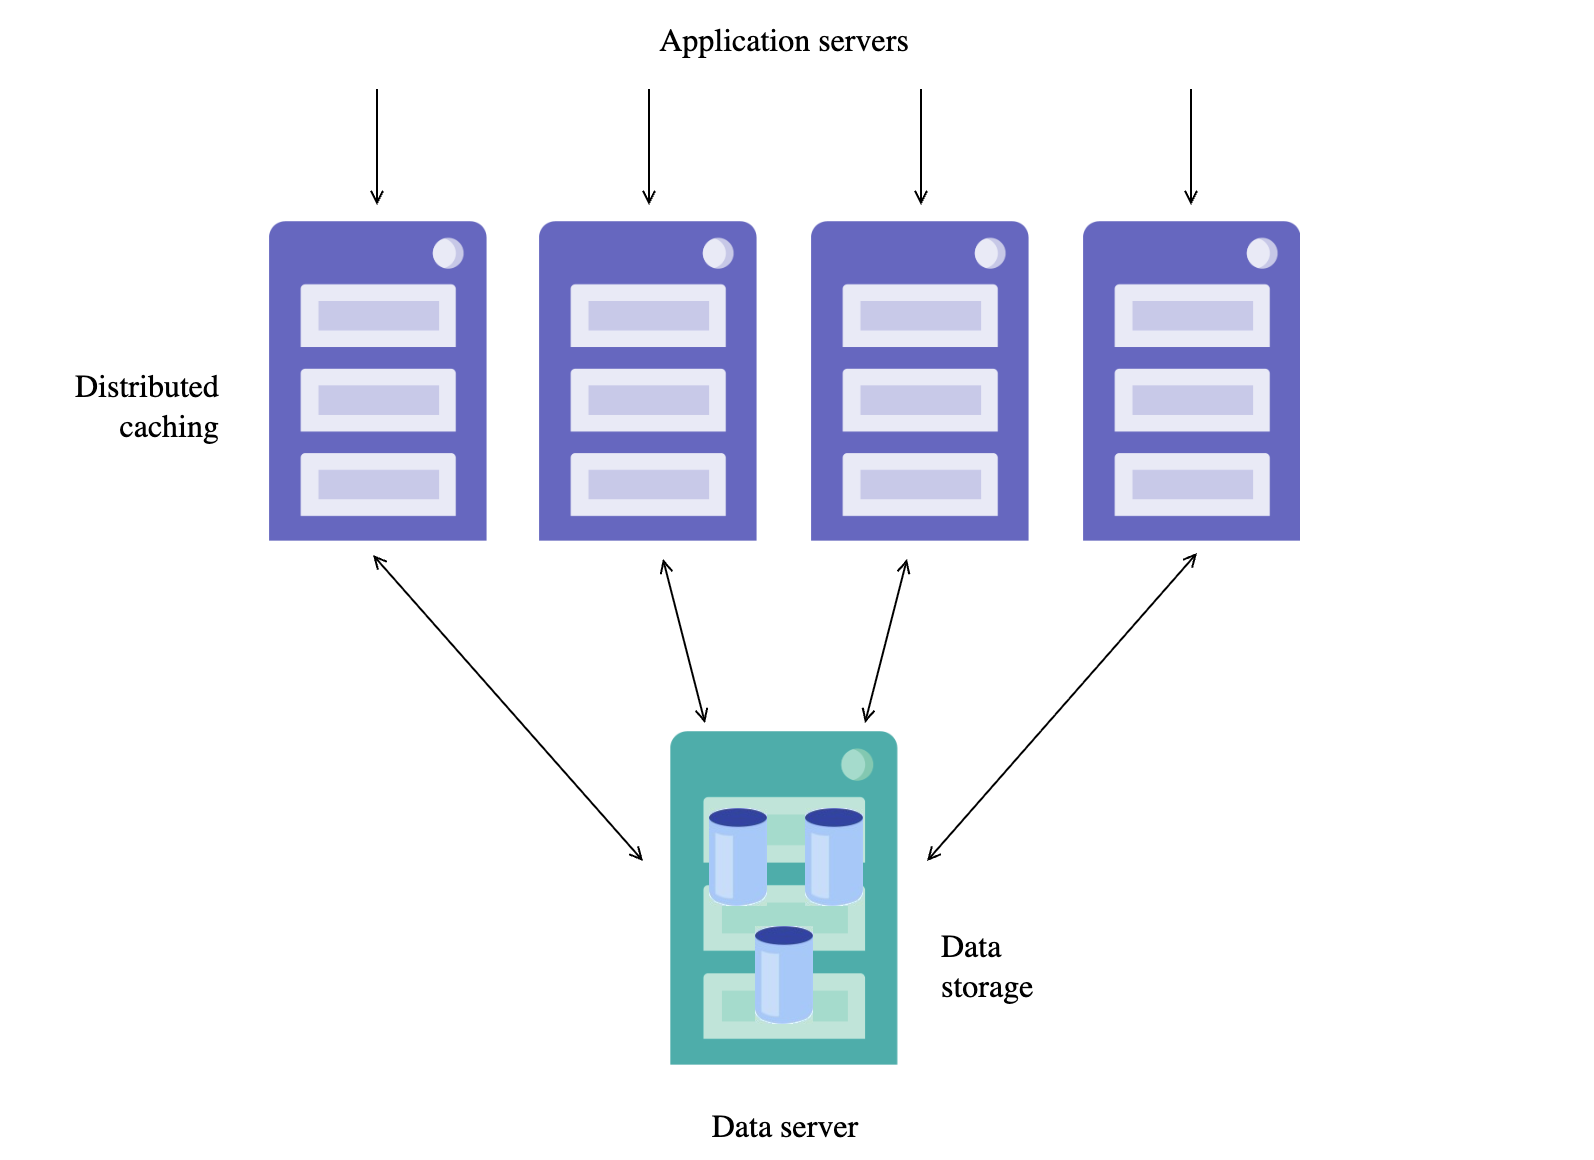
Distributed Caching — distributes computational workload, data stays centralized:
- Data servers hold authoritative dataset
- Application/cache servers handle requests and cache data locally
- Writes go to data server; reads served from cache
Use case: High user concurrency, read-heavy workloads.
Examples of Distributed Caching:
- Redis Cluster: Distributes data across nodes
- Memcached: In-memory caching for read-heavy workloads
- InterSystems IRIS ECP: Application-transparent distributed caching
Sharding — distributes data itself across independent servers:
- Data partitioned by shard key (e.g., CustomerId)
- Each shard holds a data subset
- Queries routed to relevant shards, results aggregated
Use case: Data volume exceeds single-server capacity.
Examples of Sharding/Partitioning:
- Elasticsearch: Auto-shards indices across cluster nodes
- MongoDB: Horizontal sharding with configurable shard keys
- InterSystems IRIS Sharding: Hash-based sharding with transparent SQL distribution
IRIS offers both patterns in a single platform with unified management.
When to Use Each Approach
| Distributed Caching | Sharding |
|---|---|
| High concurrent users | Dataset exceeds single-server capacity |
| Read-heavy workload | Write-heavy workload |
| Data fits on one server | Natural partition key exists |
| Need elastic scaling | Query patterns align with shard key |
How InterSystems IRIS Implements Scalability
Let's see how InterSystems IRIS implements these scalability patterns. IRIS provides two built-in mechanisms:
- Enterprise Cache Protocol (ECP): Distributed caching for user volume
- Sharding: Data partitioning for data volume
The key advantage of IRIS is that both mechanisms are application-transparent—your code doesn't need to know it's running in a distributed environment. IRIS handles query routing, cache coherency, and result aggregation automatically.
Horizontal Scaling with Distributed Caching (ECP)
Architecture Overview
Enterprise Cache Protocol (ECP) enables horizontal scaling for high user volumes. In an ECP cluster, you have:
- Data Server: Stores data locally and manages cache coherency
- Application Servers: Handle user requests and cache remote data locally
This architecture is application-transparent, meaning your code doesn't need to know it's running in a distributed environment. Each application server maintains its own cache, automatically synchronized with the data server.
Key Benefits
ECP provides several advantages for scaling:
- Elastic scaling: Add or remove application servers without reconfiguring the cluster
- Transparent to applications: No code changes required
- Automatic recovery: Interrupted connections are automatically recovered
- Massive scale: Capable of supporting tens of millions of database accesses per second
Sharding for Data Volume
What is Sharding?
Sharding is a database architecture pattern that horizontally partitions data across multiple independent database instances. Each partition (called a "shard") contains a subset of the total data, determined by a sharding key. This approach is fundamentally different from vertical scaling (adding more resources to a single server) or replication (copying the same data to multiple servers).
Why Sharding Matters:
When a single database server reaches its limits—whether in storage capacity, memory, CPU, or I/O throughput—sharding provides a path to continued growth. Instead of buying increasingly expensive hardware, you distribute the workload across multiple commodity servers.
How IRIS Sharding Works:
InterSystems IRIS implements sharding at the SQL level with automatic query distribution and coordination. When you define a sharded table with a shard key (e.g., CustomerId), IRIS:
- Hashes the key to determine which shard stores each record
- Routes write operations to the appropriate shard automatically
- Distributes queries across relevant shards in parallel
- Aggregates results transparently at the master node
Sharded Cluster Architecture
A sharded cluster consists of multiple data nodes—networked InterSystems IRIS instances that each host a portion of the distributed dataset. All nodes should have comparable specifications since parallel query processing is only as fast as the slowest data node.
IRIS uses a node-level architecture: all nodes are data nodes, the cluster namespace provides uniform access across the cluster, and the master namespace on node 1 is fully available to all nodes.
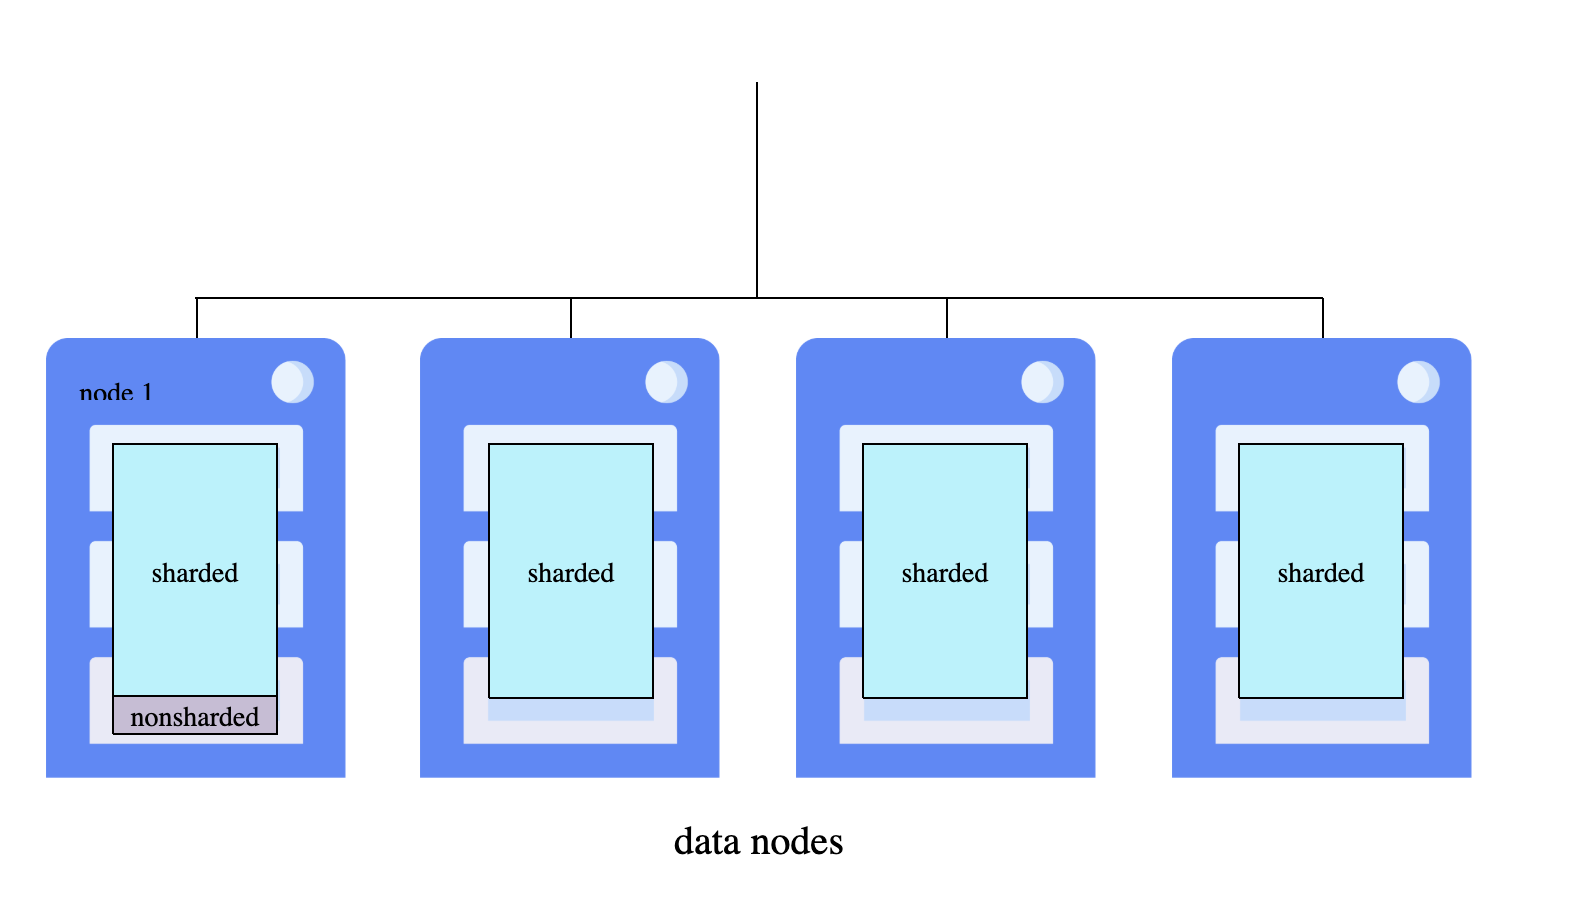
Data Node Roles:
- Data Node 1: The first node where you initialize the cluster. It stores non-sharded tables, system metadata, and code, plus hosts the master namespace (
IRISDM). - Additional Data Nodes: Store sharded data partitions and access non-sharded data from node 1 via mappings. Each node maintains a dedicated cache serving only its data partition, effectively scaling memory horizontally.
Namespaces:
- Cluster namespace (
IRISCLUSTER): Replicated identically across all nodes, provides transparent access to all sharded and non-sharded data - Master namespace (
IRISDM): Located on data node 1 only, stores metadata and non-sharded tables
Shard Key Types:
- System-Assigned Shard Key (SASK): Uses the table's RowID by default, providing balanced distribution automatically
- User-Defined Shard Key (UDSK): Specifies particular fields (e.g.,
SHARD KEY(CustomerId)), enabling co-sharded joins where related table rows reside on the same shard
Query Execution: Queries against sharded tables run in parallel on all data nodes, with results merged, aggregated, and returned transparently. Applications connect to the cluster namespace on any node and experience the full dataset as if it were local.
Practical Examples
Running IRIS in Docker
Before we dive into scaling examples, let's understand the Docker setup. As detailed in our security basics article, InterSystems IRIS runs efficiently in Docker containers using the official InterSystems Container Registry.
Prerequisites:
- Sharding requires InterSystems IRIS Enterprise Edition with a sharding-enabled license. The Community Edition (
iris-community) does not support sharding. Use the Enterprise image:containers.intersystems.com/intersystems/iris:2025.1 - Place your
iris.keylicense file in the working directory (same folder as docker-compose files) - The license must contain
Sharding=enabledin[License Characteristics]section for sharding examples. Contact InterSystems to obtain an evaluation license with sharding capabilities. - Authenticate to InterSystems Container Registry (requires WRC account):
$ docker login containers.intersystems.com
# Enter your WRC username and password when prompted
A couple of notes:
- Configuration is done via CPF merge files, a declarative approach that applies settings automatically at startup using the
ISC_CPF_MERGE_FILEenvironment variable. See Running InterSystems Products in Containers for more details - All examples use the terminal for simplicity—we don't run the web gateway container
- When a command returns
0(failure) or an error code, usedo $system.OBJ.DisplayError()to see the full error message:
%SYS>write $SYSTEM.Cluster.Initialize()
0

%SYS>do $system.OBJ.DisplayError()
ERROR #9399: Node is already attached to a sharded cluster
Example 1: ECP for Distributed Caching
ECP allows application servers to access data stored on a remote data server transparently. Under the hood, ECP works through a shared cache of globals—application servers cache frequently accessed global data locally, while the data server maintains cache coherency across all connected clients. This means reads are often served from local cache (fast), while writes propagate to the data server and invalidate stale cache entries on other application servers.
We'll configure both servers entirely using CPF merge files.
Create CPF Merge Files
Create ecp-data.cpf for the data server (creates database, namespace, and enables ECP service):
[Actions]
# Enable ECP service. It needs only on the Data server side
ModifyService:Name=%Service_ECP,Enabled=1

# Databases
CreateDatabase:Name=SHAREDCODE,Directory=/usr/irissys/mgr/sharedcode/,Resource=%DB_DEFAULT
CreateDatabase:Name=SHAREDDATA,Directory=/usr/irissys/mgr/shareddata/,Resource=%DB_DEFAULT

# Namespace. We don't need Interoperability for our use case
CreateNamespace:Name=SHAREDNS,Globals=SHAREDDATA,Routines=SHAREDCODE,Interop=0
Create ecp-app.cpf for the application server (connects to data server, maps remote database):
[ECPServers]
SHARED=dataserver,1972,0

[Actions]
# Remote Databases. LogicalOnly presents from creating a physical database on the ECP client
CreateDatabase:Name=SHAREDCODE,Directory=/usr/irissys/mgr/sharedcode/,Server=SHARED,LogicalOnly=1
CreateDatabase:Name=SHAREDDATA,Directory=/usr/irissys/mgr/shareddata/,Server=SHARED,LogicalOnly=1

# Namespace. We don't need Interoperability for our use case
CreateNamespace:Name=SHAREDNS,Globals=SHAREDDATA,Routines=SHAREDCODE,Interop=0
Create Docker Compose Configuration
Create docker-compose-ecp.yaml:
services:
  iris-data-server:
    image: containers.intersystems.com/intersystems/iris:2025.1
    container_name: iris-data-server
    hostname: dataserver
    privileged: true
    volumes:
      - ./iris.key:/usr/irissys/mgr/iris.key:ro
      - ./ecp-data.cpf:/tmp/ecp-data.cpf:ro
    environment:
      - ISC_CPF_MERGE_FILE=/tmp/ecp-data.cpf
    ports:
      - "11972:1972"
    command: --check-caps false
    healthcheck:
      test: ["CMD", "iris", "session", "iris", "-U", "%SYS", "##class(%SYSTEM.Process).CurrentDirectory()"]
      interval: 10s
      timeout: 5s
      retries: 5

  iris-app-server:
    image: containers.intersystems.com/intersystems/iris:2025.1
    container_name: iris-app-server
    hostname: appserver
    privileged: true
    volumes:
      - ./iris.key:/usr/irissys/mgr/iris.key:ro
      - ./ecp-app.cpf:/tmp/ecp-app.cpf:ro
    environment:
      - ISC_CPF_MERGE_FILE=/tmp/ecp-app.cpf
    ports:
      - "11973:1972"
    depends_on:
      iris-data-server:
        condition: service_healthy
    command: --check-caps false
Put IRIS License
For examples below we're going to use a license allowing both ECP and Sharding functionality.
So, the working directory now should look like this:
.
├── docker-compose-ecp.yaml
├── ecp-app.cpf
├── ecp-data.cpf
└── iris.key
Start and Test
Note: please use either docker compose or docker-compose depending on what is installed on your machine.
$ docker-compose -f docker-compose-ecp.yaml up -d
Create test data on the data server:
$ docker exec -it iris-data-server iris session iris -U SHAREDNS
SHAREDNS>set ^Customer(1) = "John Smith"
SHAREDNS>set ^Customer(2) = "Jane Doe"
SHAREDNS>halt
Access remote data from the application server:
$ docker exec -it iris-app-server iris session iris -U SHAREDNS
SHAREDNS>write ^Customer(1)
John Smith
SHAREDNS>set ^Customer(3) = "Bob Wilson"
SHAREDNS>halt
Verify the write reached the data server:
$ docker exec -it iris-data-server iris session iris -U SHAREDNS
SHAREDNS>zwrite ^Customer
^Customer(1)="John Smith"
^Customer(2)="Jane Doe"
^Customer(3)="Bob Wilson"

SHAREDNS>halt
Stop containers after testing:
$ docker-compose -f docker-compose-ecp.yaml down
The application server transparently reads and writes data stored on the data server via ECP.
Example 2: Deploying a Sharded Cluster with Docker
Create CPF Merge Files
Create shard-master.cpf for the master node (node1):
[Startup]
EnableSharding=1

[config]
MaxServerConn=64
MaxServers=64

[Actions]
ConfigShardedCluster:ClusterURL=IRIS://shardmaster:1972/IRISCLUSTER,Role=node1
The Role=node1 initializes this instance as the cluster master, automatically creating the IRISCLUSTER and IRISDM namespaces.
Create shard-data.cpf for data nodes:
[Startup]
EnableSharding=1

[config]
MaxServerConn=64
MaxServers=64

[Actions]
ConfigShardedCluster:ClusterURL=IRIS://shardmaster:1972/IRISCLUSTER,Role=data
Data nodes connect to the master via ClusterURL and register with Role=data.
Create Docker Compose Configuration
Create docker-compose-sharding.yaml:
services:
  iris-shard-master:
    image: containers.intersystems.com/intersystems/iris:2025.1
    container_name: iris-shard-master
    hostname: shardmaster
    privileged: true
    volumes:
      - ./iris.key:/usr/irissys/mgr/iris.key:ro
      - ./shard-master.cpf:/tmp/shard-master.cpf:ro
    environment:
      - ISC_CPF_MERGE_FILE=/tmp/shard-master.cpf
    ports:
      - "11972:1972"
    command: --check-caps false
    healthcheck:
      test: ["CMD", "iris", "session", "iris", "-U", "%SYS", "##class(%SYSTEM.Process).CurrentDirectory()"]
      interval: 10s
      timeout: 5s
      retries: 5

  iris-shard-server-1:
    image: containers.intersystems.com/intersystems/iris:2025.1
    container_name: iris-shard-server-1
    hostname: shardserver1
    privileged: true
    volumes:
      - ./iris.key:/usr/irissys/mgr/iris.key:ro
      - ./shard-data.cpf:/tmp/shard-data.cpf:ro
    environment:
      - ISC_CPF_MERGE_FILE=/tmp/shard-data.cpf
    depends_on:
      iris-shard-master:
        condition: service_healthy
    command: --check-caps false

  iris-shard-server-2:
    image: containers.intersystems.com/intersystems/iris:2025.1
    container_name: iris-shard-server-2
    hostname: shardserver2
    privileged: true
    volumes:
      - ./iris.key:/usr/irissys/mgr/iris.key:ro
      - ./shard-data.cpf:/tmp/shard-data.cpf:ro
    environment:
      - ISC_CPF_MERGE_FILE=/tmp/shard-data.cpf
    depends_on:
      iris-shard-master:
        condition: service_healthy
    command: --check-caps false

  # 3rd shard server - start separately for rebalancing demo
  iris-shard-server-3:
    image: containers.intersystems.com/intersystems/iris:2025.1
    container_name: iris-shard-server-3
    hostname: shardserver3
    privileged: true
    profiles:
      - scale
    volumes:
      - ./iris.key:/usr/irissys/mgr/iris.key:ro
      - ./shard-data.cpf:/tmp/shard-data.cpf:ro
    environment:
      - ISC_CPF_MERGE_FILE=/tmp/shard-data.cpf
    depends_on:
      iris-shard-master:
        condition: service_healthy
    command: --check-caps false
The 3rd shard server uses the scale profile, so it won't start by default—we'll bring it up later to demonstrate rebalancing. Docker Compose creates a default network, so containers can reach each other by hostname.
Start and Verify the Cluster
$ docker-compose -f docker-compose-sharding.yaml up -d
$ docker-compose -f docker-compose-sharding.yaml ps
The cluster is automatically configured at startup via CPF merge files. Verify from the master:
$ docker exec -it iris-shard-master iris session iris -U IRISDM
IRISDM>do $SYSTEM.Cluster.ListNodes()
NodeId  NodeType        Host            Port
1       Data            shardmaster     1972
2       Data            shardserver1    1972
3       Data            shardserver2    1972

IRISDM>write ##class(%SYSTEM.Sharding).VerifyShards()
1
Create a Sharded Table
The cluster initialization creates IRISDM (data master) namespace for sharded tables:
IRISDM>do $system.SQL.Shell()
[SQL]IRISDM>>CREATE TABLE Cities (ID INT PRIMARY KEY, Population INT, Name VARCHAR(50), SHARD KEY(Name))
[SQL]IRISDM>>quit
IRISDM>
The SHARD keyword marks the table for sharding. Without it, you get a regular table on the local node only.
Populate Test Data
Generate test data using %PopulateUtils:
IRISDM>for i=1:1:1000 do ##class(%SQL.Statement).%ExecDirect(,"INSERT INTO Cities VALUES (?,?,?)",i,##class(%PopulateUtils).Integer(1000,999999),##class(%PopulateUtils).City())
This inserts 1000 rows with random populations and city names. Verify:
IRISDM>do $system.SQL.Shell()
[SQL]IRISDM>>SELECT COUNT(*) FROM Cities
| Aggregate_1 |
| -- |
| 1000 |
...
The data is automatically distributed across shards based on the hash of City name. IRIS handles query distribution and aggregation transparently.
Example 3: Sharding Operations
The following examples demonstrate common sharding operations (run from IRISDM namespace).
Checking Cluster Status
// List all nodes in the cluster
IRISDM>do $SYSTEM.Cluster.ListNodes()
NodeId  NodeType        Host            Port
1       Data            shardmaster     1972
2       Data            shardserver1    1972
3       Data            shardserver2    1972
Verifying Shard Configuration
// Verify all shards are reachable and configured correctly
IRISDM>write ##class(%SYSTEM.Sharding).VerifyShards()
1
Viewing Sharded Query Plan
You can verify that queries use sharding by examining the query plan:
IRISDM>do $system.SQL.Shell()
[SQL]IRISDM>>EXPLAIN SELECT * FROM Cities WHERE Population > 500000
The plan shows distributed execution:
Distribute query to shard servers, piping results to temp-file A:
...
    SELECT ... FROM IRIS_Shard_User.Cities T1 WHERE T1.Population > ?
...
Read master map IRIS_Shard_User.Cities(T1).IDKEY, looping on T1.ID1.
...
The key indicator is "Distribute query to shard servers" - this confirms the query runs across all shards in parallel, with results collected into a temp-file and returned to the client.
Checking Data Distribution Across Shards
SQL queries are fully transparent—running SELECT COUNT(*) FROM Cities on any node (master or shard server) returns all 1000 records. IRIS automatically distributes the query and aggregates results.
To see how data is actually distributed per node, first find the storage global from the class definition.
Note: more likely, there is a better way in terminal to count rows on each shard, if you know it please leave in comments.
IRISDM>zn "IRISCLUSTER"
IRISCLUSTER>set storage = ##class(%Dictionary.CompiledStorage).%OpenId("IRIS.Shard.User.Cities||Default")
IRISCLUSTER>write storage.DataLocation
^IS.CBG8Cm.1
Then view the local data on each shard server using this global name:
// Run on each shard server (shardserver1, shardserver2)
IRISCLUSTER>zwrite ^IS.CBG8Cm.1
^IS.CBG8Cm.1=289
^IS.CBG8Cm.1(1)=$lb(1,58518,"Oak Creek")
^IS.CBG8Cm.1(2)=$lb(17,598378,"Xavier")
...
To count records on each shard, iterate through the global subscripts. Running this command on all IRIS containers shows how data is distributed across nodes:
$ docker exec -it iris-shard-master iris session iris -U IRISCLUSTER
IRISCLUSTER>set n=0,k="" for { set k=$ORDER(^IS.CBG8Cm.1(k)) quit:k=""  set n=n+1 } write n
289
IRISCLUSTER>halt

$ docker exec -it iris-shard-server-1 iris session iris -U IRISCLUSTER
IRISCLUSTER>set n=0,k="" for { set k=$ORDER(^IS.CBG8Cm.1(k)) quit:k=""  set n=n+1 } write n
393
IRISCLUSTER>halt

$ docker exec -it iris-shard-server-2 iris session iris -U IRISCLUSTER
IRISCLUSTER>set n=0,k="" for { set k=$ORDER(^IS.CBG8Cm.1(k)) quit:k=""  set n=n+1 } write n
318
IRISCLUSTER>halt
Example 4: Adding a Shard and Rebalancing Data
When you add a new node to an existing sharded cluster, the data isn't automatically redistributed. You need to run a rebalancing operation to spread data evenly across all shards. This is useful when:
- Adding capacity to handle growing data volumes
- Achieving more even data distribution
- Improving query parallelism across more nodes
Start the 3rd Shard Server
With the cluster from Example 2 still running (master + 2 shard servers with data), bring up the 3rd shard server using the scale profile:
$ docker-compose -f docker-compose-sharding.yaml --profile scale up -d
The new node automatically configures itself via the same shard-data.cpf merge file and joins the cluster.
Verify the New Node is Attached
From the master, verify all 3 shard servers are now in the cluster:
$ docker exec -it iris-shard-master iris session iris -U IRISDM
IRISDM>do $SYSTEM.Cluster.ListNodes()
NodeId  NodeType        Host            Port
1       Data            shardmaster     1972
2       Data            shardserver1    1972
3       Data            shardserver2    1972
4       Data            shardserver3    1972
Initiate Rebalancing
Rebalancing redistributes existing data across all shards. Run this from the master in the IRISDM namespace:
IRISDM>write ##class(%SYSTEM.Sharding).Rebalance(,,.report)
1

IRISDM>zwrite report
report("Buckets Moved")=512
report("Buckets To Move")=0
report("Completed")=1
report("Elapsed Seconds")=20.076352926
report("Maps","||udsk","Average Time")=.01276020240343530766
report("Maps","||udsk","Buckets Moved")=512
report("Maps","||udsk","Buckets To Move")=0
The report array contains details about the rebalancing operation. Check report("Completed")=1 to confirm all tables were fully rebalanced.
Verify New Data Distribution
Check data distribution again across all 4 nodes:
$ docker exec -it iris-shard-master iris session iris -U IRISCLUSTER
IRISCLUSTER>set n=0,k="" for { set k=$ORDER(^IS.CBG8Cm.1(k)) quit:k=""  set n=n+1 } write n
115
IRISCLUSTER>halt

$ docker exec -it iris-shard-server-1 iris session iris -U IRISCLUSTER
IRISCLUSTER>set n=0,k="" for { set k=$ORDER(^IS.CBG8Cm.1(k)) quit:k=""  set n=n+1 } write n
393
IRISCLUSTER>halt

$ docker exec -it iris-shard-server-2 iris session iris -U IRISCLUSTER
IRISCLUSTER>set n=0,k="" for { set k=$ORDER(^IS.CBG8Cm.1(k)) quit:k=""  set n=n+1 } write n
207
IRISCLUSTER>halt

$ docker exec -it iris-shard-server-3 iris session iris -U IRISCLUSTER
IRISCLUSTER>set n=0,k="" for { set k=$ORDER(^IS.CBG8Cm.1(k)) quit:k=""  set n=n+1 } write n
285
IRISCLUSTER>halt
After rebalancing, data should be distributed across all four nodes instead of just three.
Cleanup:
$ docker-compose -f docker-compose-sharding.yaml --profile scale down
Conclusion
InterSystems IRIS provides enterprise-grade horizontal scaling capabilities through two complementary mechanisms. Distributed Caching (ECP) addresses user volume challenges by distributing application processing and caching across multiple servers with zero code changes. Sharding tackles data volume challenges by partitioning large datasets across multiple servers for parallel processing.
Both approaches offer:
- Transparent operation requiring minimal application changes
- Built-in fault tolerance and automatic recovery
- Proven scalability to support demanding enterprise workloads
A key advantage is that both ECP and sharding are available within a single unified platform. Unlike solutions that require separate products for distributed caching and data partitioning, InterSystems IRIS delivers both capabilities out of the box with consistent management, monitoring, and tooling. This integrated approach simplifies architecture decisions and reduces operational complexity.
By understanding your workload characteristics and bottlenecks, you can choose the right scaling strategy or combine both approaches for maximum flexibility. Whether running in Docker containers or traditional deployments, IRIS scaling features help you grow your applications from prototype to production scale.
For hands-on practice, try the examples in this guide using Docker-based IRIS instances. Start with a simple two-node configuration, then expand as you become comfortable with the concepts and tooling.
Comments
Hi @Mikhail Khomenko
Nice Article! Thanks for sharing.
Hi @Muhammad Waseem!
I'm glad to see that it's useful. Thank you!
Thanks for sharing! Good to know how database scalability works!
Thanks @Siddharth Rawat