Security in InterSystems IRIS
Security is fundamental to enterprise application development. InterSystems IRIS provides a comprehensive security framework that protects data, controls access, and ensures compliance. This guide introduces essential security features for developers new to IRIS, covering authentication, authorization, encryption, and practical implementation strategies.
Throughout this guide, we'll use Docker containers to demonstrate security configurations in a practical, reproducible environment. All examples use the official InterSystems Container Registry to deploy IRIS and Web Gateway, making it easy to follow along and test security features in your own development environment.
Running IRIS in Docker with Secure Configuration
When deploying IRIS in containers, it's essential to change the default passwords immediately after startup. This section demonstrates how to run IRIS with Web Gateway in Docker and properly configure authentication.
Using the InterSystems Container Registry
All container examples in this article use the official InterSystems Container Registry. This registry provides official, supported container images for IRIS, IRIS for Health, Web Gateway, and other InterSystems products.
Authentication Requirements
Important: Downloading non-community InterSystems IRIS container images requires an InterSystems WRC (Worldwide Response Center) account. For our purposes, we can omit an authentication step. If you want to play with non-community IRIS images, please authenticate to the registry first:
# Login to InterSystems Container Registry
$ docker login containers.intersystems.com
# Enter your WRC username and password when prompted
Finding Available Image Tags
Image tags change over time as new versions are released. To find the latest available tags:
Method 1: Web Portal (Easiest)
- Visit https://containers.intersystems.com/contents
- Log in with your InterSystems WRC credentials (for non-community images)
- Navigate to InterSystems IRIS Community Edition → iris-community (or webgateway)
- Expand the repository to see all available tags
- Copy the docker pull command for your desired tag
Method 2: Command Line with Skopeo
Use skopeo to list available tags programmatically. Note that a previously popular tool called docker-ls was used for this purpose, but it is now archived and no longer maintained.
Step 1: Install skopeo
# On macOS
$ brew install skopeo

# On Ubuntu/Debian
$ sudo apt-get install skopeo

# On RHEL/CentOS
$ sudo dnf install skopeo
Step 2: Authenticate to the registry (for non-community)
# Login with your InterSystems WRC credentials
$ skopeo login containers.intersystems.com
# You will be prompted for username and password
Step 3: List available tags
# List available IRIS Community Edition tags
$ skopeo list-tags docker://containers.intersystems.com/intersystems/iris-community

# List WebGateway tags
$ skopeo list-tags docker://containers.intersystems.com/intersystems/webgateway
Method 3: Inspect a Pulled Image
After pulling an image with a tag like latest-em, you can check the exact version:
# Pull the image
$ docker pull containers.intersystems.com/intersystems/iris-community:latest-em

# Check the exact version
$ docker inspect containers.intersystems.com/intersystems/iris-community:latest-em \
  --format '{{ index .Config.Labels "com.intersystems.platform-version"}}'

# Output example: 2025.1.0.230.2com
Tag Naming Conventions
InterSystems uses the following tag patterns:
- Specific versions:
2025.1,2024.3,2023.2(year.release format) - Latest Extended Maintenance:
latest-em(where em = Extended Maintenance) - Latest Continuous Delivery:
latest-cd(where cd = Continuous Delivery) - Latest Preview:
latest-preview(preview releases)
Important Notes:
- InterSystems does NOT use a generic
latesttag - always specify a version - Tags contain the year and release but not the full build number
- For production, use specific version tags (e.g.,
2025.1) rather thanlatest-*tags - InterSystems recommends maintaining your own private registry with specific versions
Images Used in This Article
The examples below use the following tags, which were the latest available at the time of writing (November 2025):
- IRIS:
2025.1(Extended Maintenance release) - Web Gateway:
2025.1
To get the most current versions, check the registry as described above before deploying.
Docker Compose with Web Gateway
According to InterSystems official documentation, the Web Gateway should be deployed separately from IRIS instances to provide:
- Load balancing and failover - Distribute requests across multiple IRIS backends for high availability
- Security isolation - Web Gateway handles external-facing connections while IRIS remains in a protected network tier
- Scalability - Scale web tier and database tier independently based on workload requirements
- Centralized routing - Single gateway can serve multiple IRIS instances with different application profiles
This separation is essential for production environments and follows best practices for multi-tier architecture.
Complete Docker Compose Configuration
Create a docker-compose.yaml file with separate IRIS and Web Gateway containers:
services:
  iris:
    image: containers.intersystems.com/intersystems/iris-community:2025.1
    container_name: iris
    environment:
      - ISC_CPF_MERGE_FILE=/merge/merge.cpf
      - ISC_DATA_DIRECTORY=/durable
    volumes:
      - ./merge.cpf:/merge/merge.cpf:ro
      - ./iris-data:/durable
    networks:
      - iris-network
    command: --check-caps false

  webgateway:
    image: containers.intersystems.com/intersystems/webgateway:2025.1
    init: true
    container_name: webgateway
    ports:
      - "8080:80"
      - "8443:443"
    environment:
      - ISC_CSP_INI_FILE=/webgateway-shared/CSP.ini
      - ISC_CSP_CONF_FILE=/webgateway-shared/CSP.conf
    volumes:
      - type: bind
        source: ./webgateway
        target: /webgateway-shared
    depends_on:
      - iris
    networks:
      - iris-network

networks:
  iris-network:
    driver: bridge
Configuration Files
1. Create merge.cpf file with system configuration:
[Startup]
SystemMode=Development
WebServerPort=0
Configuration notes:
- CPF file is a Configuration Parameter File that might be used to configure some IRIS parameters in a declarative manner
SystemMode=Development- Label displayed in Management Portal header (use DEVELOPMENT, TEST, etc. as appropriate)WebServerPort=0- Disables the internal web server (since we're using a separate Web Gateway container). Relevant only for Community IRIS images, non-community images already doesn't contain an internal WebGatewayISC_DATA_DIRECTORY=/durable- Enables durable %SYS for data persistence across container restartscommand: --check-caps false- Disables Linux capability checks (required for some environments)- License: No license key configuration is needed for this use case. InterSystems IRIS Community Edition runs without requiring a license key for development and educational purposes.
- Security: After startup, you will be prompted to change the default passwords from "SYS" using the Management Portal or ObjectScript.
2. Create a webgateway directory with configuration files:
$ mkdir webgateway
3. Create webgateway/CSP.ini file with the default password (change passwords after first login):
[SYSTEM]
IRISCONNECT_LIBRARY_PATH=/opt/webgateway/bin
System_Manager=*.*.*.*
Default_Server=LOCAL
Username=CSPSystem
Password=SYS

[SYSTEM_INDEX]
LOCAL=Enabled

[LOCAL]
Ip_Address=iris
TCP_Port=1972
Username=CSPSystem
Password=SYS

[APP_PATH_INDEX]
/=Enabled
/csp=Enabled

[APP_PATH:/]
Default_Server=LOCAL

[APP_PATH:/csp]
Default_Server=LOCAL
Important Security Notes:
- The password is stored in plaintext initially in CSP.ini
- On first startup, Web Gateway automatically encrypts the password using DPAPI. See Protecting Web Gateway Connections to InterSystems IRIS for more detail
- After encryption, the password will appear as
Password=ENC:AQAAANCMnd...
4. Create webgateway/CSP.conf file to configure Apache (running inside the Web Gateway container) to route CSP requests:
# CSP config file

CSPModulePath "${ISC_PACKAGE_INSTALLDIR}/bin/"
CSPConfigPath "${ISC_PACKAGE_INSTALLDIR}/bin/"

# Serve everything via Web Gateway
<Location />
    CSP On
</Location>

<Directory />
    Options MultiViews FollowSymLinks
    AllowOverride None
    Require all granted
    <FilesMatch "\.(log|ini|pid|exe|so)$">
        Require all denied
    </FilesMatch>
</Directory>

# Redirect Help links
Redirect /csp/docbook/ https://docs.intersystems.com/irislatest/csp/docbook/
CSP.conf Configuration Notes:
-
CSPModulePathandCSPConfigPathpoint to the Web Gateway binaries directory -
directive with
CSP Onenables CSP handling for all paths -
The section sets security policies:
Require all grantedallows access (authentication handled by IRIS)- denies direct access to sensitive files (logs, config files, binaries)
-
The
Redirectdirective sends help documentation links to InterSystems official docs -
Environment variable
${ISC_PACKAGE_INSTALLDIR}is automatically substituted by the Web Gateway container
Starting the Environment
Your directory structure should look like this:
project/
├── docker-compose.yaml
├── merge.cpf
└── webgateway/
    ├── CSP.ini
    └── CSP.conf
Start the environment:
# Start both containers
$ docker-compose up -d

# Check container status
$ docker-compose ps

# View logs
$ docker-compose logs -f
The environment will start with:
- IRIS instance with default passwords (must be changed immediately)
- Web Gateway configured to authenticate to IRIS using the CSPSystem user
- Apache configuration automatically loaded from CSP.conf
- Persistent storage enabled via ISC_DATA_DIRECTORY for data durability
- Network isolation with IRIS and Web Gateway on a private Docker network
Accessing and Securing the Environment
After starting your containers, you'll need to secure the default passwords:
Step 1: Access the Management Portal and Change _SYSTEM Password
Navigate to http://localhost:8080/csp/sys/UtilHome.csp and login with:
- Username:
_SYSTEM - Password:
SYS
IRIS will immediately prompt you to change the default _SYSTEM password. Choose a strong password (12+ characters, mix of uppercase, lowercase, numbers, special characters).
Step 2: Change Other Default Passwords
After logging in with your new _SYSTEM password:
- Go to System Administration > Security > Users
- Change passwords for other critical accounts (Admin, CSPSystem, SuperUser)
- Use strong, unique passwords for each account
- Restart containers with
docker-compose restartto make sure that all CSP sessions are re-established.
Step 2.1: Configure Web Gateway Management Portal
Understanding the Two CSPSystem Users
When working with Web Gateway, it's important to understand that there are two separate CSPSystem contexts:
- CSPSystem user in IRIS - This is a predefined IRIS user account that the Web Gateway uses to authenticate to the
%Service_WebGatewayservice. This enables the Web Gateway to communicate with IRIS instances. - Web Gateway Management Portal credentials - These are separate credentials used to access the Web Gateway's own management interface (typically at
/csp/bin/Systems/Module.cxw). This is NOT the same as the IRIS Management Portal.
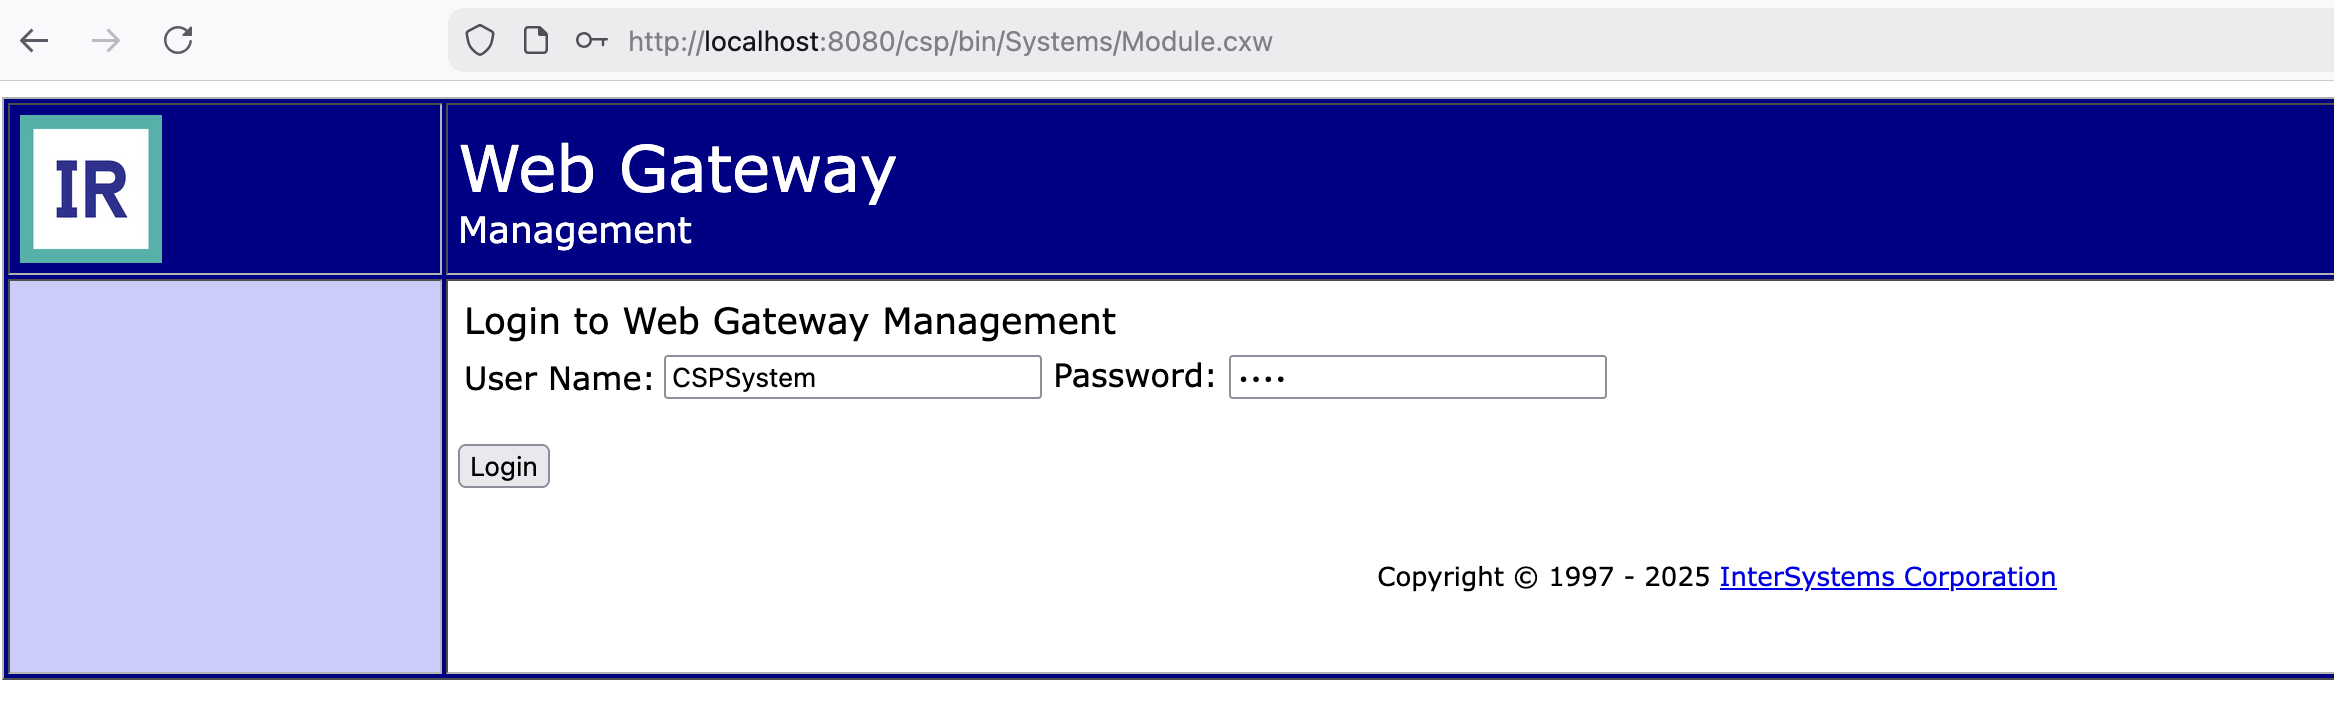
The Web Gateway has its own management interface that needs to be secured. Access it at http://localhost:8080/csp/bin/Systems/Module.cxw and login with:
- Username:
CSPSystem - Password:
SYS
1. Change Server Access Password
Navigate to the server configuration and update the Server Access password:
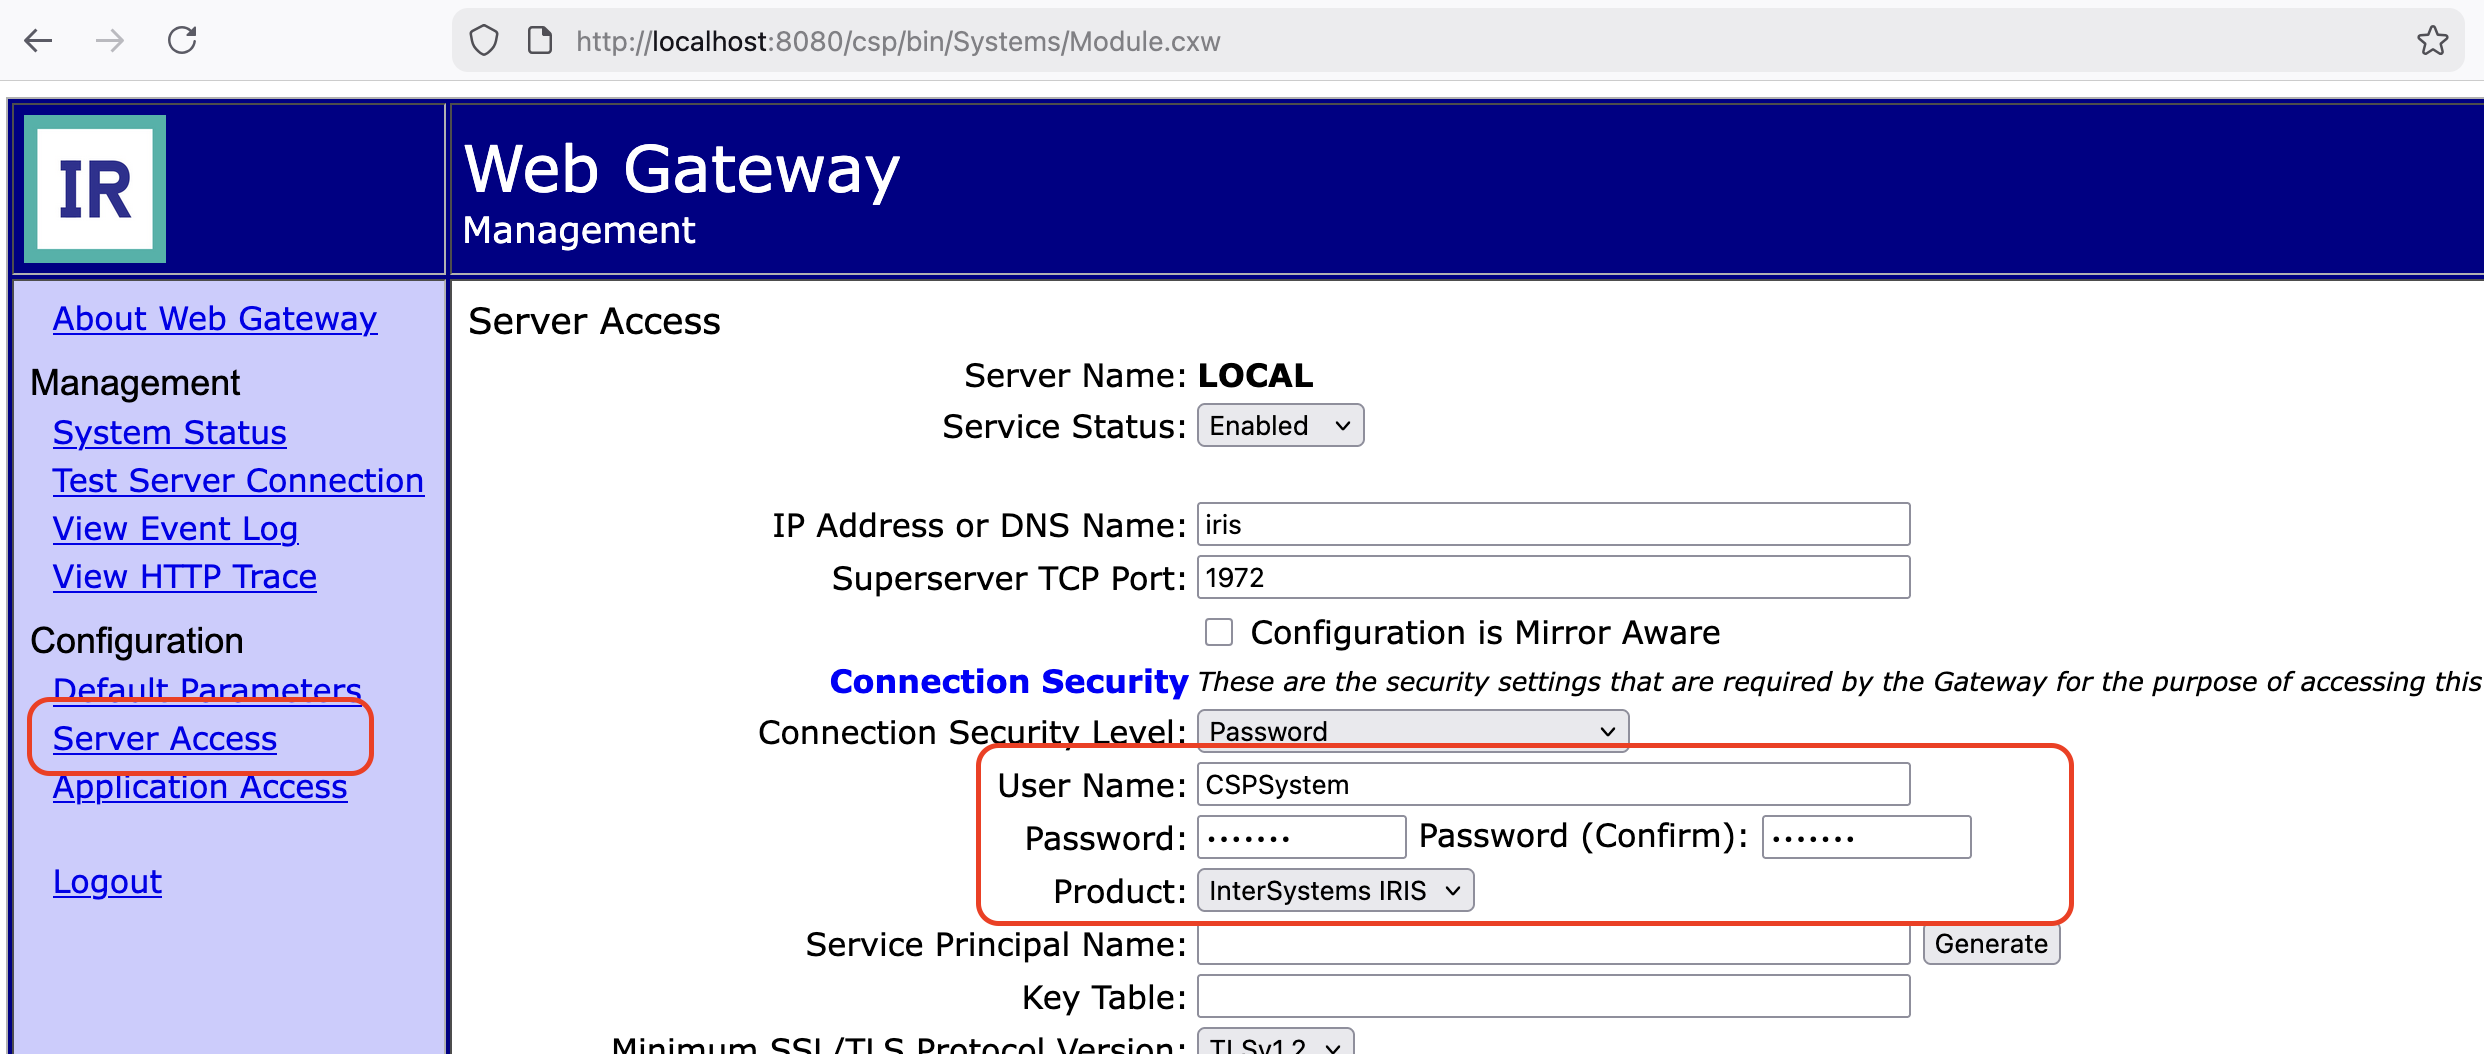
Enter the new CSPSystem password that you set in Step 2.
2. Test Server Connection
After updating the password, test the connection to ensure the Web Gateway can communicate with IRIS:
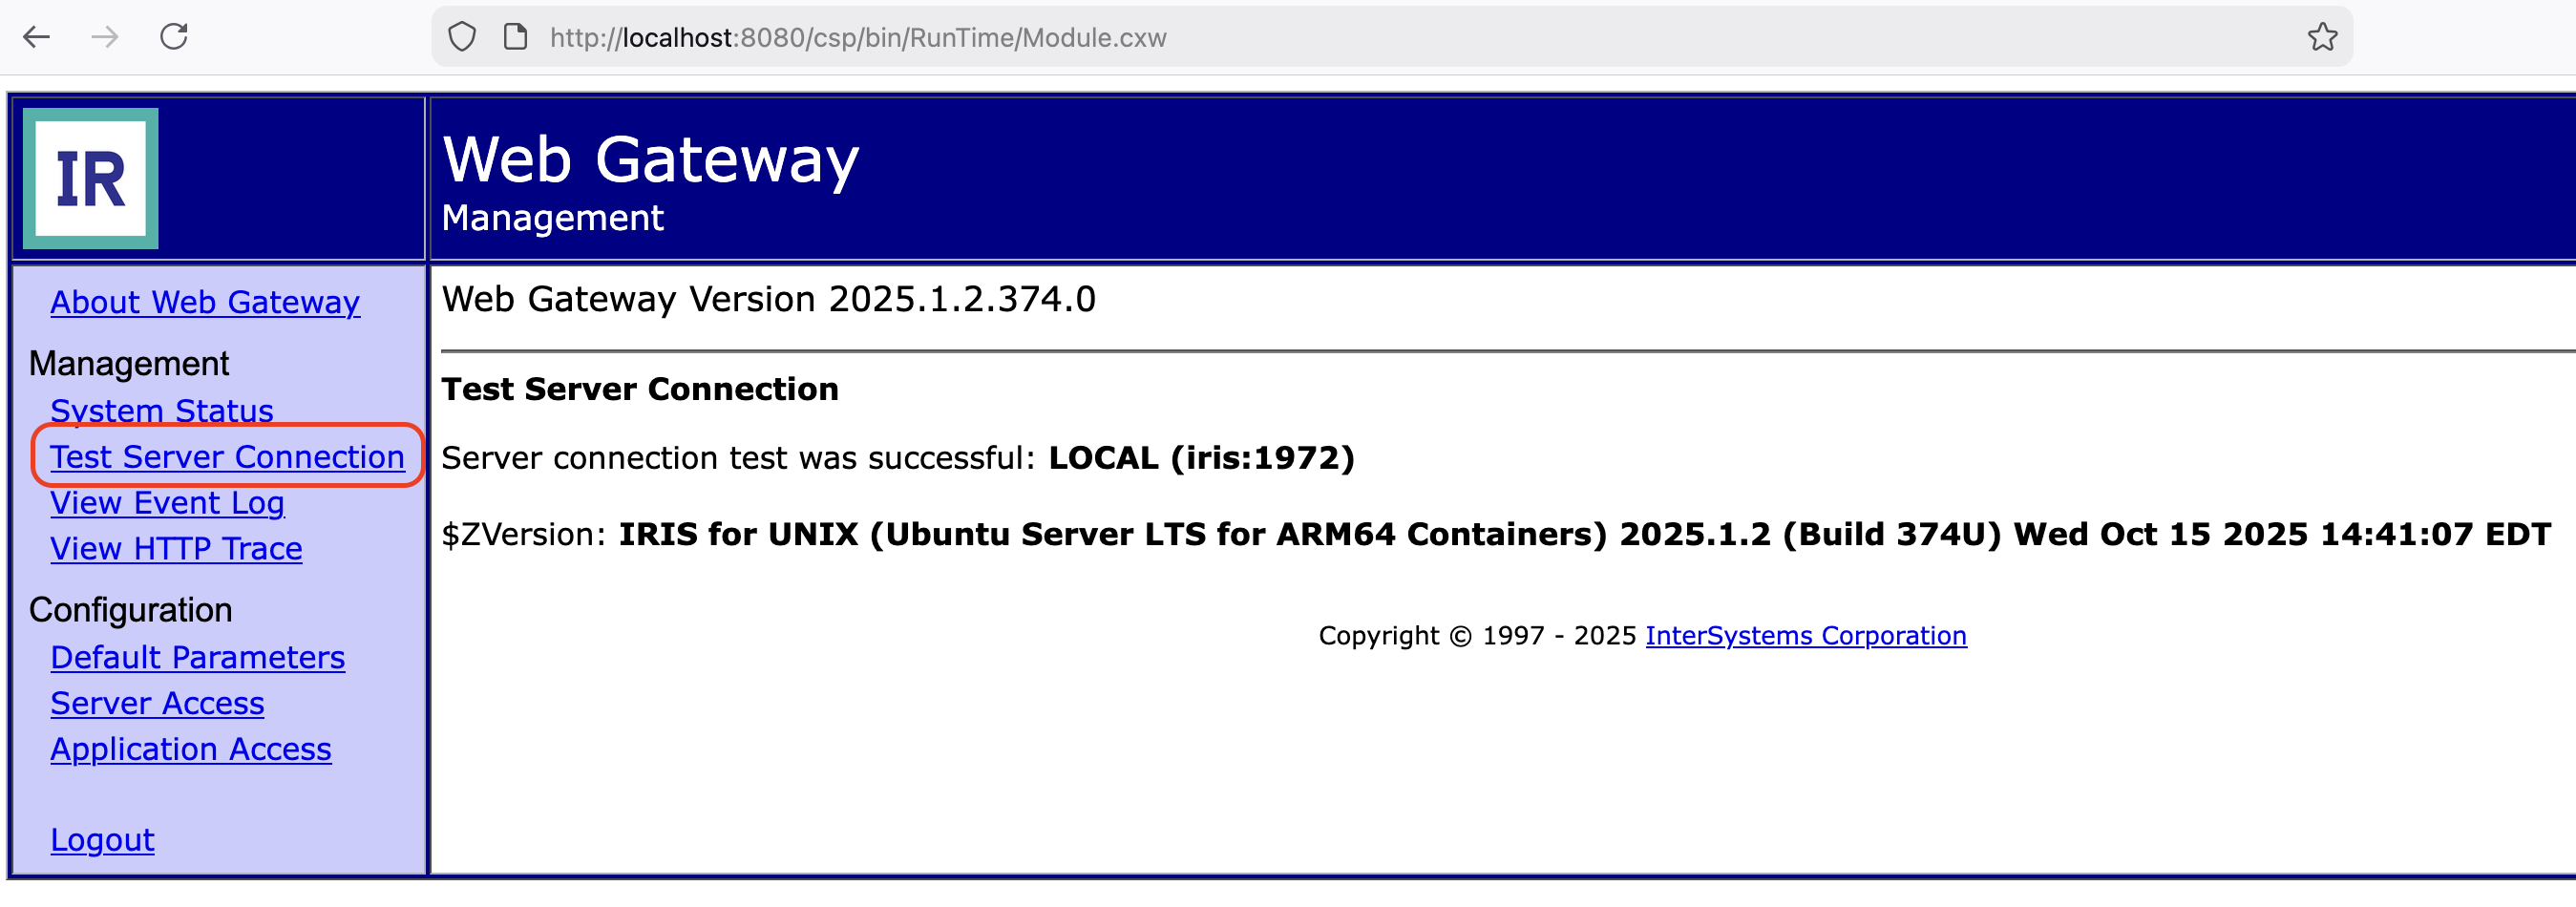
A successful connection confirms that the Web Gateway is properly authenticated to IRIS.
3. Update Default Parameters Password
Update the default password in the Default parameters:
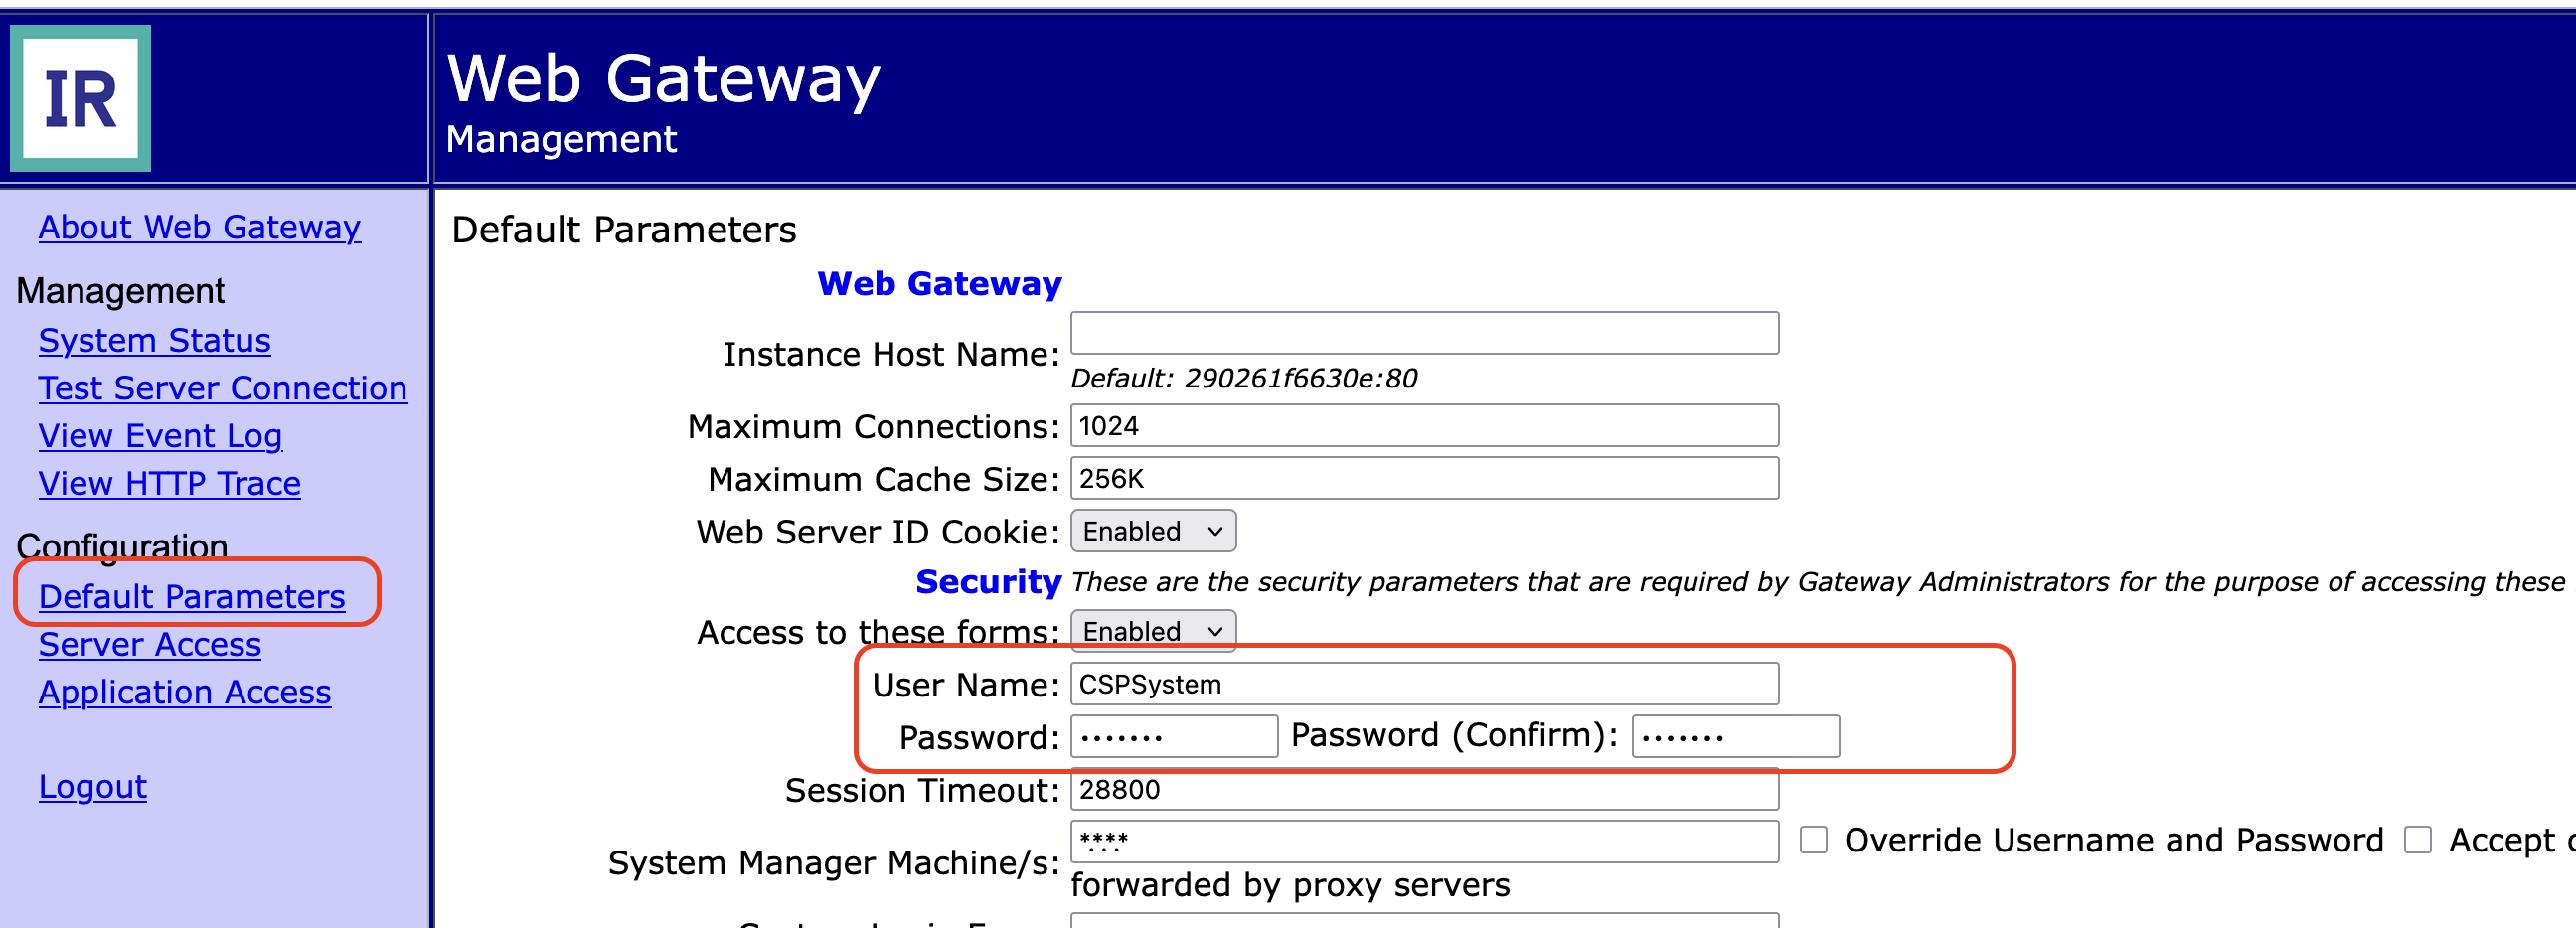
This ensures that the Web Gateway UI itself uses the updated credentials.
Step 3: Update Web Gateway Configuration File
After changing passwords through the Web Gateway Management Portal in Step 2.1, the Web Gateway has encrypted the new passwords in its internal CSP.ini file. You need to copy these encrypted passwords to your local configuration file.
Important: The Web Gateway encrypts passwords using DPAPI. You must retrieve the encrypted passwords from inside the container rather than entering plaintext passwords.
1. Extract passwords from the container:
# Copy the passwords from the container's CSP.ini file
$ docker exec webgateway cat /opt/webgateway/bin/CSP.ini | grep -i "password"
You'll see output with both encrypted and plaintext passwords:
Password=ENC:AQAAANCMnd8BFdERjHoAwE/Cl+sBAAAA...
Password=]]]...
2. Update your local webgateway/CSP.ini file:
Copy the password values from the container's output and update the corresponding entries in your local ./webgateway/CSP.ini file.
[SYSTEM]
IRISCONNECT_LIBRARY_PATH=/opt/webgateway/bin
System_Manager=*.*.*.*
Default_Server=LOCAL
Username=CSPSystem
Password=ENC:AQAAANCMnd8BFdERjHoAwE/Cl+sBAAAA...  # Encrypted password from [SYSTEM] section

[LOCAL]
Ip_Address=iris
TCP_Port=1972
Username=CSPSystem
Password=]]]...  # Password from [LOCAL] section
3. Restart the Web Gateway:
$ docker-compose restart webgateway
After restart, verify that the Web Gateway can still connect to IRIS by accessing the Management Portal at http://localhost:8080/csp/sys/UtilHome.csp.
Understanding IRIS Security Architecture
IRIS implements a multi-layered security model built on three core components:
Resources represent protected assets (databases, services, applications). Each resource has a name with standard prefixes like %DB_* for databases, %Service_* for services, and %Admin_* for administrative functions.
Privileges define permissions on resources. The three privilege types are READ, WRITE, and USE, controlling different levels of access to protected assets.
Roles are named collections of privileges. Instead of granting permissions directly to users, you assign roles to users, and roles contain the necessary privileges. This Role-Based Access Control (RBAC) approach simplifies permission management and ensures consistency.
Default Users and Password Management
When you first install InterSystems IRIS, several predefined system accounts are created. Understanding and securing these accounts is critical for system security.
Predefined User Accounts
InterSystems IRIS includes the following default accounts:
| Username | Purpose | Default Password | Security Risk |
|---|---|---|---|
| _SYSTEM | Primary system administrator account | SYS | Critical - Must be changed immediately |
| Admin | Secondary administrative account | SYS | High - Should be disabled or secured |
| CSPSystem | Internal CSP/web application account | SYS | High - Used by web applications |
| SuperUser | Elevated privilege account | SYS | High - Should be disabled if not needed |
| UnknownUser | Default unauthenticated user | N/A | Medium - Has minimal privileges |
Critical Security Note: The default password "SYS" is a well-known security vulnerability. InterSystems strongly recommends changing all default passwords immediately after installation.
Changing Default Passwords
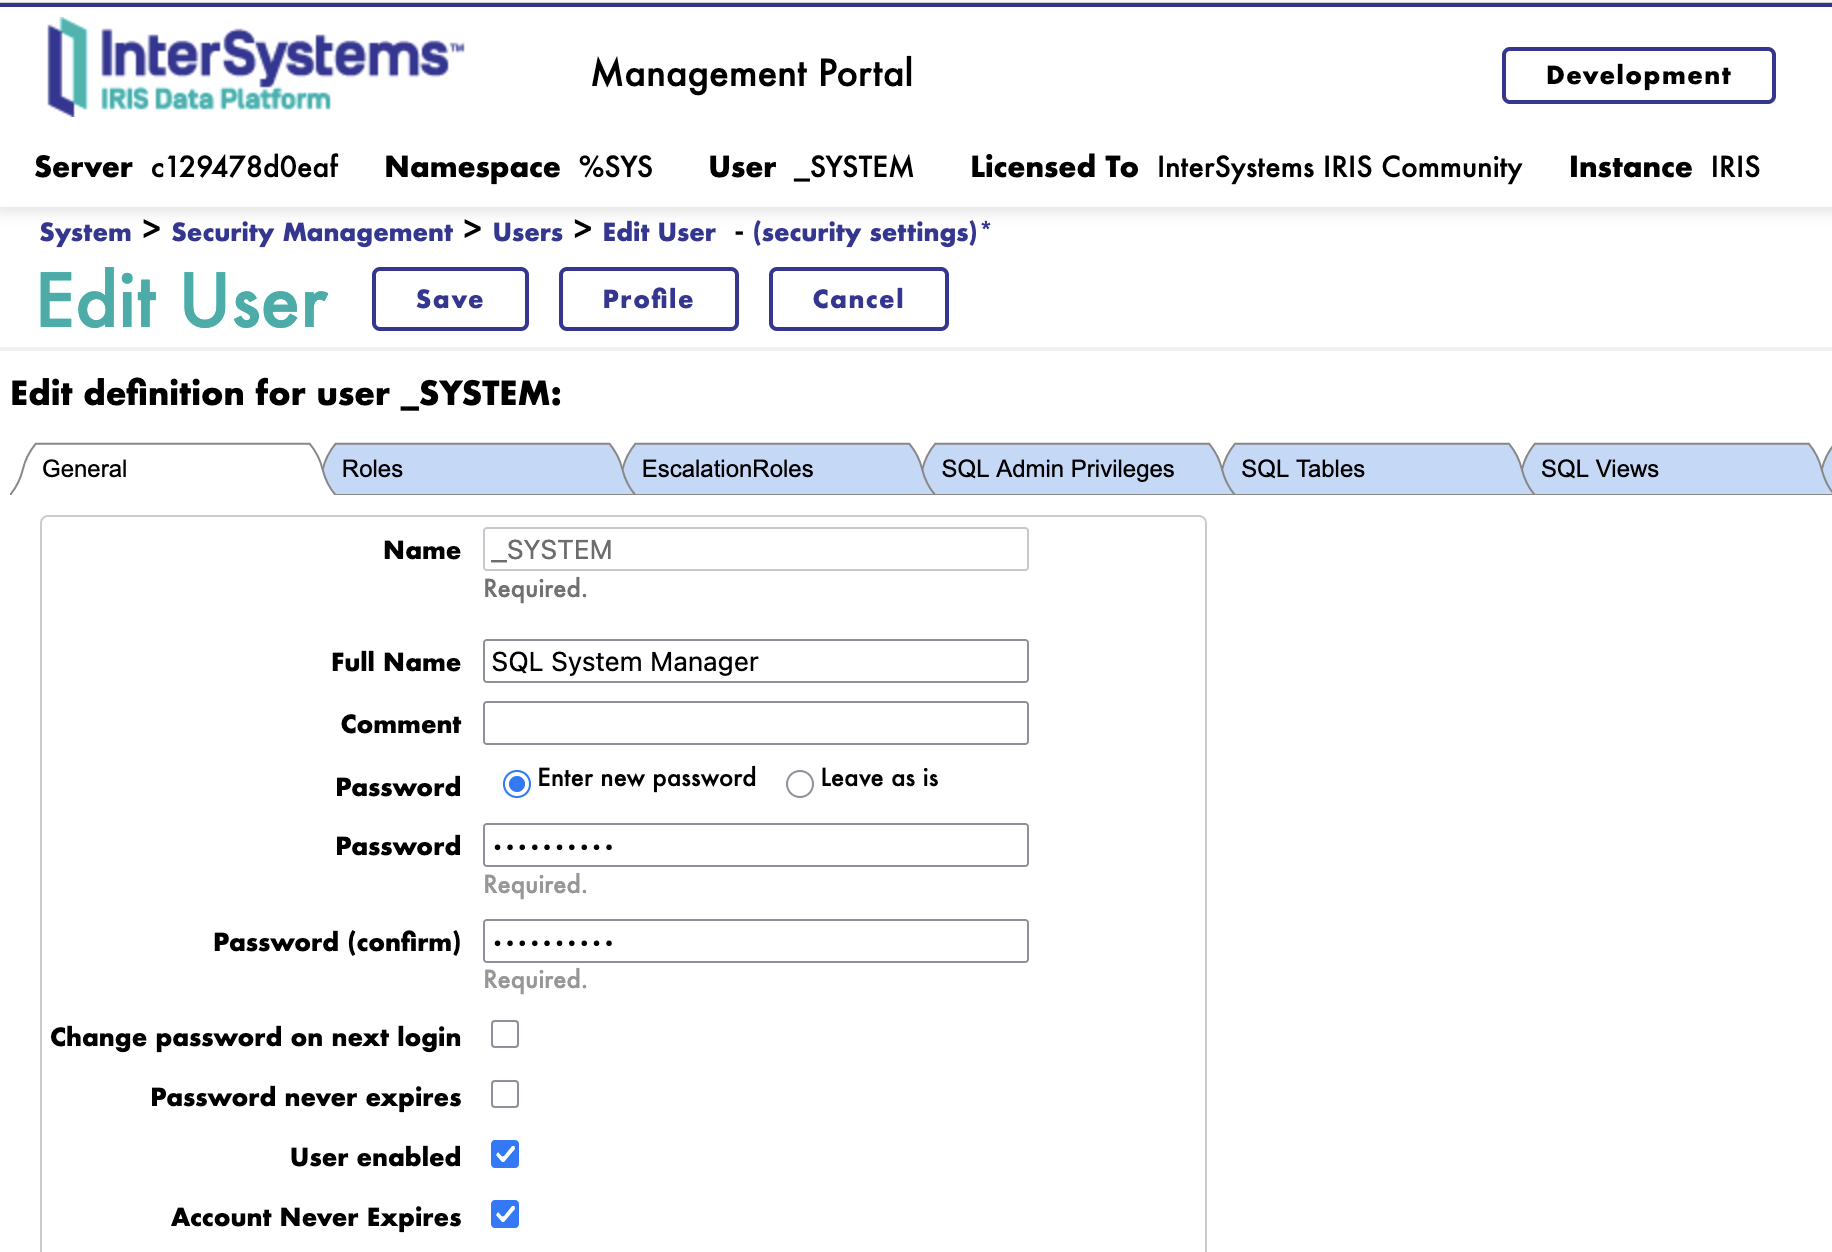
Method 1: Using the Management Portal
- Navigate to System Administration > Security > Users
- Click on the username (e.g., _SYSTEM)
- Click Edit
- Enter a new password in the Password field
- Confirm the password
- Click Save
Method 2: Using Terminal (^SECURITY Utility)
Access the IRIS terminal and use the interactive ^SECURITY utility:
$ docker exec -it iris iris session iris -U %SYS
%SYS> do ^SECURITY

1) User setup
2) Role setup
...

Select option: 1

1) Create user
2) Edit user
...

Username to edit? _SYSTEM
Full name? SQL System Manager =>
Comment?
Password? ***** =>
...
The ^SECURITY routine provides an interactive menu-driven interface for managing users, roles, and resources.
Authentication: Verifying User Identity
IRIS supports multiple authentication methods to verify user identity:
- Password Authentication - Traditional username/password verification
- Delegated Authentication - Custom authentication logic using ObjectScript
- LDAP/Active Directory - Corporate directory integration
- OAuth 2.0 & OpenID Connect - Modern federated authentication for single sign-on
- Kerberos - Network authentication protocol
For web applications and REST services, authentication is configured through application definitions in the Management Portal. Navigate to System Administration > Security > Applications > Web Applications to configure authentication methods for each application endpoint.
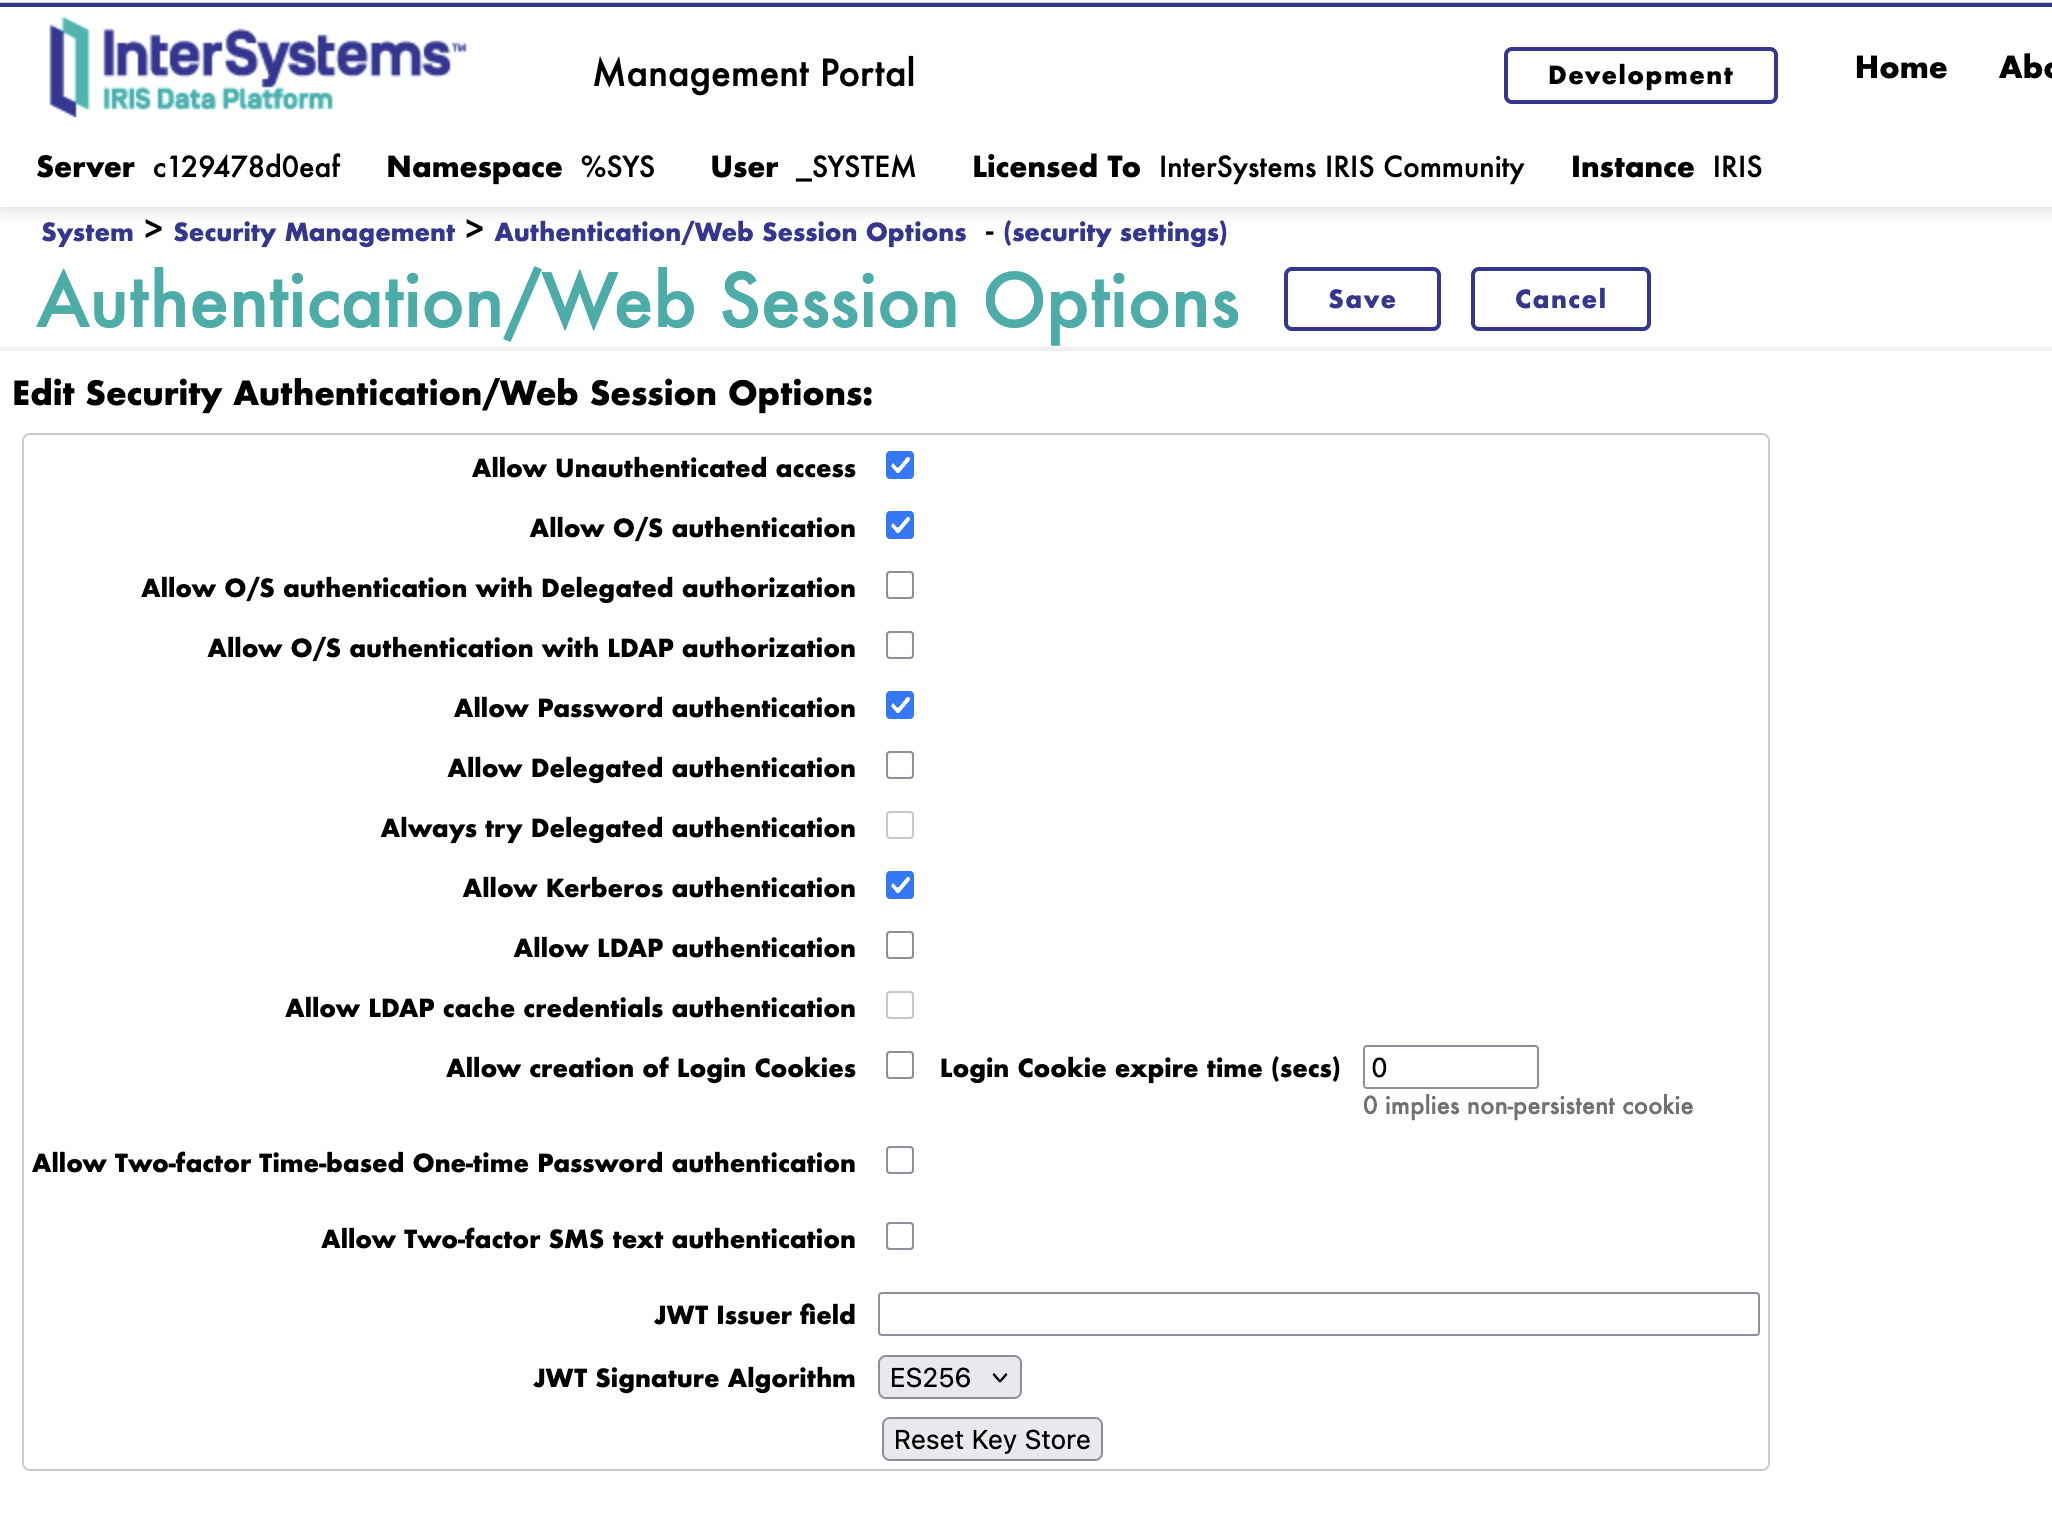
Enabling Authentication Methods
By default, web applications show only Unauthenticated, Password, and Kerberos as available authentication methods. To enable LDAP or OAuth, you must enable them at the system level first (System Administration > Security > System Security > Authentication/Web Session Options):
Enabling LDAP Authentication
Navigate to System Administration > Security > System Security > LDAP/Kerberos Configurations and create a new LDAP configuration:
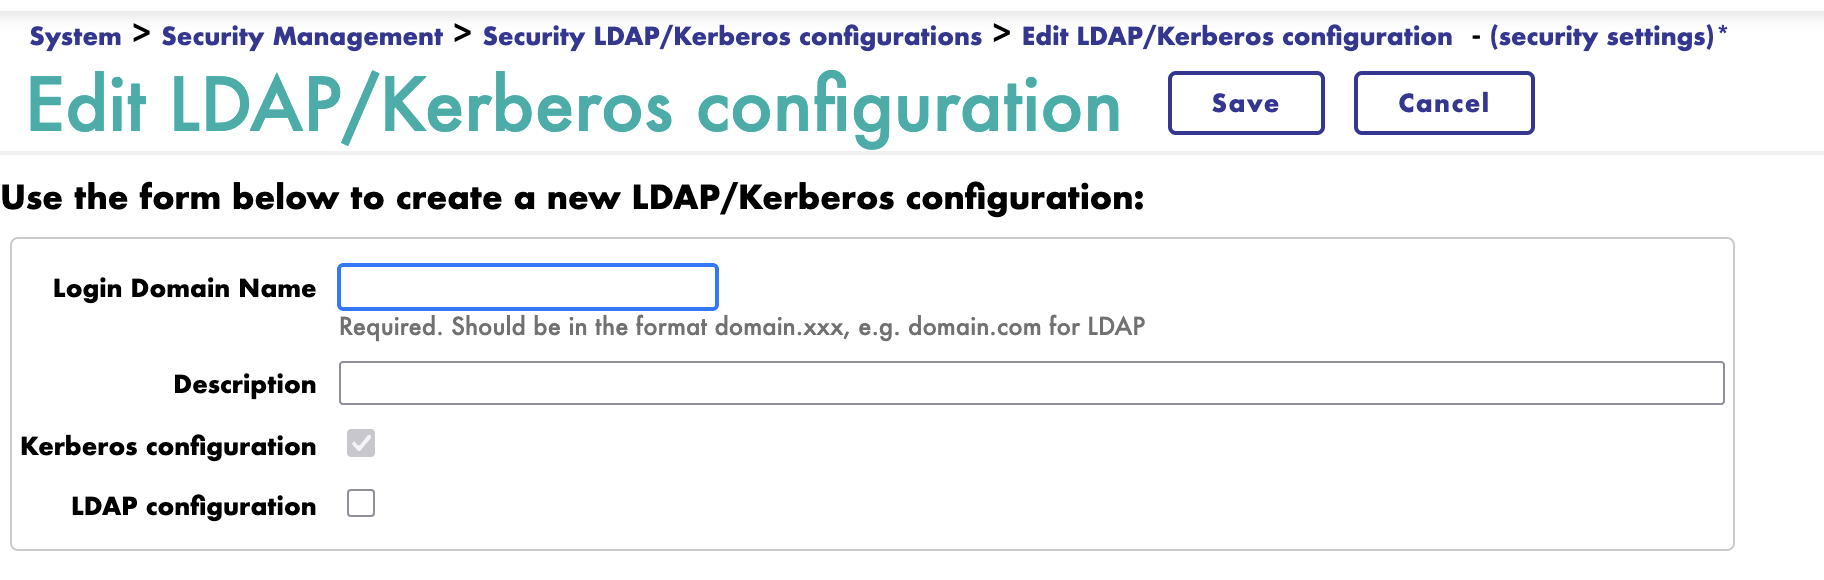
Test the configuration to ensure connectivity.
Enabling OAuth 2.0 Authentication
Navigate to System Administration > Security > OAuth 2.0 > Client and create a client configuration there.
Practical Example: Basic Password Authentication
This example demonstrates how to create a REST service with password authentication, create a user, and test the authentication flow.
Step 1: Create a User for the Application
Create a new user webuser with access to the USER database:
$ docker exec -it iris iris session iris -U %SYS
%SYS> do ^SECURITY

1) User setup
Select option: 1

1) Create user
Select option: 1

Username: webuser
Full name: Web Application User
Password: ********
Confirm password: ********

# Do not add roles on this stage, use default values everywhere

Username webuser created
Step 2: Create the REST Service Class
On your local machine, create a file SecureService.cls with the following content:
Class MyApp.API.SecureService Extends %CSP.REST
{

XData UrlMap [ XMLNamespace = "http://www.intersystems.com/urlmap" ]
{
<Routes>
  <Route Url="/list" Method="GET" Call="GetUsers" />
</Routes>
}

ClassMethod GetUsers() As %Status
{
    // Get current user and roles (available in any namespace)
    Set currentUser = $USERNAME
    Set currentRoles = $ROLES

    // Log authentication info to console
    Do ##class(%SYS.System).WriteToConsoleLog("REST API accessed by user: "_currentUser, 0, 0)
    Do ##class(%SYS.System).WriteToConsoleLog("User roles: "_currentRoles, 0, 0)

    // Check user has READ permission on USER database
    If '$SYSTEM.Security.Check("%DB_USER", "READ") {
        Set %response.Status = "403 Forbidden"
        Do ##class(%SYS.System).WriteToConsoleLog("Access denied for user: "_currentUser, 0, 0)
        Return $$$ERROR($$$AccessDenied)
    }

    // Return current authenticated user info
    // Note: We use $USERNAME and $ROLES instead of querying Security.Users
    // because Security.Users table is only accessible in %SYS namespace
    // and regular users cannot switch to %SYS namespace
    Set userInfo = {}
    Set userInfo.username = currentUser
    Set userInfo.roles = currentRoles

    Write userInfo.%ToJSON()
    Return $$$OK
}

}
Step 3: Copy and Import the Class
Copy the file into the container and import it:
# Copy the class file to the container
$ docker cp SecureService.cls iris:/tmp/

# Import the class
$ docker exec -it iris iris session iris -U USER
USER> do $system.OBJ.Load("/tmp/SecureService.cls", "ck")

Load started on 11/30/2025 12:23:59
Loading file /tmp/SecureService.cls as udl
Compiling class MyApp.API.SecureService
Compiling routine MyApp.API.SecureService.1
Load finished successfully.
Step 4: Create Web Application Using Console
Create the web application programmatically using the terminal. Authentication flags are defined in the AutheEnabled property documentation.
Understanding Authentication Flags (Bit Logic)
Authentication methods are represented as bit flags. Each method corresponds to a specific bit position, and the value is calculated as 2^(bit position):
| Authentication Method | Bit Position | Calculated Value (2^n) | Description |
|---|---|---|---|
| Kerberos (K5API) | Bit 2 | 4 | Kerberos authentication |
| Password | Bit 5 | 32 | HTTP Basic Authentication |
| Unauthenticated | Bit 6 | 64 | No authentication required |
To enable multiple methods, add their calculated values:
- Password only:
32 - Unauthenticated + Password:
64 + 32 = 96 - Password + Kerberos:
32 + 4 = 36
Example: Basic Authentication (Password)
For this example, we'll enable Password authentication (Bit 5 = 32):
USER> zn "%SYS"
%SYS> set properties("AutheEnabled") = 32  ; Password (Basic Auth) only
%SYS> set properties("NameSpace") = "USER"
%SYS> set properties("DispatchClass") = "MyApp.API.SecureService"
%SYS> set properties("MatchRoles") = ":%DB_USER"
%SYS> set sc = ##class(Security.Applications).Create("/users", .properties)
%SYS> write sc
1

%SYS> halt
This creates the /users web application with:
- Namespace: USER
- Dispatch Class: MyApp.API.SecureService
- Authentication: Password (Basic Auth) only
- Resource: %DB_USER
Important Note about MatchRoles:
The MatchRoles = ":%DB_USER" setting grants the %DB_USER role temporarily to authenticated users when they access this web application. This means:
- The
webuseraccount has 0 permanent roles assigned - When accessing
/usersendpoint, the web application grants%DB_USERrole for that request - The
$ROLESvariable shows currently active roles (including temporary ones from MatchRoles) - After the request completes, the temporary role is removed
This is a powerful IRIS security feature that allows different web applications to grant different permissions to the same user, providing fine-grained access control based on application context.
Step 5: Test Authentication
Test the REST endpoint with and without authentication:
# Without authentication - should fail
$ curl -XGET -I http://localhost:8080/users/list
HTTP/1.1 401 Unauthorized
...

# With correct authentication - should succeed
$ curl -XGET -u webuser:YourPassword http://localhost:8080/users/list

# Response:
# {"username":"webuser","roles":"%DB_USER"}
Step 6: Check IRIS Container Logs
After testing the endpoint, you can view the console logs to see the authentication information logged by the REST service:
# View recent IRIS logs
$ docker logs iris --tail 50

# Or follow logs in real-time
$ docker logs iris -f

# Search for specific log entries
$ docker logs iris 2>&1 | grep -E "REST API accessed | User"
You should see output similar to:
12/01/25-07:51:54:646 (1367) 0 [Utility.Event] REST API accessed by user: webuser
12/01/25-07:51:54:647 (1367) 0 [Utility.Event] User roles: %DB_USER
Note: The Security.Users class is only available in the %SYS namespace. In our REST service running in the USER namespace, we use the $USERNAME and $ROLES system variables instead, which are available in all namespaces.
Understanding the Security Flow:
- The web application
/usersrequires Password authentication - User
webusermust provide valid credentials - The
$SYSTEM.Security.Check()function verifies the user has READ permission on%DB_USER - If authentication or authorization fails, the request is rejected with 401 or 403
This example demonstrates the complete authentication and authorization flow in IRIS REST services.
Demonstrating SQL level access
Step 1: Create a Cars Table
Use the SQL shell to create a simple Cars table in the USER namespace:
$ docker exec -it iris iris session iris -U USER
USER> do $system.SQL.Shell()

[SQL]USER>> CREATE TABLE Cars (ID INT PRIMARY KEY, Make VARCHAR(50), Model VARCHAR(50), Year INT)

[SQL]USER>> INSERT INTO Cars (ID, Make, Model, Year) VALUES (1, 'Toyota', 'Camry', 2023)
[SQL]USER>> INSERT INTO Cars (ID, Make, Model, Year) VALUES (2, 'Honda', 'Accord', 2024)
[SQL]USER>> INSERT INTO Cars (ID, Make, Model, Year) VALUES (3, 'Ford', 'Mustang', 2023)

[SQL]USER>> SELECT * FROM Cars
| ID | Make | Model | Year |
| -- | -- | -- | -- |
| 1 | Toyota | Camry | 2023 |
| 2 | Honda | Accord | 2024 |
| 3 | Ford | Mustang | 2023 |

[SQL]USER>> quit
USER> halt
Step 2: Add Cars Endpoint to REST Service
Update the SecureService.cls file to add a new /cars endpoint (keeping the existing /list endpoint):
Class MyApp.API.SecureService Extends %CSP.REST
{

XData UrlMap [ XMLNamespace = "http://www.intersystems.com/urlmap" ]
{
<Routes>
  <Route Url="/list" Method="GET" Call="GetUsers" />
  <Route Url="/cars" Method="GET" Call="GetCars" />
</Routes>
}

ClassMethod GetUsers() As %Status
{
    // Get current user and roles (available in any namespace)
    Set currentUser = $USERNAME
    Set currentRoles = $ROLES

    // Log authentication info to console
    Do ##class(%SYS.System).WriteToConsoleLog("REST API accessed by user: "_currentUser, 0, 0)
    Do ##class(%SYS.System).WriteToConsoleLog("User roles: "_currentRoles, 0, 0)

    // Check user has READ permission on USER database
    If '$SYSTEM.Security.Check("%DB_USER", "READ") {
        Set %response.Status = "403 Forbidden"
        Do ##class(%SYS.System).WriteToConsoleLog("Access denied for user: "_currentUser, 0, 0)
        Return $$$ERROR($$$AccessDenied)
    }

    // Return current authenticated user info
    // Note: We use $USERNAME and $ROLES instead of querying Security.Users
    // because Security.Users table is only accessible in %SYS namespace
    // and regular users cannot switch to %SYS namespace
    Set userInfo = {}
    Set userInfo.username = currentUser
    Set userInfo.roles = currentRoles

    Write userInfo.%ToJSON()
    Return $$$OK
}

ClassMethod GetCars() As %Status
{
    // Get current user
    Set currentUser = $USERNAME

    // Log access attempt
    Do ##class(%SYS.System).WriteToConsoleLog("Cars endpoint accessed by: "_currentUser, 0, 0)

    // Check if user has READ permission
    If '$SYSTEM.Security.Check("%DB_USER", "READ") {
        Set %response.Status = "403 Forbidden"
        Return $$$ERROR($$$AccessDenied)
    }

    // Query cars table
    Set cars = []
    Set sql = "SELECT ID, Make, Model, Year FROM SQLUser.Cars"
    Set statement = ##class(%SQL.Statement).%New()
    Do statement.%Prepare(sql)
    Set result = statement.%Execute()

    While result.%Next() {
        Set car = {}
        Set car.id = result.ID
        Set car.make = result.Make
        Set car.model = result.Model
        Set car.year = result.Year
        Do cars.%Push(car)
    }

    Write cars.%ToJSON()
    Return $$$OK
}

}
Step 3: Reimport the Updated Class
$ docker cp SecureService.cls iris:/tmp/
$ docker exec -it iris iris session iris -U USER
USER> do $system.OBJ.Load("/tmp/SecureService.cls", "ck")
Step 4: Test the Cars Endpoint
# Test with webuser (has %DB_USER access via MatchRoles)
$ curl -XGET -u webuser:YourPassword http://localhost:8080/users/cars

# Response:
# []
Important: SQL Permissions are Separate from Database Resource Permissions
Despite having %DB_USER database access, the query returns an empty array []. This is because SQL permissions are independent from database resource permissions. The %DB_USER role grants READ access to the database resource, but does NOT automatically grant SQL SELECT privileges on individual tables.
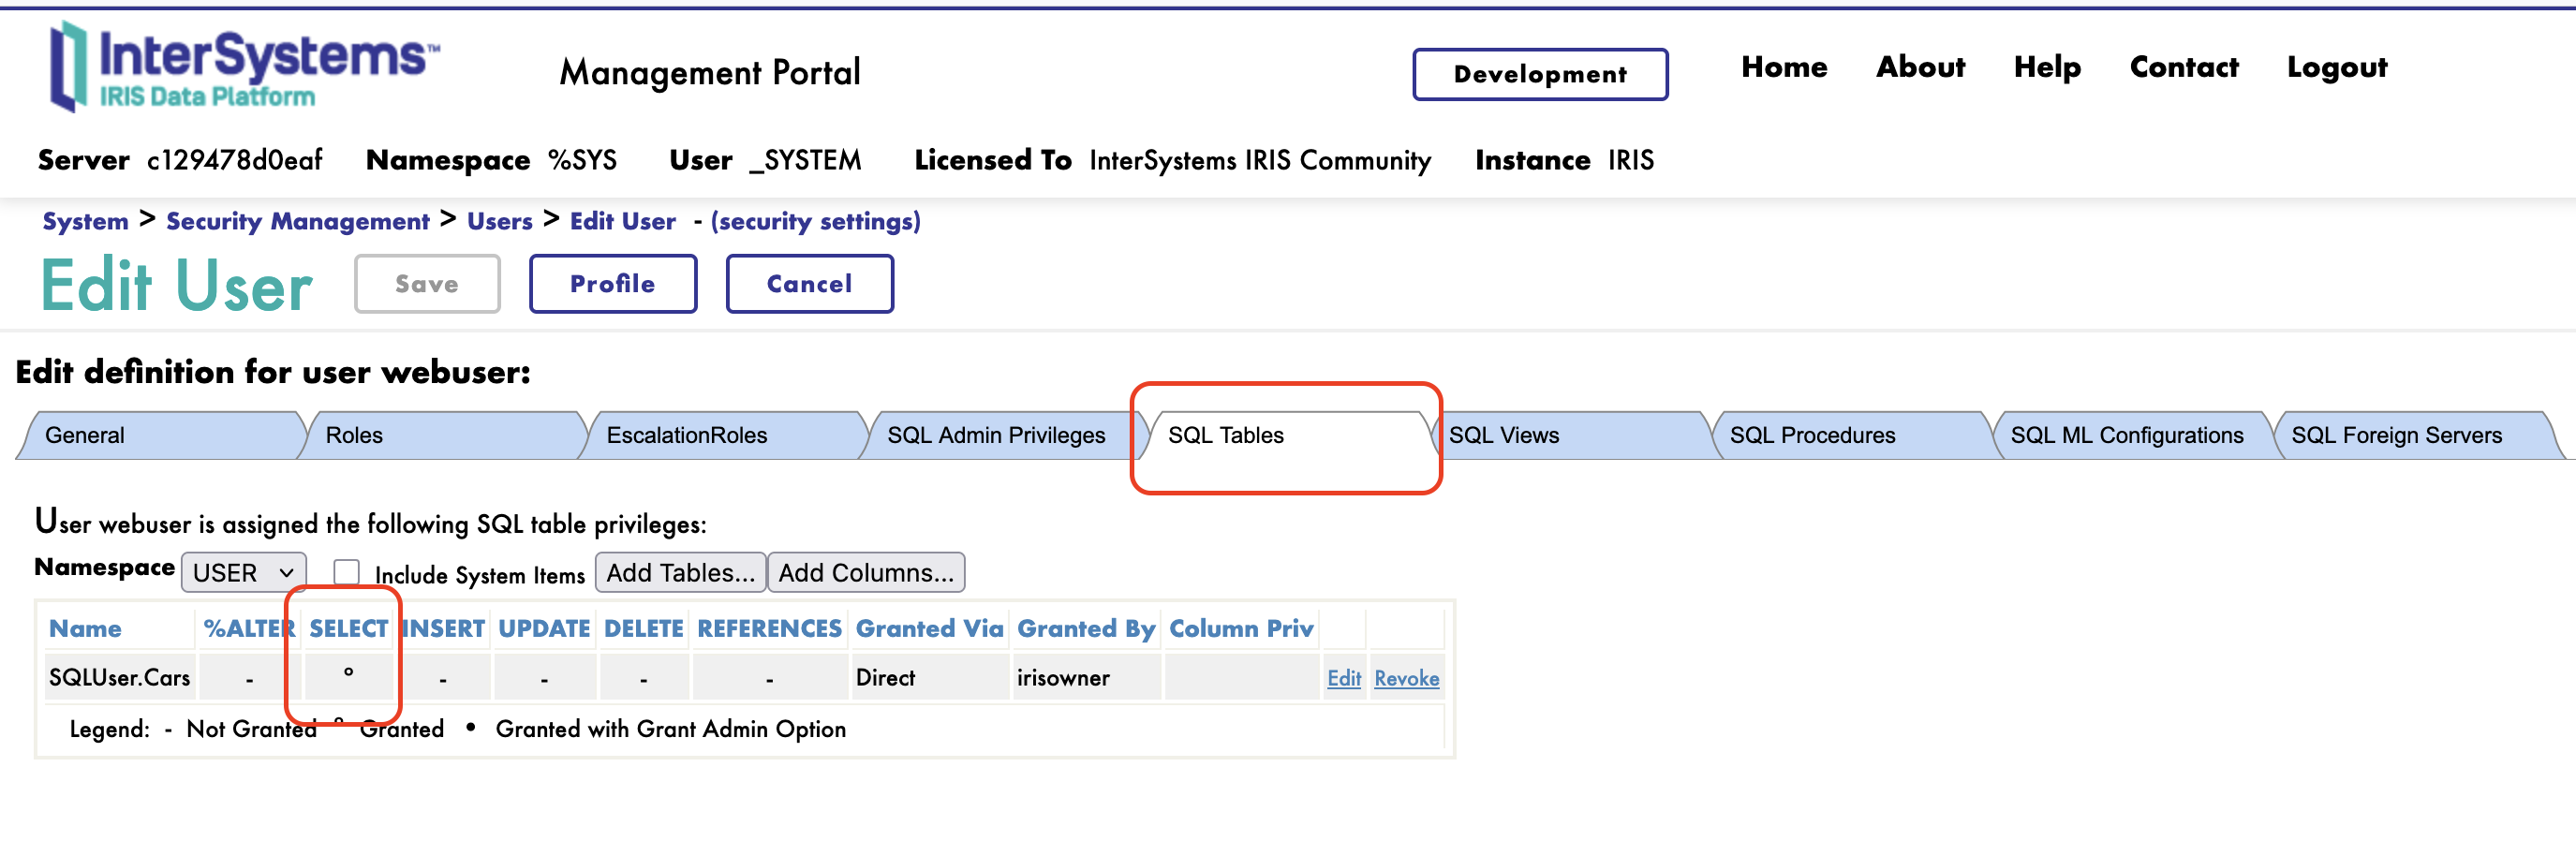
To query the Cars table, you must explicitly grant SQL permissions to the user:
$ docker exec -it iris iris session iris -U USER

USER> do $system.SQL.Shell()
[SQL]USER>>GRANT SELECT ON Cars TO webuser
[SQL]USER>>quit
USER> halt
You could also check SQL granted permissions in Management Portal:
Now test again:
$ curl -XGET -u webuser:YourPassword http://localhost:8080/users/cars

# Response:
#[{"id":1,"make":"Toyota","model":"Camry","year":2023},{"id":2,"make":"Honda","model":"Accord","year":2024},{"id":3,"make":"Ford","model":"Mustang","year":2023}]
This demonstrates how RBAC works in IRIS: users need BOTH database resource access (via roles like %DB_USER) AND SQL table privileges (via GRANT statements) to query tables. The web application's MatchRoles setting grants the %DB_USER role temporarily, but SQL permissions must be configured separately.
SQL privileges (SELECT, INSERT, UPDATE, DELETE) work independently from database resource permissions. For complete protection, users typically need both database resource access and SQL privileges.
Encryption and Data Protection
TLS/SSL for Data in Transit
IRIS supports TLS encryption to protect data transmitted over the network. An SSL/TLS Configuration in IRIS is a named set of security settings that specify certificates, private keys, and encryption parameters.
Understanding SSL/TLS Configurations
There are two types of SSL/TLS configurations:
Server Configurations - Used when IRIS acts as a server accepting encrypted connections:
- Required components: Server certificate (.crt), private key (.key), optionally CA certificate
- Use cases: Securing the Superserver for ODBC/JDBC clients, Mirror connections, Web Services
- Purpose: Authenticate the IRIS instance to clients and encrypt the connection
Client Configurations - Used when IRIS connects to external services:
- Required components: CA certificate (to verify the server), optionally client certificate for mutual TLS
- Use cases: Calling external HTTPS APIs, connecting to external databases
- Purpose: Verify the remote server's identity and optionally authenticate IRIS to the remote server
Why Create a Minimal Configuration?
You can create an SSL/TLS configuration with just a name for simple outbound HTTPS calls that rely on the operating system's default certificate store. However, for production use, you should specify:
- CA Certificate File - To verify the remote server's identity
- Certificate File - For mutual TLS authentication (when the remote server requires it)
- Private Key File - Paired with the certificate file
Common TLS Use Cases
Web Gateway (HTTPS) - Configure TLS certificates in Apache/NGINX running in the Web Gateway container. The Web Gateway handles HTTPS encryption for all HTTP traffic to IRIS web applications.
Superserver (Database Connections) - Encrypt connections from client applications (Java, .NET, Python, ODBC/JDBC):
- Create a server SSL/TLS configuration in System Administration > Security > SSL/TLS Configurations
- Specify server certificate and private key files
- Assign the configuration to %SuperServer in System Administration > Configuration > Connectivity > SuperServer Settings
Mirror Connections - Enable TLS for high-availability replication between primary and backup IRIS instances using server SSL configurations.
Database Encryption
IRIS supports transparent database encryption for data at rest. When enabled for a database, all data written to disk is automatically encrypted without requiring application code changes.
Configuring Database Encryption
To use database encryption, navigate to System Administration > Encryption in the Management Portal:
Step 1: Create New Encryption Key File
- Select Create New Encryption Key File
- Enter a key file path (e.g.,
/durable/encryption.key) - Choose security level (typically 256-bit)
- Set administrator username and password
- Click Save
Step 2: Activate the Encryption Key
- Select Database Encryption
- Click Activate Key
- Enter the key file path, administrator name, and password you created in Step 1
- Click Activate
Step 3: Configure Startup Settings (optional)
- In Database Encryption, click Configure Startup Settings
- Set Key Activation at Startup to Interactive (recommended for security)
- Optionally enable encryption for some system databases and journals
- Click Save
Step 4: Create New Encrypted Databases
When creating a new database through System Administration > Configuration > System Configuration > Local Databases, set Encrypt database to Yes.
Encrypting an Existing Database
To encrypt a database that already contains data, use the ^EncryptionKey utility:
Important: Back up your database first! The encryption process modifies data in-place, and interruptions can make the database unusable.
# Access IRIS terminal in %SYS namespace
$ docker exec -it iris iris session iris -U %SYS

# Run the encryption utility
%SYS> do ^EncryptionKey

# Select the following options:
# 3 - Database encryption
# 7 - Modify encrypted status of existing database
# Select the database you want to encrypt from the list
# Select key for encryption
# Confirm encryption

# The utility will encrypt the database in-place
# This process may take time depending on database size
Step-by-step in the utility:
- Run
do ^EncryptionKeyin the %SYS namespace - Select option 3 (Database encryption)
- Select option 7 (Modify encrypted status of existing database)
- Choose the database from the list of available databases
- Confirm the operation
- Wait for the encryption process to complete
Critical Warnings:
- Always back up the database first - Data loss can occur if the process is interrupted
- Ensure sufficient disk space - Encryption uses on-disk space for operations
- The database will be unavailable during encryption
- The process cannot be interrupted - Partial encryption renders the database unusable
Working with the Management Portal
The Management Portal provides centralized security management. Access it through System Administration > Security:
Users - Create and manage user accounts, set passwords, enable/disable accounts, and assign roles. Each user can be configured with different authentication types (Password, Delegated, LDAP, Kerberos).
Roles - Define custom roles and assign resource privileges. Create roles like "AppDeveloper" or "DataAnalyst" with specific permissions, then assign these roles to multiple users.
Resources - View and create resources that protect databases, services, and system functions. System resources use prefixes like %DB_*, %Service_*, and %Admin_*.
Applications > Web Applications - Configure authentication and authorization for REST services, CSP applications, and SOAP web services. Each application has a URL path, authentication method, and associated resource for access control.
SSL/TLS Configurations - Manage TLS certificates and create encryption configurations for different IRIS components (Web Gateway, Superserver, Mirror connections, client connections).
Auditing - Enable security event logging to track login attempts, permission changes, and sensitive data access. Configure which events to record and set retention policies.
Security Auditing and Monitoring
Security auditing in InterSystems IRIS helps detect unauthorized access attempts, track security-relevant events, and maintain compliance with security policies. The auditing system records events to the audit database for later analysis.
Enabling Auditing
Auditing is enabled by default in InterSystems IRIS. To configure audit events in the Management Portal:
- Navigate to System Administration > Security > Auditing > Configure System Events
- Review the available audit events - many events are enabled by default
- Additional events can be enabled in Configure System Events as needed (e.g., Logout, RoutineChange, SuspendResume)
- Click Save
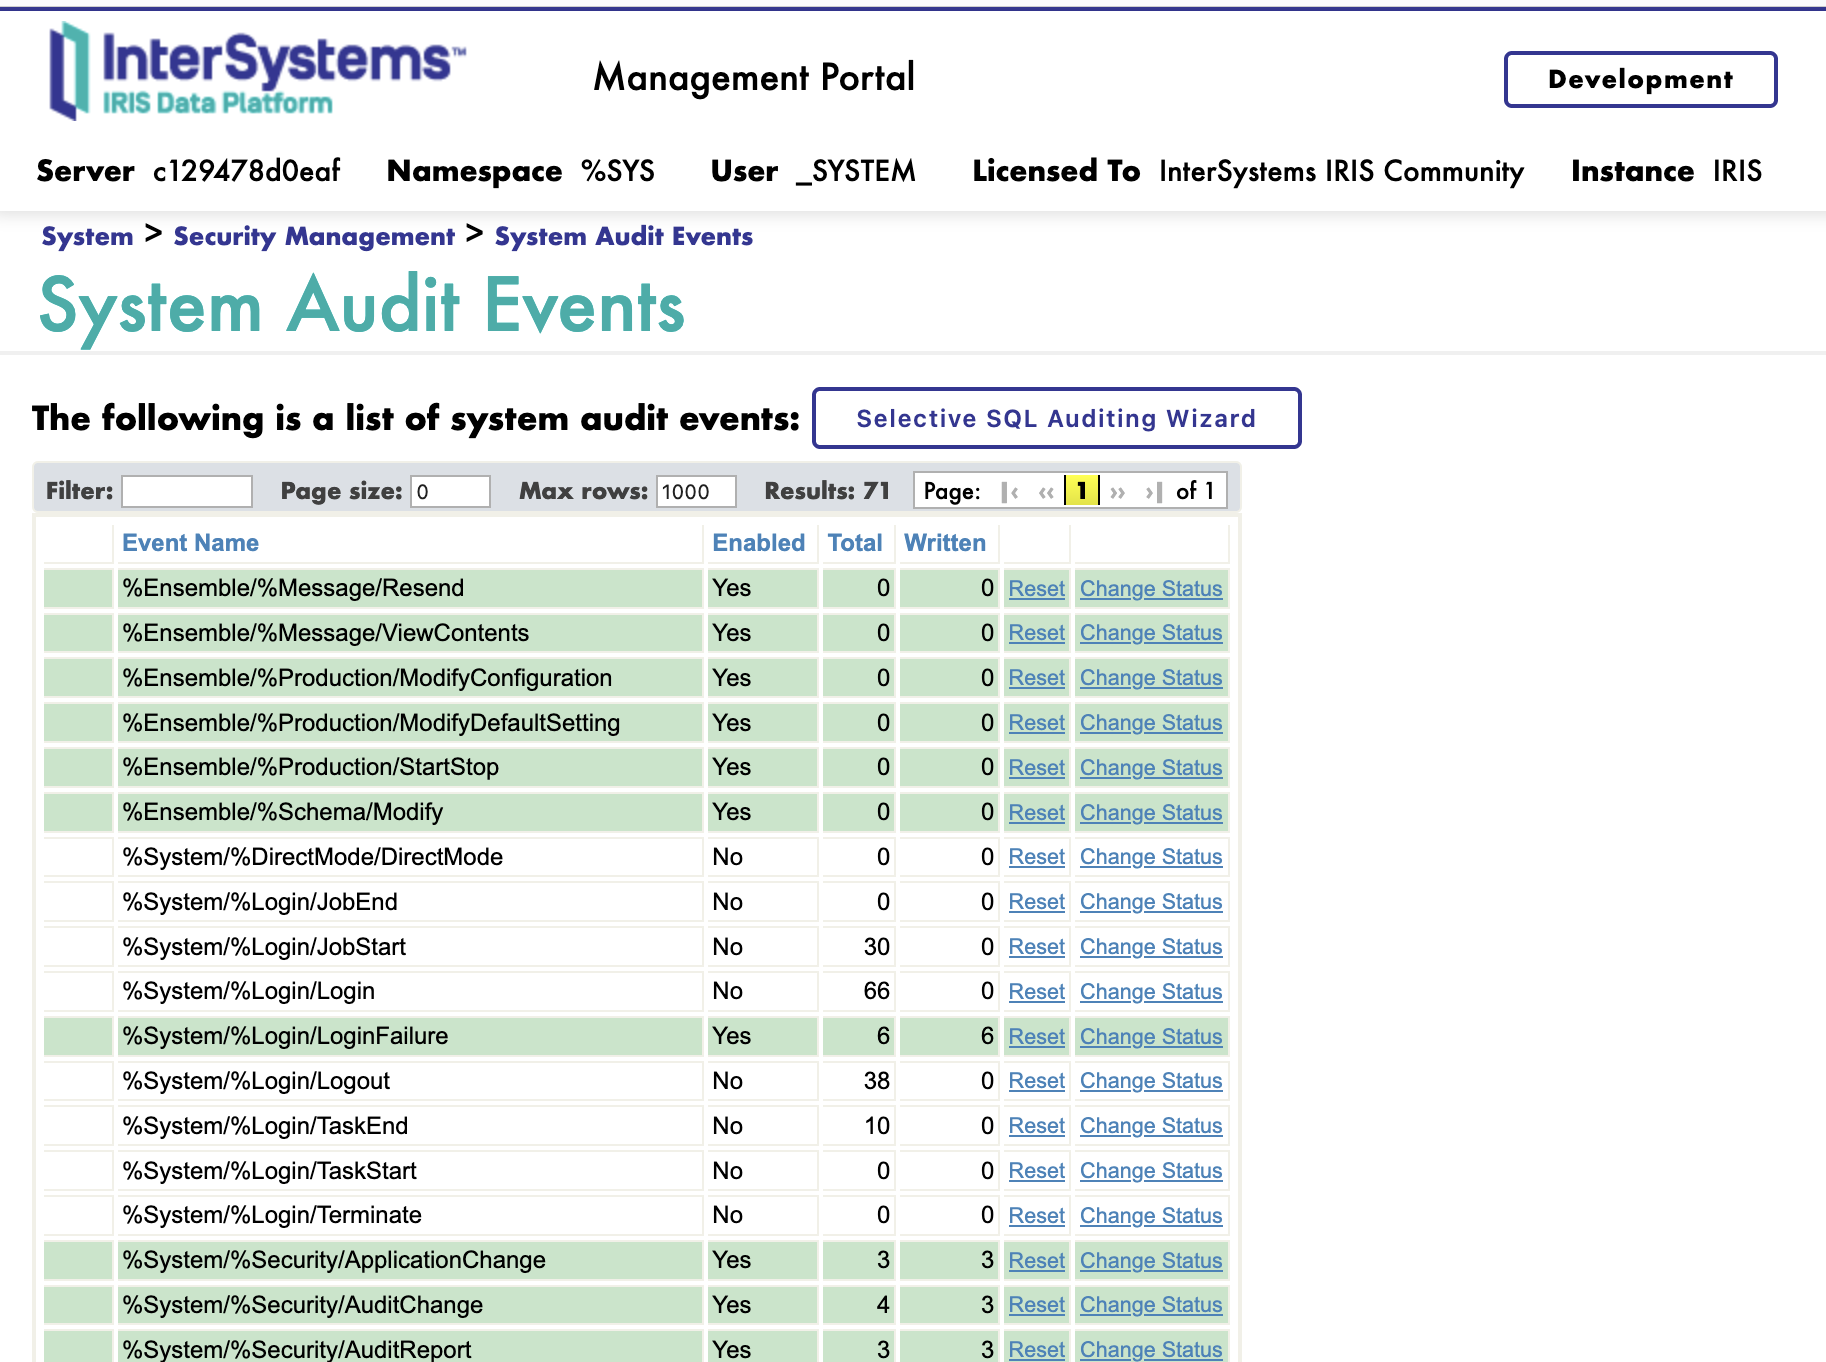
Important Notes:
- The audit database is stored in a dedicated database called IRISAUDIT
- Audit events can be viewed through System Administration > Security > Auditing > View Audit Database
- Default enabled events vary based on installation security level (Minimal, Normal, or Locked-down)
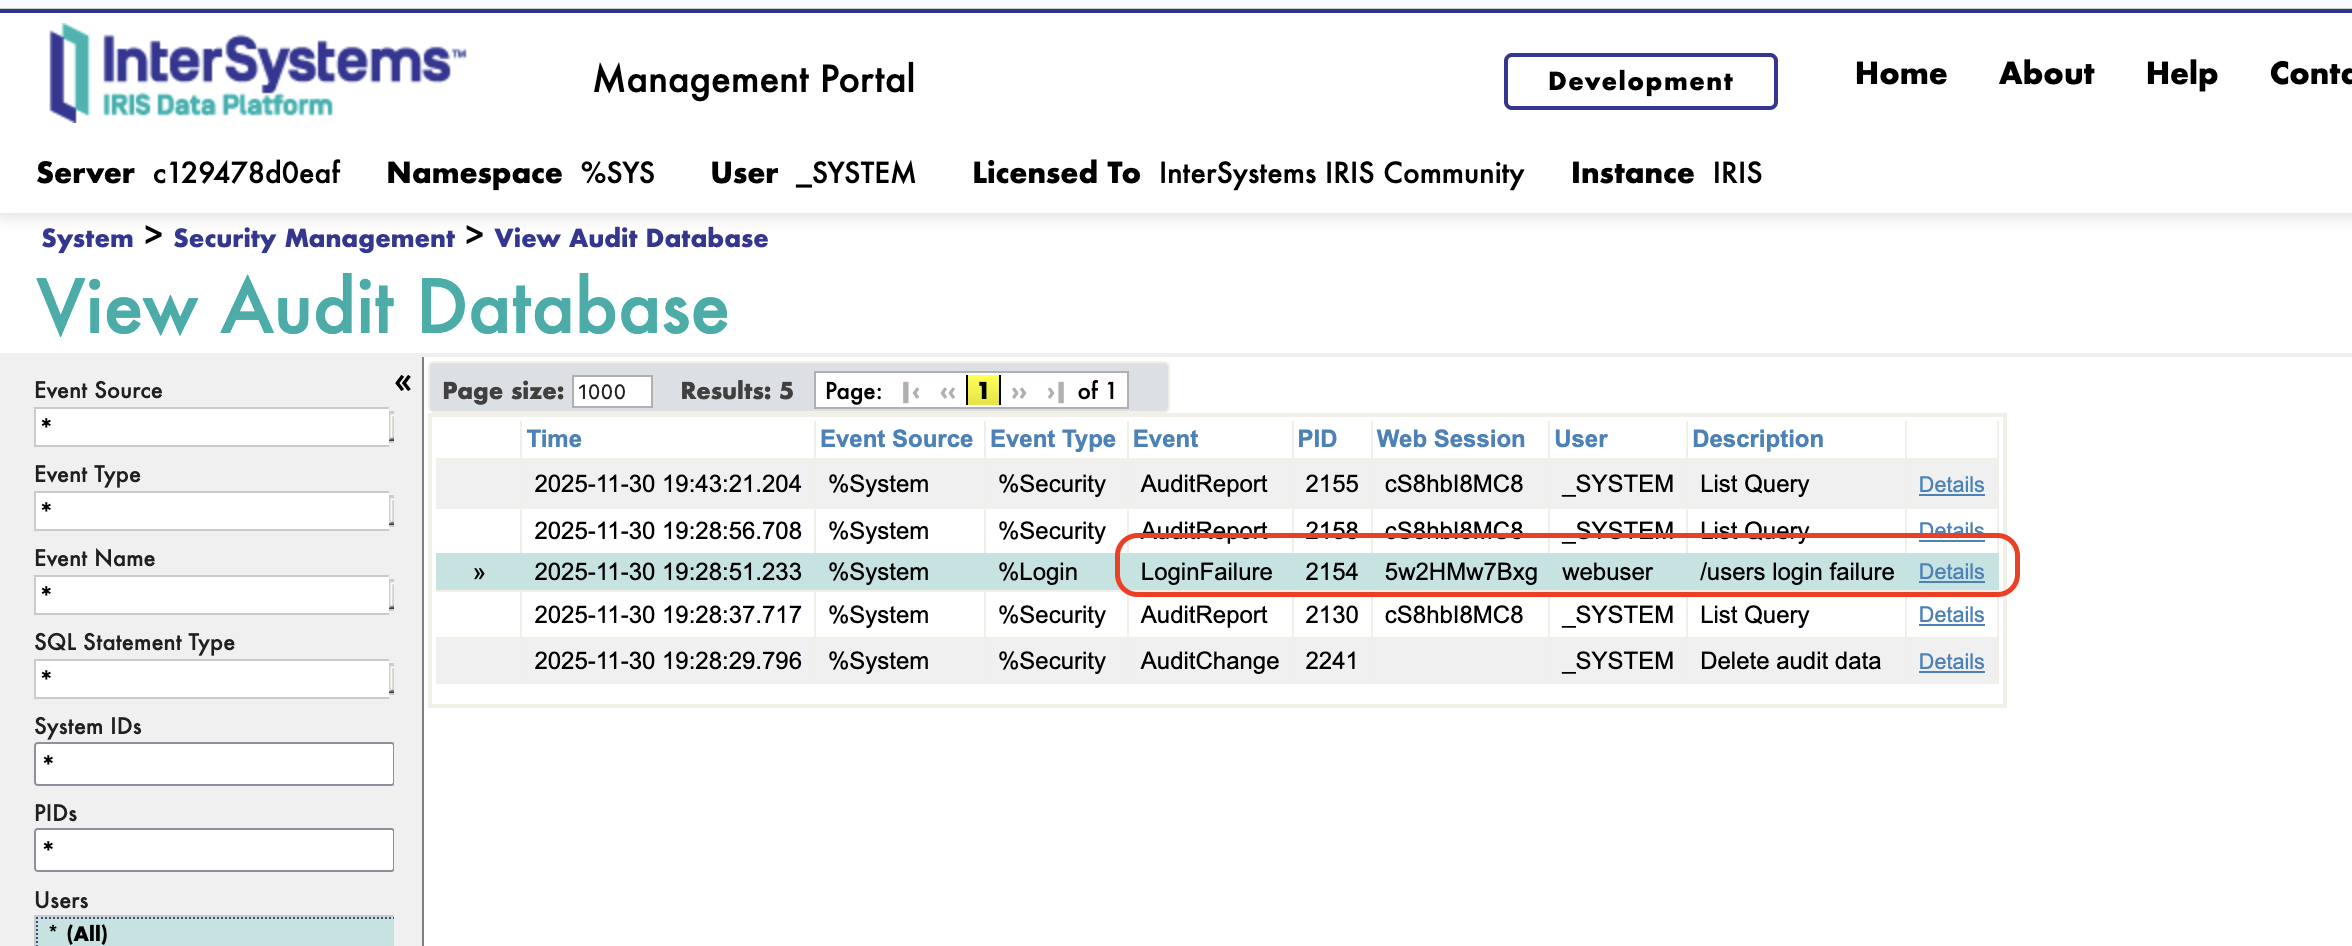
Viewing Audit Events
Audit events such as login failures can be viewed in System Administration > Security > Auditing > View Audit Database:
Conclusion
InterSystems IRIS provides enterprise-grade security through authentication, role-based access control, encryption, and auditing. The key to effective security is understanding how resources, privileges, and roles work together to protect your data and control access.
Key Takeaways:
- Change default passwords immediately - The default "SYS" password is a critical vulnerability. After deploying IRIS containers, immediately change all default passwords through the Management Portal.
- Implement role-based access control - Define resources for your databases and services, create roles with appropriate privileges, and assign roles to users. Never grant permissions directly to users.
- Enable auditing for security events - Monitor
LoginFailureevents to detect unauthorized access attempts. Review audit logs regularly and set up automated alerts for suspicious activity. - Secure all network communications - Configure TLS/SSL for web applications (via Web Gateway), database connections (Superserver), and external API calls. Never transmit credentials or sensitive data over unencrypted connections.
- Follow the principle of least privilege - Grant users only the minimum permissions needed for their tasks. Regularly review and audit role assignments.
When deploying IRIS in production, especially in containers, security configuration should be part of your infrastructure-as-code approach. Use configuration merge files to apply security settings automatically, maintain separate CSP.ini configurations for Web Gateway, and implement monitoring for failed login attempts and other security events.
By implementing these security practices from the start, you can build IRIS applications that protect your organization's data while maintaining compliance with security policies and regulations.