Examples to work with IRIS from Django
Introducing Django
Django is a web framework designed to develop servers and APIs, and deal with databases in a fast, scalable, and secure way. To assure that, Django provides tools not only to create the skeleton of the code but also to update it without worries. It allows developers to see changes almost live, correct mistakes with the debug tool, and treat security with ease.
To understand how Django works, let’s take a look at the image:
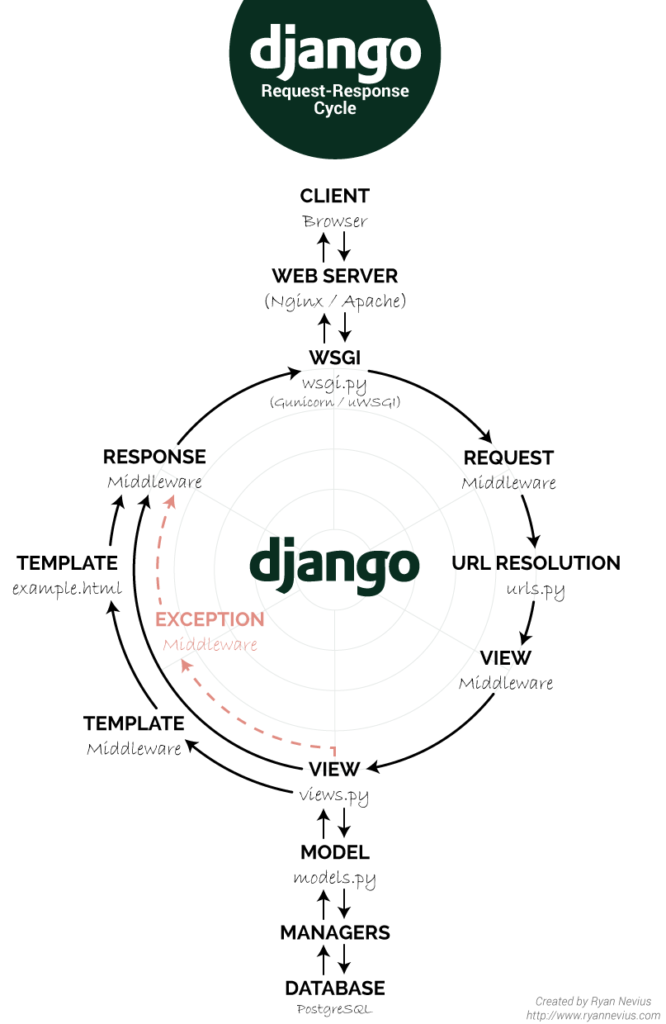
To sum it up, the client sends a request with a URL. This URL addresses a view that should give that request proper treatment by rescuing information from the model fed by the database. Once the treatment is ready, the response gets sent back to the client through a template. Django makes this complex process less problematic.
Introducing Django-iris
Django uses customizable backends to deal with any database the developer might need. MySQL, Postgre, Oracle, and others have already been implemented and are easy to find on GitHub. Django-iris is a backend to adapt the Django framework to IRIS databases, meaning that all features from the InterSystems’ platforms can be used side by side with Django tools.
In practice, if we take a look at the previous illustration, the DATABASE would be IRIS instead of PostgreSQL.
The source code and information about the application and its developers can be found on django-iris by caretdev.
Getting started
I have learned in Innovatium that the best way to get started when it comes to a new code language or tool is to discover how to do a simple CRUD (Create, Read, Update, and Delete) system. After that, it will be easier to understand how it works and to evolve to more complex and specific tasks you might be required to accomplish.
With that in mind, first I will show you how to build the simplest CRUD possible. After making things clear, and when you start feeling familiar with the tool, I will proceed to discuss other examples where Django could help. Finally, if we are lucky, I will be able to convince you to use it.
You can follow this tutorial in the commits history of the GitHub repository, starting with django-admin startproject irisCrud.
Prerequisites
Your machine must have Python, Django, a nice developing tool such as VSCode, and access to an IRIS instance. Here goes a quick guide:
Download VSCode (remember to add Python extensions to help you develop)
Type pip install django on the terminal
Type pip install django-iris on the terminal
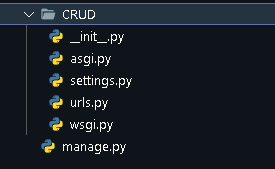
Create a folder for your project, change your terminal directory to this new folder, and type django-admin startproject PROJECTNAME .
You can omit the dot at the end to create a folder inside the current directory with the name PROJECTNAME.
This should create the following files, where you should choose “CRUD” as the PROJECTNAME:
Now you can conduct your first migration and run your server by typing the following commands on the terminal. At that point, you should notice that some more files were created.
python manage.py migrate
python manage.py runserver
If you follow the link http://127.0.0.1:8000/, you will see the default home page for Django projects.
Your next step will be creating the super user with python manage.py createsuperuser. The terminal will request a username, email, and password. Be careful: when you enter the password, you will not see any changes, but remember that the terminal is already reading what you are typing.
Add requirements for django-iris
Create a file in the root folder, name it requirements.txt, and paste the following:
# Django itself
django>=4.0.0
# InterSystems IRIS driver for Django
django-iris==0.2.2
On the terminal, type pip install -r requirements.txt and get your django-iris ready to use in your project.
Now open settings.py and search for the DATABASES configuration. Change it to something similar to the following:
DATABASES = {
    'default': {
        'ENGINE': 'django_iris',
        'NAME': 'USER',
        'USER': '_SYSTEM',
        'PASSWORD': 'SYS',
        'HOST': 'localhost',
        'PORT': 1972,
    }
}
Where
- ENGINE should point to ‘django_iris’;
- NAME should indicate the desired namespace;
- USER and PASSWORD should refer to a user with adequate privileges;
- HOST and PORT should lead to your instance. You can check it on the InterSystems IRIS Server Manager.
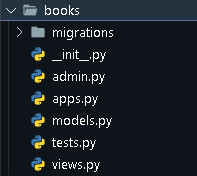
Go back to the terminal and type python manage.py startapp NAMEOFTHEAPP.
You should have a folder similar to the one illustrated below:
Now you can make a model by editing models.py and creating a class with the name and fields required. For example:
class Book(models.Model):
	title  = models.CharField(max_length=50)
	author = models.CharField(max_length=30)
Each field should be specified as a “models” property. You can check all the available fields here. You may also set various options such as how to treat null and blank or create possible alternatives for the field.
To make sure that the program will recognize this new application, go back to settings.py and add the application name to the list of INSTALLED_APPS:
INSTALLED_APPS: [
 …
‘books’,
]
When finished with the previous step, enter python manage.py makemigrations on the terminal to configure future migrations. Check migrations/__pycache__/0001_initial.py to understand better what this command does. Then, enter python manage.py migrate to apply changes.
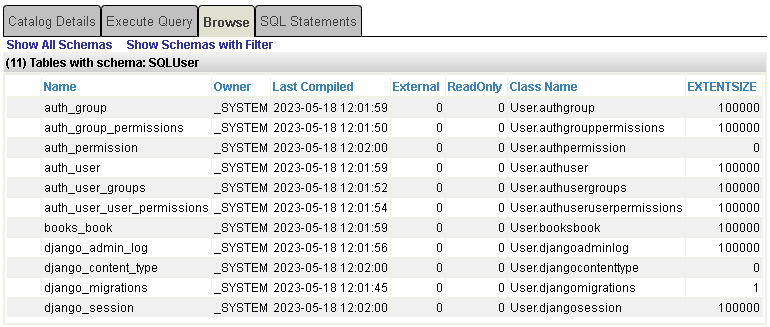
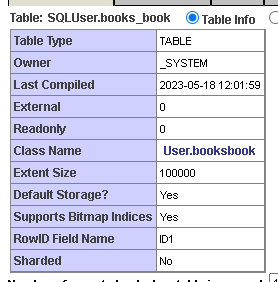
Go to the IRIS Management Portal > System Explorer > SQL, choose the same namespace you put in the DATABASES settings, and search for SQLUser. You will see the new tables created in IRIS:
If you select a schema from the table, you will be able to see its class name that you can open and make changes (at your own risk) from the Studio or any other developing tool.
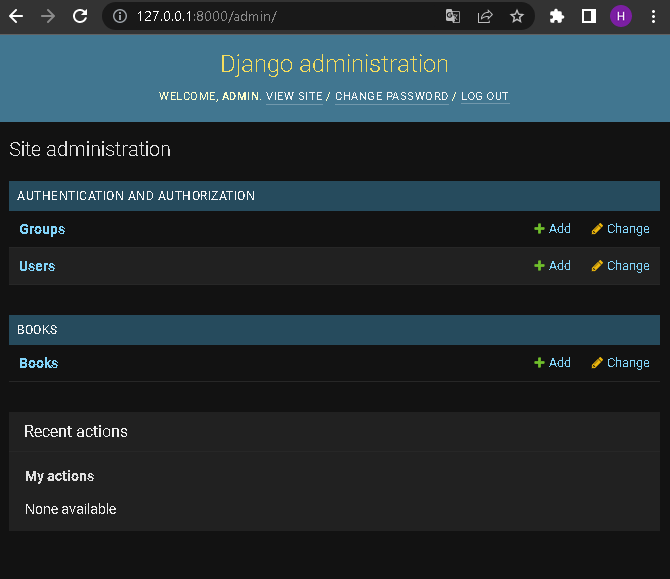
If you open the urls.py from the project folder (CRUD), you will notice a pre-built path that leads to admin. If you follow http://127.0.0.1:8000/admin, you will be required to enter a username and password. You can use the one you selected when running the command createsuperuser and take a look at what Django has to offer on that page.
However, we can have more pages. To create a custom URL based on the new application, import include from django.urls and add a new path, pointing to the application:
from django.urls import path, include
urlpatterns = [
    path('admin/', admin.site.urls),
    path('books/', include('books.urls')),
]
This should redirect you to the file books/urls.py (you will have to create this file first), where we are going to add another path forwarding us to the view. The file should look like the following:
from django.contrib import admin
from django.urls import path
from .views import home
urlpatterns = [
	path(‘’, home)
]
It is time to create the view we are being directed to. Go to books/views.py and add a definition with the request as a parameter:
def home(request):
	return render(request, “index.html”)
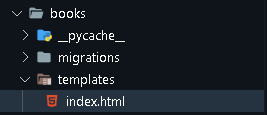
Finally, create the index.html. It should be added to a folder books/templates. Check the image below for a reference:
If you’re using VSCode, you can type !+ENTER in the file. I will give you a skeleton of the HTML page, so you will be able to add “Hello World” to the body or something similar to that. Look at a sample below:
<!DOCTYPE html>
<html>
 <body> hello world! </body>
</html>
Enter python manage.py migrate to apply changes and proceed to http://127.0.0.1:8000/books. You might be asked to run the server with python manage.py runserver once more. After that, it should be working without any issues.

Add objects from the admin page
Back to the admin page, we can now perform all CRUD actions on the created model. To do that, go to books/admin.py, import the model from .models, and register it:
from .models import Book
admin.site.register(Book)
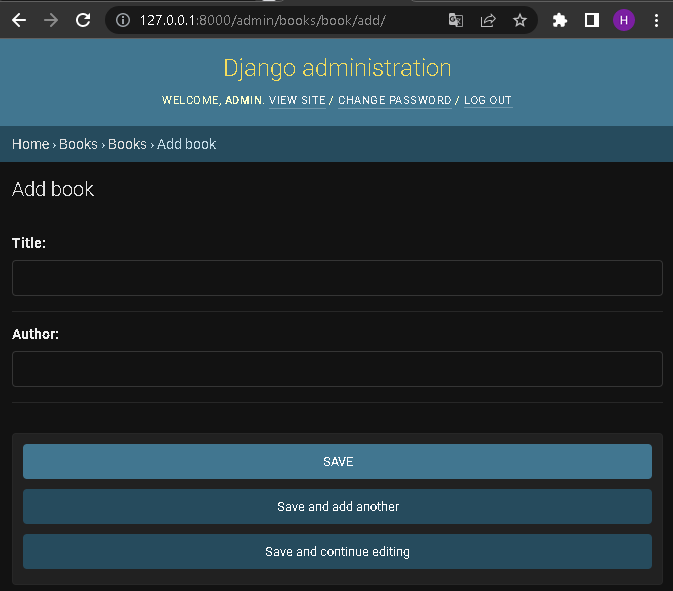
If you go to http://127.0.0.1:8000/admin, you should now see the BOOKS table with CRUD options. I recommend that you add a few books for the next steps.
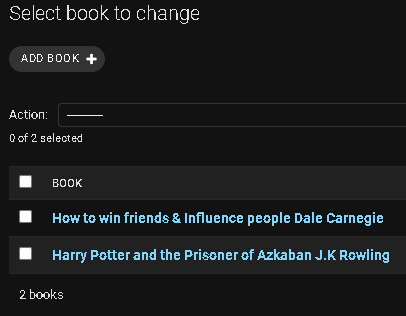
You can optionally implement a __str__ function in the model’s class to have a more readable version of the object. For instance, it could be something as simple as the following:
def __str__(self):
	return self.title+” “+self.author
If you are not familiar with this, check out any article about OOP (Object Oriented Programming) on Python. Here you can find a good one, especially if you want to learn more about the __str__ method.
The images below depict the admin portal before and after implementing it:
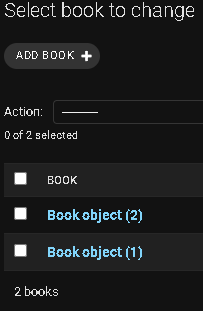
Display the objects on the home page - CRUD Read
Come back to the views.py, where we defined the home function. Import your model and add it to the function. It will allow you to access it from the HTML:
from .models import Book
def home(request):
	books = Book.objects.all()
	return render(request, “index.html”, {“books”:books})
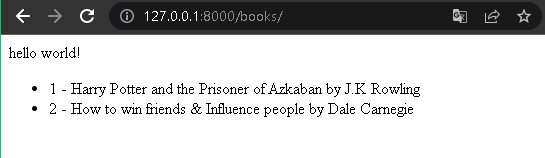
Now, in the index.html file, you can access all fields of your model directly. For instance, I chose to display a full list of all of the items with the following code:
<body>
…
  <ul>
    {% for book in books %}
    <li> {{book.id}} - {{book.title}} by {{book.author}} </li>
    {% endfor %}
  </ul>
</body>
Again, if you are not familiar with this kind of code, you can review any reliable documentation about HTML basics online, and click here to read more about {%%} tags.
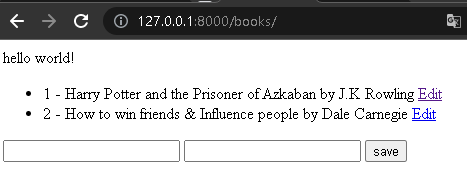
Let’s review the image at the beginning of this article. It shows us that the client sends a request (i.e. opens the website), and the URL addresses it to a view (the home function), which responds with the models containing information from the database. This response is sent back to the client in a template (HTML).
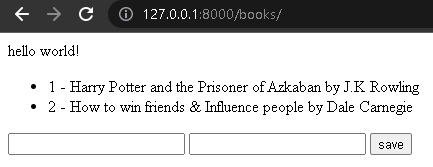
Right now, it should look like the picture below:
First of all, we need to decide on how we plan to get the information for the new object. I chose to build a simple form. However, we will need to specify the token to protect our server from malicious interactions. You can read more about security here.
<body>
  …
  <form action=”{% url ‘save’ %}” method=”POST”>
    {% csrf_token %}
    <input type=”text” name=”title”>
    <input type “text” name=”author”>
    <button type=”submit”>save</button>
  </form>
</body>
Once again, we have a request from the client (i.e. the user fills in the form), and we need a URL addressing it to a view. The action on the form can specify this URL, so let’s create it.
On books/urls.py we are going to import save from the views and add a new path:
from .views import home, save
urlpatterns = [
…
path(‘save/’, save, name=”save”),
]
Finally, we create the view:
def save(request):
	formsTitle = request.POST.get(“title”)
	formsAuthor = request.POST.get(“author”)
	Book.objects.create(title=formsTitle, author=formsAuthor)
	books = Book.objects.all()
	return render(request, “index.html”, {“books”: books})
If we reload the page, we will see the inputs and button. You can also add a few more objects to check that it works. Besides, you can open the SQL portal on the IRIS Management Portal to see how the form sends the information straight to the IRIS table.
Edit existing objects - CRUD Update
Similarly to the operations we previously created, we need to build something to send the request. For instance, we can add a link next to each object that will address a form analogous to the one we have just constructed.
Start with changing the index.html:
<body>
  …
  <ul>
  {% for book in books %}
    <li>
      {{book.id}} - {{book.title}} by {{book.author}}
      <a href=”{% url ‘edit’ book.id %}”>Edit</a>
    </li>
    {% endfor %}
  </ul>
  …
</body>
Now, in the urls.py we should add the new URL, with the ID parameter:
from .views import home, save, edit
urlpatterns = [
…
path(‘edit/<int:id>’, edit, name=”edit”),
]
Then we can create the edit view on views.py:
def edit(request, id):
	book = Book.objects.get(id=id)
	return render(request, “update.html”, {“book”: book})
The edit view is going to send the user a new template so that they can input the information to update the object. The update.html should be created in books/templates. Below there is an example of a template that meets our needs:
<!DOCTYPE html>
<html>
  <body>
    <form action=”{% url ‘update’ book.id %}” method=”POST”>
      {% csrf_token %}
	 <input type=”text” name=”title” value=”{{book.title}}”>
	 <input type=“text” name=”author” value=”{{book.author}}”>
	 <button type=”submit”>update</button>
    </form>
  </body>
</html>
Since we have a new URL now, we have to create it on urls.py and specify its view on views.py:
# file books/urls.py
from .views import home, save, edit, update
urlpatterns = [
…
path(‘update/<int:id>’, update, name=”update”),
]
# file books/views.py
from django.shortcuts import redirect
def update(request, id):
	book = Book.objects.get(id=id)
	book.title = request.POST.get(“title”)
	book.author = request.POST.get(“author”)
	book.save()
	return redirect(home)
Now our return is going to come back to the template returned by the home view.
At this point, you can reload the program and test everything, checking the corresponding information on IRIS.

We need to make it possible for the client to interact with the server in a way that allows the latter to delete information. There are a lot of ways to make this possible. I will simply add another link that contains a URL, that addresses that information to a view, to the display list.
Change the index.html as demonstrated below:
<body>
  …
  <ul>
    {% for book in books %}
    <li>
      {{book.id}} - {{book.title}} by {{book.author}}
      <a href=”{% url ‘edit’ book.id %}”>Edit</a>
      <a href = “{% url ‘delete’ book.id %}”>Delete</a>
    </li>
    {% endfor %}
  </ul>
  …
</body>
I hope that by now you have learned about this process enough to guess that at this point we need to create a path on urls.py:
from .views import home, save, edit, update, delete
urlpatterns = [
…
path(‘delete/<int:id>’, delete, name=”delete”),
]
Finally, create the view:
def delete(request, id):
	book = book.objects.get(id=id)
	book.delete()
	return redirect(home)
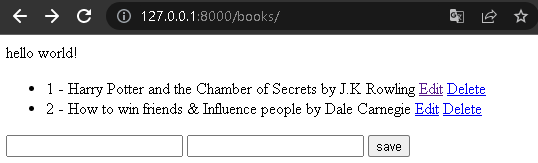
Reload the page. Your new link is ready to be tested:
Conclusion
In this article, we have created the basis for almost every server. It should be easy for you by this moment to imagine how to evolve what we did today to a register or billing system, or, perhaps, even a blog, just by adding some security features (and, of course, a nice pinch of CSS).
However, we can still deepen what we have learned here to create portals that can display any information you already have on your IRIS instance, evolving our server to a management portal for controlling data flow, user interaction, displaying information about logs, and even sending emails. Besides, we can also use Django to create an endpoint, such as a user-friendly webpage to interact with APIs we build from IRIS, including any data treatment, transformation, and monitoring that the InterSystems’ platforms provide.
Comments
What a neat article, very useful and with a lot of details.
Thanks :)
Hey, that's awesome to hear! Thank you!
Good job. I like it.
Thank you! This helps me keep writing!
I am using this django-iris. I am having a namespace with some old datatables which I want to use instead of creating any new models. While I am running python manage.py dbshell this command is not working as desired.
Also If I want to use my current tables how can I proceed with this.
Could you check if inspectdb is working for you?
python manage.py inspectdbCheck Django documentation for details
inspectdb generated models are not exactly correct need to update it manually that will take time. So I wanna skip this part and will use raw SQL query and a connection cursor to DB.
So, I think the best is to create an issue, describing what's wrong with inspectdb, what's missing in the models, and how you solve it, manually, and I could have a look and probably solve it on Django side.
@Heloisa Paiva thank you for implementing this idea from the Ideas Portal:
Examples to work with IRIS from Django 👏
Welcome to the Hall of Fame page of the Ideas Portal! 🏆