Recommendations on installing the InterSystems Caché DBMS for production environment
This article was written as an attempt to share the experience of installing the InterSystems Caché DBMS for production environment. We all know that the development configuration of a DBMS is very different from real-life conditions. As a rule, development is carried out in “hothouse conditions” with a bare minimum of security measures, but when we publish our project online, we must ensure its reliable and uninterrupted operation in a very aggressive environment.
##The process of installing the InterSystems Caché DBMS with maximum security settings
OS security settings
The first step is the operating system. You need to do the following:
- Minimize the rights of the technical account of the Caché DBMS
- Rename the administrator account of the local computer.
- Leave the necessary minimum of users in the OS.
- Timely install security updates for the OS and used services.
- Use and regularly update anti-virus software
- Disable or delete unused services.
- Limit access to database files
- Limit the rights to Caché data files (leave owner and DB admin rights only)
For UNIX/Linux systems, create the following group and user types prior to installation:
- Owner user ID
- Management group ID
- Internal Caché system group ID
- Internal Caché user ID
InterSystems Caché installation-time security settings
InterSystems, the DBMS developer, strongly recommends deploying applications on Caché 2015.2 and newer versions only.
During installation, you need to perform the following actions:
Select the “Locked Down” installation mode
Select the “Custom Setup” option, then select only the bare minimum of components that are required for the work of the application
During installation, choose the SuperServer port that is different from the standard TCP port 1972
During installation, specify the port of the internal web server that is different from the standard TCP port 57772
Specify a Caché instance location path that is different from the standard one (the default option for Windows systems is C:\lnterSystems\Cache, for UNIX/Linux systems — /usr/Cachesys)
Post-installation Caché security settings
The following actions need to be performed after installation (most of them are already performed in the “Locked down” installation mode):
All services and resources that are not used by application should be disabled.
For services using network access, IP addresses that can be used for remote interaction must be explicitly specified.
Unused CSP web applications must be disabled.
Access without authentication and authorization must be disabled.
Access to the CSP Gateway must be password-protected and restricted.
Audit must be enabled.
The Data encryption option must be enabled for the configuration file.
To ensure the security of system settings, Security Advisor must be launched from the management portal and its recommendations must be followed. [Home] > [Security Management] > [Security Advisor]
For services (Services section):
Ability to set % globals should be turned off — the possibility to modify % globals must be disabled, since such globals are often used for system code and modification of such variables can lead to unpredictable consequences. Unauthenticated should be off — unauthenticated access must be disabled. Unauthenticated access to the service makes it accessible to all users. Service should be disabled unless required — if a service is not used, it must be disabled. Access to any service that is not used by an application can provide an unjustifiably high level of access to the entire system. Service should use Kerberos authentication — access through any other authentication mechanism does not provide the maximum level of security Service should have client IP addresses assigned — IP addresses of connections to the services must be specified explicitly. Limiting the list of IP addresses that will be allowed to connect let you have greater control over connections to Caché Service is Public — public services allow all users, including the UnknownUser account that requires no authentication, to get unregulated access to Caché
Applications (CSP, Privileged Routine, and Client Applications)
Application is Public — Public applications allow all users, including the UnknownUser account that requires no authentication, to get unregulated access to Caché Application conditionally grants the %AII role — a system cannot be considered secure if an application can potentially delegate all privileges to its users. Applications should not delegate all privileges Application grants the %AII role — the application explicitly delegates all privileges to its users. Applications should not delegate all privileges
#1.Managing users
##1.1 Managing system accounts
You need to make sure that unused system accounts are disabled or deleted, and that passwords are changed for used system accounts.
To identify such accounts, you need to use the Security Advisor component of the management portal. To do it, go to the management portal here: [Home] > [Security Management] > [Security Advisor].
Change corresponding users’ passwords in all records in the Users section where Recommendations = “Password should be changed from default password”.
##1.2 Managing privileges accounts
If the DBMS has several administrators, a personal account should be created for each of them with just a minimum of privileges required for their job.
##1.3 Managing rights and privileges
When delegating access rights, you should use the minimum privileges principle. That is, you should forbid everything and then provide a bare minimum of rights required for this particular role. When granting privileges, you should use a role-based approach – that is, assign rights to a role, not a user, then assign a role to the necessary user.
##1.4 Delegation of access rights
In order to check security settings in terms of access rights delegation, launch Security Advisor. You need to perform the following actions depending on the recommendations provided by Security Advisor.
To roles:
This role holds privileges on the Auditing database — this role has privileges for accessing the auditing database. Read access makes it possible to use audit data in an inappropriate way. Write access makes it possible to compromise the audit data
This role holds the %Admin_Secure privilege — This role includes the %Admin_Secure resource, which allows holder to change access privileges for any user
This role holds WRITE privilege on the CACHESYS database — this role allows users to write to the CACHESYS system database, thus making it possible to change the system code and Caché system settings
Users:
At least 2 and at most 5 users should have the %AII role — at least 2 and no more than 5 users can have the %Аll role. Too few users with this role may result in problems with access during emergencies; too many users may jeopardize the overall security of the system.
This user holds the %AII role — this user has the %Аll role. You need to verify the necessity of assigning this role to the user.
UnknownUser account should not have the %AII role — the system cannot be considered secure if UnknownUser has the %Аll role.
Account has never been used — this account has never been used. Unused accounts may be used for unauthorized access to the system.
Account appears dormant and should be disabled — the account is inactive and must be disabled. Inactive accounts (ones that haven’t been used for 30 days) may be used for unauthorized access.
Password should be changed from default password — the default password value must be changed.
After deleting a user, make sure that roles and privileges created by this user have been deleted, if they are no longer required.
##1.5 Configuring the password policy
Password case sensitivity is enabled in Caché by default.
The password policy is applied through the following section of the management portal:
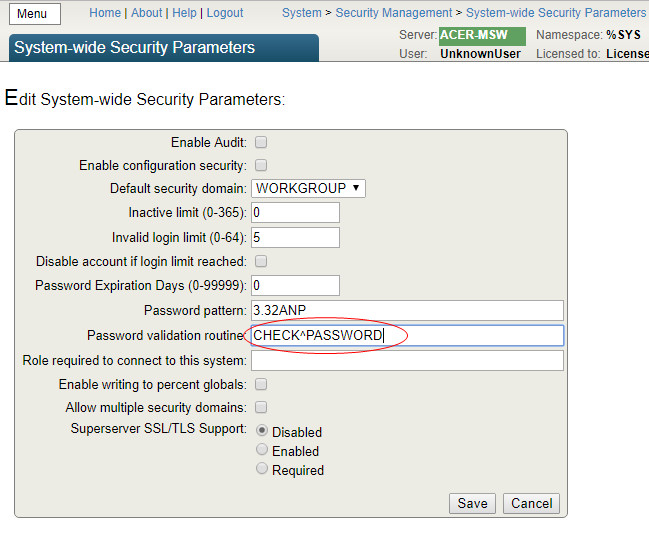
[Home]>[Security Management] > [System Security Settings] > [System-wide Security Parameters].
The configuration of the necessary password complexity is carried out by specifying a password template in the Password Pattern parameter. By default, maximum security uses Password Pattern = 8.32ANP, which means that passwords must be 8 – 32 characters long, contain numbers, characters, and punctuation marks. The “Password validation routine” parameter is used for invoking specific password validity checking algorithms.
A detailed description is provided in [1], section “Password Strength and Password Policies”.
In addition to using internal mechanisms, authentication in Caché can be delegated to the operating system, Kerberos or LDAP servers.
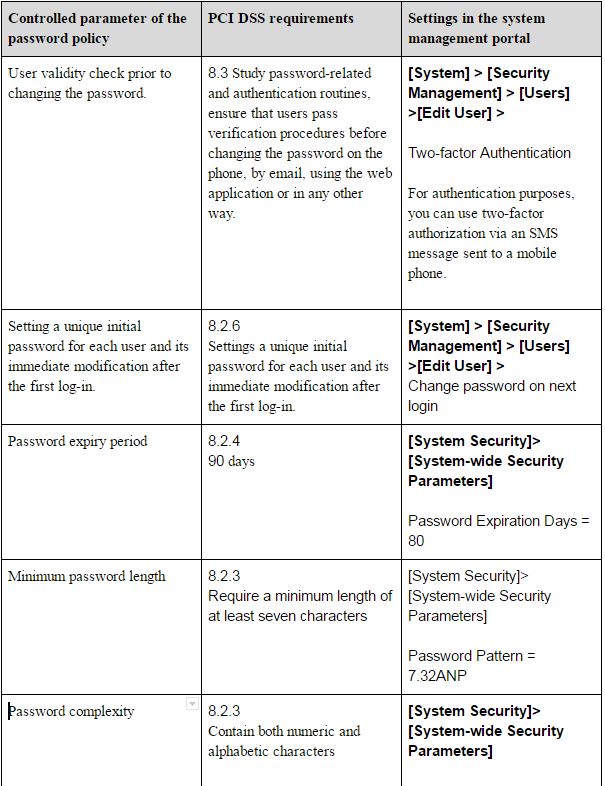
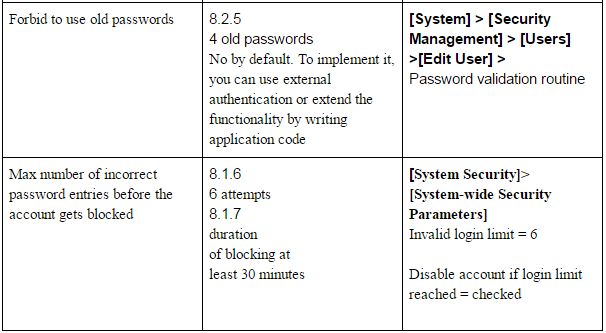
Just recently, I had to check whether the Caché DBMS complied with the new edition of PCI DSS 3.2, the main security standard of the bank card industry adopted in April 2016.
Compliance of Caché DBMS security settings with the requirements of the PCI DSS version 3.2 [5] standard
##1.6 Configuration of terminating an inactive database connection
Database disconnect settings for inactive user sessions depend on the type of connection to Caché.
For SQL and object access via TCP, the parameter is set in the [Home] > [Configuration] > [SQL Settings] > [General SQL Settings] section of the management portal. Look for a parameter called TCP Keep Alive interval (in seconds): set it to 900, which will correspond to 15 minutes.
For web access, this parameter is specified in the “No Activity Timeout” for [Home] > [Configuration] > [CSP Gateway Management]. Replace the default parameter with 900 seconds and enable the “Apply time-out to all connections” parameter
#2 Event logging
##2.1 General settings
To enable auditing, you need to enable this option for the entire Caché DBMS instance. To do it, open the system management portal, navigate to the auditing management page (([Home] > [Security Management] > [Auditing]** and make sure that the “Disable Auditing” option is available, and “Enable Auditing” is unavailable. The opposite will mean that auditing is disabled.
If auditing is disabled, it should be enabled by selecting the “Enable Auditing” command from the menu. You can view the event log through the system management portal: [Home] > [Security Management] > [Auditing] > [View Audit Database]

There are also system classes (utilities) for viewing the event log. The log contains the following records, among others: -Date and time -Event type -Account name (user identification) Access to audit data is managed by the %DB_CACHEAUDIT resource. To disable public access to this resource, you need to make sure that both Read and Write operations are closed for Public access in its properties. Access to the list of resources is provided through the system management portal [Home] > [Security Management] > [Resources] > [Edit Resource]. Select the necessary resource, then click the Edit link. By default, the %DB_CACHEAUDIT resource has the same-name role %DB_CACHEAUDIT. To limit access to logs, you need to define a list of users with this role, which can be done in the system management portal: [Home] > [Security Management] > [Roles] > [Edit Role], then use the Edit button in the %DB_CACHEAUDIT role ##2.2 List of logged event types ###2.2.1 Logging of access to tables containing bank card details (PCI DSS 10.2.1) Logging of access to tables (datasets) containing bank card data is performed with the help of the following mechanisms:
- A system auditing mechanism that makes records of the “ResourceChange” type whenever access rights are changed for a resource responsible for storing bank card information (access to the audit log is provided from the system management portal: [Home] > [Security Management] > [Auditing] > [View Audit Database]);
- On the application level, it is possible to log access to a particular record by registering an application event in the system and calling it from your application when a corresponding event takes place. [System] > [Security Management] > [Configure User Audit Events] > [Edit Audit Event] ###2.2.2 Logging attempts to use administrative privileges (PCI DSS 10.2.2) The Caché DBMS logs the actions of all users and the configuration of the logging method is carried out by specifying the events that should be logged [Home] > [Security Management] > [Auditing] > [Configure SystemEvents] Logging of all system events needs to be enabled. ###2.2.3 Logging of event log changes (PCI DSS 10.2.3) The Caché DBMS uses a single audit log that cannot be changed, except for the natural change of its content and error entries, log purging, the change of audited events, which add corresponding AuditChange entries to the log. The task of logging the AuditChange event is accomplished by enabling the auditing of all events (see 2.2.2). ###2.2.4 Logging of all unsuccessful attempts to obtain logical access (PCI-DSS 10.2.4) The task of logging an unsuccessful attempt to obtain logical access is accomplished through enabling the auditing of all events (see 2.2.2). When an attempt to obtain logical access is registered, a LoginFailure event is created in the audit log. ###2.2.5 Logging of attempts to obtain access to the system (PCI DSS 10.2.5) The task of logging an attempt to access the system is accomplished by enabling the auditing of all events (see 2.2.2). When an unsuccessful attempt to obtain access is registered, a “LoginFailure” event is created in the audit log. A successful log-in creates a “Login” event in the log. ###2.2.6 Logging of audit parameter changes (PCI DSS 10.2.6) The task of logging changes in audit parameters is accomplished by enabling the auditing of all events (see 2.2.2). When an attempt to obtain logical access is made, an “AuditChange” event is created in the audit log. ###2.2.7 Logging of the creation and deletion of system objects (PCI DSS 10.2.7) The Caché DBMS logs the creation, modification, and removal of the following system objects: roles, privileges, resources, users. The task of logging the creation and deletion of system objects is accomplished by enabling the auditing of all events (see 2.2.2). When a system object is created, changed or removed, the following events are added to the audit log: “ResourceChange”, “RoleChange”, “ServiceChange”, “UserChange”. ##2.3 Protection of event logs You need to make sure that access to the %DB_CACHEAUDIT resource is restricted. That is, only the admin and those responsible for log monitoring have read and write rights to this resource. Following the recommendations above, I have managed to install Caché in the maximum security mode. To demonstrate compliance with the requirements of PCI DSS section 8.2.5 “Forbid the use of old passwords”, I created a small application that will be launched by the system when the user attempts to change the password and will validate whether it has been used before.
To install this program, you need to import the source code using Caché Studio, Atelier or the class import page through the control panel
ROUTINE PASSWORD
PASSWORD ; password verification program
#include %occInclude
CHECK(Username,Password) PUBLIC {
if '$match(Password,"(?=.[0-9])(?=.[a-zA-Z]).{7,}") quit $$$ERROR($$$GeneralError,"Password does not match the standard PCI_DSS_v3.2")
set Remember=4 ; the number of most recent passwords that cannot be used according to PCI-DSS
set GlobRef="^PASSWORDLIST" ; The name of the global link
set PasswordHash=$System.Encryption.SHA1Hash(Password)
if $d(@GlobRef@(Username,"hash",PasswordHash)){
quit $$$ERROR($$$GeneralError,"This password has already been used ")
}
set hor=""
for i=1:1 {
; Traverse the nods chronologically from new to old ones
set hor=$order(@GlobRef@(Username,"datetime",hor),-1)
quit:hor=""
; Delete the old one that’s over the limit
if i>(Remember-1) {
set hash=$g(@GlobRef@(Username,"datetime",hor))
kill @GlobRef@(Username,"datetime",hor)
kill:hash'="" @GlobRef@(Username,"hash",hash)
}
}
; Save the current one
set @GlobRef@(Username,"hash",PasswordHash)=$h
set @GlobRef@(Username,"datetime",$h)=PasswordHash
quit $$$OK
}
Let’s save the name of the program in the management portal.

It happened so that my product configuration was different from the test one not only in terms of security but also in terms of users. In my case, there were thousands of them, which made it impossible to create a new user by copying settings from an existing one.
DBMS developers limited list output to 1000 elements. After talking to the InterSystems WRC technical support service, I learned that the problem could be solved by creating a special global node in the system area using the following command:
%SYS>set ^CacheTemp.MgtPortalSettings($Username,"MaxUsers")=5000
The source code of the %ZSTOP program
%ZSTOP() {
Quit
}
/// save users’ preferences in a non-killable global
SYSTEM() Public {
merge ^tmpMgtPortalSettings=^CacheTemp.MgtPortalSettings
quit
}
The source code of the %ZSTART program
%ZSTART() {
Quit
}
///	restore users’ preferences from a non-killable global
SYSTEM() Public {
if $data(^tmpMgtPortalSettings) merge ^CacheTemp.MgtPortalSettings=^tmpMgtPortalSettings
quit
}
Include %occKeyword
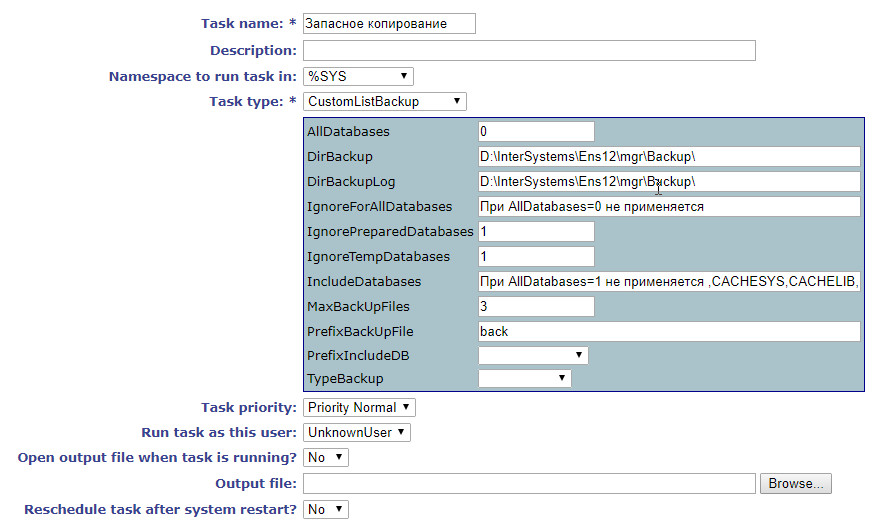
/// Backup task class
Class App.Task.CustomListBackup Extends %SYS.Task.Definition [ LegacyInstanceContext ]
{
/// If ..AllDatabases=1, include all databases into the backup copy ..PrefixIncludeDB and ..IncludeDatabases are ignored
Property AllDatabases As %Integer [ InitialExpression = 0 ];
/// If ..AllDatabases=1, include all databases into the backup copy, excluding from ..IgnoreForAllDatabases (comma-delimited)
Property IgnoreForAllDatabases As %String(MAXLEN = 32000) [ InitialExpression = "Not applied if AllDatabases=0 " ];
/// If ..IgnoreTempDatabases=1, exclude temporary databases
Property IgnoreTempDatabases As %Integer [ InitialExpression = 1 ];
/// If ..IgnorePreparedDatabases=1, exclude pre-installed databases
Property IgnorePreparedDatabases As %Integer [ InitialExpression = 1 ];
/// If ..AllDatabases=0 and PrefixIncludeDB is not empty, we will be backing up all databases starting with ..PrefixIncludeDB
Property PrefixIncludeDB As %String [ SqlComputeCode = {S {}=..ListNS()}, SqlComputed ];
/// If ..AllDatabases=0, back up all databases from ..IncludeDatabases (comma-delimited)
Property IncludeDatabases As %String(MAXLEN = 32000) [ InitialExpression = {"Not applied if AllDatabases=1"_..ListDB()} ];
/// Name of the task on the general list
Parameter TaskName = "CustomListBackup";
/// Path for the backup file
Property DirBackup As %String(MAXLEN = 1024) [ InitialExpression = {##class(%File).NormalizeDirectory("Backup")} ];
/// Path for the log
Property DirBackupLog As %String(MAXLEN = 1024) [ InitialExpression = {##class(%File).NormalizeDirectory("Backup")} ];
/// Backup type (Full, Incremental, Cumulative)
Property TypeBackup As %String(DISPLAYLIST = ",Full,Incremental,Cumulative", VALUELIST = ",Full,Inc,Cum") [ InitialExpression = "Full", SqlColumnNumber = 4 ];
/// Backup file name prefix
Property PrefixBackUpFile As %String [ InitialExpression = "back" ];
/// The maximum number of backup files, delete the oldest ones
Property MaxBackUpFiles As %Integer [ InitialExpression = 3 ];
ClassMethod DeviceIsValid(Directory As %String) As %Status
{
If '##class(%Library.File).DirectoryExists(Directory) quit $$$ERROR($$$GeneralError,"Directory does not exist")
quit $$$OK
}
ClassMethod CheckBackup(Device, MaxBackUpFiles, del = 0) As %Status
{
set path=##class(%File).NormalizeFilename(Device)
quit:'##class(%File).DirectoryExists(path) $$$ERROR($$$GeneralError,"Folder "path" does not exist")
set max=MaxBackUpFiles
set result=##class(%ResultSet).%New("%File:FileSet")
set st=result.Execute(path,".cbk",,1)
while result.Next()
{ If result.GetData(2)="F" {
continue:result.GetData(3)=0
set ts=$tr(result.GetData(4),"-: ")
set ts(ts)=$lb(result.GetData(1),result.GetData(3))
}
}
#; Let’s traverse all the files starting from the newest one
set i="" for count=1:1 { set i=$order(ts(i),-1) quit:i=""
#; Get the increase in bytes as a size difference with the previous backup
if $data(size),'$data(delta) set delta=size-$lg(ts(i),2)
#; Get the size of the most recent backup file in bytes
if '$data(size) set size=$lg(ts(i),2)
#; If the number of backup files is larger or equals to the upper limit, delete the oldest ones along with logs
if count'$g(free) $$$ERROR($$$GeneralError,"Estimated size of the new backup file is larger than the available disk space:("$g(size)"+"$g(delta)")>"$g(free))
quit $$$OK
}
Method OnTask() As %Status
{
do $zu(5,"%SYS")
set list=""
merge oldDBList=^SYS("BACKUPDB")
kill ^SYS("BACKUPDB")
#; Adding new properties for the backup task
set status=$$$OK
try {
##; Check the number of database copies, delete the oldest one, if necessary
##; Check the remaining disk space and estimate the size of the new file
set status=..CheckBackup(..DirBackup,..MaxBackUpFiles,1)
quit:$$$ISERR(status)
#; All databases
if ..AllDatabases {
set vals=""
set disp=""
set rss=##class(%ResultSet).%New("Config.Databases:List")
do rss.Execute()
while rss.Next(.sc) {
if ..IgnoreForAllDatabases'="",(","..IgnoreForAllDatabases_",")[(","$zconvert(rss.Data("Name"),"U")",") continue
if ..IgnoreTempDatabases continue:..IsTempDB(rss.Data("Name"))
if ..IgnorePreparedDatabases continue:..IsPreparedDB(rss.Data("Name"))
set ^SYS("BACKUPDB",rss.Data("Name"))=""
}
}
else {
#; if the PrefixIncludeDB property is not empty, we’ll back up all DB’s with names starting from ..PrefixIncludeDB
if ..PrefixIncludeDB'="" {
set rss=##class(%ResultSet).%New("Config.Databases:List")
do rss.Execute(..PrefixIncludeDB_"")
while rss.Next(.sc) {
if ..IgnoreTempDatabases continue:..IsTempDB(rss.Data("Name"))
set ^SYS("BACKUPDB",rss.Data("Name"))=""
}
}
#; Include particular databases into the list
if ..IncludeDatabases'="" {
set rss=##class(%ResultSet).%New("Config.Databases:List")
do rss.Execute("")
while rss.Next(.sc) {
if ..IgnoreTempDatabases continue:..IsTempDB(rss.Data("Name"))
if (","..IncludeDatabases",")'[(","$zconvert(rss.Data("Name"),"U")",") continue
set ^SYS("BACKUPDB",rss.Data("Name"))=""
}
}
}
do ..GetFileName(.backFile,.logFile)
set typeB=$zconvert($e(..TypeBackup,1),"U")
set:"FIC"'[typeB typeB="F"
set res=$$BACKUP^DBACK("",typeB,"",backFile,"Y",logFile,"NOINPUT","Y","Y","","","")
if 'res set status=$$$ERROR($$$GeneralError,"Error: "res)
} catch { set status=$$$ERROR($$$GeneralError,"Error: "$ze)
set $ze=""
}
kill ^SYS("BACKUPDB")
merge ^SYS("BACKUPDB")=oldDBList
quit status
}
/// Get file names
Method GetFileName(aBackupFile, ByRef aLogFile) As %Status
{
set tmpName=..PrefixBackUpFile_""..TypeBackup_""$s(..AllDatabases:"All",1:"List")""$zd($h,8)$tr($j($i(cnt),3)," ",0)
do {
s aBackupFile=##class(%File).NormalizeFilename(..DirBackup_"/"tmpName".cbk")
} while ##class(%File).Exists(aBackupFile)
set aLogFile=##class(%File).NormalizeFilename(..DirBackupLog_"/"tmpName".log")
quit 1
}
/// Check if the database is pre-installed
ClassMethod IsPreparedDB(name)
{
if (",ENSDEMO,ENSEMBLE,ENSEMBLEENSTEMP,ENSEMBLESECONDARY,ENSLIB,CACHESYS,CACHELIB,CACHETEMP,CACHE,CACHEAUDIT,DOCBOOK,USER,SAMPLES,")[(","$zconvert(name,"U")",") quit 1
quit 0
}
/// Check if the database is temporary
ClassMethod IsTempDB(name)
{
quit:$zconvert(name,"U")["TEMP" 1
quit:$zconvert(name,"U")["SECONDARY" 1
quit 0
}
/// Get a comma-delimited list of databases
ClassMethod ListDB()
{
set list=""
set rss=##class(%ResultSet).%New("Config.Databases:List")
do rss.Execute()
while rss.Next(.sc) {
set list=list_","rss.Data("Name")
}
quit list
}
ClassMethod ListNS() [ Private ]
{
set disp=""
set tRS = ##class(%ResultSet).%New("Config.Namespaces:List")
set tSC = tRS.Execute()
While tRS.Next() {
set disp=disp","_tRS.GetData(1)
}
set %class=..%ClassName(1)
$$$comSubMemberSet(%class,$$$cCLASSproperty,"PrefixIncludeDB",$$$cPROPparameter,"VALUELIST",disp)
quit ""
}
ClassMethod oncompile() [ CodeMode = generator ]
{
$$$defMemberKeySet(%class,$$$cCLASSproperty,"PrefixIncludeDB",$$$cPROPtype,"%String")
set updateClass=##class("%Dictionary.ClassDefinition").%OpenId(%class)
set updateClass.Modified=0
do updateClass.%Save()
do updateClass.%Close()
}
}
And include the database into the list of copied databases. All of the examples above are provided for Caché 2016.1 and are intended for educational purposes only. They can only be used in a product system after serious testing. I will be happy if this code helps you do your job better or avoid making mistakes. Github repository
The following materials were used for writing this article:
- Caché Security Administration Guide (InterSystems)
- Caché Installation Guide. Preparing for Caché Security (InterSystems)
- Caché System Administration Guide (InterSystems)
- Introduction to Caché. Caché Security (InterSystems)
- PCI DSS.RU. Requirements and the security audit procedure. Version 3.2
Comments
Great article
I found this too...
The Caché DBMS comes with several pre-configured backup jobs, but they didn’t always work for me. Every time I needed something particular for a project, it wasn’t there in “out-of-the-box” jobs. In one project, I had to automate the control over the number of backup copies with an option of automatic purging of the oldest ones.
I thought I'd share the class we use - this only deletes old backups
Class App.PurgeOldBackupFiles Extends %SYS.Task.Definition
{

Property BackupsToKeep As %Integer(MAXVAL = 30, MINVAL = 1) [ InitialExpression = 30, Required ];

Property BackupFolder As %String [ Required ];

Property BackupFileType As %String [ Required ];

Method OnTask() As %Status
 {
     //s BackupsToKeep = 2
     //s Folder = "c:\backupfolder"
     //s BackupFileType = "FullAllDatabases" // or "FullDBList"

     s SortOrder = "DateModified"

     If ..BackupsToKeep<1 Quit $$$ERROR($$$GeneralError,"Invalid - Number of Backups to Keep must be greater than or equal to 1")
     If ..BackupFolder="" Quit $$$ERROR($$$GeneralError,"Invalid - BackupFolder - not supplied")
     if ..BackupFileType = "" Quit $$$ERROR($$$GeneralError,"Invalid - BackupFileType - not supplied")
     if (..BackupFileType '= "FullAllDatabases")&&(..BackupFileType '= "FullDBList") Quit $$$ERROR($$$GeneralError,"Invalid - BackupFileType")

     s BackupCount=0
     k zPurgeOldBackupFiles(..BackupFileType)
     Set rs=##class(%ResultSet).%New("%Library.File:FileSet")
     w !,"backuplist",!

     s BackupFileWildcard = ..BackupFileType _ "*.cbk"
     set status=rs.Execute(..BackupFolder, BackupFileWildcard, SortOrder)
     WHILE rs.Next() {
          Set FullFileName=rs.Data("Name")
          Set FName=##class(%File).GetFilename(FullFileName)
          Set FDateTime=##class(%File).GetFileDateModified(FullFileName)
          w "File "_FName_" "_FDateTime,!
          Set FDate=$PIECE(FDateTime,",")
          Set CDate=$PIECE($H,",")
          s BackupCount=$I(BackupCount)
          s zPurgeOldBackupFiles(..BackupFileType, BackupCount)=FullFileName
     }
     s zPurgeOldBackupFiles(..BackupFileType, "BackupCount")=BackupCount
     do rs.Close()
     if BackupCount > ..BackupsToKeep {
          for i=1:1:BackupCount-..BackupsToKeep {
               s FullFileName = zPurgeOldBackupFiles(..BackupFileType, i)
               d ##class(%File).Delete(FullFileName)
               w "File Purged "_FullFileName_" Purged",!
          }
     }
     q status
 }

}
Thanks!