Getting started with Text Categorization
This article contains the tutorial document for a Global Summit academy session on Text Categorization and provides a helpful starting point to learn about Text Categorization and how iKnow can help you to implement Text Categorization models. This document was originally prepared by Kerry Kirkham and Max Vershinin and should work based on the sample data provided in the SAMPLES namespace.
Introduction
In this academy, we’ll introduce you to the new Text Categorization framework we’re adding to the Caché platform, which leverages the text analysis capabilities offered by our iKnow technology. “Text Categorization” means automatically assigning a category or label to a piece of free text through the use of a Text Categorization model or Text Classifier. This academy will teach you how to use the new framework to build and use TC models.
Building a model involves three main steps. First, we’ll choose a set of text features (usually the occurrence of particular terms) that represent the important characteristics of a piece of text with relation to the categorization task. The next step is to choose a mathematical technique or model type that will take these feature values as inputs and produce a category prediction as an output. The third step is then to “train” the model defined by these features and formulae on a decent amount of texts for which the actual category is known. We’ll use a UI to build a categorization model predicting the highest injury suffered in an aviation incident based on the official crash investigation report.
After we’ve built our model, we’ll use it in different ways, testing it in batch on other test data and invoking it from code, as you would do in a regular application or as part of a business process.
Prerequisites
You should have experience in using the tools provided by Caché (Management Portal, Studio and Terminal). A basic understanding of iKnow is a plus, but not required.
Exercises Overview
Exercise 1
In this exercise you will familiarize yourselves with the dataset we will be using during the academy. The data we will be using consists of 1200 official reports on aviation incidents, retrieved from the website of the National Transport and Safety Board. This dataset is available in the Aviation.Event table in the SAMPLES namespace.
You will then look at how iKnow transforms free text into a rich, structured network of interlinked entities. We will use iKnow to index the data contained in the NarrativeFull column.
Exercise 2
We will create and test our first categorization model, using a suggested list of terms (text features) and using the default settings.
Exercise 3
We will create and test a second model, this time selecting the terms manually and editing them to try and improve the accuracy of the results.
Exercise 4
In this exercise we will use the optimization tool to see if we can increase the accuracy of the model we built in the previous exercise.
Exercise 5
We will build and test a rule based model, using a deterministic set of simple rules rather than a true mathematical model to determine the category for a given piece of text. We’ll first use the default generated rule set and then edit- the rules to see if we can improve the accuracy.
Exercise 6
In these optional exercises, we’ll use some of the more advanced features to refine our models by leveraging the rich contextual information iKnow detects in free text.
Note on the data:
The dataset provided here is only a lightweight subset of the full NTSB dataset, which is available from
http://www.ntsb.gov. This data is supplied here for demonstration purposes only and neither intended nor warranted to be accurate.
Courtesy: National Transportation Safety Board
Exercises: Step by Step
Exercise 1: Exploring the data
In this exercise, you’ll familiarize yourself with the dataset and check out how iKnow processes unstructured data.
- Open the Management Portal and select System Explorer -> SQL, click on ‘Execute Query’ tab
- Enter the following query and click ‘Execute’:
SELECT InjuriesHighest, COUNT(*) FROM Aviation.Event GROUP BY InjuriesHighest
In the next exercises, we’ll create a Text Categorization model derives or “predicts“ the highest injury suffered in the incident from the report text.
- Now execute the following query:
SELECT TOP 5 InjuriesHighest, EventDate, NarrativeFull FROM Aviation.Event
We’ll now process the text in the narrative column with iKnow and store it into a domain named “Aviation Events demo”. The SAMPLES namespace contains a domain definition class “Aviation.ReportDomain”, describing all the properties and contents of this domain in an XML structure, which can easily be used to build the domain.
- Invoke the following command from terminal:
do ##class(Aviation.ReportDomain).%Build()
- To view the resulting concepts, open a browser and click on KnowledgePortal in favorites, the following page should appear [depending on your Caché version, this interface may look different]
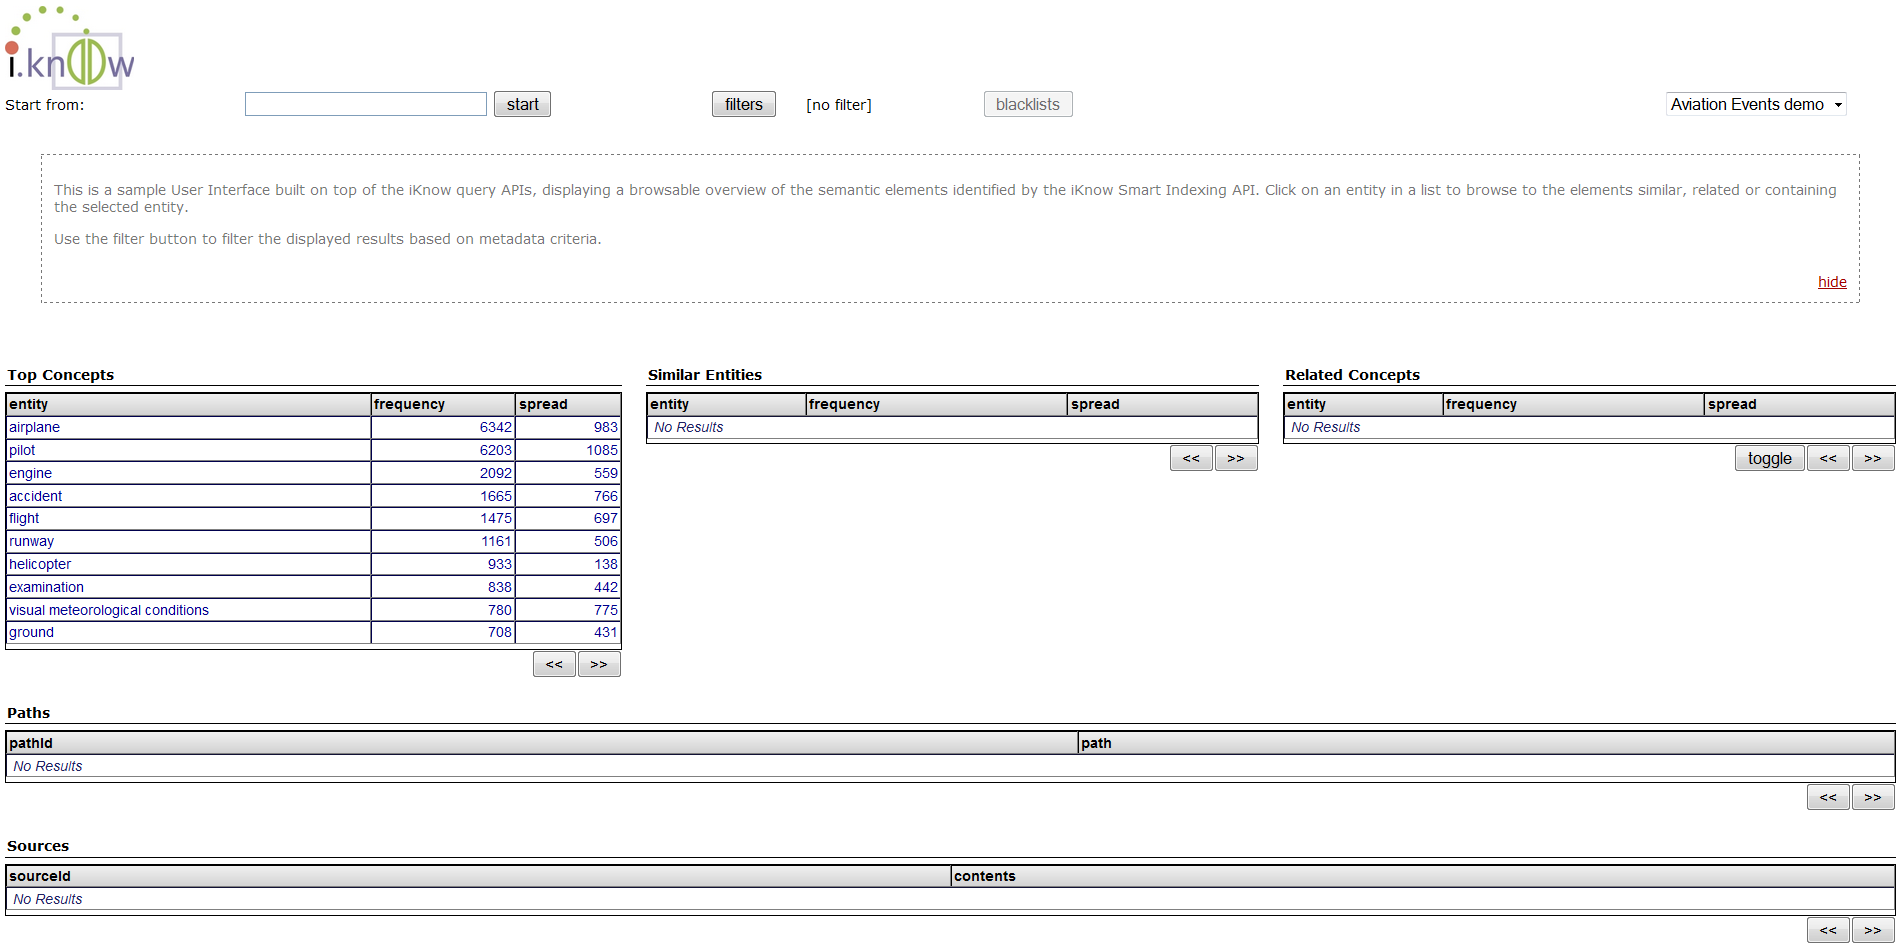
- Use the different buttons and links on the page to familiarize yourself with the possibilities iKnow offers
- To see examples of how iKnow indexed the text, click on “Indexing Results” in your browser’s favorites and use the dropdown box in the upper left corner to select a source. If you did it all right the following page should appear
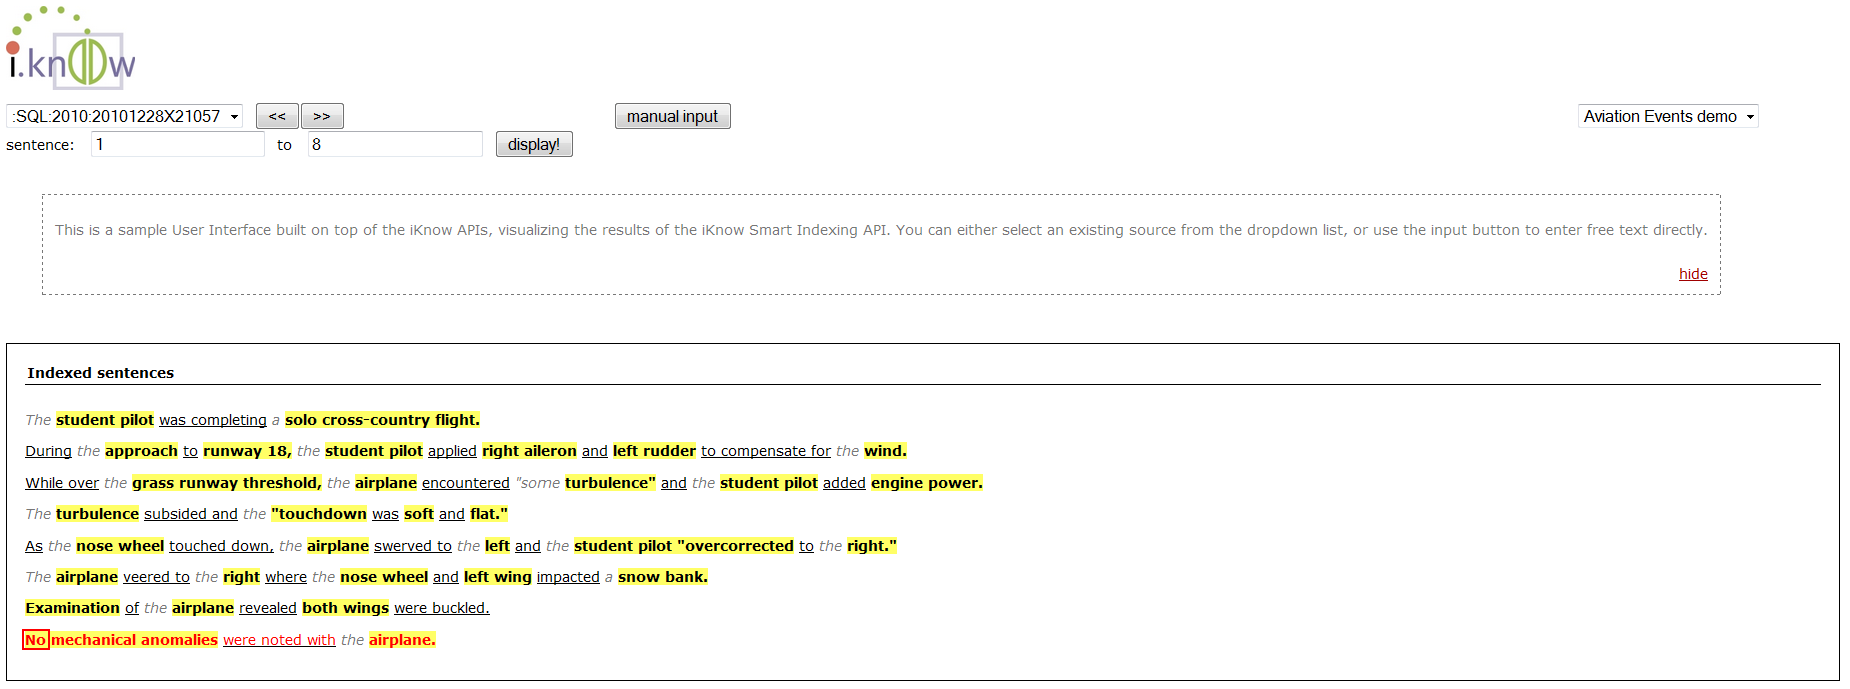
- Use the ‘manual input’ button and enter a text string of your choice. Click ‘index’ to see how iKnow breaks the text into concepts and relations
Exercise 2: Create a basic categorization model
- Open the Management Portal, make sure you are in the SAMPLES namespace
- Select System Explorer -> iKnow -> Text Categorization -> Model builder
- Click ‘New’ and enter the following:
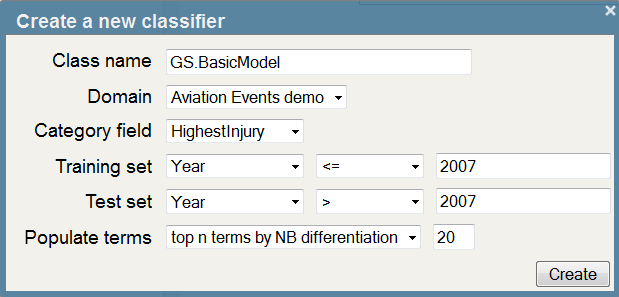
- Click ‘Create’. The interface will now display the classifier created using the settings you supplied. As we instructed the interface to populate the term list automatically, you’ll see a number of key terms in the central pane of the UI.
- Click ‘Save’. You should get a pop-up indicating ‘Classifier built successfully’
- We’ll now examine the classifier class we just generated. Open the GS.BasicModel class in Studio and look at the three main sections in the XData block. What does each of them represent?
The XData contents fully describes our classification model and compiling the class will ensure the code to invoke the model is generated in the background. We’ll now invoke that code from the terminal. - Open the Terminal and ensure you are in the SAMPLES namespace.
- Use the following command to instantiate our classifier object:
Set tModel = ##class(GS.BasicModel).%New()
- Invoke the %CategorizeText() method as follows, supplying some free text you’d like to see categorized:
Set tText = "He suffered fatal injuries when his helicopter crashed into the tree."
Write tModel.%CategorizeText(.tCats, tText)
Zwrite tCats
- You can also invoke the model on data that’s already in an iKnow domain, by specifying its source ID (in this example, we’re looking at the results for source 123):
Write tModel.%Categorize(.tCats, 123, "iKnow","Aviation Events Demo")
Zwrite tCats
The previous commands are all you need to invoke the Text Categorization model on new text fragments from your application or business process. There is no need for the original data on which it was based to be present.
In the next few steps we’ll run the model against a large number of records in one batch: the test set, which is the data we didn’t use for training the model. For these records we still know the actual outcome and therefore can use them to “test“ our model.
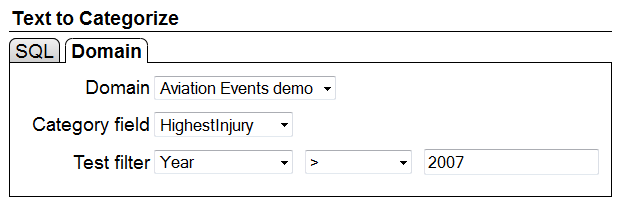
- Click ‘Test’ to test the accuracy of the model you have just created. This will open the Test Categorization batch test page in a new tab.
- Use the following settings and click ‘Run’ to test the model using all events after 2007
- Explore the results. What do the different charts show you?
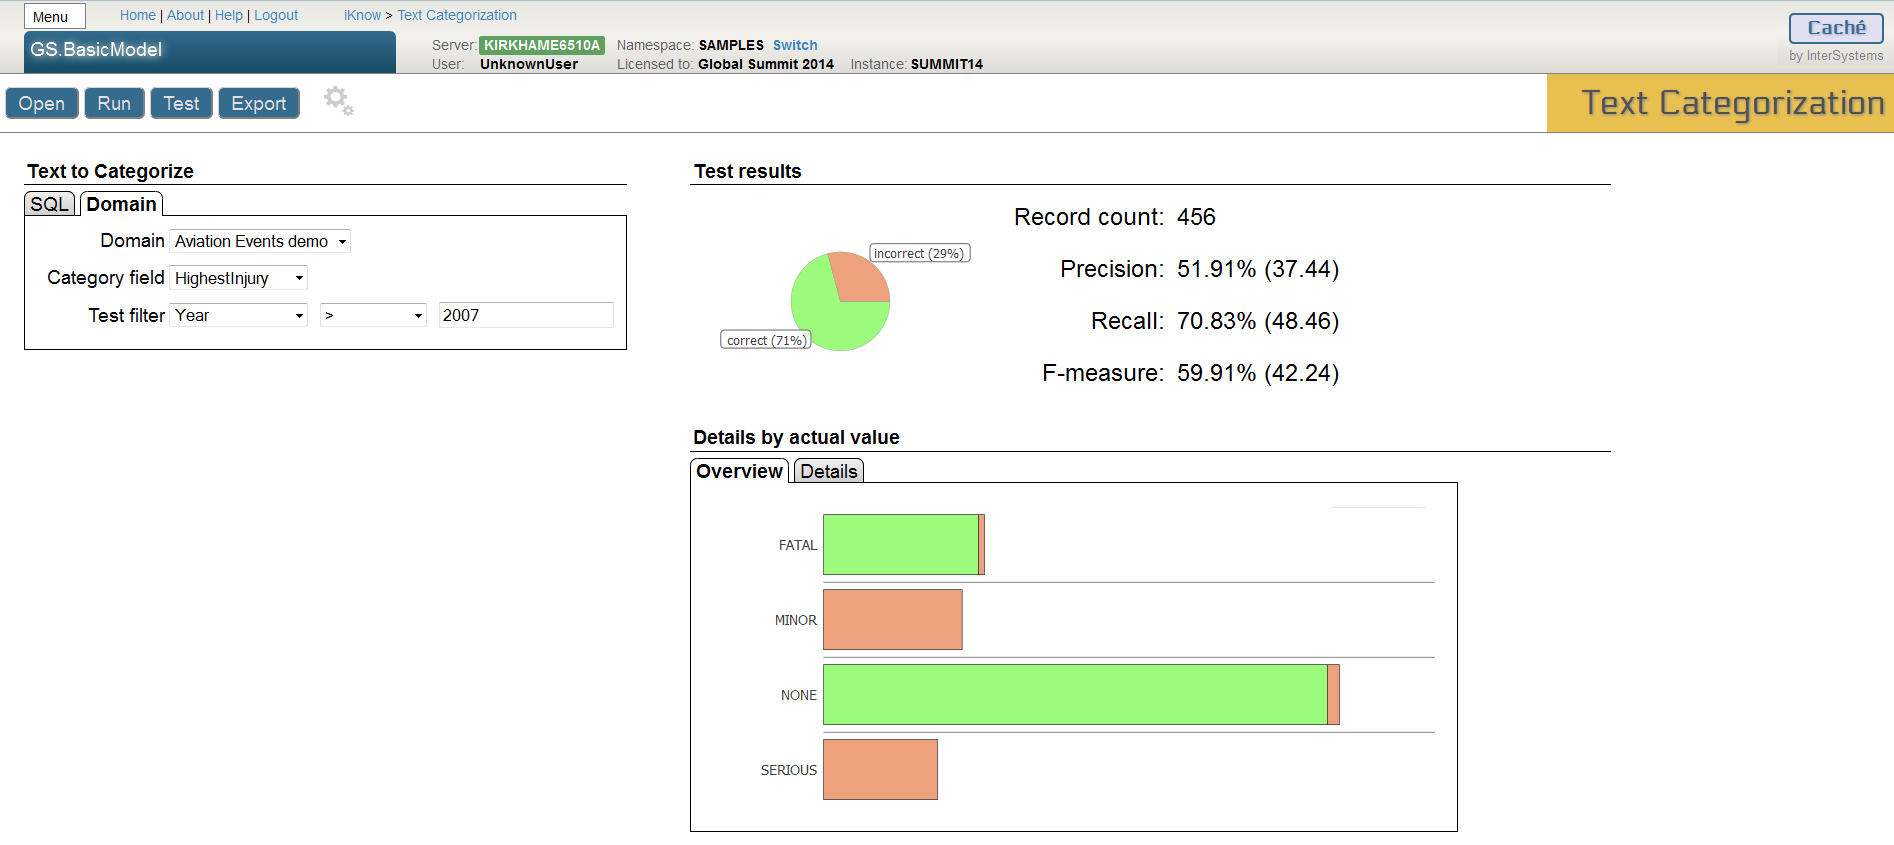
- Click on any bar in the chart or select the Details tab to further investigate the results for a particular category
- You can further drill down into the categorization results by clicking a section of the per-category pie chart.
Exercise 3: Selecting terms
In the previous exercise, we let the system suggest sample terms upon creating it. Now we’ll create a model in which we will choose (assumed) relevant terms ourselves.
- Return to the Model builder. The Text Classifier Builder tab should still be open in your browser.
- Click ‘New’ and enter the following:
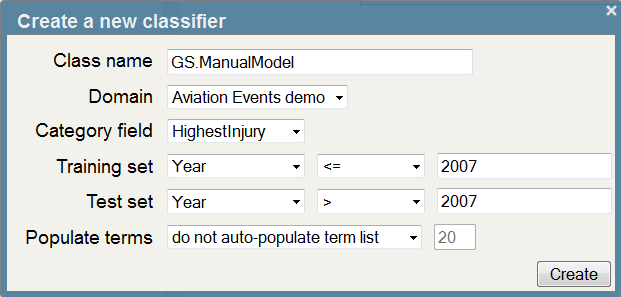
- Click ‘Create’.
- To add terms to our model we can first search for entities that contain a word or a string value we might be interested in.
- In the text box under ‘Entities’ enter “injur” and press return or wait a few seconds. The UI will now suggest a number of entities similar to “injur” that occur in the training set. The numbers to the right of each entity are the total number of occurrences of that entity (frequency) and the total number of distinct records in which it appears (spread), respectively. From the list select all the terms listed using the “select all” button at the bottom of the list and then click ‘add’. You should now see the terms appear under ‘Selected terms’.
- Save the model and test as before.
- How do the results compare?
- Let’s further refine the model. Return to the Text Classifier Builder and replace ‘injur’ with 'fire', 'explosion' and 'wreckage'. In each case select the first three terms listed and add them to the model.
- Save the model and test as before.
- How have the results changed?

- Notice how changes may yield better results for one category while another may get significantly worse. Why would this happen?
This whole term selection process is inherently a trial-and-error process and some terms might improve accuracy for one particular category but at the same time decrease the accuracy for another one. Especially when terms are relatively more common in more than just one category and uncommon in all others, adding them might not uniformly improve performance. Domain knowledge certainly helps, but some of this term selection process can be automated, which is what we’ll do in the following exercise.
Exercise 4: Using the automatic optimizer
In this exercise we’ll use a feature called the “optimizer” for selecting additional terms for our model. Rather than manually embark on a lengthy trial-and-error process of adding terms that might be helpful, testing and then retaining or rejecting them, this optimizer can automate that task. You just supply it a (possibly long) list of candidate terms and let the optimizer run through that list all by itself, adding each term individually and evaluating whether it has a positive impact on the model’s accuracy.
- Go back to the Text Classifier Builder tab in your browser
- Click ‘Optimize’.
- In the resulting pop-up, we’ll first load a list of candidate terms the optimizer will test. Select the BM25 metric in the dropdown and add 200 candidate terms. You should see the candidate terms in the panel on the right.
- Click ‘Next’, ensure the test set is for Year > 2007and click ‘Start’. You’ll see updates of the optimization process in the status panel on the right. Note that the last step (a “remove” step) will take significantly longer than the previous steps.
- What was the reported improvement?
- Close the popup and verify the “Selected terms” list has changed.
- Click “Test” and run the batch test again.
- Go back to the browser tab in which you opened the model builder and open the optimizer wizard again. Unless you accidentally closed this browser tab, the list of candidate terms should still contain the terms not tested in the previous optimization run.
- Click “Next” and run the optimizer again for 20 steps.
- Verify if there’s any further performance improvement.
Note that while this optimization approach can be helpful in fine-tuning a model, there is a risk of over-fitting the model to the specific characteristics of the dataset on which it’s being tested by this optimizer tool. Therefore it’s a good idea to review all terms added automatically by the optimizer and assess whether they are truly relevant or just lucky shots that happen to appear statistically relevant for the specifics of the test dataset.
Exercise 5: Building a Rule-Based Model
In this exercise, we’ll build a different type of model. In the previous exercises we used the Naïve Bayes algorithm, which uses a straightforward combination of probabilities to calculate the likelihood for each category and then returns the most likely category as a result. These probabilities were based on the feature values (term spread) in the training dataset. While convenient, as there were no further settings to configure, some users might prefer a more deterministic, transparent approach. A rule-based model does not use any mathematics by itself, but gets its category prediction by evaluating a number of decision rules consisting of predicates on the feature values.
- Return to the Model Builder tab
- Click ‘New’ and enter the following:
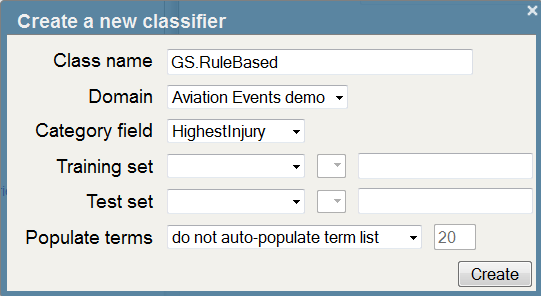
- Click ‘Create’ and add the following terms manually:
were not injured, was not injured, minor injuries, minor injury, seriously injured, serious injuries, fatally injured, fatal injuries
Tip - you can use the text box under ‘Entities’ to help search for the terms. Try ‘injur’.
- After you’ve added the terms, change the Method dropdown in the model properties to ‘Decision rules’
- The page will propose creating a default set of rules for you. Click ‘Yes’ and look at the generated rules.
- Save the model and test as before.
- How do the results compare?
- Add some more terms and edit the rules and see if you can improve the results.
Note that where the previous option (Naïve Bayes), like most model types, needed a training dataset to calculate the model’s coefficients, these rules are completely deterministic by themselves and usually manually defined. This means it typically requires domain knowledge to compile such a list of rules, which wasn’t the case for the more “automated” model type we used before. One advantage towards particular use cases is that these deterministic rules are very transparent towards end users, rather than the black box appearance of most other model types. In some scenario’s, a customer requirement might be that any categorization result can be fully explained, which is a lot easier with a rules-based model than with a complex mathematical formula.
Exercise 6: Advanced Exercises
So far, we‘ve stuck to relatively simple text features, each representing the frequency of a single entity. While it already distinguishes itself from classic word-count-based approaches by taking into account the entity boundaries identified by iKnow, there are more options to leverage iKnow output. Some of these will make the model more general (such as creating composite terms in exercise 6a), which should render it more robust against new input, whereas others will make it more specific (such as adding CRCs in 6b or setting the negation context in 6d) and thereby giving you more control through fine-grained features.
Exercise 6a: Creating composite terms
- Return to the model builder page in your browser and open the GS.ManualModel class again.
- In the left pane, type “autopsy” in the text box. Select all suggested terms and click the “append” button.
- Check out what happened to the selected term list. Click the “autopsy” term to expand it.
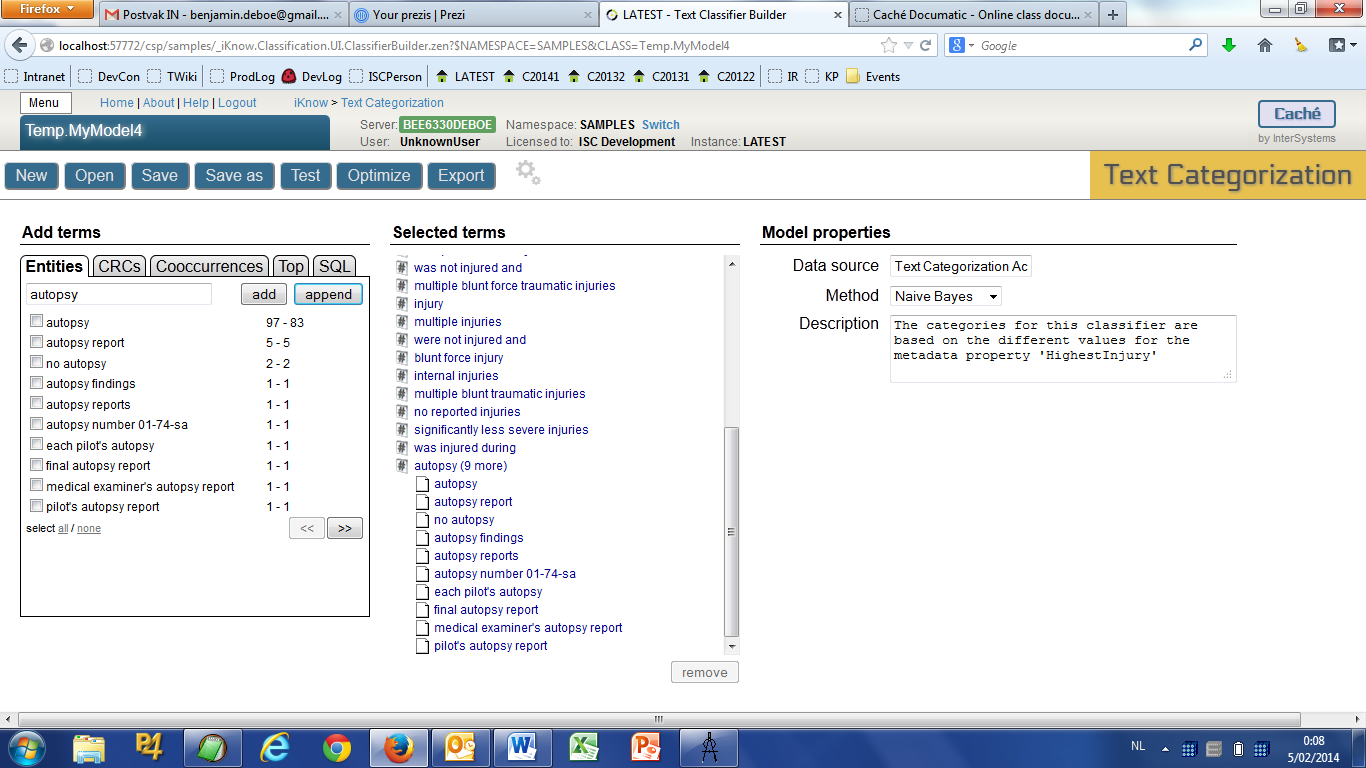
The term we just added is a “composite“ term, representing multiple entities at the same time. Whenever any of these entities is encountered in a piece of text, its occurrence will contribute to the frequency of the term. This enables you to group synonyms or otherwise very similar entities as a single term and can also be useful to bundle a number of entities that on their own occur quite rarely, but have a statistical relevance when grouped together. Note that you can also use the “append“ button to append additional terms selected in the left pane to an existing one in the selected term list by first selecting the target term and then clicking the append button.
- In the sected term list, locate the terms “was not injured“ and “were not injured“. Drag the “were not injured“ entry onto the other one. This is yet another way (at the UI level) to group or otherwise reorganize terms.
- Use this drag-and-drop functionality to combine a few more terms, for example:
Add: “no injuries” and “was not injured and“ to “was not injured“
Combine: “fatally injured” and “fatal injuries”
“serious injuries” and “seriously injured”
“was injured” and “were injured”
- Save the model and test whether accuracy improved.
Creating composite terms will make your model’s features more coarse-grained and therefore usually a little more robust, but it might decrease accuracy slightly, depending on the specific variations of the composing entities in the training set.
Exercise 6b: CRCs and Cooccurrences
- Return to the model builder page in your browser
- In the left pane, select the “CRC” tab and type “fire”. After waiting a second or two, you’ll be presented with a list of concept-relation-concept sequences iKnow found in the reports the contained the term “fire”. We can also use these as inputs for our categorization model, allowing a very fine-grained selection of features.
- Select “no evidence of fire” and add it to the model.
- Now select the “Co-occurrence” tab and type “malfunction”. This will yield a list of concepts frequently occurring together with the concept “malfunction”. Adding these as a “co-occurrence” will make the categorization model consider all cases where both concepts appear together in a sentence.
- Select all the “co-occurrences” that appear more than once from list (first nine), and add them to the model.
- Save the model and test whether accuracy improved.
Note that you can also create composite terms based on CRCs or co-occurrences, as long as you stick to a single term type per term.
Exercise 6c: Partial matches
So far, all features we’ve used in our models only counted exact occurrences of entities, CRCs or co-occurrences. While quite straightforward to count, it can become a challenge to ensure you cover all possible variations of a given entity as the training dataset gets larger. Also, new texts on which the model gets applied after it’s been built, for example simply in the test set, might have other variations than the ones covered so far. To accommodate this, we can soften the “exact occurrence“ requirement to include partial matches as well. A partial match of a term is defined as an entity that contains all words in the term, regardless of their order, but within the entity boundaries as identified by iKnow. For example, “diet coke can“ is a partial match for “diet coke“, but “raw vegan diet“ is not a partial match for “diet coke“.
- Create a new model by clicking the “New” button in the model builder, using the same settings as before but use GS.PartialMatchModel as a classname.
- Click the gears icon next to the “Export” button. This will enable a few advanced features that were hidden before in order to keep the UI transparent.
- Locate the “Count” dropdown that has appeared at the bottom left corner and select “partial match count”. This will now be the new default count policy for all terms being added.
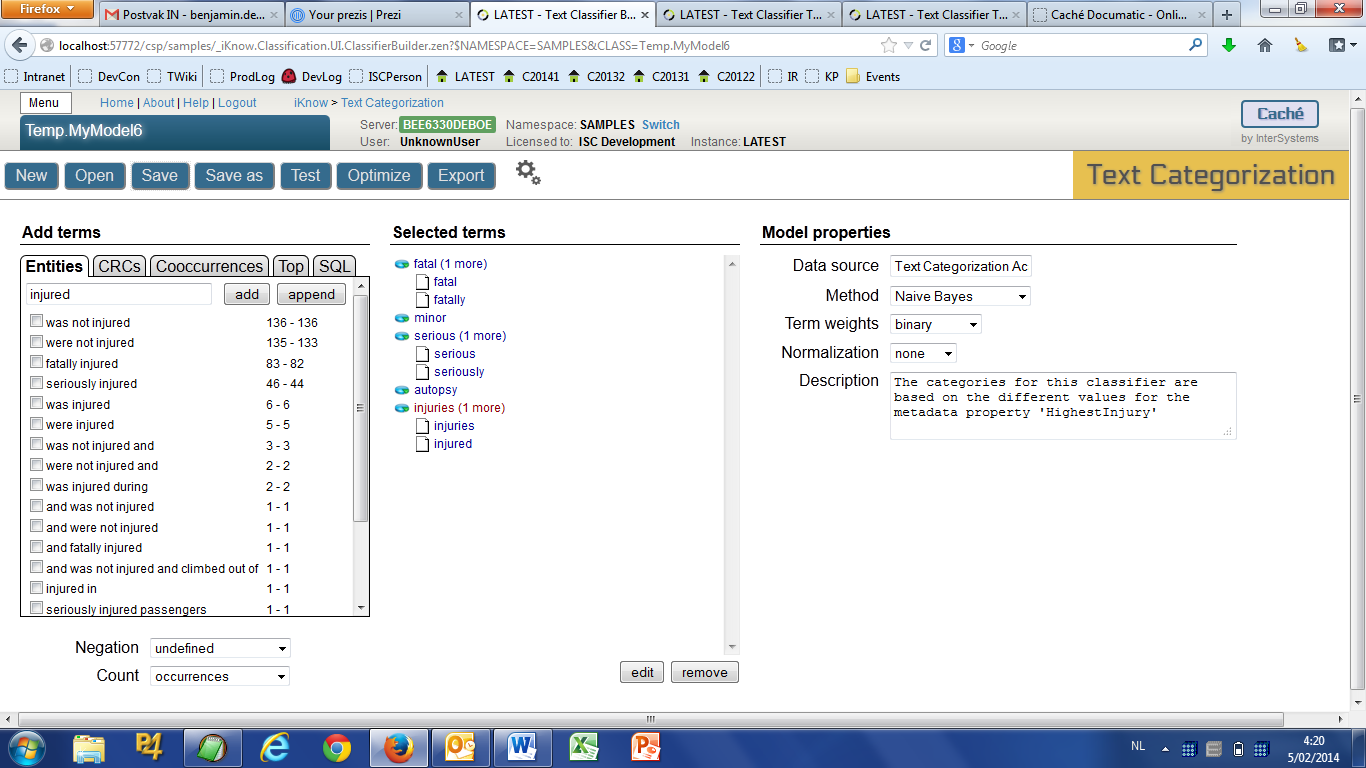
- In the entities text box, type “fatal” and click the “add” button. If you don’t select any existing entries from the list below, the string in the text box will be used instead. Note the different icon compared to the exact occurrences we used before. You can also change the count policy by selecting a term and clicking the “edit” button below the list.
- Type “fatally” and append it to our “fatal” term.
- Add more entries like this for other injury levels until the selected terms list looks like this:
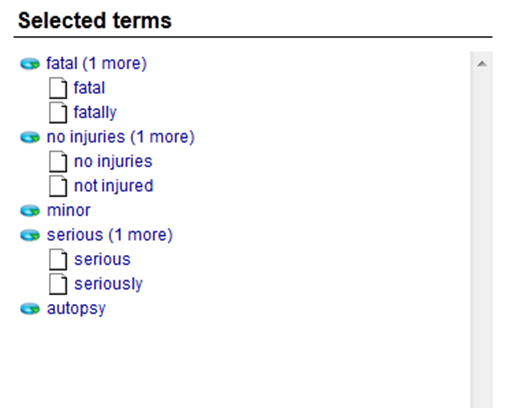
- Save and test the model. Make sure to drill down into the categorization results after you’ve run the test and find a few partial matches for the terms in this new model.
Exercise 6d: Incorporating the negation context
Another interesting piece of information that iKnow provides is the negation context of every entity occurrence. This “negation context” can tell you that the entity itself contains a specific negating element, such as in the entity “no injuries”, or that it only has an implied negation, such as the entity “injuries” in the sentence “He did not suffer any injuries”. In that last case, iKnow detects that the negation that started with “did not suffer”, extended to the entity “injuries”. We can refine our model to achieve these same results.
- In the partial match model we created in the previous exercise, drop the term “no injuries”.
- Now add another term consisting of the strings “injuries” and “injured”
- Select this new term and click the “edit” button. Change the negation policy to “explicit negation”, making the term list look like this:
- Save and test the model. The results should be identical to those of exercise 6c.
- Use the “Save As” button to save the model under a different name: GS.PartialMatchModel2
- Change the negation policy for the “injuries” term to “implied negation”. This will now cover all cases of explicit negation and those cases where the negation is being implied by a negation element elsewhere in the sentence. Therefore, this change makes the model somewhat more generic again.
- Save the model.
- Open the terminal. Now use the following commands to see the difference between the two models:
Set tText = "He did not suffer any injuries, but the plane was in a serious condition."
Set tModel1 = ##class(GS.PartialMatchModel).%New()
Write tModel1.%CategorizeText(.tCats1, tText)
Zwrite tCats1
Set tModel2 = ##class(GS.PartialMatchModel2).%New()
Write tModel2.%CategorizeText(.tCats2, tText)
Zwrite tCats2
If negation occurs frequently in the texts to be categorized and frequently applies to those terms that your model is going to be based on, it might make sense to add every term twice, once configured to look for “implied negation” occurrences and once with “no negation”. This will ensure the model counts the negative occurrences of a term separately from those cases where it is in an affirmative phrase.
In this exercise, we saw a number of techniques to refine our model. Some made the model more generic, relaxing the criteria for an entity or text fragment to count towards a specific feature value by creating composite terms or accepting partial matches. Others made the model more fine-grained by tightening those criteria to look for more specific elements such as CRCs or co-occurrences, or taking into account the negation policy. Whether this relaxing or tightening of the features improves or worsens overall model accuracy is usually difficult to tell in advance. The specifics of the training and test sets might tip the balance one way or another if those two sets are small in size. The larger the datasets you can base your model on, the less noise there would be to tip this accuracy balance in an unexpected direction.