Clear filter
Article
Evgeny Shvarov · Feb 9, 2021
Hi developers!
Recently we announced the preview of Embedded Python technology in InterSystems IRIS.
Check the Sneak Peak video by @Robert.Kuszewski.
Embedded python gives the option to load and run python code in the InterSystems IRIS server. You can either use library modules from Python pip, like numpy, pandas, etc, or you can write your own python modules in the form of standalone py files.
So once you are happy with the development phase of the IRIS Embedded Python solution there is another very important question of how the solution could be deployed.
One of the options you can consider is using the ZPM Package manager which is described in this article.
I want to introduce you a template repository that introduces a deployable ZPM module and shows how to build such a module.
The example is very simple and it contains one sample.py, that demonstrates the usage of pandas and NumPy python libs and the test.cls objectscript class that makes calls to it.
The solution could be installed with ZPM as:
zpm "install iris-python-template"
NB: Make sure the IRIS you install the module contains an Embedded Python preview code. E.g. you can use the image:
intersystemsdc/iris-ml-community:2020.3.0.302.0-zpm
With commands:
docker run --rm --name my-iris -d --publish 9091:1972 --publish 9092:52773 intersystemsdc/iris-ml-community:2020.3.0.302.0-zpm
docker exec -it my-iris iris session IRIS
USER>zpm "install iris-python-template"
[iris-python-template] Reload START
...
[iris-python-template] Activate SUCCESS
The module installs sample.py python file and titanic.csv sample file along with test.cls to the system.
E.g. sample.py exposes meanage() function which accepts the csv file path and calculates the mean value using numpy and pandas llibraries.
test.cls objectscript class loads the python module with the following line code:
set tt=##class(%SYS.Python).Import("sample")
then provides the path to csv file and collects the result of the function.
Here is how you can test the installed module:
USER>d ##class(dc.python.test).Today()
2021-02-09
USER>d ##class(dc.python.test).TitanicMeanAge()
mean age=29.69911764705882
USER>
OK! Next, is how to deploy Embedded Python modules?
You can add the following line to module.xml:
<FileCopy Name="python/" Target="${mgrdir}python/"/>
the line copies all python files from the python folder of the repository to the python folder inside /mgr folder of IRIS installation.
This lets the python modules then be imported from ObjectScript via ##class(%SYS.Python).Import() method.
Also if you want the data files to be packed into the ZPM module check another FileCopy line in the module that imports the data folder from the repository along with titanic.csv into the package:
<FileCopy Name="data/" Target="${mgrdir}data/"/>
this is it!
Feel free to use the template as a foundation for your projects with Embedded Python for IRIS!
Any questions and comments are appreciated! Hi Evgeny!
I tried embedded Python in my multi model contest app but used an ugly approach to deploy Python code. I didn't realize that ZPM could do this for me... Nice tip! Thanks, Jose!
Yes, indeed ZPM option of delivering files to a target IRIS installation looks elegant and robust. Maybe it could be used not only for Embedded python but e.g. for jar-files delivery and data. @Yuri.Gomes, what do you think? Nice option! OK. I did node.js, @Yuri.Gomes Java is yours. A suggestion is allows ZPM to copy from a HTTP URL like a github address.
Announcement
Anastasia Dyubaylo · May 8, 2020
Hi Community,
We're pleased to invite you to join the upcoming InterSystems IRIS 2020.1 Tech Talk: Integrated Development Environments on May 19 at 10:00 AM EDT!
In this edition of InterSystems IRIS 2020.1 Tech Talks, we put the spotlight on Integrated Development Environments (IDEs). We'll talk about InterSystems latest initiative with the open source ObjectScript extension to Visual Studio Code, discussing what workflows are particularly suited to this IDE, how development, support, and enhancement requests will work in an open source ecosystem, and more.
Speakers:🗣 @Raj.Singh5479, InterSystems Product Manager, Developer Experience🗣 @Brett.Saviano, InterSystems Developer
Date: Tuesday, May 19, 2020Time: 10:00 AM EDT
➡️ JOIN THE TECH TALK!
Additional Resources:
ObjectScript IDEs [Documentation]
Using InterSystems IDEs [Learning Course]
Hi Community!Join the Tech Talk today. 😉 ➡️ You still have time to REGISTER.
Announcement
Olga Zavrazhnova · Aug 25, 2020
Hi Community, As you may know, on Global Masters you can redeem a consultation with InterSystems expert on any InterSystems product: InterSystems IRIS, IRIS for Health, Interoperability (Ensemble), IRIS Analytics (DeepSee), Caché, HealthShare.And we have exciting news for you: now these consultations available in the following languages: English, Portuguese, Russian, German, French, Italian, Spanish, Japanese, Chinese. Also! The duration is extended to 1.5 hours for your deep dive into the topic.
If you are interested, don't hesitate to redeem the reward on Global Masters!
If you are not a member of Global Masters yet - you are very welcome to join here (click on the InterSystems login button and use your InterSystems WRC credentials). To learn more about Global Masters read this article: Global Masters Advocate Hub - Start Here!
See you on InterSystems Global Masters today! 🙂
Article
Timothy Leavitt · Aug 27, 2020
Introduction
In a previous article, I discussed patterns for running unit tests via the InterSystems Package Manager. This article goes a step further, using GitHub actions to drive test execution and reporting. The motivating use case is running CI for one of my Open Exchange projects, AppS.REST (see the introductory article for it here). You can see the full implementation from which the snippets in this article were taken on GitHub; it could easily serve as a template for running CI for other projects using the ObjectScript package manager.
Features demonstrated implementation include:
Building and testing an ObjectScript package
Reporting test coverage measurement (using the TestCoverage package) via codecov.io
Uploading a report on test results as a build artifact
The Build Environment
There's comprehensive documentation on GitHub actions here; for purposes of this article, we'll just explore the aspects demonstrated in this example.
A workflow in GitHub actions is triggered by a configurable set of events, and consists of a number of jobs that can run sequentially or in parallel. Each job has a set of steps - we'll go into the details of the steps for our example action in a bit. These steps consist of references to actions available on GitHub, or may just be shell commands. A snippet of the initial boilerplate in our example looks like:
# Continuous integration workflow
name: CI
# Controls when the action will run. Triggers the workflow on push or pull request
# events in all branches
on: [push, pull_request]
# A workflow run is made up of one or more jobs that can run sequentially or in parallel
jobs:
# This workflow contains a single job called "build"
build:
# The type of runner that the job will run on
runs-on: ubuntu-latest
env:
# Environment variables usable throughout the "build" job, e.g. in OS-level commands
package: apps.rest
container_image: intersystemsdc/iris-community:2019.4.0.383.0-zpm
# More of these will be discussed later...
# Steps represent a sequence of tasks that will be executed as part of the job
steps:
# These will be shown later...
For this example, there are a number of environment variables in use. To apply this example to other packages using the ObjectScript Package Manager, many of these wouldn't need to change at all, though some would.
env:
# ** FOR GENERAL USE, LIKELY NEED TO CHANGE: **
package: apps.rest
container_image: intersystemsdc/iris-community:2019.4.0.383.0-zpm
# ** FOR GENERAL USE, MAY NEED TO CHANGE: **
build_flags: -dev -verbose # Load in -dev mode to get unit test code preloaded
test_package: UnitTest
# ** FOR GENERAL USE, SHOULD NOT NEED TO CHANGE: **
instance: iris
# Note: test_reports value is duplicated in test_flags environment variable
test_reports: test-reports
test_flags: >-
-verbose -DUnitTest.ManagerClass=TestCoverage.Manager -DUnitTest.JUnitOutput=/test-reports/junit.xml
-DUnitTest.FailuresAreFatal=1 -DUnitTest.Manager=TestCoverage.Manager
-DUnitTest.UserParam.CoverageReportClass=TestCoverage.Report.Cobertura.ReportGenerator
-DUnitTest.UserParam.CoverageReportFile=/source/coverage.xml
If you want to adapt this to your own package, just drop in your own package name and preferred container image (must include zpm - see https://hub.docker.com/r/intersystemsdc/iris-community). You might also want to change the unit test package to match your own package's convention (if you need to load and compile unit tests before running them to deal with any load/compile dependencies; I had some weird issues specific to the unit tests for this package, so it might not even be relevant in other cases).
The instance name and test_reports directory shouldn't need to be modified for other use, and the test_flags provide a good set of defaults - these support having unit test failures flag the build as failing, and also handle export of jUnit-formatted test results and a code coverage report.
Build Steps
Checking out GitHub Repositories
In our motivating example, two repositories need to be checked out - the one being tested, and also my fork of Forgery (because the unit tests need it).
# Checks out this repository under $GITHUB_WORKSPACE, so your job can access it
- uses: actions/checkout@v2
# Also need to check out timleavitt/forgery until the official version installable via ZPM
- uses: actions/checkout@v2
with:
repository: timleavitt/forgery
path: forgery
$GITHUB_WORKSPACE is a very important environment variable, representing the root directory where all of this runs. From a permissions perspective, you can do pretty much whatever you want within that directory; elsewhere, you may run in to issues.
Running the InterSystems IRIS Container
After setting up a directory where we'll end up putting our test result reports, we'll run the InterSystems IRIS Community Edition (+ZPM) container for our build.
- name: Run Container
run: |
# Create test_reports directory to share test results before running container
mkdir $test_reports
chmod 777 $test_reports
# Run InterSystems IRIS instance
docker pull $container_image
docker run -d -h $instance --name $instance -v $GITHUB_WORKSPACE:/source -v $GITHUB_WORKSPACE/$test_reports:/$test_reports --init $container_image
echo halt > wait
# Wait for instance to be ready
until docker exec --interactive $instance iris session $instance < wait; do sleep 1; done
There are two volumes shared with the container - the GitHub workspace (so that the code can be loaded; we'll also report test coverage info back to there), and a separate directory where we'll put the jUnit test results.
After "docker run" finishes, that doesn't mean the instance is fully started and ready to command yet. To wait for the instance to be ready, we'll keep trying to run a "halt" command via iris session; this will fail and continue trying once per second until it (eventually) succeeds, indicating that the instance is ready.
Installing test-related libraries
For our motivating use case, we'll be using two other libraries for testing - TestCoverage and Forgery. TestCoverage can be installed directly via the Community Package Manager; Forgery (currently) needs to be loaded via zpm "load"; but both approaches are valid.
- name: Install TestCoverage
run: |
echo "zpm \"install testcoverage\":1:1" > install-testcoverage
docker exec --interactive $instance iris session $instance -B < install-testcoverage
# Workaround for permissions issues in TestCoverage (creating directory for source export)
chmod 777 $GITHUB_WORKSPACE
- name: Install Forgery
run: |
echo "zpm \"load /source/forgery\":1:1" > load-forgery
docker exec --interactive $instance iris session $instance -B < load-forgery
The general approach is to write out commands to a file, then run then in IRIS session. The extra ":1:1" in the ZPM commands indicates that the command should exit the process with an error code if an error occurs, and halt at the end if no errors occur; this means that if an error occurs, it will be reported as a failed build step, and we don't need to add a "halt" command at the end of each file.
Building and Testing the Package
Finally, we can actually build and run tests for our package. This is pretty simple - note use of the $build_flags/$test_flags environment variables we defined earlier.
# Runs a set of commands using the runners shell
- name: Build and Test
run: |
# Run build
echo "zpm \"load /source $build_flags\":1:1" > build
# Test package is compiled first as a workaround for some dependency issues.
echo "do \$System.OBJ.CompilePackage(\"$test_package\",\"ckd\") " > test
# Run tests
echo "zpm \"$package test -only $test_flags\":1:1" >> test
docker exec --interactive $instance iris session $instance -B < build && docker exec --interactive $instance iris session $instance -B < test && bash <(curl -s https://codecov.io/bash)
This follows the same pattern we've seen, writing out commands to a file then using that file as input to iris session.
The last part of the last line uploads code coverage results to codecov.io. Super easy!
Uploading Unit Test Results
Suppose a unit test fails. It'd be really annoying to have to go back through the build log to find out what went wrong, though this may still provide useful context. To make life easier, we can upload our jUnit-formatted results and even run a third-party program to turn them into a pretty HTML report.
# Generate and Upload HTML xUnit report
- name: XUnit Viewer
id: xunit-viewer
uses: AutoModality/action-xunit-viewer@v1
if: always()
with:
# With -DUnitTest.FailuresAreFatal=1 a failed unit test will fail the build before this point.
# This action would otherwise misinterpret our xUnit style output and fail the build even if
# all tests passed.
fail: false
- name: Attach the report
uses: actions/upload-artifact@v1
if: always()
with:
name: ${{ steps.xunit-viewer.outputs.report-name }}
path: ${{ steps.xunit-viewer.outputs.report-dir }}
This is mostly taken from the readme at https://github.com/AutoModality/action-xunit-viewer.
The End Result
If you want to see the results of this workflow, check out:
Logs for the CI job on intersystems/apps-rest (including build artifacts): https://github.com/intersystems/apps-rest/actions?query=workflow%3ACITest coverage reports: https://codecov.io/gh/intersystems/apps-rest
Please let me know if you have any questions!
Article
Mihoko Iijima · Mar 5, 2021
**This article is a continuation of this post.**
The purpose of this article is to explain how the Interoperability menu works for system integration.
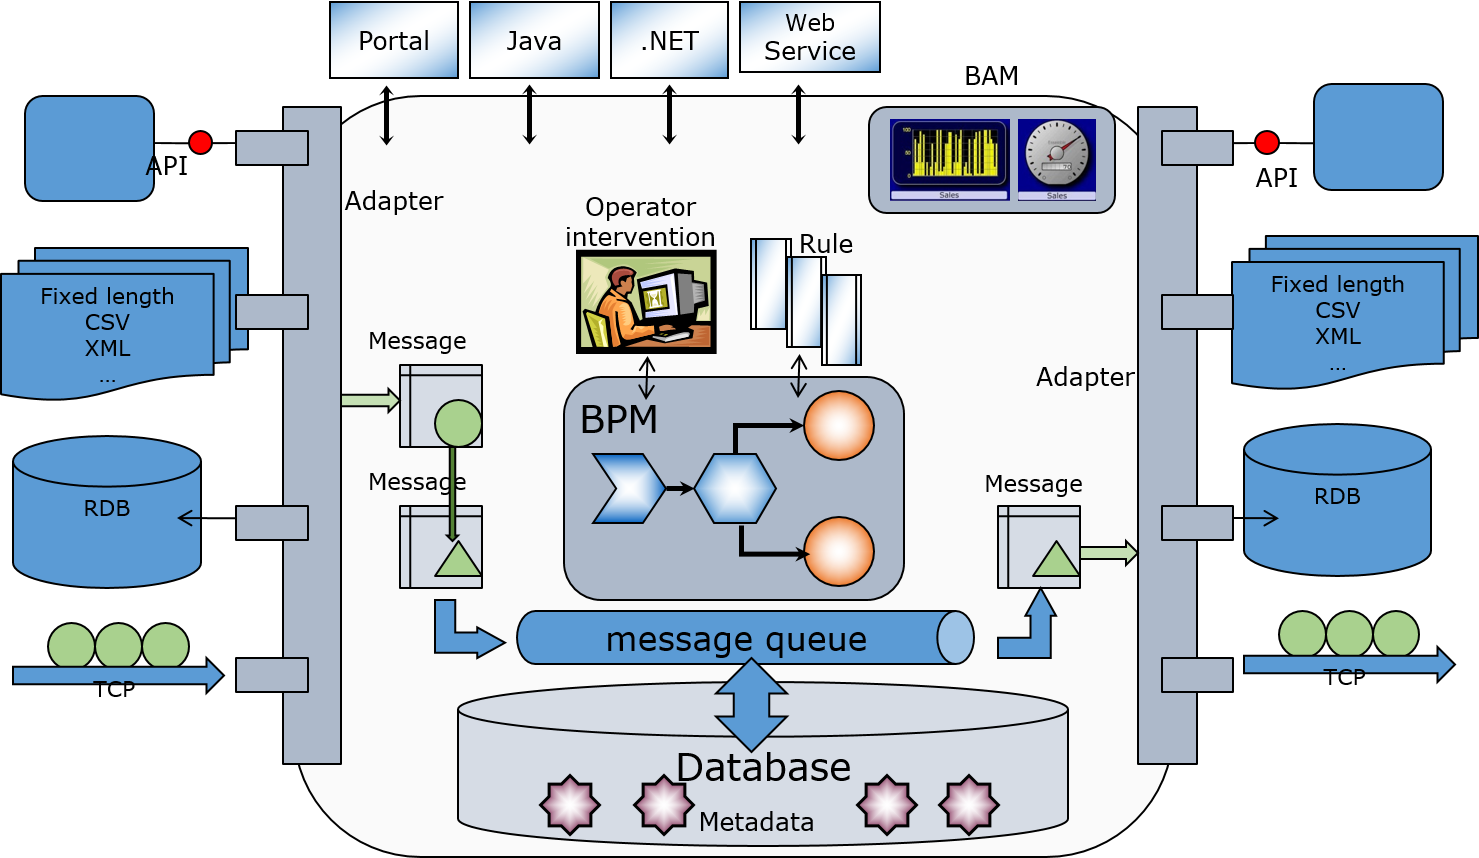
The left side of the figure is the window for accepting information sent from external systems.
There are various ways to receive information, such as monitoring the specified directory at regular intervals to read files, periodically querying the database, waiting for input, or directly calling and having it passed from applications in other systems.
In the system integration mechanism created in the IRIS Interoperability menu, the received information is stored in an object called a **message**. The **message** is sent to the component responsible for the subsequent processing.
A **message** can be created using all the received information or only a part of it.
Suppose you want to send the information contained in the **message** to an external system. In that case, you need to send the message to the component responsible for requesting the external network to process it (the right side of the figure). The component that receives the **message** will request the external system to process it.
Besides, suppose a **message** requires human review, data conversion, or data appending. In that case, the **message** is sent to the component in the middle of the diagram (BPM), which is responsible for coordinating the processing flow.
**Messages** are used to send and receive data between each component. When a **message** is sent or received, the message is automatically stored in the database.
Since **messages** are stored in the database, it is possible to check the difference before and after the data conversion. Check the **message** that was the source of a problem during an operation or start over (resend) from the middle of the process. Verify the status using **messages** at each stage of development, testing, and operation.
A simple picture of system integration would be divided into three components (business services, business processes, and business operations), as shown in the figure below.
There is also a definition called "**production**" that stores information about the components to be used (e.g., connection information).
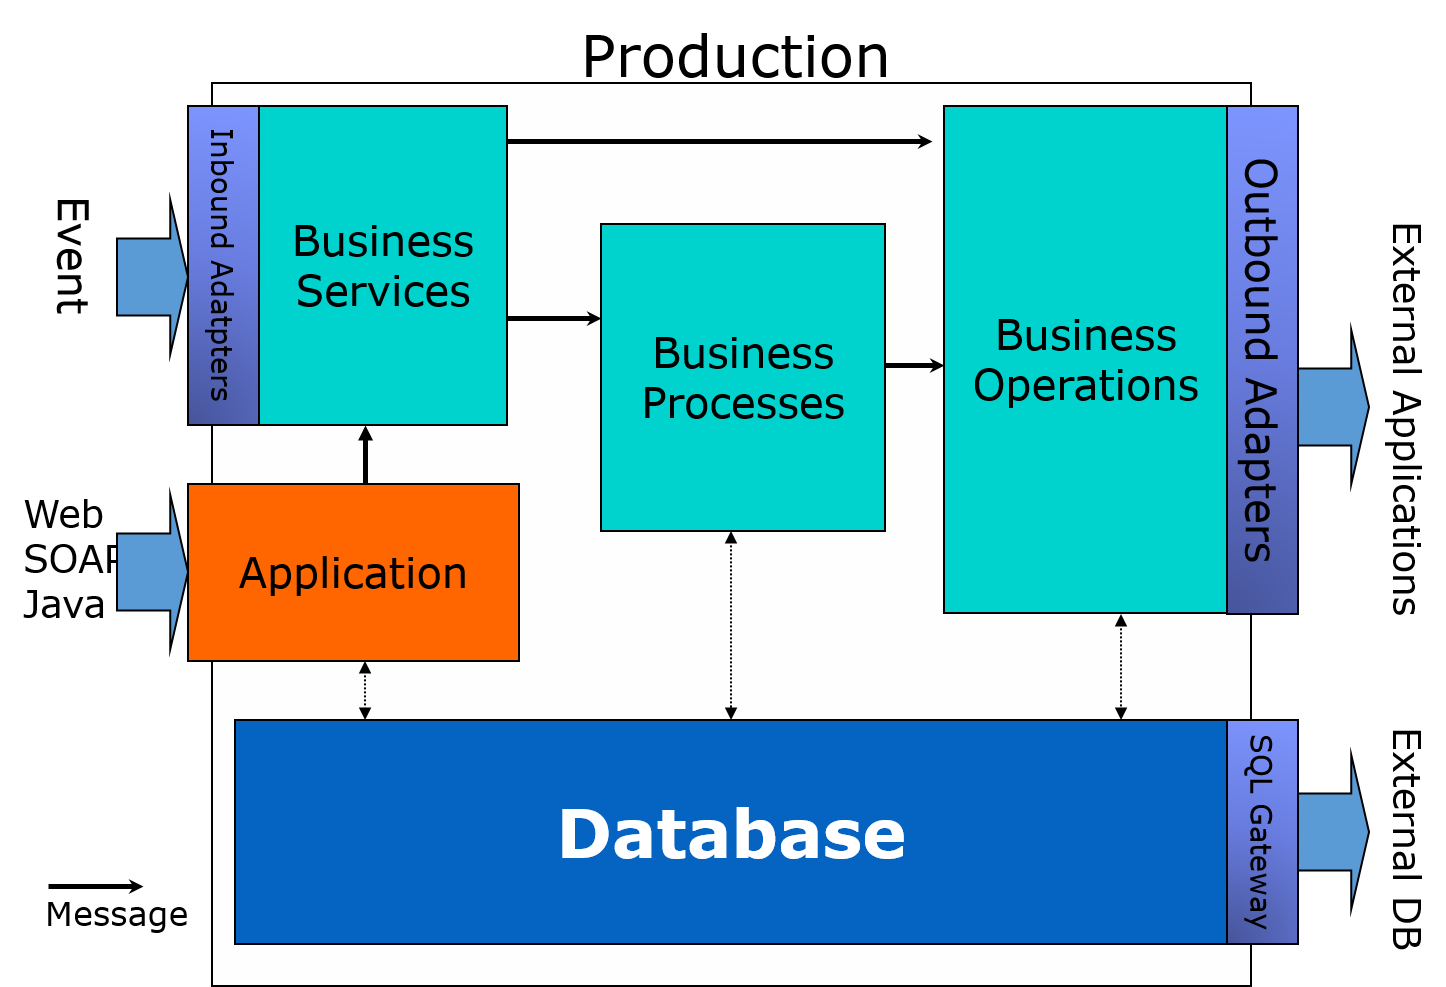
The role of each component is as follows:
**Business Services**
Responsible for receiving information from external sources, creating **messages**, and sending **messages** to other components.
**Business Processes**
This role is activated when a **message** is received and is responsible for coordinating the process (calling components in the defined order, waiting for responses, waiting for human review results, etc.).
**Business Operations**
This function is activated when a **message** is received and has a role in requesting the external system to process the message.
**Messages** are used to send and receive data between components.
Components other than business services initiate processing when they receive a **message**.
The question is, what is the purpose of creating and using this **message**?
**Messages** are created by retrieving the information you want to relay to the external system from entered data into the business service.
Since not all external systems connected to IRIS use the same type of data format for transmission, and the content to be relayed varies, the production can freely define message classes according to the information.
There are two types of **messages**: request (= request message) and response (= response message). The **message** that triggers the component's activation is called request (= request message), and the **message** that the component responds to after processing is called response (= response message).
These **messages** will be designed while considering the process of relaying them.
In the following articles, we will use a study case to outline the creation of **productions**, **messages**, and components.
Nice article. To be perfect, iris interoperability could be implement bpmn to BPM task, but it is done using bpel.
Article
Mihoko Iijima · Mar 5, 2021
**This article is a continuation of this post.**
In the previous article, we discussed business operations' creation from the components required for system integration.
In this article, you will learn how to create a business process that calls the two business operations you have defined in the sequence order.
* Production
* Message
* **Components**
* Business Services
* **Business Processes**
* Business Operations (previous post)
The business process acts as the coordinator (command center) of the process.
The processing adjustments you may want to implement in the sample include the following:
Step 1: Provide the city name to an external Web API and request weather information.Step 2: Register the result of the query (weather information) from Step 1 and the name of the purchased product received at the start of the production.
In the sample business process, we will wait for the answer to step 1 and adjust step 2 to operate.
In the process of waiting for a response (i.e., synchronization), for instance, what happens if step 1) doesn't respond for a few days?
If new messages are delivered to the business process while waiting for a response for a few days, the messages will not be dismissed since they are stored in a queue. However, the business process will not process new messages, and there will be a delay in the operation.
Note: Business processes and business operations have cues.
Therefore, in production, when there is a synchronous call, there are two ways for the business process to move: **A) to synchronize perfectly**, and B) to save the state of the business process itself in the database and hand over the execution environment so that other processes can run while waiting for a response.
**A) How to synchronize perfectly:**
While a synchronous call is being made, the business process's processing is ongoing, and waiting for the next message to be processed until all processing is completed.➡This function is used when the order of processing needs to be guaranteed in the first-in-first-out method.
B) The method of saving the state of the business process itself in the database and hand over the execution environment so that other processes can run while waiting for a response is
When a synchronous call is made, the process saves its state in the database. When a response message is received, and it is time to process the message, it opens the database and executes the next process. (IRIS will manage the storage and re-opening of business processes in the database). ➡ Used when it is acceptable to switch the processing order of messages (i.e., when it is allowed to process more and more different messages received while waiting for a response).
In the sample, **B)** is used.
There are two types of editors for creating business processes: a Business Process Editor that allows you to place processing boxes (activities) and implement them while defining their execution, and a method for creating them using ObjectScript in Studio or VSCode.
If you use the Business Process Editor, you will use the call activity to invoke the component, but this activity is **implemented** in the **B)** way. **Of course, you can also implement the** **A)** method in the Business Process Editor, except that you will not use the call activity in that case (you will use the code activity).
In this section, I will explain how to create it.
If you use the Business Process Editor, you write them in the Management Portal.
You can also open the business process from the production configuration page. The figure below shows the procedure.
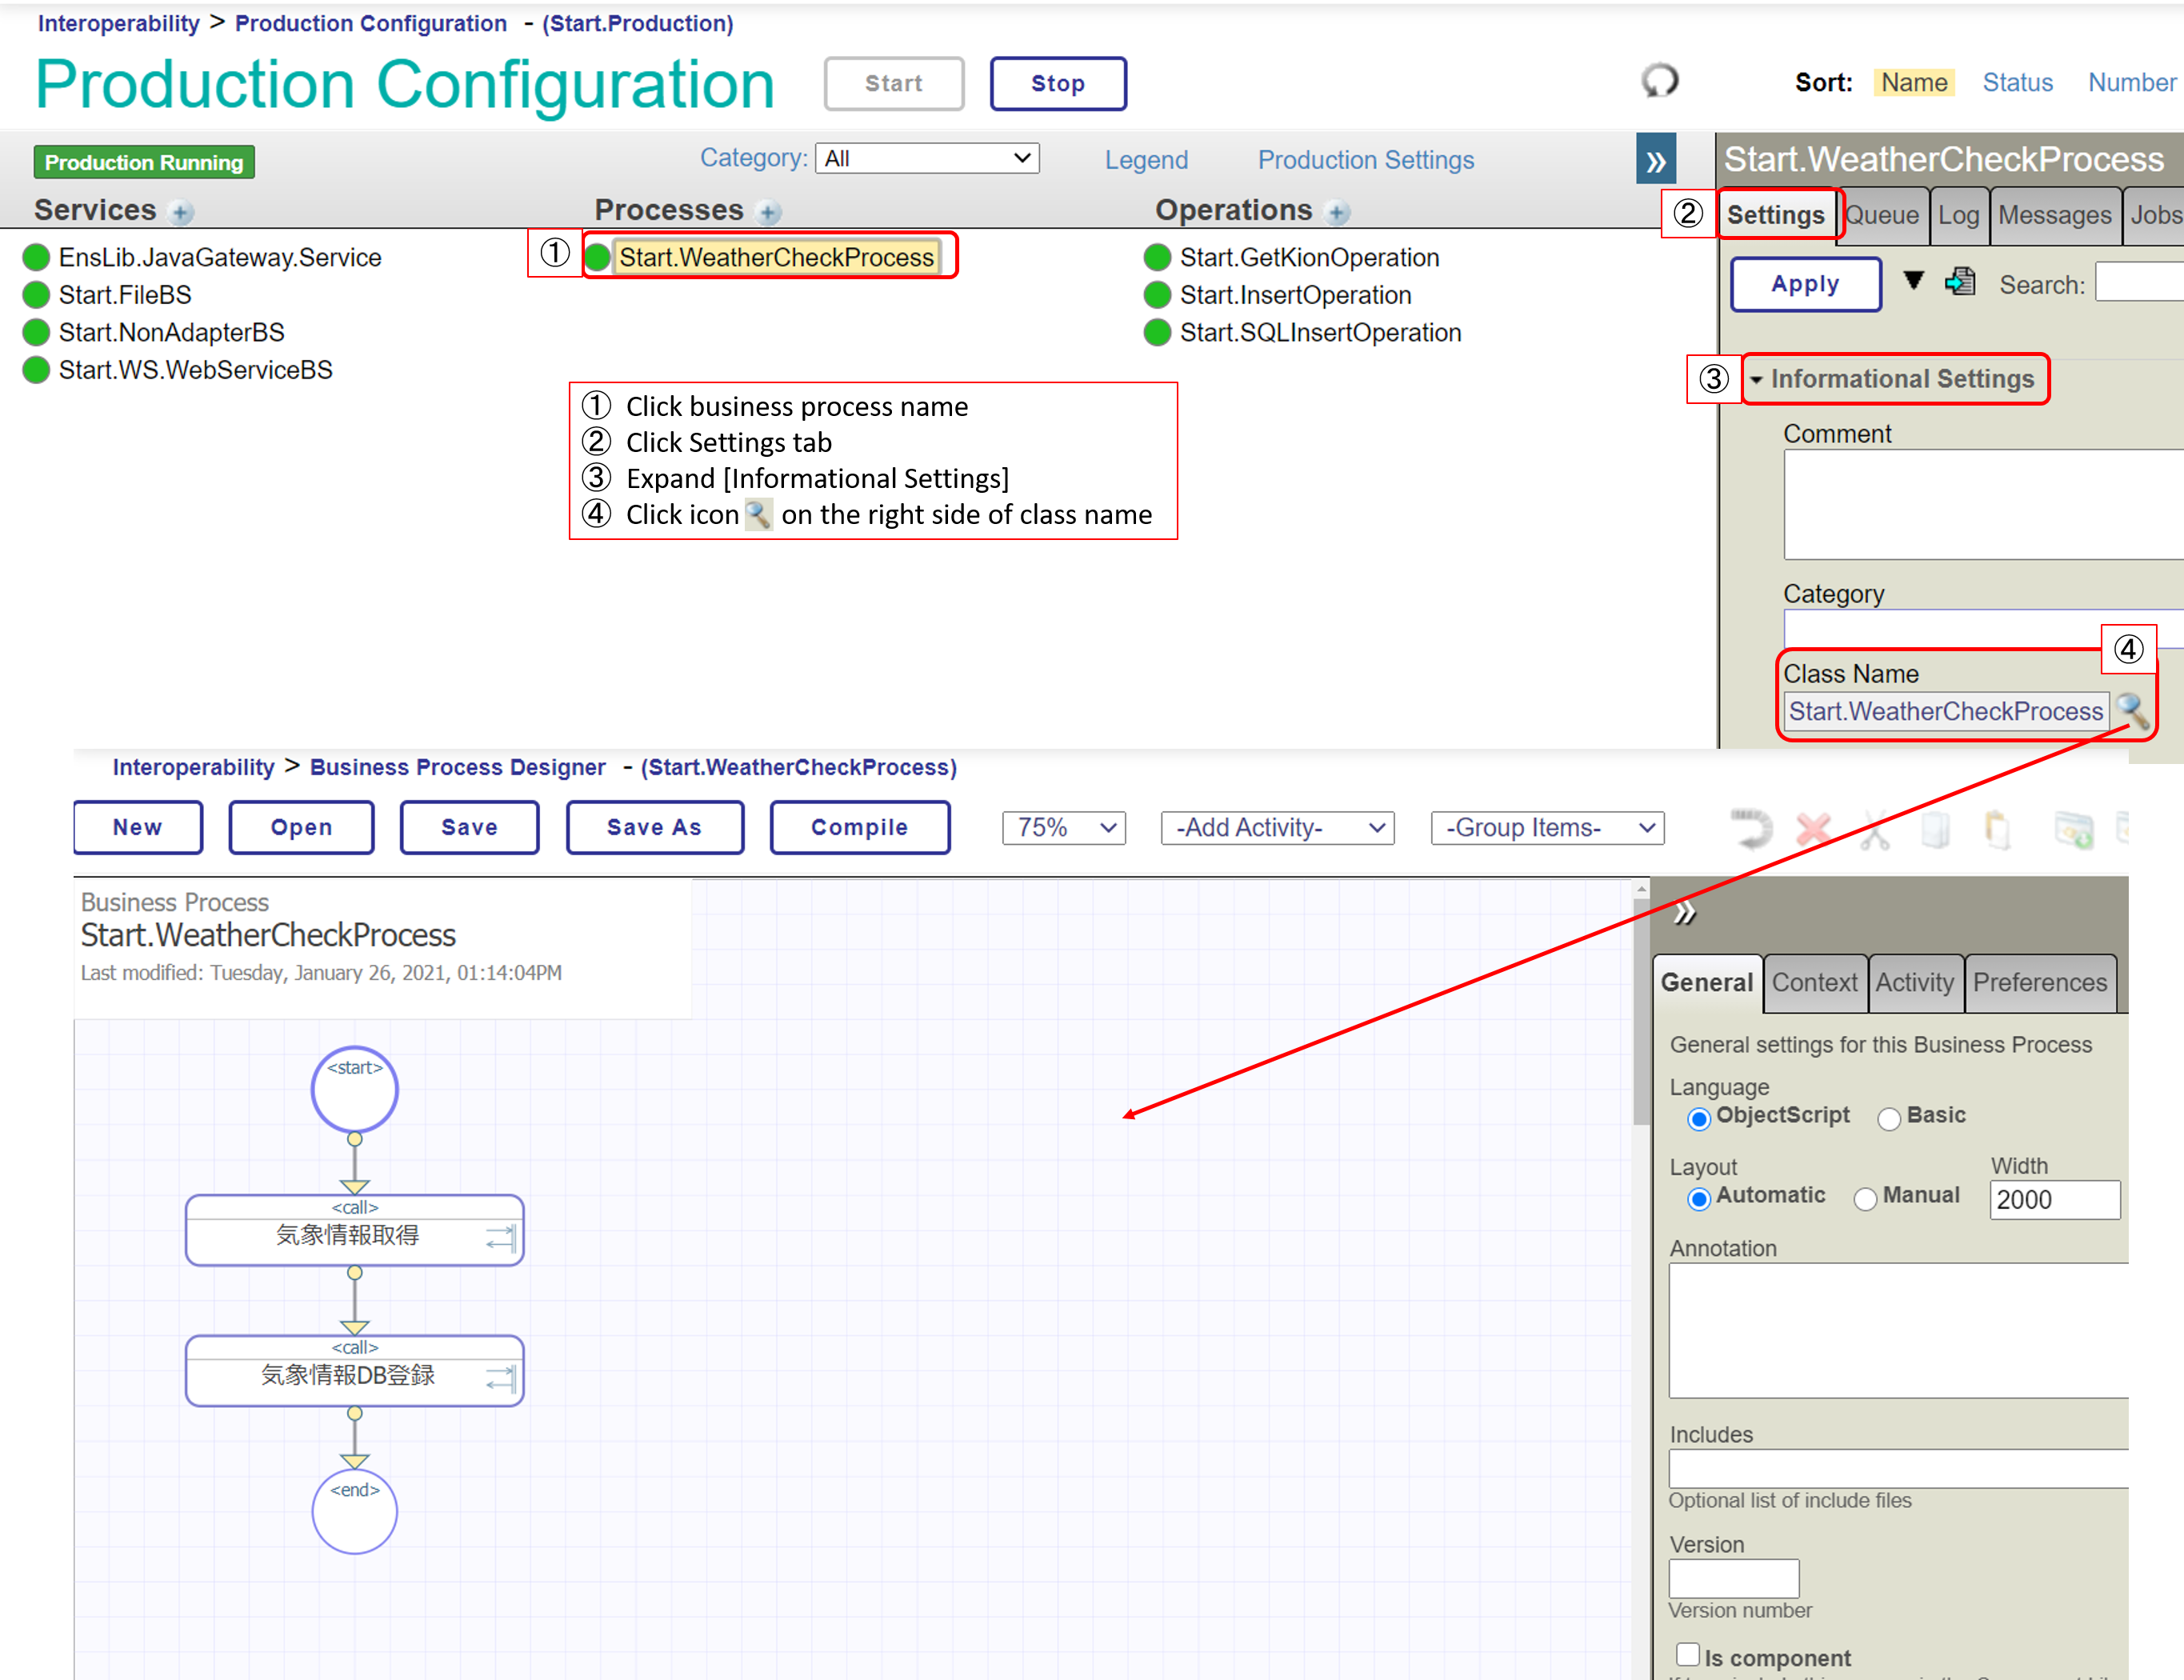
Icons like .png) in this editor are called activities, and those marked with are activities that can invoke other components.
This symbol.png) indicates that a response message will be returned (i.e., a synchronous call will be made). The activity defaults to the asynchronous call setting, which can be changed as needed.
Now let's look at business processes, which are components that are invoked upon receiving a request message, as well as business operations.
In the sample, the request message: It is set to start when it receives a Start.Request and does not return a response message.
In the business process, messages appear in various situations.
Request messages that are sent to business processes.
Request message (+ response message) to be sent when calling another component using the activity.
In the Business Process Editor, the names of the objects that store messages are clearly separated to be able to see which message was sent from which destination.
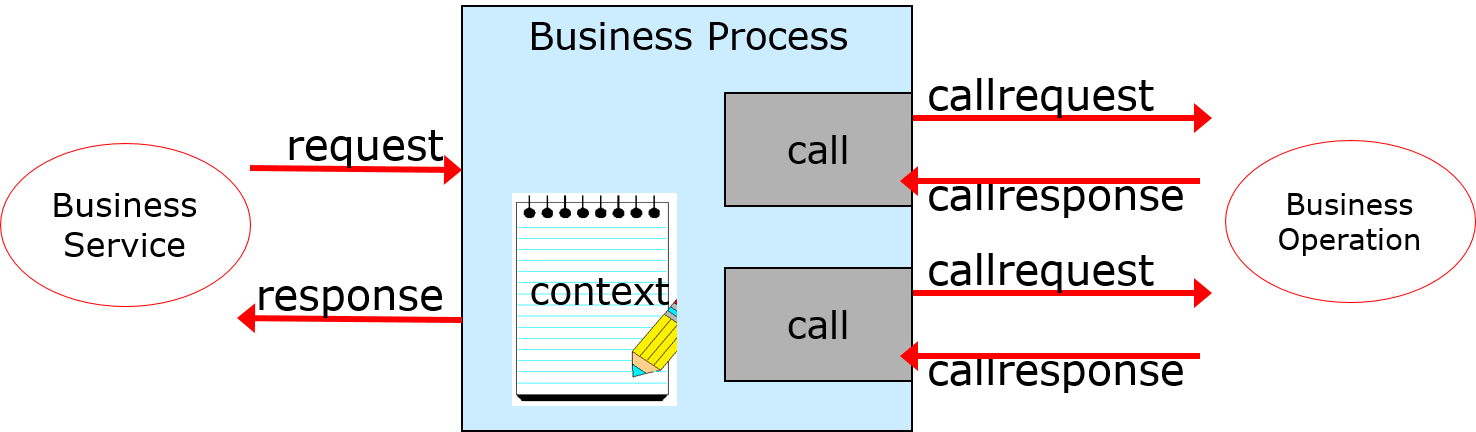
* request(basic requirements)
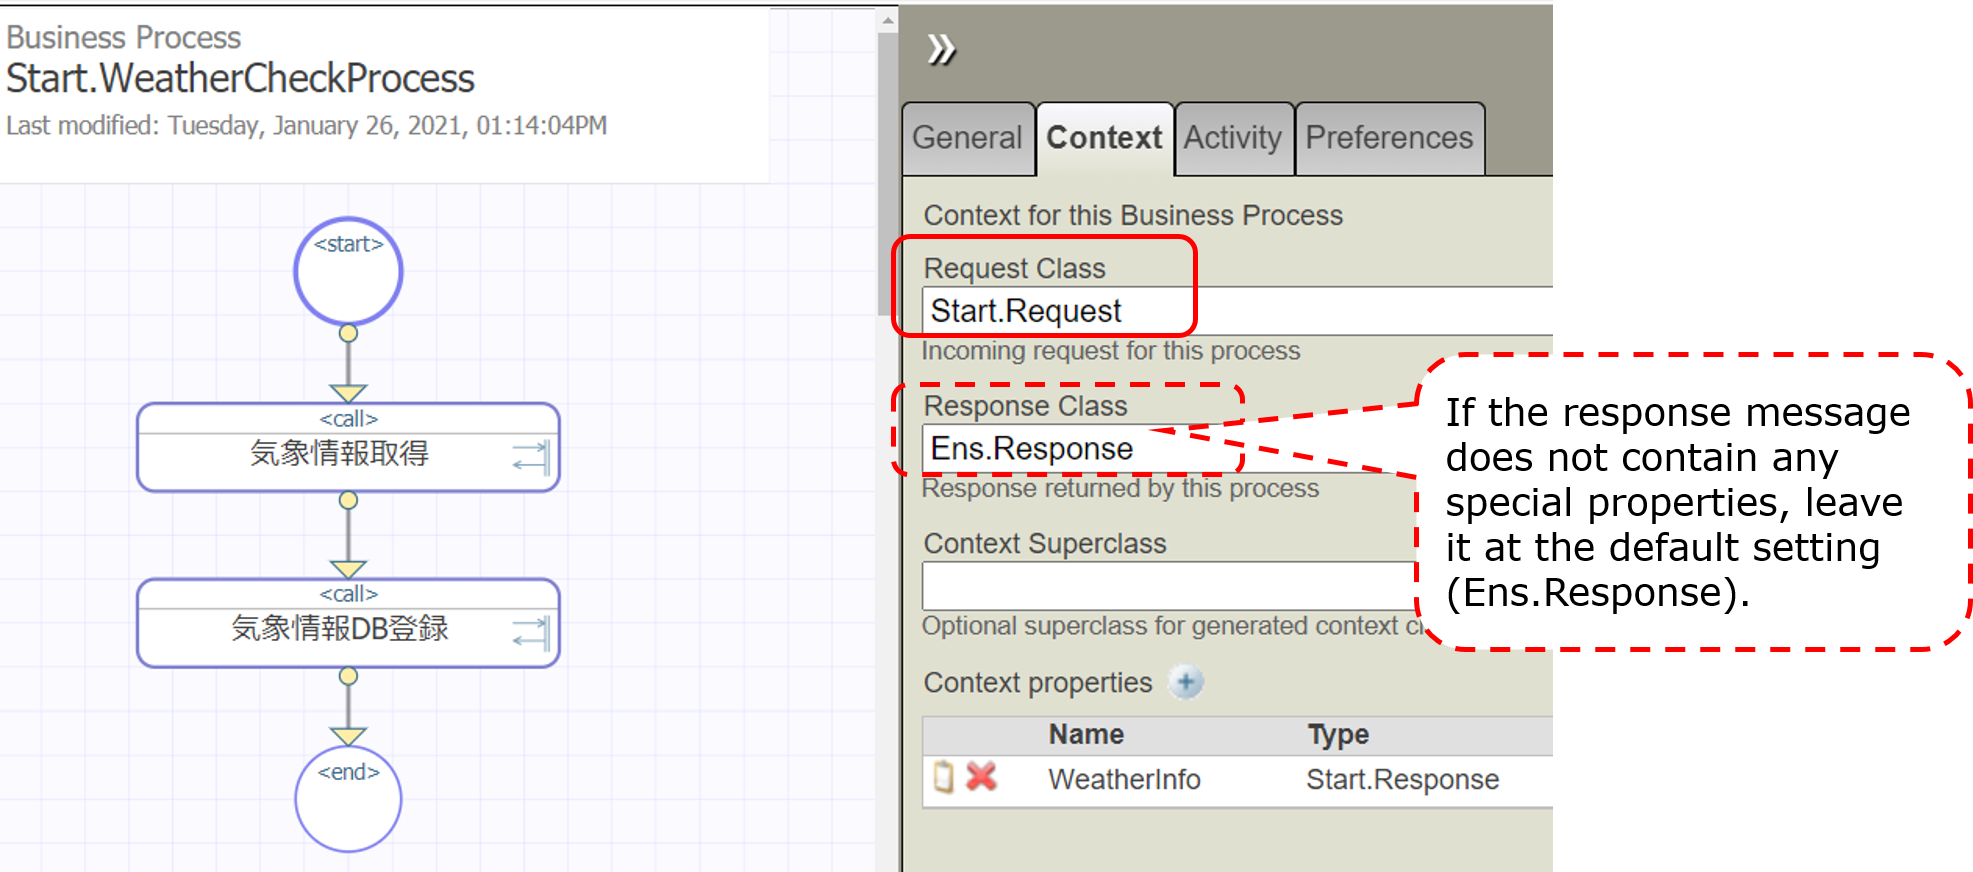
The message that triggered the start of the business process, in our example, is Start.Request (the message to be specified in the Request settings on the Context tab in the Business Process Editor)
* response(basic response)
Response message to return to the caller of the business process (not used in the sample) (message to be specified in the settings of the response in the context tab in the Business Process Editor)
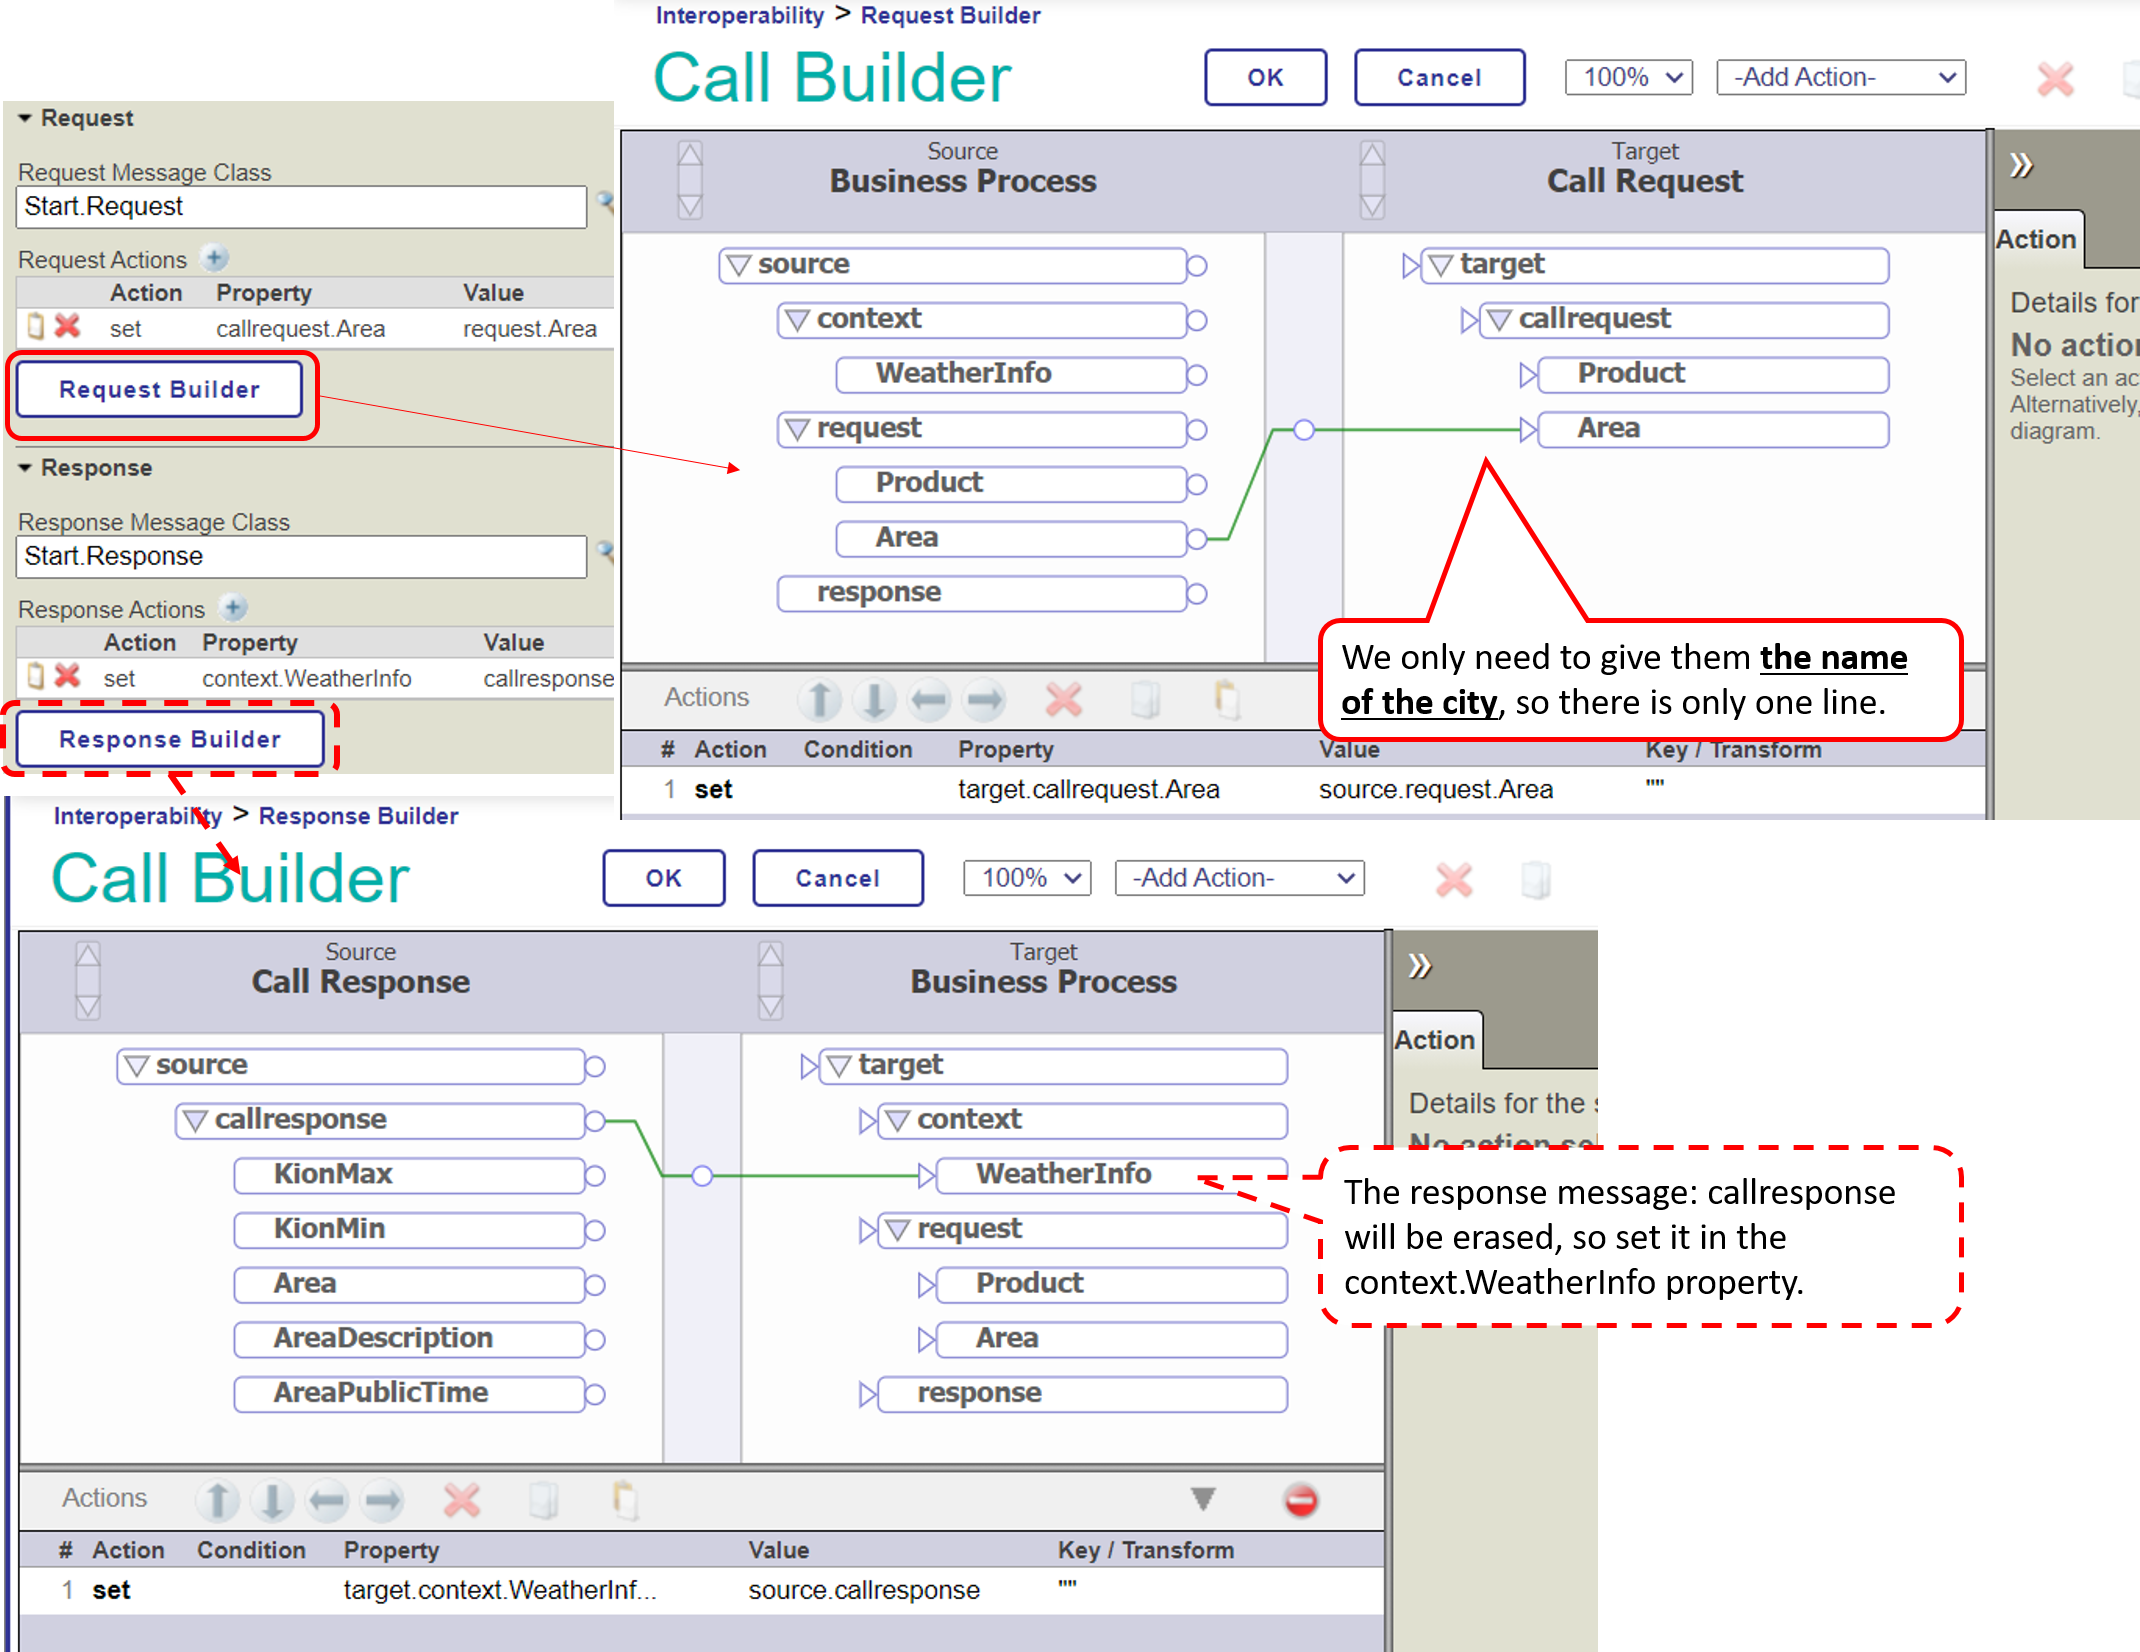
* callrequest(request message)
Request message to be sent when calling the component determined by the activity.
* callresponse(response message)
Response message returned from the component specified by the activity.
**callrequest and callresponse are objects that will be deleted when the call processing of the activity is completed.**
All other objects will not disappear until the business process is finished.
Now comes the problem when callresponse disappears.
That's because, as you can see in this sample,
**When calling a component, if you want to use the response result of a previously called component, the response message will be lost, and the information that was to be used in the next component will be erased.**
It is a problem 😓
What should we do?・・・・・
In such a case, you can use the context object.
The context object, like request/response, is an object that survives until the end of the business process.
Moreover, since context is a generic object, it can be defined in the process editor.
In addition to the context, the response object can also be used if it has a property that matches the inherited data's saving.
Now, let's go over the steps again.
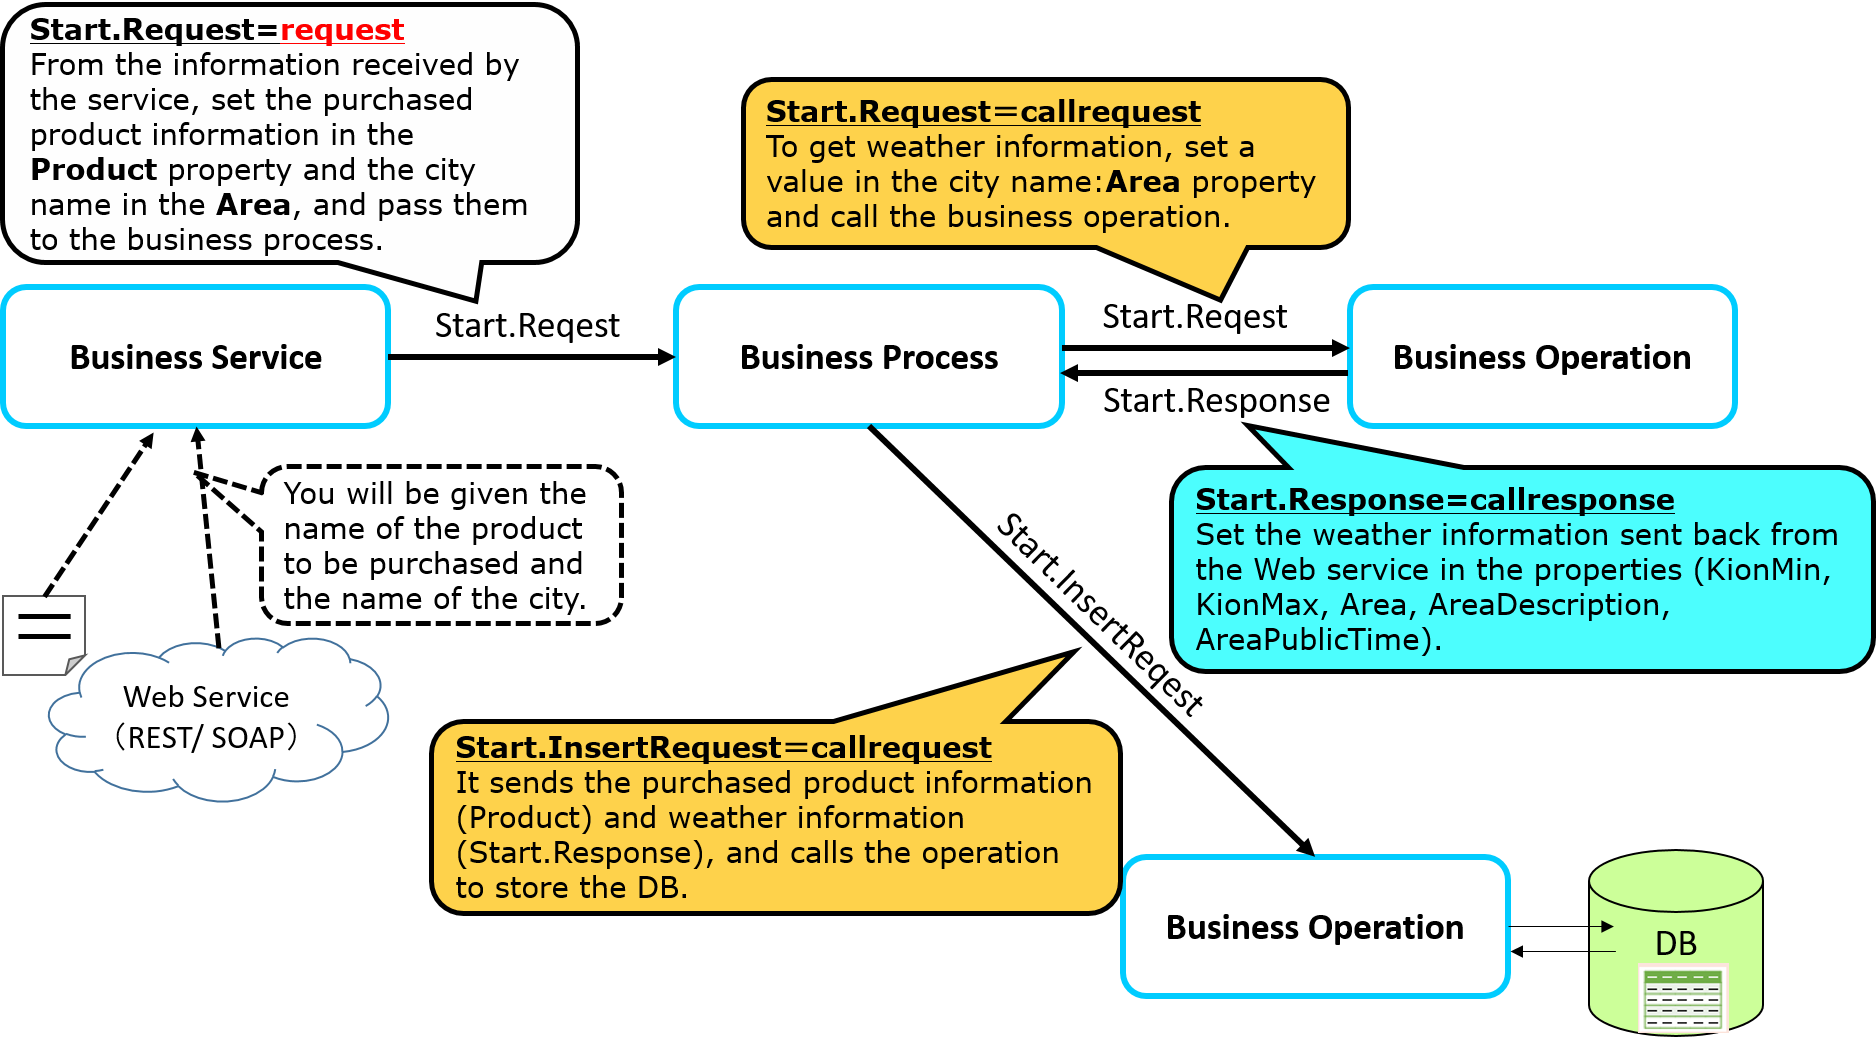
Response message in the light blue balloon: Start.Response is an object that will be deleted when the process is finished.
Since we want to use the response message (Start.Response) that contains the weather information as the message to be sent to the next [Business Operation for DB Update], we have to implement the context object in a way that all the property values of the response message (Start.Response) can be assigned to it.
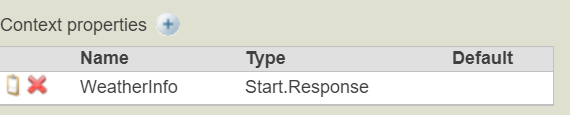
Then what is the setting for the context property?
The properties are defined in "Context Properties" in the Context tab of the Business Process Editor.
In this case, we would like to save all the properties of the response message (Start.Response) to the context object. Therefore, the property type specification is set to Start.Response.
Following that, check the settings in the activity.
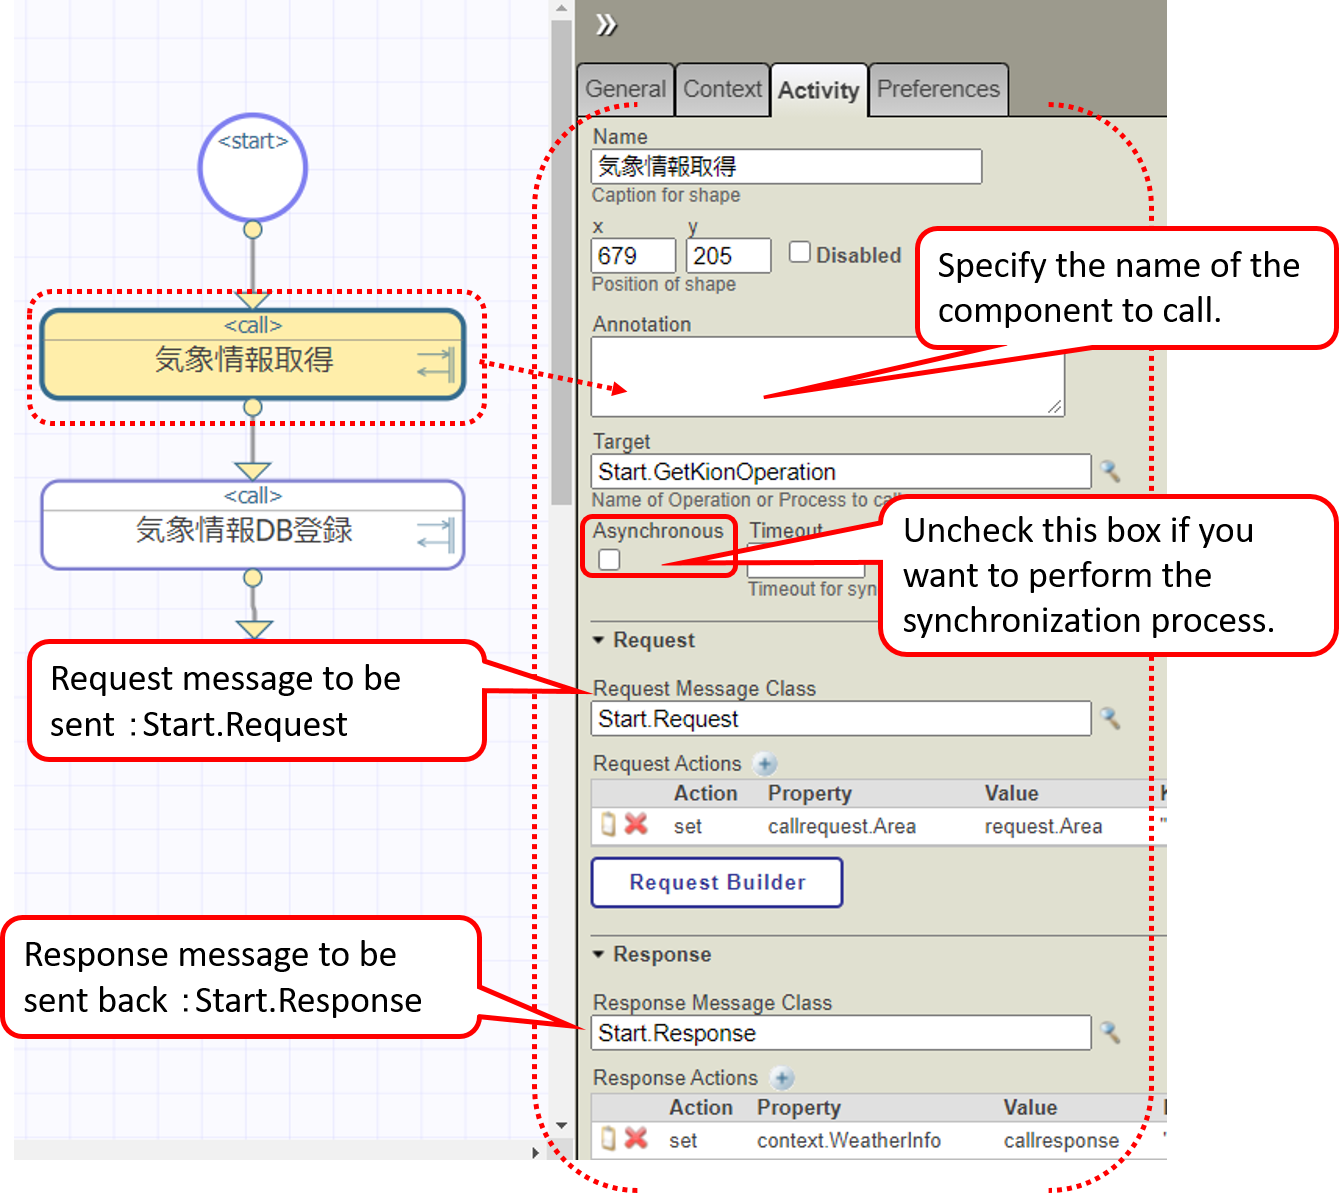
The request and response messages have a button called ○○ Builder.
Clicking on this button will launch a line-drawing editor that allows you to specify what you want to register in the properties of each message.
After this, the business operation for requesting a database update (Start.SQLInsertOperation or Start.InsertOperation) is called in the same way with the activity, and you are all set.
(For more information, see Configuring .png) for Business Processes).
Once you have completed the verification, you can test it. The testing method is the same as the one used for testing business operations (see this article).
The trace after the test is as follows:
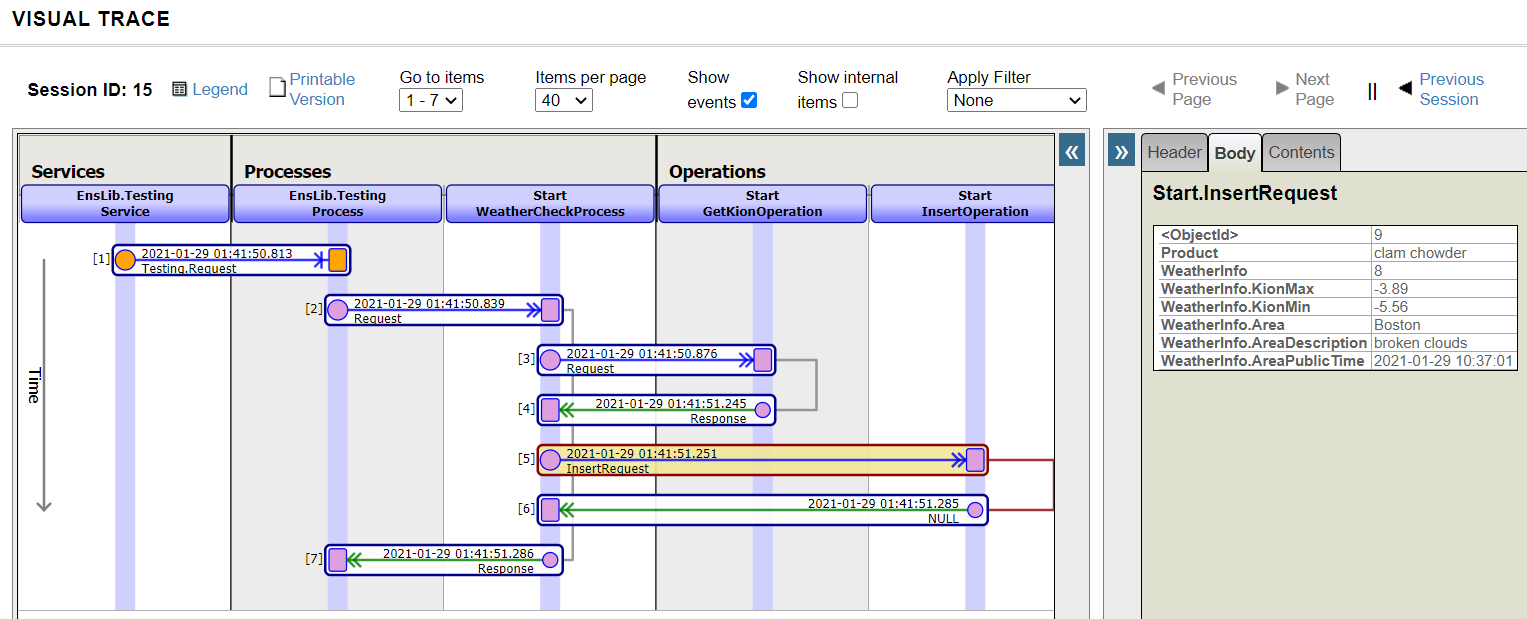
Since the business process is the coordinator, we could see that it invoked the defined components sequentially, keeping the synchronous execution.
Note 1: The sample only deals with the call activity, but various other activities such as data transformation.
Note 2: Business processes created by ObjectScript alone, other than the Business Process Editor, inherit from the Ens.BusinessProcess class. If it is created in the Business Process Editor, it inherits from the Ens.BusinessProcessBPL class.
The business process is the coordinator of the system integration process.The Business Process Editor provides the following types of variables for messages (request/response/callrequest/callreponse/context).A business process created with the Business Process Editor can work in a way that does not delay other messages, even if there is synchronization in the component's calling.
In the next section, we will finally show you how to develop the last component: business services.
Discussion
Matthew Waddingham · May 17, 2021
We've been tasked with developing a file upload module as part of our wider system, storing scanned documents against a patients profile. Our Intersystems manager suggested storing those files in the DB as streams would be the best approach and it sounded like a solid idea, it can be encrypted, complex indexes, optimized for large files and so on. However the stake holder questioned why would we want to do that over storing them in windows folders and that putting it in the DB was nuts. So we were wondering what everyone else has done in this situation and what made them take that route. The nice advantage of storing them in the DB is that is makes the following easier:
- refreshing earlier environments for testing- mirroring the file contents- encryption- simpler consistent backups
However, if you're talking about hundreds of GBs of data, then you can run into issues which you should weigh against the above:
- journaling volume- .dat size- .dat restore time
One way to help mitigate the above for larger volume file management is to map the classes that are storing the the stream properties into their own .DAT so they can be managed separately from other application data, and then you can even use subscript level mapping to cap the size of the file .DATs.
Hope that helps I can't disagree with Ben, there is a cut-off point where it makes more sense to store the files external to IRIS however it should be noted that if I was working with any other database technology such as Oracle or SQL Server I wouldn't even consider storing 'Blobs' in the database. However Cache/Ensemble/IRIS is extremely efficient at storing stream data especially binary steams.
I agree with Ben that by storing the files in the database you will have the benefits of Journallng and Backups which support 24/7 up time. If you are using Mirroring as part of your Disaster Recovery strategy then restoring your system will be faster.
If you store the files externally you will need to back up the files as a separate process from Cache/Ensemble/IRIS backups. I assume that you would have a seperate file server as you wouldn't want to keep the external files on the same server as your Cach/Ensemble/IRIS server for two reasons:
1) You would not want the files to be stored on the same disk as your database .dat files as the disk I/O might be compromised
2) If your database server crashes you may lose the external files unless they are are on separate server.
3) You would have to backup your file server to another server or suitable media
4) If the steam data is stored in IRIS then you can use iFind and iKnow on the file content which leads you into the realms of ML, NLP and AI
5) If your Cache.dat files and the External files are sored on the same disk system you potentially run into disk fragmentation issues over time and the system will get slower as the fragmentation gets worse. Far better to have your Cache.dat files on a disk system of their own where the database growth factor is set quite high but the database growth will be contiguous and fragmentation is considerably reduced and the stream data will be managed as effectively as any other global structure in Cache/Ensemble/IRIS.
Yours
Nigel Fragmentations issues, with SSD disks not an issue anymore.
But in any way, I agree with storing files in the database. I have a system in production, where we have about 100TB of data, while more than half is just for files, stored in the database. Some of our .dat files by mapping used exclusively for streams, and we take care of them, periodically by cutting them at some point, to continue with an empty database. Mirroring, helps us do not to worry too much about backups. But If would have to store such amount of files as files on the filesystem, we would lose our mind, caring about backups and integrity. Great data point! Thanks @Dmitry.Maslennikov :) I'm throwing in another vote for streams for all the reasons in the above reply chain, plus two more:
1. More efficient hard drive usage. If you have a ton of tiny files and your hard drive is formatted with a larger allocation unit, you're going to use a lot of space very inefficiently and very quickly.
2. At my previous job, we got hit by ransomware years ago that encrypted every document on our network. (Fortunately, we had a small amount of data and good offline backup process, so we were able to recover fairly quickly!) We were also using a document management solution that ran on Cache and stored the files as Stream objects, and they were left untouched. I'm obviously not going to say streams and ransomewareproof, but that extra layer of security can't hurt! Thank you all for your input, they're all sound reasoning that I can agree with. It's not a good idea to store files in the DB that you'll simply be reading back in full. The main issue you'll suffer from if you do hold them in the database (which nobody else seems to have picked up on) is that you'll needlessly flush/replace global buffers every time you read them back (the bigger the files, the worse this will be). Global buffers are one of the keys to performance.
Save the files and files and use the database to store their filepaths as data and indices.
Hi Rob, what factors play a part in this though, we'd only be retrieving a single file at a time (per user session obviously) and the boxes have around 96gb-128gb memory each (2 app, 2 db) if that has any effect on your answer? I've mentioned above a system with a significant amount of streams stored in the database. And just checked how global buffers used there. And streams are just around 6%. The system is very active, including files. Tons of objects created every minute, attached files, changes in files (yeah, our users can change MS Word files online on the fly, and we keep all the versions).
So, I still see no reasons to change it. And still, see tons of benefits, of keeping it as is. Hey Matthew,
No technical suggestions from me, but I would say that there are pros/cons to file / global streams which have been covered quite well by the other commenters. For the performance concern in particular, it is difficult to compare different environments and use patterns. It might be helpful to test using file / global streams and see how the performance for your expected stream usage, combined with your system activity, plays into your decision to go with one or the other. I agree, for our own trust we'll most likely go with Stream. However I've suggested we plan to build both options for customers but we'll just reference the links to files and then they can implement back up etc as they see fit. Great! This was an interesting topic and I'm sure one that will help future viewers of the community. There are a lot of considerations.
Questions:
Can you describe what are you going to do with that streams (or files I guess)?
Are they immutable?
Are they text or binary?
Are they already encrypted or zipped?
Average stream size?
Global buffers are one of the keys to performance.
Yes, that's why if streams are to be stored in the db they should be stored in a separate db with distinct block size and separate global buffers. Having multiple different global buffers for different block sizes, does not make sense. IRIS will use bigger size of block for lower size blocks inefficiently. The only way to separate is, to use a separate server, right for streams. For us it will be scanned documents (to create a more complete picture of a patients record in one place) so we can estimate a few of the constants involved to test how it will perform under load. I'm not sure what you mean by this. On an IRIS instance configured with global buffers of different sizes, the different sized buffers are organized into sperate pools. Each database is assigned to a pool based on what is the smallest size available that can handle that database. If a system is configured with 8KB and 32KB buffers, the 32KB buffers could be assigned to handle 16KB database or 32KB databases but never 8KB databases. It depends. I would prefer to store the files in the linux filesystem with a directory structure based on a hash of the file and only store the meta-information (like filename, size, hash, path, author, title, etc) in the database. In my humble opinion this has the following advantages over storing the files in the database:
The restore process of a single file will run shorter than the restore of a complete database with all files.
Using a version control (f.e. svn or git) for the files is possible with a history.
Bitrot will only destroy single files. This should be no problem if a filesystem with integrated checksums (f.e. btrfs) is used.
Only a webserver and no database is needed to serve the files.
You can move the files behind a proxy or a loadbalancer to increase availability without having to use a HA-Setup of Caché/IRIS.
better usage of filesystem cache.
better support for rsync.
better support for incremental/differential backup.
But the pros and cons may vary depending on the size and amount of files and your server setup. I suggest to build two PoCs, load a reasonable amount of files in each one and do some benchmarks to get some figures about the performance and to test some DR- and restore-scenarios. Jeffrey, thanks. But if I would have only 16KB blocks buffer configured and with a mix of databases 8KB (mostly system or CACHETEMP/IRISTEMP) and some of my application data stored in 16KB blocks. 8KB databases in any way will get buffered in 16KB Buffer, and they will be stored one to one, 8KB data in 16KB buffer. That's correct?
So, If I would need to separate global buffers for streams, I'll just need the separate from any other data block size and a significantly small amount of global buffer for this size of the block and it will be enough for more efficient usage of global buffer? At least for non-stream data, with a higher priority? Yes, if you have only 16KB buffers configured and both 8KB and 16KB databases, then the 16KB buffers will be used to hold 8KB blocks - one 8KB block stored in one 16KB buffer using only 1/2 the space...
If you allocate both 8KB and 16KB buffers then (for better or worse) you get to control the buffer allocation between the 8KB and 16KB databases.
I'm just suggesting that this is an alternative to standing up a 2nd server to handle streams stored in a database with a different block size.
One more consideration for whether to store the files inside the database or not is how much space gets wasted due to the block size. Files stored in the filesystem get their size rounded up to the block size of the device. For Linux this tends to be around 512 bytes (blockdev --getbsz /dev/...). Files stored in the database as streams are probably* stored using "big string blocks". Depending on how large the streams are, the total space consumed (used+unused) may be higher when stored in a database. ^REPAIR will show you the organization of a data block.
*This assumes that the streams are large enough to be stored as big string blocks - if the streams are small and are stored in the data block, then there will probably be little wasted space per block as multiple streams can be packed into a single data block.
Some info about blocks, in this article and others in cycle. In my opinion, it is much better & faster to store binary files out of the database. I have an application with hundreds of thousands of images. To get a faster access on a Windows O/S they are stored in a YYMM folders (to prevent having too many files in 1 folder that might slow the access) while the file path & file name are stored of course inside the database for quick access (using indices). As those images are being read a lot of times, I did not want to "waste" the "cache buffers" on those readings, hence storing them outside the database was the perfect solution. Hi, I keep everything I need in Windows folders, I'm very comfortable, I have everything organized. But maybe what you suggest won't look bad and be decent in terms of convenience! it depends on the file type , content, use frequency and so on , each way has its advantage
Announcement
Fabiano Sanches · Jul 19, 2023
InterSystems announces its sixth preview, as part of the developer preview program for the 2023.2 release. This release will include InterSystems IRIS and InterSystems IRIS for Health.
Highlights
Many updates and enhancements have been added in 2023.2 and there are also brand-new capabilities, such as Time-Aware Modeling, and enhancements of Foreign Tables (but still as an experimental feature). Note that some of these features or improvements may not be available in this current developer preview.
Another important topic is the removal of the Private Web Server (PWS) from the installers. This feature has been announced since last year and will be removed from InterSystems installers, but they are still in this first preview. See this note in the documentation.
--> If you are interested to try the installers without the PWS, please enroll in its EAP using this form, selecting the option "NoPWS". Additional information related to this EAP can be found here.
Future preview releases are expected to be updated biweekly and we will add features as they are ready. Please share your feedback through the Developer Community so we can build a better product together.
Initial documentation can be found at these links below. They will be updated over the next few weeks until launch is officially announced (General Availability - GA):
InterSystems IRIS
InterSystems IRIS for Health
Availability and Package Information
As usual, Continuous Delivery (CD) releases come with classic installation packages for all supported platforms, as well as container images in Docker container format. For a complete list, refer to the Supported Platforms document.
Installation packages and preview keys are available from the WRC's preview download site or through the evaluation services website (use the flag "Show Preview Software" to get access to the 2023.2).
Container images for both Enterprise and Community Editions of InterSystems IRIS and IRIS for Health and all corresponding components are available from the new InterSystems Container Registry web interface. For additional information about docker commands, please see this post: Announcing the InterSystems Container Registry web user interface.
The build number for this developer preview is 2023.2.0.214.0.
For a full list of the available images, please refer to the ICR documentation. Alternatively, tarball versions of all container images are available via the WRC's preview download site.
Article
Yuri Marx · Jul 19, 2023
Hibernate is the most popular framework to do ORM (Object Relational Mapping) projects. With Hibernate a software can use the main DBMS in the market, including the capability to change the database vendor any time, without source code impact. This is possible because the Hibernate supports dialects. Each database product has a different dialect that can be assigned into a configuration file. So, if a software is using Oracle and is looking to evolve to InterSystems IRIS, just change the configuration file with connection and dialect information. If your software needs to be prepared to use database indicated by your client, the Hibernate is the solution to you.
Is there any InterSystems IRIS dialect for the new Hibernate 6?
Currently is not any official dialect to use IRIS with the new Hibernate 6. To resolve this issue, Dmitry Maslennikov proposed an idea in the excellent Ideas Portal (https://ideas.intersystems.com/ideas/DPI-I-372) and I implemented it.If you do this tutorial, you will see the idea and this new dialect of IRIS in action and working.
What you need to do this tutorial
To do this tutorial you need:1. An IRIS instance running (if you don’t have one, you can get it on https://openexchange.intersystems.com/package/ObjectScript).2. Spring Tools installed (download it on https://spring.io/tools). Choose Eclipse version for this tutorial.3. Java JDK version 17 (download it on https://jdk.java.net/archive/). Choose Java 17 for this tutorial.4. All source code for this tutorial: https://github.com/yurimarx/iris-java-tools/tree/main/springboot-sample.
Tutorial steps
1. Open the Spring Tool Suite (STS) and choose a valid workspace path (any folder) and click Launch:
2. Click the Create new Spring Starter Project link:
3. This wizard will create a new Spring project. Fill the fields with these values:• Service URL: https://start.spring.io• Type: Maven (it is a package manager like the NPM, ZPM or IPM)• Packaging: Jar (type of executable for the compiled project)• Java Version: 17 or 20 (for this tutorial I selected version 17)• Language: Java• Group: com.tutorial (domain of the project for Maven)• Artifact: iris-tutorial (name of the project for Maven)• Version: 0.0.1-SNAPSHOT (version of the project for Maven)• Description: IRIS Tutorial• Package: com.tutorial.iris (root package for the project)
4. Click Next.5. Choose the following dependencies for your project:
6. Click Finish to create your project.7. Open your pom.xml file and include 2 new dependencies (for IRIS dialect and for IRIS JDBC driver) and 1 repository (necessary because the InterSystems IRIS JDBC driver is not published into a public maven repository).
<?xml version="1.0" encoding="UTF-8"?>
<project xmlns="http://maven.apache.org/POM/4.0.0"
xmlns:xsi="http://www.w3.org/2001/XMLSchema-instance"
xsi:schemaLocation="http://maven.apache.org/POM/4.0.0 https://maven.apache.org/xsd/maven-4.0.0.xsd">
<modelVersion>4.0.0</modelVersion>
<parent>
<groupId>org.springframework.boot</groupId>
<artifactId>spring-boot-starter-parent</artifactId>
<version>3.1.1</version>
<relativePath /> <!-- lookup parent from repository -->
</parent>
<groupId>com.tutorial</groupId>
<artifactId>tutorial-dialect</artifactId>
<version>0.0.1-SNAPSHOT</version>
<name>tutorial-dialect</name>
<description>Tutorial for IRIS Hibernate 6 Dialect</description>
<properties>
<java.version>17</java.version>
</properties>
<dependencies>
<dependency>
<groupId>org.springframework.boot</groupId>
<artifactId>spring-boot-starter-data-jpa</artifactId>
</dependency>
<dependency>
<groupId>org.springframework.boot</groupId>
<artifactId>spring-boot-starter-data-rest</artifactId>
</dependency>
<dependency>
<groupId>org.springframework.boot</groupId>
<artifactId>spring-boot-starter-hateoas</artifactId>
</dependency>
<dependency>
<groupId>org.springframework.boot</groupId>
<artifactId>spring-boot-starter-web</artifactId>
</dependency>
<dependency>
<groupId>org.springframework.data</groupId>
<artifactId>spring-data-rest-hal-explorer</artifactId>
</dependency>
<dependency>
<groupId>org.springframework.boot</groupId>
<artifactId>spring-boot-devtools</artifactId>
<scope>runtime</scope>
<optional>true</optional>
</dependency>
<dependency>
<groupId>org.springframework.boot</groupId>
<artifactId>spring-boot-configuration-processor</artifactId>
<optional>true</optional>
</dependency>
<dependency>
<groupId>org.springframework.boot</groupId>
<artifactId>spring-boot-starter-test</artifactId>
<scope>test</scope>
</dependency>
<dependency>
<groupId>io.github.yurimarx</groupId>
<artifactId>hibernateirisdialect</artifactId>
<version>1.1.0</version>
</dependency>
<dependency>
<groupId>com.intersystems</groupId>
<artifactId>intersystems-jdbc</artifactId>
<version>3.7.1</version>
</dependency>
</dependencies>
<build>
<plugins>
<plugin>
<groupId>org.springframework.boot</groupId>
<artifactId>spring-boot-maven-plugin</artifactId>
</plugin>
</plugins>
</build>
<repositories>
<repository>
<id>InterSystems IRIS DC Git Repository</id>
<url>
https://github.com/intersystems-community/iris-driver-distribution/blob/main/JDBC/JDK18</url>
<snapshots>
<enabled>true</enabled>
<updatePolicy>always</updatePolicy>
</snapshots>
</repository>
</repositories>
</project>
8. Go to the application.properties file (src > main > java > resources folder) and set connection and dialect properties with these values:
spring.datasource.username=_SYSTEM
spring.datasource.url=jdbc:IRIS://localhost:1972/USER
spring.datasource.password=SYS
spring.jpa.properties.hibernate.default_schema=Example
spring.jpa.hibernate.ddl-auto=update
spring.datasource.driver-class-name=com.intersystems.jdbc.IRISDriver
spring.jpa.properties.hibernate.temp.use_jdbc_metadata_defaults = false
spring.jpa.database-platform=io.github.yurimarx.hibernateirisdialect.InterSystemsIRISDialect
spring.jpa.show-sql=true
spring.jpa.properties.hibernate.format_sql=true
9. Create a new persistent class (click right button on project > New > Class):
10. Fill the following fields to create the class:• Package: com.tutorial.iris.model• Name: Product
11. Click Finish to create the class.12. Develop the Product persistent class (class with values persisted in a SQL table) with this source code:
package com.tutorial.dialect.model;
import java.util.Date;
import com.fasterxml.jackson.annotation.JsonFormat;
import jakarta.persistence.Column;
import jakarta.persistence.Entity;
import jakarta.persistence.GeneratedValue;
import jakarta.persistence.GenerationType;
import jakarta.persistence.Id;
import jakarta.persistence.Table;
import jakarta.persistence.Temporal;
import jakarta.persistence.TemporalType;
@Entity
@Table(name = "Product")
public class Product {
@Id
@GeneratedValue (strategy = GenerationType.IDENTITY)
private Long id;
private String name;
private String description;
private Double height;
private Double width;
private Double weight;
@Column(name="releasedate")
@Temporal(TemporalType.DATE)
@JsonFormat(pattern = "yyyy-MM-dd")
private Date releaseDate;
public Long getId() {
return id;
}
public void setId(Long id) {
this.id = id;
}
public String getName() {
return name;
}
public void setName(String name) {
this.name = name;
}
public String getDescription() {
return description;
}
public void setDescription(String description) {
this.description = description;
}
public Double getHeight() {
return height;
}
public void setHeight(Double height) {
this.height = height;
}
public Double getWidth() {
return width;
}
public void setWidth(Double width) {
this.width = width;
}
public Double getWeight() {
return weight;
}
public void setWeight(Double weight) {
this.weight = weight;
}
public Date getReleaseDate() {
return releaseDate;
}
public void setReleaseDate(Date releaseDate) {
this.releaseDate = releaseDate;
}
}
13. Create an Interface repository for CRUD operations to the Product class (click right the project > New > Interface):
14. Fill the values for the interface and click Finish:• Package: com.tutorial.iris.repository• Name: ProductRepository
15. Click Finish to create the interface.16. Develop the ProductRepository (a CRUD repository implements save, delete, find, find one and update functions) Interface (src > main > java > com > tutorial > dialect > repository folder ) with this source code:
package com.tutorial.dialect.repository;
import org.springframework.data.repository.CrudRepository;
import org.springframework.stereotype.Repository;
import com.tutorial.dialect.model.Product;
@Repository
public interface ProductRepository extends CrudRepository<Product, Long> {
}
17. Now, using the HAL browser from Springboot, is possible test CRUD functions in a web screen.18. Be sure to run an IRIS instance on localhost, port 1972 with user _SYSTEM and password SYS (or change the application.properties for other connections values).19. Run the application (click right the project > Run As > Spring boot app).20. On the console you can see the log indicating the application start:
21. Go to your browser and type http://localhost:8080. See the HAL browser:
22. Click plus button for products endpoint to create a new product:
23. Fill the following values to create a new product and click Go button to confirm:
24. A new product was persisted:
Check the new row on IRIS (table product on USER namespace)
Test other operations, check in the database and enjoy!
I would like thanks @Dmitry.Maslennikov for your advanced support and for help me to improve this new Dialect Great initiative, @Yuri.Gomes ! Could you please publish the repo on OEX too? I published on OEX: https://openexchange.intersystems.com/package/IRIS-Hibernate-Dialect thank you, @Yuri.Gomes ! Thank you @Yuri.Gomes for this great job! Thanks guys Hi @Yuri.Gomes,
Your video is available on InterSystems Developers YouTube channel:
⏯️ Using the new InterSystems IRIS Hibernate 6 Dialect for a Springboot Project
Please enjoy! Great! Thanks
Announcement
Fabiano Sanches · Jul 26, 2023
InterSystems announces its seventh preview, as part of the developer preview program for the 2023.2 release. This release will include InterSystems IRIS and InterSystems IRIS for Health.
Discontinuation of the Private Web Server (PWS)
A major topic in this release is the discontinuation of the Private Web Server (PWS) from the installers. This feature has been announced since last year and it's removed from InterSystems installers, starting with this developer preview.
See this note in the documentation. Additional information related to this topic can be found here.
--> If you are facing any issues and would like to get in touch with Product Management, or would like to provide your feedback, please email: NoPWS@InterSystems.com.
Highlights
Many updates and enhancements have been added in 2023.2 and there are also brand-new capabilities, such as Time-Aware Modeling, and enhancements of Foreign Tables (but still as an experimental feature).
Initial documentation can be found at these links below. They will be updated over the next few weeks until launch is officially announced (General Availability - GA):
InterSystems IRIS
InterSystems IRIS for Health
Availability and Package Information
As usual, Continuous Delivery (CD) releases come with classic installation packages for all supported platforms, as well as container images in Docker container format. For a complete list, refer to the Supported Platforms document.
Installation packages and preview keys are available from the WRC's preview download site or through the evaluation services website (use the flag "Show Preview Software" to get access to the 2023.2).
Container images for both Enterprise and Community Editions of InterSystems IRIS and IRIS for Health and all corresponding components are available from the new InterSystems Container Registry web interface. For additional information about docker commands, please see this post: Announcing the InterSystems Container Registry web user interface.
The build number for this developer preview is 2023.2.0.221.0.
For a full list of the available images, please refer to the ICR documentation. Alternatively, tarball versions of all container images are available via the WRC's preview download site. I confirmed that the Community Edition containers (at least, the one I checked) still include a PWS 👍 I have a problem installing this version.
Microsoft Defender 365 has detected a security threath in studio.cab : 'Bearfoos' malware.
Maybe a false positive ? Developer preview license keys are expired
I'd scan file with VirusTotal, or alternatives @John.Murray - Yes, Community Editions still have the PWS. The discontinuation affects kits for production environments, without the "Community" names. @John Murray - Yes, Community Editions still have the PWS. The discontinuation affects kits for production environments, without the "Community" names. @Dmitry.Maslennikov - thank you for bringing this to our attention. We're working on refreshing the keys now New keys are posted. Sorry for any inconvenience. Thank you! Just a week for a preview license?
@Dmitry.Maslennikov - as GA is eminent the guys were set to expire post-GA, but Product Management decided that this really wasn't necessary so next time it will have a longer expiration even if GA is right around the corner. Thanks for raising the question!
Announcement
Anastasia Dyubaylo · Dec 28, 2023
Hey Developers,
Watch this video to learn how UC Davis Health uses InterSystems API Manager to satisfy business-partner demand for access to both custom and FHIR APIs:
⏯ How UC Davis Health Uses InterSystems API Manager @ Global Summit 2023
🗣 Presenter: @Carl.Campbell4240, Senior Integration Engineer, UC Davis Health
Subscribe to our YouTube channel InterSystems Developers to stay tuned!
Article
Evgeny Shvarov · May 16, 2023
Hi folks!
Just want to introduce you a new util to import CSV into IRIS - csvgenpy!
Install
USER>zpm "install csvgenpy"
Use:
do ##class(shvarov.csvgenpy.csv).Generate("file or url","table","schema")
Example:
USER>do ##class(shvarov.csvgenpy.csv).Generate("https://raw.githubusercontent.com/datasciencedojo/datasets/master/titanic.csv","titanic","data")
This will create table and class data.titanic in IRIS and will load the data. you can proof it with:
USER>:sql
[SQL]USER>>select * from data.titanic
[SQL]USER>>select * from data.titanic
1. select * from data.titanic
passengerid survived pclass name sex age sibsp parch ticket fare cabin embarked
1 0 3 Braund, Mr. Owen Harris male 22 1 0 A/5 21171 7.25 S
2 1 1 Cumings, Mrs. John Bradley (Florence Briggs Thayer) female 38 1 0 PC 17599 71.283299999999996998 C85 C
3 1 3 Heikkinen, Miss. Laina female 26 0 0 STON/O2. 3101282 7.9249999999999998223 S
...
So that's it!
Basically it does the same thing as csvgen does, but uses python library sqlalchemy which works because of embedded python and sqlalchemy-iris by @Dmitry.Maslennikov
P.S. csvgenpy can import some "complicated" for csvgen csv as this one. Basically it can import any kind of csv.
Feedback and Pull requests are very welcome!
Announcement
Fabiano Sanches · Jun 7, 2023
InterSystems announces its third preview, as part of the developer preview program for the 2023.2 release. This release will include InterSystems IRIS and InterSystems IRIS for Health.
Highlights
Many updates and enhancements have been added in 2023.2 and there are also brand-new capabilities, such as Time-Aware Modeling, enhancements of Foreign Tables, and the ability to use Ready-Only Federated Tables. Note that some of these features or improvements may not be available in this current developer preview.
Another important topic is the removal of the Private Web Server (PWS) from the installers. This feature has been announced since last year and will be removed from InterSystems installers, but they are still in this first preview. See this note in the documentation.
--> If you are interested to try the installers without the PWS, please enroll in its EAP using this form, selecting the option "NoPWS". Additional information related to this EAP can be found here.
Future preview releases are expected to be updated biweekly and we will add features as they are ready. Please share your feedback through the Developer Community so we can build a better product together.
Initial documentation can be found at these links below. They will be updated over the next few weeks until launch is officially announced (General Availability - GA):
InterSystems IRIS
InterSystems IRIS for Health
Availability and Package Information
As usual, Continuous Delivery (CD) releases come with classic installation packages for all supported platforms, as well as container images in Docker container format. For a complete list, refer to the Supported Platforms document.
Installation packages and preview keys are available from the WRC's preview download site or through the evaluation services website (use the flag "Show Preview Software" to get access to the 2023.2).
Container images for both Enterprise and Community Editions of InterSystems IRIS and IRIS for Health and all corresponding components are available from the new InterSystems Container Registry web interface. For additional information about docker commands, please see this post: Announcing the InterSystems Container Registry web user interface.
The build number for this developer preview is 2023.2.0.202.0.
For a full list of the available images, please refer to the ICR documentation. Alternatively, tarball versions of all container images are available via the WRC's preview download site.
Announcement
Fabiano Sanches · May 24, 2023
InterSystems announces its second preview, as part of the developer preview program for the 2023.2 release. This release will include InterSystems IRIS and InterSystems IRIS for Health.
Highlights
Many updates and enhancements have been added in 2023.2 and there are also brand-new capabilities, such as Time-Aware Modeling, enhancements of Foreign Tables, and the ability to use Ready-Only Federated Tables. Note that some of these features or improvements may not be available in this current developer preview.
Another important topic is the removal of the Private Web Server (PWS) from the installers. This feature has been announced since last year and will be removed from InterSystems installers, but they are still in this first preview. See this note in the documentation.
--> If you are interested to try the installers without the PWS, please enroll in its EAP using this form, selecting the option "NoPWS". Additional information related to this EAP can be found here.
Future preview releases are expected to be updated biweekly and we will add features as they are ready. Please share your feedback through the Developer Community so we can build a better product together.
Initial documentation can be found at these links below. They will be updated over the next few weeks until launch is officially announced (General Availability - GA):
InterSystems IRIS
InterSystems IRIS for Health
Availability and Package Information
As usual, Continuous Delivery (CD) releases come with classic installation packages for all supported platforms, as well as container images in Docker container format. For a complete list, refer to the Supported Platforms document.
Installation packages and preview keys are available from the WRC's preview download site or through the evaluation services website (use the flag "Show Preview Software" to get access to the 2023.2).
Container images for both Enterprise and Community Editions of InterSystems IRIS and IRIS for Health and all corresponding components are available from the new InterSystems Container Registry web interface. For additional information about docker commands, please see this post: Announcing the InterSystems Container Registry web user interface.
The build number for this developer preview is 2023.2.0.201.0.
For a full list of the available images, please refer to the ICR documentation. Alternatively, tarball versions of all container images are available via the WRC's preview download site. What happened to ARM64 images again? Hi Dmitry. There was an issue with these images and we decided to not publish them.
We're going to publish in the next drop, during next week.
Announcement
Anastasia Dyubaylo · Jul 13, 2023
Hi Community,
We're pleased to invite you to the upcoming webinar in Hebrew:
👉 Introducing VS Code, and Moving from Studio in Hebrew 👈
🗓️ Date & time: July 25th, 3:00 PM IDT
🗣️ Speaker: @Tani.Frankel, Sales Engineer Manager
In this session, we will review using VS Code for InterSystems-based development.
It is aimed at beginners of VS Code, but will also cover some areas that might be beneficial for users who are already using VS Code. We will also cover some topics relevant to people moving from InterSystems Studio to VS Code.
The session is relevant for users of Caché / Ensemble / InterSystems IRIS Data Platform / InterSystems IRIS for Health / HealthShare Health Connect.
➡️ Register today and enjoy! >>
⚠️ Webinar password: ewE7mXWXr52 (39376999 from phones and video systems) Hey Community,
The recording of this webinar is already available on DC YouTube:
⏯️ Introducing VS Code, and Moving from InterSystems Studio
Enjoy!