Some aspects of migrating JDBC settings between IRIS instances.

Introduction
There are many entities in IRIS which are extremely difficult to transfer to another system.They usually contain important system-stored objects: users, roles, privileges, mappings, and applications. The exception to this list is for resources, which are facilitated by the ability to select and save them from the management portal interface [System > Security Management > Resources]. Yet, things are not as good with other system objects. I even got an idea for this topic
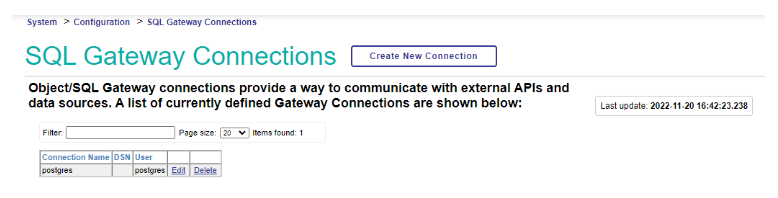
I devoted this article to the explanation of how to transfer gateway connection settings [System > Configuration > SQL Gateway Connections].
JDBC (Java DataBase Connectivity) is a Java database connection designed for a Java application to interact with relational databases. All interactions in JDBC are based on drivers that are identified by a specially described URL.
The settings consist of elements of the stored class %Library.SQLConnection, and the JDBC drivers themselves. The latter can be found on resource.
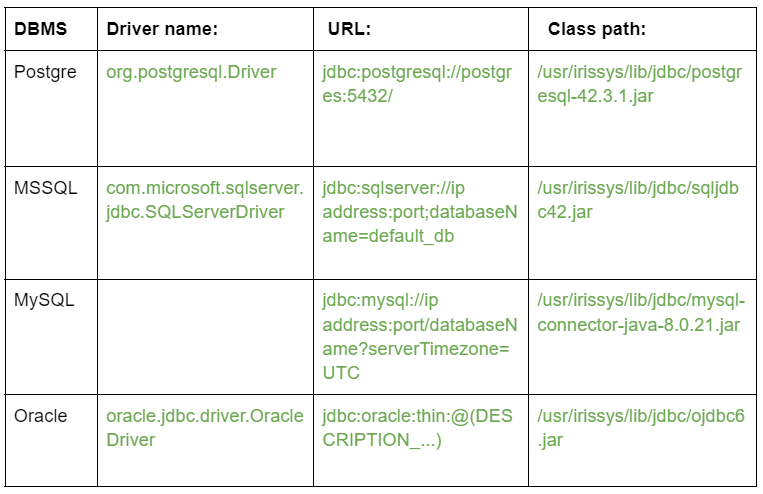
And for different DBMSs, the settings properties will differ too:
The famous hard way
To transfer to a new server, you can reposition a piece of the global ^%SYS("sql","ODBCCONNECTION","DATA").
Use the do $system.OBJ.Export("%SYS(""sql"",""ODBCCONNECTION"",""DATA"").gbl",”/tmp/file.xml”)
command to save the file on a disk and restore it on the new server using the program:
do $system.OBJ.Load(”/tmp/file.xml”)
do ##class(%Library.SQLConnection).%BuildIndices()
After that, reindex and copy the JDBC drivers to the same directories that the source server used.
But what should we do when the IRIS server already has SQL Gateway Connections settings, especially when there are a lot of them, and they are different?
Transferring a piece of the global will overwrite existing entries. Once I had to copy-paste more than 20 settings from one server to another manually. It was very painful; and I decided to automate this process.
The path with automation
Before starting to create a module for transferring SQL settings, we need to implement a universal module for saving class instances in a JSON file.
In this example, we will export a file with /tmp/gateways.json class instances collected by SQL query with JDBC type to the disk.
write ##class(apptools.core.json).ExportClassInstances("%Library.SQLConnection","select * FROM %Library.sys_SQLConnection where isJDBC = 1","/tmp/gateways.json")
In the second example, we will save all active users on a disk in JSON format.
write ##class(apptools.core.json).ExportClassInstances("Security.Users","select * from Security.Users where Enabled['1'","/tmp/users.json")
You can save selectively by filtering not only the class instances themselves but also their properties. To do that, I suggest implementing filter modules (they are called in the process of saving or restoring) and recovery modules: Example 1
set change("Name")="read"
write ##class(apptools.core.json).ImportClassInstances("/tmp/gateways.json",.js,.change)
In this example, by creating a local variable change("Name")="read", we instruct the program to ask for the name of the new entry on import.
Example 2
write ##class(apptools.core.json).ImportClassInstances("/tmp/users.json",.js)
In this example, the entry import is unconditional.
Demo stand
To demonstrate these capabilities, I have released a special project with a driver for PostgreSQL installed, based on projects Robert Cemper and YURI MARX PEREIRA GOMES.
 You can check the connection to the database in the terminal by running the command:
%SYS>do $system.SQLGateway.TestConnection("postgres")
In this demo, you can create a new ZPM project that will include a Postgres driver for porting to another system.
To do that, follow the next steps.
Download project in docker. When a container is created, the project is imported into it apptools-admin.
Let's enter the terminal: docker-compose exec iris iris session iris
Let's go to the %SYS area and run the export command for the public repos.
USER>zn “%SYS”
%SYS>set exec="##class(apptools.core.jdbc).SQLForPublicRegistry()"
%SYS>do ##class(apptools.core.jdbc).ExportSQLConnection("/tmp/sql/",.js,$Get(exec))
For example, to export only instances of SQL connections, you can apply a filter for public registers:
##class(apptools.core.jdbc).SQLForPublicRegistry()
Select 1 item and check the result in the directory. The driver was copied to the /tmp/sql/jdbc directory; and the JSON file is also located there. You can make sure that the properties are anonymized; and the passwords are empty.
When you export all elements from private resources, do not apply the filter and do not change the property values.
As a result, a ZPM project is created in the specified directory. It can be published to a private or public repo and installed on a new server.
For really important data, it is not recommended to publish it in public registries. However, you can transfer it via private repositories or as an archive file, which can be created using the package command.
Now you should import new drivers into this system. Use repo.
The project I developed has several JDBC drivers and a program that copies them to your IRIS instance while creating settings in the SQLConnection class in an interactive dialog with an option to change basic properties.
You can install this project to the system by downloading it from the public repository:
%SYS>zpm "install appmsw-gateway-sql"
You can find out which drivers are in the package by running the program:
%SYS>do ##class(appmsw.gateway.jdbc).ImportSQLConnection("view")
You can install the drivers with the program:
%SYS>do ##class(appmsw.gateway.jdbc).ImportSQLConnection()
Change the value of a field 'Name' <NameConnectionPostgresql1>
Change the value of a field 'URL' <jdbc:postgresql://postgres:5432/>
Change the value of a field 'Usr' <UserNamePostgresql>
Change the value of a field 'classpath' </usr/irissys/lib/jdbc/postgresql-42.3.1.jar>
/usr/irissys/lib/jdbc/postgresql-42.3.1.jar already exists
Change the value of a field 'driver' <org.postgresql.Driver>
You will need to enter the password in the portal interface

saved
Change the value of a field 'Name' <NameConnectionMySQL2>
As a result, we will see the new gateway settings.
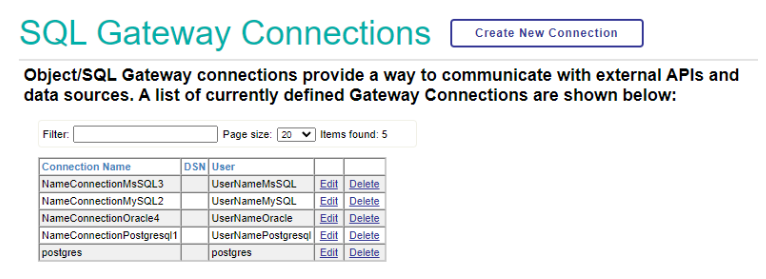 Of course,to make the new settings operational, you need to tweak the properties of the drivers and enter the user credentials for accessing the databases.
Testing
You can check the operation of the drivers from my own program by opening the link in the browser:
You need to register by entering an account and a minimum security password superuser / SYS.
Then you can select Namespaces [1] and SYS [2] on the side menu, choose postgres [3] from the DNS ODBC/JDBC list on the panel that opens, and enter the query [4]: SELECT table_name, table_schema, table_type FROM information_schema.tables WHERE table_schema = 'public' in the text area
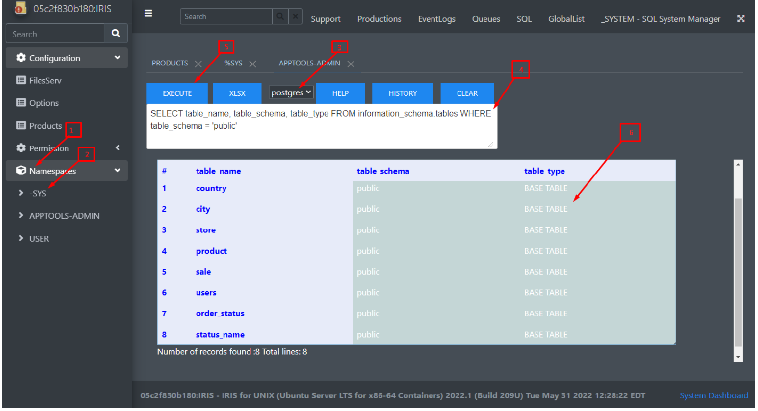 Clicking on the
 Execute button [5] will result in a list of public tables of the test database [6] through the installed JDBC driver.
Usage
When creating integration solutions in which you need to receive complex long queries, I use the following function in programs:
USER>set st=##class(apptools.core.sys).SqlToDSN(sql,jdbc,gnTemp,MaxNode)
It acts as a wrapper over the %Net.Remote.Java.JDBCGateway class.
The query result is stored in a temporary array. If I know that the request is small, I assign the array local or “global in memory”.
When the request is massive, and I load multi-million records from someone else's database,I assign the array global. If I do not need the transactional integrity of this global, then to speed up the system, I can disable logging for the duration of the request.
To do that, I use another function
For example, to get and store all records in the city table:
USER>set st=##class(apptools.core.sys).sql2gn(“SELECT * FROM city”,”postgres”,”^tmpPG”)
The structure of the array is: ^tmpPG(0)=$lb("NameField1",...,"NameFieldn") ^tmpPG(-1) Field names ^tmpPG(-3) Request and timing ^tmpPG(-4) Indexes, if built ^tmpPG(1…n) = $lb(value1,...,valuen) This information can be obtained by:
USER>do ##class(apptools.core.sys).GetTabInfo("^tmpPG",.info)

USER>zw info
info(-3,"sql")=$lb("SELECT * FROM city","postgres",100000)
info(-3,"timestamp")=$lb("2022-11-30 18:03:09","2022-11-30 18:03:09",0)
info(-1,"city_id")=1
info(-1,"city_name")=2
info(-1,"country_id")=3
info(0,1)=$lb("city_id",11,4,"int4")
info(0,2)=$lb("city_name",450,12,"varchar")
info(0,3)=$lb("country_id",11,4,"int4")
info("cols")=3
info("rows")=30
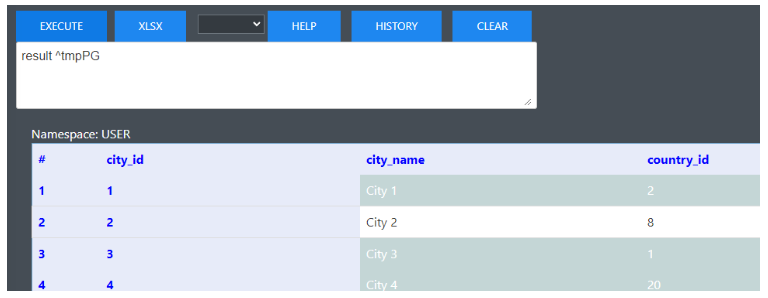
An array can be displayed in the browser as a table
USER>do ##class(apptools.core.LogInfoPane).DrawSQL("result ^tmpPG")
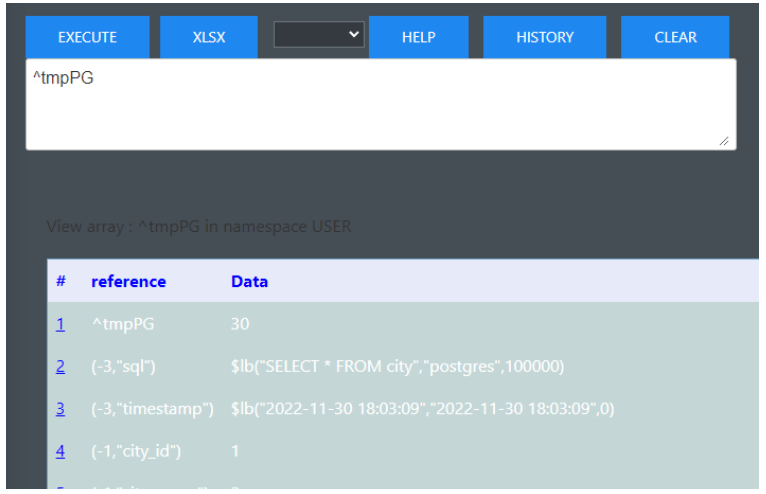
 An array can also be viewed and examined as a global
USER>do ##class(apptools.core.LogInfoPane).DrawSQL("^tmpPG")
 In application programs, you can get any table value using the method
USER>write ##class(apptools.core.sys).GetValue("^tmpPG",2,"city_name")
City 2
or a list of field values
USER>set list=##class(apptools.core.sys).GetValueGN(“^tmpPG”,2,"city_name,country_id")
USER>zw list
list=$lb("City 2","8")
All this also works if you want to save the global of any requests according to IRIS tables
USER>s sql="select Connection_Name,isJDBC,DSN from %Library.sys_SQLConnection"
USER>set st=##class(apptools.core.sys).sql2gn(sql,,"^tmpGT")
USER>write ##class(apptools.core.sys).GetValue("^tmpGT",1,"Connection_Name")
postgres
These functions and methods may come in handy when you need to duplicate settings on servers within your corporation or query other databases using the JDBC protocol. I will be glad if these projects help you administrate your servers on the IRIS platform or develop integration solutions.
Comments
There are a couple of points:
- what's wrong with users, roles, privileges, applications, etc.?
%SYS>do ^SECURITY


1) User setup
2) Role setup
3) Service setup
4) Resource setup
5) Application setup
6) Auditing setup
8) SSL configuration setup
9) Mobile phone service provider setup
10) OpenAM Identity Services setup
11) Encryption key setup
12) System parameter setup
13) X509 User setup
14) KMIP server setup
15) Exit

Option? 12

1) Edit system options
2) Edit authentication options
3) Edit LDAP options
4) Display system options
5) Export All Security settings
6) Import All Security settings
7) Exit

Option? 5

Export ALL security records? Yes => Yes

Warning: Before importing SSL configurations into a different configuration
the same certificate directories and certificate files must exist in
the new configuration, otherwise the import will fail.

Export to file name SecurityExport.xml =>
Parameters? "WNS" =>
Confirm export of selected security records to SecurityExport.xml? No => yes

Exported x Application security records
Exported x DocDB security records
Exported x Event security records
Exported x KMIPServer security records
Exported x LDAPConfig security records
Exported x OpenAMIdentityService security records
Exported x PhoneProvider security records
Exported x Resource security records
Exported x Role security records
Exported x SQLPrivileges security records
Exported x SSLConfig security records
Exported x Service security records
Exported x System security records
Exported x User security records
Exported x X509Credential security records
Exported x X509Users security records

Export complete

1) Edit system options
2) Edit authentication options
3) Edit LDAP options
4) Display system options
5) Export All Security settings
6) Import All Security settings
7) Exit

Option?
- to transfer JDBC/ODBC settings, you can still use external tools, for example DbVisualizer or SQL Data Lens, where you can choose the data format (CSV, XML, JSON, Excel, etc.), the necessary fields and much more.
DbVisualizer or SQL Data Lens.
Probably they are good for those who use them.
I did not know about these products, thanks.
^SECURITY
Everything is fine with this program, but it does not allow you to do a selective upload. For example, I need to export not all users, but only certain attributes.