QuinielaML - Working with JWT Authentication
Taking advantage of the Quiniela ML application and as we indicated in the previous article, we are going to explain how we can perform a JWT authentication between our frontend developed in Angular and our backend developed in InterSystems IRIS.
I remind you of the architecture of our QuinielaML project:
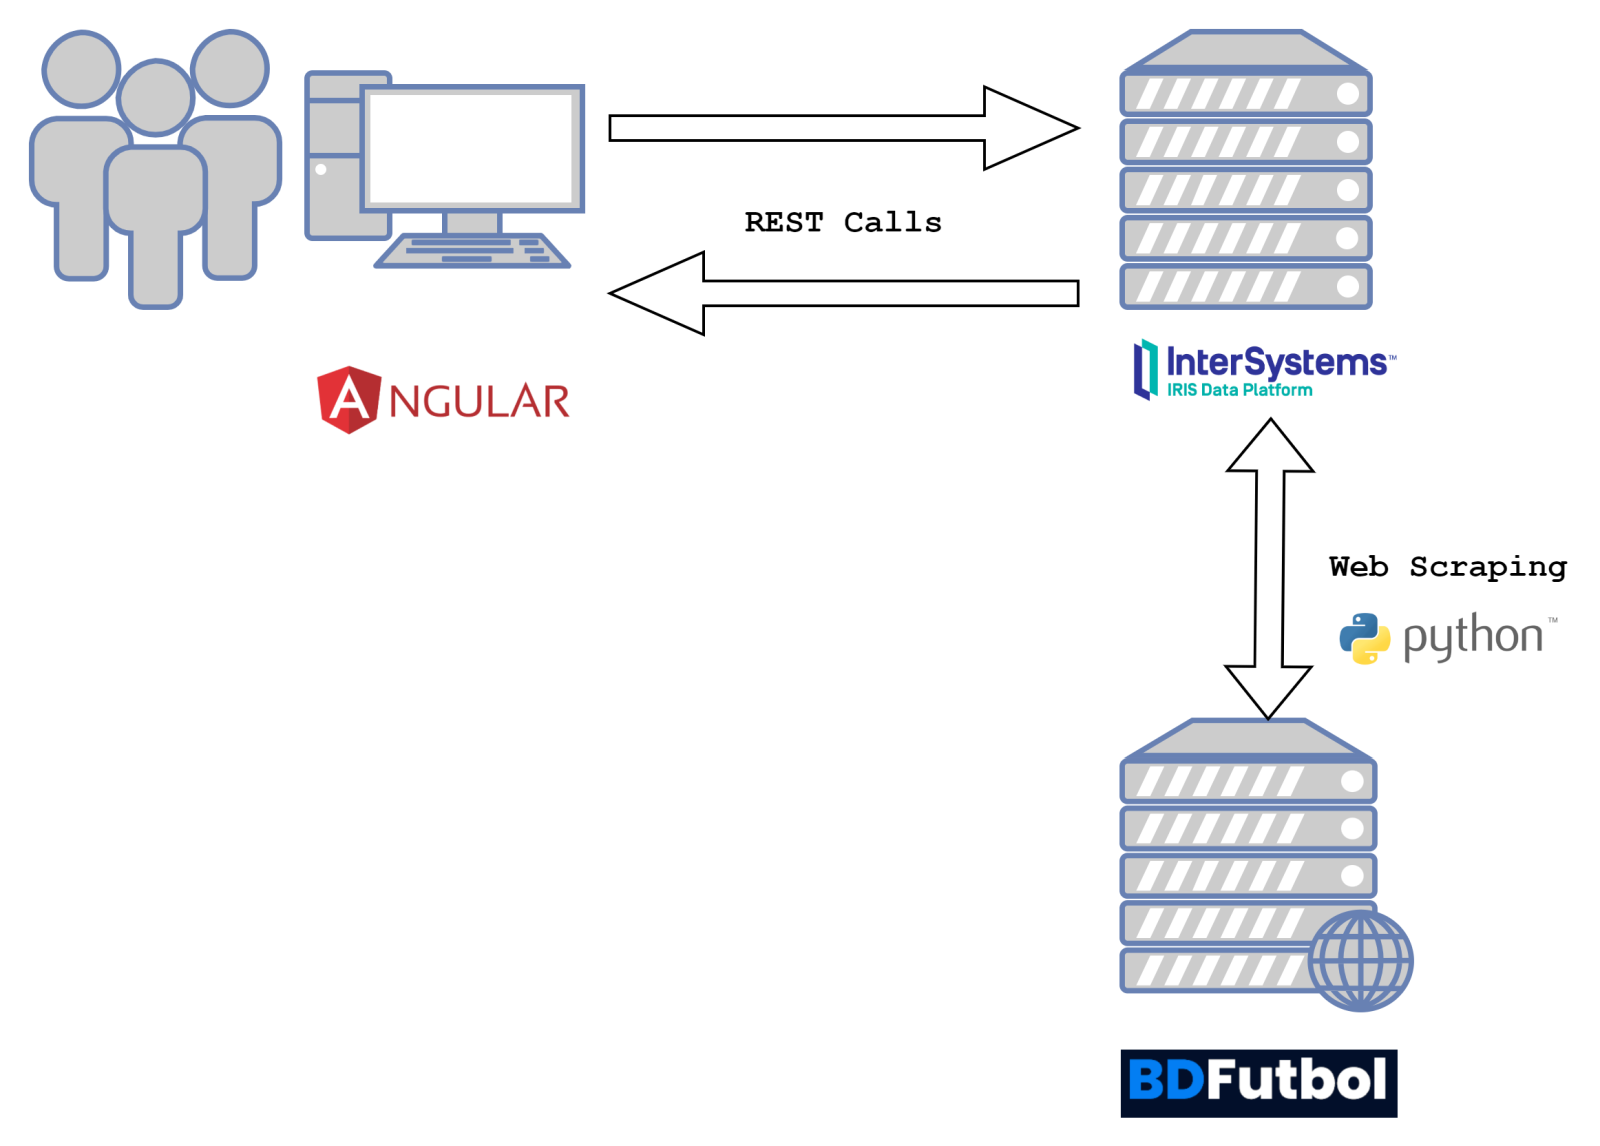
Usually it is a cumbersome process in web applications to develop the administration and management of user access, but in our case InterSystems IRIS simplifies the process by providing us with all the infrastructure we need.
JSON Web Token Authentication
IRIS provides web applications that connect to the deployed instance with the ability to connect via JWT in a simple and direct way.
Let's remember what the life cycle of a JWT authentication request is:
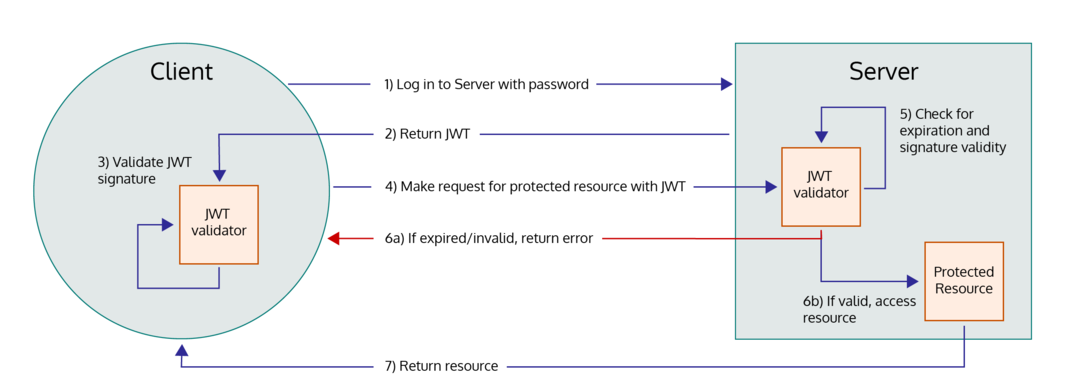
In our case, the client will be our frontend application developed in Angular and the server will be our IRIS instance.
As you can see, the process begins by sending the login request from the client to the server, the server will validate the user's data by generating a token in JSON format that it will return to the client application. The client can optionally validate the token received and must later include it in the header of its calls to the server in order to obtain the requested resources.
As we have said, IRIS facilitates the management of authentication via JWT and for this it provides us with the following endpoints that our client application can use:
- /login — A call to this endpoint using basic HTTP authentication or with valid credentials in the body of the request returns an access token and a refresh token that can be used in subsequent requests.
- /logout — A call to this endpoint, if not using Group-By-ID, invalidates the supplied access token and the associated refresh token. If using Group-By-ID, then all sessions with the current By-ID group are invalidated.
- /refresh — A call to this endpoint issues a new access and refresh token pair when invoked with a valid refresh token. This invalidates the previous access and refresh token pair.
- /revoke — If not using Group-By-ID, this is functionally the same as /logout. If using Group-By-ID, this revokes only the current access and refresh token pair.
Frontend login configuration
As we have already indicated, we have developed the frontend of our application using Angular. From our HTML login.component.html page we have configured a form that accepts the username and password and from the TypeScript class we proceed to launch the invocation from the services component that we have defined.
Here we can see how we invoke the call to the service from login.component.ts:
onSubmit(): void {
    const { username, password } = this.form;

    this.authService.login(username, password).subscribe({
      next: data => {
        this.storageService.save(data.access_token)
        this.isLoggedIn = true;
        this.router.navigate(['home']);
      },
      error: err => {
      }
    });
}
Now let's see the call that we launch from the auth.service.ts service to our backend:
login(username: string, password: string): Observable<any> {
    return this.http.post<Response>(
      AUTH_API + 'login',
      {
        "user": username,
        "password": password,
      },
      httpOptions
    )
}
As you can see, we have defined our call to the endpoint login from which we will retrieve the response and store the access_token to later authenticate our calls.
The storage of the token that we receive in response will be done from the storage.service.ts service:
save(userToken: string): void {
    window.sessionStorage.setItem(USER_KEY, userToken);
}
With our stored token we just have to intercept each request we send to IRIS and we will insert the token in the header. To do this we will define an HttpInterceptor in the auth.interceptor.ts class.
intercept(req: HttpRequest<any>, next: HttpHandler) {
    // Get the auth token from the service.
    const authToken = this.storageService.getToken();

    // Clone the request and replace the original headers with
    // cloned headers, updated with the authorization.
    if (authToken !== ''){
        req = req.clone({
            headers: req.headers.set('Authorization', 'Bearer ' + authToken)
          });
    }
    // send cloned request with header to the next handler.
    return next.handle(req);
}
Configuring JWT Authentication in IRIS
In order for our IRIS to be able to provide these services, we must properly configure our web application and for this we will access it from the menu option Administration -> Security -> Applications -> Web Applications
.png)
Once inside the application configuration we must mark the use of JWT Authentication and we can define the timeout for the access token and the refresh token:
.png)
With this configuration we will not need anything else to start using this authentication mode in our web applications.
If you have any questions regarding the configuration or use of JWT authentication, feel free to leave a comment.
In the next article we will review how we configure our QuinielaML project to perform web scraping using Embedded Python.
Comments
Thank you very much for describing how to use JWT auth with IRIS web app.
How do you solve the problem with cross-origin for development? (Basically we use the port 4200 in development mode)
I tested with the Parameter HandleCorsRequest = 1; in the dispatch class, also setup an Event class (%CSP.SessionEvents) to force the response header Access-Control-Allow-Origin to "*" but something was wrong.
The problem occurs the /login usage, not with others services in my route map
If you experienced the same problem, I'm interested in your solution :)
Thank you.
Hi Lorenzo! I'm no sure if this is the reason, but I've defined a proxy for the Angular front-end. You can check proxy.config.json:
{
    "/api/*": {
      "target": "http://iris:52773",
      "secure": false,
      "logLevel": "debug"
    }
  }
All my requests to the server are using localhost:4200 and they are translated into iris:52773 after the request.
Thank you for the tips @Luis Angel Pérez Ramos !
I'll test it this evening.
It works!
Thank you @Luis Angel Pérez Ramos
Great!
Hello @Luis Angel Pérez Ramos
I've enabled and configured JWT in my Web application. I'm trying to call the /login method from post man with body of contents {"user":"{YOURUSER}", "password":"{YOURPASSWORD}"} but I got 404 not found error. Did I anything missed/required.
As you mentioned
With this configuration we will not need anything else to start using this authentication mode in our web applications.
However This is for clarification
Do I need to write a custom login method or existing is enough?
Do I need to include /login, /logout etc.. endpoints in urlmap?
.png)
Have you defined the URL of the request properly?
Yes. my web application is /api and invoked this http://localhost:52774/api/login
You can see in the code my extended %CSP.Rest class:
Class QUINIELA.WS.Service Extends %CSP.REST
{

Parameter HandleCorsRequest = 0;

Parameter CHARSET = "utf-8";

XData UrlMap [ XMLNamespace = "https://www.intersystems.com/urlmap" ]
{
<Routes>
	<Route Url="/getPrediction" Method="GET" Call="GetPrediction" />
    <Route Url="/import" Method="GET" Call="ImportRawMatches" />
    <Route Url="/getStatus/:operation" Method="GET" Call="GetStatus" />
    <Route Url="/prepare" Method="GET" Call="PrepareData" />
    <Route Url="/train" Method="GET" Call="TrainData" />
    <Route Url="/getReferees" Method="GET" Call="GetReferees" />
    <Route Url="/getTeams" Method="GET" Call="GetTeams" />
	<Route Url="/saveMatch" Method="POST" Call="SaveMatch" />
    <Route Url="/deleteMatch/:matchId" Method="DELETE" Call="DeleteMatch" />
    <Route Url="/saveResult" Method="POST" Call="SaveResult" />
    <Route Url="/getMatches/:division" Method="GET" Call="GetMatches" />
</Routes>
}

ClassMethod OnHandleCorsRequest(url As %String) As %Status
{
	set url = %request.GetCgiEnv("HTTP_REFERER")
    set origin = $p(url,"/",1,3) // origin = "http(s)://origin.com:port"

    // here you can check specific origins
    // otherway, it will allow all origins (useful while developing only)

	do %response.SetHeader("Access-Control-Allow-Credentials","true")
	do %response.SetHeader("Access-Control-Allow-Methods","GET,POST,PUT,DELETE,OPTIONS")
	do %response.SetHeader("Access-Control-Allow-Origin",origin)
	do %response.SetHeader("Access-Control-Allow-Headers","Access-Control-Allow-Origin, Origin, X-Requested-With, Content-Type, Accept, Authorization, Cache-Control")
	quit $$$OK
}Thank you for the samples. Now it works fine and I get JWT. I have seen this parameters in some other post in community. What is the exact use of these parameters dispatcher class.
Parameter TokenLoginEndpoint = "login"; Parameter TokenLogoutEndpoint = "logout"; Parameter TokenRevokeEndpoint = "revoke"; Parameter TokenRefreshEndpoint = "refresh";
Well, I guess that you can change the URL modifying the value of those parameters, if you want to change "login" for "thisistheloginurl" you only have to update TokenLoginEndpoint to the new value.