Local K8s Deployment of a FHIR server

![]()
This is a sample to deploy iris-oauth-fhir on k3d with IKO.
- iris-oauth-fhir is a sample to deploy a FHIR server with OAuth2 authentication with InterSystems IRIS for Health as a resource server and Google OpenId as an authorization server.
- k3d is a lightweight wrapper to run k3s (Rancher Lab's minimal Kubernetes distribution) in docker.
- IKO is a tool to deploy InterSystems IRIS for Health on Kubernetes.
2. Table of Contents
- 1. K3D + iris-operator + iris-oauth-fhir
- 2. Table of Contents
2.1. Prerequisites
2.2. Installation
2.2.1. Warning
This will be a long journey, but it will be worth it. You will learn a lot of things about Kubernetes and InterSystems IRIS for Health.
2.2.2. Build iris-oauth-fhir image
First clone this repository:
git clone https://github.com/grongierisc/iris-oauth-fhir
And build the iris-oauth-fhir image as it is explained in the README.md
Next we will install k3d.
2.2.3. Download k3d
curl -s https://raw.githubusercontent.com/rancher/k3d/main/install.sh | bash
2.2.4. Create a registry
We must create a registry because for now Docker Desktop does not serve it's internal registry as an containerd registry. An experimental feature is available to use the Docker Desktop registry as a containerd registry, but it is not stable yet. So we will use k3d to create a registry.
k3d registry create registry.localhost --port 5000
This command will create a registry on port 5000. We will use it to push our images. This is the only way to use our images with k3d.
Now we will add the registry to our hosts file. Like this we will be able to use it as a DNS name. This is important because we will use it in our deployment. This DNS name will be the same for our host and for Kubernetes.
2.2.4.1. add registry to hosts
2.2.4.1.1. mac
sudo sh -c 'echo "127.0.0.1 k3d-registry.localhost" >> /etc/hosts'
2.2.4.1.2. windows
- Open Notepad as an administrator.
- Open the file C:\Windows\System32\Drivers\etc\hosts.
- Add the following line to the end of the file: 127.0.0.1 k3d-registry.localhost.
- Save the file and close Notepad.
2.3. Start the culster
Now we will start the cluster with this command line:
k3d cluster create demo --servers 1 --agents 2 --volume $(pwd)/k8s/data:/var/lib/rancher/k3s/storage@all --registry-use k3d-registry.localhost:5000 -p "8081:80@loadbalancer" -p "4443:443@loadbalancer" --api-port 6550 --volume "$(pwd)/k8s/config/traefik-config.yaml:/var/lib/rancher/k3s/server/manifests/traefik-config.yaml"
What are the options:
--servers 1will create one server node, server nodes are the master nodes.--agents 2will create two agent nodes, agent nodes are the worker nodes.--volume $(pwd)/k8s/data:/var/lib/rancher/k3s/storage@allwill mount thek8s/datafolder to the cluster. This is where we will store our data.--registry-use k3d-registry.localhost:5000will use the registry we created before.-p "8081:80@loadbalancer" -p "4443:443@loadbalancer"will expose the port 8081 and 4443 to the host. This is where we will access our cluster.--api-port 6550will expose the port 6550 to the host. This is where we will access the Kubernetes API.--volume "$(pwd)/k8s/config/traefik-config.yaml:/var/lib/rancher/k3s/server/manifests/traefik-config.yaml"will mount thek8s/config/traefik-config.yamlfile to the cluster. This is the configuration file for the ingress controller. This will configure the ingress controller to allowtraefikto route the data on the secure port without verification of the certificate.
# k8s/config/traefik-config.yaml
apiVersion: helm.cattle.io/v1
kind: HelmChartConfig
metadata:
  name: traefik
  namespace: kube-system
spec:
  valuesContent: |-
    globalArguments:
    - "--serversTransport.insecureSkipVerify=true"
2.3.1. Check the cluster
Just to give you an idea of what a Kubernetes cluster looks like, here is a diagram:

kubectl get nodes
You should see something like this:
NAME                       STATUS   ROLES                  AGE   VERSION
k3d-demo-server-0          Ready    control-plane,master   10m   v1.21.2+k3s1
k3d-demo-agent-0           Ready    <none>                 10m   v1.21.2+k3s1
k3d-demo-agent-1           Ready    <none>                 10m   v1.21.2+k3s1
This means that the cluster is ready. You have now a Kubernetes cluster with one master node and two worker nodes. 🥳
2.3.2. Install iris-operator
Now we will install iris-operator. iris-operator is a Kubernetes operator to deploy InterSystems IRIS for Health on Kubernetes. It is available on the WRC or on the InterSystems Container Registry. We will use the version 3.6.6.100.
For example, if you have IKO for the container registry, you can use this command line:
docker pull containers.intersystems.com/intersystems/iris-operator-amd:3.6.6.100
Now we will tag the image to push it to our registry:
docker tag intersystems/iris-operator-amd:3.6.6.100 k3d-registry.localhost:5000/intersystems/iris-operator-amd:3.6.6.100
And we will push it:
docker push k3d-registry.localhost:5000/intersystems/iris-operator-amd:3.6.6.100
To install the Iko operator, we will use helm. Helm is a package manager for Kubernetes. It is available here.
2.3.2.1. install helm
curl -fsSL -o get_helm.sh https://raw.githubusercontent.com/helm/helm/main/scripts/get-helm-3
chmod 700 get_helm.sh
./get_helm.sh
2.3.2.2. install iris-operator
helm install intersystems k8s/iris_operator_amd-3.6.6.100/chart/iris-operator
To check if the operator is running, you can use this command line:
kubectl --namespace=default get deployments -l "release=intersystems, app=iris-operator-amd"
You should see something like this:
NAME                        READY   UP-TO-DATE   AVAILABLE   AGE
intersystems-iris-operator  1/1     1            1           2m
2.3.3. Install iriscluster
2.3.3.1. What are we going to deploy?
We will deploy this architecture:
- One data node
- One web gateway node
This is exactly what we have in this docker-compose file:
# docker-compose.yaml
version: '3.6'
services:
  iris:
    image: iris-oauth-fhir-iris:latest
    build:
      context: .
      dockerfile: Dockerfile
    restart: always
    ports:
      - 1972
      - 8083:52773
      - 53773
    volumes:
      - ./:/irisdev/app/
      - ./data:/data
    environment:
      - ISC_CPF_MERGE_FILE=/irisdev/app/common.cpf
      - ISC_OAUTH_SECRET_PATH=/irisdev/app/misc/auth/secret.json
      - ISC_DATA_DIRECTORY=/data/iris

  webgateway:
    build:
      context: ./webgateway
      args:
        link: 'iris'
        port: '52773'
    image: proxyiris:latest
    ports:
    - "8080:80"
    - "4443:443"
    volumes:
    - ./webgateway/CSP.ini:/opt/webgateway/bin/CSP.ini
    - ./webgateway/httpd-csp.conf:/usr/local/apache2/conf/extra/httpd-csp.conf
Notice few things:
- We use the
iris-oauth-fhir-iris:latestimage for the data node.- This image use three environment variables:
ISC_CPF_MERGE_FILEto merge thecommon.cpffile.ISC_OAUTH_SECRET_PATHto set the path to the secret file.ISC_DATA_DIRECTORYto set the data directory.
- This image use three environment variables:
- We use the
proxyiris:latestimage for the web gateway node.- This image use two volumes:
CSP.inito configure the CSP application.httpd-csp.confto configure the apache server.
- This image use two volumes:
So in our Kubernetes deployment, we will have to do the same things.
This mean that we will have to:
- For the data node:
- Provide some how the
common.cpffile to the data node. - Same for the
secret.jsonfile to configure the OAuth2 authentication. - The data directory will be mounted as a volume.
- Provide some how the
- For the web gateway node:
- Provide some how the
CSP.inifile to the web gateway node. - Same for the
httpd-csp.conffile to configure the apache server.
- Provide some how the
2.3.3.2. Prepare the deployment for the data node
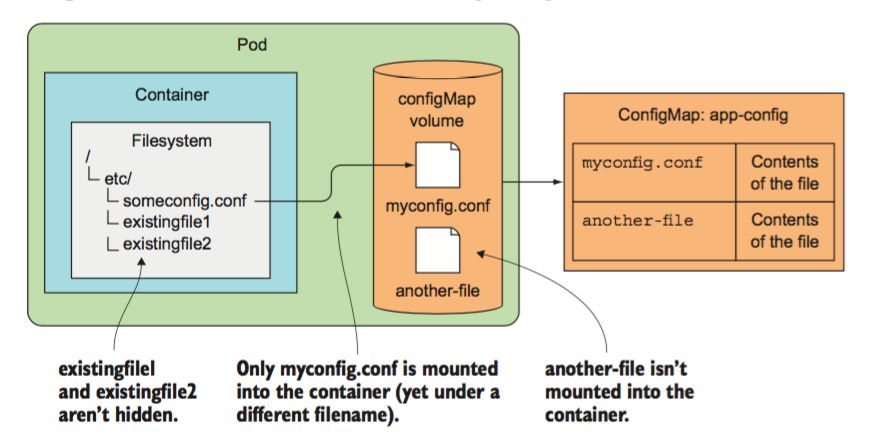
To provide the common.cpf file to the data node, we will use a config map. A config map is a Kubernetes object to store configuration files. We will use the common.cpf file we have in this repository.
Here is an schema of a config map:
To create the config map, we will use this command line:
kubectl create cm iriscluster-config --from-file common.cpf
To provide the secret.json file to the data node, we will use a secret. A secret is a Kubernetes object to store sensitive data. We will use the secret.json file we have in this repository.
To create the secret, we will use this command line:
kubectl create secret generic iriscluster-secret --from-file misc/auth/secret.json
To mount the data directory as a volume, this will be automatic. We will use the storage field in the topology section of the IrisCluster definition and use them as default.
We still need to push the iris-oauth-fhir-iris:latest image to our registry. We will use the same command line as before:
docker tag iris-oauth-fhir-iris:latest k3d-registry.localhost:5000/iris-oauth-fhir-iris:latest
docker push k3d-registry.localhost:5000/iris-oauth-fhir-iris:latest
2.3.3.3. Prepare the deployment for the web gateway node
The web gateway node is a bit different because we will not be using the proxyiris:latest image. We will use the intersystems/webgateway:2023.1.1.380.0-linux-amd64 image. This image is available on the InterSystems Container Registry.
This image is the raw web gateway image.
What are the differences between the raw web gateway image and the proxyiris image?
- the
proxyirishas https preconfigured with a self-signed certificate.
So we will have to configure the web gateway to use https. To do that, we will use a secret. A secret is a Kubernetes object to store sensitive data. We will use the tls.crt and tls.key files we have in this repository.
To create the secret, we will use this command line:
kubectl create secret tls tls-secret --key k8s/tls/tls.key --cert k8s/tls/tls.crt
The good news is that we will not have to configure the CSP application and the apache server. We will use the applicationPaths and alternativeServers fields in the topology section of the IrisCluster definition and use them as default.
In the docker-compose.yaml file we had to configure the CSP.ini file and the httpd-csp.conf file. We will not have to do that in the Kubernetes deployment because we don't know ahead of time the IP address of the data node. But we still need to tell IKO what will be the login an password to connect to the data node. To do that, we will use a secret. A secret is a Kubernetes object to store sensitive data. We will use the iris-webgateway-secret file we have in this repository.
To create the secret, we will use this command line:
kubectl create secret generic iris-webgateway-secret --from-literal='username=CSPSystem' --from-literal='password=]]]U1lT'
We still need to push the intersystems/webgateway:2023.1.1.380.0-linux-amd64 image to our registry. We will use the same command line as before:
docker tag containers.intersystems.com/intersystems/webgateway:2023.1.1.380.0-linux-amd64 k3d-registry.localhost:5000/intersystems/webgateway:2023.1.1.380.0-linux-amd64
docker push k3d-registry.localhost:5000/intersystems/webgateway:2023.1.1.380.0-linux-amd64
2.3.4. Deploy iriscluster
Now we will install IrisCluster. IrisCluster is a Kubernetes custom resource to deploy InterSystems IRIS for Health on Kubernetes.
It's defined in the k8s/config/iris-sample.yaml file.
# k8s/config/iris-sample.yaml
## uncommented fields deploy one InterSystems IRIS data server

## WARNING: default password is not reset, to do so include
## configSource below

## include commented fields for purposes described; see documentation at
## https://docs.intersystems.com/irislatest/csp/docbook/Doc.View.cls?KEY=AIKO_clusterdef_sample

## update image tags (from ":tag") before using; see list of available images at
## https://docs.intersystems.com/components/csp/docbook/Doc.View.cls?KEY=PAGE_containerregistry

apiVersion: intersystems.com/v1alpha1
kind: IrisCluster
metadata:
  name: sample
spec:

## provide InterSystems IRIS license key if required
#     licenseKeySecret:
#       name: iris-key-secret

## specify files used to customize the configurations of
## InterSystems IRIS nodes, including passwordHash parameter
## to set the default password, securing InterSystems IRIS
  configSource:
    name: iriscluster-config

## provide repository credentials if required to pull images
#     imagePullSecrets:
#       - name: iris-pull-secret

## provide VolumeSource specifications for certificates for each desired TLS feature
## "common" enables all TLS features, but each particular feature's property is given priority over "common"
  tls:
#       common:
#         secret:
#           secretName: tls-certs
#       mirror:
#         csi:
#           driver: secrets-store.csi.k8s.io
#           readOnly: true
#           volumeAttributes:
#             secretProviderClass: "my-provider"
    webgateway:
      secret:
        secretName: tls-secret


## specify platform-specific storage class used to allocate storage
## volumes (default: use platform-defined class)
#     storageClassName: iris-ssd-storageclass

## select update strategy (default: RollingUpdate)
#     updateStrategy:
#       type: RollingUpdate

## create external IP address(es)for the cluster
## ("type: LoadBalancer" and "externalTrafficPolicy: Local" are required)
#     serviceTemplate:
#       spec:
#         type: LoadBalancer
#         externalTrafficPolicy: Local

## define persistent volumes (to be mounted by "volumeMounts:" in node definitions)
#  volumeClaimTemplates:
#    - metadata:
#        name: extra-disk
#      spec:
#        accessModes:
#          - ReadWriteOnce
#        resources:
#          requests:
#            storage: 2Gi

## define ephemeral volumes (to be mounted by "volumeMounts:" in node definitions)
  volumes:
    - name: auth-config
      secret:
        secretName: iriscluster-secret

## topology: defines node types to be deployed; only "data:" is required

  topology:
    data:
      image: k3d-registry.localhost:5000/iris-oauth-fhir-iris:latest
      ## set enviroment variable for the container
      podTemplate:
        spec:
          env:
            - name: ISC_OAUTH_SECRET_PATH
              value: /auth/secret.json


## deploy a sharded cluster of data nodes and (optionally) compute
## nodes; if not included, "data:" definition in "topology:" deploys
## a single data server, "compute:" adds application servers
#         shards: 2

## deploy mirrored data nodes or data server (default: nonmirrored)
#         mirrored: true

## override default size and other attributes of predefined storage
## volumes for data nodes (additional volume names: storageWIJ,
## storageJournal1, storageJournal2); can also be included in
## "compute:" definition
#         storageDB:
#           resources:
#             requests:
#               storage: 10Gi
#           storageClassName: my-storageclass

## constrain nodes to platform-specific availability zones (can be
## included in other node definitions)
#         preferredZones:
#           - us-east1-a
#           - us-east1-b

## mount volumes defined in "volumeClaimTemplates:" (persistent) and "volumes:" (ephemeral)
      volumeMounts:
        - mountPath: "/auth"
          name: auth-config

## deploy webgateway (web server) nodes
    webgateway:
      image: k3d-registry.localhost:5000/intersystems/webgateway:2023.1.1.380.0-linux-amd64
      type: apache
      replicas: 1
      applicationPaths:
        - /csp/sys
        - /fhir/r4
      alternativeServers: LoadBalancing
      loginSecret:
        name: iris-webgateway-secret

## deploy System Alerting and Monitoring (SAM) with InterSystems IRIS
#      sam:
#        image: containers.intersystems.com/intersystems/sam:tag

## deploy InterSystems API Manager (IAM) with InterSystems IRIS
#      iam:
#        image: containers.intersystems.com/intersystems/iam:tag
Wow, that's a lot of things. But don't worry, we will explain everything.
Let's start with the configSource section:
## specify files used to customize the configurations of
## InterSystems IRIS nodes, including passwordHash parameter
## to set the default password, securing InterSystems IRIS
  configSource:
    name: iriscluster-config
This is the config map we created before. This is where we will find the common.cpf file.
Next we have the tls section:
## provide VolumeSource specifications for certificates for each desired TLS feature
## "common" enables all TLS features, but each particular feature's property is given priority over "common"
  tls:
    webgateway:
      secret:
        secretName: tls-secret
This is the secret we created before. This is where we will find the tls.crt and tls.key files.
Next we have the volumes section:
## define ephemeral volumes (to be mounted by "volumeMounts:" in node definitions)
  volumes:
    - name: auth-config
      secret:
        secretName: iriscluster-secret
This is the secret we created before. This is where we will find the secret.json file.
An IrisCluster defines how to deploy InterSystems IRIS for Health on Kubernetes. The important part is the topology section. This section defines the nodes to deploy. In this example, we will deploy one data node and one web gateway node.
Let's see the data node definition:
## topology: defines node types to be deployed; only "data:" is required

  topology:
    data:
      image: k3d-registry.localhost:5000/iris-oauth-fhir-iris:latest
      ## set enviroment variable for the container
      podTemplate:
        spec:
          env:
            - name: ISC_OAUTH_SECRET_PATH
              value: /auth/secret.json
      volumeMounts:
        - mountPath: "/auth"
          name: auth-config
The image field defines the image to use. We will use the image we built before. The podTemplate field defines the Kubernetes pod template. The env field defines the environment variables to set in the container. We will use this environment variable to set the path to the secret file will create.
podTemplate it's kind of what you can find in a docker-compose.yaml file.
The volumeMounts field defines the volumes to mount in the container. We will mount the secret we created before.
Now let's see the web gateway node definition:
## deploy webgateway (web server) nodes
    webgateway:
      image: k3d-registry.localhost:5000/intersystems/webgateway:2023.1.1.380.0-linux-amd64
      type: apache
      replicas: 1
      applicationPaths:
        - /csp/sys
        - /fhir/r4
      alternativeServers: LoadBalancing
      loginSecret:
        name: iris-webgateway-secret
The image field defines the image to use. The type field defines the type of web gateway to deploy. We will use apache. The replicas field defines the number of web gateway to deploy. We will deploy one. The applicationPaths field defines the application paths to route to the web gateway. We will route /csp/sys and /fhir/r4 to the web gateway. The alternativeServers field defines the alternative servers to use. We will use LoadBalancing. The loginSecret field defines the login and password to link the gateway to the data node.
To deploy the IrisCluster, we will use this command line:
kubectl apply -f k8s/config/iris-sample.yaml
To check if the IrisCluster is running, you can use this command line:
kubectl get iriscluster
After a few minutes, you should see something like this:
NAME     SHARDS   MIRRORED   STATUS     AGE
sample                       Running   2m16s
To get details about the IrisCluster, you can use this command line:
kubectl describe iriscluster sample
To check if the pods are running, you can use this command line:
kubectl get pods
After a few minutes, you should see something like this:
NAME                                             READY   STATUS              RESTARTS   AGE
intersystems-iris-operator-amd-87c955c9c-4zmrj   1/1     Running             0          44m
sample-data-0                                    1/1     Running             0          4m19s
sample-webgateway-0                              0/1     ContainerCreating   0          17s
To get details about the pods, you can use this command line:
kubectl describe pod sample-data-0
2.3.5. Deploy ingress

Now we will deploy an ingress. An ingress is a Kubernetes object to route the traffic to the right pod. We will use the k8s/config/ingress.yaml file.
apiVersion: networking.k8s.io/v1
kind: Ingress
metadata:
  name: ingress
  namespace: default
spec:
  rules:
  - http:
      paths:
      - path: /
        pathType: Prefix
        backend:
          service:
            name: sample-webgateway
            port:
              number: 443
This ingress will route the traffic to the sample-webgateway service on port 443.
To deploy the ingress, we will use this command line:
kubectl apply -f k8s/config/ingress.yaml
To check if the ingress is running, you can use this command line:
kubectl get ingress
To test the whole thing, you can use this command line:
curl -k https://localhost:4443/fhir/r4/metadata
Congratulations, you have deployed iris-oauth-fhir on Kubernetes. 🥳
2.4. Easy scale
If you want to create a new tenant, you can iris-demo.yaml file.
Basically, it's the same as the iris-sample.yaml file, but juste the name of the tenant change.
You can deploy it with this command line:
kubectl apply -f k8s/config/iris-demo.yaml
You can use a new ingress to route the traffic to the new tenant.
apiVersion: traefik.containo.us/v1alpha1
kind: Middleware
metadata:
  name: strip-prefix
  namespace: default
spec:
  stripPrefix:
    prefixes:
      - /sample
      - /demo
---
apiVersion: networking.k8s.io/v1
kind: Ingress
metadata:
  name: ingress
  namespace: default
  annotations:
    traefik.ingress.kubernetes.io/router.middlewares: default-strip-prefix@kubernetescrd
spec:
  rules:
  - http:
      paths:
      - path: /sample
        pathType: Prefix
        backend:
          service:
            name: sample-webgateway
            port:
              number: 443
      - path: /demo
        pathType: Prefix
        backend:
          service:
            name: demo-webgateway
            port:
              number: 443
Two new routes are added:
/sampleto route the traffic to thesample-webgatewayservice./demoto route the traffic to thedemo-webgatewayservice.
You can scale the compte node and so, but for that you will need a license key.
2.5. Quick init
Tag images
docker tag iris-oauth-fhir-iris:latest k3d-registry.localhost:5000/iris-oauth-fhir-iris:latest
docker tag containers.intersystems.com/intersystems/webgateway:2023.1.1.380.0-linux-amd64 k3d-registry.localhost:5000/intersystems/webgateway:2023.1.1.380.0-linux-amd64
docker tag intersystems/iris-operator-amd:3.6.6.100 k3d-registry.localhost:5000/intersystems/iris-operator-amd:3.6.6.100
Push images
docker push k3d-registry.localhost:5000/iris-oauth-fhir-iris:latest
docker push k3d-registry.localhost:5000/intersystems/webgateway:2023.1.1.380.0-linux-amd64
docker push k3d-registry.localhost:5000/intersystems/iris-operator-amd:3.6.6.100
2.6. Quick deployment
Delete the cluster:
k3d cluster delete demo
Create the cluster:
k3d cluster create demo --servers 1 --agents 2 --volume $(pwd)/k8s/data:/var/lib/rancher/k3s/storage@all --registry-use k3d-registry.localhost:5000 -p "8081:80@loadbalancer" -p "4443:443@loadbalancer" --api-port 6550 --volume "$(pwd)/k8s/config/traefik-config.yaml:/var/lib/rancher/k3s/server/manifests/traefik-config.yaml"
Install iris-operator:
helm install intersystems k8s/iris_operator_amd-3.6.6.100/chart/iris-operator
Create Config and Secret
kubectl create cm iriscluster-config --from-file common.cpf
kubectl create secret generic iriscluster-secret --from-file misc/auth/secret.json
kubectl create secret tls tls-secret --key k8s/tls/tls.key --cert k8s/tls/tls.crt
kubectl create secret generic iris-webgateway-secret --from-literal='username=CSPSystem' --from-literal='password=]]]U1lT'
Deploy IrisCluster:
kubectl apply -f k8s/config/iris-sample.yaml
Deploy Ingress:
kubectl apply -f k8s/config/ingress.yaml