IRIS Flow - Updates for Interoperability Contest: Building Sustainable Solutions
TL;DR: you can try the chatbot created with IRIS Flow here; if you'd like to understand how it was created, read this article.
If you prefer, you can follow the tutorial within this article in this video:
Introduction
Sometime ago, Henrique, Henry and I started the IRIS-Megazord project to join several of our projects and introduce IRIS Flow - a tool for creation of automation flows supported by the IRIS Interoperability framework.
Following the current contest subject - Sustainable Solutions, we decided to increment the automation features in IRIS Flow by adding a new adapter for use the Climatiq API. That API is a beta service that allows you to do estimates on how much CO2 emissions several human activities could generate.
Thus, with this new feature and using the previous ones, which lets us use features like Telegram communication and ObjectScript code execution, we create a simple chatbot for answering questions about CO2 emissions.
Using the EnsLib.HTTP.OutboundAdapter to access the Climatiq API
In order to use the Climatiq API, our adapter extends the EnsLib.HTTP.OutboundAdapter adapter. This adapter helps you to make HTTP requests to external servers, like an REST API service for instance - the Climatiq REST API in our case.
By inheriting the EnsLib.HTTP.OutboundAdapter class, we just need to setup basic information like the API URL, port for HTTPS and a header with the API KEY. After that, you can use the method SendRequest to perform POST to the API.
You can found how we use the EnsLib.HTTP.OutboundAdapter to develop our custom adapter in the classes ClimatiqOutboundAdapter.cls and dc.irisflow.interoplib.climatiq.ApiBeta3.
Trying the Climatiq simple chatbot example online
If you are curious about our simple Climatiq chatbot example application, we have deployed a demo online in order to show it running. You can access it here.
In order to use it, just send any message and wait for instructions.
How to setup the Climatiq bot example in you own environment
If you’d like to try the chatbot example in your own docker container, first you need to sign up for Telegram and Climatiq APIs. You can do that by following instructions described here for Telegram and here for Climatiq.
After getting the API Keys for each service, store them into IRIS Interoperability credentials. For the Telegram API Key, create a credential with ID telegram-api-key; for the Climatiq one, create a credential identified by climatiq-api-key. Those IDs are the ones expected by the pre-configured production that you are going to import.
Now, you can import the production by doing the following steps:
- Install the project using docker as described here
- Open an IRIS terminal:
docker exec -it iris-megazord_iris_1 bash
irissession iris
- Run this ObjectScript command in the USER namespace which will create the production:
Do ##class(dc.irisflow.demo.ClimatiqAPIExample02).Create()
- Open and start the production
User.ClimatiqAPIExample - Open the Telegram bot created previously and start to send messages to it
Creating the example step by step in IRIS Flow editor
In this section, let’s create the Climatiq API chatbot step by step. So, you can check out how cool it is using the IRIS Flow! :)
First you have to choose a name for your flow. In this example let’s choose User.ClimatiqAPIExample.
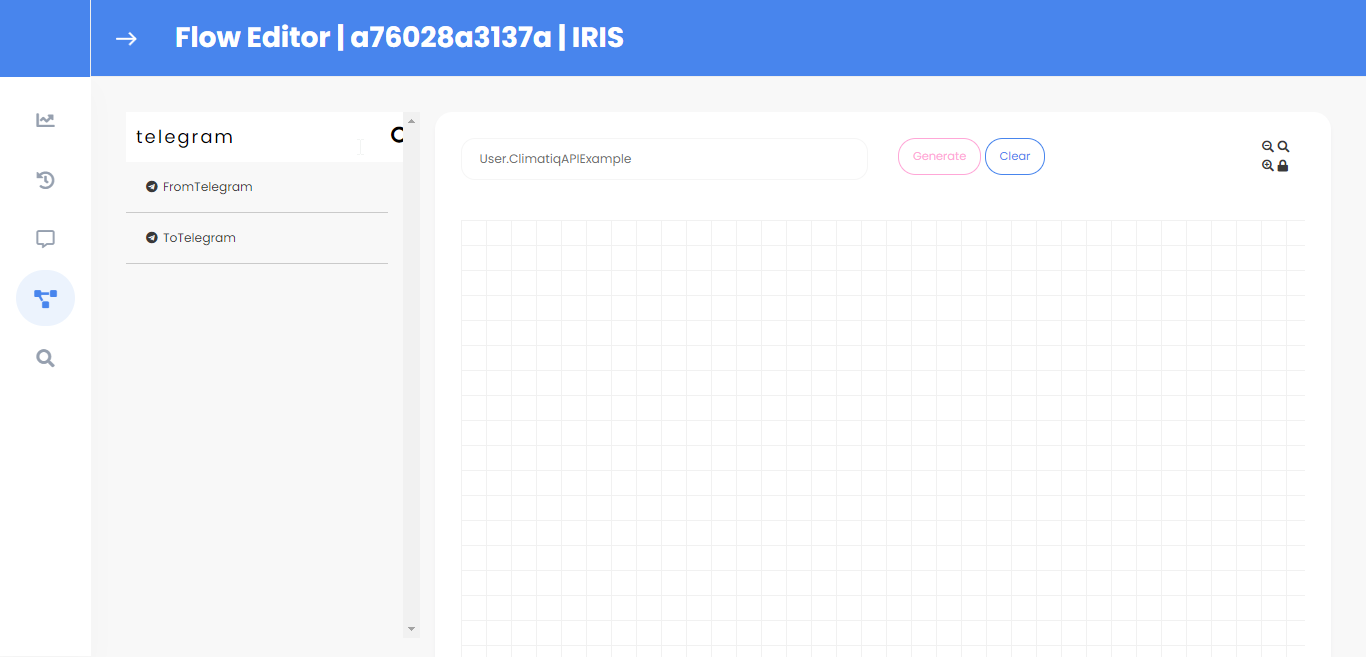
As we are planning to use Telegram API as our instant messaging service, let’s start by just adding two nodes to our flow: one for listening to a Telegram bot and another one to send messages to the same bot. Name those nodes as FromTelegram and SendToTelegram, respectively.
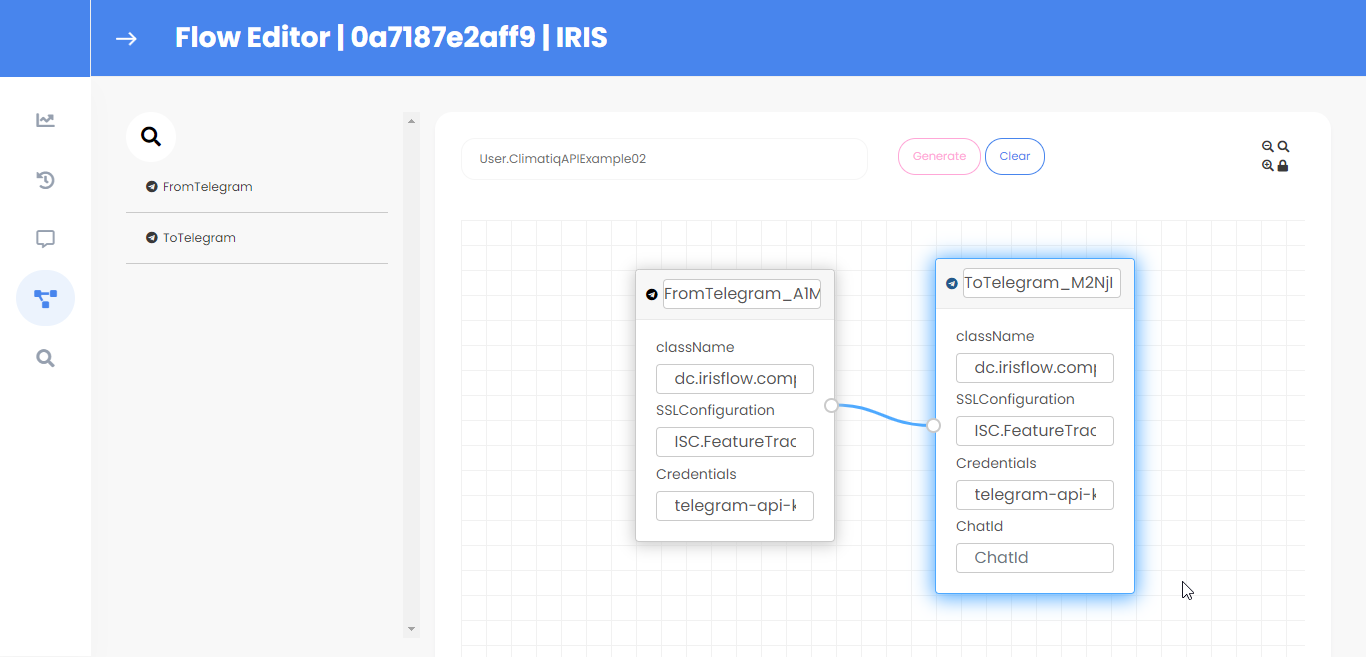
The Telegram bot is identified by its API Key stored in a credential with an ID defined in the field Credentials in the Telegram nodes. Note that our nodes use a credential called telegram-api-key, so you must define such a credential with your Telegram API Key in order to get things working.
Now, click on the Save button. If all was OK, then you’ll be able to see an IRIS Interoperability production called User.ClimatiqAPIExample02. Open it and you should see something like this:

Start the production, and start to send messages to your Telegram bot. You’ll see that our production sends back what you typed.
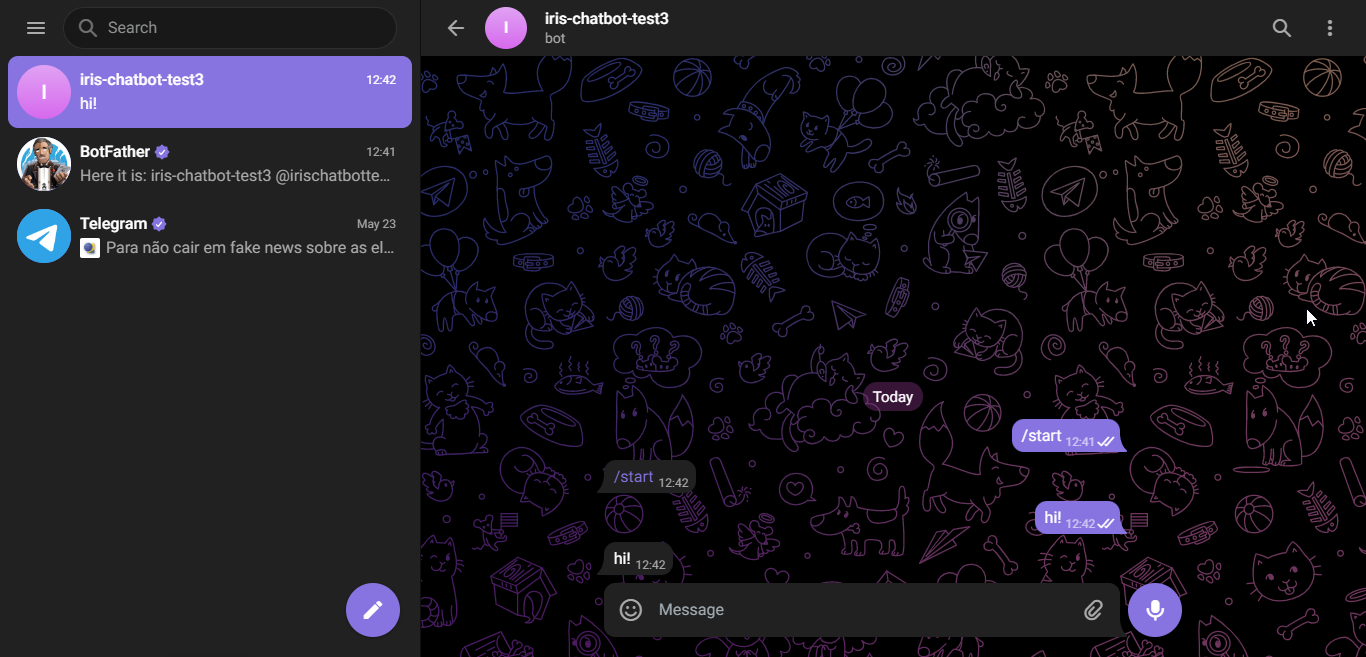
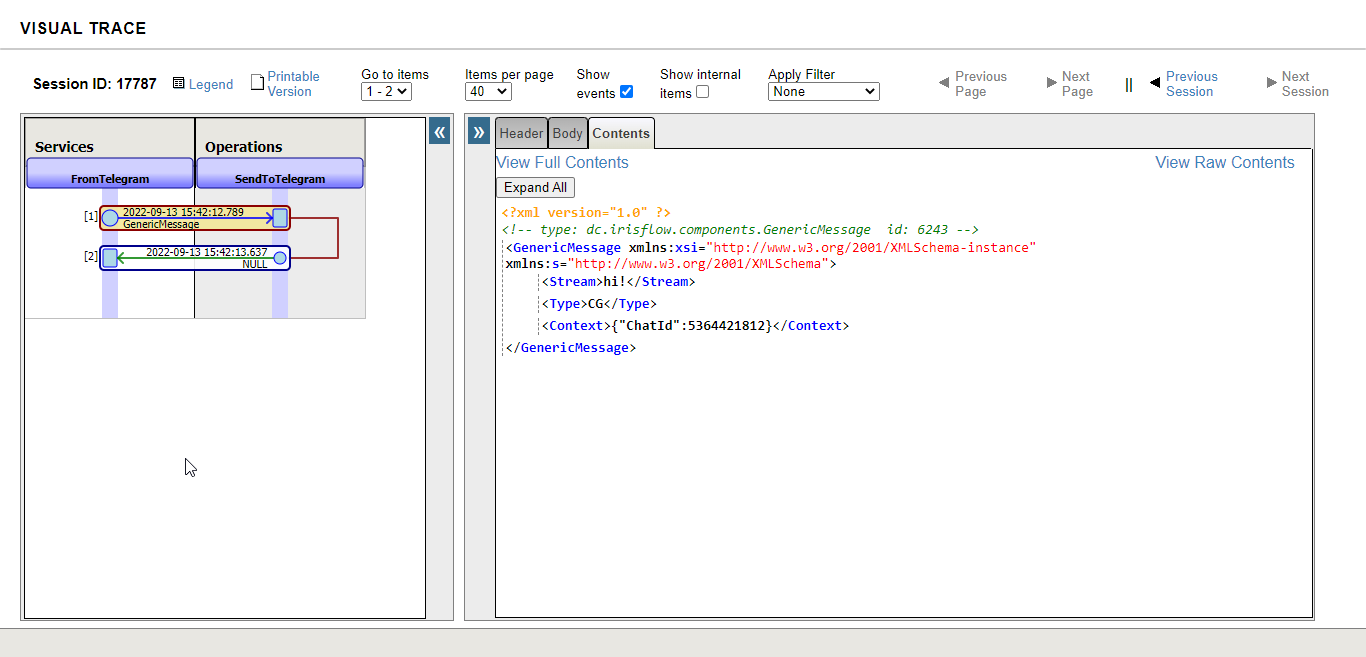
That behavior is due to the fact that our flow just receives the input gotten from Telegram by the FromTelegram node and sends it to the SendToTelegram node, without any handling. You can check this out by the IRIS Interoperability Message Viewer:
Ok, now let’s add more complexity to our flow. As we’re intending to create a chatbot, we’ll need to be able to process some interaction with users. For this demo, we developed a simple decision tree to provide a basic set of features to our users.
This decision tree is handled by an utility class which has class methods to use such a decision tree and provide an interface to be used within nodes of ObjectScriptOperation type in our flow.
Thus, let’s add an ObjectScriptOperation node, named it as ChatbotDecisionTree, delete the previous link between FromTelegram and SendToTelegram and, link them such the image below:
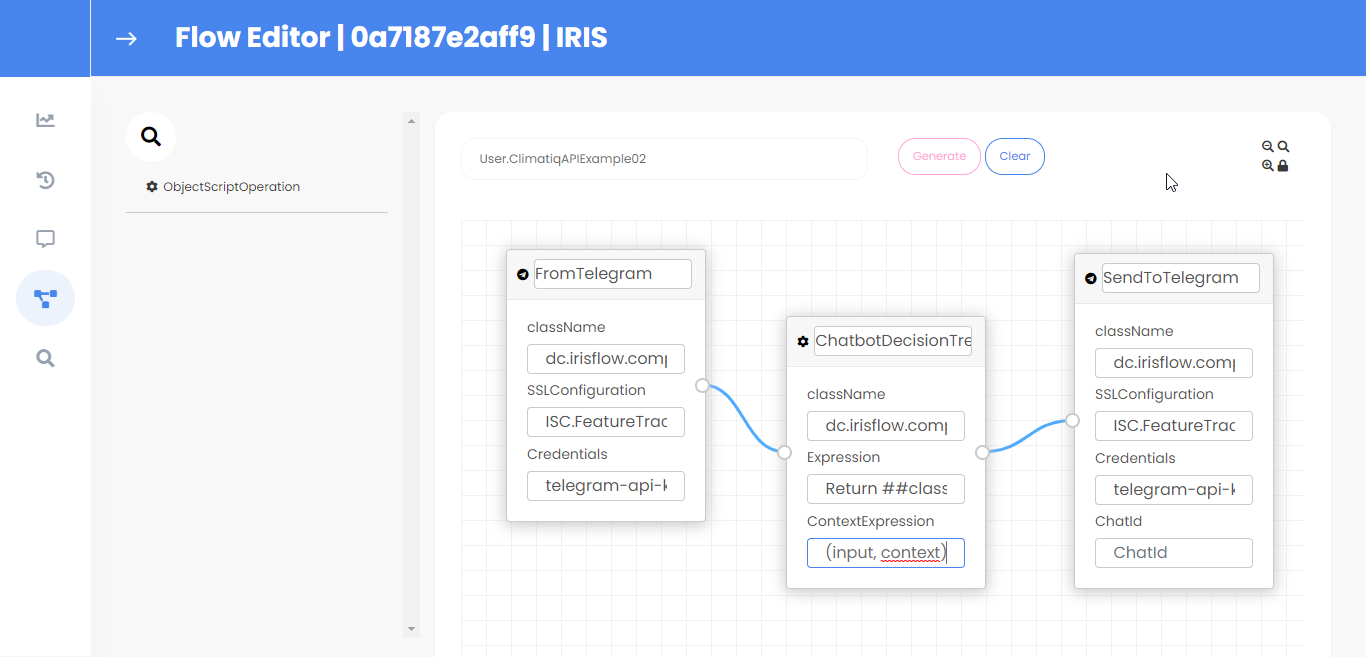
Set the properties Expression and ContextExpression with the Return ##class(dc.irisflow.demo.ClimatiqAPIExample02Utils).ChatbotDecisionTree(input, context) and Return ##class(dc.irisflow.demo.ClimatiqAPIExample02Utils).ChatbotDecisionTreeContext(input, context), respectively. Those are utility methods which format the input and send it to the decision tree.
Save this change to the flow, restart the production and send another message to your Telegram bot. Now, you should see our chatbot decision tree presenting a set of options to the user:
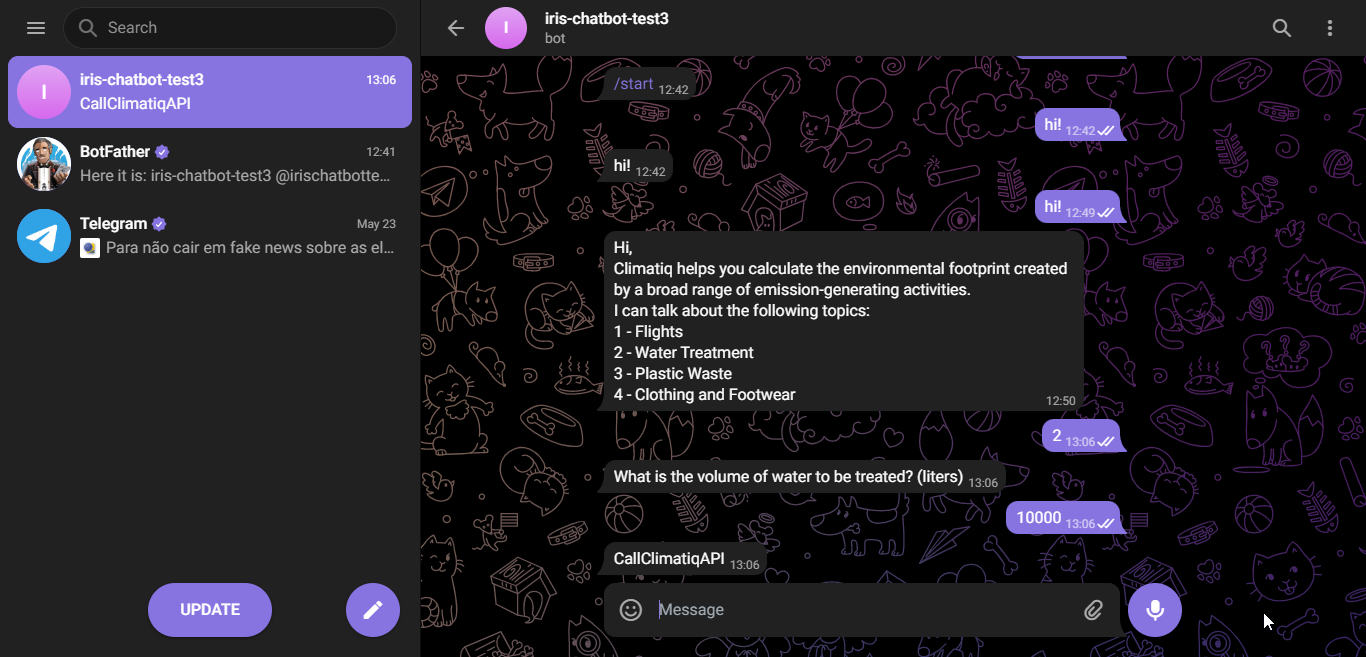
You may note that our chatbot ends the conversation with an CallClimatiqAPI token. This is because it was designed to work with the Climatiq API. This token means that a valid message is ready to be sent to the Climatiq API.
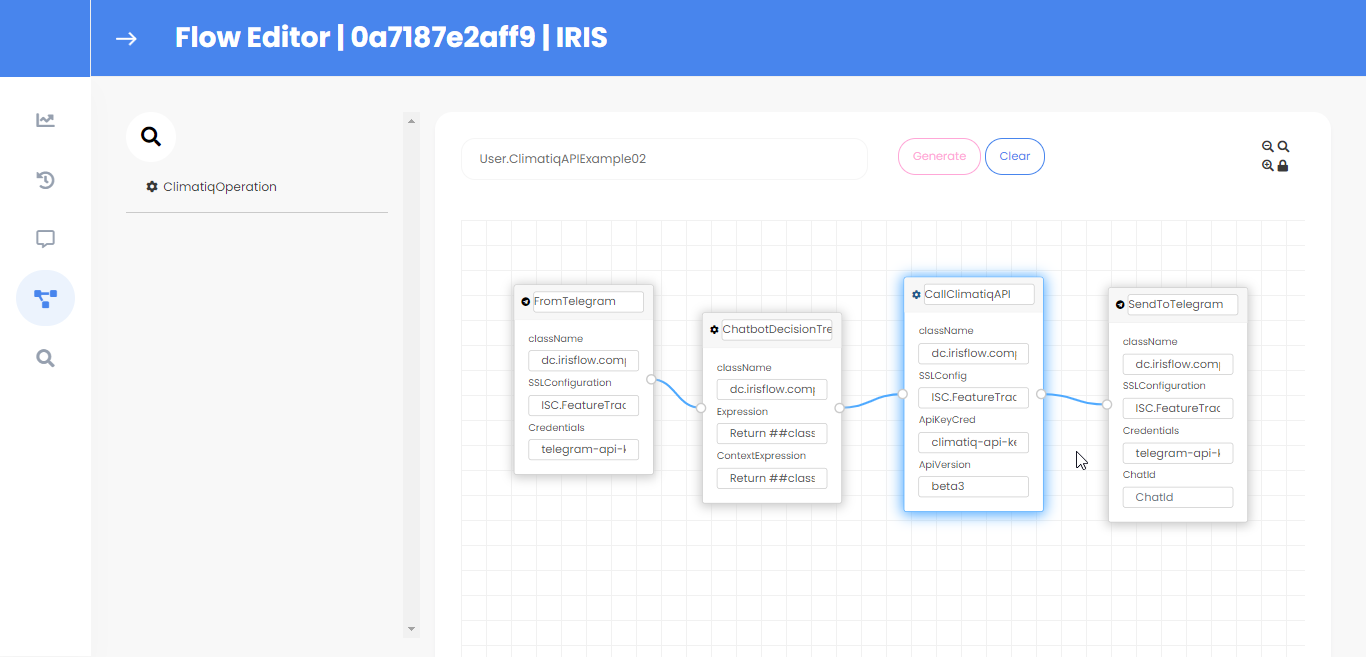
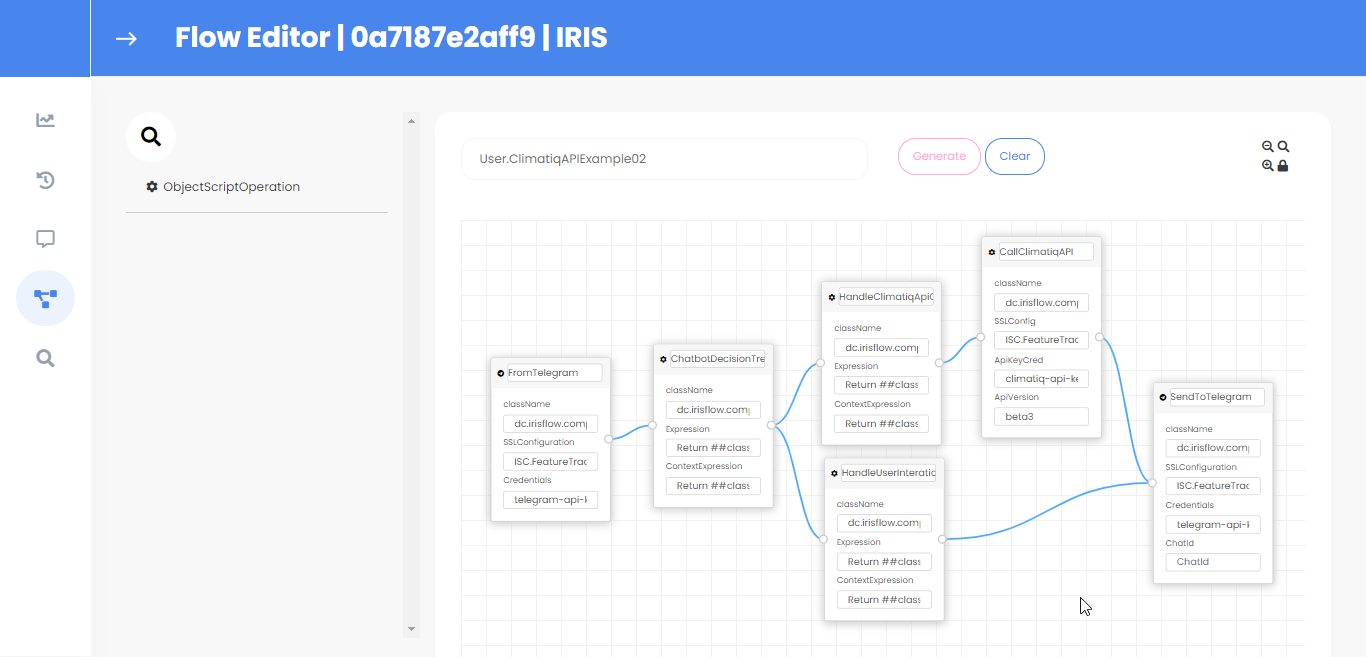
As we have our decision tree handling interactions with users and gathering information to be sent to the Climatiq API, let’s add a node which is able to talk with such an API: the node ClimatiqOperation. Add it to the flow, named it as CallClimatiqAPI and redo the links like below:
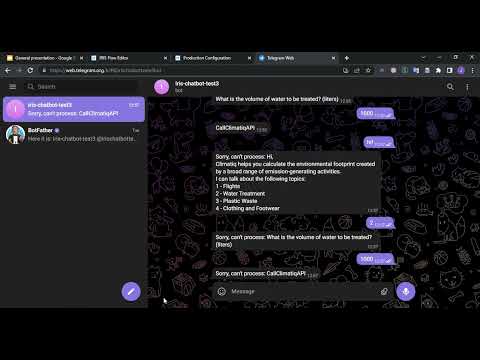
Restart the production, repeat the previous dialog to the chatbot. You’ll find that now we’re getting error messages like Sorry, can't process: blahblah.
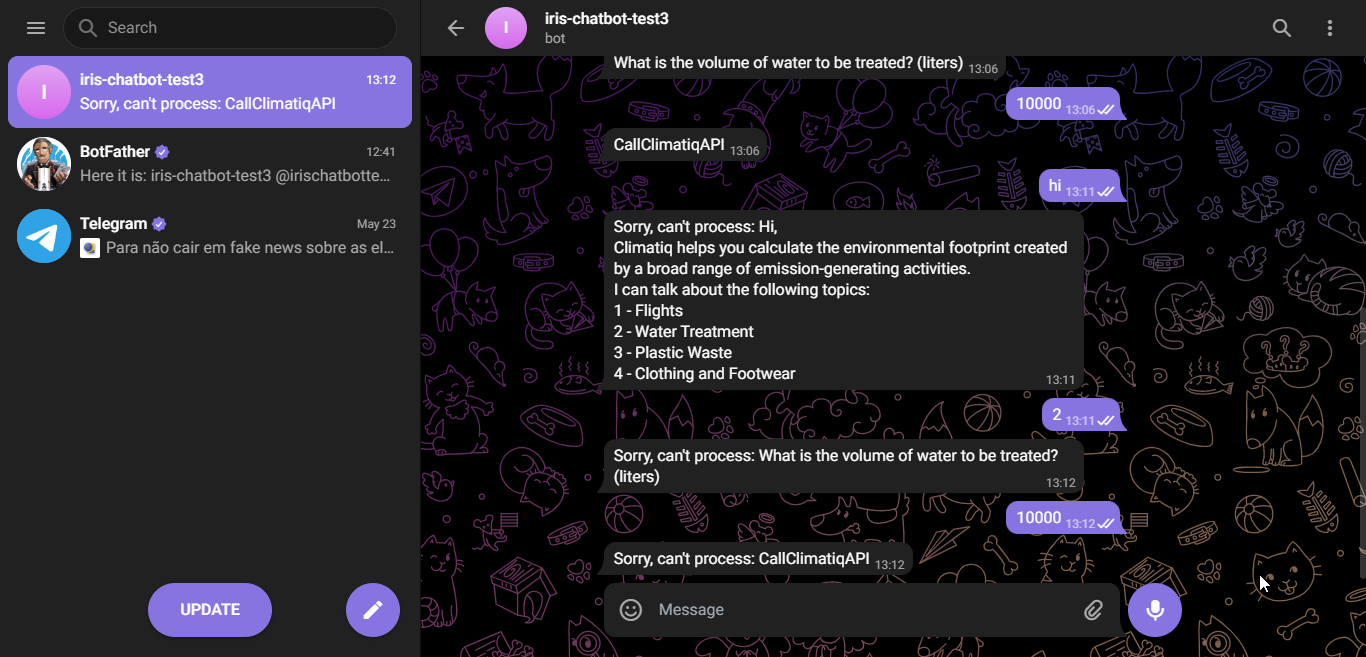
This message is generated by the CallClimatiqAPI node because it expects some JSON message following the Climatiq API scheme. So, let’s handle this.
Here, it’s important to note that we have two kinds of messages to treat: one for user interactions and another one for API calls. The first kind of messages should be sent to users directly, whereas the second one should be sent to the Climatiq API first. API call messages are identified by the CallClimatiqAPI token.
So, let’s add two new ObjectScriptOperation nodes to implement this logic to our flow.
For the first node, name it as HandleClimatiqApiCalls and set its Expression and ContextExpression properties with Return ##class(dc.irisflow.demo.ClimatiqAPIExample02Utils).HandleClimatiqApiCalls(input, context) and Return ##class(dc.irisflow.demo.ClimatiqAPIExample02Utils).HandleClimatiqApiCallsContext(input, context), respectively.
For the second node, do like the previous one but this time using the values HandleUserInteration, Return ##class(dc.irisflow.demo.ClimatiqAPIExample02Utils).HandleUserInteration(input, context) and Return ##class(dc.irisflow.demo.ClimatiqAPIExample02Utils).HandleUserInterationContext(input, context).
Finally, relink all nodes like below:
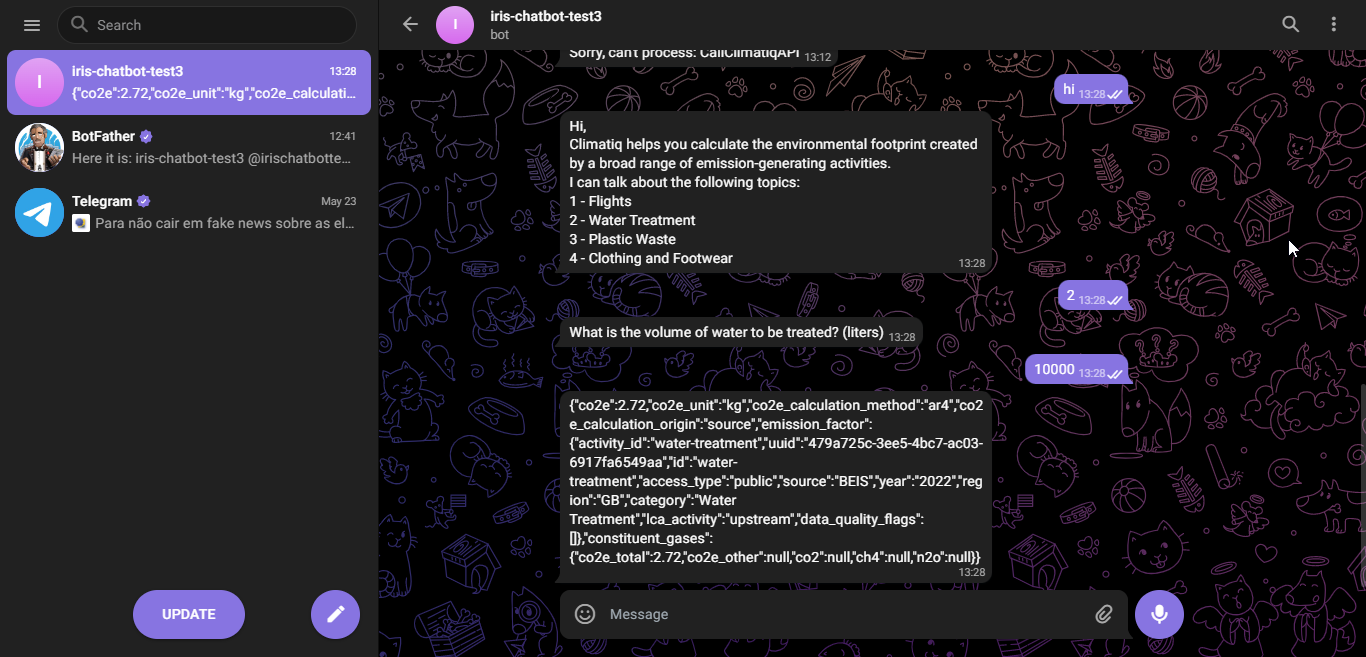
Restart the production, repeat the previous dialog to the chatbot. Now, you will see the normal chatbot interaction with the user and, a Climatiq API JSON response instead of the CallClimatiqAPI token when the conversation ends:
Let’s check out the message trace for users interaction and API interactions messages:
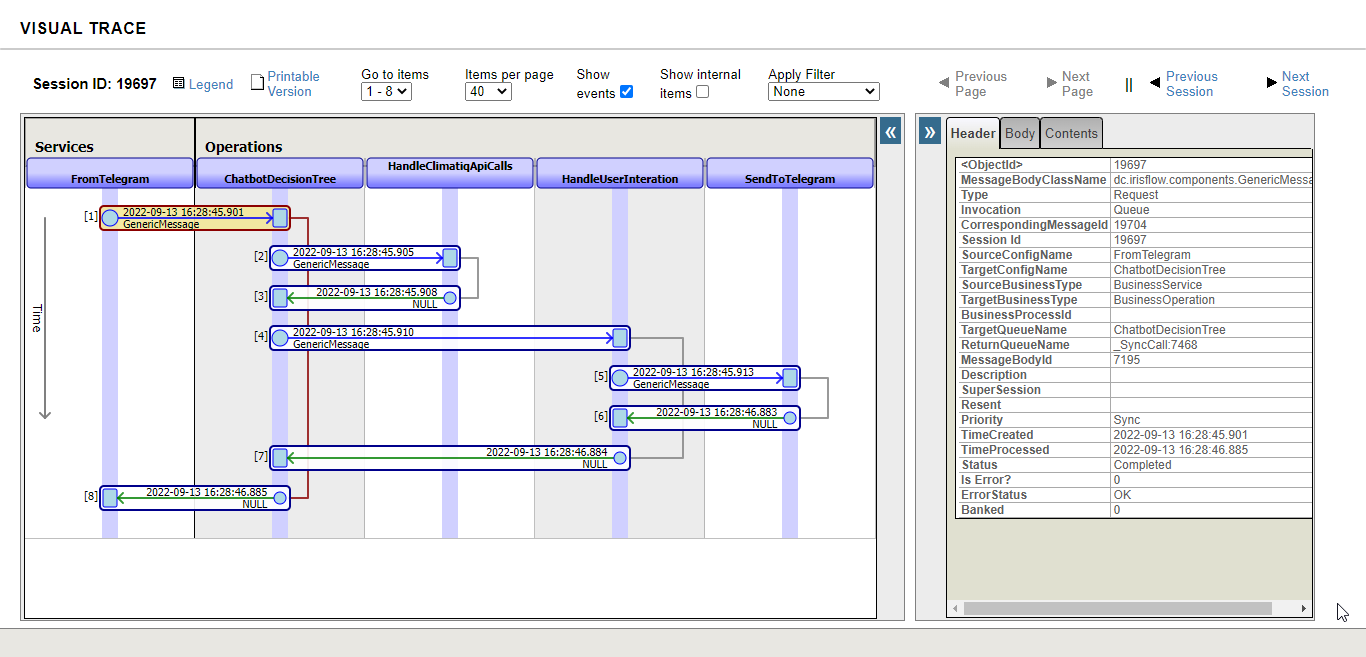

Note that in both cases, the node ChatbotDecisionTree sends the same message for the nodes HandleClimatiqApiCalls and HandlerUserInteraction. But in the first trace, only the node HandlerUserInteraction keeps sending messages in the flow. On the other hand, in the second trace, just the node HandleClimatiqApiCalls keeps sending messages.
This is because the code invoked by those nodes tests the sort of the message - user interaction or API call, and cancels the flow based on that test. Below, are a snippet of the logic to handle the kind of messages:
ClassMethod IsClimatiqApiCall(pInput As %String) As %Boolean
{
    Return $FIND(pInput, ##class(dc.irisflow.demo.ChatbotDecisionTree).#CallClimatiqAPI) > 0
}

ClassMethod HandleUserInteration(input As %String, context As %DynamicObject) As %String
{
    Set response = input
    If (..IsClimatiqApiCall(input)) {
        Return ##class(dc.irisflow.components.misc.ObjectScriptOperation).#CancelSendRequest
    }
    Return response
}

ClassMethod HandleClimatiqApiCalls(input As %String, context As %DynamicObject) As %String
{
    Set response = ""
    If ('..IsClimatiqApiCall(input)) {
        Return ##class(dc.irisflow.components.misc.ObjectScriptOperation).#CancelSendRequest
    }
    Return response
}
Thus, the last operation that we need to do in order to finalize our chatbot, is to treat the API JSON response. For this purpose, add a new ObjectScriptOperation node, named it as FormatResponse, set its Expression and ContextExpression as Return ##class(dc.irisflow.demo.ClimatiqAPIExample02Utils).FormatResponse(input, context) and Return ##class(dc.irisflow.demo.ClimatiqAPIExample02Utils).FormatResponseContext(input, context), and relink like the image below:
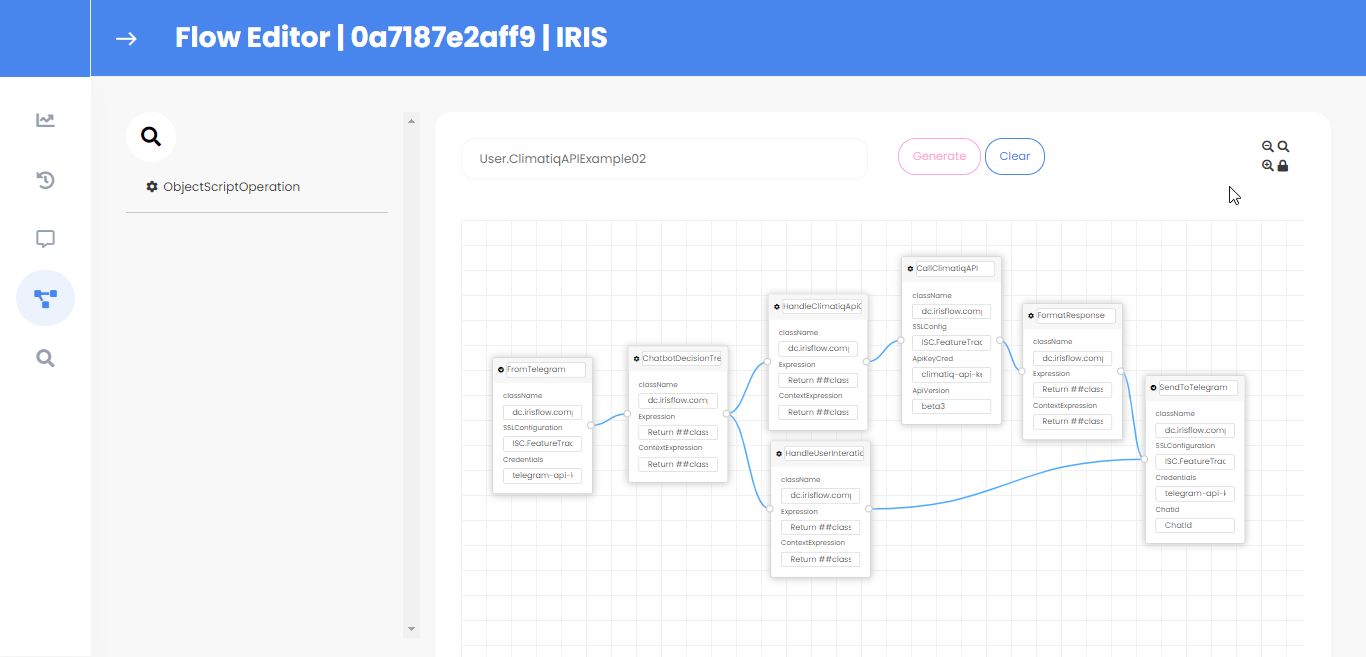
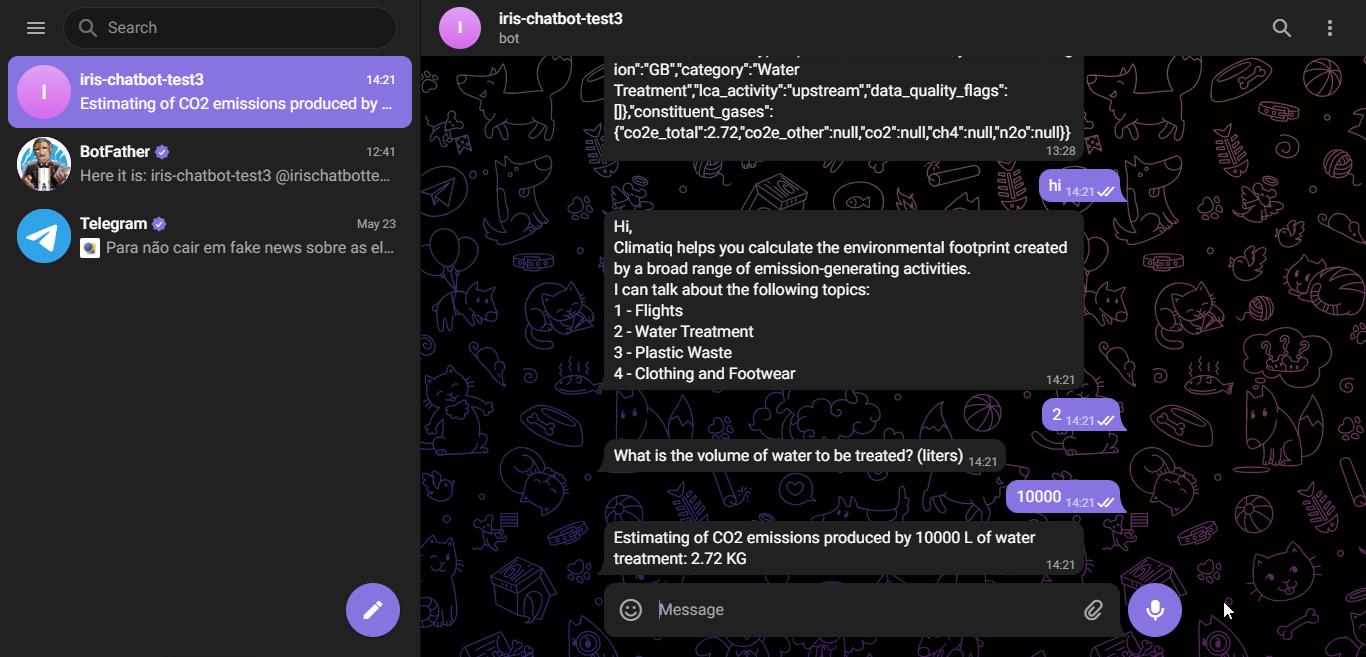
And for the last time in this article, restart the production, repeat the previous dialog to the chatbot. Now, you should be able to see a complete dialog with a treated response:
Conclusion
In this article we presented the new node for IRIS Flow, the ClimatiqOperation node. This node also uses a new custom adapter for using the Climatiq REST API.
By using this new node and the previous ones in the IRIS Flow, we were able to create a simple chatbot on Telegram, which can let users know how many CO2 emissions their activities could generate.
We hope that this article could inspire you to create great apps and be aware of your CO2 footprint as well! :)