DSW Reports — DeepSeeWeb reports generator
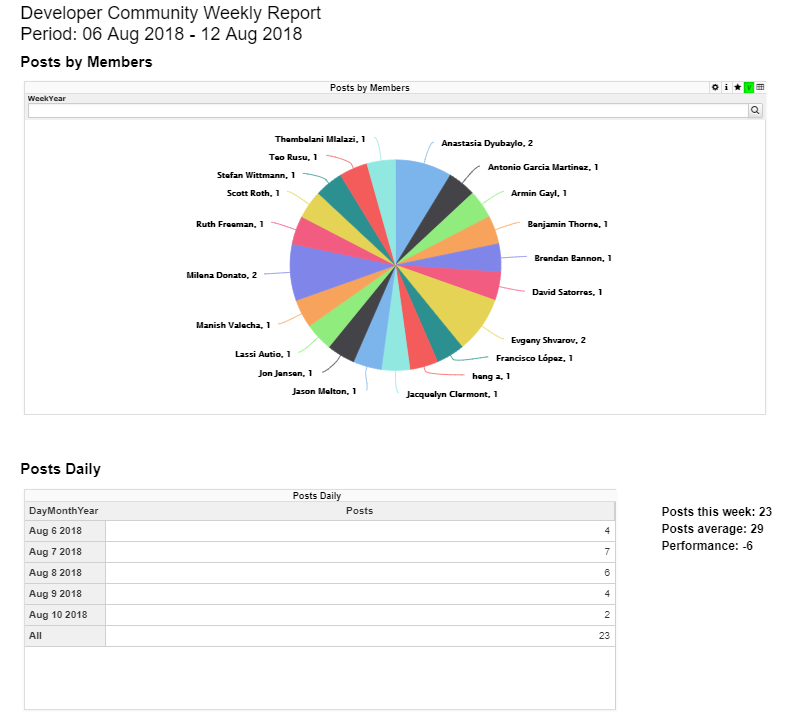
Users of analytical applications often need to generate and send out PDF reports comprised of elements of the analytical panel. In the InterSystems stack, this task is solved using the DSW Reports project that is an extension of DeepSeeWeb. In this article, we will explain how to use DSW Reports for generating PDF reports and emailing them.
What is DSW Reports?
The InterSystems IRIS Business Intelligence (formerly known as DeepSee) is used for developing analytical applications and is a part of InterSystems IRIS Data Platform. There is a separate project called DeepSeeWeb that uses a more modern web interface (AngularJS) for visualizing analytical panels of InterSystems IRIS BI. To interact with the server side, DeepSeeWeb uses MDX2JSON, a project that provides REST API access to InterSystems IRIS BI.
DSW Reports is a DeepSeeWeb extension written in AngularJS that implements the key functionality for automatic report generation. DSW Reports uses DeepSeeWeb for rendering widgets and MDX2JSON for processing MDX requests.
Capabilities:
- Rendering of selected widgets with predefined filters.
- Output of execution results for arbitrary MSD requests.
- Automatic printing and emailing of PDF reports.
- Customization of reports via CSS
Report generation
In order to generate a report in DSW Reports, you need to create just two files:
- index.html — the skeleton and the main page of the report, usually remains unchanged.
- config.js — report configuration that is changed for different types of reports and is responsible for populating the report with data.
The report configuration file must contain the getConfiguration function.
// General report settings
function getConfiguration(params){...}
The getConfiguration function accepts a params object containing parameters from the URL and an additional "server" parameter that is the address of the server. The "server" parameter has the following form: protocol://host:port.
Thanks to the params object, you can pass any data to your report via the URL string. For instance, if you need to change widget filters to your liking, you can pass the “filter” parameter in the URL and it becomes accessible via the params object.
//<protocol://host:port>/dsw/reports/report_dir/index.html?filter=NOW
function getConfiguration(params){
    var filter = params["filter"]; // filter = "NOW"
}
The getConfiguration function returns an object with 3 properties:
- REPORT_NAME — report name
- BLOCKS — array of report blocks
- NAMESPACE — namespace containing data for the report
Let’s take a closer look at an array of blocks called BLOCKS. A block is an object containing widget settings, settings of calculable fields, and so on.
Block view:
{
    "title": String,            //Block title
    "note": String,             //Notes under the block. Can contain HTML code
    "widget": {                 //Widget iframe settings:
        "url": String,          //URL of the iframe source
        "height": Number,       // iframe height
        "width": Number         // iframe width
    },
    "totals":[{                 //Settings of values calculated using MDX
        "mdx": String           //MDX request
        "strings": [{           //Value strings from the request
            "title": String,    //String title. Can use HTML.
            "value": String,    //Default string value
            "value_append": String, //Suffix for the value.
                                //Can be used for %, $ and other symbols.
                                //% converts the value in to a percentage (x * 100).
                                //Can use HTML.
            "row": Number       //Number of the row from the MDX request
                                //that the value is taken from.
                                //The default value is 0.
     },{...}]
},{...}]}
All the fields are necessary. If you don’t need a field, better leave it as a blank row.
Block example
{
     title: "Persons",
     note: "",
     widget: {
        url: server + "/dsw/index.html#!/d/KHAB/Khabarovsk%20Map.dashboard" +
        "?widget=1&height=420&ns=" + namespace,
        width: 700,
        height: 420
     }
}
Another example
{
    title: "Khabarovsky krai",
    note: "Something note (only static)",
    widget: {
        url: server + "/dsw/index.html#!/d/KHAB/Khabarovsk%20Map.dashboard" +
        "?widget=0&height=420&isLegend=true&ns=" + namespace,
        width: 495,
        height: 420
    },
    totals: [{
       mdx: "SELECT NON EMPTY " +
      "[Region].[H1].[Region].CurrentMember.Properties(\"Population\") ON 0,"+
      "NON EMPTY {[Region].[H1].[Region].&[Khabarovsk]," +
      "[Region].[H1].[Region].&[Komsomolsk-on-Amur],"+
      "[Region].[H1].[Region].&[Komsomolsky district]} ON 1 FROM [KHABCUBE]",
       strings: [{
            title: "Khabarovsk: ",
            value: "None",
            value_append: " ppl"
        }, {
            title: "Komsomolsk-on-Amur: <br />",
            value: "None",
            value_append: " ppl",
            row: 1
        }, {
            title: "Komsomolsky district: <br />",
            value: "None",
            value_append: " ppl",
            row: 2
        }]
    }]
}
What do I fill a block with?
The main fields for filling out in a block are “url” for widget settings and “mdx” for the settings of calculable values.
-
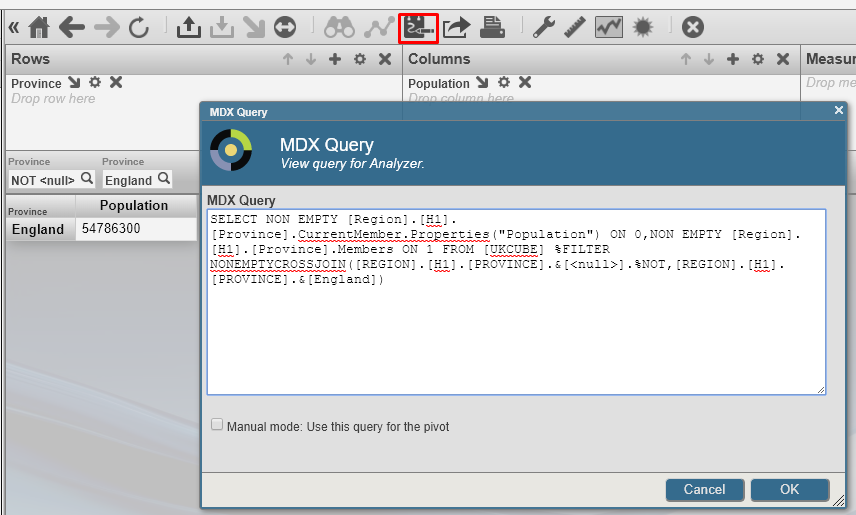
MDX can be composed manually, but we recommend doing it with the help of Analyzer, a built-in constructor from InterSystems IRIS BI/DeepSee.
-
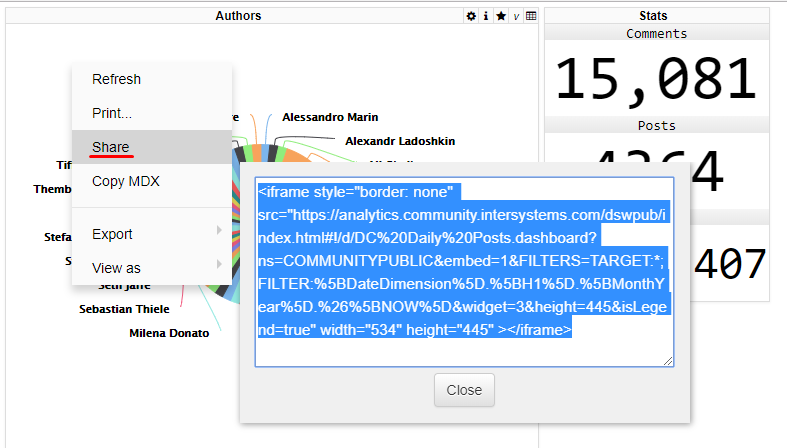
The URL value can be obtained from DeepSeeWeb. Widgets built into a report are iframe elements pulling data from DeepSeeWeb widgets. In order to get a link to the source, select “Share” from the widget’s context menu.
Report customization
Report libraries come with a file called style.css that enables you to customize the appearance of the report. It contains a standard set of classes controlling every element of the report. You can also add your own style classes and use them in the index.html file.
Emailing reports
Let’s assume that the report is ready and saved to the reports folder in DeepSeeWeb. It means that the interactive HTML report is now accessible via a link. So what do you need to do to convert it to PDF and email it? It can be done automatically by pthantomjs and the built-in SMTP client. More information about installing and configuring phantomjs can be found here (windows, ubuntu). After that, you will need to configure the SMTP client and create a task in the Task Manager.
SMTP settings
All settings are configured in the terminal.
- First, you need to configure your email settings
// SMTP configuration function
do ##class(DSW.Report.EmailSender).setConfig(server, port, username, password, sender, SSLConfig)
- server — the SMTP server address.
- port — the port for incoming messages.
- username and password — authentication details.
- sender — the sender’s email address.
- SSLConfig — Optional. The name of the SSL-configuration.
- You will then need to put together a list of recipients
// A function for adding a user
do ##class(DSW.Report.EmailSender).addRecipient(email)
// A function for removing a user
do ##class(DSW.Report.EmailSender).deleteRecipient(email)
- Once the previous steps are completed, you can start sending out emails
// A function that starts the email dispatch
do ##class(DSW.Report.Task).Run(url, reportname)
- url — a link to the report.
- reportname — the name of the report. Used for PDF generation.
Launching the automatic mailout
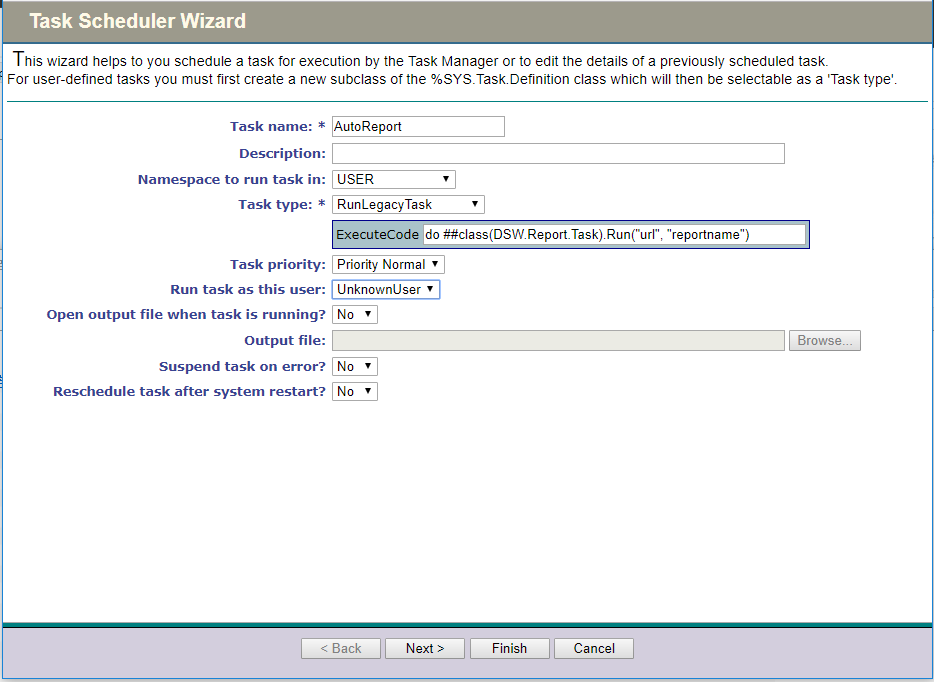
Let’s use the Task Manager to automate the mailout process. We need to create a new task with the following parameters:
-
The first page lets you configure the namespace and specify the function for launching the mailout task.
-
You can configure the time and periodicity of task execution on the second page.
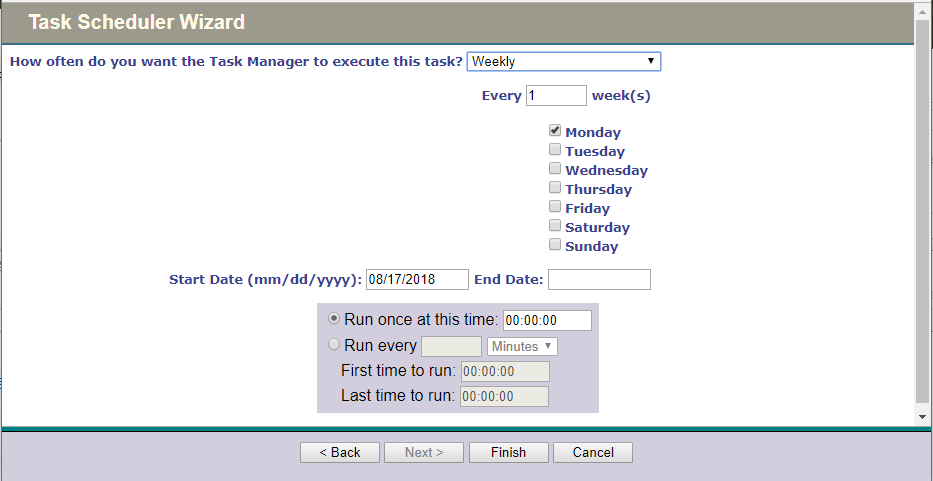
-
The last step is to click the “Finish” button.
That’s it, with all of these manipulations behind us, we have an automatically generated report consisting of DeepSeeWeb widgets that is emailed in the PDF format at a particular time.