Deploy IRIS Community Edition on the cloud: Part 1 AWS
This article explains how to deploy InterSystems IRIS Community Edition on AWS using the AWS Marketplace and EC2. It covers prerequisites, instance selection, security settings, SSH access, and first verification steps. The deployment can be completed using the AWS Free Tier and is suitable for developers who want to quickly start working with IRIS in the cloud.
Who this guide is for.
This guide is intended for developers, solution architects, and DevOps engineers who want to deploy InterSystems IRIS Community Edition on Amazon Web Services (AWS). No prior AWS automation experience is required, but basic familiarity with EC2 and SSH is helpful.
What you will achieve.
After completing this guide, you will be able to:
- Launch InterSystems IRIS Community Edition on AWS
- Configure a secure EC2 instance
- Connect to IRIS using SSH and the Management Portal
- Verify that IRIS is running correctly
Prerequisites
Before you begin, make sure you have:
- An active AWS account
- Permissions to create EC2 instances and security groups
- An SSH key pair configured in AWS
- Basic knowledge of Linux command line
Deployment overview
The deployment process consists of the following steps:
- Launch IRIS Community Edition from AWS Marketplace
- Select an EC2 instance type
- Configure networking and security
- Connect to the instance via SSH
- Verify IRIS installation
Hi Gang!
Did you know you can deploy InterSystems IRIS Community Edition on the cloud without paying for a license? You can try for free, and it could even come in handy if you want to show off that shiny new app you've created (maybe for the full stack competition..?)
In this article I will provide a complete walkthrough on how to deploy IRIS on Amazon Web Services (AWS), and will also add a follow up for deploying on Azure.
Now before I begin the walkthrough, I want to admit that I was terrified of using AWS the first time because I'd seen memes about how easy it is to rack up costs on AWS. So if you're thinking the same, I suggest you start by signing up to a Free Tier Account, which gives you $100 free credit to evaluate, and automatically shuts off to prevent charges. InterSystems IRIS Community Edition has a free license so if you pair the two, you can deploy without risk and completely for free. (Disclaimer: although I'm sure this is true, please do read the free account terms and make your own decisions 😅 )
Note, this article walks through deploying IRIS Community on AWS, however the same guide can be followed to deploy IRIS for Health Community Edition, or with Bring-your-own-licence editions of IRIS and IRIS for Health, to deploy a fully licensed, production version of IRIS on AWS.
Step 1: Launch IRIS from AWS Marketplace
Once signed in on AWS go to InterSystems IRIS Community Edition on the AWS Marketplace.
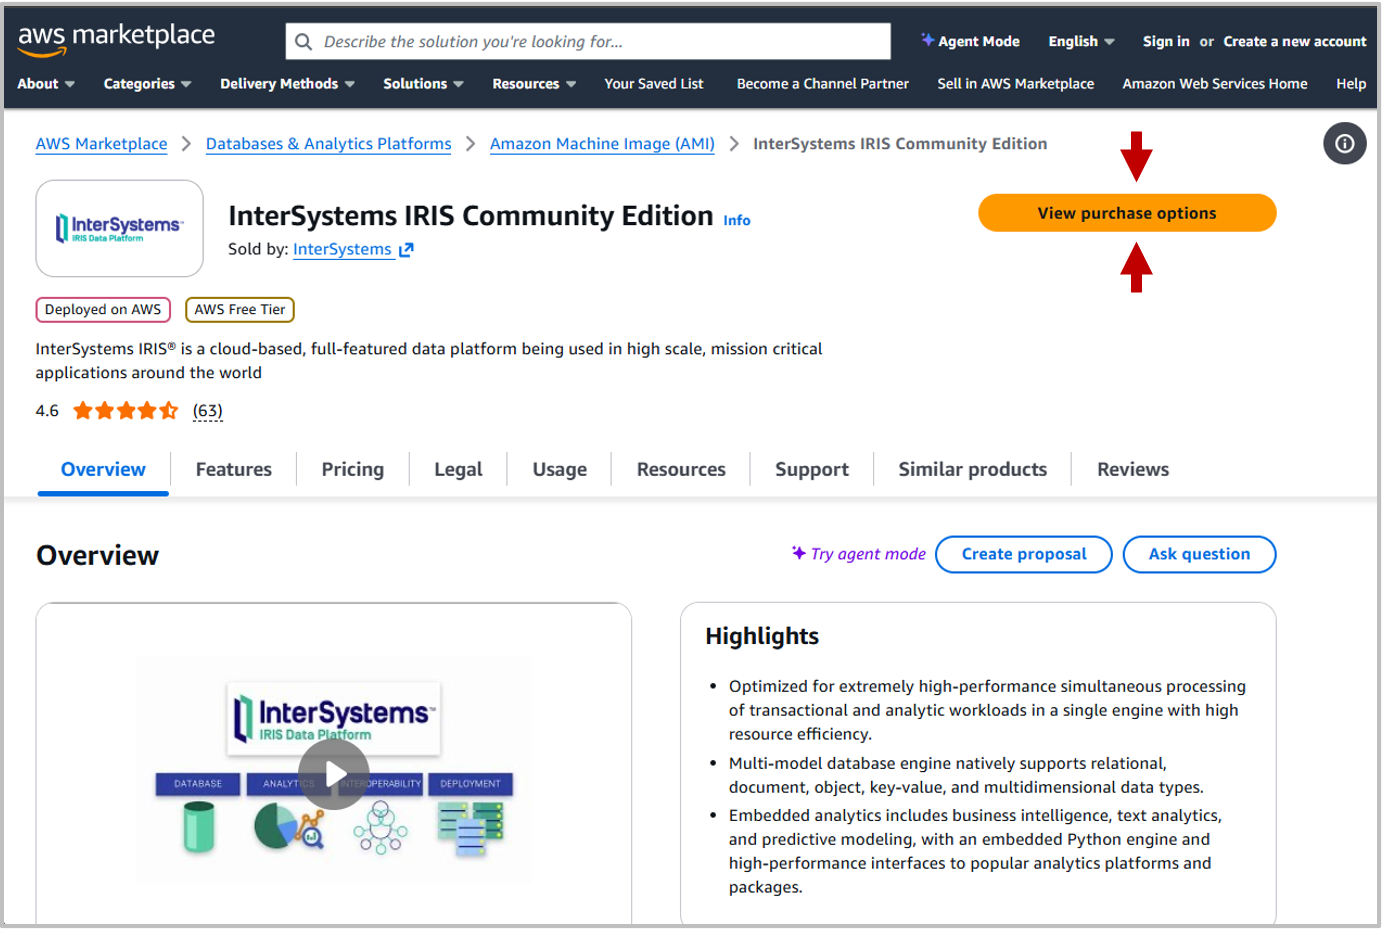
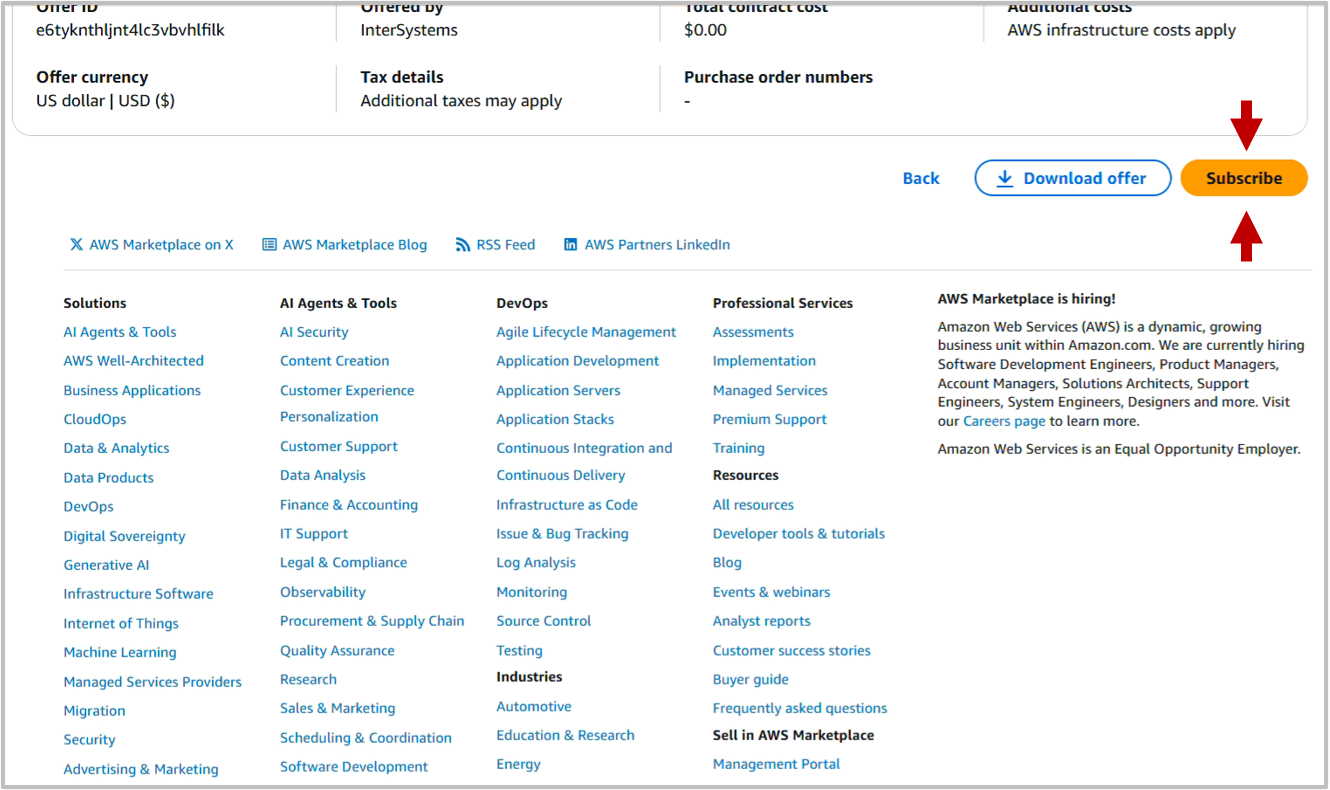
Click View Purchase Options to see the "Subscribe to InterSystems IRIS Community Edition page". This page includes Terms and Conditions, along with pricing details, which shows the Total amount as $0.00. Scroll to the bottom of the page and click Subscribe:
It might take a minute to process the Subscription. Afterwards you will be redirected to a page which includes the subscription information and a button saying "Launch your software". Note, the exact placement of this button on the page varies.
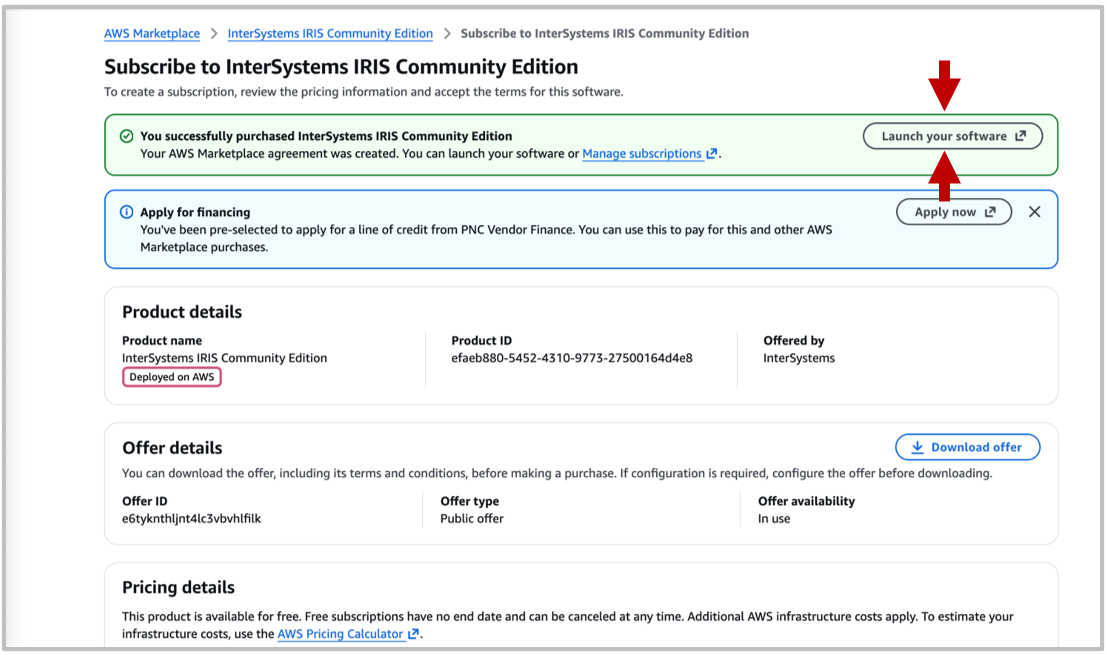
From here you can select your launch configuration and settings:
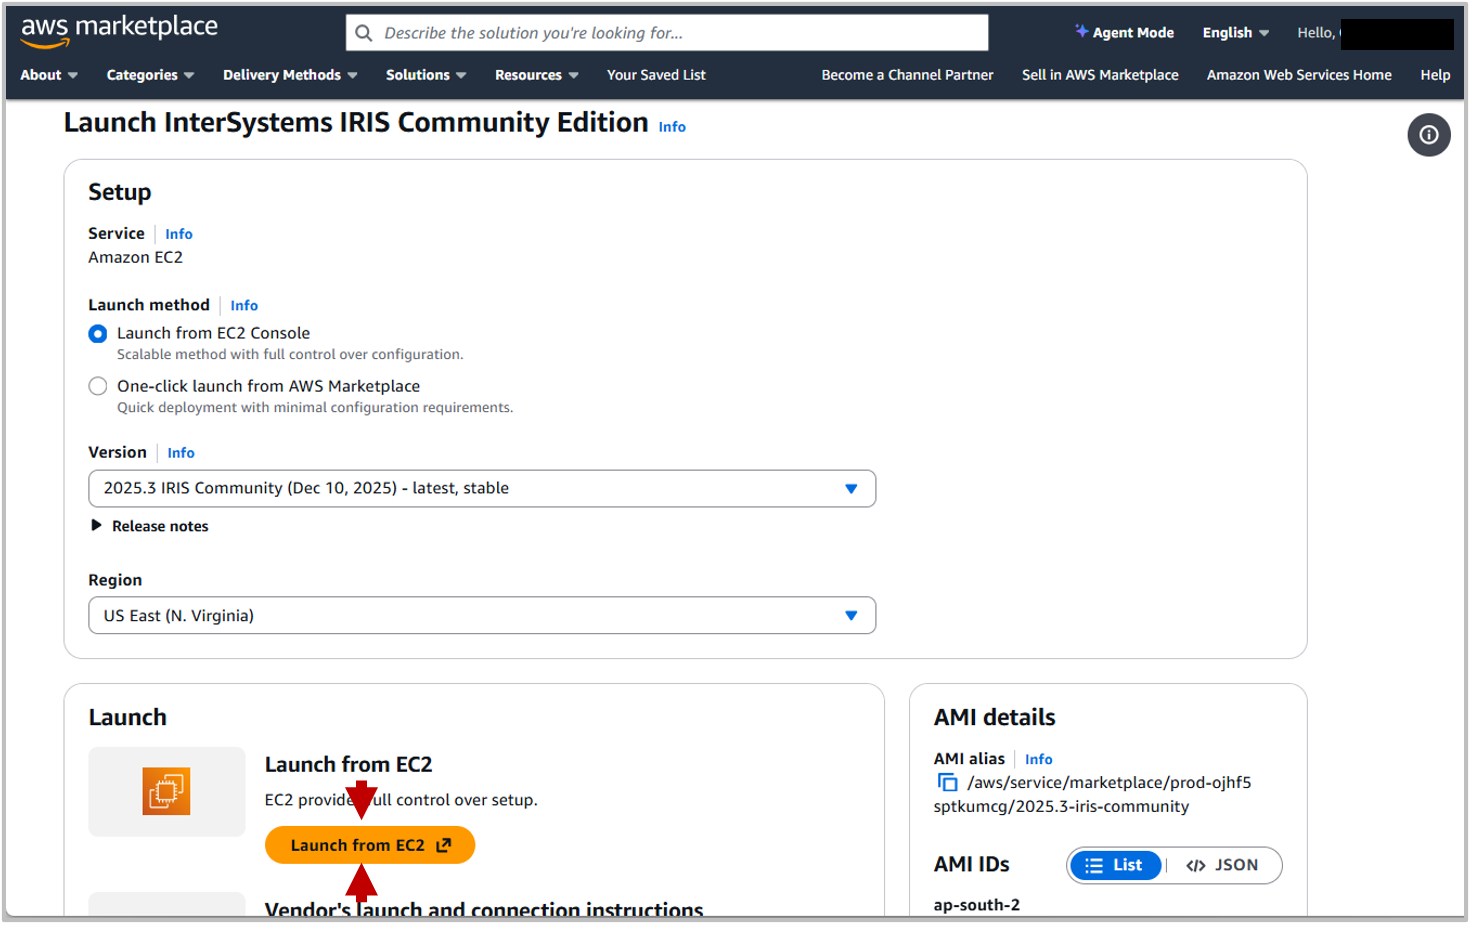
If you are not familiar with launching on AWS, it's recommended to use the EC2 Launch Console. Select this from the Launch Method and then click Launch from EC2.
Step 2: Choose EC2 instance type
EC2 Launch Console
The EC2 Launch console is where you define the settings for the Instance you are launching. You may wish to explore these settings in more detail yourself, but this guide will describe some of the core settings.
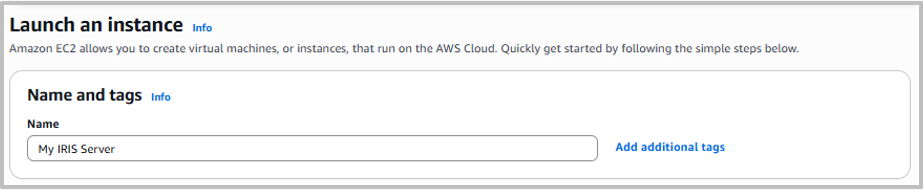
Name and Tags
These are used to recognise and identify the Instance. Organised naming and tagging is especially important if you are managing multiple AWS instances.
Application and OS Images (Amazon Machine Image)
This is where you select the virtual machine being run. If you have clicked through the InterSystems IRIS Community Edition marketplace page, you should have the correct Amazon Machine Image (AMI) already selected. Otherwise, you can select it from the catalog.

Instance Type
This is the hardware that InterSystems IRIS Community Edition will be running on. If you are a member of the free tier, you will be limited to small machines here. Choose your machine based on both workload size and budget, as more powerful machines will come at an increased cost.

Step 3: Configure security settings
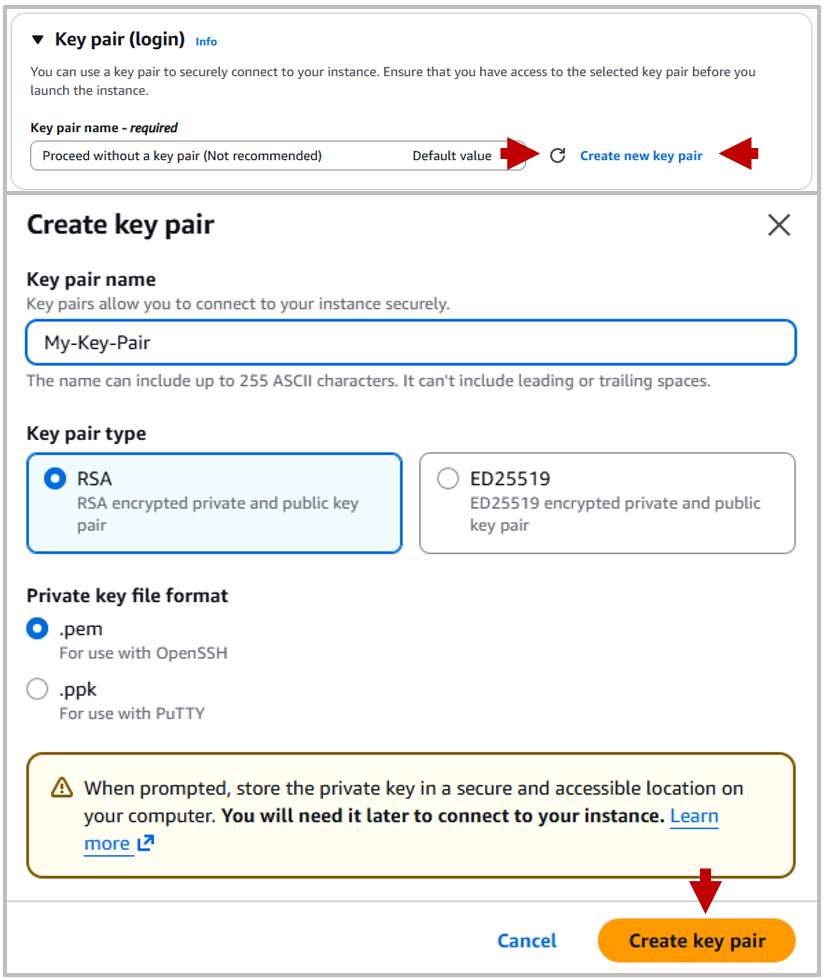
Key Pair (Login)
The Key pair is the login key which you can use to connect to the instance via a Secure Shell connection (SSH). If you do not decide a Key pair here, you will not be able to log in via SSH.
Then, create a Key pair, this allows secure SSH logins, this will download a Private Key which you can use to login.
Unless you have previously created a Key pair you will need to generate a new one. For this, click Create new key pair, and in the pop-up choose a key name (to identify it), an encryption method and a file format (if you are uncertain about these, leave them as defaults).
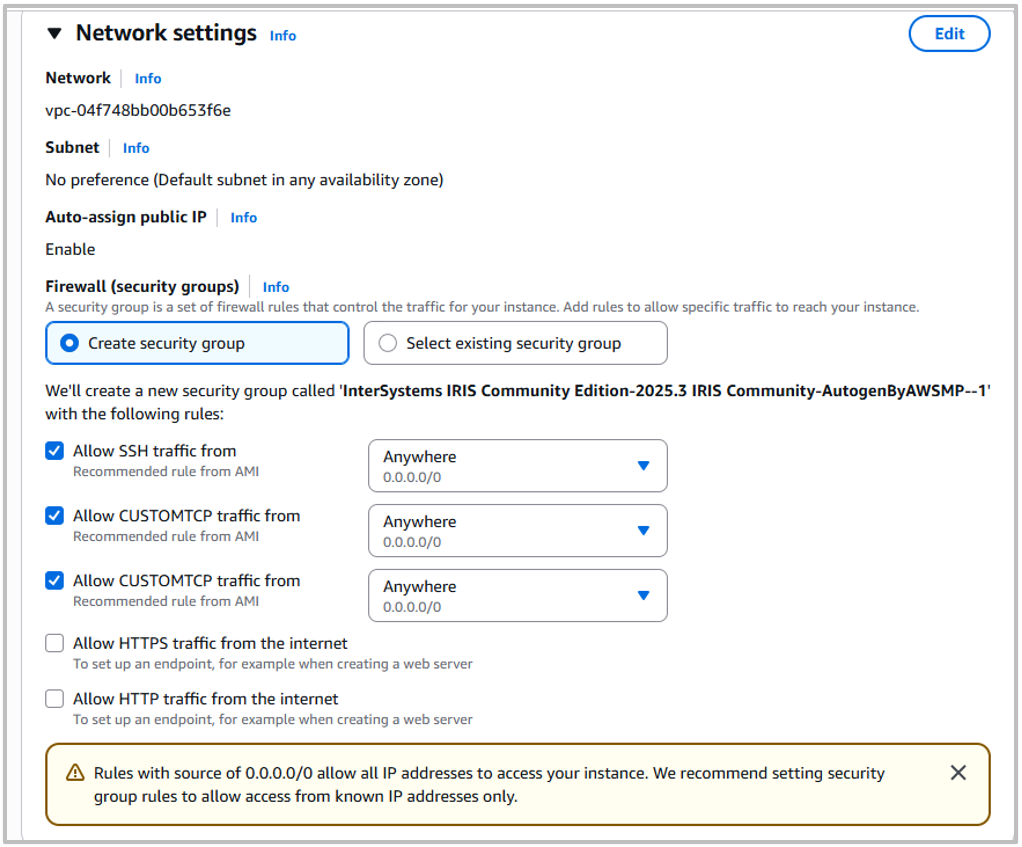
Network Settings
Here you can define some Network Security settings, like limiting which IP addresses can connect to your instance and allowing HTTP/HTTPS Traffic. Depending on your use case and security concerns, the appropriate settings will vary, so consider the required settings for your desired use.
Storage
Choose the amount of storage needed for your instance. Note, the InterSystems IRIS Community Edition limits database storage to 10GB, so significantly more than this is unlikely to be required.

Advanced Details
There are a large number of additional settings available, including the ability to upload user data from the launch portal. These can be ignored for basic usage.
Launch Instance
After selecting your settings, click Launch Instance from the Summary panel on the right-hand side of the page.
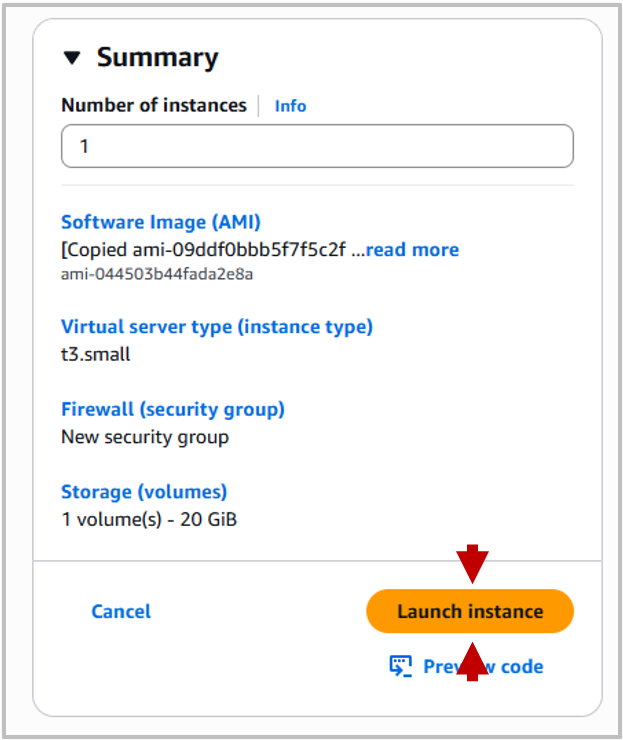
You instance will take a bit of time to launch and do appropriate status tests, but after that will be available online.
Step 4: Connect via SSH
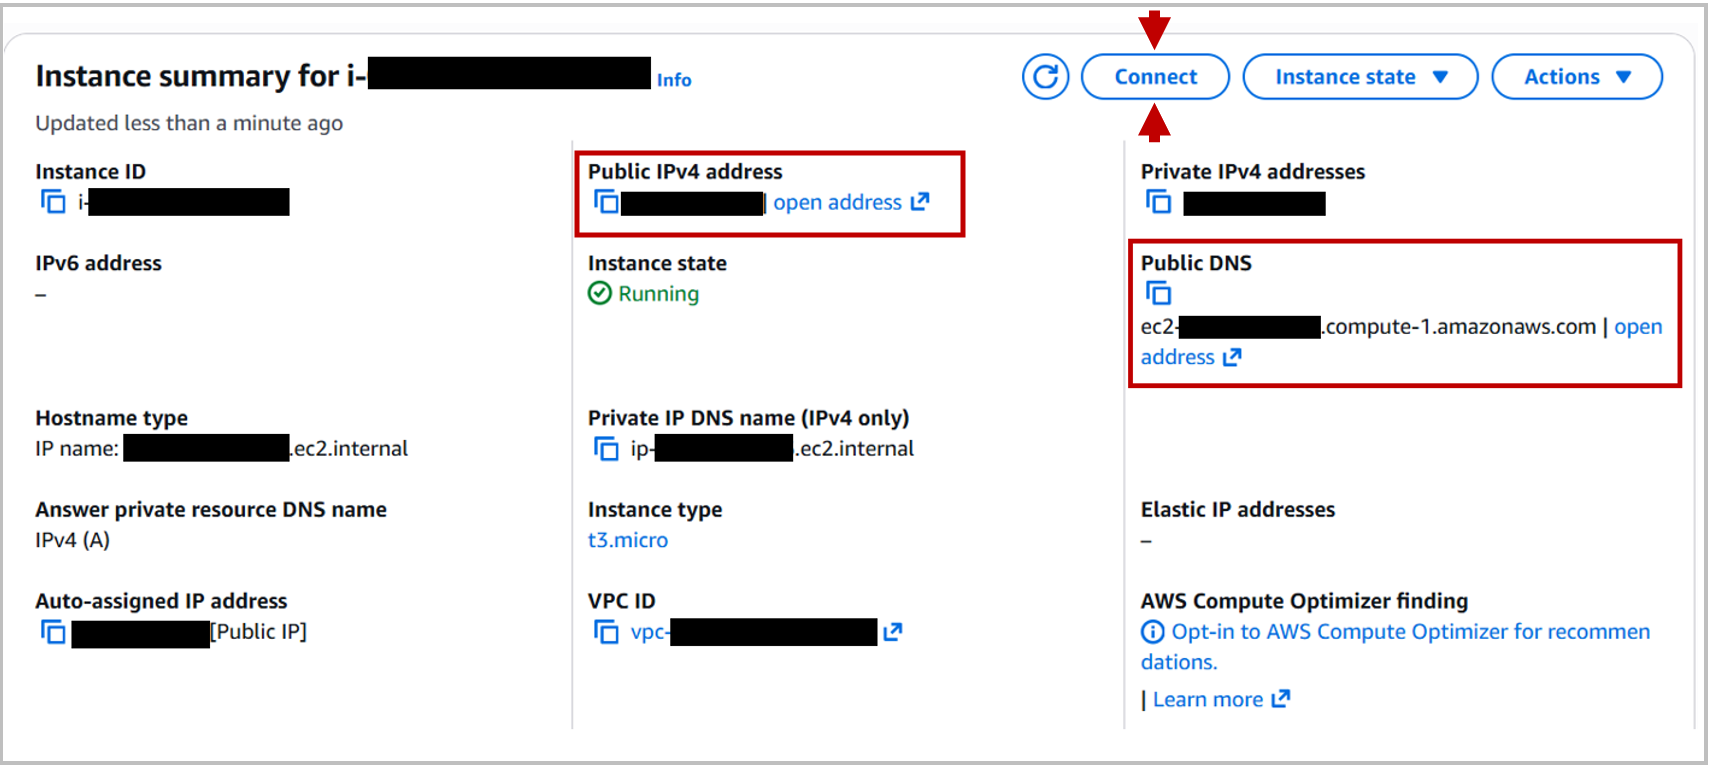
Connect
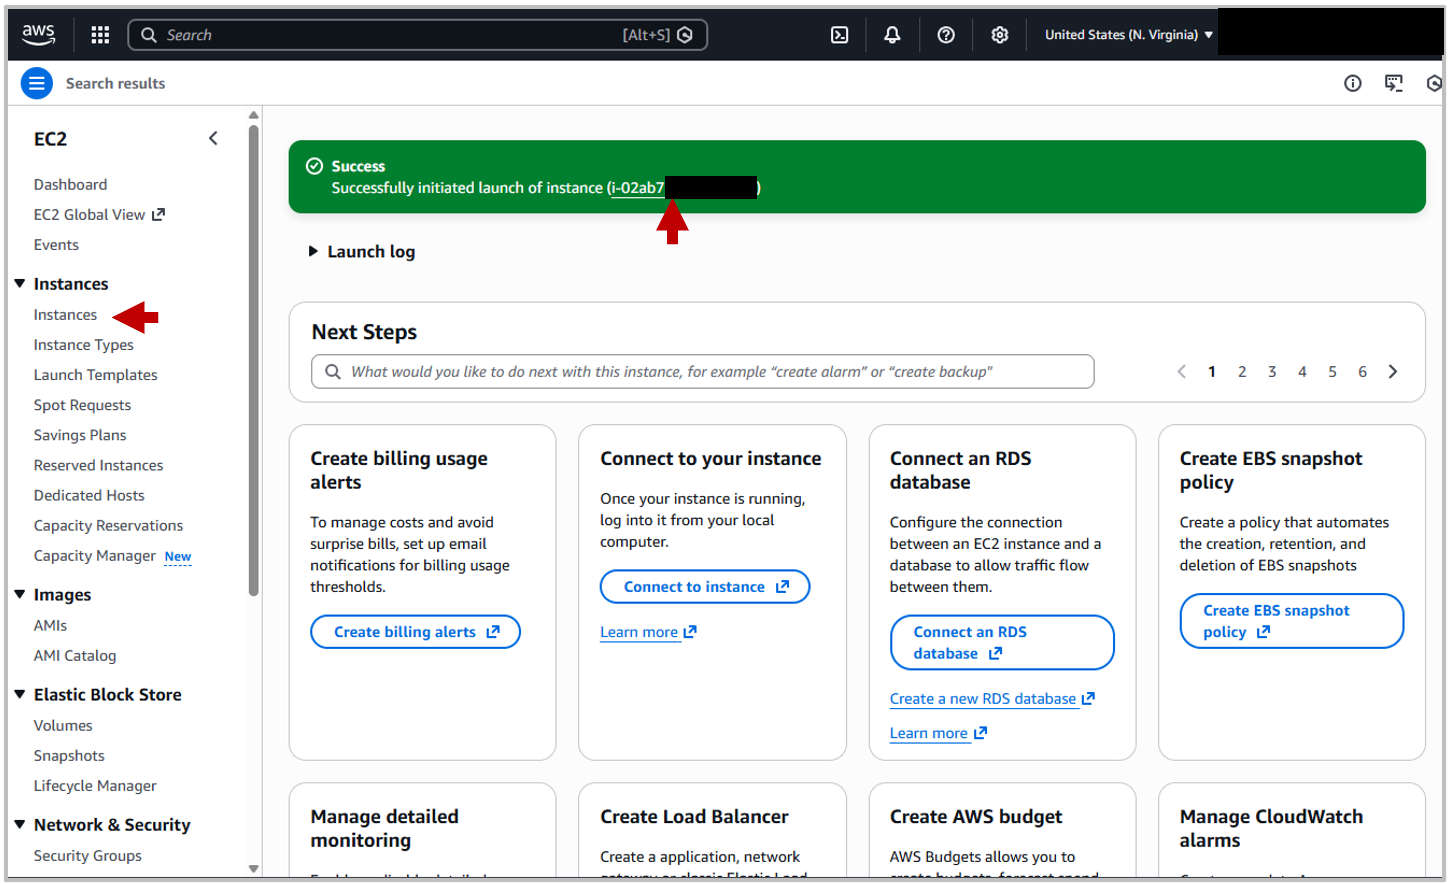
Once you've started you instance, you can navigate to the instance summary by selecting the ID within the success message or navigating to the instances dashboard from the left-hand panel.
From the Instance Summary you can find the Public IPv4 address and Public DNS, either of which can be used to connect to the instance with SSH or as a web-server. The Public DNS is a redirect that routes to the IP address, so each option has the same result.
You can connect to the instance in different ways, some of which are described below.
Whichever connection method you use, you will need to reset the password the first time you connect. The default credentials are:
- Username: _SYSTEM
- Password: SYS
If you are connecting from a command-line interface, change the password with:
iris passwordand start an IRIS terminal with:
iris session irisNote, every time you open a new terminal connection, the entry message will include a reminder to change your password, but this is only required once.
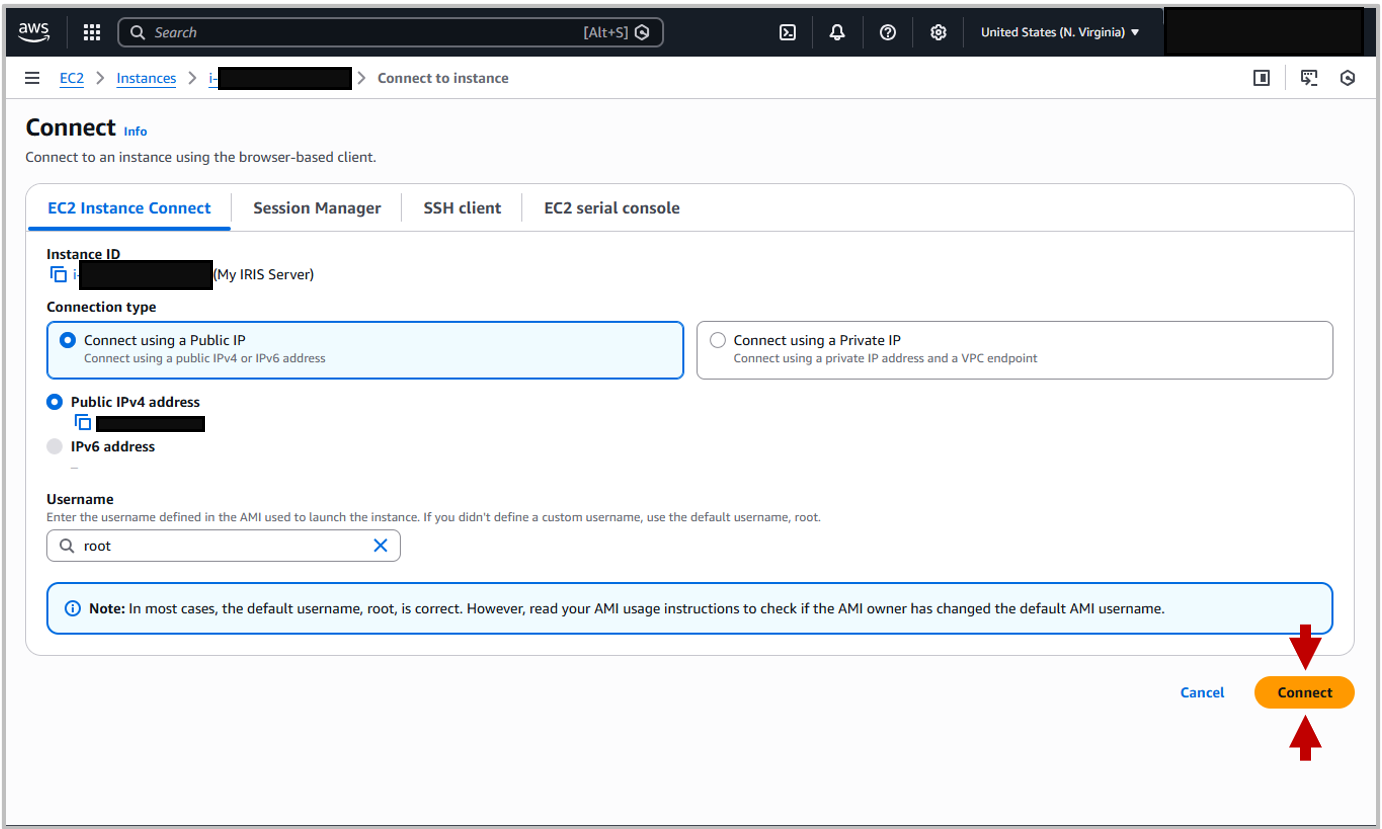
EC2 Instance Connect
On the Instance dashboard is a large button within the instance summary to Connect (see screenshot above). Click this to open the connection portal. The first tab of this is the EC2 Instance Connect tab. You can leave the defaults in place and click Connect. This will open a new terminal window.
SSH Client
You can connect using SSH, using the Private key downloaded earlier and either the IP or DNS addresses listed under the instance summary. Please note, when connecting to your InterSystems IRIS instance using SSH, you need to use the username `ubuntu`.
# Run to ensure key is not publically viewable
chmod 400 "My-Key-Pair.pem"
# Connect to instance using DNS
ssh -i "My-Key-Pair.pem" ubuntu@ec2-xx-xx-xxx-xxx.compute-1.amazonaws.com

# Connect to instance using Public IP
ssh -i "My-Key-Pair.pem" ubuntu@xx.xx.xxx.xxx
You can use an SSH connection to copy files to your instance using scp, sftp or an SFTP client like FileZilla. For any of these, you will need to use your identify file as a key and "ubuntu" as the username.
Step 5: Verify IRIS installation
Management Portal
You should be able to access the Management Portal at the DNS or IP addresses listed, unless the security settings you selected restrict this. To access the Management Portal, append :52773/csp/sys/%25CSP.Portal.Home.zen to the IP or DNS addresss and open in your browser. i.e.
`http://ec2-xx-xx-xxx-xxx.compute-1.amazonaws.com:52773/csp/sys/%25CSP.P…` or `xx.xx.xxx.xxx:52773/csp/sys/%25CSP.Portal.Home.zen`
Where x values are the server IP address.
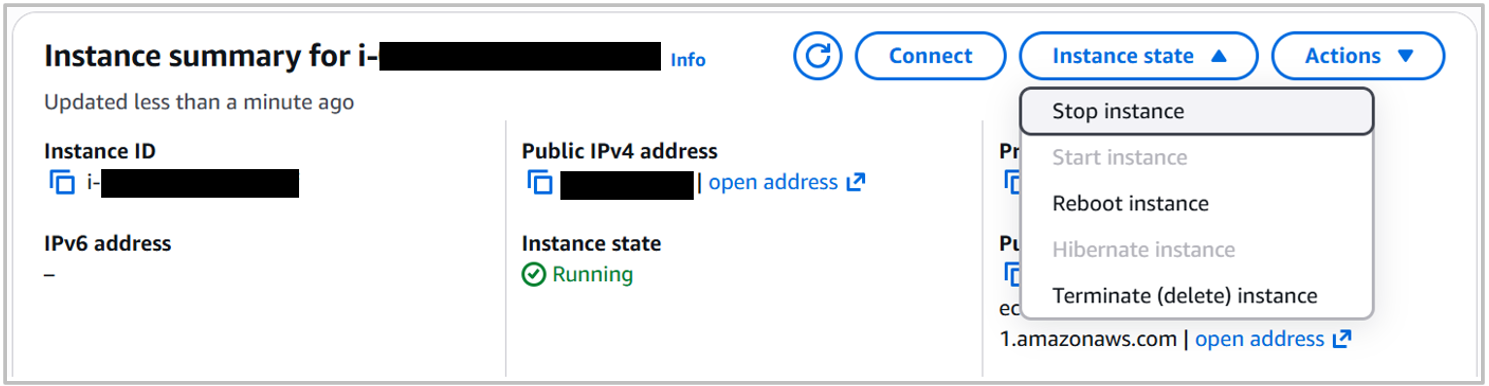
Terminate Instance
When you are finished working with your InterSystems IRIS Community Edition instance and no longer want the demo online, consider terminating it to avoid excess charges. You can do this from the Instance Portal:
 And there you have it! Thats todays guide for how to deploy InterSystems IRIS Community Edition on the Cloud with AWS
Summary
InterSystems IRIS Community Edition can be deployed on AWS in minutes using the AWS Marketplace. This approach is ideal for learning, testing, and prototyping. Using the AWS Free Tier allows you to experiment at no cost while gaining hands-on experience with IRIS in the cloud.
FAQ
1. Can I deploy IRIS for free on AWS?
InterSystems IRIS Community Edition is free to deploy on AWS for development and testing purposes. You still have to pay for compute costs to AWS (unless you can use a free trial or credits). For production purposes, there is a bring-your own-license version, so contact sales to license a production deployment.
2. Whats the easiest way to connect to a deployment?
On AWS, the easiest way to connect to an IRIS deployment is to use the EC2 instance connection from the EC2 console. You can also connect via an SSH connection.
3. What are the default credentials used?
The default credentials are:
- Username: _SYSTEM
- Password: SYS
These will need changing when you first log in, using `iris password` from the terminal.
4. How do I terminate my instance to avoid charges?
You can stop (temporary stop), or terminate (permanently delete) your instance from the Instance Summary page, by clicking the instance state dropdown and choosing Stop Instance or Terminate Instance.