Amazon EKS and IRIS. High Availability and Backup
All source code to the article is available at: https://github.com/antonum/ha-iris-k8s
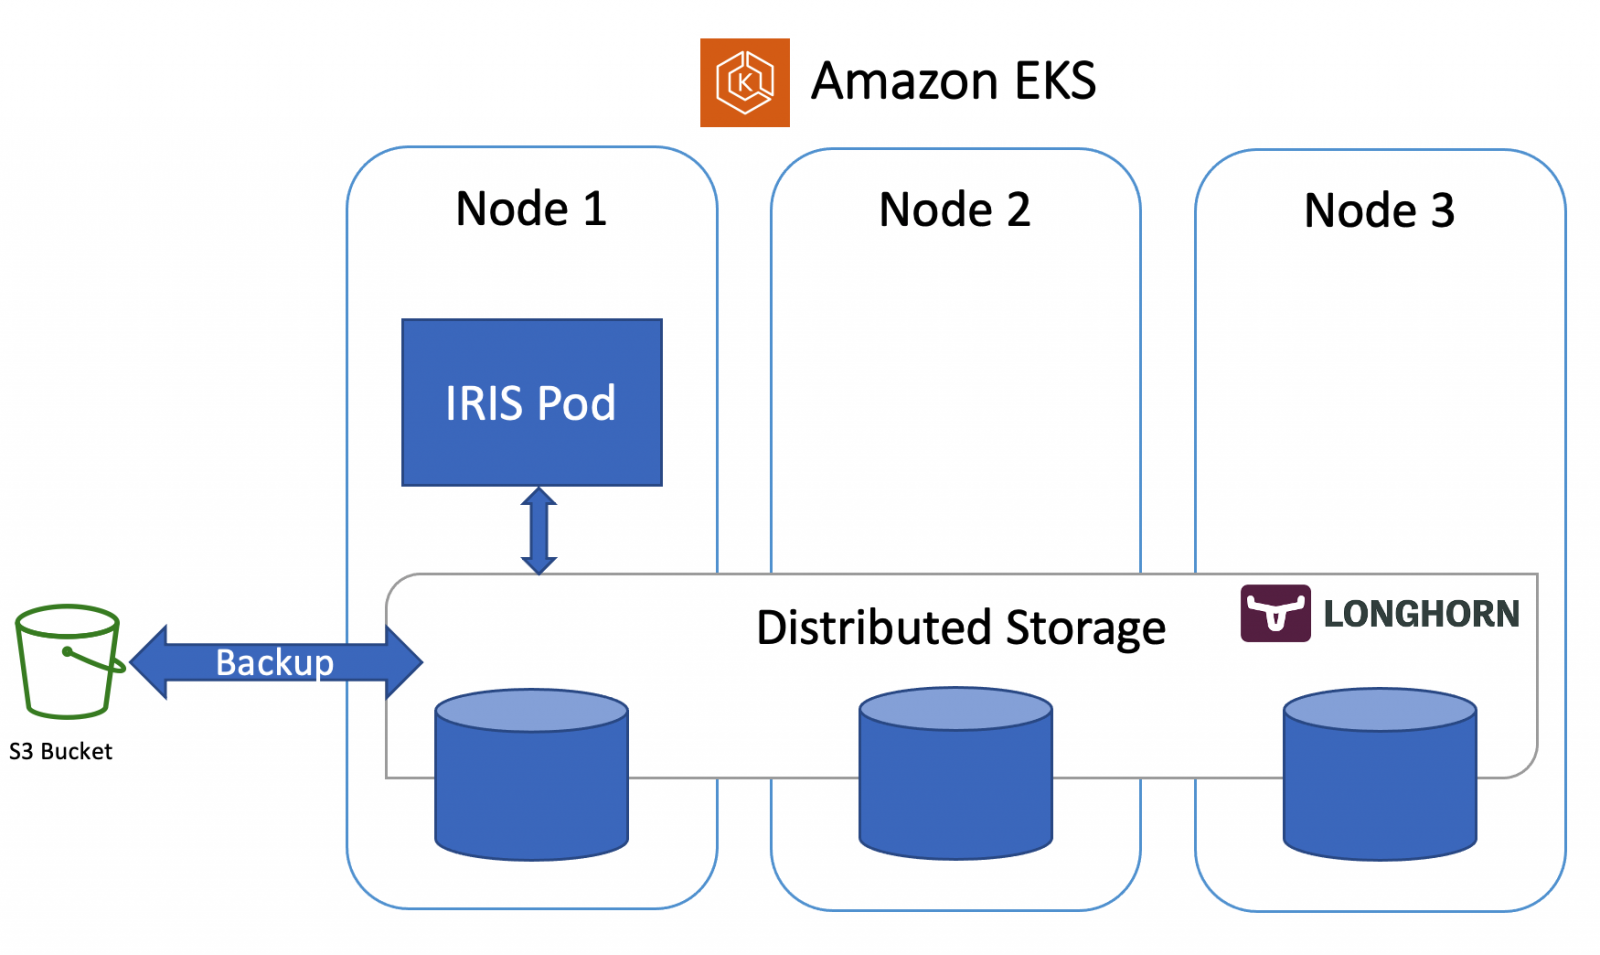
In the previous article, we discussed how to set up IRIS on k8s cluster with high availability, based on the distributed storage, instead of traditional mirroring. As an example, that article used the Azure AKS cluster. In this one, we'll continue to explore highly available configurations on k8s. This time, based on Amazon EKS (AWS managed Kubernetes service) and would include an option for doing database backup and restore, based on Kubernetes Snapshot.
Installation
Let's get right to business. First - you need AWS account, AWS CLI, kubectl and eksctl tools installed. To create the new cluster run the following command:
eksctl create cluster \
--name my-cluster \
--node-type m5.2xlarge \
--nodes 3 \
--node-volume-size 500 \
--region us-east-1
This command takes ~15 minutes, deploys EKS cluster and makes it a default cluster for your kubectl tool. You can verify the deployment by running:
kubectl get nodes
NAME                                             STATUS   ROLES    AGE   VERSION
ip-192-168-19-7.ca-central-1.compute.internal    Ready    <none>   18d   v1.18.9-eks-d1db3c
ip-192-168-37-96.ca-central-1.compute.internal   Ready    <none>   18d   v1.18.9-eks-d1db3c
ip-192-168-76-18.ca-central-1.compute.internal   Ready    <none>   18d   v1.18.9-eks-d1db3c
The next step is to install Longhorn distributed storage engine.
kubectl create namespace longhorn-system
kubectl apply -f https://raw.githubusercontent.com/longhorn/longhorn/v1.1.0/deploy/iscsi/longhorn-iscsi-installation.yaml --namespace longhorn-system
kubectl apply -f https://raw.githubusercontent.com/longhorn/longhorn/master/deploy/longhorn.yaml --namespace longhorn-system
And finally - the IRIS itself:
kubectl apply -f https://github.com/antonum/ha-iris-k8s/raw/main/tldr.yaml
At this point, you'll have a fully functional EKS cluster with Longhorn distributed storage and IRIS deployment installed. You can get back to the previous article and attempt to do all sorts of damage to the cluster and IRIS deployment, just to see how the system repairs itself. Look at the Simulate the Failure section.
Bonus #1 IRIS on ARM
IRIS EKS and Longhorn all do support ARM architecture, so we can deploy the same configuration using AWS Graviton 2 instances, based on the ARM architecture.
All you need is to change the instance type for EKS nodes to 'm6g' family and IRIS image to the ARM-based.
eksctl create cluster \
--name my-cluster-arm \
--node-type m6g.2xlarge \
--nodes 3 \
--node-volume-size 500 \
--region us-east-1
tldr.yaml
containers:
#- image: store/intersystems/iris-community:2020.4.0.524.0
- image: store/intersystems/irishealth-community-arm64:2020.4.0.524.0
name: iris
Or just use:
kubectl apply -f https://github.com/antonum/ha-iris-k8s/raw/main/tldr-iris4h-arm.yaml
That's it! You got yourself IRIS Kubernetes cluster, running on ARM platform.
Bonus #2 - Backup and Restore
One frequently overlooked part of the production-grade architecture is the ability to create backups of your database and quickly restore and/or clone these when needed.
In Kubernetes, the common way to do it is using Persistent Volume Snapshots.
First - you need to install all the required k8s components:
#Install CSI Snapshotter and CRDs

kubectl apply -n kube-system -f https://raw.githubusercontent.com/kubernetes-csi/external-snapshotter/master/client/config/crd/snapshot.storage.k8s.io_volumesnapshotcontents.yaml
kubectl apply -n kube-system -f https://github.com/kubernetes-csi/external-snapshotter/raw/master/client/config/crd/snapshot.storage.k8s.io_volumesnapshotclasses.yaml
kubectl apply -n kube-system -f https://raw.githubusercontent.com/kubernetes-csi/external-snapshotter/master/client/config/crd/snapshot.storage.k8s.io_volumesnapshots.yaml
kubectl apply -n kube-system -f https://raw.githubusercontent.com/kubernetes-csi/external-snapshotter/master/deploy/kubernetes/snapshot-controller/setup-snapshot-controller.yaml
kubectl apply -n kube-system -f https://raw.githubusercontent.com/kubernetes-csi/external-snapshotter/master/deploy/kubernetes/snapshot-controller/rbac-snapshot-controller.yaml
Next - configure S3 bucket credentials for Longhorn (see detailed instructions):
#Longhorn backup target s3 bucket and credentials longhorn would use to access that bucket
#See https://longhorn.io/docs/1.1.0/snapshots-and-backups/backup-and-restore/set-backup-target/ for manual setup instructions
longhorn_s3_bucket=longhorn-backup-123xx #bucket name should be globally unique, unless you want to reuse existing backups and credentials
longhorn_s3_region=us-east-1
longhorn_aws_key=AKIAVHCUNTEXAMPLE
longhorn_aws_secret=g2q2+5DVXk5p3AHIB5m/Tk6U6dXrEXAMPLE
The following command would pick up the environment variables from the previous step and use them to configure Longhorn Backup
#configure Longhorn backup target and credentials

cat <<EOF | kubectl apply -f -
apiVersion: longhorn.io/v1beta1
kind: Setting
metadata:
 name: backup-target
 namespace: longhorn-system
value: "s3://$longhorn_s3_bucket@$longhorn_s3_region/" # backup target here
---
apiVersion: v1
kind: Secret
metadata:
 name: "aws-secret"
 namespace: "longhorn-system"
 labels:
data:
 # echo -n '<secret>' | base64
 AWS_ACCESS_KEY_ID: $(echo -n $longhorn_aws_key | base64)
 AWS_SECRET_ACCESS_KEY: $(echo -n $longhorn_aws_secret | base64)
---
apiVersion: longhorn.io/v1beta1
 kind: Setting
metadata:
 name: backup-target-credential-secret
 namespace: longhorn-system
value: "aws-secret" # backup secret name here
EOF
It might seem a lot, but it essentially tells Longhorn to use a specific S3 bucket with the specified credentials to store the content of the backups.
That's it! If you now go to the Longhorn UI, you'll be able to create backups, restore them etc.

A quick refresher on how to connect to the Longhorn UI:
kubectl get pods -n longhorn-system
# note the full pod name for 'longhorn-ui-...' pod
kubectl port-forward longhorn-ui-df95bdf85-469sz 9000:8000 -n longhorn-system
That would forward traffic to Longhorn UI to your http://localhost:9000
Programmatic Backup/Restore
Doing backup and restore via Longhorn UI might be a good enough first step - but we'll go one step forward and perform backup and restore programmatically, using k8s Snapshot APIs.
First - snapshot itself. iris-volume-snapshot.yaml
apiVersion: snapshot.storage.k8s.io/v1beta1
kind: VolumeSnapshot
metadata:
  name: iris-longhorn-snapshot
spec:
  volumeSnapshotClassName: longhorn
  source:
    persistentVolumeClaimName: iris-pvc
This volume snapshot refers to the source volume 'iris-pvc' that we do use for our IRIS deployment. So just applying this would start the Backup process immediately.
It's a good idea to execute IRIS Write Daemon Freeze/Thaw before/after the snapshot.
#Freeze Write Daemon
echo "Freezing IRIS Write Daemon"
kubectl exec -it -n $namespace $pod_name -- iris session iris -U%SYS "##Class(Backup.General).ExternalFreeze()"
status=$?
if [[ $status -eq 5 ]]; then
 echo "IRIS WD IS FROZEN, Performing backup"
 kubectl apply -f backup/iris-volume-snapshot.yaml -n $namespace
elif [[ $status -eq 3 ]]; then
 echo "IRIS WD FREEZE FAILED"
fi
#Thaw Write Daemon
kubectl exec -it -n $namespace $pod_name -- iris session iris -U%SYS "##Class(Backup.General).ExternalThaw()"
The restore process is pretty straightforward. It's essentially creating a new PVC and specifying snapshot as the source.
apiVersion: v1
kind: PersistentVolumeClaim
metadata:
  name: iris-pvc-restored
spec:
  storageClassName: longhorn
  dataSource:
    name: iris-longhorn-snapshot
    kind: VolumeSnapshot
    apiGroup: snapshot.storage.k8s.io
  accessModes:
    - ReadWriteOnce
  resources:
    requests:
      storage: 10Gi
Then you just create a new deployment, based on this PVC. Check this test script in a github repo that would in sequence:
- Create brand new IRIS depoyment
- Add some data to IRIS
- Freeze Write Daemon, take snapshot, Thaw Write Daemon
- Create a clone of IRIS deployment, based on the snapshot
- Verify that all data is still there
At this point you'll have two identical IRIS deployments, one being a clone-via-backup of another.
Enjoy!
Comments
--node-type m6.2xlarge \
m6g.2xlarge probably?
Great article!
Yes sir! Thank you!