Building an FHIR Repository + OAuth2 Authorization Server/Resource Server Configuration on IRIS for Health Part 1
Hello, developers!
In this article, we will focus on OAuth2, a protocol that is increasingly being used in combination with FHIR to perform authorization.
In this part 1, we will start up the Docker container for IRIS for Health and Apache, configure the OAuth2 authorization server function on IRIS for Health, access it from the REST development tool Postman, and obtain an access token. Besides, in Part 2 and beyond, we will add FHIR repository functionality to IRIS for Health, add OAuth2 resource server configuration, and explain how to execute FHIR requests with access tokens from Postman.
Several great articles have already been published on the developer community to explain the OAuth2 functionality of InterSystems products; however, I would like to explain again how to configure the latest version. InterSystems IRIS Open Authorization Framework (OAuth 2.0) implementation - part 1
In this article, we will use the latest InterSystems IRIS for Health 2020.3 Preview Edition. If you plan to build an environment based on this article, please make sure to use this version or later of the kit. Some features are not included in products before this version.
Preliminary preparations
The first step is to do some preliminary preparation. There are many things to prepare to build a secure environment.
IRIS for Health 2020.3 Preview Edition is only available in a Docker container version。(InterSystems Docker Hub/IRIS for Health)
To perform the OAuth2 configuration, you will also need to perform web server and SSL configuration. In this article, we will use Apache.
When performing SSL configuration on Apache, the SSL configuration certificate must correctly match the hostname of the server. Please be aware of this point.
Getting sample files from the intersystems-jp GitHub repository
The docker-compose.yml/Dockerfile and other sample files used in this configuration are available in the GitHub repository reserved for the InterSystems developer community. First, unpack this file into your environment using the following command. (You can also do this from the attachment to this article.) This docker-compose.yml/Dockerfile and other files are created by referring to the iris-webgateway-example application published on OpenExchange.
git clone https://github.com/Intersystems-jp/IRIS4H-OAuth2-handson.git
Changing the configuration to match the kit being used
In this docker-compose.yml file, two containers are configured to be started: the IRIS for Health container and the Apache (httpd) container will be created by the docker build command. The file docker-compose.yml, available on GitHub, refers to IRIS for Health Community Edition Preview Edition (2020.3.200.0). The Community Edition can be used for the evaluation of InterSystems products.
iris:
    image: store/intersystems/irishealth-community:2020.3.0.200.0
If you use a different version (official release version or newer version), please change this part of the specification.
The Apache container will be built with the contents of the Dockerfile, which requires a WebGateway kit to connect to IRIS from Apache. For information on obtaining the kit, InterSystems partners should visit the WRC kit download site or contact the WRC Support Center. For other inquiries, please contact us at this address.
Change the following parts of the Dockerfile according to the product you have obtained. Regardless of the OS of the host machine (Windows/Ubuntu/CentOS), the platform will be lnxubuntux64 because the base httpd container OS is Debian.
ARG version=2020.3.0.200.0
ARG platform=lnxubuntux64
ADD WebGateway-${version}-${platform}.tar.gz /tmp/
Preparing an SSL certificate
In the next step, an SSL certificate is prepared. When OAuth2 authorization is accessed, the SSL certificate set in the webserver is checked to see if it matches the URL being accessed. You do not need to use an official certificate; it is possible to use OpenSSL, etc. Enter the hostname in the “Common Name” field when creating the certificate.
Also, since the certificate you created will be loaded automatically at the startup time, you need to change the file to one that does not require a passphrase. Please refer to the following command.
$ openssl rsa -in cert.key.org -out cert.key
Place the created CRT and KEY files in the same directory with the Dockerfile, with the file names server.crt / server.key respectively.
In addition to using it with the Apache web server, you will need an SSL certificate for OAuth2 configuration. These do not require you to enter a hostname, etc., but you should create three sets. (In subsequent configurations, they appear as auth.cer/auth.key , client.cer/client.key , resserver.cer/resserver.key)
Building docker and starting a docker container
Now you are finally ready! In addition to the four files you have downloaded, you now have a Web Gateway installation kit and two SSL certificates in your directory. Be careful about the access and execution permissions of each file. (For example, I added execute permission to webgateway-entrypoint.sh.)
docker-compose build
docker-compose up -d
Once started, use the docker ps command to verify that the two containers are running.
Apache Container name:<directoryname>_web
IRIS for Health container name:store/intersystems/irishealth-community:2020.3.0.200.0(or other name depend on kit)
Now try to access the management portal in the following three ways. If the third method works, your SSL configuration via the Apache web server is a success!
http://[hostname]:52773/csp/sys/UtilHome.csp :This URL is accessed via Private Apache in the IRIS container. It does not go through the configured Apache.
http://[hostname]/csp/sys/UtilHome.csp :This URL accesses the management portal via the configured Apache.
https://[hostname]/csp/sys/UtilHome.csp :This URL accesses the Management Portal using an SSL connection via Apache, which you have configured.
Creating an SSL Configuration
Now that IRIS for Health is up and running, and we have access to the management portal, let’s create the SSL configuration for the last preparation.
Go to Management Portal -> System Administration -> Security -> SSL/TLS Configuration and create three SSL configurations using the three pairs of certificate keys you prepared.
You can choose any name you like, but in this article we will use SSL4AUTH/SSL4CLIENT/SSL4RESSERVER, following past OAuth2 related articles.
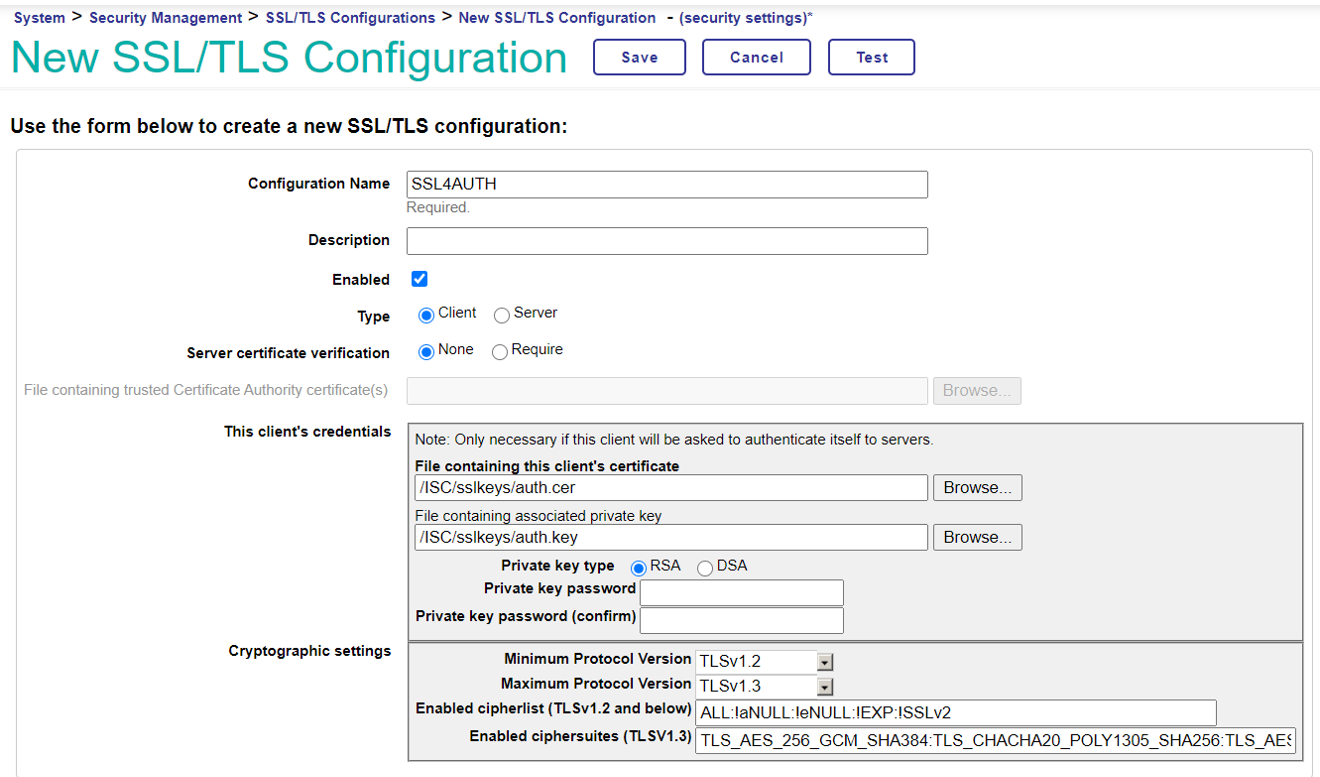
*About directory sharing between hosts and containers
The following volumes specification in the docker-compose file shows the host = /ISC directory’s current directory location in the container. Please make use of this directory when you specify the certificate file in the above settings, etc.
    volumes:
      - .:/ISC
This directory will contain not only files but also IRIS database files and configuration files. See the document “Persistent %SYS for storing persistent instance data” for more information.
Configuring OAuth2 in IRIS for Health
Now it’s time to get into the specifics of accessing IRIS for Health using OAuth2!
OAuth2 authorization server configuration
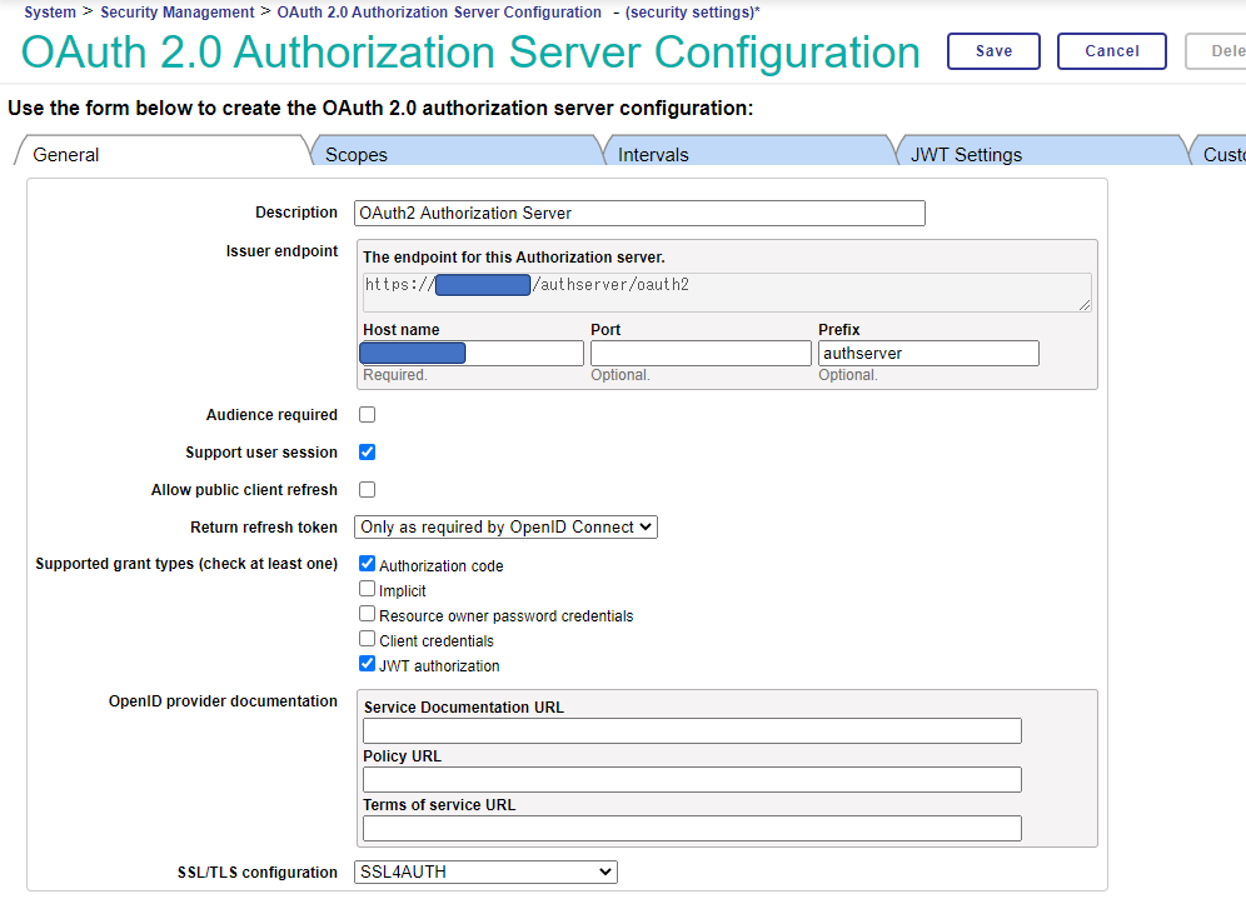
First, let’s configure the OAuth2 authorization server! Go to Management Portal → System Administration → Security → OAuth 2.0 → Server.
Follow the instructions below to configure the settings.
| Settings in the “General” tab | |
|---|---|
| Issuer endpoint: Host name | enter the actual hostname |
| Issuer endpoint: Prefix | You can enter any value you like, but here we have set it to “authserver”. |
| Supported grant types | In this article, we will only use “Authorization Code”, but if you would like to test other “Grant Types”, please add a checkmark. Also, add a check to “JWT authorization” |
| SSL/TLS configuration | Specify the SSL configuration that you just added. |
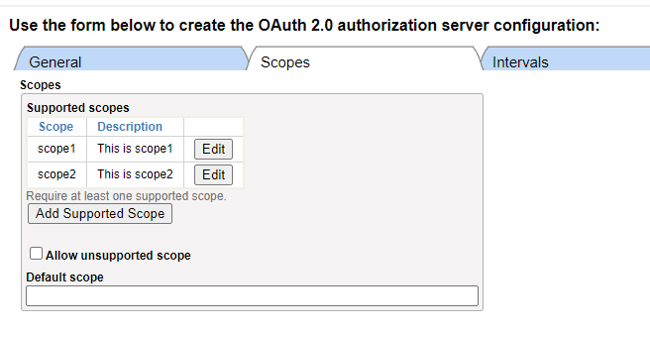
In the “Scopes" tab, click “Add Supported Scope” to add them. Later on, the Authorization Code login screen will show the “Description” you wrote here.
Do not change the “Intervals" tab from the default. In the “JWT Settings” tab, let’s select “RS512” as the signature algorithm.

In the last “Customization” tab, change the Generate Token Class specification to %OAuth2.Server.JWT.
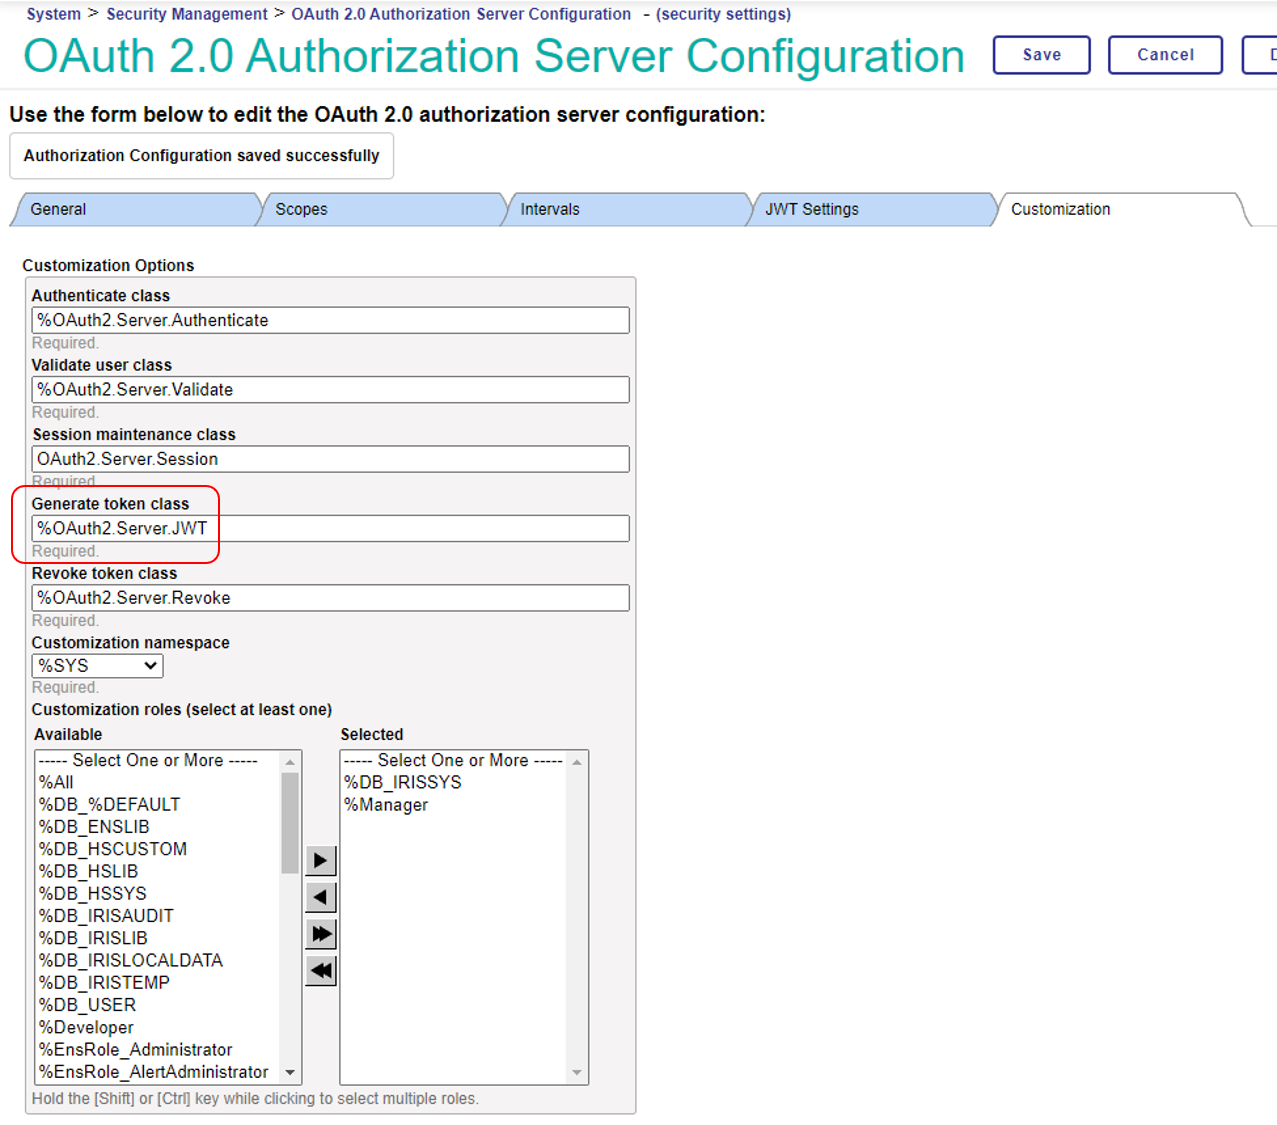
Once you have entered the information, click the “Save” button to save the configuration.
Now that you have the necessary configuration for IRIS for Health to run as an OAuth2 authorization server, you are ready to try it out! Let’s try accessing it from Postman and see if we can get an access token!
However, before doing that, we need to do two more configurations.
Adding a client description
Firstly, add the information of Postman to be accessed as an OAuth2 client. OAuth2 client registration may be added through dynamic registration or other methods.
Click “Client Description” on the server configuration page to proceed.

Click “Create Client Description” to add an entry.
Follow the instructions below to create a client subscription.
| Settings in the “General” tab | |
|---|---|
| Name | Enter a name of your choice. In this case, we have chosen “postman”. |
| Client Type | Select “Confidential” |
| Redirect URLs | Click on the “Add URL” button to add a redirect URL for Postman. https://www.getpostman.com/oauth2/callback as the redirect URL for Postman. |
| Supported grant types | Specify the same “Authorization Code” (Authorization Code) as configured in the OAuth2 authorization server settings. (Default) Add a check if you want to test other grant types as well. However, the settings must be the same as the configuration of the authorization server. Also, check the “JWT authorization” box. Specify it here |
| Authenticated Signing Algorithm | Check “JWT authorization” under Supported grant Types to be able to select it. Select “RS512”. |
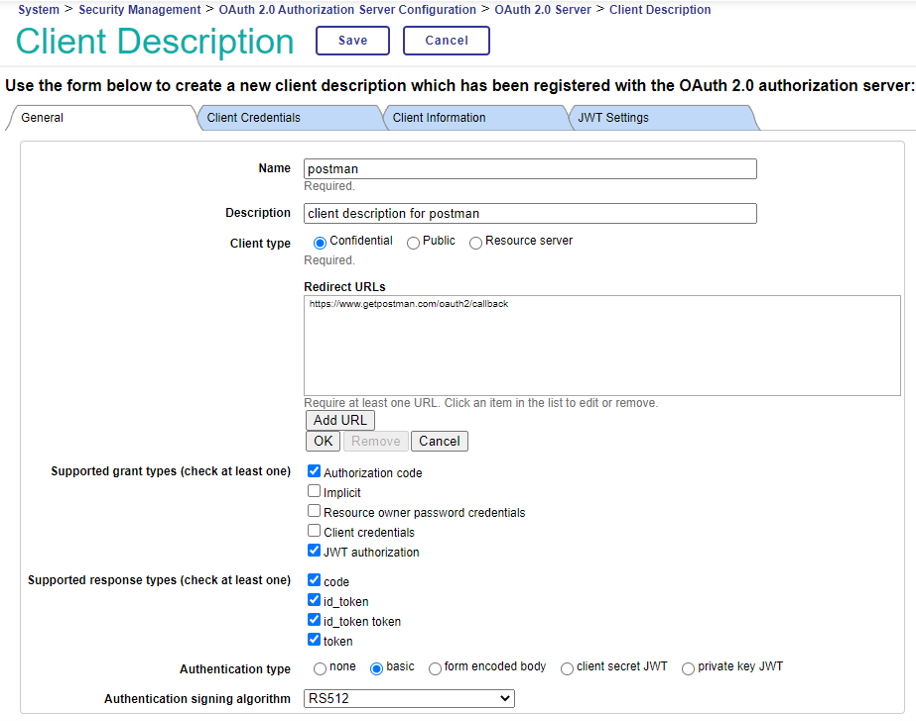
Once you have entered the information, click the “Save” button to save the client description.
Click on the “Client Credentials” tab to see the client ID and the client’s private key for this entry. You will need this ID and private key when testing from POSTMAN.

Adding a Web Application
One more important setting is required to be added before accessing it from POSTMAN. The OAuth2 authorization server configuration screen has determined that the endpoint for this configuration is https://<hostname>/authserver/oauth2. For access to this endpoint to be handled correctly by IRIS, we need to add a web application for this URL path.
Go to System Administration→Security→Applications→Web Applications, and click “Create a new web application”.

An OAuth2 web application template is provided, so first, select “/oauth2” from “Copy from”.
| “Edit Web Application” settings | |
|---|---|
| Copy From | “/oauth2” : Always select this one first from the pull-down. |
| Name | /authserver/oauth2 |
| Enable | Check the “REST” radio button. |
After entering each value, save it.
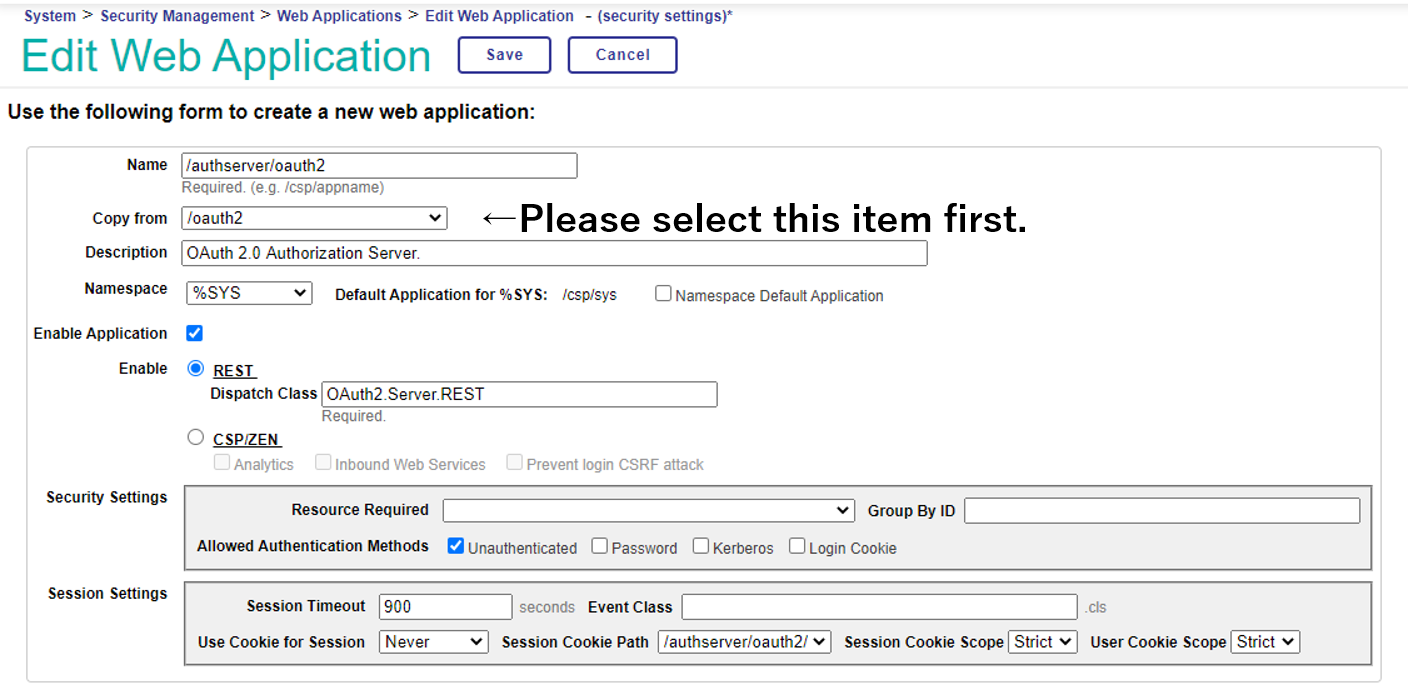
Testing OAuth2 from POSTMAN
Let’s test it from POSTMAN. Tests can also be run from other tools or from the actual program. The detailed explanation of POSTMAN is beyond the scope of this article, but one point to note is that SSL certificate verification should be changed to OFF in POSTMAN Settings.
After creating a new request in POSTMAN, select “OAuth 2.0” in the TYPE of Authorization tab and click “Get New Access Token”.
.png)
In the next screen, enter the values according to the following.
| 「GET NEW ACCESS TOKEN」Settings | |
|---|---|
| Token Name | Enter a name of your choice. |
| Grant Type | Choose “Authorization Code”. |
| Callback URL | https://www.getpostman.com/oauth2/callback |
| Auth URL | https://<hostname>/authserver/oauth2/authorize Enter the value for endpoint +/authorize. By adding ?ui_locales=ja, you can display the login screen in Japanese. |
| Auth Token URL | https:// |
| Client ID | Enter the client ID displayed in the Client Credentials tab after registering for the client description. |
| Client Secret | Enter the client’s private key, displayed in the Client Credentials tab after registering the client description. |
| Scope | Enter the scope registered in the authorization server configuration.For example, “scope1”. You can also specify multiple scopes separated by spaces. |
| State | Enter the State parameter, which is used for countermeasures against CSRF. It is not explicitly used but cannot be left blank, so we enter an arbitrary string. |
.png)
After entering the parameters and clicking the “Request Token” button, you see the login screen as shown below.
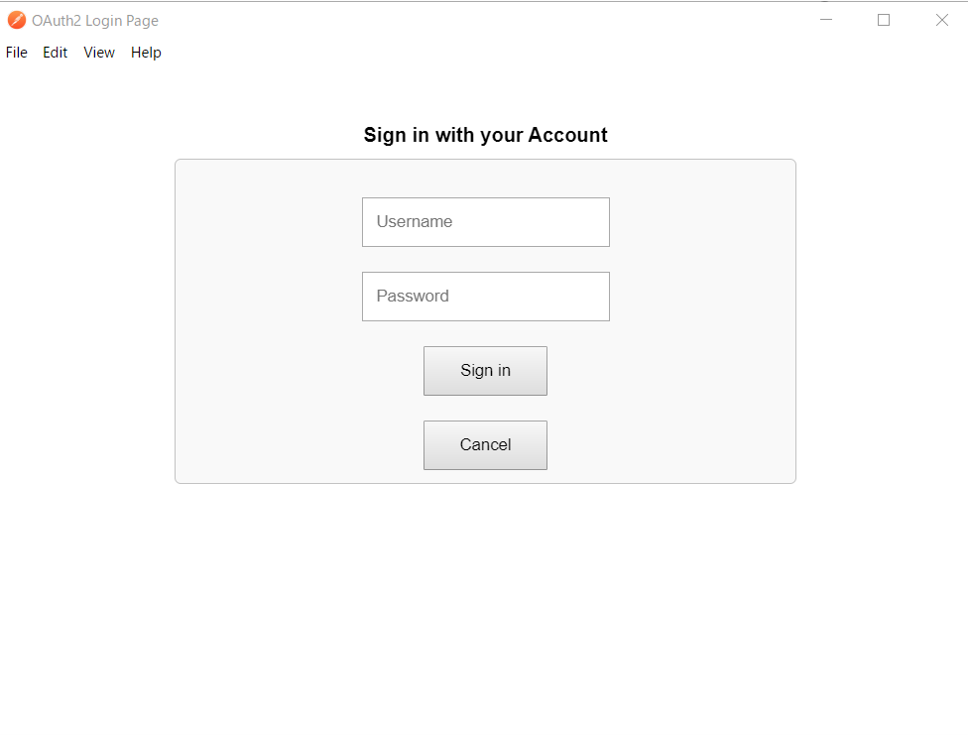
Try to log in with the user information (e.g., _SYSTEM) with access to the Management Portal.
On the next screen after login, you can decide on granting permissions to this application. After clicking “Allow”, if the Access Token is displayed on the next screen, as shown below, the access token acquisition test is successful!
.png)
Testing OpenID Connect
IRIS for Health can perform OAuth2 authorization processing as well as OpenID Connect compliant authentication processing. See this document for more details.
In this configuration, OpenID Connect is enabled, so let’s test if we can also get the OpenID Connect ID token!
It’s effortless to implement. In the GET NEW ACCESS TOKEN screen, add “openid” to the scope and make a request.
.png)
OpenID Connect will also be shown on the authorization request page. After you have logged in and given your permissions, make sure you also get an ID token (id_token) when you see the following screen. (You may need to scroll down the screen.)
.png)
Were you able to get the Access Token and id_token?
Although there are some preparations such as certificates that require a bit of time and effort, we could build an OAuth2 authorization server with such simplicity using IRIS for Health, a database platform.
In the next part of this series, I will finally show you how to build an FHIR repository, register the FHIR repository as an OAuth2 resource server, and show you how to REST access the FHIR repository using an OAuth2 access token from POSTMAN.