Building an FHIR Repository + OAuth2 Authorization Server/Resource Server Configuration on IRIS for Health Part 2
Hello, developers!
In this article, I will show you how to configure FHIR repository + OAuth2 authorization server/resource server on IRIS for Health following the previous article.
In Part 1, we introduced the preliminary preparations, configuring the OAuth2 authorization server, and obtaining the access token.
Part 2 will show you how to build an FHIR repository and configure an OAuth2 client/resource server.
The FHIR repository configuration and the OAuth2 client/resource server that we will configure today can be used separately from the IRIS instance of the OAuth2 authorization server that we configured in the previous part 1, or they can be co-located in the same instance. In this article, we are going to configure it in the same instance as the previous one.
Building the FHIR Repository and Specifying the OAuth Client Name
Building an FHIR repository is described in this document, “Installing and Configuring a FHIR Server”.
In the following screen, after building it, click on the endpoint URL /csp/healthshare/fhirserver/fhir/r4 to open the configuration screen.
.png)
On the configuration screen, enter the configuration name of the OAuth2 client you are going to create in the OAuth Client Name field. If you have already configured an OAuth2 client, please match its name.
.png)
In this example, we will use the string “FHIRResource". To change it, click the “Edit” button on the above screen, and then click the “Update” button to save the changes.
.png)
OAuth2 Client Configuration
In the following, let’s create the OAuth2 client configuration.
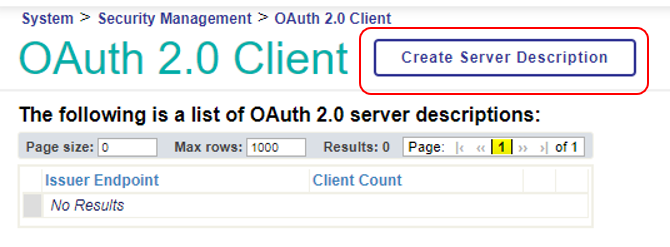
Go to System Administration → Security → OAuth2.0 in the Management Portal and select “Client” instead of “Server”, unlike the previous part 1.
On the next screen, click on “Create Server Description” to create the configuration for connecting to the OAuth2 authorization server.
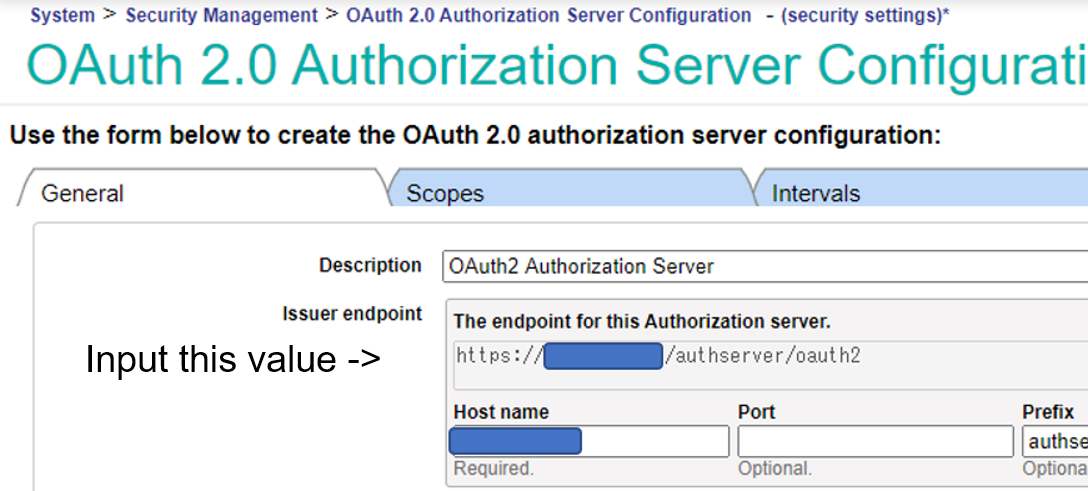
For the Issuer endpoint, the Server Description page enters the authorization server’s endpoint configured in Part 1.
The following is the configuration screen of the OAuth2 authorization server configured in Part 1.
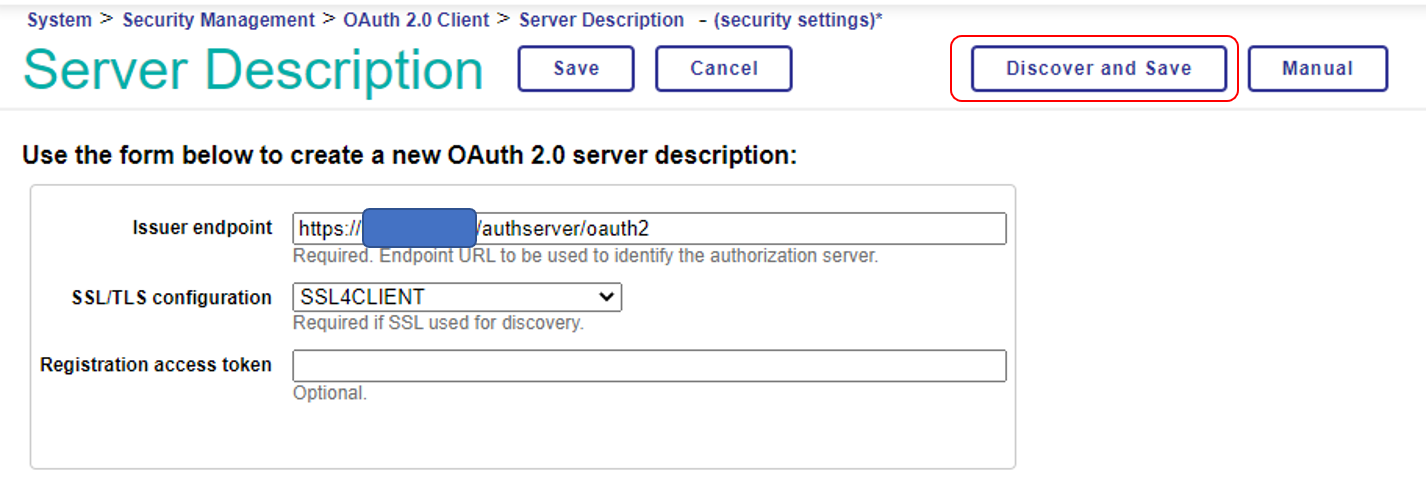
For the SSL/TLS configuration, enter the SSL/TLS configuration “SSL4CLIENT” that you created in the preparation of Part 1.
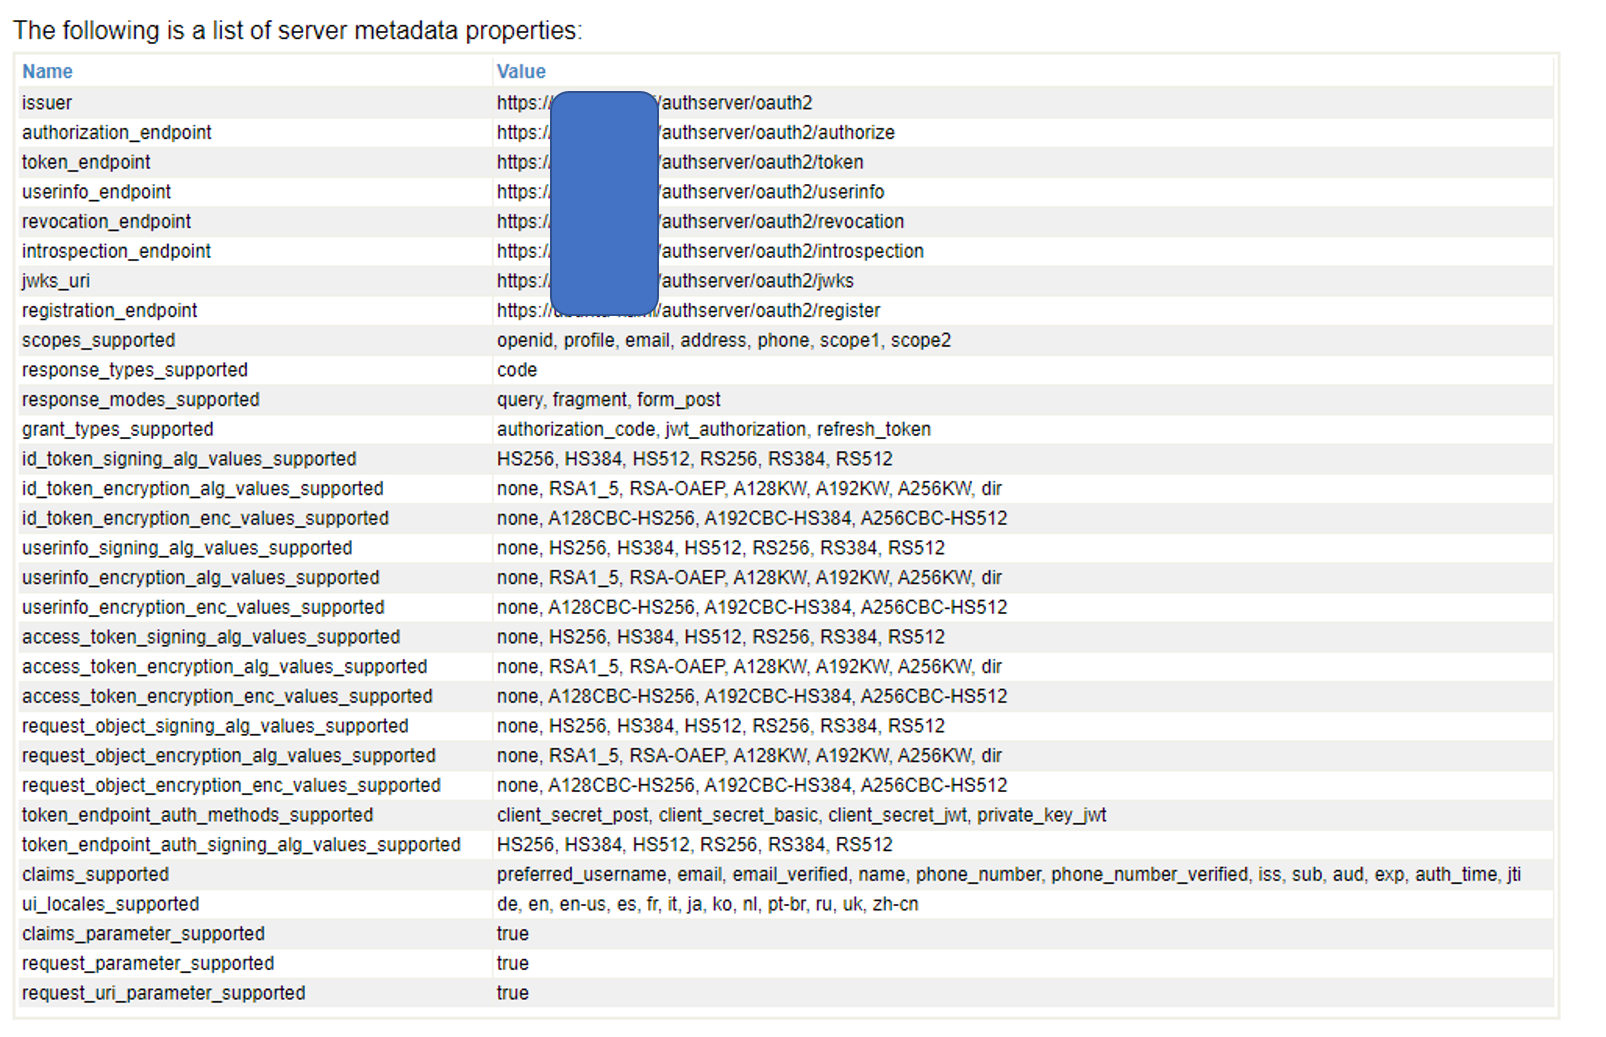
After entering the items, run “Discover and Save” to get the information from the OAuth2 authorization server!
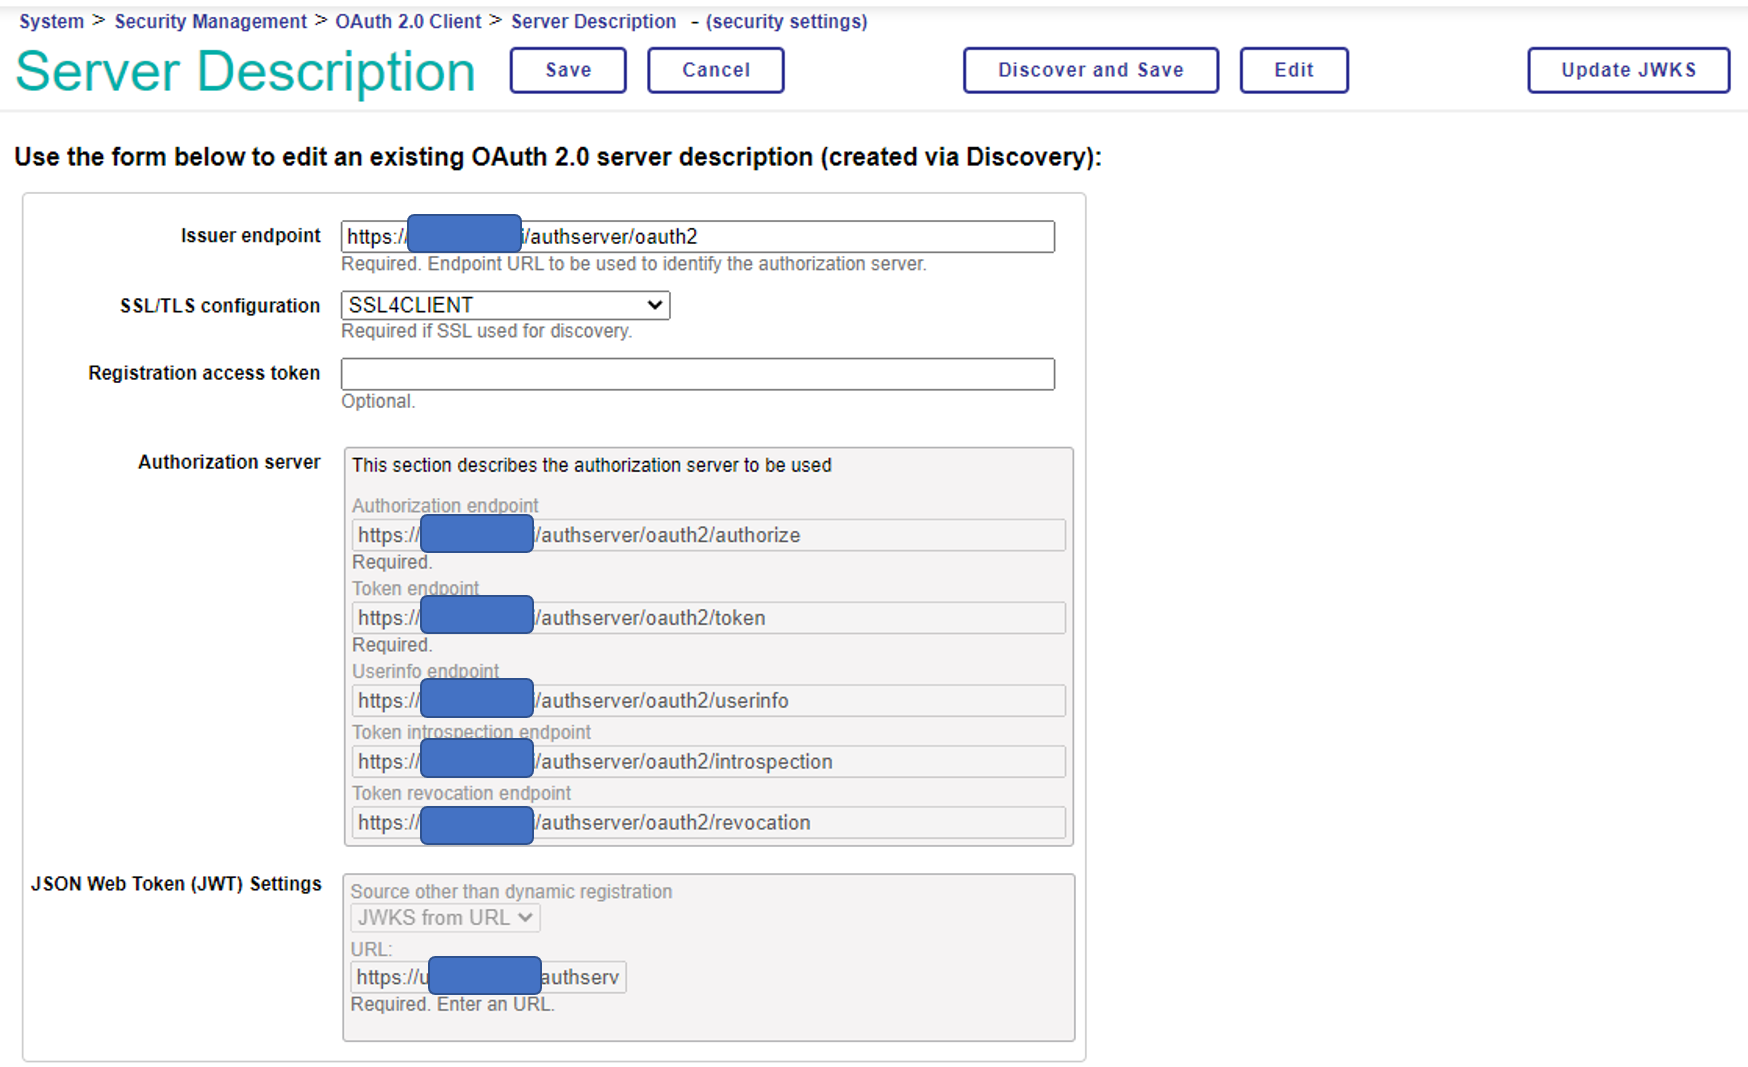
If the access is successful, the information obtained will be displayed, as shown below. Please be aware that an error may occur during this process if the SSL certificate specifying the hostname you prepared previously in the preparation of Part 1 is not created correctly and recognized.
Attention: Even if you are using the docker-container file DL in part 1 of this series, you may have trouble accessing the IRIS container -> Apache container by specifying the hostname. In this case, you may be able to solve the problem by entering the hostname and IP address of your machine in the docker-compose.yml file as extra_hosts, as shown below.
  extra_hosts:
    - <yourhostname>:<your ip address>
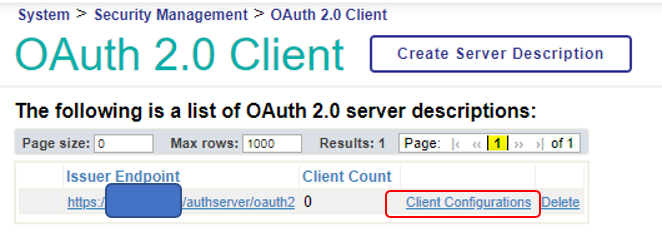
Once you have saved the configuration, click “Save” to return to the following page, and then select “Client Configuration” to create the FHIR repository configuration.
Add client configuration to OAuth2 client
It is a complicated title, but the next step is to add the client configuration (information about the specific FHIR repository, CSP application, etc. that you desire to connect to the OAuth2 authorization server as an OAuth2 client) to the OAuth2 client configuration you just created ( with information about which OAuth2 authorization server to connect to).
On the next screen, click “Create Client Configuration” to display the following screen and set the necessary items.
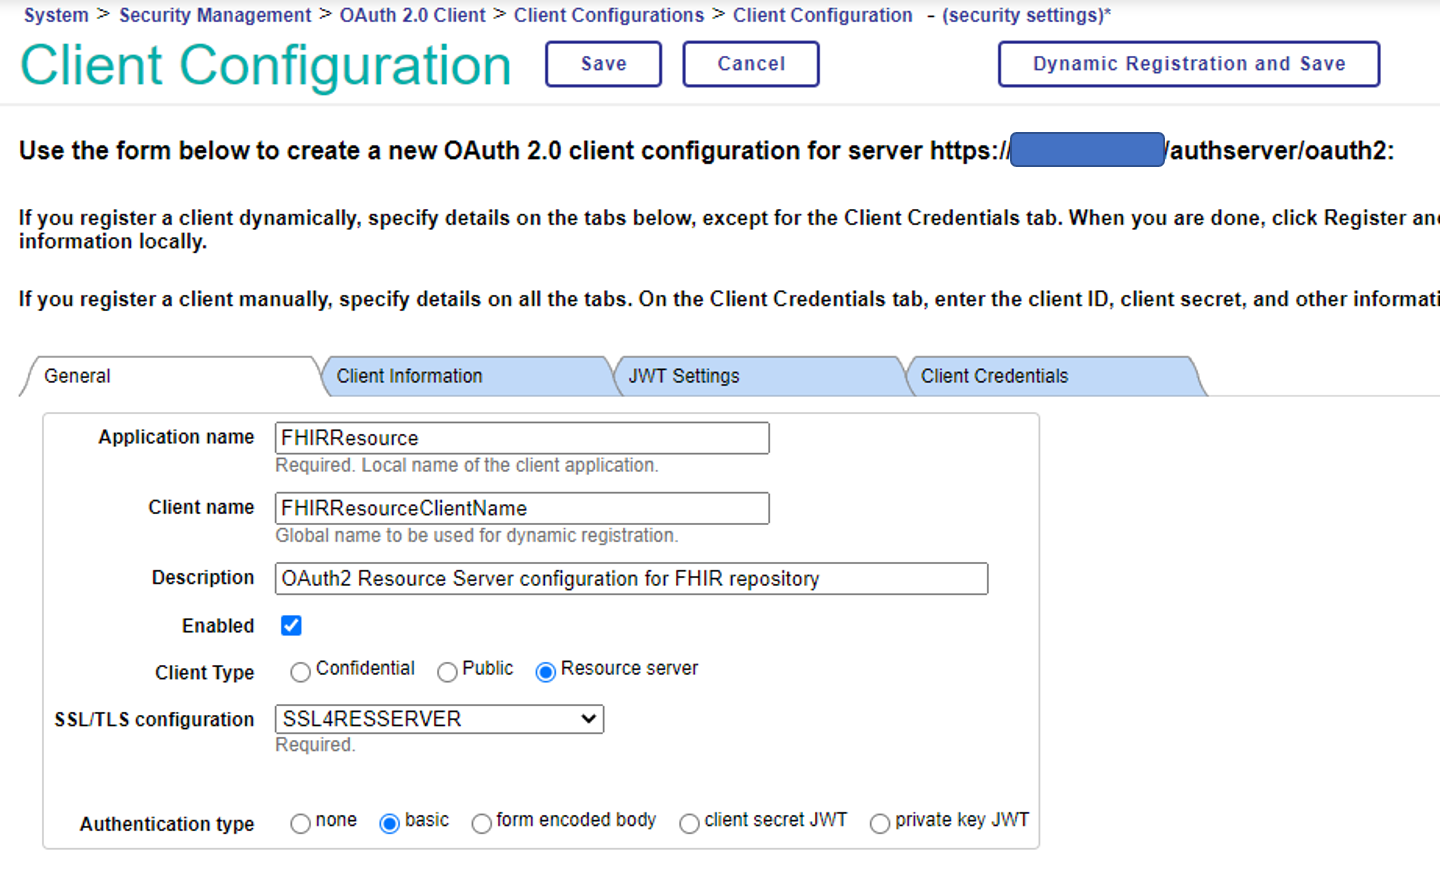
If you first select the client type = Resource Server, the input screen will be the same as below.
| Application Name | FHIRResource: Enter the value you entered for “OAuth Client Name” in the FHIR Repository configuration. |
| Client Name | This is the client name that will be registered with the OAuth2 authorization server. It can be the same as the application name; however, we have chosen a different name here. |
| Description | Enter a description for this configuration. |
| Type of client | Select “Resource Server”. |
| SSL/TLS configuration | Specify the SSL/TLS configuration that you prepared previously in the preparation of Part 1. |
After completing the form, click on the “Dynamic Registration and Save” button to save and register the file to the server. It is a little confusing, but when the button changes from “Dynamic Registration and Save” to “Get Update Metadata and Save”, the registration has been successful.
Let’s look at the configuration information on the OAuth2 authorization server-side and check if it is registered.
On the Management Portal→System Administration→Security Management→OAuth2.0→Server page, click on “Client Description”, and you will see that it is registered as shown below

Confirm that the name is the one you specified in the client name.
In Part 1, when we tested the access from Postman, we manually copied the client ID and private key that is displayed further down in the client descriptor screen. However, this time, this information is passed to the client-side during the dynamic registration process.
Accessing the FHIR repository from Postman using an OAuth2 access token
Then finally, it’s time to access it from Postman!
First, we need to get an access token. The basic method is the same as the one used at the end of Part 1, but we need to add an audience parameter to indicate where the access token will be issued.
aud=https://[hostname]/csp/healthshare/fhirserver/fhir/r4
To add it specifically in Postman, add it as a parameter to the endpoint URL of the Authorization Code as follows: (Because of the limitations of the Postman screen, you cannot see all the parameters, but please include all the above aud=https://[hostname]/csp/healthshare/fhirserver/fhir/r4 )
.png)
Attention: You do not need to change the Client ID and Client Secret that you enter into Postman to the ones issued in the resource server’s dynamic registration earlier. Use the Client ID and Secret key issued for Postman that you added in part 1.
After obtaining the access token, please copy its contents.
In Postman, if you leave the TYPE of Authorization as OAuth2, there is a function to send the access token. However, in the FHIR repository of IRIS for Health, it is also necessary to send the user and password information of the Basic Auth.
For that purpose, when accessing from Postman, the TYPE of Authorization (which is a bit of a pain) should be Basic Auth, the user name and password should be entered, and the access token should be sent as a Parameter in the REST request to the FHIR repository.
In detail: first, enter the user name and password as shown in the following screen. This user information will be checked to see if it matches the user information in the access token sub; therefore, it must be the same user as the user information you entered when you obtained the access token.
.png)
In the Params tab, for access_token, enter the access token value you just entered for the parameter.
.png)
If you have just built the FHIR repository, there is no data in the repository, but you can request Patient data!
For the Request URL, enter https://[hostname]/csp/healthshare/fhirserver/fhir/r4/Patient, and select GET as the HTTP method (as shown in the figure above).
Press the “Send” button to submit the request! If you get the FHIR Bundle as shown below, you’ve successfully accessed the FHIR repository using the access token!
.png)
For more information on how to register and search data in the FHIR repository, please refer to the IRIS for Health documentation and community articles.
IRIS for Health 2020.3 Documentation Resource Repository
How was your success in accessing the FHIR repository?
The configuration described in this series is the most straightforward. In an actual FHIR project, the scope of the data to be returned will depend on the scope approved by the user, and this will need to be considered and implemented.
We will continue to keep the developer community informed about FHIR.
Comments
Is OAuth2 Client Secret also a requirement?
Hello Hao,
Thank you for asking.
Yes, Client ID and Secret are requirements for getting OAuth2 access token.
Hello Shintaro,
I have Implimented all the thing as you mention below but still i getting error in postman (401 Unauthorized)
I am attaching some detail below please let me know any solution.
.png)
And When I get token from above detail. I use this to get FHIRResource (https://[HostName]/csp/healthshare/fhirserver/fhir/r4/Patient?access_token= ) like this but I get 401 error