Continuous Delivery of your InterSystems solution using GitLab - Part VIII: CD using ICM
In this series of articles, I'd like to present and discuss several possible approaches toward software development with InterSystems technologies and GitLab. I will cover such topics as:
- Git 101
- Git flow (development process)
- GitLab installation
- GitLab Workflow
- Continuous Delivery
- GitLab installation and configuration
- GitLab CI/CD
- Why containers?
- Containers infrastructure
- CD using containers
- CD using ICM
In this article, we'll build Continuous Delivery with InterSystems Cloud Manager. ICM is a cloud provisioning and deployment solution for applications based on InterSystems IRIS. It allows you to define the desired deployment configuration and ICM would provision it automatically. For more information take a look at First Look: ICM.
Workflow
In our Continuous Delivery configuration we would:
- Push code into GitLab repository
- Build docker image
- Publish image to docker registry
- Test it on a test server
- If tests pass, deploy on a production server
Or in graphical format:
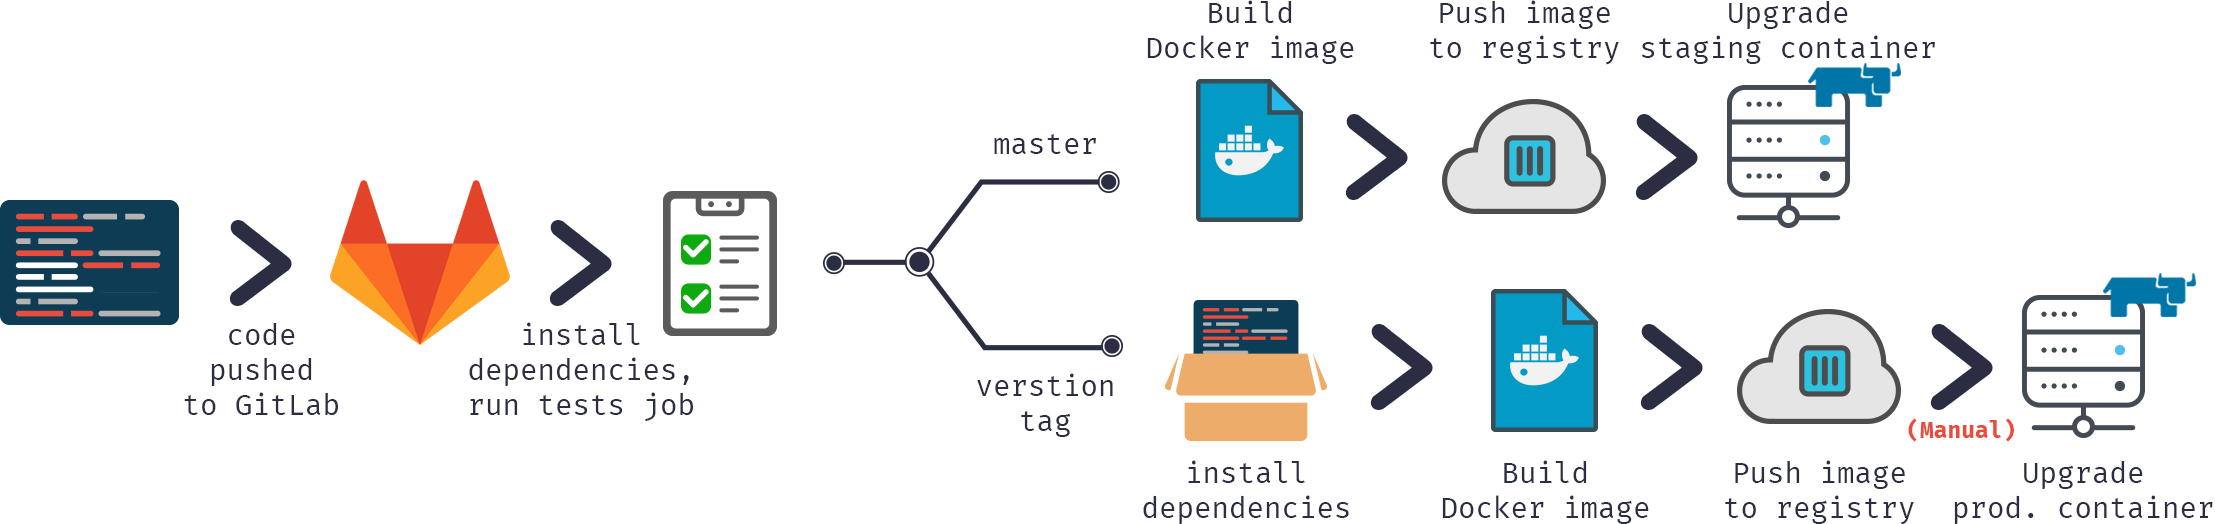
As you can see it's all pretty much the same except we would be using ICM instead of managing Docker containers manually.
ICM configuration
Before we can start upgrading containers, they should be provisioned. For that we need to define defaults.json and definitions.json, describing our architecture. I'll provide these 2 files for a LIVE server, definitions for a TEST server are the same, defaults are the same except for Tag and SystemMode values.
defaults.json:
{
    "Provider": "GCP",
    "Label": "gsdemo2",
    "Tag": "LIVE",
    "SystemMode": "LIVE",
    "DataVolumeSize": "10",
    "SSHUser": "sample",
    "SSHPublicKey": "/icmdata/ssh/insecure.pub",
    "SSHPrivateKey": "/icmdata/ssh/insecure",
    "DockerImage": "eduard93/icmdemo:master",
    "DockerUsername": "eduard93",
    "DockerPassword": "...",
    "TLSKeyDir": "/icmdata/tls",
    "Credentials": "/icmdata/gcp.json",
    "Project": "elebedyu-test",
    "MachineType": "n1-standard-1",
    "Region": "us-east1",
    "Zone": "us-east1-b",
    "Image": "rhel-cloud/rhel-7-v20170719",
    "ISCPassword": "SYS",
    "Mirror": "false"
}
definitions.json
[
    {
    "Role": "DM",
    "Count": "1",
    "ISCLicense": "/icmdata/iris.key"
    }
]
Inside the ICM container /icmdata folder is mounted from the host and:
- TEST server definitions are placed in /icmdata/test folder
- LIVE server definitions are placed in /icmdata/live folder
After obtaining all required keys:
keygenSSH.sh /icmdata/ssh
keygenTLS.sh /icmdata/tls
And placing required files in /icmdata:
- iris.key
- gcp.json (for deployment to Google Cloud Platform)
Call ICM to provision your instances:
cd /icmdata/test
icm provision
icm run
cd /icmdata/live
icm provision
icm run
This would provision one TEST and one LIVE server with one standalone InterSystems IRIS instance on each.
Please refer to ICM First Look for a more detailed guide.
Build
First, we need to build our image.
Our code would be, as usual, stored in the repository, CD configuration in gitlab-ci.yml but in addition (to increase security) we would store several server-specific files on a build server.
iris.key
License key. Alternatively, it can be downloaded during container build rather than stored on a server. It's rather insecure to store in the repository.
pwd.txt
File containing default password. Again, it's rather insecure to store it in the repository. Also, if you're hosting prod environment on a separate server it could have a different default password.
load_ci_icm.script
Initial script, it:
- Loads installer
- Installer does application initialization
- Loads the code
set dir = ##class(%File).NormalizeDirectory($system.Util.GetEnviron("CI_PROJECT_DIR"))
do ##class(%SYSTEM.OBJ).Load(dir _ "Installer/Global.cls","cdk")
do ##class(Installer.Global).init()
halt
Note that the first line is intentionally left empty.
Several things are different from previous examples. First of all we are not enabling OS Authentication as ICM would interact with container instead of GitLab directly. Second of all I'm using Installer manifest to initialize our application to show different approaches to initialization. Read more on Installer in this article. Finally we'll publish our image in a Docher Hub as a private repo.
Installer/Global.cls
Our installer manifest looks like this:
<Manifest>
    <Log Text="Creating namespace ${Namespace}" Level="0"/>
    <Namespace Name="${Namespace}" Create="yes" Code="${Namespace}" Ensemble="" Data="IRISTEMP">
        <Configuration>
            <Database Name="${Namespace}" Dir="${MGRDIR}/${Namespace}" Create="yes" MountRequired="true" Resource="%DB_${Namespace}" PublicPermissions="RW" MountAtStartup="true"/>
        </Configuration>

        <Import File="${Dir}MyApp" Recurse="1" Flags="cdk" IgnoreErrors="1" />
    </Namespace>

    <Log Text="Mapping to USER" Level="0"/>
    <Namespace Name="USER" Create="no" Code="USER" Data="USER" Ensemble="0">
        <Configuration>
            <Log Text="Mapping MyApp package to USER namespace" Level="0"/>
            <ClassMapping From="${Namespace}" Package="MyApp"/>
        </Configuration>

        <CSPApplication  Url="/"      Directory="${Dir}client" AuthenticationMethods="64" IsNamespaceDefault="false" Grant="%ALL"  />
        <CSPApplication  Url="/myApp" Directory="${Dir}"       AuthenticationMethods="64" IsNamespaceDefault="false" Grant="%ALL"  />
    </Namespace>
</Manifest>
And it implements the following changes:
- Creates application Namespace.
- Creates application code database (data would be stored in USER database).
- loads code into application code database.
- Maps MyApp package to USER namespace.
- Creates 2 web applications: for HTML and for REST.
gitlab-ci.yml
Now, to Continuous Delivery configuration:
build image:
  stage: build
  tags:
    - master
  script:
    - cp -r /InterSystems/mount ci
    - cd ci
    - echo 'SuperUser' | cat - pwd.txt load_ci_icm.script > temp.txt
    - mv temp.txt load_ci.script
    - cd ..
    - docker build --build-arg CI_PROJECT_DIR=$CI_PROJECT_DIR -t eduard93/icmdemo:$CI_COMMIT_REF_NAME .
What is going on here?
First of all, as docker build can access only subdirectories of a base build directory - in our case repository root, we need to copy our "secret" directory (the one with iris.key, pwd.txt and load_ci_icm.script) into the cloned repository.
Next, first terminal access requires a user/pass so we'd add them to load_ci.script (that's what empty line at the beginning of load_ci.script is for btw).
Finally, we build docker image and tag it appropriately: eduard93/icmdemo:$CI_COMMIT_REF_NAME
where $CI_COMMIT_REF_NAME is the name of a current branch. Note that the first part of the image tag should be named same as project name in GitLab, so it could be seen in GitLab Registry tab (instructions on tagging are available in Registry tab).
Dockerfile
Building a docker image is done using Dockerfile, here it is:
FROM intersystems/iris:2018.1.1-released

ENV SRC_DIR=/tmp/src
ENV CI_DIR=$SRC_DIR/ci
ENV CI_PROJECT_DIR=$SRC_DIR

COPY ./ $SRC_DIR

RUN cp $CI_DIR/iris.key $ISC_PACKAGE_INSTALLDIR/mgr/ \
 && cp $CI_DIR/GitLab.xml $ISC_PACKAGE_INSTALLDIR/mgr/ \
 && $ISC_PACKAGE_INSTALLDIR/dev/Cloud/ICM/changePassword.sh $CI_DIR/pwd.txt \
 && iris start $ISC_PACKAGE_INSTANCENAME \
 && irissession $ISC_PACKAGE_INSTANCENAME -U%SYS < $CI_DIR/load_ci.script \
 && iris stop $ISC_PACKAGE_INSTANCENAME quietly
We start from the basic iris container.
First of all, we copy our repository (and "secret" directory) inside the container.
Next, we copy license key to mgr directory.
Then we change the password to the value from pwd.txt. Note that pwd.txt is deleted in this operation.
After that, the instance is started and load_ci.script is executed.
Finally, iris instance is stopped.
Note that I'm using GitLab Shell executor and not Docker executor. Docker executor is used when you need something from inside of the image, for example, you're building an Android application in java container and you only need an apk. In our case, we need a whole container and for that, we need Shell executor. So we're running Docker commands via GitLab Shell executor.
Publish
Now, let's publish our image in a Docker Hub
publish image:
stage: publish
tags:
- master
script:
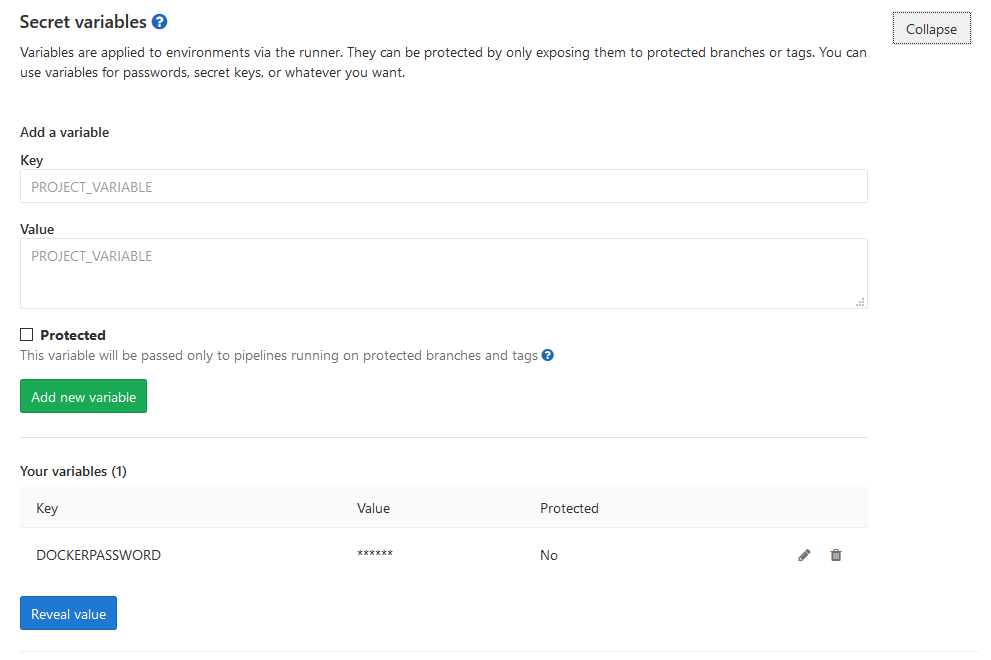
- docker login -u eduard93 -p ${DOCKERPASSWORD}
- docker push eduard93/icmdemo:$CI_COMMIT_REF_NAMENote ${DOCKERPASSWORD} variable, it's a GitLab secret variable. We can add them in GitLab > Project > Settings > CI/CD > Variables:
Job logs also do not contain password value:
Running with gitlab-runner 10.6.0 (a3543a27)
  on icm 82634fd1
Using Shell executor...
Running on docker...
Fetching changes...
Removing ci/
HEAD is now at 8e24591 Add deploy to LIVE
Checking out 8e245910 as master...
Skipping Git submodules setup
$ docker login -u eduard93 -p ${DOCKERPASSWORD}
WARNING! Using --password via the CLI is insecure. Use --password-stdin.
Login Succeeded
$ docker push eduard93/icmdemo:$CI_COMMIT_REF_NAME
The push refers to repository [docker.io/eduard93/icmdemo]
master: digest: sha256:d1612811c11154e77c84f0c08a564a3edeb7ddbbd9b7acb80754fda97f95d101 size: 2620
Job succeeded
and on Docker Hub we can see our new image:

Run
We have our image, next let's run it on our test server. Here is the script.
run image:
  stage: run
  environment:
    name: $CI_COMMIT_REF_NAME
  tags:
    - master
  script:
    - docker exec icm sh -c "cd /icmdata/test && icm upgrade -image eduard93/icmdemo:$CI_COMMIT_REF_NAME"
With ICM we need to run only one command (icm upgrade) to upgrade existing deployment. We're calling it by running "docker exec icm sh -c " which executes a specified command inside the icm container. First we mode into /icmdata/test where our ICM deployment definition is defined for a TEST server. After that we call icm upgrade to replace currently existing container with a new container.
Test
Let's run some tests.
test image:
  stage: test
  tags:
    - master
  script:
    - docker exec icm sh -c "cd /icmdata/test && icm session -namespace USER -command 'do \$classmethod(\"%UnitTest.Manager\",\"RunTest\",\"MyApp/Tests\",\"/nodelete\")' | tee /dev/stderr | grep 'All PASSED' && exit 0 || exit 1"
Again, we're executing one command inside our icm container. icm session executes a command on a deployed node. The command runs unit tests. After that it pipes all output to the screen and also to grep to find Unit Tests results and exit the process successfully or with an error.
Deploy
Deploy on a Production server is absolutely the same as deploy on test, except for another directory for the LIVE deployment definition. In the case where tests failed this stage would not be executed.
deploy image:
  stage: deploy
  environment:
    name: $CI_COMMIT_REF_NAME
  tags:
    - master
  script:
    - docker exec icm sh -c "cd /icmdata/live && icm upgrade -image eduard93/icmdemo:$CI_COMMIT_REF_NAME"