User authentication using Arduino with RFID
 In the previous article, I had just started working with Arduino, and got a meteorological station to show as a result. In this article, let's go further: we will set up authentication via RFID cards and Arduino against the InterSystems Caché application.
Delegating authentication
Caché has a mechanism for delegating authentication by allowing user to write authentication code. To enable it user needs to perform the following steps:
- Write the user authentication code in the ZAUTHENTICATE routine. It has 4 entry points: obtaining a username/password, verifying them and assigning rights, changing the password, and generating a token. More on that below.
- Enable the delegated authentication in Caché (SMP → System Administration → Security → System Security → Authentication/CSP Session Options, check the Allow Delegated authentication box and save the settings).
- Enable the delegated authentication for relevant services (SMP → Menu → Manage Services → Service → Allowed Authentication Methods → select Delegated → Save) and/or applications (SMP → Menu → Manage Web Applications → Application → Allowed Authentication Methods → select Delegated → Save).
How it works
This is what happens when the user is authenticated against the service or web application, for which delegated authentication has been enabled:
- The ZAUTHENTICATE routine is called. The code for this routine is written by the user and may be any Caché ObjectScript code, including calls to the operating system.
- The next step depends on whether the ZAUTHENTICATE call was successful:
- If the ZAUTHENTICATE call was successful and this is the first time that the user was authenticated with ZAUTHENTICATE, the "Delegated user" is created. If ZAUTHENTICATE assigns roles or other privileges to the user, they will become the user properties.
- If the ZAUTHENTICATE call is successful and this is not the first time when the user is authenticated with ZAUTHENTICATE, the user record will be updated.
- If the ZAUTHENTICATE call is not successful, the user will receive an access error.
- If the two-factor authentication is enabled for the instance and service, then a search will be initiated for the user's phone number and operator. If they have been entered, then two-factor authentication is run. If they are not provided, the user is not authenticated.
Where are the users coming from?
There are two methods of authentication depending on which authentication methods are enabled for an application/service:
- Delegated: username/password is taken from ZAUTHENTICATE routine (GetCredentials entry point) and verified using ZAUTHENTICATE (user type: delegated)
- Delegated and Password: the username/password is taken from GetCredentials, but checked using standard Caché tools (user type: Caché)
Now let's look at the ZAUTHENTICATE routine and its entry points.
ZAUTHENTICATE
This is the main routine, it consists of four entry points.
GetCredentials
This entry point is called in the case where the delegated authentication is enabled for the service, and it is called instead of prompting the user to enter their username/password. The code in this routine obtains the username and password (in any way). Thereafter (outside this entry point) the received username and password are authenticated as though the user entered them normally. Any method of obtaining the username and password may be used: input from the keyboard, API, or scanning using an external device. In this article, we will implement authentication with RFID cards.
This entry point returns status, and if this is an error, it will be recorded in the audit log and the authentication attempt will be rejected. The one exception to this is if the error status $SYSTEM.Status.Error($$$GetCredentialsFailed) is returned, in which the normal username/password prompting proceeds. The signature is as follows:
GetCredentials(ServiceName, Namespace, Username, Password, Credentials) Public { }Where:
- ServiceName – the name of the service, through which the connection is made
- Namespace – the namespace, if specified at the time of connection
- Username – the username
- Password – the password
- Credentials – currently unused
I would like to remark upon an important feature of this entry point. If both delegated authentication and password authentication are enabled for the service/application, the username and password would be received via GetCredentials entry point, but they will be used for the standard password authentication (as if the user entered them manually) and the user, if authenticated, would be a normal Cache user, not a delegated user.
ZAUTHENTICATE
If the initial authentication succeeds, ZAUTHENTICATE will establish roles and other user properties. If this is not the first authentication, the properties would be updated (so Roles, for example, must be specified at every login). To do this, the Properties array properties must be set in the routine code. Signature:
ZAUTHENTICATE(ServiceName, Namespace, Username, Password, Credentials, Properties) Public { }Properties array:
- Properties("Comment") — comment
- Properties("FullName") — first and last name
- Properties("NameSpace") — initial namespace
- Properties("Roles") — comma-deliminated list of roles
- Properties("Routine") — initial routine
- Properties("Password") — password
- Properties("Username") — username
- Properties("PhoneNumber") — user phone number
- Properties("PhoneProvider") — phone operator
- Properties("AutheEnabled") — enable standard two-factor authentication (for this purpose it is necessary to set the value equal to $$$AutheTwoFactorSMS)
ChangePassword
Entry point for changing user password The signature is as follows:
ChangePassword(Username, NewPassword, OldPassword, Status) Public { }Where:
- NewPassword — new password
- OldPassword — old password
- Status — result of the password change
SendTwoFactorToken
For use in standard two-factor authentication. Specifies the format of the request and the authentication token. Signature:
SendTwoFactorToken(Username, ServiceName,Namespace,Application,Credentials,SecurityToken,TwoFactorTimeout,UserPhoneNumber) Public { }Where:
- Application — CSP application or routine to which the user is connected
- SecurityToken — token to be sent to the user
- TwoFactorTimeout — time when token expires
- UserPhoneNumber — user phone number
Example
Let's begin with a simple example: %Service_Console service, responsible for Caché terminal in Windows, should ask for a username and password from the user. Let's enable the delegated authentication for this service. Here’s the ZAUTHENTICATE routine (in the %SYS namespace) prompting the user for username and password:
ZAUTHENTICATE(ServiceName, Namespace, Username, Password, Credentials, Properties) PUBLIC {
    #Include %occStatus
    Quit $$$OK
}
GetCredentials(ServiceName, Namespace, Username, Password, Credentials) Public {
    #Include %occErrors
    #Include %occStatus
    Do ##class(%Prompt).GetString("USER:",.Username)
    Do ##class(%Prompt).GetString("PASS:",.Password)
    Quit $$$OK
}
In the terminal, this will look similar to a usual username authentication.
>USER: _SYSTEM
>PASS: SYS
RFID
Let's now look at authentication via RFID. The idea is simple: Caché will write the encrypted username and password on the card, and during authentication, Caché will scan the card, decrypt it, and use received username and password for authentication.
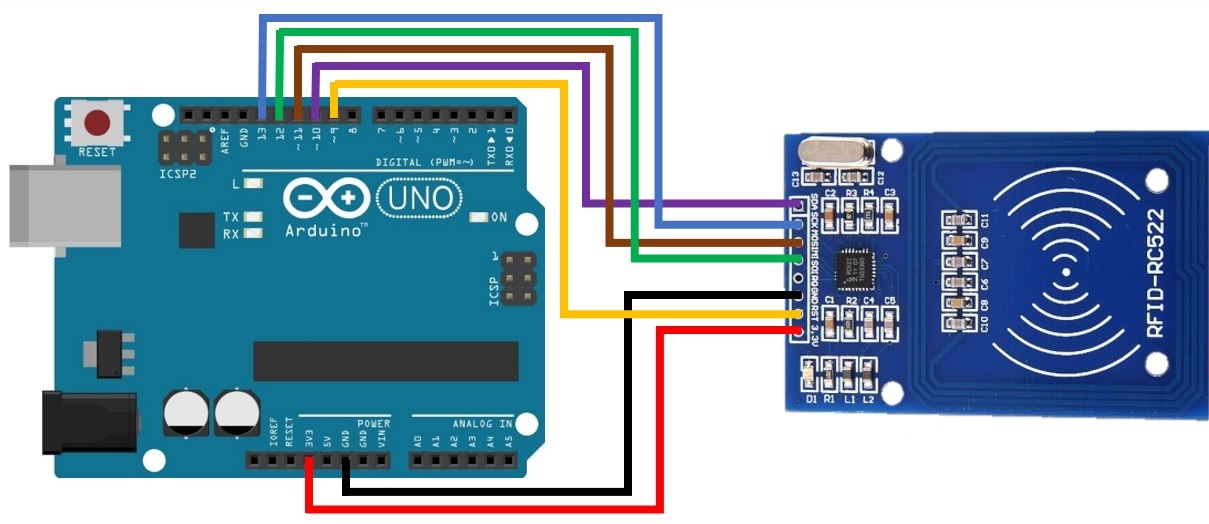
To start let's draft a circuit from the Arduino Uno and RFID-RC522 module:
Here's the C code, using the MF522 library. It can receive 2 commands over the COM port:
- Get – the contents of the RFID card blocks 2, 4, 5, 6 are passed through to the com port
- Set@bloc2@bloc4@bloc5@bloc6 — values of blocks 2, 4, 5, 6 are replaced with the received data
On a Caché side, there is Arduino.Delegate class, which has two corresponding entry points:
- SetCredentials — accepts username and password input, encrypts it with AES encryption using a key stored in the system and writes it to the RFID card.
- GetCredentials — receives ciphertext from the card and decrypts it, returning a username, password, and the status of the operation.
And ZAUTHENTICATE routine, which calls the Arduino.Delegated class using GetCredentials:
ZAUTHENTICATE(ServiceName, Namespace, Username, Password, Credentials, Properties) PUBLIC {
#Include %occStatus
Quit $$$OK
}
GetCredentials(ServiceName, Namespace, Username, Password, Credentials) Public {
#Include %occErrors
#Include %occStatus
Quit ##class(Arduino.Delegated).GetCredentials(.Username, .Password)
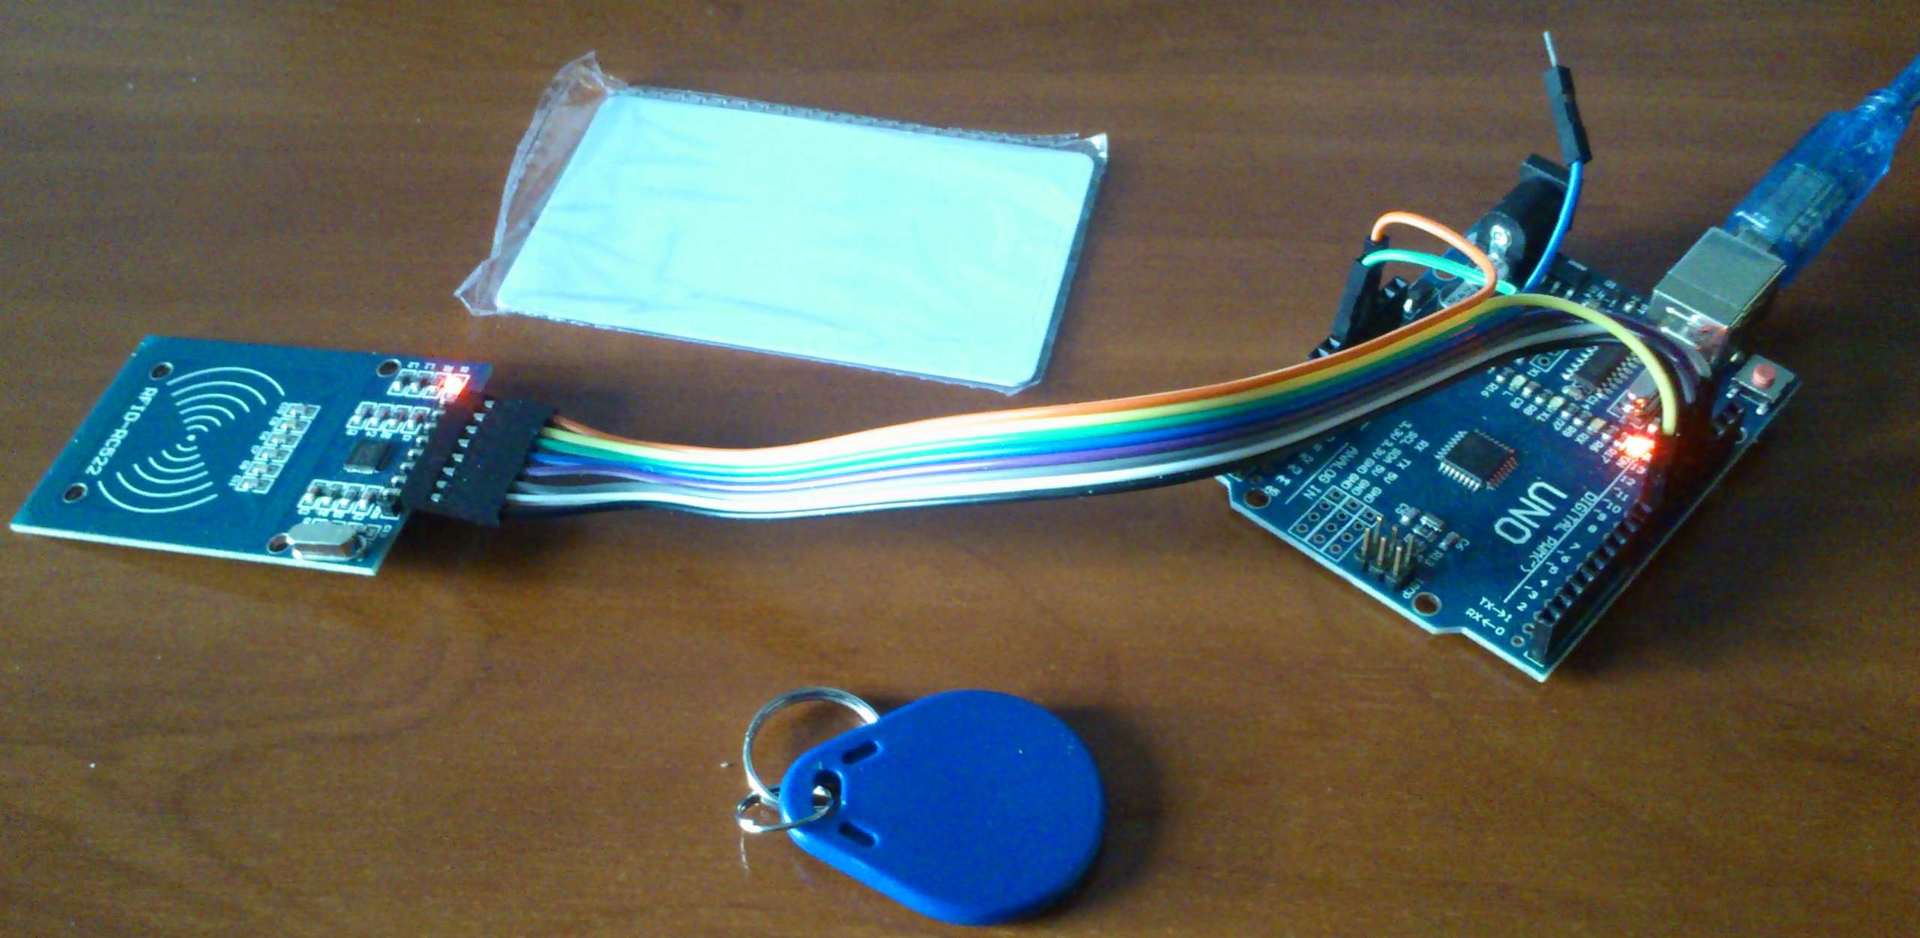
}Everything is ready! The assembled device looks like this:
Set the system encryption key in the terminal (in %SYS namespace and the Arduino.Delegated class must be available there):
Do ##class(Arduino.Delegated).InitEncryption(Key, IV)Where Key — encryption key, IV — initialization vector. They will be used to encrypt the username and password. Connect Arduino to Caché and write information to the card in order to authenticate using the command:
Do ##class(Arduino.Delegated).SetCredentials("_SYSTEM", "SYS")Enable Delegated and Password authentication in the appropriate services/web applications, thereby allowing authentication (for example, in the terminal or system management portal) by holding the card to the RFID card reader.
Possible enhancements
- Increase security through the use of managed encryption keys to encrypt the username and password.
- Increase security through the use of two-factor authentication: first, obtain the username/password pair, and then read the card that stores the key that is unique to the user. Then you need to verify the received key with the one that is stored in the system for the given user. Options for storing arbitrary user data are discussed on the InterSystems Community.
- Add the ability to store a username and password that are longer than 15 characters each.
Conclusions
Flexible Caché authentication system makes it possible to implement an arbitrary user authentication logic.
Links
- Documentation
- GitHub repository
- SAMPLES namespace also has an example of the ZAUTHENTICATE routine
Comments
Nice article, Eduard!
Have you experienced any practical usage of this?
Yes, I use it for web development, when I frequently need to login as different users.
Thank you for sharing. Really interesting post.