Weather station on Arduino
It was InterSystems hackathon time and our team, consisting of Artem Viznyuk and me had Arduino board (one) and various parts of it (in overabundance). And so like that our course of action was set - like all other Arduino beginners, we decided to build a weather station. But with data persistent storage in Caché and visualization in DeepSee!
Work with devices
InterSystems Caché can work directly with many types of physical and logical devices
- Terminal
- TCP
- The Spooler
- Printers
- Magnetic Tape
- COM ports
- and many others
As Arduino uses COM port for communication, we were all set.
Generally, work with devices could be divided into 5 steps:
- OPEN command to register device with current process and access it
- USE command to make it primary
- Do some actual work. READ to receive data from a device, and WRITE to send data
- USE again to switch primary device
- CLOSE command to free the device
So, that's theory, what's in practice?
Blink from Caché
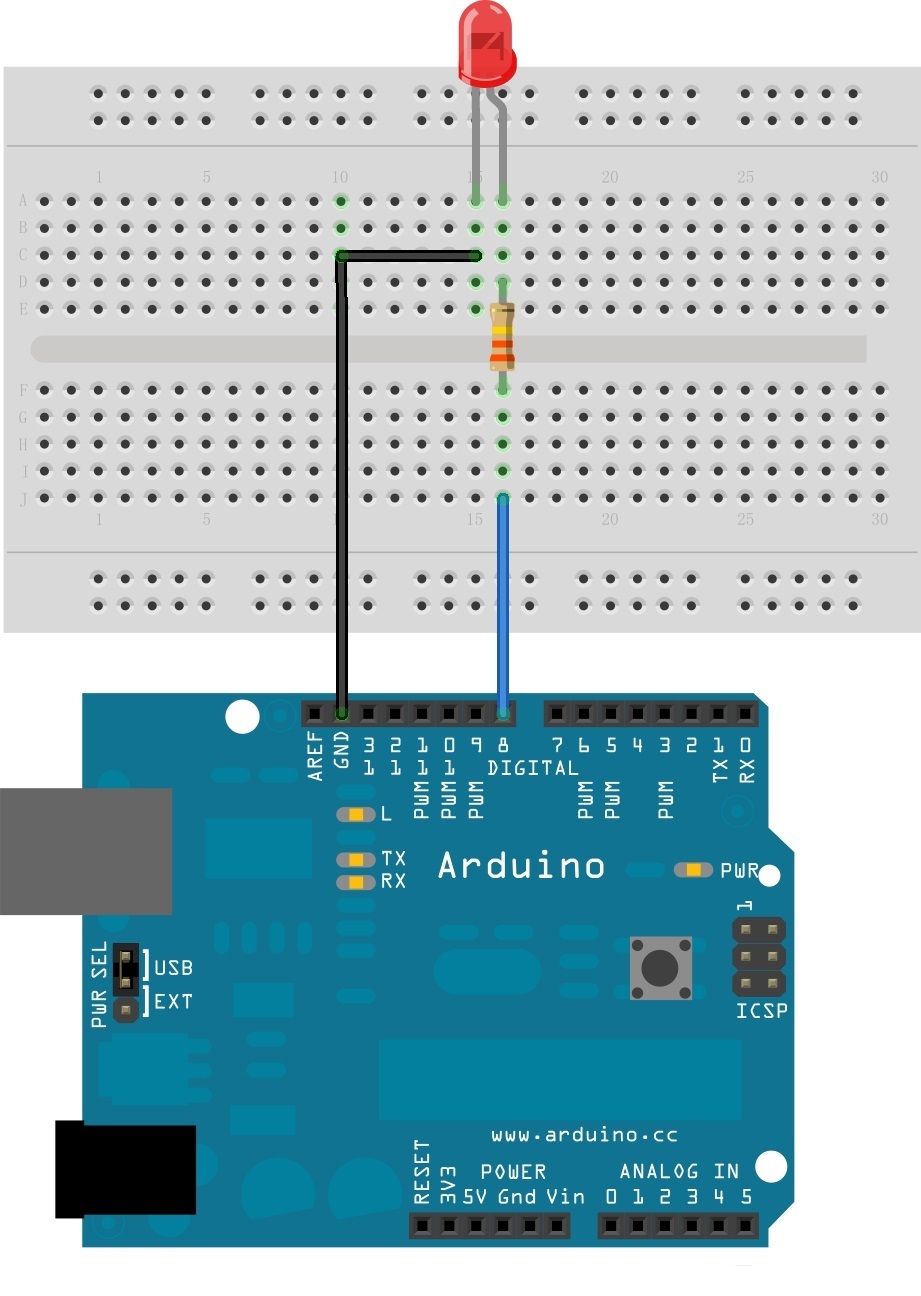
Ferst, we built an Arduino device, which reads a number from COM port and powers the led for a specified number of milliseconds.
/* Led.ino
 * Receive data on a COM port
 * Connect your led to ledPin
 */

// Pin, to connect your led
#define ledpin 8

// Received data buffer
String inString = "";

// Execute once at the beginning
void setup() {
	Serial.begin(9600);
	pinMode(ledpin, OUTPUT);
	digitalWrite(ledpin, LOW);
}

// Execute indefinetly
void loop() {
	// Get data from com
	while (Serial.available() > 0) {
	int inChar = Serial.read();
	if (isDigit(inChar)) {
		// one character at a time
		// and append it to data buffer
		inString += (char)inChar;
	}

	// Encounter new line
	if (inChar == '\n') {
		// Power on the led
		digitalWrite(ledpin, HIGH);
		int time = inString.toInt();
		delay(time);
		digitalWrite(ledpin, LOW);
		// Flush the buffer
		inString = "";
	}
  }

}
And finally a Caché method, which sends 1000\n string to a com port:
/// Send 1000\n to a com port
ClassMethod SendSerial()
{
	set port = "COM1"
	open port:(:::" 0801n0":/BAUD=9600)     // Open device
	set old = $IO // Recorn current primary device
	use port  // Switch to com port
	write $Char(10) // Send some test data
	hang 1
	write 1000 _ $Char(10) // Send 1000\n
	use old // Back to old terminal
	close port // Free the device
}
«0801n0» is a string with parameters to access Com port, which is which is described in documentation. And /BAUD=9600 — is, of course, the connection speed.
If we execute this method in a terminal:
do ##class(Arduino.Habr).SendSerial()
It would output nothing, but a led would flash for a second.
Receive data
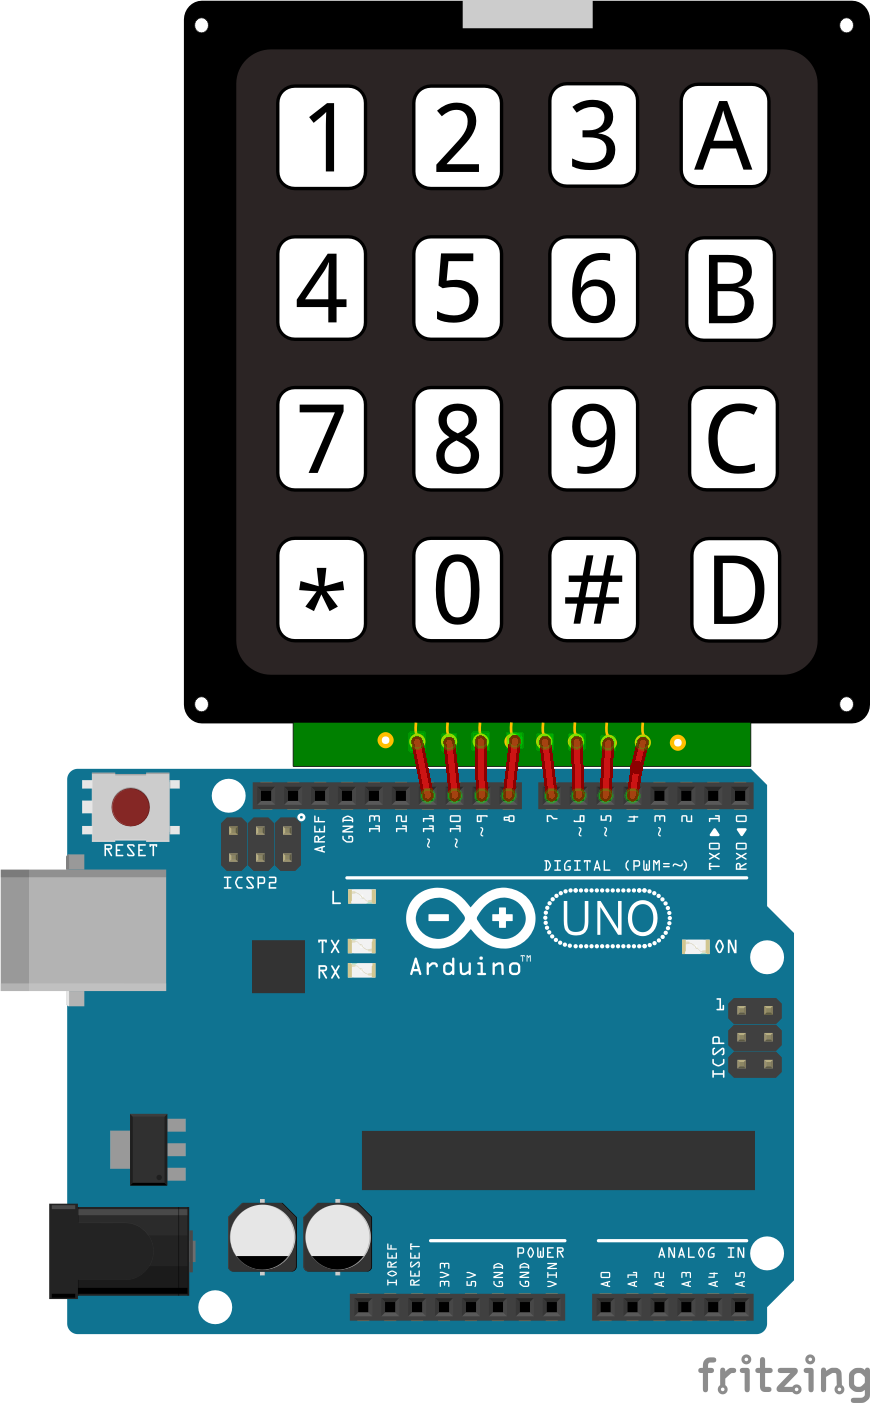
Now let's attach keypad to Cache and receive entered data. This could be used as a custom user authentication with authentication delegation and ZAUTHENTICATE.mac routine.
/* Keypadtest.ino *
 * Uses Keypad library,
 * Connect Keypad to Arduino pins
 * as specified in rowPins[] and colPins[].
 *
 */

// Repository:
// https://github.com/Chris--A/Keypad
#include <Keypad.h>

const byte ROWS = 4; // Four rows
const byte COLS = 4; // Three columns
// Map symbols to keys
char keys[ROWS][COLS] = {
	{'1','2','3','A'},
	{'4','5','6','B'},
	{'7','8','9','C'},
	{'*','0','#','D'}
};
// Connect keypad pins 1-8 (up-down) to Arduino pins 11-4: 1->11, 2->10, ... , 8->4
// Connect keypad ROW0, ROW1, ROW2 и ROW3 to this Arduino pins
byte rowPins[ROWS] = { 7, 6, 5, 4 };

// Connect keypad COL0, COL1 and COL2 to this Arduino pins
byte colPins[COLS] = { 8, 9, 10, 11 };

// Keypad initialization
Keypad kpd = Keypad( makeKeymap(keys), rowPins, colPins, ROWS, COLS );

void setup() {
	Serial.begin(9600);
}

void loop() {
	char key = kpd.getKey(); // Receive key pressed
	if(key)
	{
		switch (key)
	{
		case '#':
			Serial.println();
		default:
			Serial.print(key);
	}
	}
}
And here is a Caché method used to get data from a com port, one line at a time:
/// Receive one line till we encounter line terminator from COM1
ClassMethod ReceiveOneLine() As %String
{
	port = "COM1"
	set str=""
	try {
		open port:(:::" 0801n0":/BAUD=9600)
		set old = $io
		use port
		read str // Read till we encounter line terminator
		use old
		close port
	} catch ex {
		close port
	}
	return str
}
Execute in a terminal:
write ##class(Arduino.Habr).ReceiveOneLine()And it would start waiting for input till # is pressed (which would be sent as a line terminator), after which entered data would be displayed in a terminal.
That was Arduino-Caché I/O basics, and now we're ready to build our own weather station.
Weather station
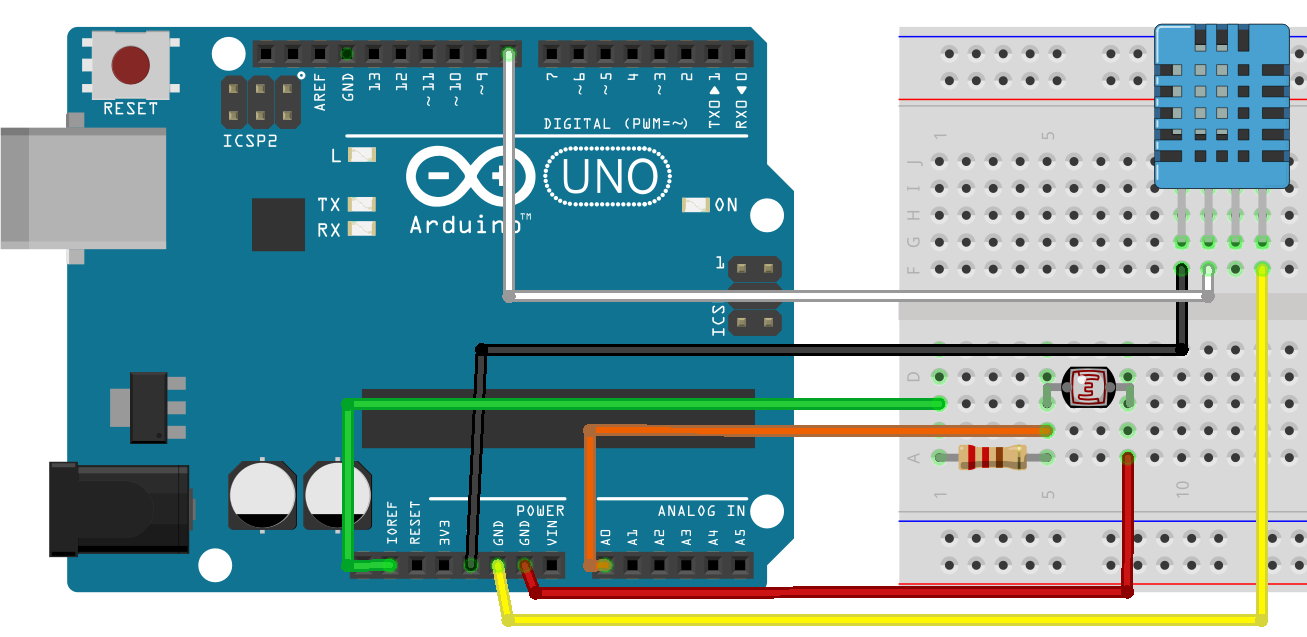
We're finally getting to the weather station! We used a photoresistor and a DHT11 Humidity &Temperature Sensor to gather data.
Circuit:
/* Meteo.ino *
 * Register humidity, temperature and light level
 * And send them to a COM port
 * Output sample: H=1.0;T=1.0;LL=1;
 */

// Photoresistor pin (analog)
int lightPin = 0;

// DHT-11 pin (digital)
int DHpin = 8;

// Array to store DHT-11 temporary data
byte dat[5];

void setup() {
	Serial.begin(9600);
	pinMode(DHpin,OUTPUT);
}

void loop() {
	delay(1000); // measure everything once per second
	int lightLevel = analogRead(lightPin); //Get brightness level

	temp_hum(); // Get temperature and humidity into dat variable
	// And output the result
	Serial.print("H=");
	Serial.print(dat[0], DEC);
	Serial.print('.');
	Serial.print(dat[1],DEC);
	Serial.print(";T=");
	Serial.print(dat[2], DEC);
	Serial.print('.');
	Serial.print(dat[3],DEC);
	Serial.print(";LL=");
	Serial.print(lightLevel);
	Serial.println(";");
}

// Get DHT-11 data into dat
void temp_hum() {
	digitalWrite(DHpin,LOW);
	delay(30);
	digitalWrite(DHpin,HIGH);
	delayMicroseconds(40);
	pinMode(DHpin,INPUT);
	while(digitalRead(DHpin) == HIGH);
	delayMicroseconds(80);
	if(digitalRead(DHpin) == LOW);
	delayMicroseconds(80);
	for(int i=0;i<4;i++)
	{
	  dat[i] = read_data();
	}
	pinMode(DHpin,OUTPUT);
	digitalWrite(DHpin,HIGH);
}

// Get a chunk of data from DHT-11
byte read_data() {
	byte data;
	for(int i=0; i<8; i++)
	{
		if(digitalRead(DHpin) == LOW)
		{
			while(digitalRead(DHpin) == LOW);
			delayMicroseconds(30);
			if(digitalRead(DHpin) == HIGH)
			{
				data |= (1<<(7-i));
			}
			while(digitalRead(DHpin) == HIGH);
		}
	}
	return data;
}
After we had loaded this code into Arduino, it started sending data from COM port in the following format:
H=34.0;T=24.0;LL=605;
Where:
- H — humidity (from 0 to 100 percent)
- T — temperature (degrees Celsius)
- LL — brightness (from 0 to 1023)
Let's store this data in Caché, for that we wrote a new Arduino.Info class:
Class Arduino.Info Extends %Persistent
{

Parameter SerialPort As %String = "com1";

Property DateTime As %DateTime;

Property Temperature As %Double;

Property Humidity As %Double(MAXVAL = 100, MINVAL = 0);

Property Brightness As %Double(MAXVAL = 100, MINVAL = 0);

Property Volume As %Double(MAXVAL = 100, MINVAL = 0);

ClassMethod AddNew(Temperature = 0, Humidity = 0, Brightness = 0, Volume = 0)
{
	set obj = ..%New()
	set obj.DateTime=$ZDT($H,3,1)
	set obj.Temperature=Temperature
	set obj.Humidity=Humidity
	set obj.Brightness=Brightness/1023*100
	set obj.Volume=Volume
	write $SYSTEM.Status.DisplayError(obj.%Save())
}
After that then we wrote a method which would receive data from Arduino and transform them into Arduino.Info class objects
/// Receive a RAW data in this format: H=34.0;T=24.0;LL=605;\n
/// Convert into Arduino.Info objects
ClassMethod ReceiveSerial(port = {..#SerialPort})
{
    try {
        open port:(:::" 0801n0":/BAUD=9600)
        set old = $IO
        use port
        for {
            read x //read one line
            if (x '= "") {
                   set Humidity = $Piece($Piece(x,";",1),"=",2)
                set Temperature =  $Piece($Piece(x,";",2),"=",2)
                set Brightness =  $Piece($Piece(x,";",3),"=",2)
                do ..AddNew(Temperature,Humidity,Brightness) // Add data
            }
        }
    } catch anyError {
        close port
    }
}
And finally we connected Arduino and executed ReceiveSerial method:
write ##class(Arduino.Info).ReceiveSerial()This method would receive and store data from Arduino indefinitely
Data visualisation
After we built our device we set it outside to collect data for a night: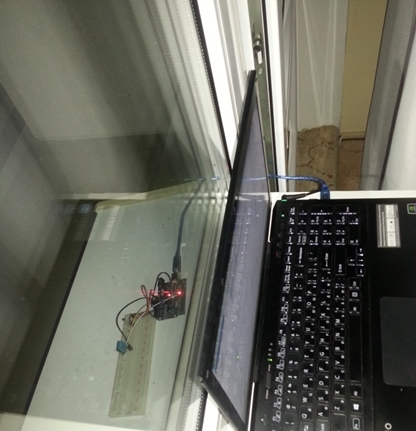
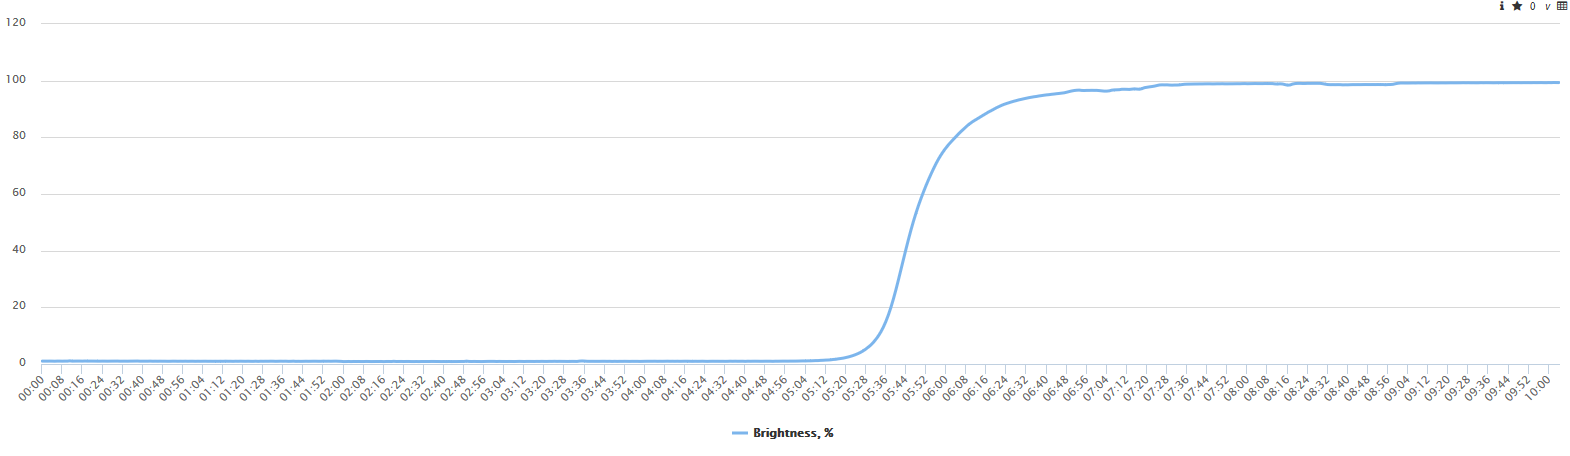
Come morning we got some 36000+ records and we decided to visualize them in DeepSee with MDX2JSON server-side REST API and DeepSeeWeb dashboard renderer, here are the results:
Brightness levels. Sunrise is clearly visible around 5:50:
Temperature and humidity graphs: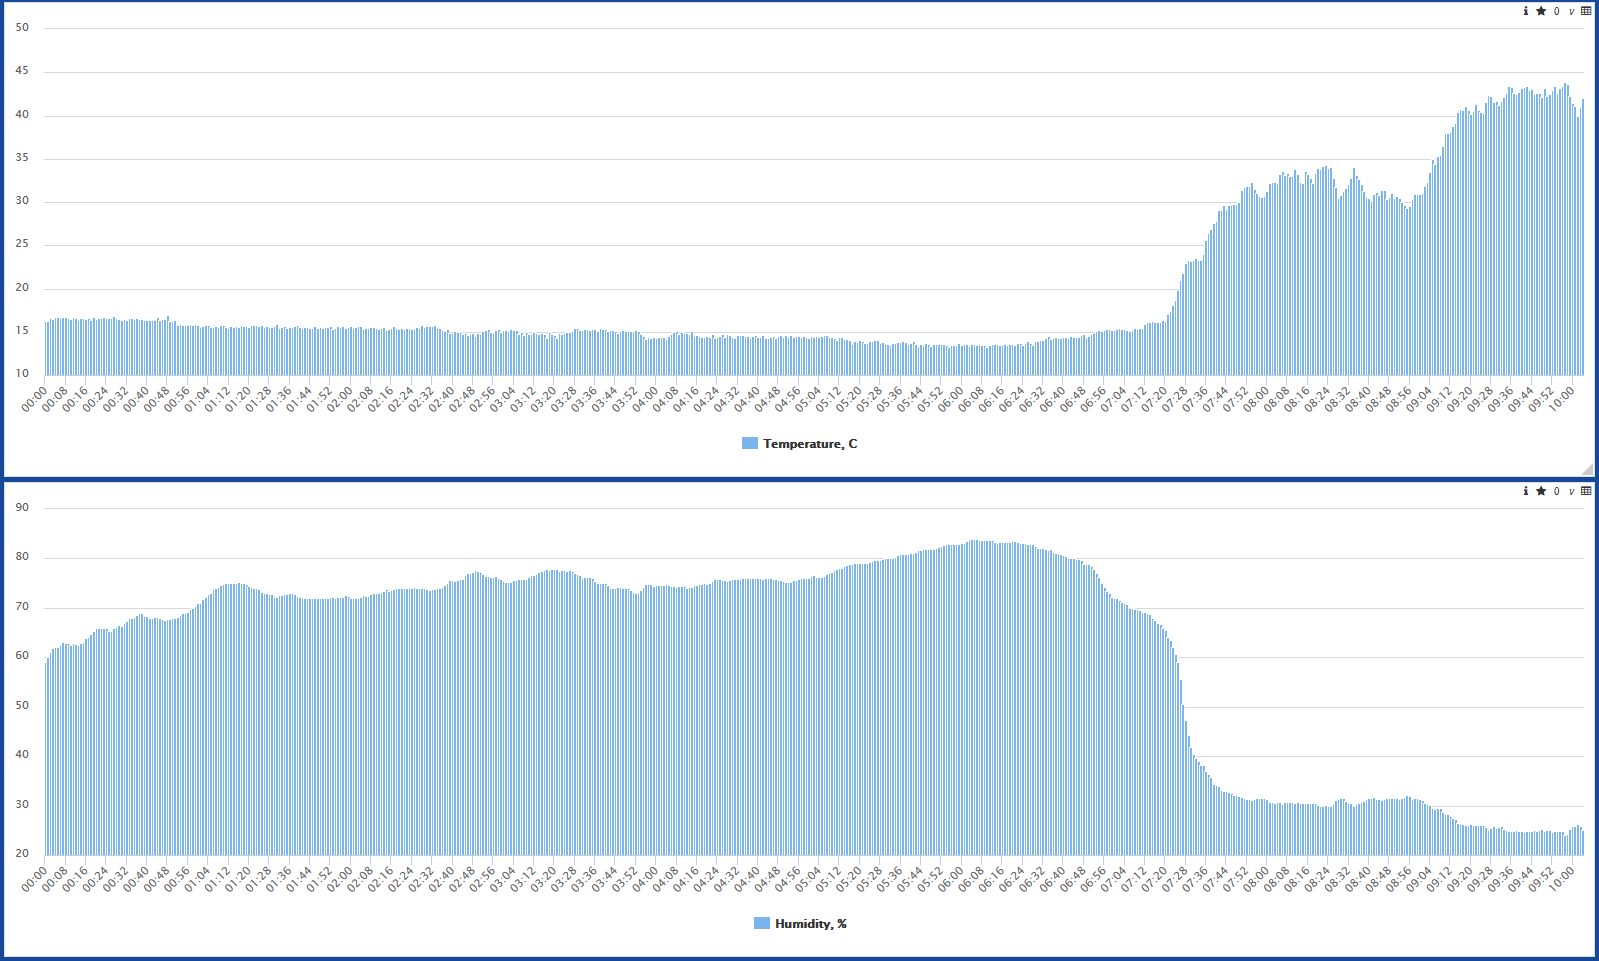
Negative correlation between humidity and temperature is clearly visible.
Demo
Available here.
Conclusion
With InterSystems Caché you can communicate with a large number of different devices directly. You can develop your solutions for data processing and visualization rapidly - it took our team around 4 hours to build our own weather station connect it to Caché and visualize the results and we mainly spend them designing the circuit and writing C code.
Links
Comments
Very nice! Thanks for the rainy-day Arduino project!

Very fun!
I have never been into building electric circuits, but this Arduion toy really got me. Purchased one and now starting experimenting. Next phase - with Cache. Nice topic.
this looks like a good project to do with my kids. Can you provide an inventory of the components you needed. Obviously you needed an arduino board and a bread board. What was the weather sensor you used?
You'll need:
- Arduino
- Breadboard
- DHT11 or preferably DHT22 (Humidity and temperature sensor)
- Photoresistor
- 220 ohm resistor
- Wires
I used this kit, it has a lot of additional parts for starter projects.
I've also done user user authentication in Caché using RFID cards.
Very good explanation! It worked for me. Thank you!
Have you ever tried to send over network instead of using the cable?
Can't say I have. But there are a lot of Arduino network modules - seems doable.
What are you doing?
I just got a wifi module esp8266 and want to try some data logging. The weather station is a nice start to learn how to integrate IRIS and all these inputs arduino can generate.