How to Export and Import Ensemble Components and Productions
Configuring an Ensemble production can be a challenging task involving a thorough understanding of the system and production functionality and a detailed understanding towards each configuration item. After successfully configured an Ensemble production, you might need to set up an identical production on the mirror environment, or deploy the production on a development system to a live system, or send a copy for diagnostic/debug purposes. Other times you might have spent some time designing a BPL/DTL and some other productions can use the same logic. In these cases, Ensemble exports and imports can help you transfer your work in a few steps described below.
Exports
To do an export from the Management Portal, you can go to Ensemble -> <the correct namespace> -> List -> Productions, then select the production containing the items you would like to export (the name of the production is highlighted after being selected), and click the “Export” button on the top of the page, as shown in Figure 1 below.
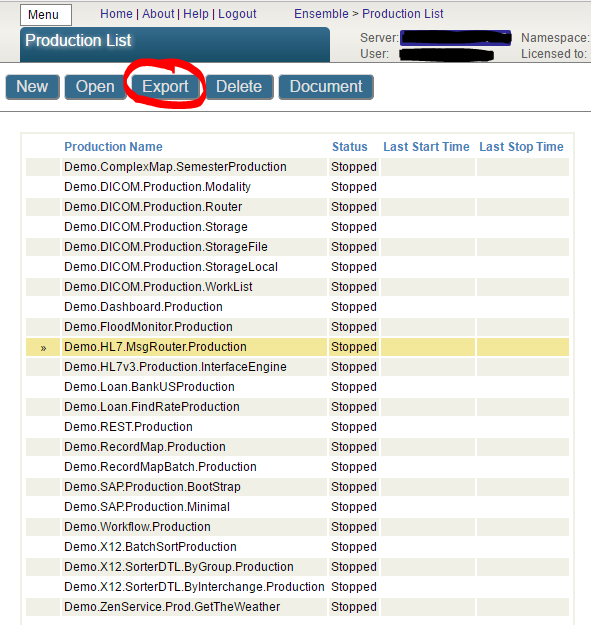
Figure #1: Export a Selected Production from the List of Productions
In the pop out window, you will be able to select the items you would like to include in the exported file.

Figure #2: Select Items to Be Exported
The “Production Configuration” page also provides the functionality to export production settings, as well as individual components. Figure 3 below shows how the settings for the entire production can be exported via the Production Configuration page.

Figure #3: Export Production Settings from Action Tab
As marked out in Figure 3, on the Production Configuration page we can first click on “Production Settings”, then click on the “Actions” tab, and finally the “Export” button.
This export gets you to the same “Export From Configuration Item” page shown in Figure 2. It will automatically include all the classes needed for the production. You will be able to add/remove items that are included in the exported xml file.

Figure #4: Export Individual Component from Action Tab
Similarly, if you select an individual item, go to the “Actions” tab on the right hand of the Production Configuration page, and finally click on the “Export” button, it will automatically include all the classes need for the selected component, as well as a .ptd file that contains the configuration settings for this component.
When you export the complete production, the production configuration class is included. When you only export the individual component, the production configuration class is not included, and a separate .ptd file is created, which only specify the configuration settings for the specific component.
You might be familiar with exporting files directly from Studio, where you go to Tools -> Export…, and select the files you would like to export. One difference between the two is that the Studio export needs manual selection of the files. If you have a component class code has any second level dependent code, lookup tables, or other dependencies, they will need to be manually included in a Studio export. Another major difference is that the Studio export does not contain a deployment file, and therefore a Studio export cannot be deployed on another instance. We will talk about deployment in the next section of this article.
- Common items to export and when to find them
The customized component class definition can be found under “Business Service/Process/Operation Class”.
The component configuration items can be found under “Config. Item Definition”.
The configuration items for the entire production can be found under “Production Settings”.
- Files to include when you are exporting a complete production
Definition of the production class (by default when you export from a list of productions);
Production settings;
Configuration definitions of all components used in the production;
All custom BPLs, DTLs, Rules, Schemas, Lookup Tables, Record Maps, Complex Record Maps, and so on.
- Files to include when you are doing an update
Definition and configuration of all components that has been updated;
Configuration of all components that needs to be disabled before the import (the import process will first disable all components included in the xml file, so in a way the import can be used to disable all related components before the import).
Imports
Importing an Ensemble Production is more than importing a global or a routine on the Caché level.
Loading a production from an xml file using Management Portal includes the following background jobs:
- Creates a rollback and log file
- Disables components that have configuration items in the deployment file
- Imports and compiles the xml file
- Enables the disabled components
If the import is done using the “Tools -> Import Local/Import Remote” to import the xml file, all components needs to be manually re-compiled and re-enabled in the production. If the import is done using the “System Management Portal -> System Explorer -> Classes -> Import”, the classes are automatically compiled, but the rollback package will not be created, and all components will remain disabled.
A complete import and deployment of an xml file via the Management Portal involves the following steps:
- Go to Ensemble -> <Target Namespace> -> Manage -> Deployment Changes -> Deploy
- Click the “Open Deployment” button to select the xml file you would like to import
- Double check that the target production, the rollback file address, and the log file address are all set up correctly, then click “Deploy” to apply the changes
Figure 5 below shows the Deploy page after opening a deployment xml file.

Figure #5: Deployment Package Opened in Deployment Changes Page
The Deployment Changes page can also be used to rollback a deployment. Simply select a rollback file after clicking the “Open Deployment” button and deploy.
After a successful deploy, please double check the configuration settings of your new production before starting the production and make sure they are listening to the correct port/looking at the correct file directory. Two components listening on the same TCP port or pulling files from the same file directory will cause conflicts.
Further reading in our documentation regarding imports and exports can be seen here: http://docs.intersystems.com/latest/csp/docbook/DocBook.UI.Page.cls?KEY=EGDV_deploying