Configuring TLS (SSL) IRIS SuperServer to work with ODBC/JDBC clients
Several steps should be done in order to secure the connection through xDBC clients to an IRIS Server instance using TLS. Most of the information can be obtained from the documentation about TLS on IRIS here, about configuring the security layer for encrypted connections. In the next paragraphs we will cover an step-by-step guide on how to configure and test the connection using SQL Clients apps using ODBC and JDBC.
You can download the drivers from InterSystems IRIS Driver Packages
Configuring IRIS SuperServer to use TLS
IRIS Documentation on this link
Before starting with the client connections, the IRIS SuperServer should be secured by configuring the SSL Configuration. Have a read of the IRIS Documentation here in order to fully understand the steps. The first step is to generate a certificate authority and the server certificate and key. I used easyRSA assuming a Linux server environment. The installation directory for easyRSA would be "~/easyRSA".
$ mkdir ~/certs
$ cd ~/certs
$ ~/easyRSA/easyrsa init-pki
Notice
------
'init-pki' complete; you may now create a CA or requests.

Your newly created PKI dir is:
* /home/useradmin/cert/pki

* Using Easy-RSA configuration:

* IMPORTANT: Easy-RSA 'vars' template file has been created in your new PKI.
             Edit this 'vars' file to customise the settings for your PKI.
             To use a global vars file, use global option --vars=<YOUR_VARS>

* Using x509-types directory: /home/useradmin/easyrsa/x509-types
$ ~/easyRSA/easyrsa build-ca
* Using SSL: openssl OpenSSL 1.1.1k  FIPS 25 Mar 2021

* Using Easy-RSA configuration: /home/useradmin/cert/pki/vars


Enter New CA Key Passphrase:

Confirm New CA Key Passphrase:
.......................................+++++
........................................................................+++++
You are about to be asked to enter information that will be incorporated
into your certificate request.
What you are about to enter is what is called a Distinguished Name or a DN.
There are quite a few fields but you can leave some blank
For some fields there will be a default value,
If you enter '.', the field will be left blank.
-----
Common Name (eg: your user, host, or server name) [Easy-RSA CA]:iris-server

Notice
------
CA creation complete and you may now import and sign cert requests.
Your new CA certificate file for publishing is at:
/home/useradmin/cert/pki/ca.crt
$ ~/easyRSA/easyrsa gen-req IRIS nopass
* Using SSL: openssl OpenSSL 1.1.1k  FIPS 25 Mar 2021

* Using Easy-RSA configuration: /home/useradmin/cert/pki/vars
Generating a RSA private key
.................................................+++++
.............................+++++
writing new private key to '/home/useradmin/cert/pki/bf84ccf8/temp.5fd8704f'
-----
You are about to be asked to enter information that will be incorporated
into your certificate request.
What you are about to enter is what is called a Distinguished Name or a DN.
There are quite a few fields but you can leave some blank
For some fields there will be a default value,
If you enter '.', the field will be left blank.
-----
Common Name (eg: your user, host, or server name) [IRIS]:

Notice
------
Keypair and certificate request completed. Your files are:
req: /home/useradmin/cert/pki/reqs/IRIS.req
key: /home/useradmin/cert/pki/private/IRIS.key
$ ~/easyRSA/easyrsa sign-req server IRIS
* Using SSL: openssl OpenSSL 1.1.1k  FIPS 25 Mar 2021

* Using Easy-RSA configuration: /home/useradmin/cert/pki/vars

You are about to sign the following certificate.
Please check over the details shown below for accuracy. Note that this request
has not been cryptographically verified. Please be sure it came from a trusted
source or that you have verified the request checksum with the sender.

Request subject, to be signed as a server certificate for 825 days:

subject=
    commonName                = IRIS


Type the word 'yes' to continue, or any other input to abort.
  Confirm request details: yes

Using configuration from /home/useradmin/cert/pki/3754c4d3/temp.165602f3
Enter pass phrase for /home/useradmin/cert/pki/private/ca.key:
Check that the request matches the signature
Signature ok
The Subject's Distinguished Name is as follows
commonName            :ASN.1 12:'IRIS'
Certificate is to be certified until Aug 13 02:25:01 2025 GMT (825 days)

Write out database with 1 new entries
Data Base Updated

Notice
------
Certificate created at:
* /home/useradmin/cert/pki/issued/IRIS.crt
Then copy the files to a known location, and assign the correct permissions to them
$ sudo mkdir /tls
$ sudo cp ~/cert/pki/issued/* /tls/
$ sudo cp ~/cert/pki/private/* /tls/
$ sudo cp ~/cert/pki/ca.crt /tls/
$ sudo chown irisusr.irisgrp /tls/*
$ sudo chmod 440 /tls/*
$ ll /tls/*
total 20
-r--r-----. 1 irisusr irisgrp 1196 May 10 22:29 ca.crt
-r--r-----. 1 irisusr irisgrp 1874 May 10 22:29 ca.key
-r--r-----. 1 irisusr irisgrp 4592 May 10 22:29 IRIS.crt
-r--r-----. 1 irisusr irisgrp 1704 May 10 22:29 IRIS.key
Optionally, generate client certificate and key for mutual verification. Is recommended to do it after establishing an initial encrypted connection.
After the creation of the server cert/key, the SuperServer SSL Configuration will use them to encrypt the connection. It can be done from the IRIS Management Portal or using the IRIS console with the following commands.
IRIS> set p("CertificateFile") = "/tls/IRIS.crt"
IRIS> set p("Ciphersuites") = "TLS_AES_256_GCM_SHA384:TLS_CHACHA20_POLY1305_SHA256:TLS_AES_128_GCM_SHA256"
IRIS> set p("Description") = "Autogenerated SuperServer Configuration"
IRIS> set p("Enabled") = 1
IRIS> set p("PrivateKeyFile") = "/tls/IRIS.key"
IRIS> set p("PrivateKeyPassword") = ""
IRIS> set p("PrivateKeyType") = 2
IRIS> set p("TLSMaxVersion") = 32
IRIS> set p("TLSMinVersion") = 16
IRIS> set p("Type") = 1
IRIS> set sc = ##class(Security.SSLConfigs).Create("%SuperServer", .p)
IRIS> kill p
Set TLSMinVersion to 32 to stick with TLSv1.3. The name of the SSL Configuration must be exactly "%SuperServer", as we are configuring the SuperServer.
Once the configuration is created, enable (or require) SuperServer SSL/TLS support running the following commands from IRIS console.
IRIS> set p("SSLSuperServer") = 1
IRIS> set sc = ##class(Security.System).Modify("SYSTEM", .p)
IRIS> kill p
To set the SSLSuperServer configuration to "1" will enable the TLS encryption but not require it. Before you require SSL/TLS connections, remember to enable encrypted connections for WebGateway and Studio. Is recommended first enabling encrypted connections, then verifying all clients (xDBC, WebGateway, Studio, NativeAPI, etc) use SSL/TLS connections and after that change the "SSLSuperServer" configuration to "2" to require the usage of SSL/TLS connections.
Configuring ODBC Windows Driver Connection
IRIS ODBC Windows Drivers download
In the previous step, the CA certificate was created, get the certificate from the server and make sure the format is in PEM format. The certificate could be converted using "openssl" if needed by executing the following command.
$ sudo openssl x509 -in /tls/ca.crt -out /tls/ca.pem -outform PEM
After installing the driver in Windows, a configuration file should be created, since the client installer does not create one. By default the settings file is called SSLdefs.ini and should be put in the InterSystems IRIS directory under the 32-bit common program files. This directory is found in the Windows environment variable %COMMONPROGRAMFILES(x86)% on 64-bit Windows or %COMMONPROGRAMFILES% on 32-bit Windows versions. For example, on Windows 10 64-bit, the path is:
C:\Program Files (x86)\Common Files\InterSystems\IRIS
To specify a different location, an environment variable called "ISC_SSLconfigurations" must be created with the full path and file name. You may need administrator privileges to do this.
This file has two sections: the configuration where the address, ports and name of the SSL config are specified, and the section where the parameters of the encrypted connection are set. This file is also used by Studio in order to get the parameters to establish the connection with the server. The first section should look like this:
[IRIS Server]
Address=10.100.1.17
Port=51773
TelnetPort=23
SSLConfig=DefaultSettings
The name between the bracket should be something meaningful for you, but it can be anything. The address, port and telnet port are the settings used to decide which connection should match this section. Either IP address or DNS names can be used for the address. The final parameter (SSLConfig) is the name of the configuration to get TLS settings from. It needs to match the name of one of the configuration in the file. The second section looks like this:
[DefaultSettings]
VerifyPeer=2
VerifyHost=1
CAfile=c:\InterSystems\certificates\ca.pem
CertFile=c:\InterSystems\certificates\client.pem
KeyFile=c:\InterSystems\certificates\client.key
Password=
KeyType=2
Protocols=24
CipherList=ALL:!aNULL:!eNULL:!EXP:!SSLv2
The name in this section matches the name listed in the SSLConfig parameter of the first section. Then, this config will be used for connections to the address "10.100.1.17" on ports "51773" or "23". The descriptions of the parameters are as follows.
- VerifyPeer
Options for this are 0=none, 1=request, and 2=require. Require is the recommended value. If you choose none, it is possible for a malicious server to pretend to be the server you mean to connect to. If you choose require, you'll need to fill in a Certificate Authority that you trust to verify certificates for the CAFile value. This is the equivalent of "Server certificate verification" in the portal.- VerifyHost
Options for this are 0=none, 1=required. This option checks that the server's certificate lists the host name or IP you've asked to connect to in the Subject's Common Name or subjectAlternativeName fields. This field does not have an equivalent in the portal, but is the same type of check as the SSLCheckServerIdentity property of the %Net.HttpRequest class. It is only configurable if your client is using Caché / Ensemble 2018.1 or later, or any version of InterSystems IRIS Data Platform.- CAfile
The path to the trusted Certificate Authority (CA) file. This should be the CA that signed the certificate of the other side (the server), not your own certificate. This should be filled in if you have picked a VerifyPeer value of 2. This is the equivalent of "File containing trusted Certificate Authority certificate(s)" in the portal. Certificates must be in PEM format.- CertFile
The path to your own certificate. This should be blank if your client doesn't have one. This is the equivalent of "File containing this client's certificate" in the portal. Certificates must be in PEM format.- KeyFile
The path to the matching private key for CertFile. This should be filled in if you have a CertFile, and blank if you don't. This is the equivalent of "File containing associated private key" in the portal.- Password
The password needed to decrypt your private key. This should be blank if you're not using a certificate for this client, or if the certificate's private key is not encrypted on disk.- KeyType
Is your private key RSA (2) or DSA (1)? The value is only relevant for configurations which have CertFile and KeyFile set. If you're not sure which it is, your key is probably RSA.- Protocols
This is a decimal representation of bit values for the versions of SSL/TLS supported. The options are: 1=SSLv2, 2=SSLv3, 4=TLSv1, 8=TLSv1.1, 16=TLSv1.2, 32=TLSv1.3. SSLv2 and SSLv3 have known problems and are not recommended. More than one version may be specfied by adding numbers. For example, 24 is TLSv1.1 and TLSv1.2. This the equivalent of the "Protocols" checkboxes in the portal.- CipherList
This is the equivalent of "Enabled ciphersuites" in the portal. This controls exactly which types of encryption and hashing will be acceptable to this client.ALL:!aNULL:!eNULL:!EXP:!SSLv2is the default value for this setting in the management portal. If you're having trouble with your connection, it's probably not this. Changing this can make your connection less secure by allowing weak encryption. You can find more information about this value on the openssl website.
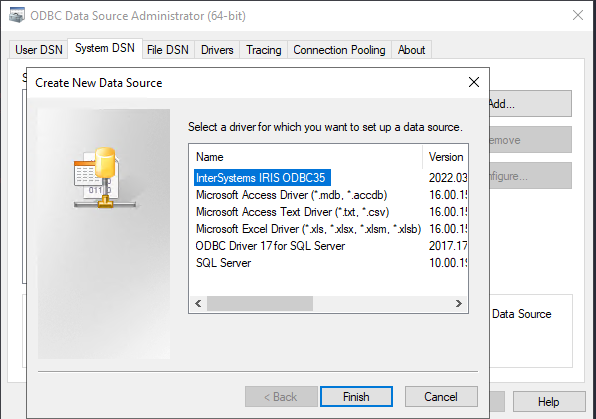
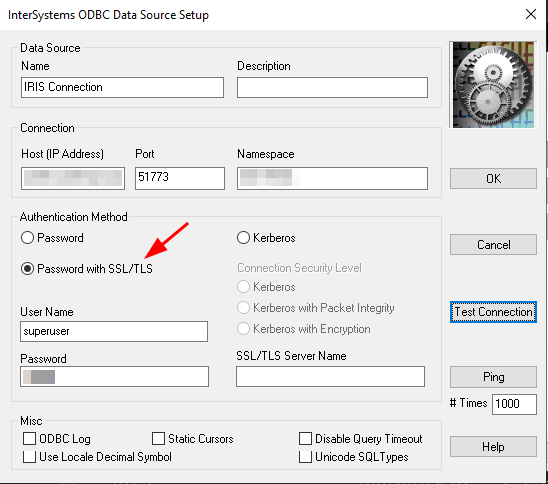
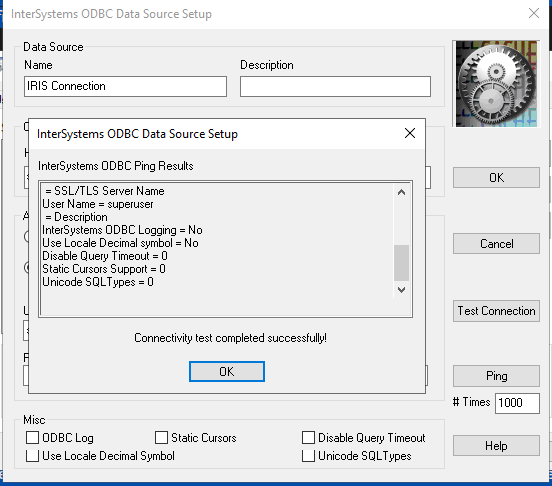
Save the SSLdefs.ini file in the specified path and using the "ODBC Data Source Administrator" create a new Data Source using the "InterSystems IRIS ODBC35" driver. Give the data source a name, set the Host and Port, specify the Namespace, User Name and Password. Under "Authentication Method" select "Password with SSL/TLS" in order to use the encrypted connection. If you configured the ODBC connection with the address and port specified in the SSLdefs.ini file, then you will be using the TLS encrypted connection. Press "Test Connection" in order to check if the ODBC is configured correctly.
You can use the configured ODBC data source with any ODBC client to get access to the IRIS instance.
Configuring JDBC Client
IRIS JDBC Driver download
Using the JDBC Driver documentation
To use any of the JDBC SQL clients you need to first download the JDBC driver, copy it in the tool library directory and specify the Connection URL for the IRIS JDBC Driver. The minimal required parameters for this URL are:
jdbc:IRIS://<host>:<port>/<namespace>
but you can also specify several optional URL parameters. The full syntax is:
jdbc:IRIS://<host>:<port>/<namespace>/<logfile>:<eventclass>:<nodelay>:<ssl>
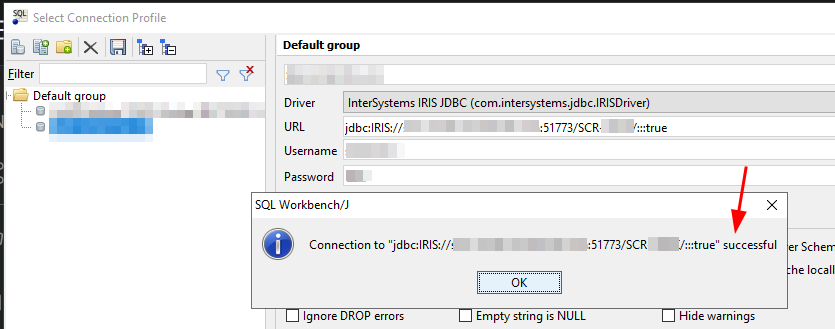
and for the purposes of this article, the ssl parameter enables TLS for both IRISDriver and IRISDataSource. Valid values are true and false. If not set, it defaults to false. So, in order to connect to our server using an encrypted connection, we should specify the URL as:
jdbc:IRIS://10.100.1.17:51773/USER/:::true
(if there is a "blank" value in the optional parameters will use the default)
It is important to note here that the CA certificate should be added to the Java trust store. In order to do this, we could use the keytool command. First locate the Java home directory where the CA certificates are. This can be achieved by going to the command line or terminal, depending on what operating system you are, and execute:
Linux: echo $JAVA_HOME
Windows: echo %JAVA_HOME%
Usually the CA certificates store is under JAVA_HOME/lib/security/cacerts. Once you located the file, make a backup copy of it and get the CA certificate for your server. To import it to the java trust store run the following command:
Linux:
$ keytool -import -trustcacerts -keystore "$JAVA_HOME/lib/security/cacerts" -storepass changeit -noprompt -alias mycert -file /path/to/ca.crt

Windows:
C:\> keytool -import -trustcacerts -keystore %JAVA_HOME%\lib\security\cacerts -storepass changeit -noprompt -alias mycert -file \path\to\ca.crt
Replace the paths and path delimiters accordingly.
This will add the CA certificate to the trusted store in order for the driver to accept the encrypted connection. Now from the JDBC SQL Client program you can connect to the server using the connection URL specifying to use SSL/TLS.
General Considerations
-
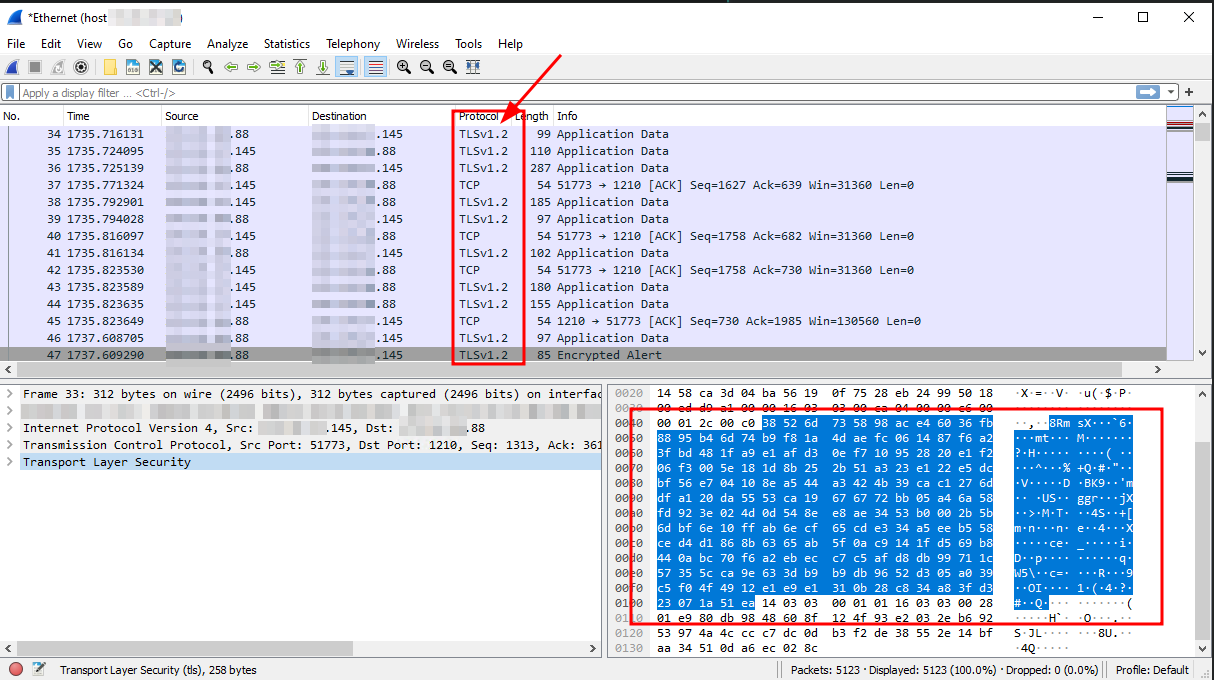
Verifying that connection is encrypted
To check whether the connection is encrypted and running through SSL/TLS, you could run Wireshark to capture some network packets and analyze their contents. You will easily see "TLSv1.x" in the protocol column, and upon checking the contents, it is clearly encrypted.